BTS-002 - CMT Bowl and Tray Kit - Owner's Manual - CMT Utensili
←
→
Page content transcription
If your browser does not render page correctly, please read the page content below
BTS-002 - CMT Bowl and Tray Kit
Owner’s Manual
Thank you for purchasing the CMT Bowl and Tray Kit. With this kit you can make platters and bowls up to 70mm deep. Bowls and platters
make great gifts, and they’re a great way to use up scrap wood. There’s no end to the different combinations of wood and shapes you can
create with this kit. Please read all the instructions thoroughly before using the BTS-002 kit.
Tool Requirements
- 1300 watt or larger plunge router with variable speed
- Forstner bit, 35mm or larger
- 12,7mm radius roundover bit (CMT #938.880.11 w/ 12mm shank, or,
#938.380.11, w/8mm shank)
- Drill Press (Note: The bowl can be excavated with a router only.
It just takes longer and puts more wear and tear on your router and bit.)
- Soft disc sanding pads designed for bowl turning for sanding bowl interior.
(Available where turning supplies are sold.)
- Compass
Get Started
Unpack the CMT Bowl and Tray Kit,
which includes a Bowl and Tray
bit, collet extension and two bowl Use a Forstner bit in a drill press to remove most of the wood. Forstner bits do the best
templates. job because they can make overlapping cuts and leave a flat bottom.
Drill the holes to within 3,2mm of your layout lines. Set the depth of cut to stop short of
the finished bottom so the router bit can clean up the dimples left by the center point in
the Forstner bit.
Watch the video on Note: It’s best to use a bit whose diameter is larger than the 31,75mm diameter Bowl
and Tray Bit. If you must use a Forstner bit less than 31,75mm, don’t cut too close into
the corners or the router bit won’t be able to clean it up.
Once the partitions have been excavated on the drill press, it’s time to move on to the
router. First, make an extension router base plate that’s large enough to safely bridge the
opening in the template. The base plate can be made of 12,7mm sheet stock or 9,5mm
thick acrylic or polycarbonate plastic. Drill a 50,8mm hole in the middle of the plate.
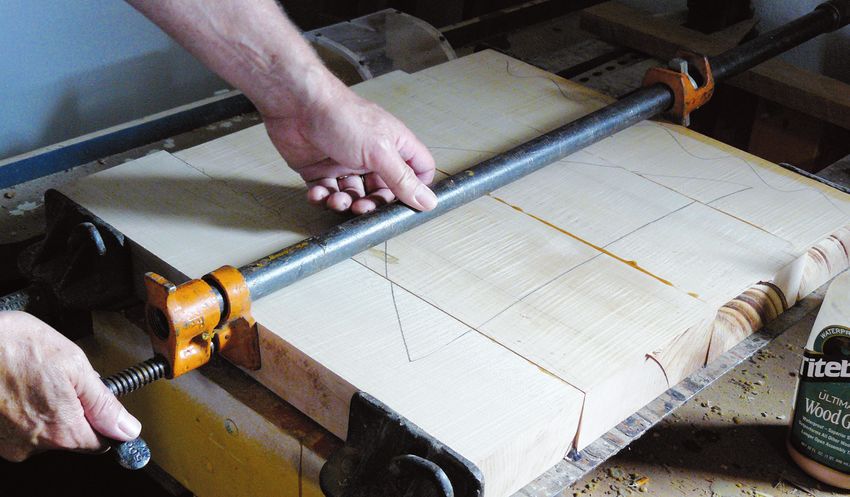
Glue up a bowl blank. Make an 460x460mm blank to use with the round bowl template Mount the extension base to your router.
and a 380x590mm blank for the oval template. Thick stock works best, but you can stack- Next, assemble the collet extension using a 14mm and an 18mm wrench. Insert the
laminate thinner boards to build the blank to the desired depth. bowl-cutting bit into the collet and tighten using a 27mm wrench and the 18mm wrench.
Note: A 70mm deep bowl is about the max for most routers.
Warning: You must have at least 2/3 of the bit’s shaft length inside the collet. Do not
try and extend the depth of cut by overextending the bit from the collet.
Insert the collet extension into the router and tighten.
Note: Be certain to unplug the router whenever changing bits or making adjustments to
the router.
Mount the template on the blank so it lines up exactly with the previously drawn lines.
Drill and countersink at least two holes in the template. Be sure to locate the holes over
the waste portions of the bowl where they will be removed later. Fasten the template onto
the blank with flat head screws. Make sure the screw heads are set just below the surface
of the template so they don’t interfere with the router.
Set the plunge router’s turret stop for a cut deep enough to finish the bottom of the
bowl.To do this, set the router on top of the template on the bowl blank and plunge the
unplugged router down until the bit bottoms out. Set the stop so the bit will plunge ano-
ther 3,2mm - 4,7mm beyond the drilled out bottom and remove the dimples left by the
You can mix woods in your bowl blank. A layer of contrasting wood at the top is a nice Forstner bit’s center point.
touch. Like bowl turners, you can have a lot of fun experimenting with different woods and Finally, be certain that at the top of the router’s travel the bearing on the router bit is riding
different glue-up patterns to achieve stunning results. It’s important to align your boards on the template. This sets the router for the first pass. If your router has a chip collection
perfectly flush in the clamps to avoid unnecessary sanding to flatten out the blank. This is attachment, be sure to use it.
especially true if you are going to stack-laminate or add an accent layer as shown here.
Lay out the bowl using the template. Center the template on the blank and mark the Secure the blank to your bench. With the plunge mechanism set at the top of its travel,
first partition. Remove the template and make marks exactly 12,7mm from the edge of place the router over an open area on the template. Make sure the cutter is not contac-
the first partition. This defines the wall thickness for each partition. It’s important to be ting the wood and turn on the router. Gently slide the router to the template edge and
exact in order to achieve a uniform wall thickness for all the partitions. Use these marks begin your cut. Continue the cut around the opening.
to align the template for the two adjoining partitions. Make additional marks to position Then, lower the bit 9,5mm and make another pass. Eventually the bearing on the bit will
the template for the last partition. drop below the template and begin to register on the wall of the bowl itself. Keep making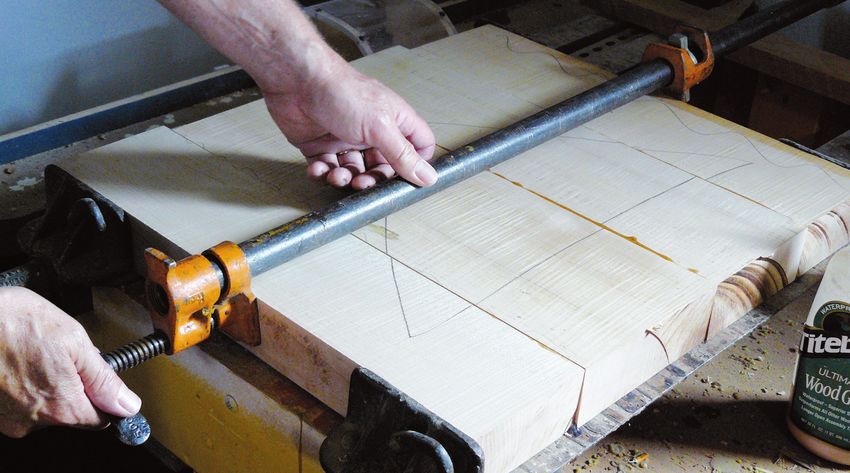
progressively deeper cuts until you reach the bottom of the bowl. Then, sweep the router        An edge or disc sander will make quick work of this job but be careful; they can just as
back and forth to clean up the bottom. Don’t worry about the slight ridges left by the router   quickly cut a facet on the edge and ruin the piece. You can also sand the exterior using
bit. These will clean up easily with a disk sander.                                             a random orbit sander.

Turn the router off and let it stop before lifting it from the bowl. Move the template to
the next quadrant and repeat the process until all four partitions and the center hole
are complete.

                                                                                                With the bowl sanded round and the band saw marks removed, head to the router table
                                                                                                for some final shaping. Mount a 12,7mm roundover bit in the router and round over the
                                                                                                bottom edge of the bowl.

                                                                                                To rout the top edges of the partitions, mount a 6,35mm roundover in the table, remove
                                                                                                the fence and set the bowl upside down so the bit is inside one of the quadrants. Make
The next step is to lay out the outside wall of the bowl. Set a compass to mark a little        sure the bit is not in contact with the bowl. Turn the router on and rout the inside edge of
over 12,7mm to allow for sanding. Make sure the compass point extends about 6,35mm              the partition. Turn the router off and let it spin down to a stop. Reposition the bowl over
or so past the pencil point.                                                                    the bit and rout the next partition. Repeat this process for all four partitions and the dip
Hook the pivot point just inside the rim of the bowl and run the compass around the bowl.       cup hole. Rout the outside top edge of the bowl with the same bit.
Always keep the line from the pencil point to the pivot point perpendicular to the rim.
To bridge the gaps in the outline that occurs at the partitions, bend a thin piece of wood
along the existing lines and pencil in the break.

                                                                                                Sand the interior of the bowl using a soft disc. These discs are commonly used by lathe
                                                                                                turners on lathe-turned bowl interiors. Start with 80-grit and work your way up to 220-grit.
                                                                                                Finish sanding the outside with an orbital sander. Now you’re ready to apply a finish.
                                                                                                A great food safe finish for wood is walnut oil. You’ll find it at most health food stores.
                                                                                                It dries hard and is totally non-toxic. Other food safe finishes include mineral oil, salad
Take the blank to the bandsaw and cut off the excess stock. Take care to cut up to the          bowl finish and shellac.
layout line. Go slowly and do your best to make the cut smooth and accurate. It’ll save
you a lot of sanding later.

                                                                                                C.M.T. UTENSILI S.p.A.              C.M.T. UTENSILI, Sucursal en España
                                                                                                Via della Meccanica
                                                                                                61122 Pesaro                        Calle 25/31 Poligono Industrial
                                                                                                Fraz. Chiusa di Ginestreto - Italia 46470 Catarroja - Valencia - España
                                                                                                Phone #39 0721 48571                             Tel. #34 96 1274500
                                                                                                Fax #39 0721 481021                              Fax #34 96 1262754
                                                                                                                                                                                                       03.60.0274

                                                                                                info@cmtorangetools.com
                                                                                                www.cmtorangetools.com

The bowl will come off the band saw round but rough. Sand the band sawn edge smooth
and fair. A good way to sand the edge on a round bowl is to use a sanding belt. Pencil
                                                                                                         ®:   CMT, the CMT logo and the orange color applied to tool surfaces are trademarks
                                                                                                                                      of C.M.T. UTENSILI S.P.A.
marks on the outside edge tell you where the low spots are and where you’ve sanded.
Clamp the bowl blank in a vise (use scrap wood to protect the bowl form iron jaws) and                                                  © C.M.T. UTENSILI S.P.A.
                                                                                                                        This document has been sent for your personal use only.
sand the edge like a shoeshine polishes a shoe.                                                       All usage and reproduction is forbidden without written permission from C.M.T. UTENSILI S.P.A.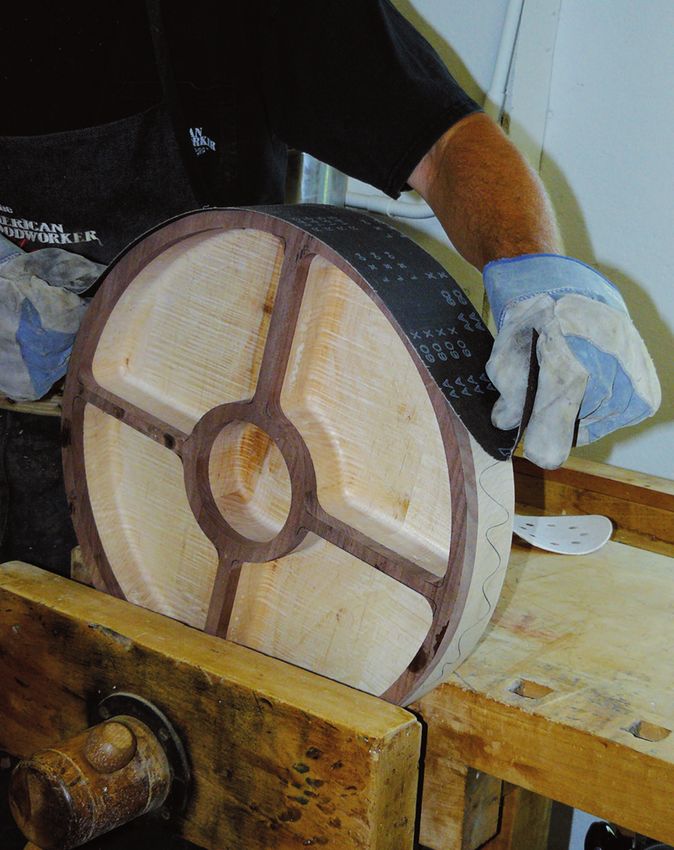
BTS-002 – Sistema CMT para bandejas
                                         Manual de instrucciones
¡Muchas gracias por haber comprado CMT BTS-002! Por medio de este KIT usted podrá crear banjedas de hasta 70mm de profundidad,
como regalo para sus amigos, o como objeto para decorar su casa o su habitación. ¡Realice todo lo que quiera! Lea atentamente el manual
de intrucciónes antes de utilizar.
Requisitos
- Fresadora de velocidad de rotación variable de 1300 W. o superior;
- Broca Forstner de diámentro 35mm o superior;
- Fresa de radio cóncavo CMT 938.880.11 de mango 12mm o CMT 938.380.11
  de mango 8mm;
- Taladro de columna (N.B. se puede también fresar en profundidad usando una
  fresadora, aunque usted necesitaría más tiempo y podría desgastar tanto la
  máquina como la fresa);
- Un disco para lijar las bandejas;
- Un compás.

Para empezar
El kit incluye la fresa
para crear bandejas,
un mandril y dos moldes.                                                                 Quite el máximo material posible del bloque utilizando una broca Forstner en un taladro
                                                                                         de columna. Taladre hasta una distancia de 3,2mm de las marcas dibujadas y ajuste
                                                                                         la profundidad de taladro para evitar tocar el fondo de la bandeja. Los desechos de
                                                                                         materiales dejados por la broca serán quitados por la fresa para bandejas incluida en
                  Watch the video on                                                     el embalaje.
                                                                                         Nota. Se aconseja utilizar una broca Forstner con diámetro de corte mayor que 31,75
                                                                                         (medida de la fresa para bandejas). Si el diámetro de la broca fuera más pequeño, no
                                                                                         frese demasiado cercano a las equinas, ya que la fresa no quitará completamente los
                                                                                         desechos de materiales.
                                                                                         Cuando haya finalizado con el taladro, pase a su fresadora. Cree una base de madera
                                                                                         de espesor 12,7mm o de plástico de policarbonato o acrílico de espesor 9,5mm para
Encole varias piezas de madera para crear un bloque de tamaño 460x460mm sobre el         fresar de manera segura. Taladre el agujero en el medio de la bandeja hasta 50,8mm de
cual usted usará su molde en forma de banjeda, y un bloque de 380x590mm sobre el         profundidad, monte la base en su fresadora, inserte el mandril utilizando una llave de
cual usted usará el molde de forma oval. Aconsejamos utilizar material bastante grueso   14mm y de 18mm. Inserte la fresa en el mandril y aprietela por medio de una llave de
o varios paneles laminados más finos.                                                    27mm y de 18mm.
Nota. La mayoría de las fresadoras permiten fresados de hasta 70mm de profundidad.
                                                                                         Cuidado: compruebe que al menos 2/3 del mango de la fresa se introduzcan
                                                                                         correctamente en el mandril. No trate de alargar la profundidad de corte de otras
                                                                                         maneras. Inserte el mandril en la fresadora y apriételo.

                                                                                         Nota: asegúrese de que su fresadora esté desconectada de la red electrica cuando
                                                                                         efectúe ajustes o reemplace su fresa. Posicione el molde sobre el bloque en parte
                                                                                         trabajado, de forma que esté alineado con las marcas dibujadas y apriételo por medio
                                                                                         de tornillos de cabeza plana. Inserte los tornillos bajo el molde para no interferir con
                                                                                         su fresadora. Posicione su fresadora sobre el molde poniendo la fresa en contacto con
                                                                                         el fondo de la bandeja, permitiendo una posterior profundidad de corte entre 3,2 y
                                                                                         4,7mm para quitar los desechos de materiales dejados por la broca Forstner. Conecte su
                                                                                         fresadora a la red eléctrica, enciéndala y frese para quitar más desechos de materiales
                                                                                         posibles de cada cuadrante.

Usted podrá fabricar el bloque y la parte superior en maderas diferentes, para que así
tenga un contraste visual agradable. Alinee bien las piezas antes de pegarlas, para
garantizar un buen apriete del bloque sin necesidad de lijarlo, en particular para los
bloques de laminados o de otro tipo de madera, como puede ver en la imagen.

                                                                                         Al final asegurese de que el rodamiento de la fresa se mueva a lo largo del molde para
                                                                                         garantizar una primera pasada eficaz. Si tiene, inserte la boca para el polvo antes de
                                                                                         trabajar.

                                                                                         Apriete el bloque en su mesa de trabajo. Active la función de fresado en profundidad de
                                                                                         su fresadora, posicionela sobre el molde y enciéndala, asegurándose de que la fresa no
Posicione el molde sobre la parte central del bloque y dibuje el primer cuadrante como   toque el bloque a trabajar. Mueva la fresadora hacia el borde del molde y frese. Muévase
en la imagen. Quite el molde y dibuje un signo a 12,7mm del borde marcado para definir   hasta la parte más grande del cuadrante. Baje la fresa de 9,5mm y efectúe otra pasada.
el espesor de la bandeja. Es importante crear todos los cuadrantes iguales. Alinee el    El rodamiento quedará bajo el borde del molde para trabajar el borde de la bandeja.
molde a las marcas para crear los otros cuadrantes, asì que se reproduzca la forma de    Frese en profundidad hasta el fondo. Quite todos los desechos de materiales. Las marcas
una bandeja.                                                                             dejadas por la fresa se quitaran con el lijado.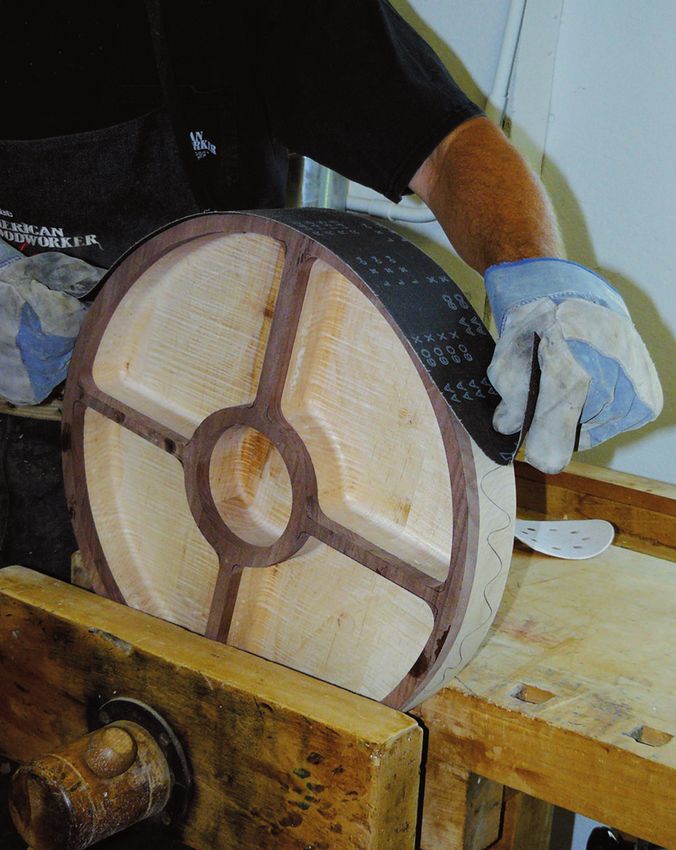
Apague su fresadora y asegúrese de que la fresa se haya parado, antes de sacar la fresa      Como alternativa, utilice un disco abrasivo para trabajar más rápido, pero lije
de la bandeja. Empieze fresar el próximo cuadrante y repita el mismo procedimiento para      cuidadosamente, porque podría estropear la parte interior de la bandeja. Si no tiene
todos los cuadrantes y para el agujero en el medio de la bandeja.                            disco abrasivo, use una lijadora orbital.

Ahora usted tiene que dibujar el espesor de la bandeja. Utilice un compás para dibujar       Cuando esté listo con el lijado, utilice una fresa de radio cóncavo de 12,7mm en una
una circunferencia a una distancia de 12,7mm del borde. La punta del lápiz tendrá que        mesa de trabajo para el toque final. Bisele el borde inferior de la bandeja.
estár 6,35mm delante la punta del compás. Posicione el compás como en la imagen po-
niéndolo perpendicular y dibuje una línea alrededor del bloque. Si la superficie alrededor   Para biselar el borde interior de los cuadrantes inserta una fresa de radio 6,35mm, quite
de la bandeja no fuera uniforme, ponga una pieza de madera fina al lado del borde para       la guía de la mesa, ponga la bandeja al revés, así que la fresa esté dentro de uno de los
dibujar la circunferencia sin dificultades.                                                  cuadrantes sin tocarlos. Encienda su fresadora y frese. Terminado el trabajo apague su
                                                                                             fresadora y espere que la fresa se haya parado. Efectúe el mismo procedimiento para
                                                                                             todos los cuadrantes y para el agujero en el medio de la bandeja.

Use una sierra de cinta para cortar a lo largo de la línea dibujada y quite la bandeja del
bloque trabajado. Trabaje cuidadosamente para evitar lijados y obtener una bandeja
uniforme. La bandeja necesita ahora trabajo addicional.                                      Lije la parte interior de los cuadrantes por medio de un disco abrasivo, empleando
                                                                                             una superficie abrasiva de 80 granos, hasta 220 granos si necesario. Estos discos son
                                                                                             utilizados por torneros para lijar bandejas de madera. Cuando esté listo, repase la parte
                                                                                             exterior de la bandeja con una lijadora orbital. Al final remoje la bandeja con aceite de
                                                                                             nuez (no es tóxico y se seca rápidamente), con aceite mineral o goma laca.il vassoio con
                                                                                             olio di noci (non tossico e di rapida essicazione), oppure con olio minerale o gommalacca.

                                                                                             C.M.T. UTENSILI S.p.A.              C.M.T. UTENSILI, Sucursal en España
                                                                                             Via della Meccanica
                                                                                             61122 Pesaro                        Calle 25/31 Poligono Industrial
                                                                                             Fraz. Chiusa di Ginestreto - Italia 46470 Catarroja - Valencia - España
                                                                                             Phone #39 0721 48571                             Tel. #34 96 1274500
                                                                                             Fax #39 0721 481021                              Fax #34 96 1262754
                                                                                                                                                                                                        03.60.0274

                                                                                             info@cmtorangetools.com
                                                                                             www.cmtorangetools.com

                                                                                               ®: CMT, el logotipo CMT ysonel color anaranjado del revestimiento de la superficie de las herramientas
                                                                                                                              marcas registradas de C.M.T. UTENSILI S.p.A.
Lije la parte exterior, por ejemplo empleando una cinta de lijado. Lije las marcas dejadas
por el lápiz. Apriete la bandeja en una abrazadera (ponga desechos de materiales entre                                             © C.M.T. UTENSILI S.P.A.
                                                                                             Este documento ha sido enviado para uso personal. Se prohíbe cualquier uso diferente y/o reproducción
la bandeja y las morzadas para evitar estropear la bandeja) y líjela como en la imagen.                             sin previa autorización escrita de C.M.T. UTENSILI S.p.A.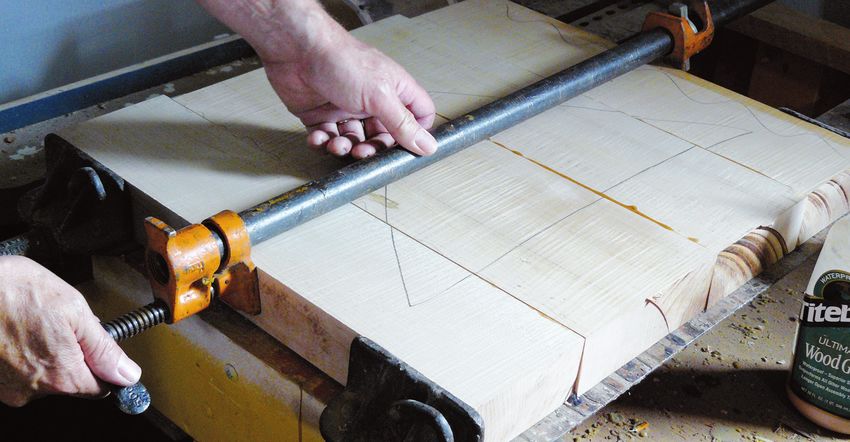
BTS-002 – Système CMT pour plateaux
                                               Manuel d’instructions
Merci d’avoir acheté CMT BTS-002 ! Avec ce kit vous pouvez créer des plateaux d’une épaisseur allant jusqu’à 70mm que vous pourrez offrir
en cadeau à vous amis où utiliser comme d’élégants objet décoratifs pour votre maison ! Laissez-vous guider par votre imagination ! Lisez
attentivement ce manuel avant de commencer à utiliser le kit.
Requis
- Une défonceuse à vitesse variable de 1300 Watt ou supérieure;
- Mèche Forstner avec diamètre 35mm ou plus grand ;
- Fraise à rayon concave CMT 938.880.11 avec queue 12mm ou CMT 938.380.11
  avec queue 8 mm;
- Perceuse à colonne (Remarque. Il est possible d’effectuer des fraisages en plon-
  gée en utilisant seulement votre défonceuse, même si cela aurait comme effet
  d’épuiser la fraise et votre machine);
- Un disque abrasif pour lisser les plateaux;
- Un compas.

Pour commencer:
Dans l’emballage vous trouverez
la fraise pour plateaux,
un mandrin et deux gabarits.                                                                    Enlevez le plus de matériau possible du bloc en utilisant une mèche Fornster montée sur
                                                                                                une perceuse à colonne. Percez jusqu’à une distance de 3,2mm des lignes tracées et
                                                                                                ajuster la profondeur de coupe pour éviter d’entrer en contact avec le fond. Les déchets
                                                                                                de matériau seront enlevés par la fraise pour plateaux incluse dans le kit.
                   Watch the video on
                                                                                                Remarque. Nous vous recommandons d’utiliser une mèche Forstner avec un diamètre
                                                                                                de coupe supérieur à celui de la fraise pour plateaux. Si le diamètre de la mèche est
                                                                                                inférieur à 31,75mm, n’effectuez pas de fraisages trop près des coins, sinon la fraise pour
                                                                                                plateaux ne sera plus capable d’enlever les déchets du matériau.
                                                                                                Terminez le perçage avec la mèche Forstner, passez à la défonceuse. Réalisez une base
                                                                                                pour votre machine pour travailler en toute sécurité. La base peut être fabriquée en bois
Collez plusieurs pièces de bois pour créer un bloc de 460x460mm sur lequel vous utilise-        d’une grosseur de 12,7mm ou en plastique de polycarbonate ou acrylique grosseur
rez le gabarit en forme de bol, et plusieurs pièces pour fabriquer un bloc de 380x590mm,        9,5mm. Percez le centre du plateau jusqu’à 50,8mm de profondeur, montez la base sur
sur lequel vous utiliserez le gabarit oval. Nous vous recommandons d’utiliser un matériau       votre défonceuse, puis insérez le mandrin en utilisant une clé de 14mm et de 18mm.
assez gros, mais vous pouvez aussi travailler des panneaux laminés plus minces.                 Insérez la fraise dans le mandrin et serrez-la avec une clé de 27mm et de 18mm.
Remarque. La majorité des défonceuses permet de travailler jusqu’à une profondeur de
70mm.                                                                                           Avertissement: assurez-vous que la fraise soit insérée dans le mandrin sur au moins
                                                                                                2/3 de la longueur de sa « queue ». N’essayez pas d’étendre la profondeur de coupe
                                                                                                par d’autres façons. Insérez le mandrin dans la défonceuse et serrez-le.

                                                                                                Remarque. Assurez-vous que votre défonceuses soit déconnectée électriquement avant
                                                                                                d’effectuer des ajustements ou de remplacer la fraise. Placez le gabarit sur le bloc partiel-
                                                                                                lement travaillé, pour qu’il soit aligné avec les lignes précédemment tracées et serrez-le
                                                                                                en utilisant des vis à tête plate. Insérez les vis sous le gabarit pour ne pas interférer avec
                                                                                                la fraiseuse. Positionnez la défonceuse au-dessus du gabarit, connectez-la au courant
                                                                                                et assurez-vous que la fraise soit en contact avec le fond du plateau, permettant une
                                                                                                nouvelle profondeur de coupe entre 3,2mm et 4,7mm pour enlever de chaque quadrant
                                                                                                les déchets du matériau laissés par la mèche Forstner.

Fabriquez le bloc et la partie supérieure avec différentes essences de bois pour obtenir
un bon contraste visuel. Il est important d’aligner les pièces de bois qui formeront le
bloc avant le collage pour garantir un serrage optimal sans effectuer de lissage après.
Cela s’applique particulièrement aux blocs de laminés ou stratifiés particuliers, comme
l’image le montre.

                                                                                                Enfin, assurez-vous que le roulement de la fraise se déplace le long du gabarit pour
                                                                                                obtenir un premier passage efficace. Si vous le possédez, insérez le tuyau d’aspiration des
                                                                                                copeaux avant de commencer à travailler.

                                                                                                Serrez le bloc au banc de travail, sélectionnez le fraisage à réaliser, placez votre défon-
                                                                                                ceuses au-dessous du gabarit et allumez-la en vous assurant que la fraise ne touche
                                                                                                pas le bloc à travailler. Déplacez la défonceuse vers le côté du gabarit et commencez le
                                                                                                fraisage. Procédez vers la partie la plus grande du quadrant. Baissez la fraise de 9,5mm
Centrez le gabarit sur le bloc et tracez le premier quadrant comme l’image le montre.           et effectuez un autre passage. Le roulement de la fraise restera sous le bord du gabarit
Enlevez le gabarit et tracez une marque à 12,7mm du bord du quadrant en dehors, pour            pour que vous puissiez en fraiser le contour.
définir l’épaisseur du plateau. Il est important de réaliser tous les quadrants uniformément.
Alignez le gabarit aux marques tracées pour reproduire les autres quadrants aussi. Au           Continuez progressivement à fraiser jusqu’à toucher le fond et enlevez tous les déchets du
final vous obtiendrez la forme d’un gabarit.                                                    matériau. Les marques laissées par la fraise seront enlevées avec le lissage.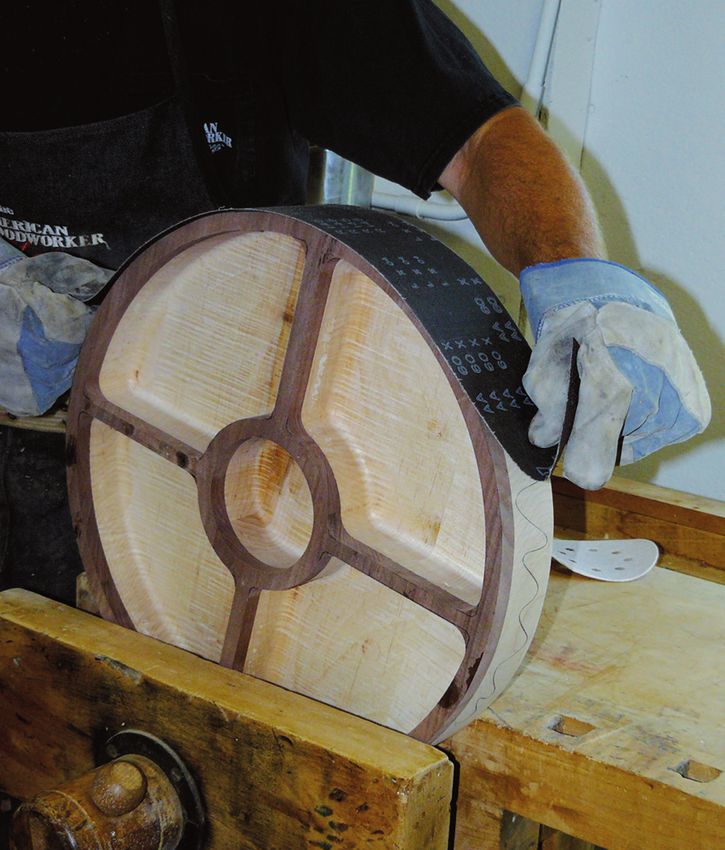
Éteignez la défonceuse et assurez-vous que la fraise se soit arrêtée avant de déplacer      Alternativement, vous pouvez utiliser un disque abrasif pour travailler plus rapidement,
votre machine. Procédez avec le quadrant suivant et répétez la procédure pour tous les      mais effectuez le ponçage attentivement, car vous pourriez endommager l’intérieur du
quadrants et pour le trou central dans le plateau.                                          plateau. Vous pouvez aussi utiliser une ponceuse orbitale.

L’étape suivante consiste à tracer le contour du plateau. Tracez un cercle à 12,7mm de      Quand vous avez enlevé les marques du ponçage, passez au banc de travail pour la
distance du bord du plateau avec un compas. La pointe du crayon devra rester environ        touche finale. Insérez une fraise à rayon concave de 12,7mm et chanfreinez les bords
à 6,35mm devant la pointe du compas. Bloquez le compas comme l’image le montre              inférieurs du plateau.
en le tenant perpendiculaire et tracez une ligne autour du bloc. Si le bloc n’est pas
uniforme, placez une pièce de bois à côté du bord du plateau pour tracer le contour         Pour effectuer le chanfrein des bords intérieurs installez une fraise avec un rayon 6,35mm,
sans problème.                                                                              enlevez le guide du banc et retournez le plateau. La fraise devrait rester dans un des qua-
                                                                                            drants. Allumez votre défonceuse et fraisez. Terminez le travail éteignez votre machine et
                                                                                            attendez que la fraise se soit arrêtée. Répétez la même procédure pour tous les quadrants
                                                                                            et pour le trou central du plateau.

Utilisez une scie à ruban pour couper le long de la ligne tracée et enlevez le plateau du
bloc. Travaillez doucement pour éviter tout ponçage superflu.
                                                                                            Lissez la partie intérieure des quadrants avec un disque abrasif. Ces disques-ci sont com-
                                                                                            munément utilisés par les tourneurs pour lisser les plateaux en bois. Commencez à lisser
                                                                                            avec une superficie abrasive de 80 grains de finesse, jusqu’à arriver, si nécessaire, à 220
                                                                                            grains. Enfin huilez le plateau avec huile de noix (non-toxique et qui sèche rapidement),
                                                                                            huile minérale ou gomme laque.

                                                                                            C.M.T. UTENSILI S.p.A.              C.M.T. UTENSILI, Sucursal en España
                                                                                            Via della Meccanica
                                                                                            61122 Pesaro                        Calle 25/31 Poligono Industrial
                                                                                            Fraz. Chiusa di Ginestreto - Italia 46470 Catarroja - Valencia - España
                                                                                            Phone #39 0721 48571                           Tel. #34 96 1274500
                                                                                            Fax #39 0721 481021                            Fax #34 96 1262754
                                                                                                                                                                                                   03.60.0274

                                                                                            info@cmtorangetools.com
                                                                                            www.cmtorangetools.com

La plateau que vous aurez enlevé nécessitera d’être poncé sur la partie extérieure, par          ®: CMT, lesdeslogos  CMT, CMT ORANGE TOOLS et la couleur orange du revêtement de la surface
                                                                                                                 outils sont des marques déposées de la société C.M.T. Utensili S.p.A.
exemple en utilisant une bande de ponçage. Placez celui-ci sur les marques données par
le crayon et lissez. Serrez le plateau dans un étau (placez des déchets du bois sur les                                            © C.M.T. UTENSILI S.P.A.
                                                                                             Ce document vous a été envoyé exclusivement à usage personnel. Toute utilisation et ou reproduction
mâchoires pour éviter de l’abimer) et lissez-le comme l’image le montre.                                  de celui-ci est interdite sans l’autorisation expresse de son propriétaire.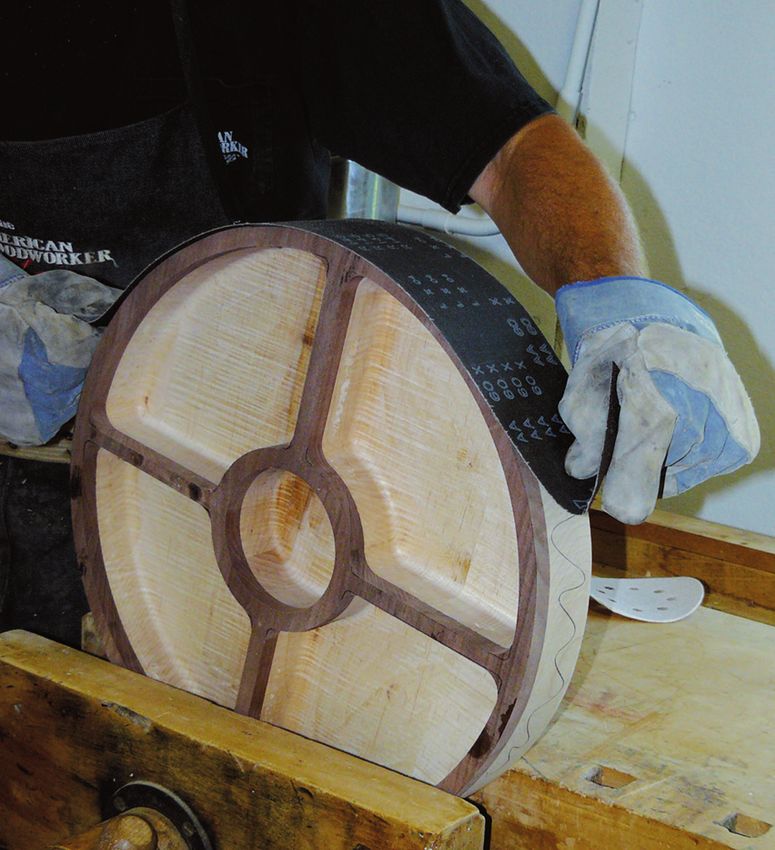
BTS-002 – Sistema CMT per vassoi
                                                 Manuale d’istruzioni
Grazie per avere acquistato CMT BTS-002! Con questo kit potrete creare vassoi spessi fino a 70mm che potrete regalare ai vostri amici o
utilizzare come semplici ma eleganti oggetti d’arredamento. Lasciatevi guidare dalla fantasia! Leggete attentamente il manuale d’istruzioni
prima dell’uso.
Requisiti
- Fresatrice a velocità variabile da 1300 watt o superiore;
- Punta Forstner con diametro 35mm o superiore;
- Fresa a raggio concavo CMT 938.880.11 con attacco 12mm, oppure CMT
  938.380.11 con attacco 8mm;
- Trapano a colonna (N.B. è anche possibile fresare in profondità utilizzando
  solamente una fresatrice, sebbene questo richieda più tempo e potrebbe logorare
  la fresa e la fresatrice stessa).
- Un disco abrasivo per levigare i vassoi.
- Un compasso.

Per iniziare
Nell’imballo troverete
l’apposita fresa per creare vassoi,
un mandrino e due dime.                                                                         Rimuovere più materiale possibile dal massello utilizzando una punta Forstner su trapano
                                                                                                a colonna. Forate fino ad una distanza di 3,2mm dalle linee tracciate e regolate la
                                                                                                profondità di taglio in modo da evitare il contatto con il fondo. I residui di materiale
                                                                                                lasciati dalla punta verranno poi rimossi dalla fresa per vassoi inclusa nel kit acquistato.
                   Watch the video on                                                           N.B. E’ consigliabile l’utilizzo di una punta Forstner con diametro di taglio maggiore
                                                                                                rispetto ai 31,75mm della fresa per vassoi. Se fosse minore di 31,75mm non effettuate
                                                                                                fresature troppo vicine agli angoli, altrimenti la fresa per vassoi non sarà più in grado di
                                                                                                rimuovere completamente i residui di materiale.
                                                                                                Una volta effettuata la foratura con la punta Forstner passate alla fresatrice. Realizzate una
                                                                                                base per il vostro elettroutensile, in modo da poter operare in maniera sicura. La base può
                                                                                                essere realizzata in legno spesso 12,7mm oppure in plastica di policarbonato o acrilico
Incollate più pezzi di legno per creare un massello con dimensioni di circa 460x460mm           spessa 9,5mm. Forate il centro del vassoio ad una profondità di 50,8mm, montate la
su cui utilizzerete la dima a forma di ciotola, e due pezzi di legno di circa 380x590mm su      base sulla fresatrice, poi inserite il mandrino utilizzando una chiave da 14mm e da 18mm.
cui utilizzerete la dima a forma ovale.                                                         Inserite la fresa nel mandrino e serratela con una chiave da 27mm e da 18mm.
Si consiglia di utilizzare materiale abbastanza spesso, ma sono adatti anche pannelli
laminati più fini.                                                                              Attenzione: assicuratevi che la fresa sia inserita nel mandrino per almeno 2/3 della
N.B. La maggior parte delle fresatrici permette di fresare con una profondità massima           lunghezza del suo attacco. Non provate ad estendere la profondità di taglio in altri
di 70mm.                                                                                        modi. Inserite il mandrino nella fresatrice e serratelo.

                                                                                                N.B. Assicuratevi che la vostra fresatrice sia disconnessa dalla rete elettrica quando
                                                                                                effettuate regolazioni o sostituite la fresa. Posizionate la dima sul massello parzialmente
                                                                                                lavorato in modo che sia allineato con le linee precedentemente marcate e fissatela
                                                                                                utilizzando viti a testa piana. Inserite quest’ultime nella parte sottostante della dima per
                                                                                                non interferire con la fresatrice. Posizionatevi con la fresatrice sopra la dima, collegatela
                                                                                                alla corrente e collocatela in maniera tale che la fresa sia a contatto con il fondo del
                                                                                                vassoio, impostando un ulteriore profondità di taglio tra 3,2mm e 4,7mm per rimuovere i
                                                                                                residui di materiale lasciati dalla punta Forstner. Fresate per rimuovere la quantità residua
                                                                                                di legno presente in ogni quadrante.

Potete realizzare il massello e la parte superiore in diverse essenze di legno per creare
un bel contrasto visivo. E’ importante allineare bene i pezzi di legno che formeranno
il massello prima di incollarli, così da garantire un serraggio ottimale senza eventuale
necessità di levigatura. Questo vale in particolar modo per masselli di laminato o strati
di materiale particolari come da immagine.

                                                                                                Infine assicuratevi che il cuscinetto della fresa scorra sulla dima per garantire una prima
                                                                                                efficace passata. Inserite l’eventuale tubo d’aspirazione per trucioli nella fresatrice prima
                                                                                                di operare.

                                                                                                Serrate il massello al vostro tavolo da lavoro. Impostate la fresatrice per fresature in
                                                                                                profondità, posizionatela sopra la dima e accendetela assicurandovi che la fresa non
                                                                                                tocchi il massello da lavorare. Fate scivolare lentamente la fresatrice verso il lato della
                                                                                                dima ed iniziate a fresare. Continuate il lavoro spostandovi verso la parte più ampia del
                                                                                                quadrante. Abbassate poi la fresa di 9,5mm ed effettuate un’altra passata. Il cuscinetto
Centrate la dima sul massello e tracciate il primo quadrante come da figura. Rimuovete          della fresa rimarrà sotto il bordo della dima, così che possiate fresare il contorno del
la dima e tracciate un segno a 12,7mm dal bordo del quadrante verso l’esterno per defi-         vassoio.
nirne lo spessore. E’ importante essere precisi per ottenere uniformità tra tutti i bordi dei   Continuate progressivamente a fresare in profondità fino a raggiungere il fondo. Fresate
quadranti. Fate riferimento ai segni tracciati per allineare la dima e riprodurre anche gli     fino a rimuovere totalmente i residui di materiale. Gli eventuali segni lasciati dalla fresa
altri quadranti, in modo che venga complessivamente riprodotta la forma di un vassoio.          verranno facilmente rimossi con la successiva levigatura.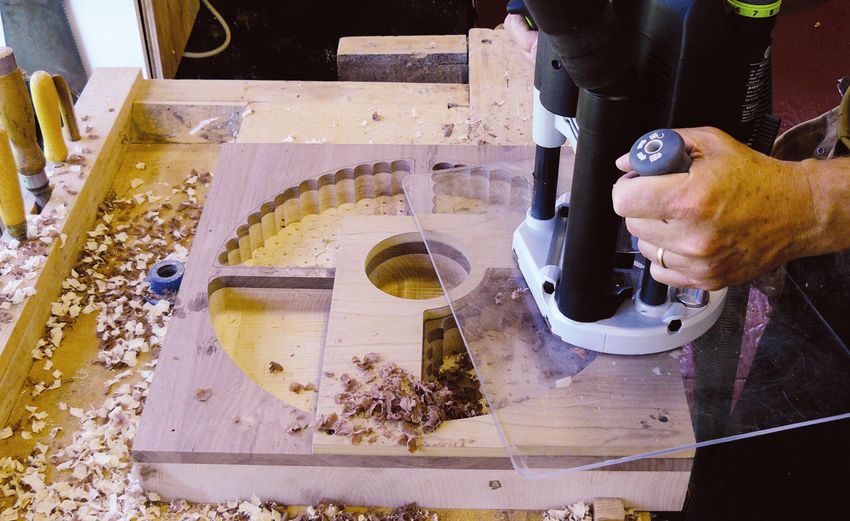
Spegnete la fresatrice e assicuratevi che la fresa si sia fermata prima di rimuovere l’elet-     In alternativa potete utilizzare un disco per la levigatura per effettuare il lavoro più velo-
troutensile dal vassoio. Spostatevi al quadrante successivo e ripetete il processo sopra         cemente, ma prestate attenzione, perché potreste rovinare gli interni del vassoio. Potete
descritto per tutti i quadranti e per il foro centrale.                                          altrimenti adoperare una levigatrice rotorbitale.

Il prossimo passo consiste nel tracciare il bordo del vassoio. Utilizzate un compasso per        Una volta coperti i segni della fresatura ed effettuata la levigatura, passate al tavolo da
tracciare una circonferenza distante 12,7mm dal bordo. La punta della matita dovrà               lavoro per il tocco finale. installate una fresa a raggio concavo da 12,7mm, passate il
essere avanti di circa 6,35mm rispetto alla punta del compasso. Fissate il compasso              vassoio per smussarne i bordi inferiori.
sul bordo come da immagine tenendolo in perpendicolare e tracciate un segno attorno
all’intero massello. Utilizzate un pezzo di legno sottile da collocare al lato del bordo in      Per smussare i bordi interni dei quadranti installate una fresa con raggio 6,35mm,
modo da colmare eventuali disomogeneità per il vostro passaggio con la matita.                   rimuovete la guida del tavolo e capovolgete il vassoio, così che la fresa sia all’interno
                                                                                                 di uno dei quadranti, assicuratevi però che la fresa non sia a contatto con il vassoio.
                                                                                                 Accendete la fresatrice e fresate. Una volta terminato spegnete la fresatrice e aspettate
                                                                                                 che la fresa si sia completamene fermata. Effettuate lo stesso procedimento con tutti i
                                                                                                 quadranti successivi e il foro centrale del vassoio.

Utilizzate una sega a nastro per tagliare lungo la linea tracciata ed estraete il vassoio dal
massello lavorato. Lavorate lentamente per ottenere il massimo della precisione, in modo
da evitare eventuali levigature.
Il vassoio che estrarrete dal massello necessiterà di ulteriore lavorazione. Dovrete levigarne
                                                                                                 Passate la parte interna dei quadranti per la levigatura utilizzando un disco abrasivo.
                                                                                                 Questi dischi vengono comunemente usati da tornitori per levigare vassoi in legno.
                                                                                                 Incominciate levigando con una superficie abrasiva di varia finezza, incominciando con
                                                                                                 80 grani fino ad arrivare a 220 ove necessario. Terminate la levigatura passando la parte
                                                                                                 esterna del vassoio con una levigatrice rotorbitale. L’ultimo passo consiste nel cospargete
                                                                                                 il vassoio con olio di noci (non tossico e di rapida essicazione), oppure con olio minerale
                                                                                                 o gommalacca.

                                                                                                 C.M.T. UTENSILI S.p.A.              C.M.T. UTENSILI, Sucursal en España
                                                                                                 Via della Meccanica
                                                                                                 61122 Pesaro                        Calle 25/31 Poligono Industrial
                                                                                                 Fraz. Chiusa di Ginestreto - Italia 46470 Catarroja - Valencia - España
                                                                                                 Phone #39 0721 48571                            Tel. #34 96 1274500
                                                                                                 Fax #39 0721 481021                             Fax #34 96 1262754
                                                                                                                                                                                                        03.60.0274

                                                                                                 info@cmtorangetools.com
                                                                                                 www.cmtorangetools.com

l’esterno, ad esempio utilizzando del nastro abrasivo. Prendete come riferimento I segni              ®: CMT, i loghi CMT, CMT ORANGE TOOLS e il colore arancio del rivestimento della superficie
                                                                                                                       degli utensili sono marchi registrati di C.M.T. Utensili S.P.A.
lasciati dalla matita per effettuare quest’operazione. Serrate il vassoio in una morsa
(Inserite scarti di legno sulle ganasce della morsa per evitare di rovinarlo) e levigatelo                                              © C.M.T. UTENSILI S.P.A.
                                                                                                     Questo documento Vi è stato inviato solo ad uso personale. Qualsiasi altro uso e/o riproduzione
come da figura.                                                                                        di esso è vietata senza preventiva autorizzazione scritta rilasciata da C.M.T. UTENSILI S.P.A.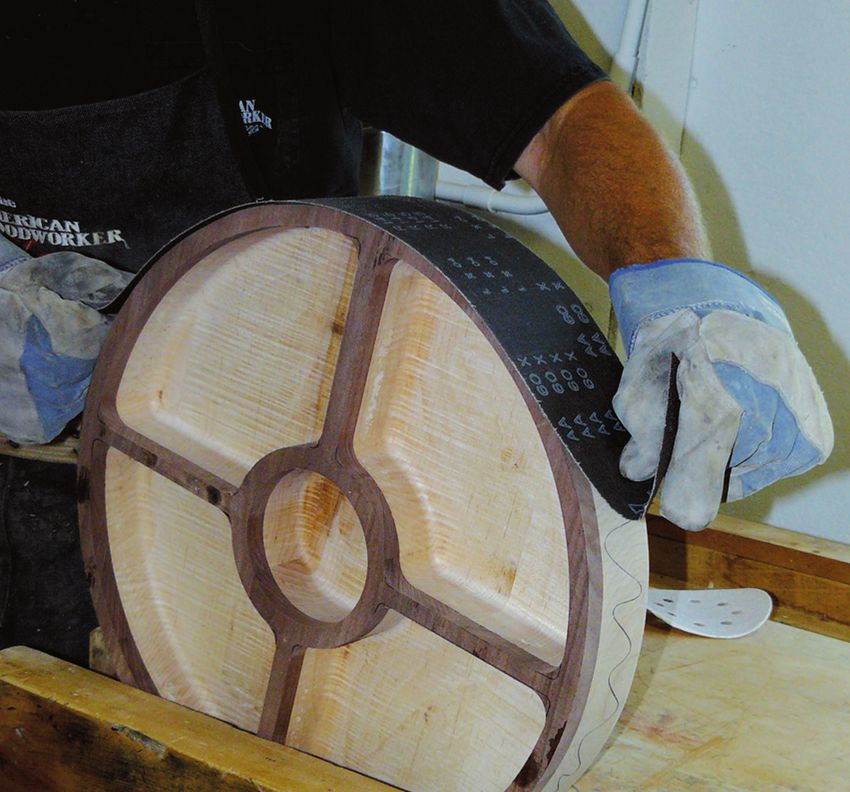
BTS-002 – CMT System für Tabletts
                                              Bedienungsanleitung
Vielen Dank für den Kauf von CMT BTS-002! Mit Hilfe dieses Kits können Sie Tabletts bis zu 70mm tief herstellen, die Sie Ihren Freunden
schenken können oder einfach als elegantes Dekorativelement in Ihrem Haus verwenden können. Lesen Sie die Bedienungsanleitung
aufmerksam durch, bevor Sie das Produkt verwenden.
Voraussetzungen
- 1300 Watt oder leistungsstärkere Oberfräse;
- Forstner Bohrer mit 35mm Schnittdurchmesser oder großer;
- Radiusfräser CMT 938.880.11 mit 12mm Schaftdurchmesser oder CMT 938.380.11
  mit 8mm Schaftdurchmesser.
- Standbohrmaschine (Beachten Sie bitte, dass das Tauchfräsen mit Hilfe einer
  Oberfräse auch möglich ist, aber das könnte Ihre Maschine und den eingesetzten
  Fräser verschleißen).
- Schleifscheibe zum Schleifen der Tabletts.
- Ein Zirkel
Vorab
In der Packung befindet sich
der Fräser zur Herstellung von
Tabletts, ein Spannzangenfutter                                                              Mit einem Forstner-Bohrer in einer Standbohrmaschine entfernen Sie so viele Überschüs-
und zwei Schablonen.                                                                         se, wie möglich vom Block. Bohren Sie bis zu 3,2mm von den angezeichneten Marken und
                                                                                             verstellen die Schnitttiefe, um den Boden des Tablettes nicht zu berühren. Überschüsse
                                                                                             entfernen Sie später mit dem im Set inbegriffenen Fräser.
                   Watch the video on                                                        Achtung. Wir empfehlen Ihnen, einen Forstner Bohrer mit Schneiddurchmesser größer
                                                                                             als den 31,75mm Schneiddurchmesser des Fräsers für Tabletts zu benutzen. Wenn dieser
                                                                                             kleiner als 31,75mm wäre, bitte fräsen Sie nicht zu nah von Ecken, ansonsten kann der
                                                                                             Fräser die Überschüsse nicht vollständig entfernen.
                                                                                             Wenn Sie mit der Bohrung fertig sind, fangen Sie mit der Oberfräse an. Stellen Sie
                                                                                             eine Unterlage für Ihre Oberfräse, sodass Sie auf sichere Weise bearbeiten können. Die
Verleimen Sie mehrere Holzstücke, um einen Block mit Abmessungen 460x460mm zu                Unterlage kann aus 12,7mm-dickem Holz oder aus 9,5mm-dicker Polycarbonat- oder
erzeugen, auf dem Sie die schalenförmige Schablone verwenden werden, und mehrere             Acrylplastik hergestellt werden. Bohren Sie die Mitte des Tabletts bis zu einer Tiefe
Holzstücke, um einen Block mit Abmessungen 460x460mm herzustellen, auf dem Sie die           von 50,8mm, stellen Sie die Unterlagen auf die Oberfräse ein, dann setzen Sie das
ovale Schablone benutzen werden. Wir empfehlen Ihnen, dickes Material zu verwenden,          Spannzangenfutter in die Oberfräse mit 14mm und 18mm Schlüssel ein. Spannen Sie
aber dünnere Laminatpaneelen sind auch dafür geeignet.                                       den Fräser in den Spannzangenfutter ein, und klemmen Sie ihn mit Hilfe von 27mm
Beachten Sie bitte, dass die Mehrheit der Oberfräsen das Tauchfräsen bis zu 70mm tief        und 18mm Schlüsseln.
ermöglichen.
                                                                                             Vorsicht! Stellen Sie sicher, dass mindestens 2/3 der Länge des Fräser-Schaftdurch-
                                                                                             messers im Spannzangenfutter deutlich eingesetzt wurden. Versuchen Sie nicht, die
                                                                                             Schnitttiefe auf andere Weise zu erweitern. Spannen Sie das Spannzangenfutter in
                                                                                             die Oberfräse ein, dann klemmen Sie es.

                                                                                             Beachten Sie bitte, dass Ihre Oberfräse vom Strom getrennt ist, bevor Sie den Fräser
                                                                                             verstellen oder ersetzen. Setzen Sie die Schablone auf den gearbeiteten Block, sodass
                                                                                             ihn zu den vorher gezeichneten Linien ausgerichtet ist und klemmen Sie sie fest mit
                                                                                             Hilfe von Flachkopfschrauben. Die Letzten müssen unter die Schablone gesetzt werden,
                                                                                             damit sie nicht mit der Oberfräse in Berührung kommen. Setzen Sie die Oberfräse auf
                                                                                             die Schablone, verbinden Sie sie an den Strom und stellen Sie eine weitere Schnitttiefe
                                                                                             zwischen 3,2mm und 4,7mm, um alle Überschüsse zu entfernen. Fräsen Sie in allen
                                                                                             Quadranten.

Stellen Sie das Oberteil und den unteren Teil des Blockes mit verschiedenen Hölzern her,
um einen schönen, visuellen Kontrast zu erzielen. Richten Sie alle Holzstücke deutlich aus
bevor Sie sie einkleben, um einen gleichmäßigen Block zu erzeugen, ohne Besandung
eventuell anzuwenden. Das gilt für Laminatblöcke oder für besondere Materialschichten
wie das Bild anzeigt.

                                                                                             Achten Sie darauf, dass das Kugellager dem Schablonenbord entlang gleitet, um einen
                                                                                             effizienten Durchgang zu garantieren. Setzen Sie das Entstaubungssystem in die Oberfrä-
                                                                                             se, falls Sie eines zur Verfügung haben.

                                                                                             Klemmen Sie den Block an dem Tisch fest. Setzen Sie die Oberfräse zum Tauschfräsen
Zentrieren Sie die Schablone auf dem Block und zeichnen Sie den ersten Quadrant, wie         ein, dann legen Sie die Oberfräse auf die Schablone, aber stellen Sie sicher, dass der
das Bild anzeigt. Entfernen Sie die Schablone und zeichnen Sie eine Marke 12,7mm vom         Fräser den Block nicht berührt. Bewegen Sie sich nach der Seite der Schablone und
Bord auswärts. Bitte bearbeiten Sie langsam und deutlich, um regelmäßige Quadranten          fangen Sie zu fräsen an. Machen Sie weiter mit dem Fräsen nach dem breitesten Teil
zu erzeugen. Bitte orientieren Sie sich an der vorher gezeichneten Marke, um die Schab-      des Quadrants. Senken Sie den Fräser 9,5mm und machen Sie einen weiter Durchgang.
lone auszurichten und stellen Sie die andere Quadranten her, sodass Sie die Form eines       Das Kugellager bleibt unter dem Bord der Schablone, sodass Sie den Umriss des Tab-
Tabletts insgesamt abbilden.                                                                 letts fräsen können.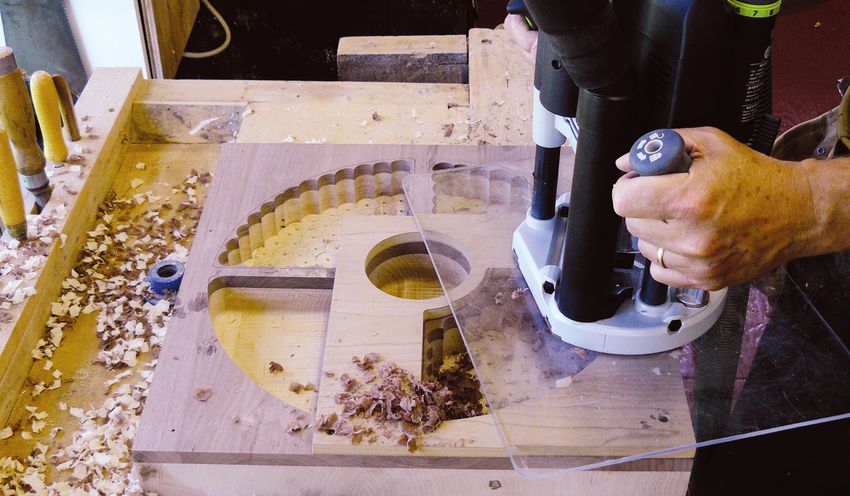
Fräsen Sie so weit in die Tiefe, bis Sie den Boden des Tabletts erreicht haben. Machen      Als Alternative, wenn Sie schneller arbeiten möchten, können Sie eine Schleifscheibe zum
Sie weiter, bis Sie alle Überschüsse entfernt haben. Die Marke des Fräsens werden Sie       Schleifen benutzen, aber achten Sie darauf, dass Sie dabei die Innenseite des Tabletts
danach mit der folgenden Besandung entfernen.                                               beschädigen könnten. Ansonsten können Sie einen Exzenterschleifer verwenden.

Schalten Sie Ihre Oberfräse aus und stellen Sie sicher, dass der Fräser angehalten hat,     Wenn Sie mit der Besandung fertig sind, gehen Sie zum Tisch für den letzten Schliff.
bevor Sie ihn aus dem Tablett wegnehmen. Wiederholen Sie das beschriebene Verfahren         Setzen Sie einen 12,7mm Radiusfräser ein, dann fräsen Sie die untere Außenseite des
mit alle Quadranten und mit dem Loch in der Mittle des Tabletts.                            Tabletts wie das Bild anzeigt.
Als nächsten Schritt zeichnen Sie den Umriss des Tabletts. Benutzen Sie einen Zirkel, um
eine Kreislinie im Abstand von 12,7mm außen entlang zu machen. Setzen Sie die Spitze        Für die Innenseite der Quadranten verwenden Sie einen 6,35mm Radiusfräser. Entfernen
des Bleistiftes 6,35mm vor die Spitze des Zirkels. Halten Sie den Zirkel senkrecht an der   Sie die Tischführung und drehen Sie das Tablett um. Jetzt sollte der Fräser sich in einem
Kante des Tabletts wie das Bild anzeigt und zeichnen Sie mit Ihrem Bleistift. Falls das     der Quadranten befinden, aber stellen Sie sicher, dass das Werkzeug nicht in Berührung
Tablett nicht regelmäßig um die Kante wäre, benutzen Sie ein dünnes Holzstück, um einen     mit dem Tablett ist. Schalten Sie die Oberfräse ein und fräsen Sie. Wenn Sie fertig sind,
angemessenen Durchgang mit dem Bleistift zu erledigen.                                      schalten Sie die Maschine aus und warten Sie darauf, dass der Fräser völlig angehalten
                                                                                            hat. Wiederholen Sie das gleiche Verfahren mit allen nebenliegenden Quadranten und mit
                                                                                            dem Loch in der Mitte des Tabletts.

Verwenden Sie eine Bandsäge, um der Linie entlang zu schneiden, danach entfernen Sie
das Tablett aus dem gearbeiteten Holzblock. Bearbeiten Sie langsam, um eine hochpräzi-
se Arbeit zu erzielen und eventuelle Besandung zu vermeiden.                                Schleifen Sie die Innerseite der Quadranten mit einer Schleifscheibe. Normalerweise wer-
Das entnommene Tablett müssen Sie danach wieder bearbeiten. Tatsächlich müssen Sie          den diese Scheiben von Drechslern benutzt, um Holztabletts zu glätten. Fangen Sie an mit
die Außenseite schleifen, zum Beispiel mit Hilfe eines Schleifbandes. Schleifen Sie auf     einer abrasiven Oberfläche verschiedener Feinheit, beginnend mit 80 Körner bis zu 220
den Bleistiftmarken. Klemmen Sie das Tablett mit einem Spannsystem. Setzen Sie bitte        wenn nötig. Schleifen Sie die Außenseite des Tabletts mit einem Exzenterschleifer. Zuletzt
Holzüberschüsse zwischen den Backen und dem Tablett, um dieses letztes beschädigen          nässen Sie das Tablett mit Walnussöl (ungiftig und sich schnell trocknen), Mineralöl oder
zu vermeiden. Danach schleifen Sie das Tablett wie das Bild anzeigt.                        Schellackdurch. Sie sind fertig!

                                                                                            C.M.T. UTENSILI S.p.A.              C.M.T. UTENSILI, Sucursal en España
                                                                                            Via della Meccanica
                                                                                            61122 Pesaro                        Calle 25/31 Poligono Industrial
                                                                                            Fraz. Chiusa di Ginestreto - Italia 46470 Catarroja - Valencia - España
                                                                                            Phone #39 0721 48571                           Tel. #34 96 1274500
                                                                                            Fax #39 0721 481021                            Fax #34 96 1262754
                                                                                                                                                                                             03.60.0274

                                                                                            info@cmtorangetools.com
                                                                                            www.cmtorangetools.com

                                                                                                ®: CMT, die CMT Logos, CMT ORANGE TOOLS und die orangene Farbe der Werkzeugflächen sind
                                                                                                                   eingetragene Warenzeichen von C.M.T. Utensili S.p.A.

                                                                                                                                   © C.M.T. UTENSILI S.P.A.
                                                                                                   Dieses Dokument wurde Ihnen nur zur privaten Nutzung zugesendet. Jede Art von Nutzung
                                                                                                    und/oder Vervielfältigung ist ohne die schriftliche Genehmigung von GMT nicht erlaubt.
You can also read