CAST IRON SKILLET PIZZA - Macon Centreplex
←
→
Page content transcription
If your browser does not render page correctly, please read the page content below

CAST IRON SKILLET PIZZA
FROM CHEF AMELIA’S KITCHEN
   A NOTE FROM CHEF AMELIA:
   One of the questions I was asked when I was interviewing for this position was, “what would my last supper be?” I thought briefly about
   black truffles and caviar, foie gras and prime ribs. And then I remembered pizza. Oh, pizza. I could wax poetically about my love of pizza for
   hours on end, it is truly my favorite food. My family had it every Friday, and even still, Friday remains Pizza Night for us, and we come
   together weekly via group texts to share what kind we're all eating. My one and only tattoo? It's a slice of pizza. Props at my sister's
   wedding? A giant inflatable pizza slice. Obviously, I had to confess that yes, although I'm a chef, my last supper meal would be pepperoni
   pizza with fresh chopped garlic on top.

   Ok, I can feel the eyelids drooping. Let's get started. These days, I prefer a nice cast iron pizza. It's personal sized, easily customizable, and
   really has such a wonderful chewy texture that can stand up to lots of toppings. I know the fact that it needs to chill for 12 hours is
   daunting, but I promise you it's actually pretty quick and easy to put together. If you don't have a cast iron skillet, what are you waiting
   for? They're great for everything. And they last forever! Any baking dish will work, I've used springform cheesecake pans, I've used square
   brownie pans, you can even roll it out into a circle and bake it on a cookie sheet if you like. The cast iron gives it a really nice crispy texture,
   as the dough effectively fries in the olive oil while it bakes. I usually make a pot of coffee, turn on Fleetwood Mac, and make my dough
   while my hot bean water brews. Then it hangs out in the fridge until I'm ready for it. Sometimes it's my midnight snack during a Netflix
   binge (currently rewatching Gilmore Girls), sometimes I cut the 12 hours down to 10 and have it for dinner. It also is totally fine to kick it in
   the fridge for 3 days, at that point you can Ziploc it and freeze it.

   INGREDIENTS: FOR THE DOUGH
       2 cups all purpose flour
       ¾ teaspoon salt
       ½ teaspoon instant or active dry yeast
       1 teaspoon honey or sugar
       ¾ cup warm water
       1 tablespoon extra virgin olive oil
       1 teaspoon granulated garlic
       1 teaspoon Italian seasoning
       ½ teaspoon crushed red pepper (optional)

   INGREDIENTS: FOR THE SAUCE
        16 oz can of crushed tomatoes
        4 cloves of chopped garlic
        A hefty pinch of kosher salt
        Freshly cracked black pepper

   TOPPINGS
        Entirely up to you!
        Spinach, arugula, and fresh basil are all great fresh
        lettuces that should be added last minute, post
        baking, to avoid wilting.
        Sautéed and drained spinach can be added
        before baking.
CAST IRON SKILLET PIZZA
FROM CHEF AMELIA’S KITCHEN

   INSTRUCTIONS: FOR THE DOUGH
       1.      In a large mixing bowl, combine warm water, yeast, oil,
               and honey (or sugar). Stir and let sit for 5 minutes. It
               should be nice and foamy at this point.
       2.      While your yeast is blooming, in a separate bowl, mix
               the flour, salt, and seasonings.
       3.      Mix your dry ingredients into your wet ingredients and
               get in there with your hands! Dough is notoriously
               finnicky, and the best way to get great results is to let
               the dough speak to you, and there's no better way
               than getting your hands in the dough. No mixer
               required! If your dough feels wet, add a tablespoon of
               flour and see if that helps. If it's too dry, a splash of
               warm water won't hurt!
       4.      Mix until the dough comes together into a smooth ball, it should peel away from the sides of the bowl.
               At this point, turn dough onto a floured counter, and knead for 10 minutes. You can test if you've
               kneaded enough by poking the dough. If the poke leaves a mark, keep working those muscles. Think of
               it as working off all the delicious Quarantine Calories you're about to eat. The poke test is complete
               when the hole fills back up quickly. You're looking for elasticity here.
       5.      Drizzle some oil in a large bowl and roll the dough around to cover it. Plastic wrap the top, or a large
               dish towel works as well. Let the dough sit out at room temperature - between 68 and 75 degrees (or
               in the oven with the light turned on but the heat turned off, for those of us who have already turned
               on our AC!).
       6.      After an hour, refrigerate it for 12 hours, or overnight. This helps the gluten develop for a really nice,
               chewy crust, perfect for holding tons of delicious toppings.
   INSTRUCTIONS: FOR THE SAUCE
          1. Combine all ingredients and mix well.
          2. Save in a container until dough is ready to bake.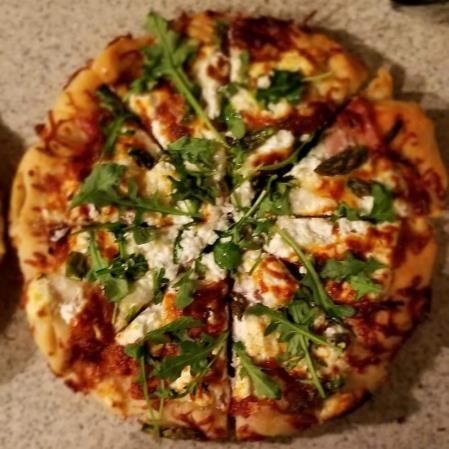
CAST IRON SKILLET PIZZA
FROM CHEF AMELIA’S KITCHEN

   INSTRUCTIONS: FOR THE PIZZA
       1.      An hour and a half before you want to eat, preheat
               your oven to 450 degrees.
       2.      Prepare a 9- or 10-inch cast iron skillet by pouring 1 ½
               tablespoons of olive oil in it and coating the sides
               thoroughly.
       3.      Gently pat your dough into the pan. If it doesn't quite
               stretch to the sides, let it rest at room temperature for
               15 minutes.
       4.      Let the oven preheat for a full hour while your dough,
               in its pan, rises.
       5.      After an hour is up, get ready for toppings! The
               wonderful thing about cast iron pizza is that the crust
               is thick enough to hold lots of toppings, so go for it!
       4.      When you're ready to bake, drizzle some olive oil on the edges of your crust, sprinkle liberally with
               parmesan (good ol shaky cheese in the green can, I'm talking to you), and bake on the center rack for
               25 minutes.
       5.      If it's looking a little pale and you're looking for some more caramelization on your cheesy goodness,
               move your pie up to the top rack and turn the broil on and just watch it like a hawk for a couple
               minutes.
       6.      Pull your pie out of the oven and let it cool on top of your stove for a couple minutes.
       7.      Loosen the edges of the pizza by using a paring knife. If you've got a pie server, that works beautifully
               for removing the pizza. If not, a regular burger flipper, offset spatula, or even butter knife work fine.
       8.      Place the pizza on a cutting board and cut into 4 slices. Pour a glass of red wine and try not to burn
               your mouth like I do literally every time I eat pizza. Cheers!
You can also read