Competition Brake System Installation Guide Front Mazda RX-7 (FD3S)
←
→
Page content transcription
If your browser does not render page correctly, please read the page content below
Competition Brake System Installation Guide Front
               Mazda RX-7 (FD3S)

         Note: Please read complete install guide before turning a wrench!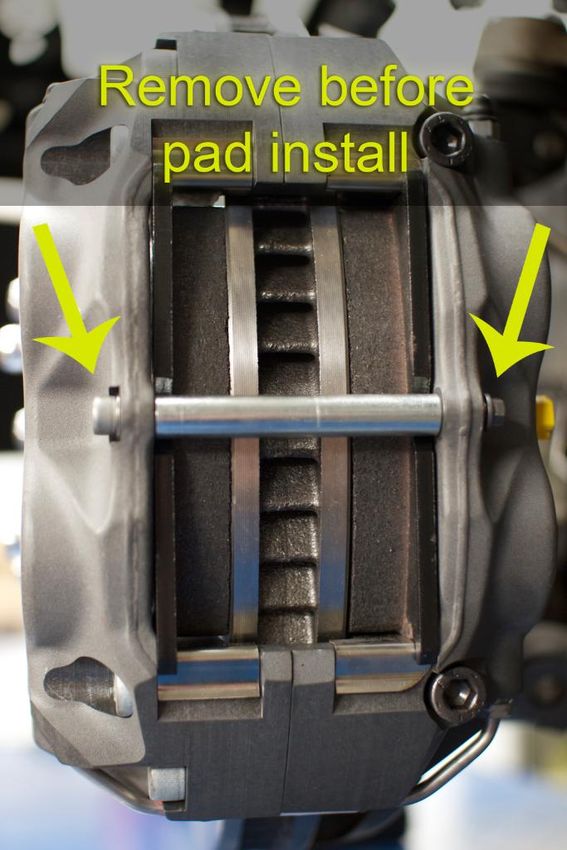
DISCLAIMER OF WARRANTY
By installing this product on a vehicle, the purchaser expressly acknowledges and agrees to assume all
responsibility resulting from the use or misuse of this system, or components contained within it. SakeBomb
Garage LLC will not be held liable for any damage, injury, or death, consequential or otherwise, due to equipment
failure or poor‐performance after installation. The purchaser assumes all risk associated with the use or misuse of
this system.
 SakeBomb Garage LLC offers no warranties for this product whatsoever, expressed or implied, oral or written, to
purchasers or users of this product. SakeBomb Garage expressly disclaims any implied warranty of fitness for a
particular purpose, including fitness of these systems, parts or equipment for racing or road use. No warranty or
representation is made to the product’s ability to protect the user from injury or death. The user assumes all risk
associated with this system, and is aware that routine maintenance of the components contained within it will be
required.
By installing this product the purchaser expressly affirms that they are relying upon their own skill and judgment in
selecting and purchasing these goods as suitable for purchasers’ intended use. Purchaser understands and agrees
that no officer, employee, or dealer for SakeBomb Garage LLC has the authority to make any statement contrary to
the terms of this disclaimer and agreement.

Installation
The brake system on any vehicle is a safety device. It is strongly recommended that any personnel performing
brake‐related replacement or maintenance operations should be competent and certified, using proper tools and
equipment.

Brake to Wheel Clearance
The customer is solely responsible for verifying wheel fitment. We have a wheel clearance template available for
download on our website.

Brake Noise, Vibration, and Harshness (NVH)
Brake noise can be caused by many factors. Following the bed‐in procedures outlined on the following pages will
help reduce brake noise as much as possible, but keep in mind that high performance brake pads do tend to make
more noise than typical OEM pads. The customer is solely responsible for any NVH related problems with the
brake system (squealing, scraping, vibration, judder, etc.). Also be aware that floating rotors tend to rattle when
cold at low speeds. Any unusual pulsing, unusual noises, etc may be a problem. Discontinue use until the source of
this issue has been diagnosed. NVH does not mean ignore abnormal brake noise.

Caliper, Bracket, and Hat Finish
The bells (hats) and caliper brackets are hard anodized aluminum, and as such are subject to corrosion when
introduced to corrosive agents such as brake fluid, road salt, wheel cleaners, certain soaps, etc. Use caution when
cleaning and servicing the system components.
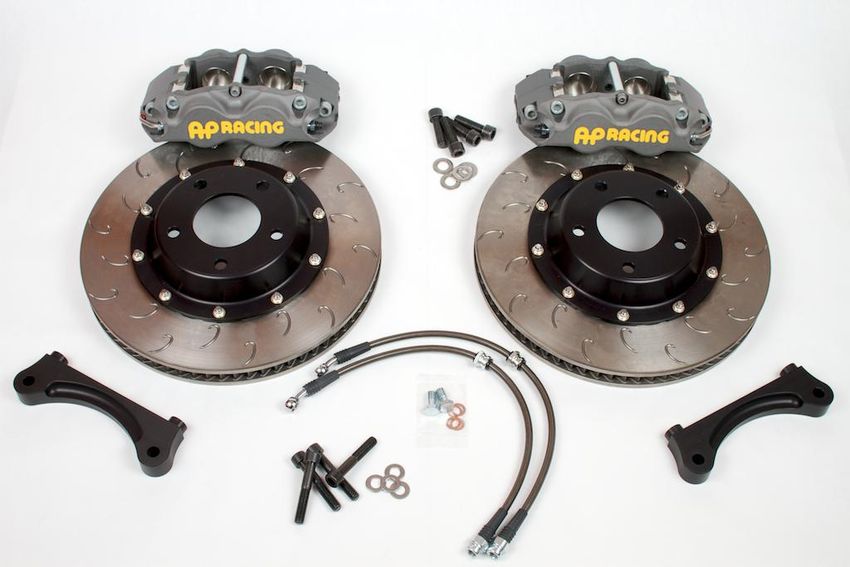
What’s in the Boxes?
Your brake system is packaged in two separate boxes.
Box One (calipers/hardware)
Left CP8350 AP Racing four piston caliper (#CP8350‐25S4L); Bleed screw at top when installed properly
Right CP8350 AP Racing four piston caliper (#CP8350‐24S4L); Bleed screw at top when installed properly
Left anodized aluminum caliper mounting bracket (identical to the right hand bracket)
Right anodized aluminum caliper mounting bracket (identical to the left hand bracket)
Four socket head caliper mounting bolts (attaches caliper to bracket)(HD-SM1-060)
Four washers for the above bolts
Four socket head caliper bracket mounting bolts (attaches caliper bracket to upright)( HD-SM1-240)
Four washers for the above bolts
One pair sheathed stainless steel brake lines (left and right side lines are identical)
Box Two (disks/hats)
Left CP3908 AP Racing J Hook brake disc (#CP3908‐103GA) with attached anodized aluminum hat; Please
note the direction of the J Hook slot pattern for proper orientation.
Right CP3908 AP Racing J Hook brake disc (#CP3908‐102GA), with attached anodized aluminum hat; Please
note the direction of the J Hook slot pattern for proper orientation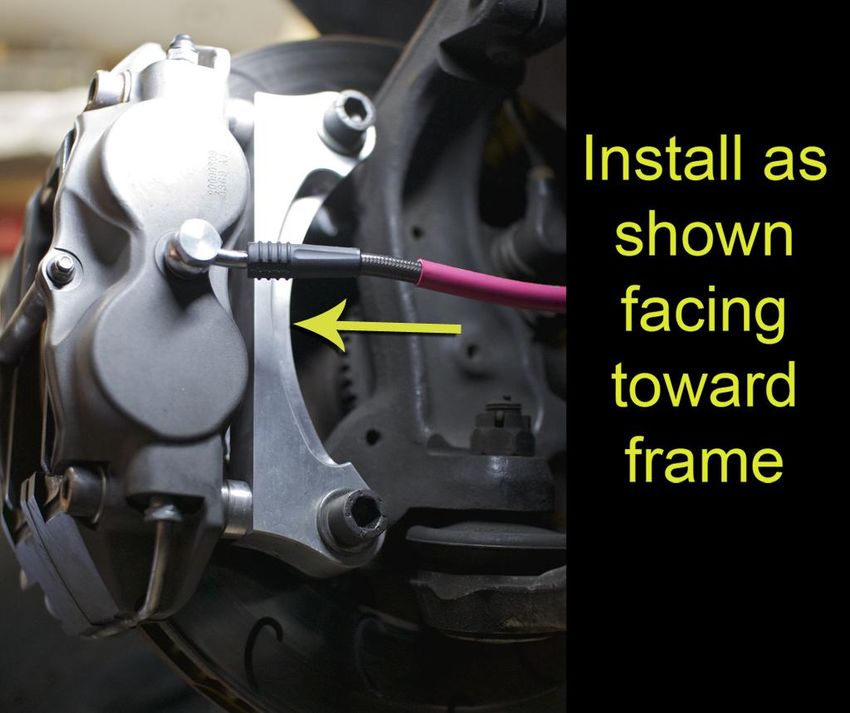
Required Tools & Use
Torque wrench capable of 10‐90 lb.‐ft.
Breaker bar‐ OEM caliper bolt and wheel removal
7mm socket‐ Caliper bridge bolt
14mm socket‐ Banjo bolt on caliper end of brake line
17mm socket‐ OEM caliper bolt removal
17/19/21mm socket‐ Wheel lug nuts
5mm hex key wrench/socket‐ Caliper bridge bolt
8mm hex key wrench/socket‐ Bolt, caliper to bracket
10mm hex key wrench/socket‐ Bolt, caliper bracket to upright
7/16” box end wrench‐ Caliper bleed screw
10mm line wrench‐ Brake line at hard line attachment
17mm open end wrench‐ Brake line at hard line attachment
Needle nose pliers‐ OEM brake line spring clips/retainer
Small hammer‐ Secure brake line clip on new lines
Rags‐ Brake fluid
Brake fluid cleaning solution
Funnel‐ Brake fluid
Eye protection
Gloves
2 or 3 500ml bottles of racing grade brake fluid ‐ SakeBomb Garage recommends AP Racing PRF or Endless
RF650.
Pair of jack stands
SNELL approved race helmet – optional ;)
Installation Procedure
Step 1‐ Wash both brake discs with soap and water
The discs in our system are coated with a water soluble rust inhibitor that must be removed prior to use.
Use soap and water to clean them. Dish detergent works well. The discs will start to rust immediately (as
they do when you wash your car), so please don’t be alarmed when that occurs. They’ll be rust free once
you start driving the car.
Step 2‐ Lift and secure vehicle, remove wheel(s)
a. Apply the parking brake and chock the rear wheels.
b. Loosen front wheel lug nuts using the appropriate socket. Lug size will vary depending on what brand you
have. Typical sizes are 17mm, 19mm and 21mm.
c. Lift the front of the car on a flat, clean, and stable surface per manufacturer recommendations.
d. Secure the vehicle on two jack stands or one if you’d like to install one side at a time.
***Never leave your vehicle supported with only a floor jack. ALWAYS USE JACK STANDS***
e. Remove front wheel(s).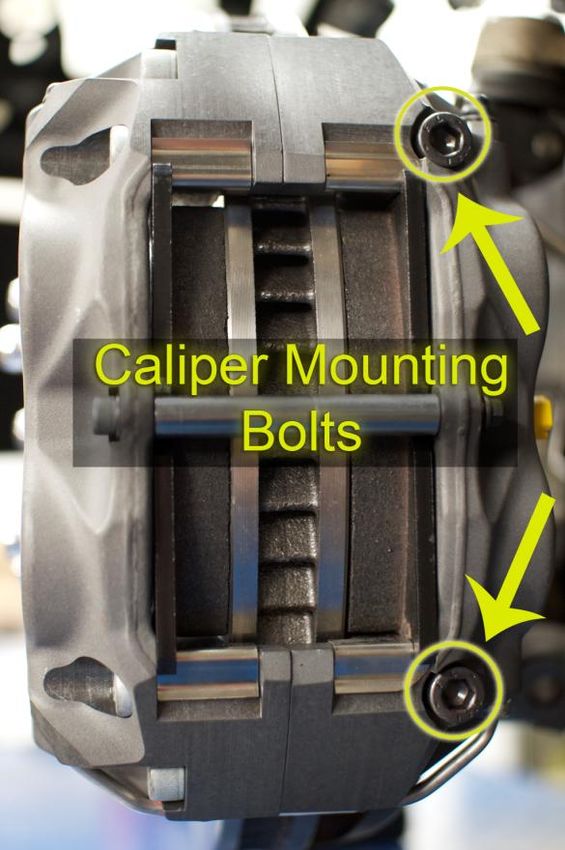
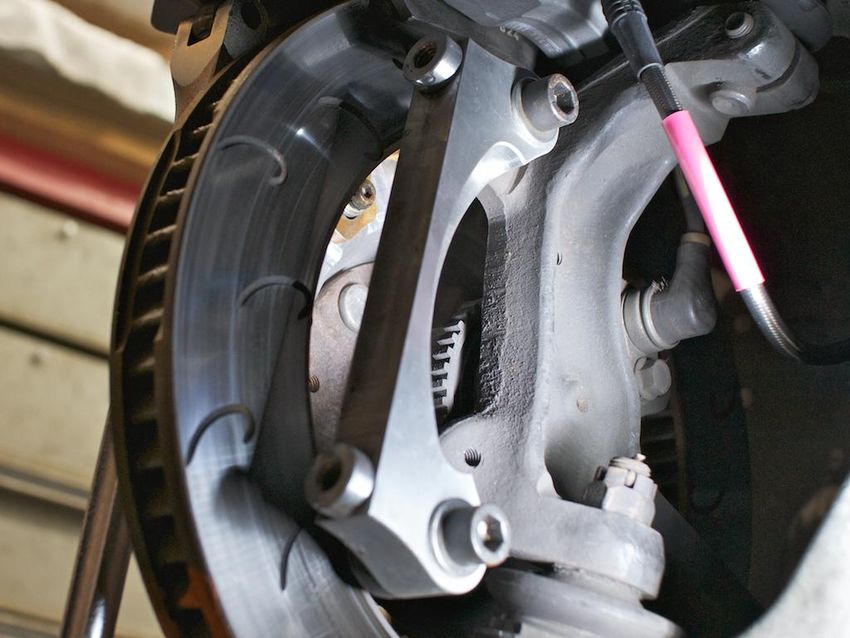
Step 3‐ Detach hard line brake connection
Warning‐ Brake fluid is corrosive and will damage painted and anodized finishes. Clean up all spills immediately.
Place a tray and/or rags below the brake hard line connection.
Before removing the OEM brake line, take note (or a picture if necessary) of the routing. The line included
with our system will be installed in the exact same orientation.
Using the 10mm line wrench, loosen and remove the hard line fitting from the stock brake line (if you use a
standard 10mm open end, you will likely strip the fitting).
Take note of how the factory spring clip holds the brake line in place (which side is up). Using needle nose
pliers, remove the OEM spring clip at the hard line attachment point.
Remove the second spring clip located on a bracket on the inside of the strut. Place the spring clips to the side
as they will be reused upon installation of the new lines included.
Disconnect the soft line from the hard line nearest the chassis, and quickly wrap the hard line to absorb brake
fluid which will drain out.
Step 4‐ Remove OEM caliper
Using a 17mm socket, loosen and remove the two flange bolts that hold the OEM caliper onto the upright.
These bolts may be difficult to remove and may require use of a longer breaker bar. Turning the
steering wheel towards the side on which you are working will give you better access to these bolts.
Remove the caliper and set it aside. Pads can remain installed in the OEM caliper during removal.
Step 5‐ Remove OEM disc
Once the OEM caliper is removed, you should be able to easily remove the OEM discs. If the disks do not
come off easily a soft blow mallet may help the process.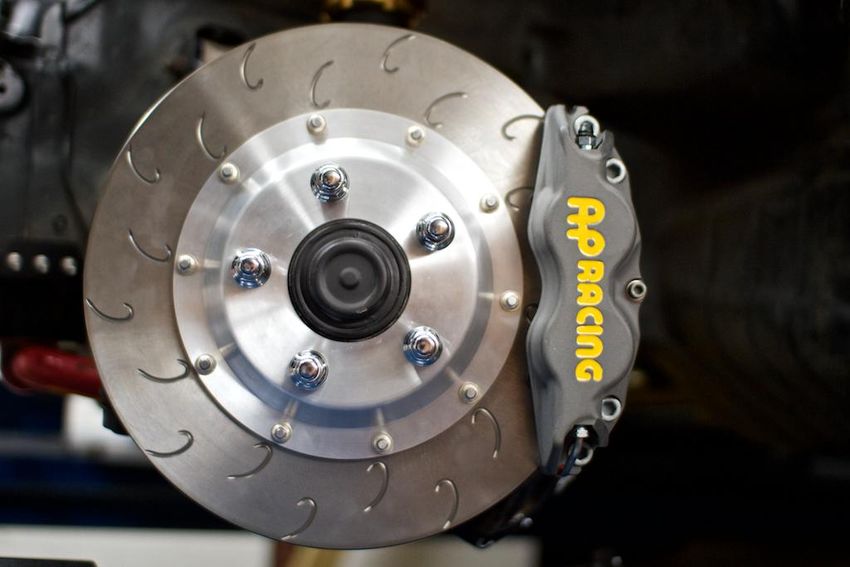
Step 6‐ Install Caliper Bracket
   Apply red Loctite™ 271 (red) to the threads of the shorter socket head bolts.

   Using a 10mm hex key socket and the supplied washers(HD-SM1-240), attach the caliper bracket to upright in
   the orientation shown (driver’s side front wheel well shown). Keep in mind that the left and right caliper
   brackets are identical.

   Ensure you use the included washers as shown below. Torque to 55 lb.‐ft.

   Caliper bracket installed on driver side upright.
Step 7‐ Install AP Racing brake disc
      Install the supplied 2‐piece brake rotor on the wheel studs. To ensure proper airflow and cooling, make
      sure the discs are on the proper side of the car per the pictures below. The J Hook slot pattern and internal
      vane design can both be used as reference points.

      Driver/Left J Hook Disc (Essex part #CP3908‐103GA)

      Right/Passenger J Hook Disc (Essex part #CP3908‐102GA)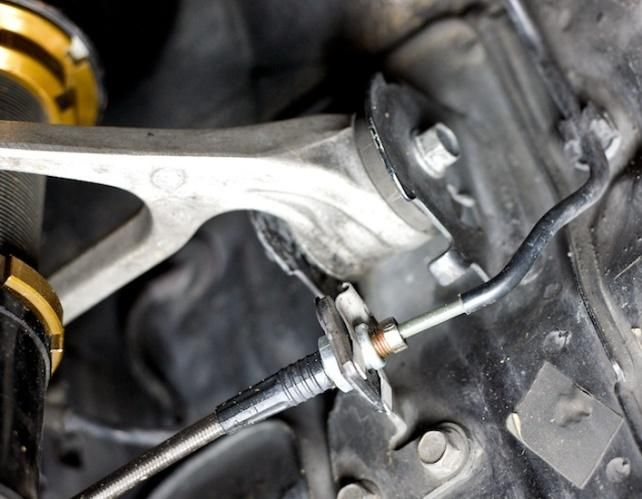
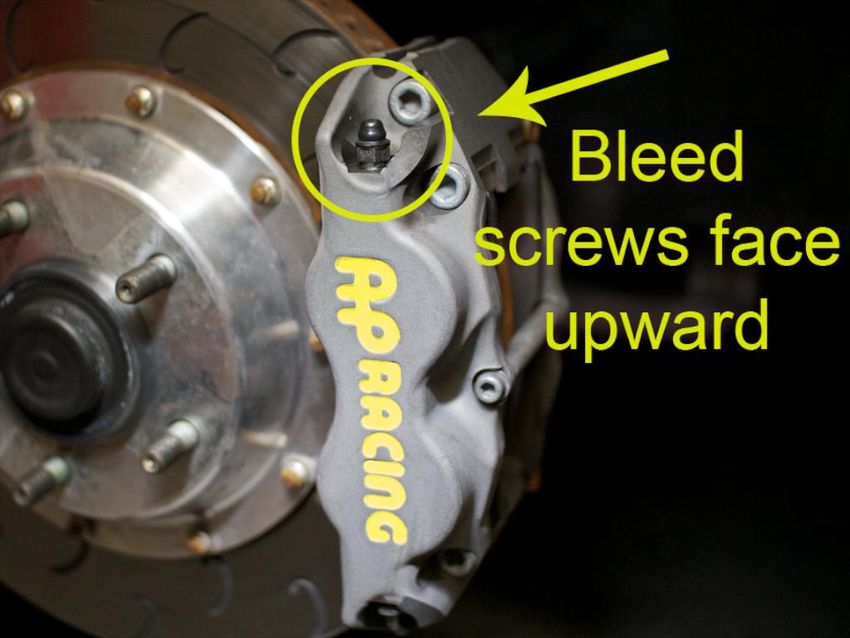
Step 8‐ Install AP Racing CP8350 Brake Caliper
      Verify that you are putting the proper caliper on the correct side of the car.

      The bleed screws on your caliper should be pointing up when installed on the car.

      Apply red Loctite™ 271 to the threads of the longer supplied socket head bolts (HD-SM1-060). Using an
      8mm hex key socket and the supplied washers, attach the caliper to the caliper bracket using these bolts.

      Torque to 23 lb‐ft.

      Using a 7mm socket and 5mm hex wrench, remove the pad retention bolt from the caliper.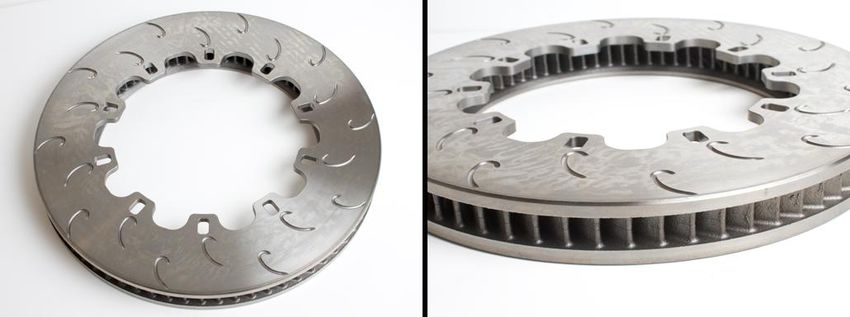
Step 9‐ Install brake pads (DO NOT SKIP THIS STEP)
      Slide your chosen pad compound into the calipers. They should fit snugly, but you should not have to
      hammer them in. If you do not install your pads during this step, you will potentially have a big mess on
      your hands when you attempt to bleed your brakes!

      Using a 7mm socket and 5mm hex wrench, reinstall the pad retention bolt removed in Step 8. You may
      need to tap the pad retention bolt slightly to get it seated properly in the caliper. There is very little force
      acting on this bolt, so there’s no need to crank it down. Just snug it up (pictures on previous page can be
      used as reference if needed).

Step 10‐ Install Stainless Steel Brake Lines
      Install the banjo bolt on the end of the brake line with a copper crush washer on both sides of the line
      banjo fitting. Hand‐thread the banjo bolt into the inlet port on the back of the caliper, making sure not to
      cross thread the bolt. While pointing the line toward the caliper bracket, torque the banjo bolt with a
      14mm socket to 14 ft.‐lbs.

          With the banjo bolt end of the line towards the caliper and the steering wheel straight ahead, hook the
          grommet on the center of the line into the bracket on the upright, and replace the spring clip you
          removed in step 3.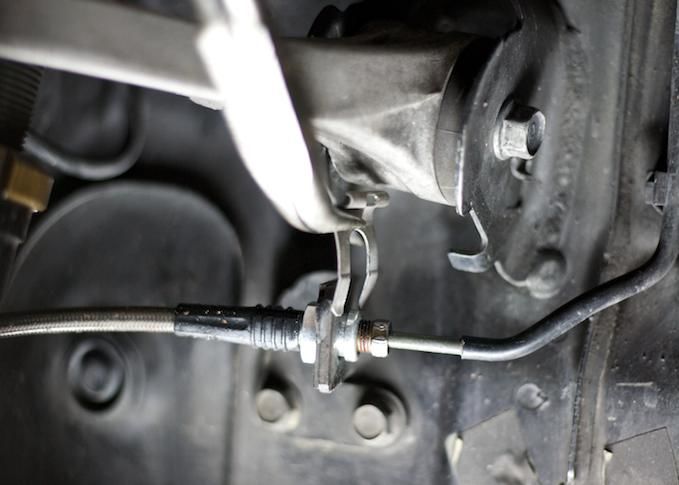
Step 10‐ Install Stainless Steel Brake Lines (cont.)
      Insert the stainless steel brake line into the hard line bracket on the car. Hand‐tighten the hard line fitting
      into the stainless steel soft line. Use the 10mm line wrench and 17mm open‐end wrench to tighten the
      connection. The threads on the hard line will not go all the way down into the stainless line, leaving some
      threads exposed. Do not over tighten. Just make sure the connection is snug.

      Turn the steering wheel lock‐to‐lock, and make sure the brake line is not touching anything, binding, or
      rubbing. If necessary, slightly loosen the banjo bolt at the caliper, and adjust the routing of the line until
      there is no interference.

      Replace the factory spring clip at the hard line (removed in Step #3). You may need to tap the clip slightly
      with a hammer to get it seated properly. Note: the nut on the end of the stainless line is not a hex shape.
      There is a rounded edge that corresponds with a recess in the bracket on the car. Make sure the line is
      seated completely before inserting the spring clip.

Step 11‐ Repeat steps 2 through 10 on the other side of the car.
      After both sides are installed it’s time to bleed your brakes.

Step 12‐ Bleed your brakes
      For use with our system, we recommend AP Racing PRF brake fluid or Endless RF650 brake fluid. Both are
      always in stock and available through us. We recommend purchasing three bottles (standard 500ml size) of
      your preferred fluid to complete the installation.

      The goal of bleeding the brakes is to remove all of the old fluid from the system, replacing it with your new
      fluid. With a single brake fluid reservoir, fluid in the front and the rear of the car will mix. You therefore
      need to bleed all four corners of the car. The caliper bleeding sequence is to start with the corner of the car
      furthest from the master cylinder (mc), and work your way closer to the mc: Passenger rear, driver rear,
      passenger front, driver front. For fixed calipers with two bleed screws (like the AP calipers included in your
      package), the proper bleeding sequence is the inboard bleed screw (closest to the engine), followed by the
      outboard bleed screw (closest to the wheel face). Use a 7/16” box end wrench on the caliper bleed screws,
      and an appropriate bleeder bottle.

      When loosening and tightening the bleed screws during this process, just snug them and do not
      over‐tighten. The final torque value on your last tightening of the bleed screw should be 150 lb‐in. An easy
      rule of thumb to remember when tightening bleed screws is that you should never apply more pressure
      than you could exert with one finger.

      Make sure brake pads are secured in both calipers.

      Open the top of your brake fluid reservoir, and make sure it is mostly full. At no point during the bleeding
      process should you allow the level of brake fluid to go below the minimum level marking.
Step 12‐ Bleed your brakes (con’t)
Have some rags and brake cleaner handy, and place a drip pan or cardboard below the caliper you are
bleeding.
Position your 7/16” box end over the inboard bleed screw on the passenger rear caliper, followed by the
hose from your bleeder bottle.
With a friend behind the wheel and working the brake pedal, loosen the bleed screw and have your friend
pump the brakes to the floor 5 or 6 times to flow some of the old brake fluid out of the system You should
see some air bubbles flowing through the bleeder hose. Have your friend hold the brake pedal to the floor,
and snug the bleed screw back up.
Check the fluid in your reservoir often, and refill to the max line if necessary throughout this process. Do
not allow the fluid to run low or you may introduce air into the system.
Tell your friend, “pressure.” S/he will apply pressure to the brake pedal. Loosen the bleed screw. The pedal
will slowly drop to the floor as fluid flows out of the bleed screw. When the pedal hits the floor your friend
should hold it there and say, “down.” Tighten the bleed screw. Your friend may now lift the pedal. You will
repeat this process until no more air bubbles (even small ones) are seen flowing through the clear drain line
attached to the caliper. On your friend’s final press, close the bleed screw when his foot is half way to the
floor.
Again, remember to check the fluid level in your reservoir, and refill to the max line if necessary throughout
this process.
Repeat this procedure on the outside bleed screw on the passenger rear.
Repeat the above procedure in the prescribed caliper order, continually checking the fluid level in your
reservoir. It will drain quickly, so keep a close eye on it.
When you are done bleeding, wipe up any brake fluid on the calipers, lines, etc. with brake clean and rags.
It will destroy the finish of any painted surface it touches.
Fill your fluid reservoir to the max line and tighten the cap.
Have your friend apply pressure to the brake pedal, while you examine the connections at all corners of the
car for leaks.
Step 13‐ Install wheels
Check wheel clearance before tightening. At times adhesive wheel weights inside the wheel barrel could
potentially come into contact with your calipers.
Torque your wheels to manufacturer’s recommendation.
Step 14‐ Safety check
Drive the car at low speeds in a safe location to ensure proper functioning of the brakes. If any unusual
behavior is witnessed immediately discontinue driving and assess the problem.Step 15‐ Bedding and Preparation
Properly preparing your new brake pads before heavy use is extremely important. Please visit
www.essexparts.com/learning‐center for additional detailed bedding information in both written and video
format.
The goal of bedding‐in your brake pads and discs is to mate them together properly and prepare them for heavy
use. When prepared properly, or bed‐in, your pads will transfer a thin layer of material to the disc face (transfer
layer). The pads in your caliper will then actually ride on that thin layer of pad material you've put down on the
rotor, rather than rubbing directly on the iron rotor face. A good transfer layer is going to give you superior brake
pedal feel, less noise, superior pad wear, and lower the chances of cracking your discs.
Important Notes‐ PLEASE READ!
First, make sure you have a safe location to perform a proper bed‐in. You need a stretch of road with long straights,
good visibility, and no potential obstructions. Make sure you are in a position to safely, legally, and repeatedly hit
the necessary speeds to perform the bed‐in procedure. A controlled racetrack is the best place to perform this
procedure. AP Racing and SakeBomb Garage in no way suggest or condone speeding or breaking the law in your
car, nor do we take responsibility for any damage or injury that occurs as a result of using our product or these
procedures. You are performing the bed‐in procedure at your own risk. For complete details, please read the
Disclaimer of Warranty located on the previous second page of this document.
Bed‐in Procedure
During these procedures, it's critical that you never come to a complete stop with your foot on the brake pedal.
If you have brake ducts on your car, you may want to block them off to allow your brake system to heat up easily.
The procedure outlined below is a generic procedure for most types of mild race pad. Please check your pad
manufacturer’s recommended bed‐in procedure.
1. Accelerate to approximately 60mph and then decelerate down to 5 mph. If your car has ABS, you should try
to hold the brakes at a point just before ABS intervention.
2. Once the car slows to 5mph, immediately accelerate back up to about 60mph, and brake again to roughly
5mph.
3. Repeat this series of stopping and accelerating 8 to 10 times. Again, do not come to a complete stop with
your foot on the brake pedal.
4. Cool the brake system down by cruising at 45mph+ for 5 to 10 minutes.
5. Visually inspect your discs. They should be a blue/grey color (instead of shiny silver), and have an even layer
of pad material across and around the entire rotor face.
6. If the pads don't have a layer of pad material on them, perform another series of stops in the manner
outlined above.
We at SakeBomb Garage would like to thank you again for choosing us and for your continued
support.
If need assistance don’t hesitate to contact us at sakebombgarage@gmail.comYou can also read