Moderator and Presenter Instructions for Zoom Meetings and Webinars - Provided for SASE by The Conference Exchange
←
→
Page content transcription
If your browser does not render page correctly, please read the page content below
Moderator and Presenter Instructions for
    Zoom Meetings and Webinars

Provided for SASE by The Conference Exchange
                                               1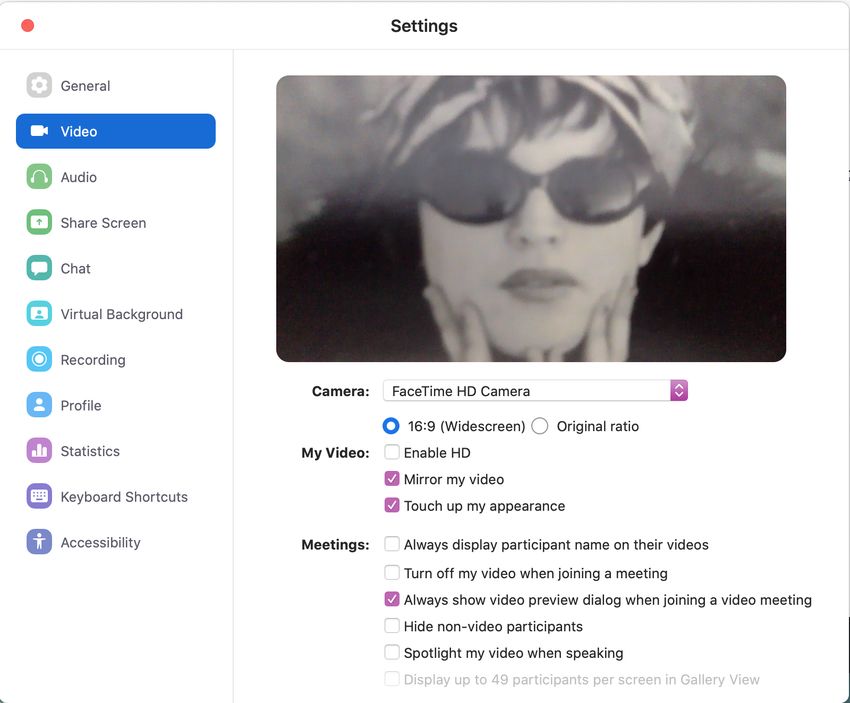
Table of Contents
• Zoom Meeting Controls available to Participants and Presenters: Slide 12
• Zoom Meeting Controls for Co-hosts/Moderators: Slides 13-16
• ZoomBombings: Slides 17-18
• Screen Sharing and Remote Control: Slides 19-21
• Embedded Videos and External Links in your presentation: Slides 22-25
• View Options: Slides 26-29
• Step-by-Step Instruction for Moderators in a Zoom Meeting: Slides 31-36
• Step-by-Step Instructions for Presenters in a Zoom Meeting: Slide 37
• Step-by-Step Instructions for Moderators and Presenters in a Webinar: 38-42
• Tips on a Successful Zoom Meeting: Slides 43-45
• Trouble Shooting Zoom and Zoom Resources: Slides 46-52
                                               2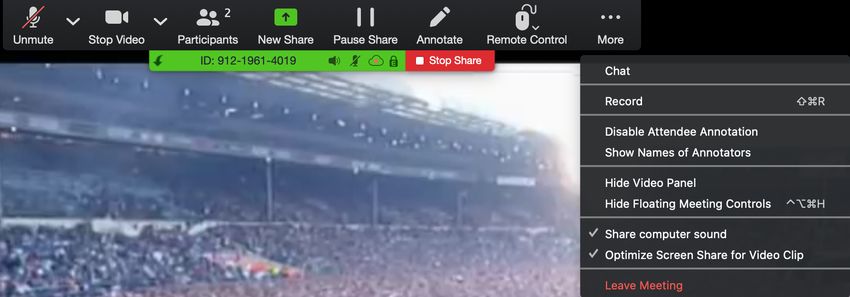
What You Need to Get Started
• A high-speed internet connection to your computer (a hard line is ideal).
• An external webcam or built-in camera on your computer.
• The built-in microphone on your computer will work or for better sound an external
  USB microphone or a headset can be used.

• You do not need to have a Zoom account to join a Zoom meeting or webinar but
  for the best user experience (moderators must do this to utilize co-hosting controls)
  we do recommend you at least download and install the Zoom desktop application
  prior to your meeting.

• Although Zoom can be downloaded on Android and iOS devices we strongly
  encourage you to use a laptop or desktop over a smartphone or tablet. This will
  give you a better viewing experience with more functionality.

                                           3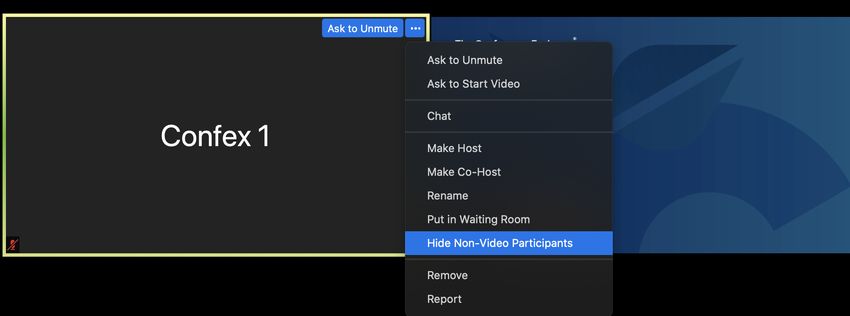
Downloading and Installing Zoom
• You can download Zoom by clicking here: https://zoom.us/download

 • In the Download Center click on the Download button under Zoom
   Client for Meetings. Then locate and run the Zoom installer (default
   location is the downloads folder).
                                        4
Zoom Desktop Application
• The Zoom Desktop icon will look like this:
and will be found in the Docking Station on your Mac or on the Desktop of your PC.

• Once you click on the icon the desktop application will prompt you with the following:

• You can join a meeting from here by entering the Meeting ID and password. If you
  create a free or a paid account with Zoom 5you can sign in here.
Joining The Meeting
• Find your session in the meeting
     app. Click on the link to join the
     live conference. Alternatively, you
     may have also been emailed a
     Zoom invite with a link and, or a
     Meeting ID and password. You can
     click on the link or enter the
     Meeting ID and password in the
     Desktop application or in the Zoom
     website in the top right corner
     where it says, Join a Meeting. You
     will then be prompted with the
     following window, click Allow.
•   A window will appear with the
    following choices. Choose Test
    Speaker and Microphone and follow
    the prompts to test your audio.
                                           6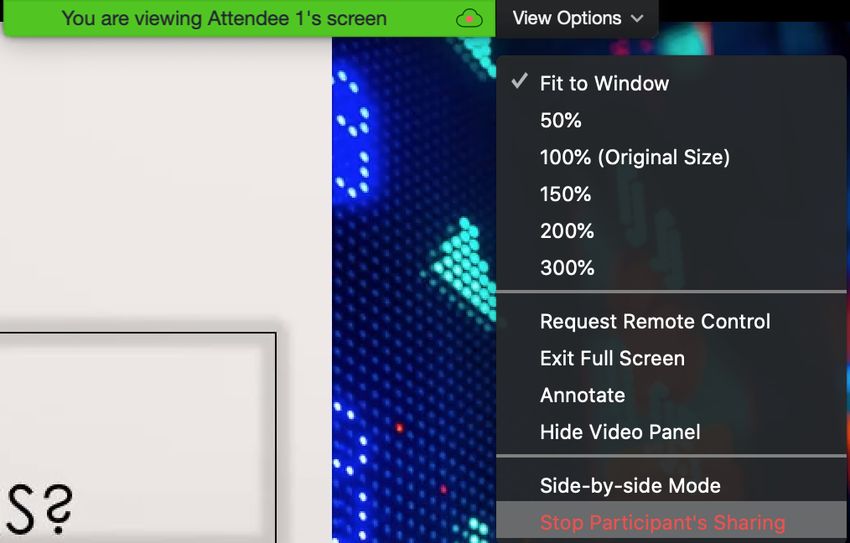
Arriving to the Meeting
If you arrive before the host you will see this message:

                                                           Please take this time to
                                                           test your audio. Click on
                                                           the “Test….” button and
                                                           follow the prompts to
                                                           ensure your speaker and
 If you arrive to the meeting and you see the message      microphone are working
 below then you are in the virtual waiting room and your   correctly.
 host will let you in shortly.

                                            7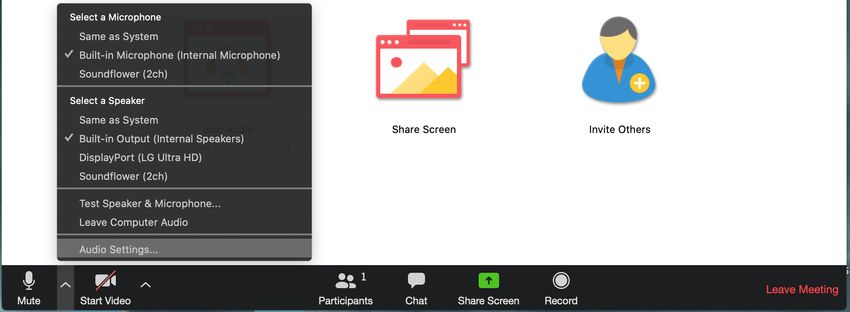
Join with Computer Audio or by Phone
Once you are admitted into the
meeting (automatically or by the
host) you will be presented with
this pop-up window to Join With
Computer Audio. Alternatively,
you can dial in with your phone by
choosing Phone Call (top left of
the pop-up window). If you are
experiencing audio issues with
your computer this is your work
around. Stay logged into the
meeting on your computer while
using your phone to speak and
listen.

                                     8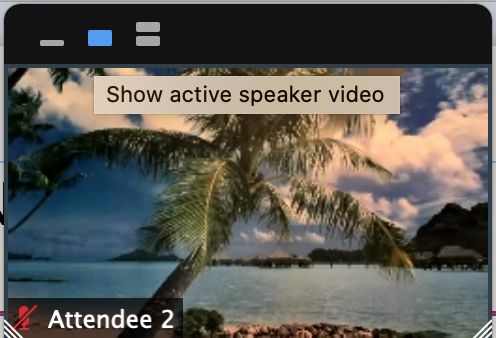
Zoom Meeting Interface
• Once you have chosen whether to join with or without computer audio your Zoom
  meeting screen will appear:

• This is what you will see if
  no one is currently
  sharing their screen (ie.,
  the session title slide) or
  their camera.

                                     9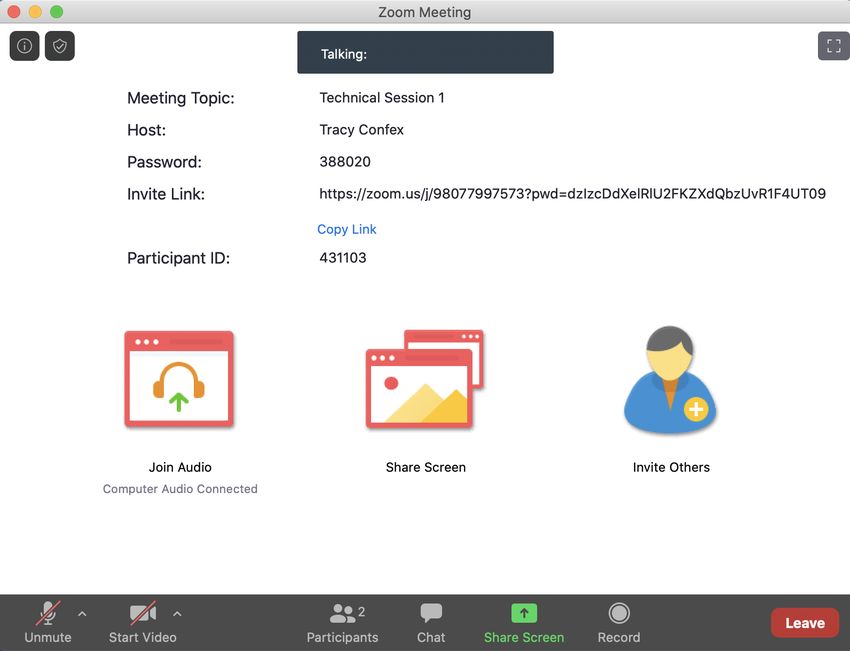
Testing Video
• Before turning on your camera (Start Video) you may want to preview your
appearance and check your video settings. Do this by clicking on the up
arrow located next to the symbol Start Video and choose Video Settings.
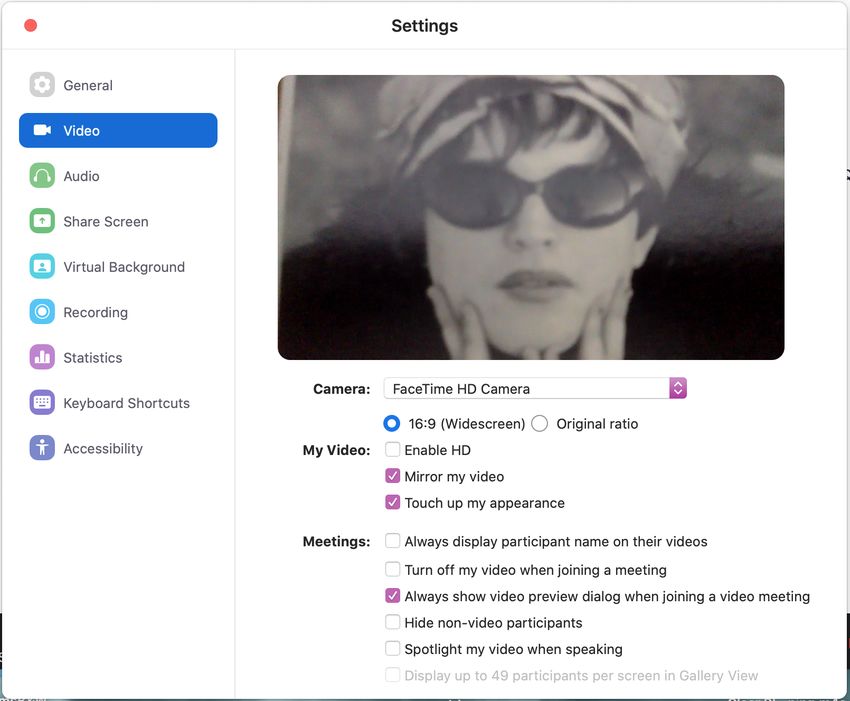
10Video Settings in the Desktop Application
• Here you have the opportunity to see exactly how you will look before you join
the meeting. You can also use the Touch up my appearance setting.
• If you have trouble finding an
aesthetically pleasing environment
for your meeting you can choose a
Virtual Background or insert a
background provided to you by
your organization.
11Zoom Controls Available to Participants & Presenters in the Meeting
• These are the controls available to you in a meeting. They will be located at the bottom of your
screen.
• Microphone: Mute and unmute your own microphone.
• Camera: Start and stop your video camera.
• Participants: Clicking here will show you all the names of each attendee in the meeting, along with
controls that allow participants to raise and lower a virtual hand.
• Chat: Here you have the ability to send a message to Everyone or send a Private message to an
individual.
• Share Screen: Clicking here will give you options for the application or desktop you want to share.
• Reactions is only available when your camera is turned on. You can choose from thumbs up or
clapping hands emojis which appears briefly in your camera window after you’ve made your
selection.
• Gallery View and Speaker View: Found in the top right corner of the screen once you’ve joined the
meeting and at least one camera is turned on. Speaker View will display only the window of the
person speaking. Gallery View will show all windows of all participants in a faces-in-windows format.
12Co-hosting controls for Moderators
•Security:
• Participants: clicking on this icon will open a window on
the right side of the screen listing all people in attendance.
• Mute All: Before a speaker begins their presentation you
may choose to click Mute All in the Participants panel to
avoid any disruption. Once you click on Mute All a pop-
up window appears. Here you can disallow or Allow
participants to unmute themselves and click Continue.
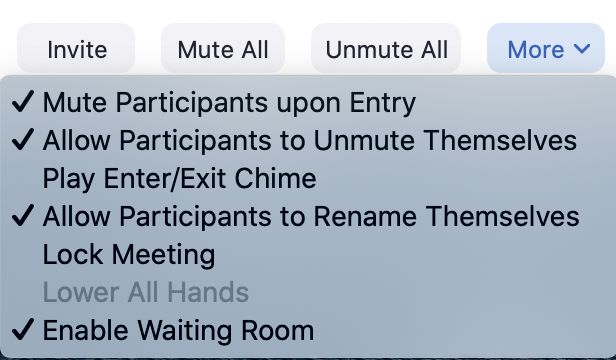
13Co-hosting Controls for Moderators cont.
• Participants More: At the bottom of the Participants window you will see a More
button. Click on the arrow to bring up the drop down menu which will give you
muting options and give the participants the ability to rename themselves.
• You will also see another More button when you hover
over an individual name. Clicking here will bring a
drop down menu to the right of each name to show
options pertinent to you like Chat with them privately
or Remove from the meeting.
14Co-hosting Controls for Moderators cont.
• Chat: Clicking on Chat will bring up a chat window on the right side of your
screen with a message window at the bottom. Clicking on the button in the
lower right corner with the 3 dots will bring up a pop-up window to choose
which person you want to chat with.
• An easy way to chat with someone privately is to simply click on that person’s
name in the participant’s list. This will immediately open a private chat with
them at the bottom of the screen.
*Always look at the “To:” to ensure you’re
chatting with right participant and how,
privately or publicly.
15Co-hosting Controls for Moderators, cont.
Controlling external noise and disruptions in your meeting
• If you’re finding a lot of background noise happening in your meeting you can
either remind all participants to keep their mic muted until they wish to speak
or manually Mute All. When you click Mute All, a pop-up window appears
giving you the following option:
• You can choose to keep all participants muted and unmute each participant
as each one virtually raises a hand to ask a question. Hover over their name
in Participants panel and a blue mute/unmute button appears.
• If you choose to read aloud the questions from the chat, be sure to unmute
yourself.
16Co-host Controls for ZoomBombing
How to Stop Screen Share Quickly and Removing a Participant
1. At the top of your screen you will see a green message bar telling you whose
screen is being shared. Click View Options next to this green bar. Click Stop
Participant’s Sharing at the bottom of the View Options drop down menu.
17Co-host Controls for ZoomBombing, cont.
Stopping Screen Share cont.
2. After you have noted who is inappropriately sharing
and you want to remove them you can go to Security
at the bottom of the screen and click Remove
Participant. You will then be prompted with a pop-up
window with all Participants’ names. Select Remove. If
you uncheck Screen Share in Security this will stop all
participants from sharing.
3. You can also select the More drop down menu to the right of their name in
Participants and click Remove. *Settings have been configured for your
meeting so that any removed participant will not be allowed to return to the
meeting.
18Share Screen
• Be sure your presentation is open and ready to be shared before you
begin screen share. Nothing else should be open on your desktop.
Click on Share Screen. This will bring up a window giving you several
options of screens/applications to share.
• Once you’ve made your choice click Share and then bring your
presentation to full screen.
• If you need to share more than one application, have all applications
open and use New Share for a seamless transition from one to the
next.
19Share Screen, cont.
• If you have audio/video in your presentation click Share computer sound at the bottom
left of your screen before you click Share. It is highly recommended that you practice
playing your video through a free or paid Zoom account prior to the meeting. Have
another person join you in the meeting (or you can join) on a different device and ask for
their feedback on their viewing experience.
• When you’re finished with your presentation and taking any questions click the red Stop
Share button in your meeting control bar. This will allow the next presenter to share their
screen as this meeting is configured to allow only one participant to share their screen at
a time.
20Requesting or Giving Remote Control of Your Screen
It is possible to share control of your screen with another participant. This is
useful when more than one speaker is presenting a co-authored presentation.
• When the first speaker is ready to give control to the second speaker click
Remote Control and choose which participant you are giving control. In the
example below, Presenter One is listed. Please be patient, there is a brief
delay before you can take control.
•To return control, click View Options at the top of
your screen and choose Stop Remote Control.
Alternatively, the first presenter can also retrieve
control by clicking Remote Control and then
choosing Abort Control.
21Share Screen with Embedded Videos in Presentation
• If the video plays choppy follow these steps:
• Just before you play your video click on More at the right side of your black meeting control bar and
make sure Share computer sound is checked. Select Optimize Screen Share for Video Clip.
22Share Screen with Embedded Videos cont.
•Go back to More and select Hide Floating Meeting Controls. This will prevent the viewer from seeing a
black box overlaid on your video (the meeting control bar). Play your video.
•When your video is finished playing press Esc to return your meeting control bar to the screen. Click
More and uncheck Optimize Screen Share for Video Clip. This is important for the viewing quality of the
remainder of your presentation.
23Using an External Link
• If you use an external link in your presentation it will not be seen by your
viewers.
• If you absolutely must use an external link instead of embedding the file in
your presentation one way to do this is to:
• Before sharing your screen, open your presentation and click on your link.
Leave the linked window open. Go back to the first slide of your presentation.
Select Share Screen, (check Share Computer Sound if it has audio) select
your presentation application and go full screen.
24Using an External Link, cont.
• When you get to the slide that has the link do not click on the link. Instead
click on New Share in your meeting control bar at the top of the screen. If it’s
hiding click Esc. Choose the window with your opened link and click Share.
When you’re finished click New Share and select the presentation application
window, bring to full screen and continue with your presentation.
25View Options
• When you are viewing someone else’s shared screen you can choose wether
or not you will see the presenter’s face (if they have their camera turned on).
Click View Options from the top of the screen. Choosing Side-by-side Mode
will bring your Video panels to the right side of the full sized shared screen.
• In Side-by-side mode you can then choose Gallery
View displaying a faces-in-windows format or Speaker
View showing only the speaker’s window. When you,
yourself are sharing your screen, Side-by-side mode
is unavailable.
26View Options for Presenters
• When you begin your Screen Share the video panel
may appear automatically (if participant’s cameras
are turned on). You can click on More and select
Hide Video Panel to avoid any distraction during your
presentation.
• When you are ready to take take questions you can
click Show Video Panel to see the participant’s and/
or the Moderator’s face during Q&A.
27More Viewing Options
• Choosing Show Video Panel during your own shared screen or while viewing
someone else’s gives you several options:
Clicking on the double bar will give you this panel view.
Clicking on the thin line will minimize the
video panel.
Clicking on the blue square in the middle will
show only the Active Speaker’s video (if their
camera is live).
28Viewing Options, cont.
• For participants who do not wish to have their camera turned on their
video box will simply show their name. To hide all video boxes that
do not have a camera turned on click the blue square with the 3 dots
in the top right corner of a participant’s video box and select Hide
Non-Video Participants.
29Communicating with Confex Staff
During a Confex Tech Supported Zoom Meeting
• If you need help troubleshooting Zoom or working out audio or video issues in
your meeting contact Confex Tech Support:
• Confex Staff Support will be in the meeting with you. Look for the name
that includes Confex in Participants and send them a private message
through Chat.
30Step-by-Step Instructions for Moderators in a Zoom Meeting
• Arrive to your meeting 15 min. before the start time. If your meeting is utilizing the
waiting room you will be in a virtual waiting room until your host lets you in. Test your
audio and video.
• If your meeting is being supported and hosted by Confex Tech Support they will arrive
shortly and let you into the meeting. They will then make you a Co-Host. Confex Tech
Support can assist you with any questions you may have before or during the meeting.
• Click Participants in your meeting tool bar at the bottom of the screen. Then click
Chat. You can now see all attendees and any communication occurring during the
meeting. Leave this viewable to you at all times.
31Step-by-Step Instructions for Moderators in a Zoom Meeting, cont.
• Begin rehearsal: ask the presenters to practice sharing their screen.
They can test their audio by simply reading the first slide of their
presentation. Encourage presenters to have their camera on during
their presentation, or at the very least, during the Q&A.
• When each presenter has finished practicing screen sharing have the
moderator/introducer and, or all of the presenters turn on their
camera(s) so the audience can be greeted with smiling faces when
attendees enter the meeting. You could alternatively choose to greet
your audience with a welcome or session title slide. There should
always be a camera turned on and, or a screen being shared at all
times.
32Step-by-Step Instructions for Moderators in a Zoom Meeting, cont.
•Mute All: Utilizing this function is personal preference. Some moderators feel comfortable just asking
their presenters and attendees to mute themselves and to only unmute when they are prompted to
speak. If you click Mute All you will be presented with a pop up window with a check box next to the
option Allow Participants to Unmute themselves.
•Housekeeping Notes: The moderators and presenters should always have their camera on when
speaking. When it’s time to start the meeting make an announcement to your audience that their
microphones will be muted throughout the presentation(s). Let them know that if they need assistance
or want to ask a question they can use the virtual Raise Hand function or just type in the chat.
• While moderator is making introductions stop screen share of the session title slide. Presenter will then
share their screen and intro slide. Continue introducing the presenter and let presentation begin.
• Monitor the Chat during the presentation. When it’s time to do Q&A you can either Unmute All to allow
participants to verbalize their questions or you can read aloud their questions from the chat leaving
everyone except the presenter and yourself muted.
• When the meeting has ended thank your presenters and attendees and then click Leave Meeting. The
Host (your Confex tech or a staff member) will end the meeting for all.
33Step-by-Step Instructions for Moderators in a Zoom Meeting, cont.
Waiting Room Functions
• A waiting room is helpful if you’d like
to have a private practice session with
your presenters before your meeting
begins. The waiting room can be
customized with your logo and
session description.
• Keep an eye on the Participant’s Panel
for your presenters entering the
meeting. Begin practice screen
sharing as soon as your first presenter
arrives.
34Step-by-Step Instructions for Moderators in a Zoom Meeting, cont.
Waiting Room Functions
• A few minutes before the meeting Admit your
attendees into the meeting from the waiting room by
clicking Admit All.
• Then disable your waiting room by clicking More at
the bottom of the Participants window and then
choose Enable Waiting Room to uncheck/disable it.
35Step-by-Step Instructions for Moderators in a Zoom Meeting, cont.
Playing Prerecorded Presentations
• Test all prerecorded presentations prior to the meeting: try sharing the prerecorded
presentation with and without checking Optimize Screen Share for Video Clip in the
Share Screen window to determine the best viewing experience. Always check Share
Computer Sound.
• The preferred (safest) option is to have any prerecorded talks downloaded on your
computer and easily accessible. OR…Before the meeting begins go to your session in
the meeting app. Click the link to open the prerecorded presentation and leave this
tab/window open so it’s ready to share.
• Click Share Screen. Check the Share Computer Sound box at the bottom left of the
screen (and Optimize Screen Share for Video Clip if this looked better). Click Share.
• Bring presentation to Full Screen and press Play.
36Step-by-step Instructions for Presenters in a Zoom Meeting
• Log into your meeting 25 min. before the start time. You may be put in a waiting room
upon arrival, your moderator will let you in shortly.
• Test your audio and video.
• Once in the meeting, rehearse with your moderator. Practice sharing your screen, make
sure the moderator can hear you speaking for at least 10 seconds.
• To begin the meeting the moderator will stop sharing their session title slide (if they have
one) and will give Housekeeping Notes and Introductions.
• When it’s time to present click Share Screen, choose your application window, click
Share and put your presentation in Slideshow Mode. Leave your last slide on the screen
until you are done taking questions. If your presentation has audio be sure to check the
box for Share Computer Sound.
• Leave your last slide on the screen until you are done taking questions.
37Webinar Instructions for Moderators & Presenters
For Confex Supported Meetings
• Join the webinar 30 minutes prior to the meeting start time. Do this by clicking on the link that you received
in the Zoom Invitation email. This will allow you to enter the practice session and the webinar as a Panelist.
• If your meeting is being supported by Confex Tech Support they will arrive shortly. They will then make the
moderator(s) and any specified staff members/presenters a Co-Host. Confex Tech Support can assist you
with any questions you may have before and during the webinar.
• Rehearse screen sharing and test your audio and video. Familiarize yourself with Q&A and Chat.
• Moderator: Share Screen with your welcome or session title slide. Confex staff will “Broadcast” the meeting
2 minutes prior to the start time. Allow some time for the attendees to stream into the meeting before you
begin speaking. Moderator will start the meeting at its scheduled time with welcoming remarks,
housekeeping notes and introductions. *Moderator should turn on their camera and microphone whenever
they are speaking and remember to turn them off when they are not speaking.
• Explain to the audience how Q&A will be handled and give brief instructions. Stop screen share of session
title slide to allow the first presenter to share their screen with the first slide of their presentation.
• Give introductions. Presenter should have their camera on during the presentation and the Q&A. Leave
your last slide on the screen until you are done taking questions.
38Webinar Meeting Controls Q&A Tools • Q&A will display a number next to the icon indicating how many questions are being asked. • Click on the Q&A icon and answer the question. • This can be done by clicking Answer live or Type answer. If you choose Answer live be sure to unmute your microphone first. • Be sure to Answer (live or typed) or Dismiss (unanswered) questions before the next presenter so you know when there are new questions in the Q&A. 39
Webinar Q&A Tools, cont.
• Panelists cannot ask questions of each other in the Q&A, they can
  however use the Chat to ask questions.

• A moderator with co-hosting controls can also unmute attendees
  individually, allowing them to verbally contribute to the Q&A.

• Click on Attendees in the Participants panel and then hover over the
  attendees name who wishes to speak and click Allow to talk.

                                       40
Webinar Q&A Settings
• Click on the Settings icon in the top
right corner of the Q&A window. This
will bring up a drop down menu and
allow you to choose which answers
you would like the audience to view.
• You can also allow Attendees to
upvote and comment.
41Moderator Instructions for Attendees on How to Use Q&A in a Webinar
• Before you begin the meeting you should give brief instructions to your
attendees on how to use the Q&A.
• Attendees: click on the Q&A icon in your meeting tool bar. A window appears
with a message box located in the bottom of the window. It will say, “Type
your question here…”
• Type your question and press enter or click Send. You can also check the
Send anonymously box at the bottom of the Q&A window (if you have made
this option available in the Q&A settings).
• The Moderator can either choose to share the answer publicly by pressing
enter or clicking Send, or click the box to Send Privately.
• If there is a public reply their answer will appear in the Q&A window.
42Tips on a Successful Zoom Meeting
• Choose an uncluttered location inside, quiet and free from interruptions.
• When possible, connect with a hard line ethernet cable to obtain the fastest and most
stable connection or ensure you have a strong and secure Wifi connection.
• Before joining the meeting close all unnecessary applications so all processing power can
be used to maximize the quality of your Zoom experience. In addition, turn off all sound
notifications (on your computer/ cell phone/ tablet, etc.) to avoid any audio or visual
disruptions.
• Pay attention to the lighting in the room. Too much light behind you will make you appear
a dark figure. To counteract back lighting make sure you have a good source of light in
front of you.
• Test your microphone and computer audio prior to the meeting. If you are using a headset
with a built-in microphone be sure to test this well in advance of the meeting. Be
conscious of any external noise close to your microphone such as your hair or rustling
papers.
43Tips on a Successful Zoom Meeting
• Use a professional virtual background with your organization’s logo.
• Know the phone-in information for the Zoom meeting you are attending. When you
enter the meeting you will be asked to Join by Computer Audio or by Phone Call.
Click Phone Call to see the dial-in information.
• If possible, practice presenting with a friend in a Zoom meeting through a free Zoom
account.
• If you are using an external monitor be sure you are very confident screen sharing
your presentation/application through this monitor before you present live.
• Look into your camera! Even if you need to look at your notes on a separate screen
or a piece of paper, just as if you were at the podium your audience is still out there
and looking for your eye contact and engagement.
44Tips on a Successful Zoom Meeting, cont.
• Think about your actions on camera. Remember that everyone can see and
hear you at all times when your microphone is unmuted and your camera is on.
• Explore Zoom Setup options in the Desktop Application, such as choosing a
Virtual Background or Touch up my appearance.
• Your meeting will have the best audio experience if all participants mute their
microphone until they are ready to speak.
• If you are a presenter have a glass of water nearby.
• Make sure no one in your location is using a lot of bandwidth.
45Troubleshooting Zoom
• Navigating: If you find yourself out of the Zoom Window and you’re unsure how to
get back, press Command Tab on a Mac or Alt Tab on a PC to show applications
that are running and press Tab until the Zoom icon is highlighted.
• Screen Sharing: If you have trouble sharing your screen check your Security &
Privacy Settings or Sharing Settings in your System Preferences on your computer.
• Audio Issues:
1. If you can’t hear the participants in a meeting make sure your computer speaker
volume is turned up. Ensure your speakers are selected for the active output in
Zoom. Do this by clicking on the up arrow next to the microphone icon in the
Zoom toolbar. Click on Audio Settings and then click on the Test Speaker button,
if you hear audio this is set up correctly. If you do not hear audio, use the drop
down menu to select a different output and Test Speaker again. Repeat this step
until you hear audio.
46Troubleshooting Zoom
Audio Issues Continued
2. If other participants can’t hear you make sure you have the correct internal/external
microphone set up in Zoom. Click on the up arrow next to the microphone symbol in the Zoom
meeting toolbar and click Audio Settings. Click the test mic button; you should see colored
bars in the volume meter and your test meter will be replayed through the speakers. If you do
not see the colored volume bars or hear the audio message recorded, use the drop down menu
and select another microphone and repeat the process.
47Audio Settings
48Joining a Meeting By Phone
If you continue to experience audio issues you can join a Zoom meeting by
calling in from your phone:
•Click the up arrow next to the microphone symbol in your meeting tool
control bar and choose Leave Computer Audio.
•Now click Join Audio. The following window appears.
•Choose Phone Call.
Here you will find the phone
numbers, Meeting ID,
Participant ID and password.
Dial the call-in number with the
area code closest to your
location and follow the
prompts.
49Troubleshooting Zoom
Video Issues
• Can the other participants see you? Make sure your camera is turned on (or
plugged in if using an external webcam) and selected in Zoom. In the Zoom
meeting click the up arrow next to the camera symbol and choose Video
Settings. Make sure your camera is selected in the Camera selection. If it is
not, use the drop down menu to select the correct camera. If the camera is
turned on, make sure nothing is blocking the camera view. If using an
external web camera, try connecting to a different USB port and repeat steps
to select the correct camera. If you continue to experience difficulties, try
restarting your computer/device.
50Video Settings
51Zoom Resources
• The following video gives you brief instructions on how to join a Zoom
meeting:
https://support.zoom.us/hc/en-us/articles/201362193-How-Do-I-Join-A-
Meeting-
• More information on the various functions within Zoom can be found here:
https://support.zoom.us/hc/en-us
52You can also read