Version 3.1 - March 2021 - Note: This manual has been computer translated. I apologize for any errors - A7Info
←
→
Page content transcription
If your browser does not render page correctly, please read the page content below
Version 3.1 – March 2021
                                User Manual

Note: This manual has been computer translated. I apologize for any errors.
A7Info 3.1 Benutzerhandbuch

  1. introduction ...................................................................................................................................................................... 3
     1.1. What is A7Info ..................................................................................................................................................................... 3
     1.2. Supported cameras .............................................................................................................................................................. 3
     1.3. A7Info is freeware................................................................................................................................................................ 3
     .1.4. System requirements .......................................................................................................................................................... 3
     1.5. Contakt................................................................................................................................................................................. 4
  2. Download And Installation ............................................................................................................................................... 5
     2.1. Installation ........................................................................................................................................................................... 5
     2.2. Deinstallation ....................................................................................................................................................................... 5
     2.3. Updates ................................................................................................................................................................................ 6
  3. Using the Programm ......................................................................................................................................................... 7
     3.1. Program start ....................................................................................................................................................................... 7
     3.2. Main Window ...................................................................................................................................................................... 7
       1 – MenU Bar and Toolbar ...................................................................................................................................................... 7
       2- Thumbnail ........................................................................................................................................................................... 7
       3 - SourceDirectory Window ................................................................................................................................................... 8
       4 -Statistics Window .............................................................................................................................................................. 8
       5 - DirectoryContents(Thumbnails)......................................................................................................................................... 8
       6 – Status BAR ......................................................................................................................................................................... 8
       7 – Main Data Window ........................................................................................................................................................... 8
       8 - Exif and MakerNotes Window ........................................................................................................................................... 9
     3.3. Tool Bar .............................................................................................................................................................................. 10
     3.4 Menu Bar ............................................................................................................................................................................ 10
       3.4.1 File-Menü ..................................................................................................................................................................... 11
           3.4.1.1 SavePreview .......................................................................................................................................................... 11
           3.4.1.2 Print... ................................................................................................................................................................... 11
           3.4.1.3 Delete.................................................................................................................................................................... 12
           3.4.1.4 Settings/Preferences............................................................................................................................................. 12
           3.4.1.5 Quit ....................................................................................................................................................................... 15
       3.4.2 View-Menü .................................................................................................................................................................. 16
           3.4.2.1- Focus Location ..................................................................................................................................................... 16
           3.4.2.2 PhaseAF Locations ................................................................................................................................................ 16
           3.4.2.3 TrackingAF Location .............................................................................................................................................. 16
           3.4.2.4 OnScreen Infos ...................................................................................................................................................... 16
           3.4.2.5 FullSizeRaw... ........................................................................................................................................................ 17
           3.4.2.6 Statistics... ............................................................................................................................................................. 17
       3.4.3 Windows-Menü ........................................................................................................................................................... 20
       3.4.4. Help-Menü .................................................................................................................................................................. 21
  4. Appendix .........................................................................................................................................................................22
     4.1. List OF Detected lenses ...................................................................................................................................................... 22
     4.2. Version historY ................................................................................................................................................................... 24

© 2021 Wolfram Söns
                                                                                                                                                                                           Seite 2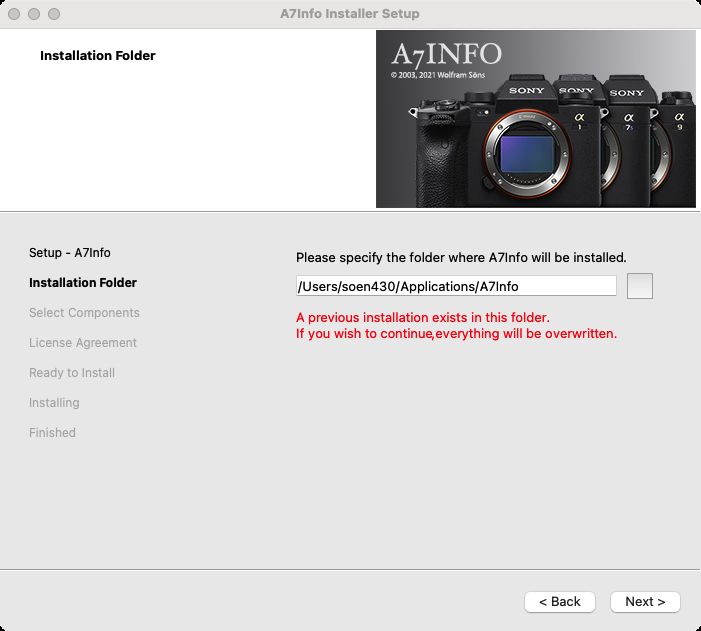
A7Info 3.1 Benutzerhandbuch

1. INTRODUCTION

1.1. WHAT IS A7INFO

A7Info is a program to display the metadata contained in the RAW and JPG files of Sony e-mount models.

The goal of the program is to provide the camera user with a quick and comprehensive look at the Exif and MakerNotes
information of the image files.

Program functions

•   Display of Exif and MakerNotes data, such as information on exposure data, AF settings,
•   Lens data (* see appendix), number of releases, etc.
•   Display of the autofocus positions in the image
•   Display of camera settings as overlay similar to CameraDisplay
•   Display of the embedded preview image (RAW) or the entire JPG
•   rudimentary display of the whole raw image using LibRaw© library or the full JPG image
•   RGB distribution of the preview
•   Statistical quick overview of aperture values, ISO settings, metering methods, exposure programs and focal lengths
•   Further statistics via separate dialog
•   Opening the files with external programs
•   Printout of the corresponding information
•   Tool for calculating the loss of resolution when cropping images (Crop Resolution)

The program is compatible with HiRes displays.

1.2. SUPPORTED CAMERAS

Version 3.1, 03/2021

• Full-frame models Sony A7II, A7III, A7SII, A7SIII, A7RII, A7RIII, A7RIV, A9, A9M2, A7C and A1
• APS-C models A6100, 6400 and 6600

Due to the different features of the cameras, differences in the program functions or displays may occur

1.3. A7INFO IS FREEWARE

You can use the software without having to pay any further fees. If you like the software and find it useful, please consider
supporting the further development with a small donation. You would contribute to the maintenance of the website and to
cover further costs such as software licenses. You can find a corresponding link on the download page of the program.

If you have any questions or suggestions about the program, please feel free to contact me using the contact information below
or the contact form on my website

.1.4. SYSTEM REQUIREMENTS

The program exists exclusively in 64Bit versions for Windows©, MacOS as well as Linux.The programs were developed and
tested under

     •    Windows 7, 10

© 2021 Wolfram Söns
                                                                                                                            Seite 3
A7Info 3.1 Benutzerhandbuch

     •    MacOS (10.6ff incl. 11.x BigSur)
     •    Linux (Ubuntu 16.04)

The functional scope of the versions is identical

1.5. CONTAKT

Author:

Wolfram Söns
Fürstenbergstraße 109
D-50226 Frechen

Up-to-date information about the program and the possibility to contact me are located on my Website https://www.soens.de
You can also send me questions and suggestions at any time via my eMail address: wolfram@soens.de

© 2021 Wolfram Söns
                                                                                                                    Seite 4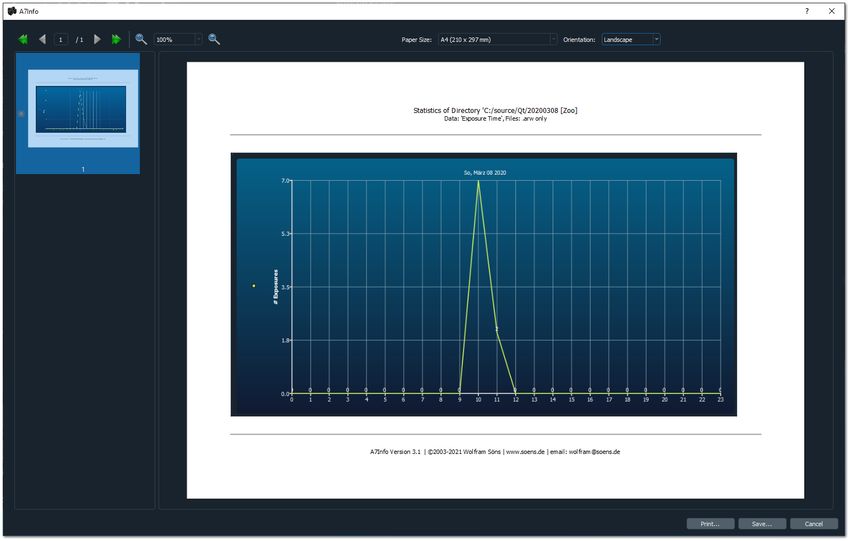
A7Info 3.1 Benutzerhandbuch

2. DOWNLOAD AND INSTALLATION

The current version of the program can be downloaded from https://www.soens.de/downloads.
The file names of the installation programs or downloads are as follows

- Windows:         A7InfoSetup.exe
- Mac OSX:         A7InfoSetup.dmg
- Linux:           A7InfoSetup

All files contain an installer that guides you through the setup of the program. The MacOS file (dmg) must first be opened by
double-clicking on it. The setup program is then located in the mounted volume.

The setup is identical for the different platforms. The Windows version additionally generates
an entry in the start menu.

2.1. INSTALLATION

The setup is done via a common installation program. Here exemplary in the Windows version.

The 'Next' button is used to perform the installation step by step.
After confirming the license agreement, the program can be installed in any directory
can be created. If the directory already exists, a warning message is displayed (see figure). The installation can be
then be continued or canceled if desired.

The Windows version requires the runtime library of Microsoft VisualC++, which can be installed subsequently.
must be set. This is done automatically via the setup program if required.

After completing the setup, the program can be started.

2.2. DEINSTALLATION

After the installation you will find the application MaintanenceTool in the installation directory, via
© 2021 Wolfram Söns
                                                                                                                            Seite 5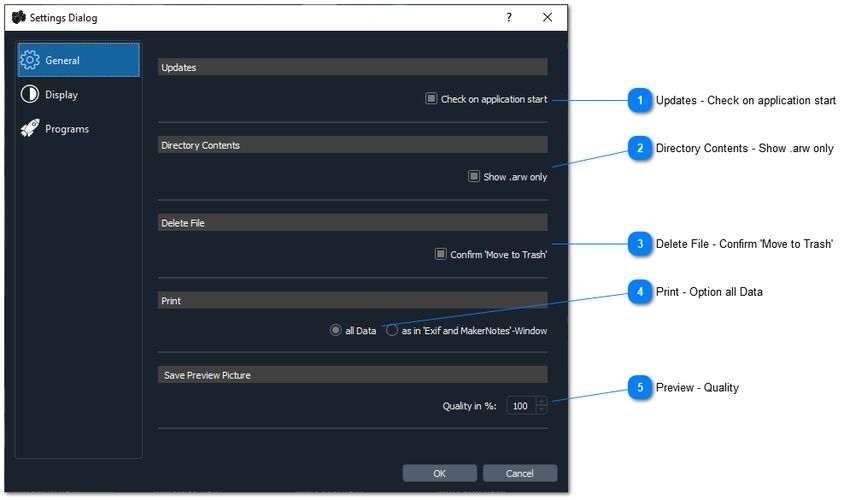
A7Info 3.1 Benutzerhandbuch

that a complete removal of the program can be performed. Furthermore, the uninstallation of the program under Windows can
be done in the usual way via the Control Panel.

Removing program settings:

The program stores information about its settings in the system during runtime. These are located
are located in different places depending on the operating system:

- Windows :        in the registry under \SOFTWARE\WWS\A7Info....
- MacOS:           under /Users/username/Library/Preferences/en.soens.A7Info.plist
- Linux:           under $HOME/.config/WWS/A7Info.conf

The files are not removed during uninstallation. If there are any problems with the
last saved settings, it may be necessary to delete these files manually.
The program is then reset to the default settings

2.3. UPDATES
The program checks for the presence of new versions on the website on request. (see also
Program settings). The new version must be downloaded manually and the setup must be executed again; an automatic update
does not take place.

© 2021 Wolfram Söns
                                                                                                                    Seite 6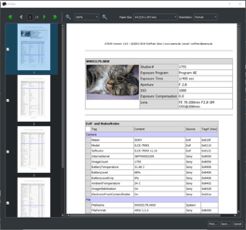
A7Info 3.1 Benutzerhandbuch
3. USING THE PROGRAMM
3.1. PROGRAM START
The program is started by double-clicking on the program icon in the Explorer or Finder.
The program can also be called from the command line. A directory can be specified as a start parameter. In this case, the
directory saved at the last end of the program is overwritten, which would otherwise be opened again at the beginning of the
program.
The call from the command line is exemplary in the form
Windows: A7Info.exe < mydirectory>
MacOS: ./A7Info.app/Contents/MacOS/A7Info < myfolder>
Linux: ./A7Info < mydirectory>
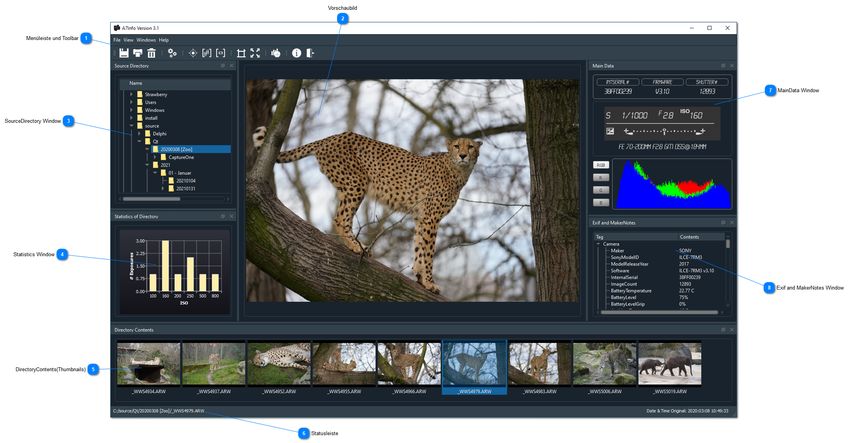
3.2. MAIN WINDOW
After starting the program, the main window of the application will be displayed as shown in the figure below.
The display areas outside the central preview image are located in dockable individual windows
and can be positioned inside or outside the main window.
The changes are saved beyond the end of the program and when the program is restarted
restored.
1 – MENU BAR AND TOOLBAR
The functions of the program can be reached via the menu bar or toolbar. They are congruent and can be used alternatively.
About the individual functions see point 3.3
2- THUMBNAIL
© 2021 Wolfram Söns
Seite 7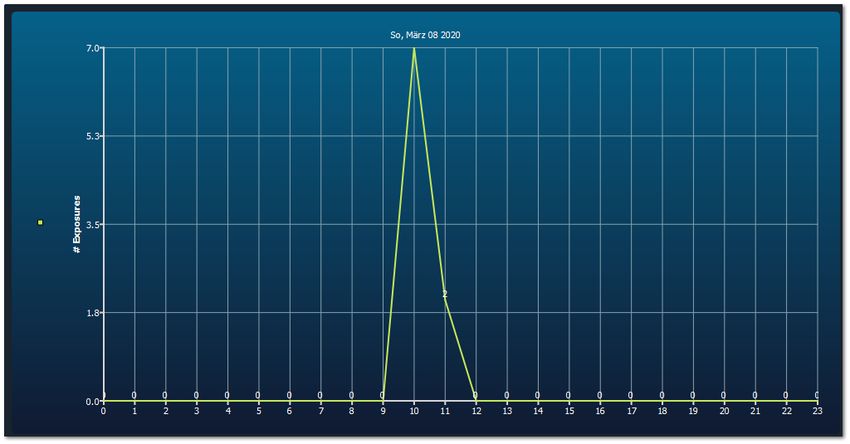
A7Info 3.1 Benutzerhandbuch

In the central area of the application, either the preview image contained in the raw file (monitor preview, maximum size
1616*1080) or the original JPG is displayed in reduced size. The display is scaled appropriately within the display area. Zooming
in or out of the preview image is not possible.

Since it is always the JPG created in the camera, all the settings selected at the time of capture apply. Thus, even in the case of a
RAW file, the image is displayed in the same way as a JPG that may have been created at the same time.

Display in full resolution:
While displaying the preview image, the image can also be displayed in full resolution:

-by       double-clicking on the preview image
-by       selecting the 'View/FullSizeRaw' menu item in the View menu.
-or       the selection of the corresponding icon in the toolbar

The image is opened in a separate window. By means of the scroll wheel of the mouse a display scaling in the range of 5-400%
can take place. The initial value of the scaling can be set in the program settings (File/Settings).

Note: The conversion of raw data is done by means of the free decoder 'LibRaw'. It is only rudimentarily implemented in the
current program version; the conversion is done with the default settings, adjustments of the image are not possible

3 - SOURCEDIRECTORY WINDOW
As soon as a directory with usable . raw files is selected within the drive and directory display, the contained images are
displayed as thumbnail in the lower thumbnail bar (5). The detail display jumps to the first usable image in the directory.

4 -STATISTICS WINDOW
At the same time, an overview of the aperture values used for the exposures is displayed in the statistical data window.
Accordingly, in the example directory, four exposures were made with aperture 5.6, three exposures with aperture 4.5, and so
on. A mouse click within the display switches to the distribution of the ISO values, the focal length distribution, the exposure
program and the measuring method.

With another click, the display starts again at the aperture distribution.
Depending on the amount of raw files contained in a directory, it is recommended for reasons of clarity to detach the statistics
window from the main window and then resize it as desired.
When changing the display type between 'Raw only' and all files (File/SettingsGeneral), the statistics are not updated. If
necessary, the directory must be selected again.

5 - DIRECTORYCONTENTS(THUMBNAILS)
The currently selected image is highlighted. Moving between images within a selected directory is done by mouse clicks or by
using the arrow keys. For this, the focus must be in the thumbnail overview.

6 – STATUS BAR
The file path and name of the currently selected image are displayed along with the date it was taken.

7 – MAIN DATA WINDOW
This window is used to display the essential shooting data: Information about the exposure data and the lens used:

Camera data:

      •   Internal serial number of the camera
      •   Firmware version

© 2021 Wolfram Söns
                                                                                                                                Seite 8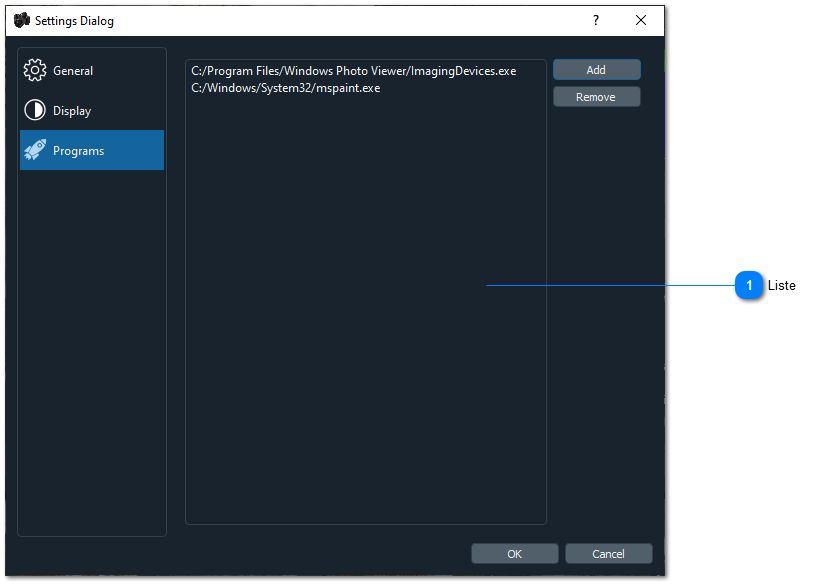
A7Info 3.1 Benutzerhandbuch

     •    - Actuations of the (mechanical) shutter

Exposure data:
    • Program mode
    • exposure time
    • Aperture
    • ISO value
    • -+/-     Correction

Lens data:
    • Name of the lens used
    • In case of a zoom additionally used focal length (e.g. @200mm)

The area below the shooting data informs about the distribution of the RGB parts in the preview image.
By default, the red, green and blue components are displayed overlapping..

By clicking the corresponding buttons (R/G/B) the display can also be done separately.

8 - EXIF AND MAKERNOTES WINDOW
This display area provides a comprehensive view of the metadata contained in the file. This is both the standard EXIF data and
the so-called MakerNotes, i.e. additional Sony-specific information.

The display is grouped thematically:
    • Camera - information about camera model and hardware
    • File - information about the file; for example, file format and recording date.
    • Picture - Image related settings like white balance, PictureProfile
    • Light&Exposure - information about exposure metering, time and corrections
    • Lens - lens data and corrections
    • Autofocus & Drive - AF and Focus Modes, Single and Continuous Image Settings
    • Miscellaneous

     •    GPS location coordinates , if GPS data was registered during recording (e.g. via PlayMemories app).

The individual subject areas can be opened or closed separately. The respective state remains when changing an image and also
beyond the end of the program. When printing the file summary, the output scope can be limited to the topic areas currently
open in the window.

© 2021 Wolfram Söns
                                                                                                                           Seite 9
A7Info 3.1 Benutzerhandbuch
3.3. TOOL BAR
Most of the program functions can be accessed from the menu as well as from the toolbar.
The icons in the toolbar correspond to entries in the menus as shown below.
The toolbar is movable like all other windows. It can be brought into a vertical display as well as
can also be completely detached from the main window.
Note: Various entries, especially those relating to the focus points, cannot be selected if the
corresponding function or the data required for it are not available in the image file. This can happen depending on the
Camera model / firmware version etc may be different.
1 - Save Preview = [File] SavePreview
2 – Print = [File] Print
3 – Delete = [File] Delete
4 – Settings = [File] Settings
5 - Focus Location = [View] Focus Location
6 - PhaseAF Locations = [View] PhaseAF Location
7 - TrackingAF Location = [View] TrackingAF Location
8 - OnScreen Infos = [View] OnScreen Infos
9 – FullSizeRaw = [View] FullSize Raw
10 – Statistics = [View] Statistics
11 - About A7Info = [File] About A7Info
12 – Quit = [File] Quit
3.4 MENU BAR
© 2021 Wolfram Söns
Seite 10A7Info 3.1 Benutzerhandbuch
Note: The menus of the Windows version are shown. However, the menus differ in details for the various operating systems. For
example, the menu item 'Settings' can be found as 'Preferences' in the Mac version. The menu items 'About' and 'Quit' are
located at other positions in the menus, as is usual for Macs.
3.4.1 FILE-MENÜ
3.4.1.1 SAVEPREVIEW
The currently selected image can be saved via the menu item SavePreviewPictureAs... as a JPG. file in the
Size 1616 × 1080 can be saved:
The quality can be preset in the range of 10-100% via the [File]Settings menu item.
By default, saving is done at the highest level (100%).
3.4.1.2 PRINT...
Data on the currently displayed image can be printed out in the form of a profile. This includes
a thumbnail of the image, the essential camera and exposure information as in the 'Maindata'.
window as well as the Exif Maker Notes.
© 2021 Wolfram Söns
Seite 11A7Info 3.1 Benutzerhandbuch
The scope of the printed Exif and MakerNotes information can be limited via [File] Settings .
3.4.1.3 DELETE
One or more currently selected exposures can be deleted via this menu item.
Whether an additional confirmation for the deletion should take place can be set via Settings.
3.4.1.4 SETTINGS/PREFERENCES
Various basic settings for the program can be made via the Settings dialog. These
Settings are saved when the program is terminated and are available when the program is restarted.
© 2021 Wolfram Söns
Seite 12A7Info 3.1 Benutzerhandbuch
3.4.1.4.1 'GENERAL'
1 - Updates - Check on application start
Check at program start whether a new program version is available. For this purpose a
Online connection exist.
2 - Directory Contents - Show .arw only
Thumbnail display can be limited to . arw files. Other file types will be
hidden. If all file types are to be displayed, the display of the Exif data and
the program displays next to the raw files exclusively for jpg files created in by the camera.
were ('OOC jpg's))
3 - Delete File - Confirm 'Move to Trash'
The deletion of files must be confirmed additionally
4 - Print - Option all Data
When printing, you can choose to print all Exif and MakerNotes or only those that are
be in the corresponding 'Exif and MakerNotes' window in the expanded state.
5 - Preview - Quality
For saving the preview picture ([File] SavePreviewPicture) its JPG quality can be set in the
Range 10-100% can be preset here.
© 2021 Wolfram Söns
Seite 13A7Info 3.1 Benutzerhandbuch
3.4.1.4.2 'DISPLAY'
1 - AF-Symbols - Color & Transparencies
For the various focus displays (see menu items under [View]), both color and
Transparency can be set. After clicking on the symbol graphic, the setting is made via a
corresponding (operating system specific) dialog
2 - Raw Picture InitialScale
It determines in which display size a raw image is initially displayed. After installation
of the program, this value is 10%. Depending on the resolution of the camera or the raw files, the
value should be adjusted. For the A7RIII, for example, a value of 25-30% is recommended.
3 - OnScreenInfos Transparency
The transparency of the info that can be displayed ([View] OnScreenInfos) can be set here
© 2021 Wolfram Söns
Seite 14A7Info 3.1 Benutzerhandbuch
3.4.1.4.3 'PROGRAMS'
1 - Liste
The currently displayed file can be opened for further editing with external programs.
The definition in the Settings dialog is used for this purpose. After selecting the 'Add" button an external
program via a file dialog. Under Windows the selection option is limited to
to the executable file types. The target program must be able to use the filename as the
Parameters to be evaluated when calling the program.
Entries in the list can be removed accordingly via 'Remove'.
3.4.1.5 QUIT
Leave the program
© 2021 Wolfram Söns
Seite 15A7Info 3.1 Benutzerhandbuch
3.4.2 VIEW-MENÜ
3.4.2.1- FOCUS LOCATION
The focus point set by the camera at the moment of capture can be changed using the menu item "Show
FocusLocation" or the corresponding icon in the toolbar. In the preview image the
Focus point displayed as crosshairs:
The opacity/transparency and the color of the focus point can be set via the Settings dialog.
The selection of the menu items Phase AF and FocusLocation remain as well as other display options via
the change of an image and active beyond the end of the program.
3.4.2.2 PHASEAF LOCATIONS
If the phase AF was active during the exposure, the used AF fields can be selected via this menu item.
are displayed. The color and opacity of the displayed fields can also be set via the Settings menu item.
3.4.2.3 TRACKINGAF LOCATION
If tracking is switched on, the phase AF fields are only displayed during the first exposure.
In the following images, the tracking symbol or the EyeAF symbol is displayed instead around the
point in the image.
Their color and opacity of the displayed fields can also be preset via the Settings menu item.
3.4.2.4 ONSCREEN INFOS
Similar to the camera display or viewfinder, some relevant shooting information can be displayed as overlay
© 2021 Wolfram Söns
Seite 16A7Info 3.1 Benutzerhandbuch
are displayed above the preview image. As with the focus display, the setting of the
Display transparency via the [File] Settings menu item.
Note: The display is not yet fully implemented.
3.4.2.5 FULLSIZERAW...
This menu item can be used to display the embedded raw image in the case of an . arw file. (-> Main window/preview)
3.4.2.6 STATISTICS...
Further evaluations can be created or called up via the statistics dialog.
1 - Chart Window
The main display area of the dialog shows the graphical evaluation of the current data.
2 - Current Directory
The basis of the data is initially the data of the active directory when the dialog is called. The directory
is displayed as the window title (3).
The base directory can be changed via ChangeDirectory.
The data is read in again.
3 - current directory
Under Current Directory the number of evaluated files in the current directory (1) is displayed.
The start directory for the evaluation can be changed using ChangeDirectory.
4 - Files
If subdirectories and/or jpg files are to be included in the evaluation,
the corresponding selections are to be made here. A new import of the data takes place at this point
not automatically, but must be confirmed with 'Refresh Data'.
5 - Chart Settings
Evaluations can be made using a wide variety of criteria in the exif data as well as via a timeline.
• ExifData: If a statistic is to be made via Exif data, the selection of the field to be analyzed is made by mouse click in the
window "10 - ExifData -FieldSelection". For the display of the ExifData, the display styles mentioned under '6 -
© 2021 Wolfram Söns
Seite 17A7Info 3.1 Benutzerhandbuch
ChartStyle Type' are available. For the chart types PieChart and Donut, a legend can also be displayed and/or positioned
via the item '6 - ChartStyle Legend'.
• Timeline: The timeline is only displayed as a line chart. The display depends on the time span of the data, i.e. on the
date and time of the first or last recording.
o Recordings within one day: Timeline 24Std
o Recordings within one month: Timeline month (28-31 days)
o Recordings within one year: Timeline year (12 months)
o Recordings over more than one year: Timeline over years
Example: Timeline of one day
6 - Chart Style
Types:
• BarChart vertikal (Default)
• BarChart horizontal
• PieChart
• Donut
Themes:(Farben):
• Light
• Blue Cerulian
• Dark (Default)
• Brown Sand
• Blue NCS
• High Contrast
• BlueICY
• Qt
Legend: (PieChart und Donut):
• No Legend
• Legend Top
• Legend Bottom
• Legend Left
• LegendRight
7 - Print Chart
The chart can be printed with the current settings.
© 2021 Wolfram Söns
Seite 18A7Info 3.1 Benutzerhandbuch
Example: Print Chart Dialog
8 - Copy to Clipboard
... or transferred to the clipboard and thus made available to other programs
be
9 - ExifData - FieldSelection
Listing of all criteria that can be selected for a chart evaluation
© 2021 Wolfram Söns
Seite 19A7Info 3.1 Benutzerhandbuch
3.4.3 WINDOWS-MENÜ
All windows except the preview image can be shown or hidden.
The state of visibility is saved beyond the end of the program.
1 - Show Source Directory
On/off switch for the SourceDirectory Window
2 - Show Statistics of Directory
On/Off switch for the Statistics Window
3 - Show MainData
On/off switch for the MainData Window
4 - Show Exif and MakerNotes
On/Off switch for the Exif and MakerNotes Window
5 - Show Directory Contents
On/Off switch for the DirectoryContents (Thumbnail) Window
© 2021 Wolfram Söns
Seite 20A7Info 3.1 Benutzerhandbuch
3.4.4. HELP-MENÜ
1 - Crop Resolution Calculator...
The Crop Resolution Tool is used to calculate the loss of resolution in an image crop.
Example: From an image of the A7R IV (61MP), which was taken with 50mm focal length, a
A section is selected that corresponds to that of an 85mm lens. The resolution is reduced in this case to
rd. 21.1 MP.
2 - About A7Info
A little information about program & author
© 2021 Wolfram Söns
Seite 21Sony FE 16-35mm F4 ZA OSS36
4. APPENDIX Sony FE 50mm F2.8 Macro
Sony FE 28-70mm F3.5-5.6 OSS
Sony FE 35mm F1.4 ZA
4.1. LIST OF DETECTED LENSES Sony FE 24-240mm F3.5-6.3 OSS
As of version 3.1, 03/2021, the following lenses are Sony FE 28mm F2
recognized by the program: Sony FE PZ 28-135mm F4 G OSS
Sony FE 100mm F2.8 STF GM OSS
Sony E PZ 18-110mm F4 G OSS
Sigma 19mm F2.8 [EX] DN Sony FE 24-70mm F2.8 GM
Sigma 30mm F2.8 [EX] DN Sony FE 50mm F1.4 ZA
Sigma 60mm F2.8 DN Sony FE 85mm F1.4 GM
Sony E 18-200mm F3.5-6.3 OSS LE Samyang AF 85mm F1.4
Tamron 18-200mm F3.5-6.3 Di III VC Sony FE 50mm F1.8
Tokina FiRIN 20mm F2 FE AF Sony FE 21mm F2.8 (SEL28F20 + SEL075UWC)
Tokina FiRIN 20mm F2 FE MF Sony FE 16mm F3.5 Fisheye (SEL28F20 + SEL057FEC)
Zeiss Touit 12mm F2.8 Sony FE 70-300mm F4.5-5.6 G OSS
Zeiss Touit 32mm F1.8 Sony FE 100-400mm F4.5-5.6 GM OSS
Zeiss Touit 50mm F2.8 Macro Sony FE 70-200mm F2.8 GM OSS
Zeiss Loxia 50mm F2 Sony FE 16-35mm F2.8 GM
Zeiss Loxia 35mm F2 Sony FE 400mm F2.8 GM OSS
Sony LA-EA1 or Sigma MC-11 Adapter Sony E 18-135mm F3.5-5.6 OSS
Sony LA-EA2 Adapter Sony FE 135mm F1.8 GM
Sony LA-EA3 Adapter Sony FE 200-600mm F5.6-6.3 G OSS
Sony LA-EA4 Adapter Sony FE 600mm F4 GM OSS
Sony LA-EA5 Adapter Sony E 16-55mm F2.8 G
Metabones Canon EF Smart Adapter Sony E 70-350mm F4.5-6.3 G OSS
Metabones Canon EF Smart Adapter Mark III or other Sony FE 35mm F1.8
Adapter Sony FE 20mm F1.8 G
Metabones Canon EF Speed Booster Ultra Sony FE 12-24mm F2.8 GM
Metabones Canon EF Smart Adapter Mark IV Sony FE 28-60mm F4-5.6
Metabones Canon EF Speed Booster Sony FE 35mm F1.4 GM
Sony E 16mm F2.8 Sony FE 70-200mm F2.8 GM OSS + 1.4X Teleconverter
Sony E 18-55mm F3.5-5.6 OSS Sony FE 70-200mm F2.8 GM OSS + 2X Teleconverter
Sony E 55-210mm F4.5-6.3 OSS Sony FE 100mm F2.8 STF GM OSS (macro mode)
Sony E 18-200mm F3.5-6.3 OSS Sony FE 100-400mm F4.5-5.6 GM OSS + 1.4X Teleconverter
Sony E 30mm F3.5 Macro Sony FE 100-400mm F4.5-5.6 GM OSS + 2X Teleconverter
Sony E 24mm F1.8 ZA Sony FE 400mm F2.8 GM OSS + 1.4X Teleconverter
Samyang AF 50mm F1.4 Sony FE 400mm F2.8 GM OSS + 2X Teleconverter
Sony E 50mm F1.8 OSS Sony FE 200-600mm F5.6-6.3 G OSS + 1.4X Teleconverter
Samyang AF 14mm F2.8 Sony FE 200-600mm F5.6-6.3 G OSS + 2X Teleconverter
Sony E 16-70mm F4 ZA OSS Sony FE 600mm F4 GM OSS + 1.4X Teleconverter
Sony E 10-18mm F4 OSS Sony FE 600mm F4 GM OSS + 2X Teleconverter
Sony E PZ 16-50mm F3.5-5.6 OSS Zeiss Touit 12mm F2.8
Sony FE 35mm F2.8 ZA Zeiss Touit 32mm F1.8
Samyang AF 24mm F2.8 Zeiss Touit 50mm F2.8 Macro
Samyang AF 35mm F2.8 Zeiss Batis 25mm F2
Sony FE 24-70mm F4 ZA OSS Zeiss Batis 85mm F1.8
Sony FE 85mm F1.8 Zeiss Batis 18mm F2.8
Viltrox PFU RBMH 85mm F1.8 Zeiss Batis 135mm F2.8
Sony E 18-200mm F3.5-6.3 OSS LE Zeiss Batis 40mm F2 CF
Sony E 20mm F2.8 Zeiss Loxia 50mm F2
Sony E 35mm F1.8 OSS Zeiss Loxia 35mm F2
Sony E PZ 18-105mm F4 G OSS Zeiss Loxia 21mm F2.8
Sony FE 12-24mm F4 G Zeiss Loxia 85mm F2.4
Sony FE 90mm F2.8 Macro G OSS Zeiss Loxia 25mm F2.4
Sony E 18-50mm F4-5.6 Tamron 28-75mm F2.8 Di III RXD
Sony FE 24mm F1.4 GM Tamron 17-28mm F2.8 Di III RXD37
Sony FE 24-105mm F4 G OSS Tamron 35mm F2.8 Di III OSD M1:2
Sony E PZ 18-200mm F3.5-6.3 OSS Tamron 24mm F2.8 Di III OSD M1:2
Sony FE 55mm F1.8 ZA Tamron 20mm F2.8 Di III OSD M1:2
Sony FE 70-200mm F4 G OSS Tamron 70-180mm F2.8 Di III VXDA7Info 3.1 Benutzerhandbuch
Tamron 28-200mm F2.8-5.6 Di III RXD
Tamron 70-300mm F4.5-6.3 Di III RXD
Tamron 17-70mm F2.8 Di III-A VC RXD
Tokina atx-m 85mm F1.8 FE
Tokina FiRIN 20mm F2 FE AF
Tokina FiRIN 100mm F2.8 FE MACRO
Sigma 30mm F1.4 DC DN | C
Sigma 50mm F1.4 DG HSM | A
Sigma 18-300mm F3.5-6.3 DC MACRO OS HSM | C + MC-11
Sigma 18-35mm F1.8 DC HSM | A + MC-11
Sigma 24-35mm F2 DG HSM | A + MC-11
Sigma 24mm F1.4 DG HSM | A + MC-11
Sigma 150-600mm F5-6.3 DG OS HSM | C + MC-11
Sigma 20mm F1.4 DG HSM | A + MC-11
Sigma 35mm F1.4 DG HSM | A
Sigma 150-600mm F5-6.3 DG OS HSM | S + MC-11
Sigma 120-300mm F2.8 DG OS HSM | S + MC-11
Sigma 24-105mm F4 DG OS HSM | A + MC-11
Sigma 17-70mm F2.8-4 DC MACRO OS HSM | C + MC-11
Sigma 50-100mm F1.8 DC HSM | A + MC-11
Sigma 85mm F1.4 DG HSM | A
Sigma 100-400mm F5-6.3 DG OS HSM | C + MC-11
Sigma 16mm F1.4 DC DN | C
Sigma 105mm F1.4 DG HSM | A
Sigma 56mm F1.4 DC DN | C
Sigma 70-200mm F2.8 DG OS HSM | S + MC-11
Sigma 70mm F2.8 DG MACRO | A
Sigma 45mm F2.8 DG DN | C
Sigma 35mm F1.2 DG DN | A
Sigma 14-24mm F2.8 DG DN | A
Sigma 24-70mm F2.8 DG DN | A
Sigma 100-400mm F5-6.3 DG DN OS | C
Sigma 85mm F1.4 DG DN | A
Sigma 105mm F2.8 DG DN MACRO | A
Sigma 65mm F2 DG DN | C
Sigma 35mm F2 DG DN | C
Voigtlander SUPER WIDE-HELIAR 15mm F4.5 III
Voigtlander HELIAR-HYPER WIDE 10mm F5.6
Voigtlander ULTRA WIDE-HELIAR 12mm F5.6 III
Voigtlander MACRO APO-LANTHAR 65mm F2 Aspherical
Voigtlander NOKTON 40mm F1.2 Aspherical
Voigtlander NOKTON classic 35mm F1.4
Voigtlander MACRO APO-LANTHAR 110mm F2.5
Voigtlander COLOR-SKOPAR 21mm F3.5 Aspherical
Voigtlander NOKTON 50mm F1.2 Aspherical
Voigtlander NOKTON 21mm F1.4 Aspherical
Voigtlander APO-LANTHAR 50mm F2 Aspherical
Voigtlander NOKTON 35mm F1.2 Aspherical SE
Samyang AF 50mm F1.4
Samyang AF 14mm F2.8
Samyang AF 35mm F2.8
Samyang AF 35mm F1.4
Samyang AF 45mm F1.838
Samyang AF 18mm F2.8
Samyang AF 35mm F1.8
Samyang AF 75mm F1.839
© 2021 Wolfram Söns
Seite 23A7Info 3.1 Benutzerhandbuch
2.1.0 (09/11/2020)
+ Move to Trash
+ new Lens data
4.2. VERSION HISTORY
+ RGB Values
Main changes + new Statistics
Legend: * bug fixes40
+ new feature
* improvement/modification or bugfix 2.0.0 (02/23/0000)
+ support .jpg Files
3.1 (03/05/2021)
+ Linux Support 1.9.0 (12/07/2019)
+ New Setup program + support A9M2
+ DirectoryContentsWindow movable * extended print function
* Bugfixes * extended program settings
* bug fixes
3.0 (02/13/2021)
+ A1 support 1.8.0 (10/17/2019)
+ A6100, A6400, A6600 support + print function
+ print Chart * AF Tracking A9 Firmware V6.00
* bugfixes * AnimalEye AF
* BitsPerSample bug fix
2.6.0 (01/26/2021)
+ horizontal BarChart 1.7.0 (08/30/2019)
+ Donut Chart + support A7RIV
+ new Lens Data + new ExifTags
2.5.0 (01/12/2021) 1.6.7 (07/19/2019)
+ timeline in Statistics + Windows 64Bit
* bugfix A7SM3 + Updatecheck
2.4.0 (12/03/2020) 1.6.2 (12/04/2018)
+ new Statistics Dialog + Linux Version
* program start with paramter
* corrected Directory order 1.6.0 (11/14/2018)
+ support A9
2.3.0 (11/10/2020) * phaseAF Display
+ first support for A7C * bug fixes
+ Split PhaseAF/Tracking AF
+ new Lens Data 0.9.5 (03/14/2018)
+ new Settings + support A7III
* modifications Crop Calculator
* modifications MenuLayout 0.9.0 (02/18/2017)
+ support A7RIII
2.2.0 (11/01/2020) + DarkStyle
+ first support for A7SIII * changes CropTool
+ new Lens Data
0.8.0 (12/26/2016)
2.1.1 (09/22/2020) + support A7II, A7SII
* bug fixes jpg's 0.6.0 (03/14/2016)
+ first released version
© 2021 Wolfram Söns
Seite 24You can also read