HCC Kickstart Introduction to HCC University of Nebraska Holland Computing Center
←
→
Page content transcription
If your browser does not render page correctly, please read the page content below

HCC Kickstart
   Introduction to HCC
 University of Nebraska
Holland Computing Center
            October 15-16, 2018

Carrie Brown, David Swanson, Emelie Fuchs,
 Adam Caprez, Caughlin Bohn, Huijun Zhu
Schedule

 09:00 – 09:30 Overview of HCC

 09:30 – 12:00 Introduction to HCC

 12:00 – 1:00 Lunch / Ask the Users Panel                            Upcoming Workshops
                                                                • UNL: Software Carpentry
 1:00 – 1:30 Using Globus for Data Management                      • Bash, Git & Python
                                                                   • December
 1:30 – 3:00 Overview of Anvil                                  • UNO: Data Carpentry
                                                                   • Genomics Data Analysis
 3:00 – 3:30 Using Jupyter Notebook on HCC                         • January 2019
 3:30 – 4:00 Introduction to OSG

 4:00 – 5:00 One on One Consultations / Tour of HCC / Resource Planning Team Meeting
Intro to HCC: Teaching Objectives
• Login to HCC clusters using PuTTY(Windows)/Terminal(Mac).

• Create files on the cluster. Transfer files between your laptop

 and the cluster.

• Utilize modules (software) installed on the clusters.

• Submit jobs using SLURM job scheduler.

Logistics
     • Location: Nebraska East Union – Arbor Suite
     • Name tags, sign-in sheet
     • Sticky notes: Red = need help, Green = all good
     • Lunch is provided
     • Link to attendee portal (with command history):
        http://hcc.unl.edu/swc-history/index.html
     • Link to schedule and lessons/slides:
        http://hcc.unl.edu/hcc-kickstart-2018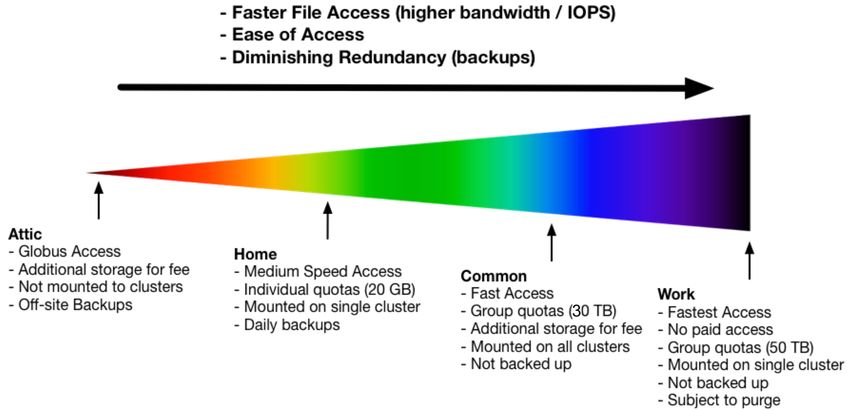
Intro to HCC: Teaching Objectives
• Login to HCC clusters using PuTTY(Windows)/Terminal(Mac).

• Create files on the cluster. Transfer files between your laptop

 and the cluster.

• Utilize modules (software) installed on the clusters.

• Submit jobs using SLURM job schedule.

What is a Cluster?
Crane
   • 548 node Linux cluster                                 Tusker
   • 452 nodes with 64 GB RAM            • 82 node Linux cluster
      • 2.6 Ghz 2 CPU/16 cores           • 2.1 Ghz – 4 CPU/64 cores per node
   • 59 nodes with 256 GB RAM            • 256 GB RAM in most nodes
      • 2 CPU/36 cores per node              • 2 nodes with 512 GB RAM
   • 37 nodes with 512 GB RAM                • 1 node with 1024 GB RAM
      • 2 CPU/36 cores per node          • 500 TB shared storage
   • 1452 TB shared storage                  • 500 GB scratch per node.
      • 4 TB scratch per node

               Sandhills
• 108 node “Condominium” Linux cluster
• 62 nodes with 192 GB RAM                                  Red
    • 2.3 Ghz and 64 cores/node          •   337 node Linux cluster
• 44 nodes with 128 GB RAM               •   5888 cores
    • 2.0 Ghz and 32 cores/node          •   6.67 PB raw storage
• 2 nodes with 156 GB RAM                •   Used by HCC staff scientists to
    • 1.9 Ghz and 48 cores/node              analyze LHC data
• 175 TB shared storage
    • 1.5 TB scratch per node
Anvil                   Attic
                                           • Near-line data archive
                   • HCC’s Cloud           • Backed up in both Lincoln and Omaha for
• Customizable virtual machines              disaster tolerance
                                           • 10 GB/s transfer speed to and from the
  based on the OpenStack Software            clusters when using Globus Connect
• For projects that are not well served    • Cost per TB is significantly lower than
                                             commercial cloud services.
  by a traditional Linux environment:      • No transfer limits or charges
   •   Highly interactive environments
   •   Projects that require root access
   •   Alternate operating systems
   •   Test cluster environments
   •   Cluster applications that require
       dedicated resources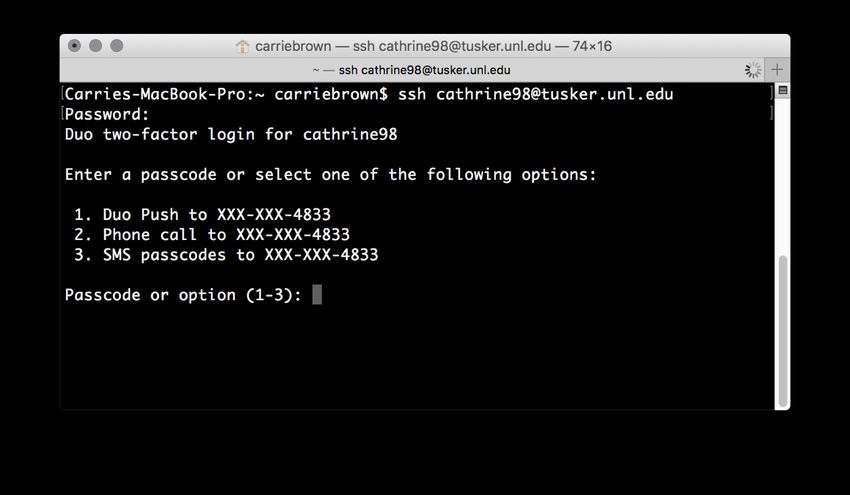
Connecting to the Clusters
How to connect
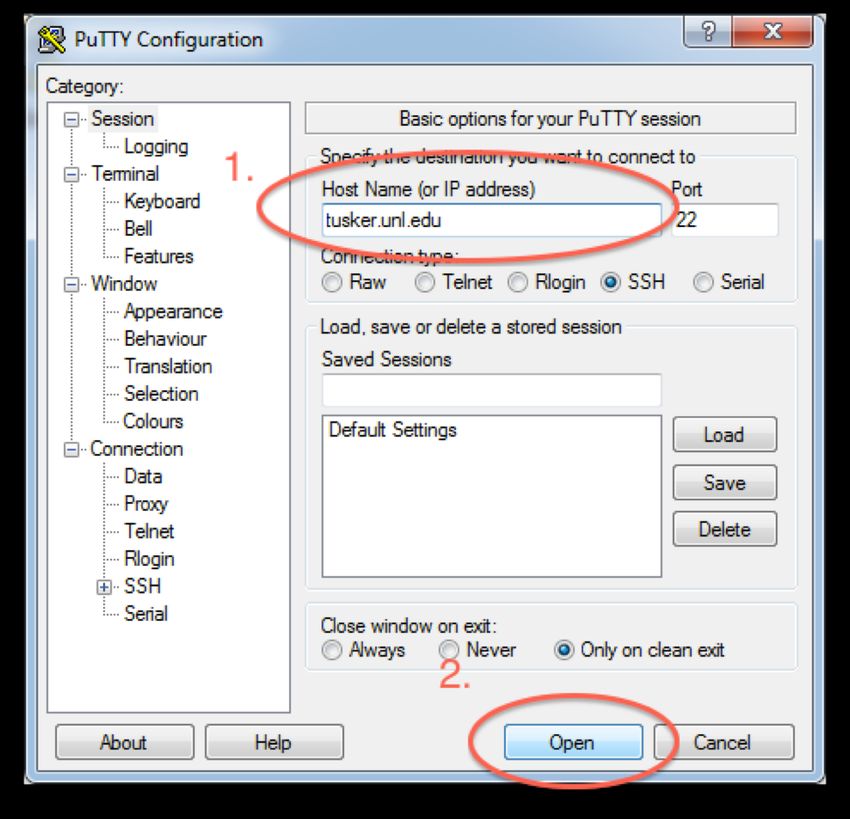
Mac OS / Linux Windows
• Open Terminal • Open PuTTY
• Type in the following command and press Enter: • Type tusker.unl.edu for Host Name and click
Open
ssh @tusker.unl.edu
(Replace with your HCC login)
• On the second screen, click Yes
Once you connect, you will be prompted for your password.
Nothing will appear on your screen as you type your password. This is normal.Two-Factor Authentication
If you are using a cell phone:
• Press 1 to receive a push notification on your device
• Press 2 to receive an automated phone call. Then
enter the passcode provided.
• Press 3 to receive a list of passcodes via text
message. Enter the passcode which starts with the
number indicated
If you are using a hardware token (Yubikey):
• Insert the Yubikey into the computer’s USB slot on
your computer. A green light should come on inside The Duo Mobile
the gold circle. app can also be
used to generate
• Press your finger against the gold circle and a passcodes, even
when cell service
passcode will be generated.
is unavailable.Shell Command Review
More commands and information can be found at: https://hcc-docs.unl.edu/display/HCCDOC/Bash+Commands
Command What it does Example Usage
ls
list: Lists the files and directories located in the current • Lists all files and directories in the current directory
ls directory ls *.txt
• Lists all files which end with .txt in the current directory
cd
• Navigates into the directory “dir_name”
change directory: this allows users to navigate in or out of cd ..
cd file directories • Navigates out of the current directory and into the parent directory
cd $WORK
• Navigates to your default /work directory
nano
nano text editor: opens the nano text editor • opens the text editor in a blank file
nano Note: To access the menu options, ^ indicates the control nano
(CTRL) key. • opens the text editor with “file_name” open. If “file_name” does not
exist, it will be created if the file is saved
less: opens an extended view of a file less
less
Note: scroll using up and down arrows. To exit, press 'q' • opens an extended view of the file "file_name"Exercises
1. Type exit to logoff of the Tusker cluster.
2. Connect to the Crane cluster (hostname: crane.unl.edu)
• Try using a different Two-factor authentication method if you have another option.
3. Change to your $WORK directory
4. Clone the tutorial files by entering the command:
• git clone https://github.com/unlhcc/job-examples.git
• Contributions to this repository are welcome!
Once you have finished, put up your green sticky note.
If you have issues, put up your red sticky note and
one of the helpers will be around to assist.Intro to HCC: Teaching Objectives • Login to HCC clusters using PuTTY(Windows)/Terminal(Mac). • Create files on the cluster. Transfer files between your laptop and the cluster. • Utilize modules (software) installed on the clusters. • Submit jobs using SLURM job schedule.
Home vs Work vs Common
$HOME - /home/group/user                $WORK - /work/group/user
• Not intended for I/O to active jobs   • Designed for I/O for running jobs
• Quota-limited to 20GB per user        • 50TB quota per group
• Backed up for best-effort disaster    • Not backed up
  recovery                              • To check group usage:
• Meant for items that take up             • hcc-du
  relatively small amounts of space.    • Purge policy
   • Source code                           • Files will be deleted after 6 months
   • Program binaries                        inactivity
   • Configuration files                   • Files eligible for purge can be checked
• Read-Only to worker nodes                  using hcc-purge
Home vs Work vs Common (cont.)
$COMMON- /common/group/user
• Mounted on all HCC clusters
• Not intended for heavy I/O to active jobs
• Quota-limited to 30TB per group
• Not backed up
• Not purged
• Meant for items that read to be accessed
  from multiple clusters.
   • Shared data files
   • Reference databases
   • etc.
Home vs Work vs Common vs Attic
$WORK/$COMMON Usage Best Practices
• Avoid large numbers of files
   • Having hundreds of files in your directories can drastically degrade the performance of
     the file system
• Storage resources are finite
   • Be judicious about the data you store.
   • Periodically review your files and carefully consider what you need; remove what is no
     longer needed.
• Use Globus for file transfers
   • Globus Connect is a fast and robust file transfer service that allows users to quickly
     move large amounts of data between computer clusters and to and from personal
     workstations
• Backup valuable data
   • Users are responsible to backup their valuable research data on $WORK periodically
Transferring Files
• Transfer files using an SCP client
• WinSCP (http://winscp.net) – Windows
• Cyberduck (http://cyberduck.io) – MacOS
• Filezilla (http://filezilla-project.org) – Windows, MacOS and Linux
• Globus Connect
• http://globus.org
• Fast, secure and robust transfers with user-friendly web interface
• Uses the High-Speed transfer nodes by default
• Can transfer directly between clusters, Attic and personal machine
• scp
• Usage: scp user@host:source_file user@host:target_file
• Example: scp my_file.txt demo01@crane.unl.edu:$WORK/my_file.txtExercises
1. In your $HOME directory create a file called ‘bio.txt’ – edit this file to include
your name and department. (type command ‘cd’ to switch to $HOME)
2. If you are using a Windows laptop, download and setup WinSCP. Or if you are
using a Mac, download and setup Cyberduck.
• Windows instructions: https://hcc-docs.unl.edu/x/2IEr
• Mac instructions: https://hcc-docs.unl.edu/x/2oEr
3. Copy the ‘bio.txt’ file from Crane $HOME to your local laptop.
4. Copy the ‘bio.txt’ file from your local laptop to Crane $WORK.
Once you have finished, put up your green sticky note.
If you have issues, put up your red sticky note and
one of the helpers will be around to assist.Intro to HCC: Teaching Objectives • Login to HCC clusters using PuTTY(Windows)/Terminal(Mac). • Create files on the cluster. Transfer files between your laptop and the cluster. • Utilize modules (software) installed on the clusters. • Submit jobs using SLURM job schedule.
Running Applications
 • All applications installed on HCC clusters are loaded in individual modules
   implemented with Lmod
    • Lua based module system

 • Modules dynamically change the user environment
    • $PATH
    • $LD_LIBRARY_PATH

 • Hierarchical structure
    • If module A is dependent on module B, then module B must be loaded first to load
      module A

 • Typically follows the naming convention /
    • Example: python/2.7

 • Load using the module command
Lmod Commands
Command What it does
module avail Lists all modules available to be loaded
module spider Information about a specific module – can also be used to search
module load Load module(s) – can load a list of space delimitated modules
module unload Unload module(s) – can unload a list of space delimitated modules
module purge Unloads all currently loaded modules
module list Lists all currently loaded modules
For more information:
• module --help
• Available software lists for each cluster:
• Crane: https://hcc-docs.unl.edu/x/OwBq
• Tusker: https://hcc-docs.unl.edu/x/LQF9
• Sandhills: https://hcc-docs.unl.edu/x/LQF9Exercises
1. Find a list of ‘Core’ modules that do not have any dependences.
2. Load one or more of the modules from the list you just found. Now unload them. Try
doing it two different ways.
3. Lookup information about the MATLAB module.
• How many different versions are available?
• Load a specific version using the / name
4. Try loading the lammps/10Feb2017 module. Did it work?
• Now load these modules first
• compiler/intel/15
• openmpi/1.10
• Now try loading lammps/10Feb2017 again. Does it work now? Why?
• Unload all modules with only one command.
Once you have finished, put up your green sticky note.
If you have issues, put up your red sticky note and
one of the helpers will be around to assist.Intro to HCC: Teaching Objectives • Login to HCC clusters using PuTTY(Windows)/Terminal(Mac). • Create files on the cluster. Transfer files between your laptop and the cluster. • Utilize modules (software) installed on the clusters. • Submit jobs using SLURM job schedule.
Running Jobs

• All software and analysis must be done on the worker nodes
• Processes started on the login node will be killed
   • Limit usage to brief, non-intensive tasks like file management and editing text files
• HCC uses the SLURM scheduler to manage and allocate resources
   • Resources are allocated based on the Fair Use Algorithm
• Jobs can be run in interactive or batch format
Interactive vs Batch Jobs
  Batch Jobs                             Interactive Jobs
  • The user creates a submit file       • Allows the user to type in
    which contains all commands            commands and run programs
    and job information and add its        interactively
    to the queue                         • Must remain connected and wait
     • Similar to running Bash scripts     for resources to be allocated
  • Holds job information until          • Job can be interrupted
    resources become available
     • User can disconnect and the job   • Uses the srun command
       will remain queued
  • Uses the sbatch command
Batch Jobs
• To create a batch job, the user must first make a submit script
• Submit scripts include all job resource information:
• number of nodes/cores
• required memory
• Runtime
• If the job exceeds the requested memory or time, it will be killed.
• Submit script is then added to the job queue using the sbatch
command
• squeue will show queued and running jobs
• sacct can be used to find information about completed jobsCommon SBATCH Options
Command What it does
--nodes Number of nodes requested
--time Maximum walltime for the job – in DD-HHH:MM:SS format – maximum of 7 days on batch partition
Real memory (RAM) required per node - can use KB, MB, and GB units – default is MB
--mem Request less memory than total available on the node -
The maximum available on a 512 GB RAM node is 500, for 256 GB RAM node is 250
--ntasks-per-node Number of tasks per node – used to request a specific number of cores
--mem-per-cpu Minimum of memory required per allocated CPU – default is 1 GB
--output Filename where all STDOUT will be directed – default is slurm-.out
--error Filename where all STDERR will be directed – default is slurm-.out
--job-name How the job will show up in the queue
For more information:
• sbatch –help
• SLURM Documentation: https://slurm.schedmd.com/sbatch.htmlSubmit Scripts
Name of the submit file
This can be anything. Here we are using
“invert_single.slurm” the .slurm makes it
easy to recognize that this is a submit file.
Shebang
The shebang tells Slurm what
interpreter to use for this file.
This one is for the shell (Bash)
SBATCH options
These must be immediately
after the shebang and before
Commands any commands.
Any commands after the
SBATCH lines will be executed The only required SBATCH
options are time, nodes and
by the interpreter specified in
the shebang – similar to what mem, but there are many
would happen if you were to that you can use to fully
type the commands customize your allocation.
interactivelyDetermining Parameters
How many nodes/memory/time should I request?
• Short answer: We don’t know.
• Long answer: The amount of time and memory required is highly
dependent on the application you are using, the input file sizes and the
parameters you select.
• Sometimes it can help to speak with someone else who has used the software
before.
• Ultimately, it comes down to trial and error
• Check the output and utilization of each job will help you determine what parameters you
will need in the future.
• Trying different combinations and seeing what works and what doesn’t.Submit Files Best Practices
• Put all module loads immediately after SBATCH lines
• Quickly locate what modules and versions were used.
• Specify versions on module loads
• Allows you to see what versions were used during the analysis
• Use a separate submit file for each job
• Instead of editing and resubmitting a submit files – copy a previous one and make
changes to it
• Keep a running record of your analysis
• Redirect output and error to separate files
• Allows you to see quickly whether a job completes with errors or not
• Separate individual workflow steps into individual jobs
• Avoid putting too many steps into a single jobExercises
1. Navigate into the matlab directory of the job-examples directory and locate the invertRand.submit
file
• This submit file runs a MATLAB script which inverts a 10,000 x 10,000 randomly generated matrix and outputs the
length of time it took to perform the inversion.
• Look at the contents of invertRand.submit - How many nodes this will run on? How many cores? How much
memory and time is requested?
• Submit the invertRand.submit job. Check the output to see how long it took to invert the matrix.
2. Copy the invertRand.submit file to a new file using the cp command.
• Edit the invertRand.submit file to use 4 cores.
• If you need help, look at the InvertRandParallel.submit file which is already configured to run on 4 cores
• Submit the job again and compare the time to your initial run. How much faster or slower is it?
• Compare times with your neighbor. Did you see the same amount of improvement?
3. If there’s time, try different combinations of SBATCH commands and see how the running time
changes.
Once you have finished, put up your green sticky note.
If you have issues, put up your red sticky note and
one of the helpers will be around to assist.Interactive Jobs
• Interactive jobs work very similarly
to batch jobs
• Once resources are allocated,
commands can be input
interactively
• All output is directed to the screenExercises
1. Request an interactive job for certain amount of resources
• If you can’t think of a setup, use one of these:
• 1 node, 1 core with 2 GB RAM each core
• 2 nodes, 1 core per node with 2 GB RAM each core
• How long did it take to allocate resources? Compare your set up and wait time with your
neighbor. Did they get resources faster or slower than you did?
2. Using your interactive job from above, load the module for your favorite
programming language (Python, R, MATLAB, etc.)
• Run the program interactively
Once you have finished, put up your green sticky note.
If you have issues, put up your red sticky note and
one of the helpers will be around to assist.Asking for help
• Read the Documentation
• http://hcc-docs.unl.edu
• If the documentation doesn’t answer your question, leave a
comment or email to let us know!
• Consult Google
• Useful for application specific errors or general usage
• Contact Us
• Drop in our offices
• UNL: Room 118 in the Schorr Center on City Campus
• UNO: Room 158 in the Peter Kewit Institute on Center Campus
• Email hcc-support@unl.eduYou can also read