How to use weSPOT Inquiry-Based Learning Model with its Tools
←
→
Page content transcription
If your browser does not render page correctly, please read the page content below
How to use weSPOT Inquiry-Based Learning Model with its
Tools:

Project Acronym:              weSPOT

Project Name:                 Working Environment with Social and Personal Open Tools for
                              inquiry based learning

Call:                         FP7-318499

Author(s):                    Aristidis Protopsaltis

How to use the weSPOT IBL model and its tools                                       1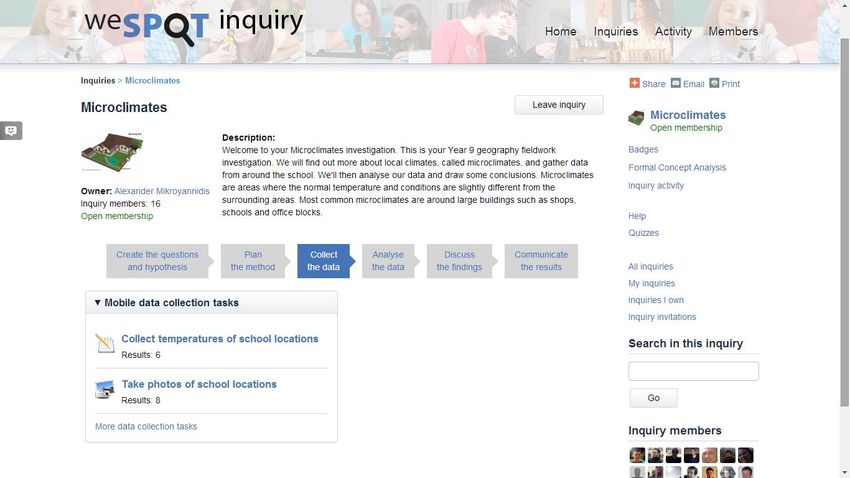
CONTENTS
CONTENTS ............................................................................................................................................... 2
The use of the weSPOT IBL model and its tool set ................................................................................. 3
       The Microclimates Scenario ............................................................................................................ 3
The Microcliamte example with the IBL model and the weSPOT Tools ............................................... 10

How to use the weSPOT IBL model and its tools                                                                                            2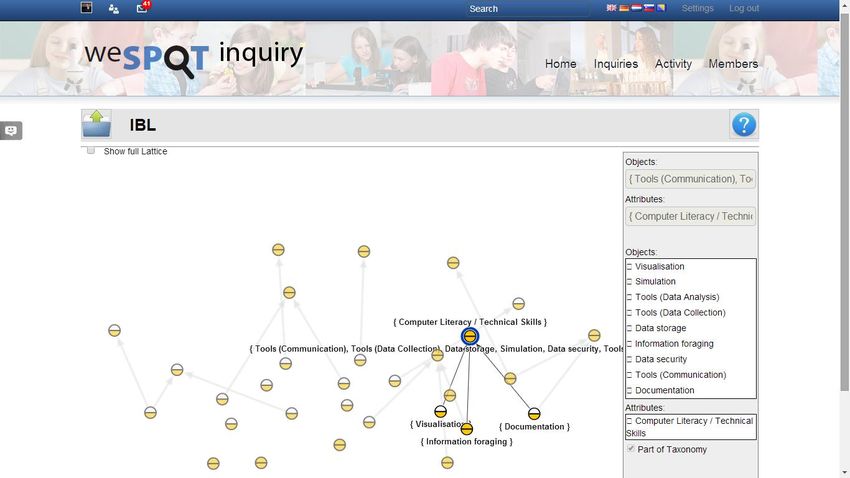
The use of the weSPOT IBL model and its tool set
The document describes the use of the weSPOT IBL model and the use of its tool-set using a
microclimate scenario.
The Microclimates Scenario
To show case the weSPOT IBL model and the weSPOT tool-set a scenario within a secondary
education context, about microclimates (Mikroyannidis et al. in press) will be used. This scenario is a
Year 9 geography fieldwork investigation where students will find out more about local climates,
called microclimates, and gather data from around the school. Microclimates are areas where the
normal temperature and conditions are slightly different from the surrounding areas. Most common
microclimates are around large buildings such as shops, schools and office blocks. The aim of this
scenario is to find the best place to have a bench at the school. The initial hypothesis is that the best
place is the garden site nearest the school entrance because it is sheltered from the wind but south
facing, so it is warm and not windy there. Other places to be considered are the car park, the
canteen, the games area and the reception.
The scientific questions proposed by the teacher might be:
Where is the windiest part of the school grounds?
Where is the sunniest part of the school? This is likely to be the warmest.
Where will we find the warmest part of the school grounds? (Mikroyannidis et al. in press).
Therefore, the inquiry is based on four measurements: speed of wind, sunny periods, temperature
and humidity.
Below are the phases of the weSPOT IBL model and the appropriate tools in relation to the
microclimate example. The focus here is on the use of the appropriate weSPOT tools in accordance
to the theoretical weSPOT IBL model.
Tool-set
The weSPOT project offers a number of tools to assist teachers and students with their inquiries. The
relation between the IBL model and the tools can be seen at figure 1.
How to use the weSPOT IBL model and its tools 3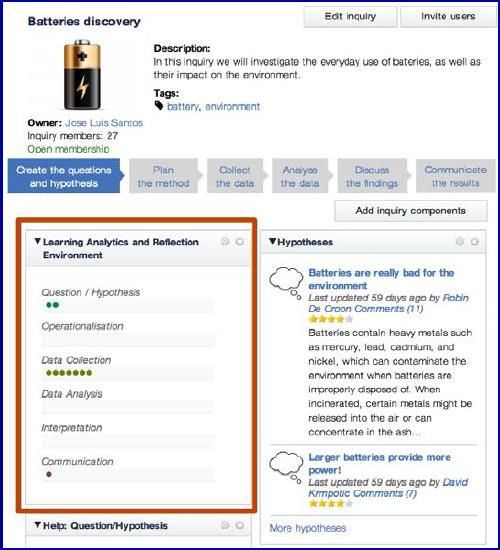
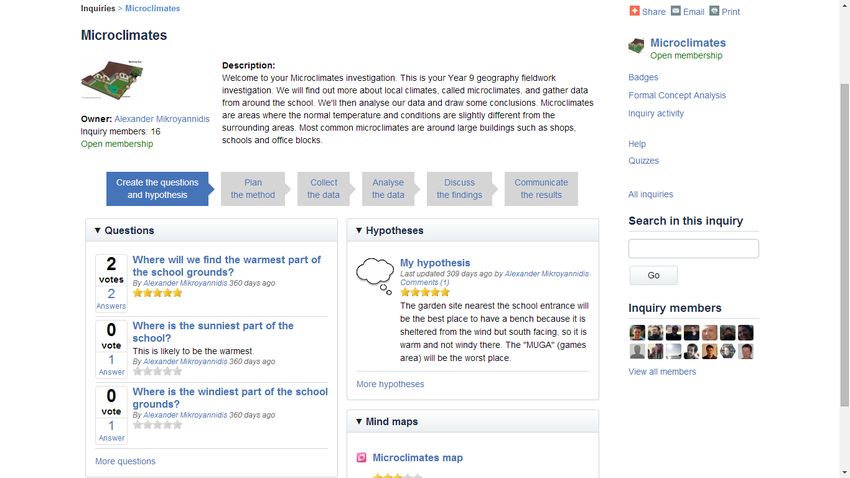
Figure 1: Relation between weSPOT IBL model and tool kit

The tools include:

a)      Inquiry space

Link: http://inquiry.wespot.net/

Use: Teachers and students

Link to short screencasts:

Starting an inquiry and duplicating an inquiry /setting up an inquiry:
https://www.youtube.com/watch?v=6R8yxdih5t8

Performing an inquiry: https://www.youtube.com/watch?v=cbMSTvqAC6k

Functionality

The inquiry space is based on the open source software called Elgg (http://inquiry.wespot.net/) is
the base of the weSPOT inquiries. In the inquiry space teachers and students need to register either
by using a social network account or by registering on the platform. After registration, they gain
access to the environment and the can start their inquiry. The weSPOT inquiry space allows teachers
and students to set up an inquiry and structure it according to their needs, to upload files (pictures,
docs, values etc.), communicate with each other etc. An example of the space can be seen at figure 2
below, and a short tutorial at: https://www.youtube.com/watch?v=6R8yxdih5t8 and
https://www.youtube.com/watch?v=cbMSTvqAC6k.

How to use the weSPOT IBL model and its tools                                              4
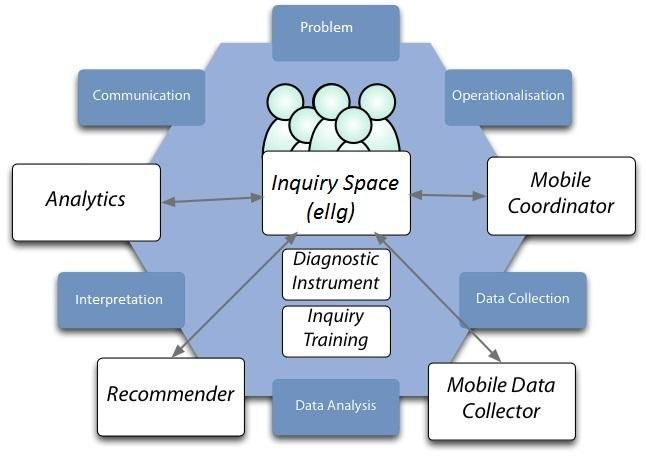
Figure 2: The weSPOT inquiry space

b)      Personal Inquiry Manager (PIM)

Download: IOS version: https://itunes.apple.com/be/app/personal-inquiry-
manager/id889937609?mt=8 (or type Personal inquiry Manager in the app store)

Android version: https://play.google.com/store/apps/details?id=net.wespot.pim (or type Personal
Inquiry Manager in the play store.

Use: Teachers and students

Link to short screencasts: https://www.youtube.com/watch?v=tGwxHnxS7bc

Functionality

The Personal Inquiry Manager gives weSPOT users mobile access to their inquiries, allows them to
create new inquiries, see the hypothesis, collect data and create data collection tasks and also
comment and discuss their inquiries, manage their friendships and their profile. It facilitates a more
self-directed inquiry approach as it enables users to set up their own personal inquiry projects. A
short tutorial about the PIM can be found at https://www.youtube.com/watch?v=tGwxHnxS7bc.

The core functionalities of this tool are:

• Access to existing personal inquiries and setting up a new one

• List all earned badges

• Collect data (audio, video, text, voice) into the inquiry space

• Manage friendships

How to use the weSPOT IBL model and its tools                                               5
1) Inquiries            2) Badges                  3) Activities             4) Friends

                                     Figure 3: The weSPOT PIM interface

The Inquiries tab details various functionalities related to an inquiry. A user can see here in how
many inquiries he participates in, can manage notifications or can start a new inquiry. Some trigger
in the environment (“A wonder moment”) can serve as an inspiration to start an inquiry. Starting an
inquiry allows the user immediately to react to the triggers by collecting data (taking pictures,
recording first thoughts, etc…).

The Badges section displays the badges the user has already acquired. These badges can be awarded
manually by a teacher or are awarded automatically, through a predefined set of rules. The Activities
list details recent activities for all inquiries the user is subscribed to.

The Friends section shows all friends. The purpose of this section is to add a social layer to the PIM,
to enable users to share data and findings with these friends, exchange findings, etc…

The PIM is available both for Android from Google Play and for iOS devices from the Apple store. For
further information about the weSPOT PIM, you can check the deliverable D4.1 available on the
website at: http://wespot.net/en/home.

c)       Mobile Inquiry Coordination Interface (MICI)

     Link: http://ibl.exactls.com/

     Use: Students and teachers

     Link to short screencasts:

The Inquiry coordination interface will give inquiry coordinators access to the current on-going
inquiries and the contributions of all participants. It will allow central dispatching of messages and
management of tasks and data. Envisaged main functionalities:
-       To track students during an inquiry
-       To broadcast messages to the inquiry participants
-       To show data collected by inquiry participants
-       Badges’ awarding

How to use the weSPOT IBL model and its tools                                                  6
Figure 4: the weSPOT MICI mockup

d)      Formal Concept Analysis tool

Link: http://inquiry.wespot.net/ (it is embedded in the Inquiry Space on the left hand side menu
under the name Formal Concept Analysis)

Direct link: http://inquiry.wespot.net/fca/main?gid=38079&name=navigation&uid=2219

Usable by: mainly teachers and –under certain conditions- students

Link to short screencasts: https://www.youtube.com/watch?v=yrjsM_X0u5s

Functionalities
To model a content domain, the Formal Concept Analysis (see a short tutorial at:
https://www.youtube.com/watch?v=yrjsM_X0u5s) plugin can be found within the Inquiry Space. It
provides teachers with an interface to model a content domain in terms of objects and attributes.
The instructor can then assign learning resources to objects and attributes. The resulting concept
graph forms the basis for our learner model that will be updated according to a learner’s
performance in questionnaires and additionally by considering a learner’s interaction with the
system (log data). Learning resources will be recommended that are tailored to the learner’s
learning progress.

How to use the weSPOT IBL model and its tools                                             7

Figure 5: The weSPOT FCA tool

e)      Learning Analytics Reflection & Awareness Tools (LARAe)

Link: http://ariadne.cs.kuleuven.be/wespot/ (The LARAe will be embedded into the Inquiry Space)

Usable by: mainly teachers and –under certain conditions- students

Link to short screencasts https://www.youtube.com/watch?v=8UPaRyHF_FM

Functionalities

The Learning Analytics Reflection & Awareness environment (LARAe) presents teachers and students
with visualizations of learner traces (A short tutorial can be found at:
https://www.youtube.com/watch?v=8UPaRyHF_FM). These learner traces are generated by learner
activities in the Workflow Inquiry Engine and the Personal Inquiry Manager. The data collection layer
provides access to this data. LARAe is available both through an Elgg widget for a quick personal
overview of activities, and through a web dashboard, providing an overview of all activities and
generated content in the ILB environment.

Widget
Through the Inquiry Workflow Engine, the user can access the Learning Analytics widget, which
presents a quick overview of own activities. The widget presents the user with the six phases of the
IBL model and the actions related to the current inquiry. Every action the user performs in the
inquiry is displayed as a circle and positioned chronologically within the phase the action belongs to.
The user instantly sees how active he/she was in each phase and which phases could require more
attention. The user also sees how well his/her actions are rated. This is represented by the size of

How to use the weSPOT IBL model and its tools                                              8
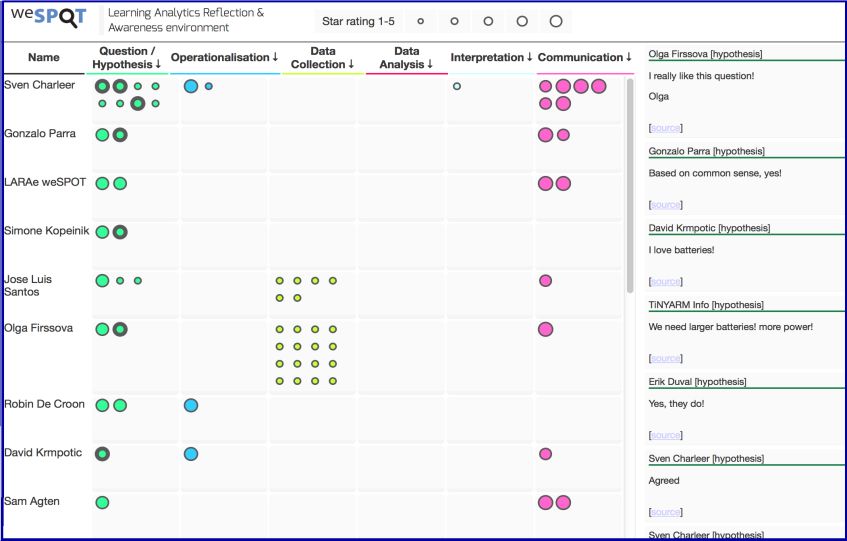
the circle. Large circles equal a more positive rating by peers/teacher, while smaller circles denote
lower rating.

                                      Figure 6: The weSPOT LARAe widget

Dashboard
The dashboard gives an overview of all users' activities in the Inquiry Workflow Engine and PIM's
environment. Every column represents a phase of the IBL model while every row represents a user that has
participated in the inquiry. As with the widget, each circle matches an activity performed by the participants.
Every color matches a phase. Large circles equal highly rated activities, while smaller circle denote lower
rated activities. Presenting the data in this way, the user can instantly compare activities across participants
and discover new events. As activities are registered for different widgets, the dashboard allows filtering per
widget in each phase. By clicking on an activity, the content of that activity is displayed e.g. a picture taken, a
comment given, etc. All related activities, such as replies to a question or activities with the same tag, are also
highlighted, providing the user with more context for the selected activity.

How to use the weSPOT IBL model and its tools                                                 9
Figure 7: The weSPOT LARAe dashboard A quick example: Using his mobile phone, a student notices more activity in a specific phase by his fellow students. More specifically, their data collection activities are much higher. He invites some students around an interactive tabletop where they dig deeper into the analytics data, go through their collected data and discuss their progress. He concludes that his data collection is lacking and should spend more time on this. The Microcliamte example with the IBL model and the weSPOT Tools Phase 1 – Problem (Topic). Students identify the area of interest or the teacher defines the topic according to the curriculum and then the students discusses the main questions and define more specific questions to be answered in advance in order to define their hypothesis. The field of research in this example has been decided by the teacher who he/she will make the connection with existing research and theories so students have a complete idea of the research area. That can be done either before the inquiry starts or in previous learning sessions. Some example specific questions can be the following: What are the energy sources in the classroom? What quantity of energy do they consume? Is there a relation between external climate and energy consumption? How long is the air-conditioner working during the day and at what temperature? How to use the weSPOT IBL model and its tools 10
What measures could be taken to minimize the energy consumption (e.g. do not open
windows, do not leave the door open during breaks, do not switch the light on during the
day, etc.) (Mikroyannidis et al. 2013).
After that students prioritize these questions and define their hypothesis. These hypotheses are
formulated by different teams in each class and further investigated. The students think about the
questions either individually or collectively and therefore reflect upon them. The reflection can
either be self-reflection or group reflection.
For the microclimate example let’s say that the students have chosen three different questions:
a) Where will we find the warmest part of the schools grounds?
b) Where is the sunniest part of the school?
c) Where is the windiest part of the school?
How to use the tool-set
The students or the teacher are using the inquiry flow engine to write their question/s and their
hypotheses, since different groups might work on different questions or hypotheses. Both teacher
and the students can leave comments and provide feedback regarding the hypothesis that will allow
students to reflect upon and refine the hypotheses, if needed. Additionally, they can use the
personal inquiry manager to set up an inquiry, view existing ones, upload files, and write blogs.
Furthermore, the inquiry engine offers opportunities for discussion/argumentation and reflection by
providing the correspondent widgets. The analytics data from LARAe can be used by the teacher
and the students for reflection, by tracking achievement at this stage and at every stage thereafter.
For the microclimate example, the students can use the inquiry flow engine to enter their
questions by using the provided question widget. The question widget offers the opportunity to the
students to vote the “best” questions for their inquiry by using the star voting system or even to
proceed with all 3 questions. Then they can create their inquiry hypotheses using the hypotheses
widget, like in the screenshot below.
How to use the weSPOT IBL model and its tools 11Figure 8: weSPOT Inquiry Flow Engine Question and Hypotheses widgets
Phase 2 – Operationalisation (plan the method). Here students plan their method, discuss what
information they need, how they can collect it and what needs to be measured, how it will be
measured, decide on specific indicators and make prediction. Some of the activities can be the
following:
To measure the temperature inside and outside three times a day (morning, midday and
evening).
To compare the temperature in the classroom and outside the building.
To check during the measurement if the window or the door are open.
To watch external climate conditions (sunny, windy, rainy etc.)
To check when the air-conditioner is on and off.
To calculate the energy consumption of the air-conditioner.
To search the web for the most efficient way of use of the air-conditioner they have in the
classroom.
To check how often the lights are on and off.
To calculate the energy consumption of the lights.
To check how long the sunlight is enough during the day.
To make informal questionnaires with their parents and relatives about how they save
energy (Mikroyannidis et al. in press).
Depending on the type of inquiry, guided, structured, confirmatory, or open the teacher provides
guidance and makes decisions. For example, if the inquiry is confirmatory, the teacher will make all
the decisions about what needs to be measured, how, where and when and make specific
predictions. However, if the inquiry is open, the students will take control of everything and will
make the decisions about each specific sub-phase of the model, if needed. Some of the subtasks
How to use the weSPOT IBL model and its tools 12maybe excluded from the processes because they do not fit the scope of the specific topic, for
example in the microclimate example the teacher or students can decide that at the
operationalisation stage the ethical aspects are not important and therefore do not take them into
consideration. The students think about every step of the process either individually or collectively,
provide arguments to support their decisions and reflect upon them. The reflection can also either
be self-reflection or group reflection depending on the type of inquiry.
How to use the tool-set
The technology used at this phase can also be the inquiry flow engine. Inquirers can insert a new
area onto the platform called “plan the method” where they can discuss and decide about what can
be measured and how, make predictions and examine the methodology that they will follow and
argue for or against. The weSPOT inquiry engine also offers the opportunity to leave comments that
will feed the discussion and reflection upon the relevant sub phases. All the weSPOT IBL sub-phases
are available via widgets.
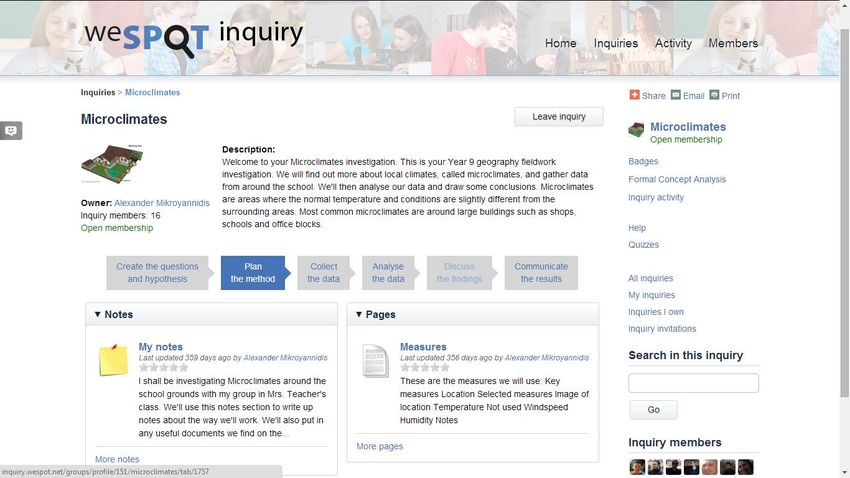
For the microclimate inquiry for the operationalization or plan the method phase the learners need
to click on the “Plan the method” tab to create their work environment. There they can add any
notes they might have and decide about the measurements (e.g. temperature) and items such as
pictures of the appropriate places to place the bench by using the appropriate widgets. They can
also create a discussion area by using the “discussion/argumentation” widget to justify their
decisions.
Figure 9: The weSPOT plan the method Inquiry Space area
How to use the weSPOT IBL model and its tools 13Phase 3 – Data collection. Each student or team collects the data it has chosen to measure by
using the appropriate method and the appropriate tools. Then they have to document their activities
by for example taking pictures or recording the measurements and store their data in a secure and
safe way. While doing so they are reflecting on the process and the suitability of the chosen method,
the chosen tools and provide the relevant arguments to support their choices. However, if the
inquiry is guided or confirmatory, argumentation and reflection might be reduced since most of the
decisions are made by the teacher
How to use the tool-set
The weSPOT tool used to collect the data is the Personal Inquiry Manager (PIM). Students with
their smartphones can collect pictures of the appropriate places, record temperatures and upload
them onto the weSPOT inquiry flow engine. The students can use other tools available to the school
to make the measurements and then enter the values through PIM. All the values and pictures are
then automatically available to everybody who is member of this inquiry and everybody can
comment and rate them. This will enhanced collaboration and reflection. The inquiry flow manager
is the place that all the data will be uploaded to. The inquiry flow manager will also offer
opportunities for reflection and discussion, with the appropriate widgets, since every inquiry
member can comment and rate what the others have done. Also, the analytics data from LARAe can
be used by the teacher to aid with reflection.
For the microclimate inquiry and the data collection phase the learners need to click on the “Collect
the data” tab to create their work environment. There they can add any notes they might have and
insert their measurements (temperature) and the pictures of the appropriate place to place the
bench.
Figure 10: The weSPOT Inquiry Space data collection area and widget
How to use the weSPOT IBL model and its tools 14Phase 4 – Data analysis. Students or teams analyse the collected data by using the appropriate
method and tools. They prepare diagrams and graphics, and identify relations between different
factors related to energy consumption (human behaviour, climate, conditions in rooms, etc.), and
exclude the invalid data to reduce the noise of the data. Argumentation and reflection at this step
are very similar to those described in the phase above.
How to use the tool-set
weSPOT does not provide any tools for data analysis but rather suggests the use of existing tools
such as excel and SPSS that might be available to the schools. However, the weSPOT inquiry flow
engine offers the opportunity to the students to upload exported data sheets. The data results then
become available to all inquiry members and they can be commented, criticised, evaluated etc.
These actions will enhance reflection and therefore feed into any re-evaluation or any other
supportive or correcting actions.
Phase 5 – Interpretation. Students, individually or in teams make conclusions related to their
hypothesis and discuss different decisions and results. They decide on the relevance of their results,
their significance, and they place them within the appropriate research field, microclimate. Each
team has to defend their conclusions and provide the needed arguments and reflect upon. Each
student has to make her/his own decision. On the basis of final decisions the class prepares a list
with suggestions to the school management. Some possible suggestions:
How long to have the lights on and when to switch them on and off depending on different
conditions.
How long to have the air-conditioner on and when to switch it on and off depending on
different conditions.
What type of woodwork to use.
What type of doors to use and of what material.
What additional energy sources to be used (Mikroyannidis et al. in press).
How to use the tool-set
Students can use the tools available to the weSPOT inquiry engine. There is a dedicated subsection
regarding the interpretation and discussion of the results. Students can use the comment area and
discuss the results, compare them to other existing environmental studies and draw conclusions by
using the appropriate widgets in order to decide the best place for the bench. Additionally, students
will have the upload other relevant works that will help them embed their results into the current
research if possible, and draw conclusions about their significance. For the microclimate example
such actions might not be necessary since the task at hand is very specific.
Phase 6 – Communication. Each team or student prepares its presentation, conclusions and
recommendations, and gives arguments (data, tables, diagrams, pictures), decides on how to
How to use the weSPOT IBL model and its tools 15disseminate the results. They need to think about their audience, their fellow students’ teachers, parents etc. Different audiences may require different types of communication. They decide on the tools they need to use and how can incorporate the feedback they might got from the fellow students or peers. Throughout this phase reflection is at the centre scrutinising every single step or decision the students have made. Each team or student then makes its presentation in front of the audience and receive feedback. How to use the tool-set Students can discuss, comment and reflect on the platform and decide upon the different aspects of communication such as audience, types, media etc., using the comments area, the blog or the wiki, which are available to them in the communication tab. They can prepare their dissemination documents using technologies outside the weSPOT platform, such as word processor, PowerPoint, video recording etc. and upload them onto the inquiry flow engine. Once upload them onto the platform, fellow students or teachers can comment and give feedback using the platform and the authors can reflect upon using the provided widgets. A useful list of short screencasts with introductions on how to use the weSPOT toolkit is provided below: Starting an inquiry and duplicating an inquiry /setting up an inquiry https://www.youtube.com/watch?v=6R8yxdih5t8 Performing an inquiry https://www.youtube.com/watch?v=cbMSTvqAC6k FCA tool https://www.youtube.com/watch?v=yrjsM_X0u5s LARAe tool https://www.youtube.com/watch?v=8UPaRyHF_FM PIM tool https://www.youtube.com/watch?v=tGwxHnxS7bc How to use the weSPOT IBL model and its tools 16
You can also read