Lubbock-Cooper Elementary Campuses

    Skyward Educator Access Plus

      Gradebook Users Guide
←
→
Page content transcription
If your browser does not render page correctly, please read the page content below
Lubbock-Cooper Elementary Campuses
Skyward Educator Access Plus
Gradebook Users Guide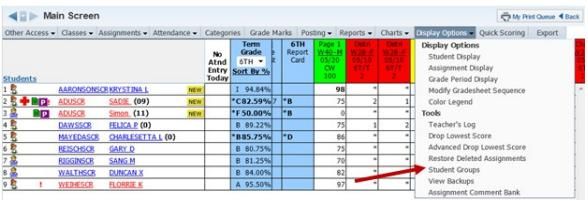
Table of Contents
Page Topic
2 Skyward Access at School
2 Skyward Access at Home
2 Skyward Login
3 Password Reset
3 EA+ Homepage
5 Attendance
6 Alert Legend
6 Seating Chart / Assigning Seats
7 Gradebook
9 (Screen) Display Options
9 Student Display
9 Displaying Dropped Students
10 Assignment Display
10 Grade Period Display
10 Category and Category Weight Setup
12 Assignments
13 Adding Assignments
13 Posting to Family and Student Access
14 Save and Score
14 Mass Assign Score
14 Deleting Assignments
15 Cloning an Assignment
15 Quick Scoring
16 Non-Core Subject Grades
16 Viewing Cumulative Grades
16 Grade Proof Sheets
18 Reports
18 Grade Sheet Report
19 Blank Grade Sheet
19 Drop Lowest Score
21 Advanced Drop Lowest Score
22 Electronic Discipline Referrals
25 Requesting Grade Changes after Closed Grading Periods
25 Resubmits
28 Adding Progress Report and Report Card Comments
30 Emailing a Class, Classes or Select Students Through Skyward
31 Favorites Feature
34 The Button
40 Grade Adjustments
41 Incompletes and Medical Overrides
43 Bold Grades with Asterisks in the Gradebook
44 Student Groups
Page | 1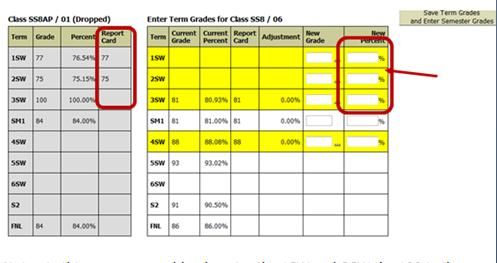
Skyward - Educator Access Plus (EA+)
Skyward Access at School Click on the desktop icon Skyward Educator in order to access the
website.
NOTE:
If this link is missing, submit a HelpDesk ticket to your Campus
Technologist.
Skyward Access at Home Go to the school website www.lcisd.net Login Click Staff
Click Teacher Grade Book.
Skyward “Employee Access” is where you
access your pay stubs.
Skyward Login:
The first page you will see when you
access the website is your login screen.
This screen is where you will login to
take attendance and use the grade book.
First Time User - Type in your:
Login ID - (the first part of your email
address)
AND
Password – (password)
NOTE:
If you are a first time user OR if your
password has had to be reset, you will
be prompted to change your password
before proceeding into Skyward.
Page | 2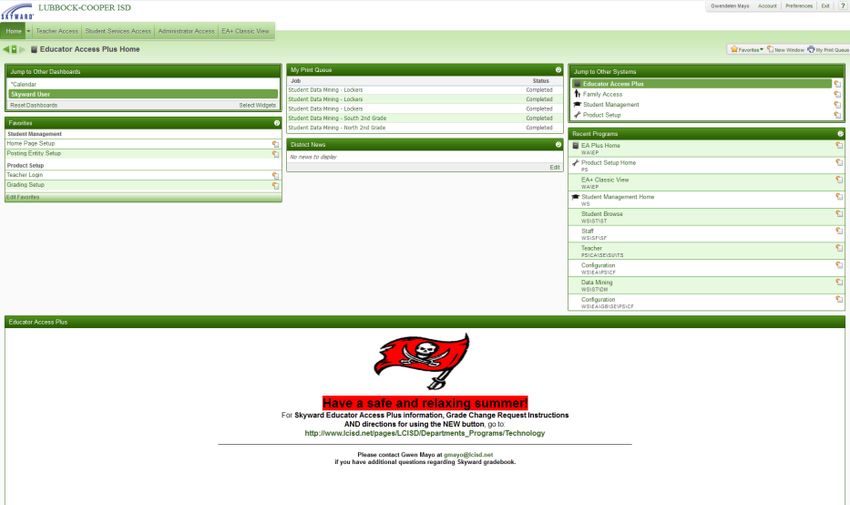
Password Reset                           If you do not remember your password and make more than 5
                                         attempts to login to Skyward without success, you will be locked out
                                         of the system.

                                         If you have been locked out, you will receive an email to reset your
                                         password.

EA+ Homepage
Skyward opens up to your Educator
Access Plus Homepage.

NOTE:

The message in the area at the
bottom will change periodically.
Make sure you read it as
important information about
grade entry deadlines will be
posted here.
                                               A link to the online version of the Gradebook Manual
                                                               can also be found here.
Choose Educator Access Plus on the
Jump to Other Systems box on the right
if you are not on the EA+ homepage.

Choose Teacher Access from the tabs
on the upper left.

                                                                                                       Page | 3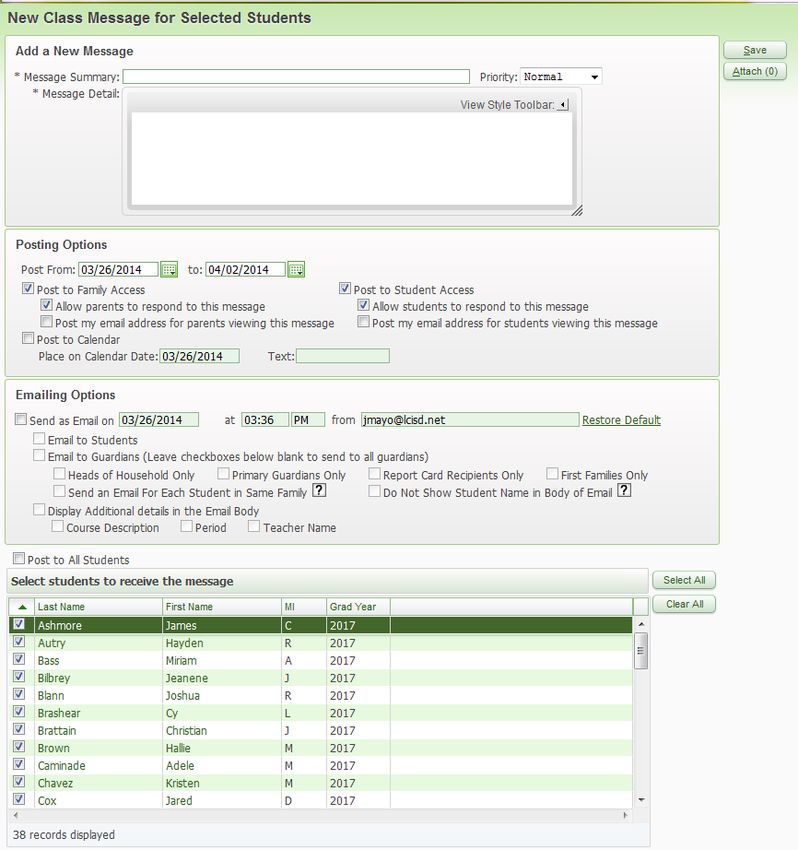
The Teacher Access drop-down menu
shows a list of options that you can use.

NOTE:

Always click SAVE and use the
BACK button after entering data or
your data will be lost.

Never use the red X in the upper right      Teacher Access
to close the window.                        My Gradebook – access to all of your classes, grades and attendance

Data will be lost if SAVE is not clicked    My Students – access the Gradebook by student, view attendance, or
when it is an option.                       choose report options by student

                                            My Classes – access your Gradebook, attendance reports, etc. by
                                            class

                                            Post Daily Attendance – enter or view daily attendance by class or
NOTE:                                       period

There may be additional options on          My Homeroom – access your homeroom class and run a variety of
each based on your assignment and           reports
access levels.
                                            My Activities – view and run eligibility reports for Activity Groups,
                                            send email messages to Activity groups – NOT USED IN
                                            ELEMENTARY.

                                            Administrator Access
                                            Student Search By Entity – View individual student profiles and
                                            information for ALL students on your campus.

                                            This is also where you can create discipline referrals. See page 22 in
                                            this manual

                                                                                                           Page | 4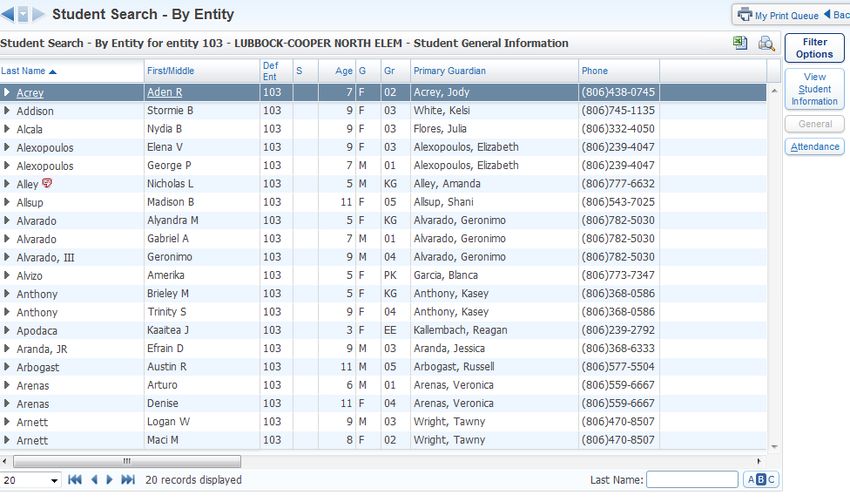
Attendance:
Click on Post Daily Attendance.
You will now see a list of your
classes.
At the elementary schools,
attendance is tied to your
Citizenship, so all other classes
will be unavailable for
attendance.
Choose how you want to see the list
for your class.
Attendance can be taken by:
o Name
o Seating Chart
By Name:
The class will open with all students
marked present (by default).
You can click on Last Name OR First
Middle to change the view.
If a student is absent, click on the radio
button under the Absent column.
A Tardy is generally marked by the
office staff. Contact your PIEMS
secretary if you have any questions.
NOTE:
Click on Save to submit your
attendance.
The View Class Summary button offers various summaries you can
view and print.
Page | 5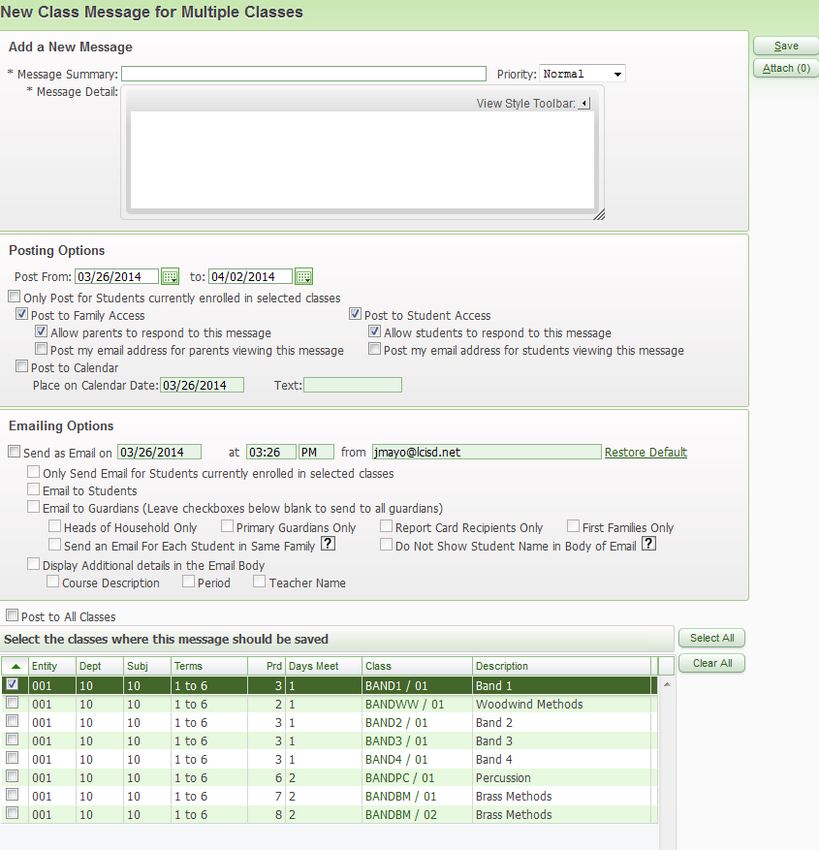
Your Absent Count and Tardy Count
columns will show the number of times
a student has been absent or tardy for
the year.

The Alerts column shows any alerts
assigned to each student.

Click on the Alert Legend link to see
what each color represents.

Click on the alert to the left of the
student to see the alert for that student.
Alert Legend

The Alert Legend will show color
codes for each item.

Seating Chart / Assigning Seats:
Access the seating chart by going to
Teacher Access > Post Daily
Attendance > Assign Seats OR My
Gradebook > choose a class > roll over
Attendance tab > choose Assign seats
for seating chart.

Skyward will automatically put the
students in a seat alphabetically.

Option #1:
Move a student by clicking on Select         NOTE:
in the box with the student you wish to
move, then click on Fill Seat or Swap        You can change the number of Rows and Seats Per Row.
Seats in the seat you wish them to go.
                                             Once you put the numbers in be sure to click on Refresh
Repeat the process until you have the
students in the desired order.

                                                                                                       Page | 6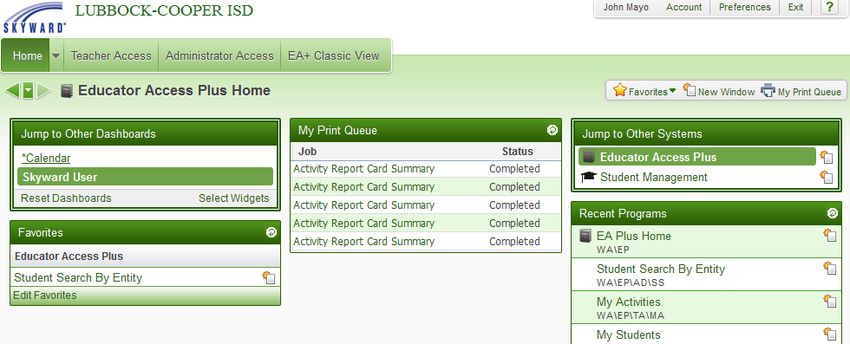
Option #2:
You can clear out the seats by clicking
on Clear Seating Chart. The student
names will now be on the left.

Change the numbers of rows and
columns if you want.

Click on Select and then Fill Seat to
arrange the students.

Be sure to click Save when you are
finished.

Gradebook:

Click on My Gradebook.

Select your class by clicking on a
Gradebook (in blue font) on the right.

NOTE:

The Reports for All Classes button here
allows you to create reports that will
print results for ALL of your classes

                                          Page | 7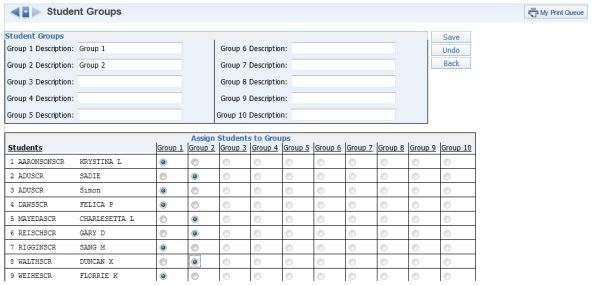
Your Gradebook will open and your
screen will be similar to this.
Columns:
Students: Student names
Term Grade – Can be changed
to show averages for desired
term using drop down box.
SW1, SW2, SW3, etc. – Six
Weeks Average
PR1, PR2, PR3, etc. – Progress
Report Average
EX1, EX2 – 1st Semester and
2nd semester exams
SM1, SM2 – Semester Average
FNL – Final overall average
Menu Bar Overview:
Other Access: Use to access
Message Center, Athletic
Eligibility and more.
Classes: Use to switch between
classes.
Assignments: Use to enter, edit
and view assignments.
Attendance: Take attendance
from here by Name or Seating
Chart. – Also, create a seating
chart in this tab.
Categories: Use to set your
categories and weights.
Grade Marks: This Tab will
not be used.
Posting: Use to post comments
for the students at progress
report, six weeks and semester.
Reports: Use to print
attendance reports, Gradebook
reports, class information, blank
grade sheets and more.
Charts: Use to provide charts
on assignments. Class and
individual reports can be printed
for analysis.
Display Options: Use to
arrange the appearance of your
Gradebook. This is where you
can also drop lowest grades.
Page | 8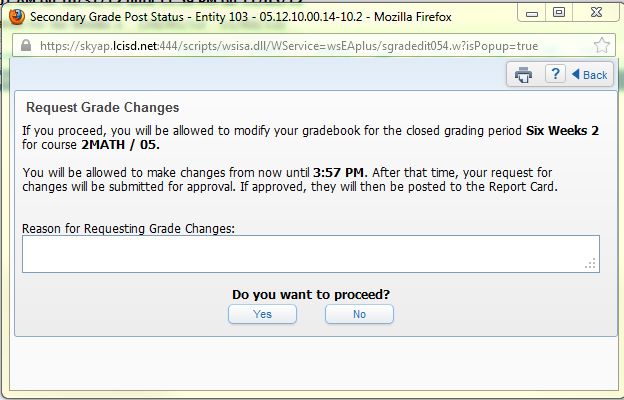
Menu Bar Cont…
Quick Scoring –Use to enter
grades without opening each
assignment separately.
Export – Use to export your
grades into an Excel
spreadsheet.
(Screen) Display Options
Hover over the Display Options button
on the menu bar then select the option
you desire.
Student Display
Use this screen to choose the way you
want to display your student names in
your gradebook.
You can display the Student ID,
Dropped Students and the Student
Grade Level by checking the
appropriate boxes.
Sorting options allows you to sort the
list of student names.
If you make any changes be sure to
SAVE.
Displaying Dropped Students Students who have dropped your class do not disappear from your
Gradebook. They are hidden and can be displayed through Student
Display Options.
Check the box next to Dropped
Students in the Student Display
Options and Save.
Dropped students will show in your
Gradebook as tan highlighted rows
across the Gradebook.
Page | 9Assignment Display
Choices here include showing the
average score of the assignment,
comments, the order that the
assignments will be displayed, etc.
Change the sequence to Ascending to
have the oldest assignments first (like
a traditional Gradebook)
Other choices at the bottom are for how
the assignment will be displayed in the
column heading.
Grade Period Display
This section is where you can hide all
of the other columns that are displayed
on the screen.
If you only want the current six weeks
click on Hide All under Display Grade
Period.
You CANNOT hide the current grading
period. This option is grayed out.
You can also show assignments within
a specific date range in the
“Assignments By Date Range” box.
If you want the Term Grade column in your
Gradebook to show all six weeks and semester average
NOTE: options in the drop down menu, you must have all the
Displaying SW3 grade period makes Six Weeks boxes checked under the Display Grade
EX1 & SM1 display in the Gradebook. Period. You do not have to check the boxes in the
Displaying SW6 makes EX2 & SM2 Display Assignments column.
display in the Gradebook.
Category and Category Weight
Setup
Click the Categories button.
Page | 10Click the Add/Edit Categories button
You will now see a list of categories
that are available.
NOTE:
If you would like a category added to
the list of categories that are available
you will need to submit your category
name to Gwen Mayo at
gmayo@lcisd.net to have it added.
Click to uncheck the categories that
you don’t want to use.
Next, type in the percentage that you
want each category to be weighted.
This must total 100. If you
choose only 1 category then put
100 in that Modified Percent
column.
Click Save
NOTE:
NOTE:
It is best to do your category setups for
the entire year all at once. Then you do The option to add or change category weights is NOT AVAILABLE
not have to worry with them again. after the first six week progress reporting period closes.
Check the District Grading Policy Categories & Weights must be set up prior to this time. After the
approved categories and weights. close of the first six weeks progress reporting period you will need to
contact Gwen Mayo at gmayo@lcisd.net for assistance
Contact your campus administrator if
you have further questions.
If you want to use these same
categories for your other classes click
“Use These Categories For My Other
Classes” button.
Page | 11Check the boxes next to the classes that
will use the same categories.
NOTE:
Some of the classes will automatically
check for you since they are tied
together.
NOTE:
Click Save when you are finished.
The classes you wish to apply the same categories to must be using
the same Scoring Method.
ASSIGNMENTS:
Hover over the Assignments tab and
choose Add Assignments
OR click on Assignments.
If you click on Assignments you will
see the screen to the right
Click Add.
Page | 12Adding Assignment
Select your Category.
Enter a Description of the
assignment.
Entered Date: This shows
what day you actually entered
the assignment into the system.
It is an auto stamp date and
cannot be changed.
Select the Date of the
Assignment
Select the Proposed Due Date
Enter the Actual Due Date.
Enter the Max Score.
Enter the weight, if desired,
using the Weight Multiplier.
(2.0 means the assignment will
count twice without you having On this screen you may choose to add this assignment to multiple
to put the assignment in twice.) classes or subjects. Simply check the boxes in desired classes.
You will go to the other class(es) to score the assignment.
Proposed Due Date Idea
Saving Options Use the Proposed due date for the date that the assignment is due
Choose Save and Back if you from the students and setting the actual date for a couple of days later
are finished. to allow for grading. The assignment won’t show as missing until
Choose Save and Add Another after the actual due date.
if you want to add more
assignments.
Choose Save and Score to go Posting to Family and Student Access
to the screen to enter grades. You can uncheck these two options if you have chosen to temporarily
Choose Attach if you wish to add an assignment without grades or are creating a future proposed
add an attachment such as the assignment. This will keep the assignment from showing as
actual assignment. “missing” in Family/Student Access which can be confusing for
WARNING: Be aware of parents and students.
copyrights on items you attach.
Back – takes you back to the NOTE:
prior screen without saving.
It is very important that you check these 2 boxes once grades are
entered so parents and students can see accurate grades in
Family/Student Access.
Page | 13Save and Score
If you click Save and Score you will
be taken to this screen.
The score code will show up as an (*)
to start with.
You can enter any of the codes found in
the box to the right in the Special
Codes column if applicable.
You can also click on No Count or
Missing
You can enter a Comment for each
student.
Mass Assign Score
The Comment column is used
If you want to assign a blanket grade, click on the Assign All Scores
to enter individual comments
button, type in the score to be given and click Apply.
for the students on this
assignment only.
If you want to add a “curve” or extra points to all students on an
assignment, click on Adjust All Scores, type in the points and click
WARNING: Be careful using Apply.
the comment column since it is
live and the parents will see it You can also Remove All Scores, Set All to No Count, Remove All
immediately. No Count, and Remove All Missing.
Click in the Score box to enter the You can hall ALL missing assignments show as a 0 in the Gradebook
grade for each student. You can press by clicking on the Mark un-scored as 0 and Missing button.
enter to go to the next student.
The Mass Assign Option can also be accessed by clicking on the
Be sure to click SAVE when you are
Assignment name at the top of the column and choosing Score
finished or your grades will NOT be
Entry.
saved.
Deleting an Assignment
Select the assignment to delete by
clicking on the Assignment name at the
top of the column.
Click Delete.
Page | 14You will see a popup box confirming
that you want to delete the assignment.
Click OK to verify.
Cloning an Assignment
Select the assignment you wish to clone
by clicking on the assignment heading.
Click on Clone.
Select the classes to copy the
assignment to by checking the box(es).
NOTE:
Click on the class you are currently in
to deselect it so it does not clone an
assignment in the same class or subject.
Click Save and you are back to the
main assignment list.
You can go to the class you cloned the
assignment to enter the scores for that
class.
Quick Scoring
NOTE:
This option is NOT AVAILABLE after
a grading period has closed!
Quick Scoring allows you to enter
scores for various assignments listed
without having to open the individual
assignments.
Click Quick Scoring on the menu bar.
Enter grades/scores for the desired
assignment(s) and SAVE when done.
Page | 15Non-Core Subject Grades Non-core subject classes such as PE, Art, Music are required to
have a minimum of 2 assignments per six weeks – 1 for the
progress report period and 1 for the end of the six weeks.
Please contact your campus administrator if you have any questions.
Viewing Cumulative Grades
To view the cumulative grades for the
class:
Click the down arrow under the
Term Grade column
Select the progress report
period, six weeks period or final
grade to see the averages.
Grade Proof Sheets
Open your Gradebook and mouse-over
Reports.
Scroll down to click Grade Proof
Sheet.
NOTE:
GRADE PROOF SHEETS CAN BE
VIEWED AT ANYTIME.
HOWEVER, THE OFFICE WILL
PRINT AND PROVIDE YOU WITH
A PAPER COPY OF YOUR GRADE
PROOF SHEETS FOR
VERIFICATION PRIOR TO
PROGRESS REPORTS OR REPORT
CARDS GOING OUT.
Page | 16In the drop-down box, select the grade
period for which you wish to print.
Click Print
NOTE:
Print is actually preparing the report
for viewing NOT printing.
Once the report is prepared you will
have the option to print.
Click Display Report to see the file.
The file will open in a PDF Reader and
you will be able to print it out from
there.
Click Back and you will be at the
report Screen.
To Select Different Classes
Click on Select Different Classes.
This option will take you to the screen
to select different classes or all of the
classes so that you can print them
without having to open each
Gradebook.
Page | 17Check/uncheck the classes you want to
print.
Click Print
Reports
Reports will offer you a variety of
reports for attendance, Gradebook,
progress reports, partial progress
reports, class information and report
cards.
Scroll down to get to the lower part of
the report options.
Take some time to view the different
reports to see which ones you like and
want to use.
Grade Sheet Report
The Grade Sheet Report is under the
Gradebook category and gives you a
printout of your Gradebook that could
be used at parent conferences.
You will see 3 sets of reports in
different font sizes. The larger the font
the less columns per page in the report.
Page | 18You can also create new templates with
the information you specifically need
by using the Add new Template
button.
Blank Grade Sheet will give you a list of your
students in alphabetical order as they appear in your
Gradebook along with blank columns that could be
used to record assignments or as a checklist form.
Drop Lowest Score
This option allows you to drop
the assignments that most
negatively affect the students
overall grade in a designated
grading period.
Click on Display Options on the menu
bar.
Choose Drop Lowest Score under the
Tools section.
Page | 19Choose a grading period to drop the
lowest score.
Note:
Closed grading periods are grayed
out and cannot be accessed.
You can uncheck boxes next to
students you wish to exclude from this
process.
Click Next.
You can also choose assignments
and/or categories to exclude from the
process if you do not wish to include
benchmarks, tests or special
assignments in the drop process.
Click Next.
You will be given a list to review
before processing the drops.
Dropped grades are shown in the
gradebook as *AD (Assignment
Dropped)
Click Process Drops to have the
gradebook calculate and drop the
lowest grade.
Page | 20Advanced Drop Lowest Score
This option allows you to drop
multiple assignments within the
same grading period.
Click on Display Options on the menu
bar.
Choose Advanced Drop Lowest Score
under the Tools section.
Choose a grading period to drop the
lowest scores from.
Note:
Closed grading periods are grayed
out and cannot be accessed.
You can uncheck boxes next to
students you wish to exclude from this
process.
Click Next.
Page | 21You can also choose assignments
and/or categories to exclude from the
process if you do not wish to include
benchmarks, tests or special
assignments in the drop process.
On this screen choose the number of
scores you will to drop from the
subject or class.
Click Next.
You will be given a list to review
before processing the drops.
Dropped grades are shown in the
gradebook as *AD (Assignment
Dropped)
Click Process Drops to have the
gradebook calculate and drop the
lowest grades.
Electronic Discipline
Referrals NOTE:
Short-term subs, long-term subs, student teachers and TAs will use the
traditional paper discipline referral forms.
Login to Skyward Gradebook.
Skyward will open on your
Educator Access Plus Home
Click on the Administrator
Access tab and choose Student
Search By Entity.
NOTE:
Depending on your access level,
you may have other options under
Administrator Access.
Page | 22Search by last name for the student
you are giving a referral by typing
in the light purple search box in
the lower right corner.
Highlight the correct student and
click on View Student
Information button.
Click on Discipline on the left.
Page | 23Click on Add.
Fill in the Discipline Form and click Save (This is the
submit.)
Check the box Parent Notified if you did so
prior to submitting the form.
o Refer to your campus policies about
notifying parents prior to disciplinary
actions.
There is a Spell Check button available.
Please use it as this report will eventually go
to the parent.
Once the referral is Saved an email will be
sent to the principal in charge of discipline.
o Refer to your campus administrator if
you have any questions.
NOTE:
When writing up the referral in the comment box, DO NOT refer to other students involved in
the incident by name. Refer to them as “other student” or “another student”. Parents do not
need to know the names of the other students involved in the incident – only their own.
You will need to do a separate referral for each student involved in the incident.
Page | 24Requesting a Grade
Change after a Closed When to use this:
Grading Period
To make grade adjustments
This includes closed
progress report periods To add a grade for a student who was absent or had an incomplete
if you want the grades grade at the end of the grade period
to reflect on the
progress report. To add an overlooked assignment
Progress reports are To edit and back date an assignment that is not falling within the
only a snapshot of the correct grading period
grades at that moment.
You do not have to
request grade changes Resubmits
for progress reports To resubmit grades for a grading period that is not showing on the progress
once the progress report report or report card – this can occur when the auto posting window and
has gone home. nightly updates to the Skyward server conflict with each other. Doing a
resubmit will force the gradebook to recalculate and update.
If you are doing a resubmit, you only have to Request a Grade
Change to temporarily open the reporting period and then turn right
around and Complete the Grade Change.
Login to Skyward
Click on My
Gradebook.
Open desired class or
subject.
Click on the Options drop
down menu on the grade
column for the PR (Progress
Report), SW (Six Weeks), or
SM (Semester) or FNL (Final)
in which you want to request a
change.
Select Grade Posting Status
for Term SW, PR, SM or
FNL.
Page | 25Click on Request Grade
Changes button.
This gives you a 2 hour time
window in which the grading
period is temporarily open to
make the necessary changes,
(NOTE: If “Complete Grade Changes” ever appears on this button
additions or adjustments.
instead of “Request Grade Changes”, it means you have recently
requested changes for that class without completing the grade change
and you still have time in the two hour window to make them without
needing to enter a reason again.)
Type in the Reason for
Requesting Grade Change.
It does not have to be a
long explanation or
even a complete
sentence. (EX: grade
change; add grade,
back-date; resubmit;
etc.)
Click on Yes.
You have a 2 hour window to
complete any needed changes.
Once you have completed the
necessary changes, click on the
Options drop down menu
again on the grade column you
chose to make a grade change
request.
You should now see 2
additional options.
Click on Grade Posting Status
for Term SW, PR, SM or
FNL.
Page | 26Click on the Complete Grade
Changes button.
Click on Yes
***************NOTE: VERY IMPORTANT*************
Final Step:
Send an email or call your PEIMS secretary notifying them
that you have made adjustments so they can complete the
process on their end by reposting the grades so they calculate
correctly. Progress reports or report cards can then be run or
re-run as needed.
Page | 27Adding Progress Report Auto posting comments is a huge time saver. If you are one who hand writes
and Report Card comments on report cards, this could save you a lot of time.
Comments
Login to Skyward.
Go to Teacher Access.
Choose My Gradebook.
Choose the gradebook
you wish to enter.
Roll over Posting and
click on Post
Comments.
Click on Post Comments link
(in blue font) under the current
six weeks.
Click in the C1 box next to the
student you wish to add a
comment code and type in the
corresponding number code. To
see the codes available click on
the View Comment Codes link
(in blue) in the upper left.
You can add up to 6
codes per student.
You can post a Default
comment to all blanks,
but be careful with this
option as it auto fills for
ALL students and the NOTE:
code may not be
applicable to ALL Comments will not show up in the grade book, but they will print on the
students. report cards.
Page | 28Additional Options
Show Dropped Students
o By clicking on
this you will see
former students
in the class that
have dropped.
Hide Grade Columns
o By clicking on
this you will hide
the PR and SW
columns.
Alert Legend
o By clicking on
this you will see
the alert legend
that corresponds
to student alerts
such as At Risk,
Disability, etc.
Adding a Freeform Comment
You can add a comment
of your chosing by
clicking on the icon at
the end of the row for
the student you wish to
add a comment.
A new window will
open and you may enter
any comment and click
OK. The comment will
show for that student
only.
Once you click OK, you
will go back to the full
class list. Complete your
comments and then click
SAVE.
Page | 29Emailing a Class, Classes This option saves you the time of creating email groups in GroupWise and it
or Select Students is always current as long as parents keep the office updated with new email
addresses.
Through Skyward
If parents notify you of and email change, send a courtesy email to the
office with the information as a double check.
Login to Skyward.
Go to Teacher Access.
Click on My Classes
Choose a class by clicking on
Class Options (blue font after
description on right).
Choose Message Center (on
left).
Page | 30Choose one of the following
options found on the right side of
the window:
- Add Message for
Multiple Classes: Add a
new message for ALL
students in a selected
class or classes.
- Add Message for
Current Class: Add a
new message for the
current classes or selected
students in the current
class.
FAVORITES FEATURE
Look for the Favorites Feature throughout Skyward. When it is available, you will see a gray star next to the
page title. Click on the Star and add that item to Favorites. The star will then turn yellow to let you know the
page is listed in your Favorites for easy access from your Homepage.
You can jump from one Favorites page to another by clicking on the Favorites Drop Down Menu when it is
available on a page.
Page | 31Multiple Classes Option:
Type a Message
Summary and Message
Detail. This is like the
subject line and body of
the email in a regular
email message.
Select or unselect
Posting Options if you
wish the information to
show in Family and/or
Student Access.
Select or unselect the
options you wish under
Emailing Options.
Select Post to All
Classes if you choose
OR
Check the boxes next to
the specific classes you
wish to email.
Save
Page | 32Current Class Option:
Type a Message
Summary and Message
Detail. This is like the
subject line and body of
the email in a regular
email message.
Select or unselect
Posting Options if you
wish the information to
show in Family and/or
Student Access.
Select or unselect the
options you wish under
Emailing Options.
Select Post to All
Students if you choose.
OR
Select Clear All and
check the boxes next to
the specific students you
wish to email.
Save
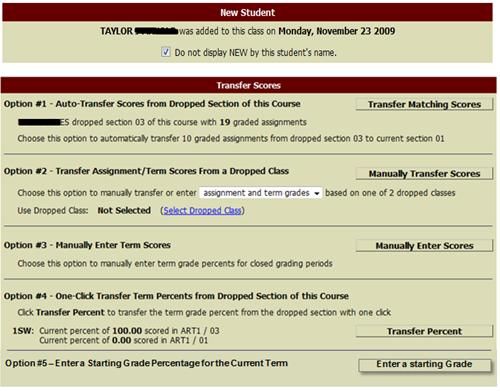
Page | 33The NEW Button allows you to:
The NEW Button Transfer term scores from a dropped section
Transfer term scores from a dropped class
Manually Enter Term Scores
Enter a starting grade percent for the current term
DO NOT IGNORE IT! NOTE:
The NEW Button is like an alert. It is notifying you that you have a new
student and that you need to do a grade transfer.
This is extremely important for awarding credit and GPA and for accurate
records for the state.
When you open your grade
book, you will see a yellow
button to the right of
students that are new to your
class or section.
When you click on the
button, you will be given
several options.
NOTE:
Not all options will
always be available
depending on the nature
of the nature of the
NEW student.
If options are not
available it will note that
on the right and give a
reason under the option
choice.
Read all information
carefully!
Page | 34Option #1 – Auto- DO NOT USE THIS OPTION!
Transfer Scores from
Dropped Section of this
Course
Option #2 – Transfer
Assignments/Term Scores
from a Dropped Class
This option is available if a
student has any previously
dropped classes from any
class on the campus and is
new to your class. (AKA:
Schedule Change Students)
It is used typically if a
student goes from one
class on the grade level to
another class on the grade
level.
Click on the drop down menu
and choose “term grades
only”.
NOTE:
DO NOT USE the “assignment
and term grades” option.
Click on Select
Dropped Class (blue
font)
Choose a class to
transfer scores from by
clicking on the radio
button at the beginning
of the row.
NOTE:
If you are unsure of the class to
transfer grades from, contact
your counselor.
Click on Manually
Transfer Scores.
Page | 35The term grades from the
previous class will show on the
left.
Enter dropped class
Report Card column
averages for the
appropriate six weeks in
the New Percent column
on the right.
In this example the 100
in the 3SW is NOT
transferred from the
dropped class as the
grade was not a final
term grade. The final
term grade comes from
the current class.
NOTE:
DO NOT put the averages for
the current section (your class).
Only transfer dropped class
term grades.
Click on Save Term
Grades and Enter
Semester Grades to
continue.
You will enter Semester
grades, if applicable and
click on Save Semester
Grades and Finish.
Check your gradebook and see Follow the directions for requesting a grade change (resubmits) beginning on
if the semester grade in your page 25 in this manual.
gradebook is bold. If it is, you
will need to request a grade
change and resubmit the See page 44 for Bold Grades with Asterisks in the Gradebook in this
semester average. manual.
Page | 36Option #3 – Manually
Enter Term Scores
This option is used for
students new to the
district OR who do not
have any dropped
classes available.
Click on Manually Enter
Scores.
Enter grades from the
Report Card column in
the New Percent
column.
Click Save Term If all you need to enter is a semester
Grades and Enter average then skip the first step and click
Semester Grades to the Save Term Grades and Enter
continue. Semester Grades button to move on and
enter Semester Grade only.
Enter the semester grade
from the Report Card
column into the New
Percent column.
Click Save Semester
Grades and Finish.
Page | 37Option #4 – One-Click
Transfer Term Percents
from Dropped Section of
this Course
This option will only be To transfer ONLY the percent averages from the previous section of
available if a student the current course, click the Transfer Percent button for each
transfers from one completed six weeks.
section to another The grade listed on top is the grade in the student’s previous section.
section of the same The grade on the bottom is the grade in the student’s current section.
course.
ART1 = Course / 03 = Section
Option #2, Option #3 and Option #4 only take care of grades for completed/closed terms.
If it is in the middle of a current term, you must also account for the student’s withdraw grade from the previous
school or course.
This is the Entry/Starting grade for the current/open term in your class.
You will use Option #5 to enter a starting grade percentage.
Using option #5 will save you time as it inserts the starting grade percentage into every assignment you
currently have for the current term. You do not have to open each individual assignment to put in a grade.
Option #5 – Enter a
Starting Grade
Percentage for the
Current Term
This option is used when
you want to enter a starting
grade for a student when
the current term has
already begun.
Click on Enter a
starting Grade.
Type in the Starting
Grade Percent
provided by the registrar
All missing grades for the student, from the start of the current term up to (and
including) the student start date, will be assigned the starting grade unless they are
marked “no count” or are after the student start date.
Page | 38***************NOTE: VERY IMPORTANT*************
Final Step: TURN OFF THE NEW BUTTON
When you have taken care of any withdraw grades and transferred all the necessary
percentages, then click on the button again and select the box that says Do not
display NEW by this student’s name. The button will disappear, and you will
know you have taken care of all their transfer grades.
ADDITIONAL NOTE:
If the new button is accidently turned off on a student you know to be new to your class you can get to the same
information by clicking on the student’s name in your Gradebook and then selecting the New Student tab at the
top of the page.
Page | 39Grade Adjustments Grade adjustments are most commonly used to raise a student’s six weeks or
semester grade from a 69 (failing) to 70 (passing). Other situations can occur,
but are very student specific.
Grade adjustments can be done for a Six Weeks (SW), Semester (SM) or
the Final Average (FNL).
If you have any questions, contact your campus administrators.
Open your grade
book and the class of
the student whose
grade you wish to
adjust.
Click on the SW drop
down menu and
choose Enter Term
SW/ Grade
Adjustment.
Insert the new grade
for the student in the
Grade column.
Click Save.
You will be taken back to the
Main Screen for the current NOTE:
classes gradebook.
If you wish to make a grade adjustment
A new column will now be in a closed grading period, you will need
visible next to the SW to request a grade change to open the
column. The SW Grade closed grading period.
Adjust column will show the
points necessary to adjust the Follow the directions for requesting a
students grade to the desired grade change beginning on page 25 in
score. this manual.
Page | 40Incompletes and Incompletes are used when a student has not completed assignments for
Medical Overrides a grading period that has closed.
Medical Overrides are used when a student has incomplete assignments
due to long term medical illness or hospitalization.
o Medical Overrides can stay in place until the student is medically
released back to school and has a reasonable time to complete
make-up work.
If you have any questions concerning the handling of Incompletes or Medical
Overrides, please contact your campus administrators.
Open your gradebook
and the class of the
student whose grade
you wish to override.
Click on the SW drop
down menu and
choose Enter Term
SW? Grade
Adjustment.
Click on the drop
down menu in the
override box on the
row for the student
you wish to create an
override.
Choose
(I Incomplete) or
(M Medical)
Save
An I or M will now
show in your
gradebook.
Once students have made up grades and you have entered them into your gradebook, you must go back
into Grade Adjustments and remove the Incomplete or Medical Override.
Page | 41 Open your
Gradebook and the
class of the student
whose grade you wish
to override.
Click on the SW drop
down menu and
choose Enter Term
SW? Grade
Adjustment.
Click on the drop
down menu in the
override box on the
row for the student
you wish to change
an override.
Choose the blank.
(- )
Save
NOTE:
If you wish to create or change an Incomplete or Medical Override in a closed grading period, you will need to
request a grade change to open the closed grading period.
Follow the directions for requesting a grade change beginning on page 25 in this manual.
Page | 42Bold Grades with
Asterisks in the
Gradebook
Bold grades with an
asterisk next to them DO NOT IGNORE THESE!
in SW, SM and FNL
columns appear This example shows that the student had a 74 at the close of the semester BUT
when there is a and 84 is calculating and showing in the live Gradebook because additional
discrepancy between grades were added and the PEIMS secretary not notified so reposting
the average at the (recalculation of the grade) should be done.
close of the grading
period (what would To correct this issue a Resubmit must be done. This is just like requesting a
show on the report grade change so follow the directions for requesting a grade change beginning on
card) and what is page 25 in this manual.
currently calculating
in the Gradebook. NOTE:
Progress Report columns are slightly different in that they are a snapshot of the grades
for a student.
Bold grades DO NOT have to be addressed in the PR columns unless there is a specific
grade that is being added that you want to calculate in with the progress report.
Page | 43Student Groups
The Student Groups option
allows you to divide students in
the class into a maximum of ten
possible groups based on
specific learning and/or grading
situations. Separate
assignments can be created for
each Student Group.
You can move a student to a new
Student Group only if all
assignments match or all scores
for assignments have been
removed.
Click on Student Groups
under Display Options
tab.
Enter the group names in
the Group Descriptions
Identify the group to
which each student
belongs by selecting the
NOTE:
appropriate button under
the column heading for This should not be used if students will be switching groups because it is
that group. difficult to move students from one Student Group to another. It is designed
Save for static groups within your classroom.
DO NOT use this for Guided Reading or
Math Groups!
You are now operating
two Gradebooks
within a single
Gradebook. The
Gradebook Main
screen will now
display students based
on their student group.
Page | 44 You can choose to
Show all groups on the
Gradebook Main
screen. The number to
the right of the
student’s name shows
the student group
number.
Assignments can be
created for the specific
student group that is
currently being viewed
in the Gradebook.
These assignments
will not appear for
other groups on
reports or in
Family/Student
Access.
After setting up
student groups, a new
option of Apply the
assignment to All
Student Groups is
added to the Add
Assignment screen.
For ANY questions about Skyward Gradebook, please submit a
HelpDesk ticket to Gwen Mayo, call EXT. 9008 or send an email
to gmayo@lcisd.net .
Page | 45You can also read