Editor Manual - Floorplanner
←
→
Page content transcription
If your browser does not render page correctly, please read the page content below
Editor Manual
Floorplanner Editor Manual

          1 Overview                            7 Build tools:
          2 Sidebar                                  a Draw Rooms and walls
          3 Canvas                                   b Draw Surfaces
               a 2D view                             c   Doors and Windows
               b View Settings                       d Structures
          4 3D view                                  e Background Drawing
               a Orbital and walkthrough mode   8 Information tools:
               b How to navigate                     a Room types
               c   Adding cameras                    b Tekst
               d Scenery image                       c   Symbols
               e Create a render                     d Lines
          5 Project settings                         e Dimension Lines
               a Levels                         9 Decorate tools:
               b Exit, rename and Collaborate        a Colors
               c   Viewer & Spaceplanner             b Materials
               d Downloads & Light settings          c   Furniture
          6 Floor menu                               d Auto-Layout
               a Floors                         10 a Export 2D
               b Design actions                      b Export 3D
                                                11 Keyboard shortcuts
                                                12 More Help

Editor manual   www.floorplanner.com                                          page 2 of 53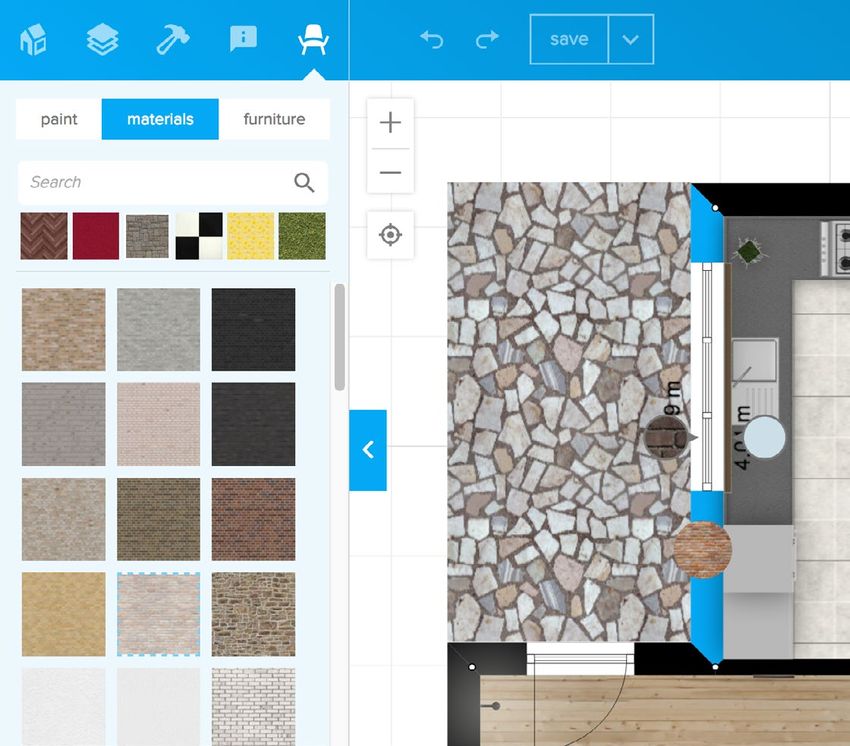
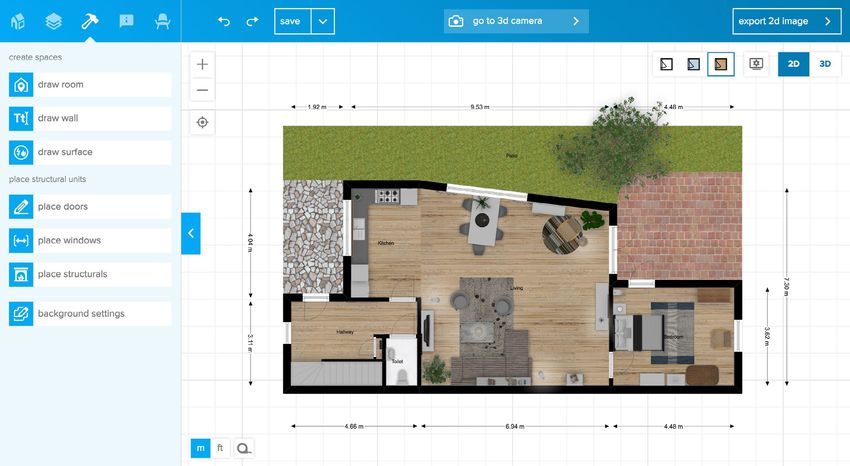
1 Overview
Below you see the floorplan editor. In this tool you draw your floorplan,
add doors, windows, and other architectural elements. You can label
your rooms and add furniture.

        Sidebar         Zoom         Undo/Redo           Save          Camera view   Canvas   Export 2D

                                                                                                              2D / 3D view

                                                                                                               View settings

                                                                                                               Display style

                                                                                                          units / tape measure

Editor manual     www.floorplanner.com                                                                              page 3 of 53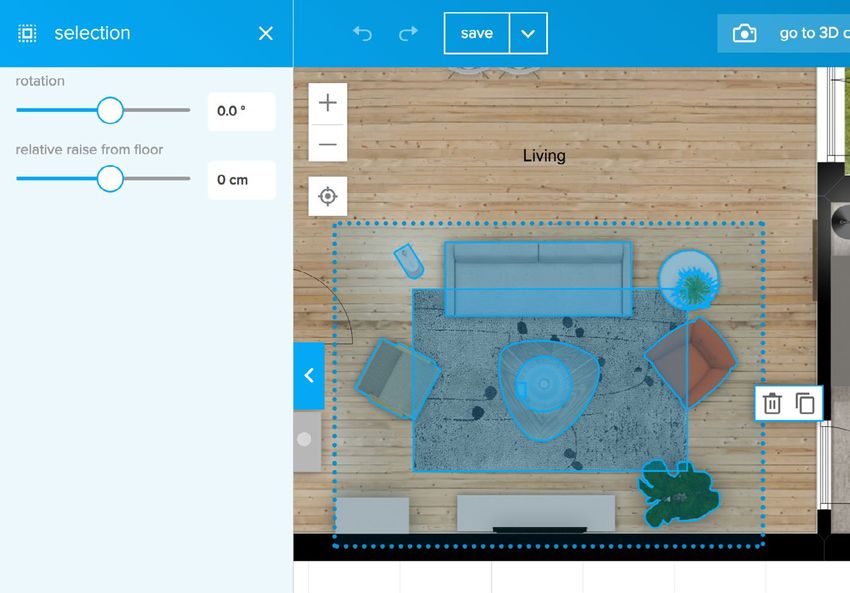
2 The Sidebar: Home
The sidebar is the main area where all the tools can be found to manage
your project and floors, create and detail your floorplan and furnish your
rooms.

                                                           Project settings                                        Floor menu
Exit to dashboard / Project actions                        The options that show up here are depending on          Projects from level II you can have multiple
                                                           your project level. Level II (shown here) gets down-    floors and designs. They can be created and
           Build tools Decorate and furnish                load FML and collaborate. Level III gets embed and      managed in your floor menu. See floor menu,
                                                           sharing options.                                        page ...)

                                                                                            Exit to dashboard
                           Technical details

          Floor and design menu                                                                                                                    Add a floor

                                                                                            Collaborate via link

                                                                                            Download fml

                                                                                                                                                   The active floor

                                                                                                                                                   The active design

                                                                                                                                                   All designs
                                                                                                                                                   in this floor

Editor manual     www.floorplanner.com                                                                                                                   page 4 of 53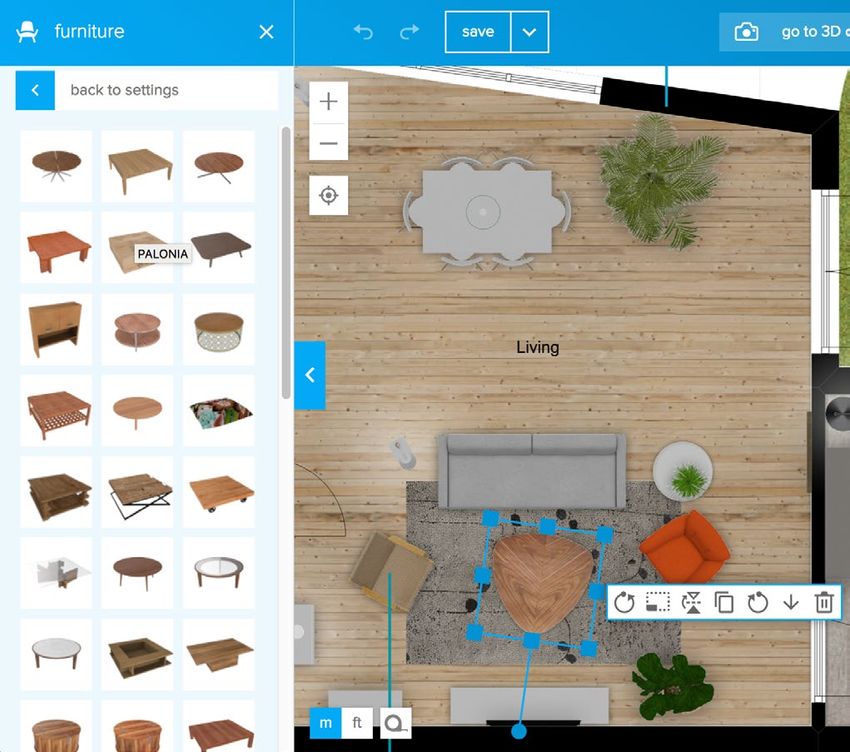
2 The Sidebar
The sidebar is the main area where all the tools can be found to create
and detail your floorplan and interior design.

 Build                                                      Infomation                                    Decorate & Furnish
 You start with drawing your actual floorplan in            Add usefull information and make your plan    Apply paint or materials to your walls or floor.
 the build section. All tools are here to create            easy to read. Label your room types, add      Search or huge library of furniture to furnish
 the walls, windows doors and structures.                   dimensions, text, symbols and lines.          plan.

                                                                                                                                          color, material furniture
                               Draw Rooms                                               Room types
                                                                                                                                          Search through our
                               Draw Walls                                               Tekst                                             libraries of items
                                                                                                                                          by category
                               Draw Surfaces                                            Symbols / Icons

                               Doors                                                    Lines

                               Windows                                                  Dimensions

                               Structures

                               Background drawing
                               (to trace a floorplan)

Editor manual    www.floorplanner.com                                                                                                                page 5 of 53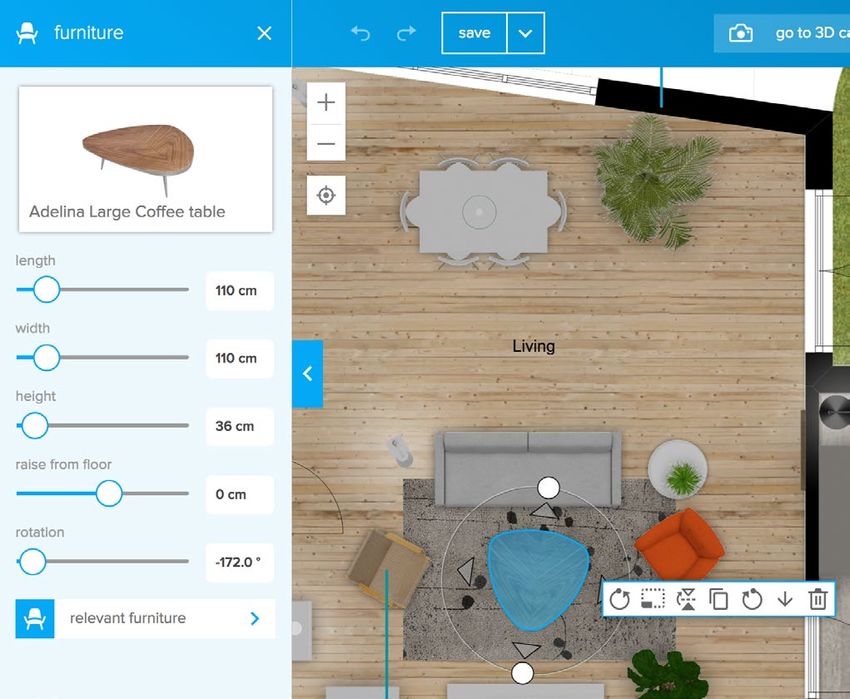
2 The Sidebar for selected objects (wall / room / furniture)
When you’ve selected a wall segment, the sidebar        When you’ve selected a room, the sidebar will show info about the
will show info about this item. You can edit the wall   room. You can edit the room label. You can show the total area. You
size properties. You also see which materials are       can auto-furnish your room. You also see which materials are applied to
applied to this wall.                                   this room and find furniture relevant to this room type.

Editor manual     www.floorplanner.com                                                                                            page 6 of 53
3a Canvas, 2D view
In your canvas you draw walls, rooms, lines etc. Other items can be
dragged and dropped.

                                                                      2D View settings
                                                                      See this page
Main navigation
To pan, click and drag your
left mouse button on an empty                                         Interactive Snapping
space in the canvas, or on
                                                                      When drawing or dragging
empty spot on a surface.
                                                                      items you will often snap to
Use your mousewheel to zoom
                                                                      other items in your canvas.
in and out.
                                                                      Hold S to temporarily
                                                                      disable snap.
Selecting and deselecting
Click on objects to select
them. This will activate the
sidebar, and give some han-
dlers and buttons and info in
the canvas.
Click anywhere in the
canvas to deselect,

or press esc     on your
keyboard.

Editor manual     www.floorplanner.com                                                 page 7 of 53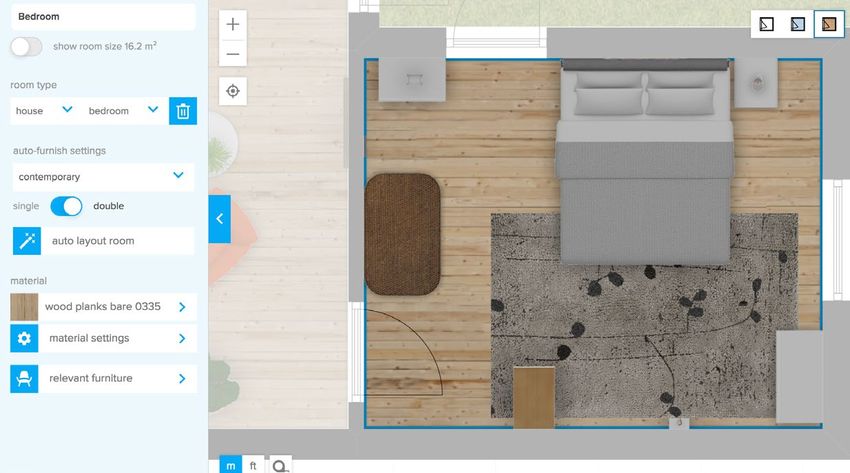
3b Canvas, View settings
There are several options you have to change the appearance of your
plan in 2D and the amount of information you want to display.

                                               Set 2D view:            Black and white
                                                                       All surfaces appear in
                                                                       white. All furniture as
                                                                       black and white outlines

                                                                       Colored outline
                                                                       All surfaces appear in
                                                                       plain color. All furniture
                                                                       as black and white
                                               Toggle any              outlines
                                               elements
                                               on or off.

                                                                       Material and shadows
                                                                       All surfaces appear in
                                                                       seleced materials. All furni-
                                               Set units               ture in their real materials.
                                               to Meter or Feet        Walls and furniture have a
                                                                       light dropshadow.
                                                                       Lights cast light.
                                               Tape measure
                                               To measure a distance

Editor manual    www.floorplanner.com                                                                  page 8 of 53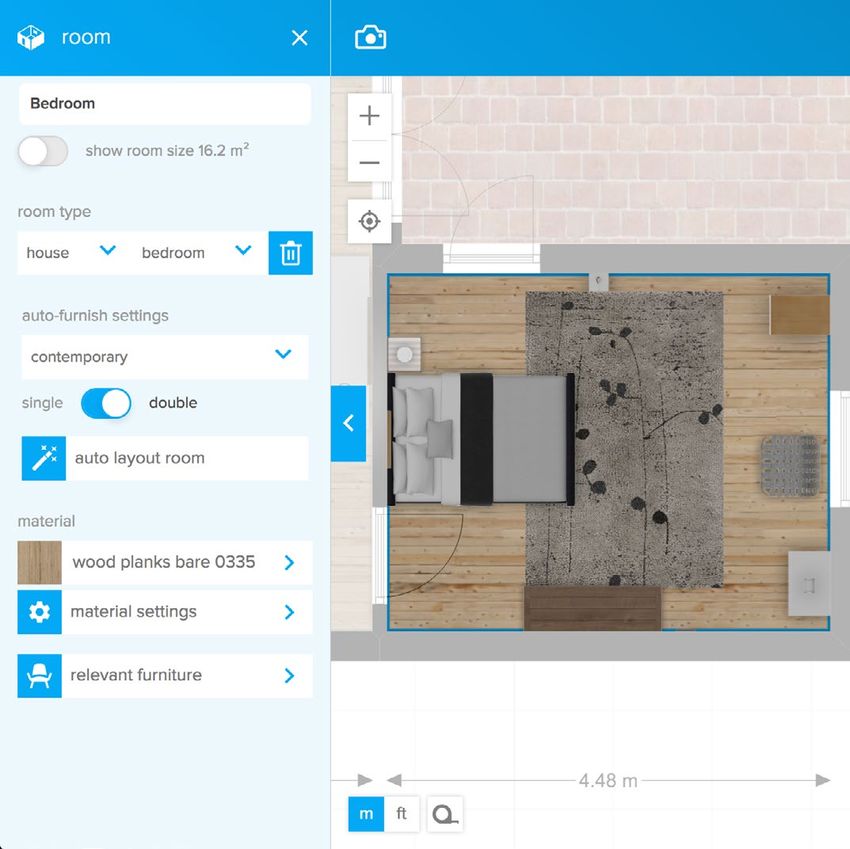
4a 3D View: Orbital and walkthrough
In floorplanner you can get view the plan in 3D   Camera in orbital mode

Switch from 2D to 3D view
Click the camera or 3D button to go to
the 3D view mode. Here you can view
your plan from above (orbital mode)
or from eye-level (walkthrough mode)

                                                  Camera in walkthrough mode

Editor manual    www.floorplanner.com                                          page 9 of 53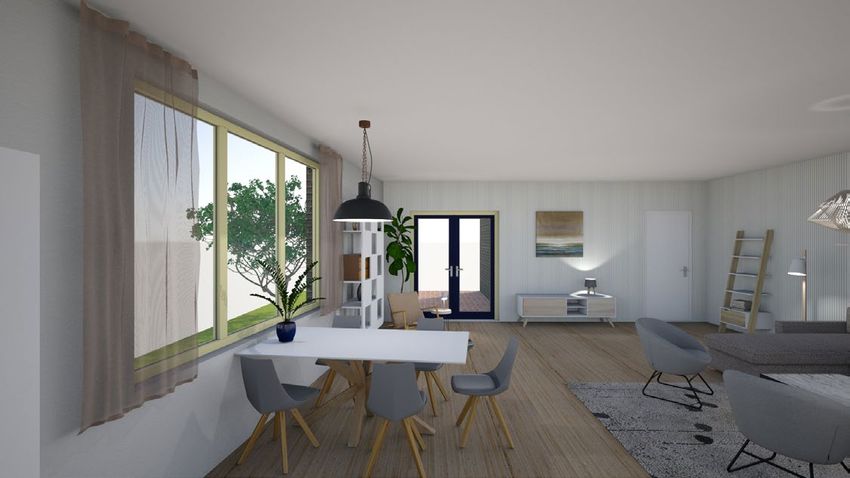
4b 3D view: How to navigate
Once you’re in the camera (or 3D) mode, here’s This button places
how you can change you camera position. you camera to the
center of the room
on eye-level.
Double-click on a surface
moves your camera to
that position
You reset your view
to top-view orbital by
pressing this button:
Tip: you can also use to shift the
camera position to the front, back, right, or left.
3D View settings
Hide walls, doors and windows above a chosen
height.
Display the camera frame applied for renders
Show/Hide automatically generated ceilings
Tip: if you have different wall heights this can
give problems. Better use custom surfaces with
an elevation in that case.
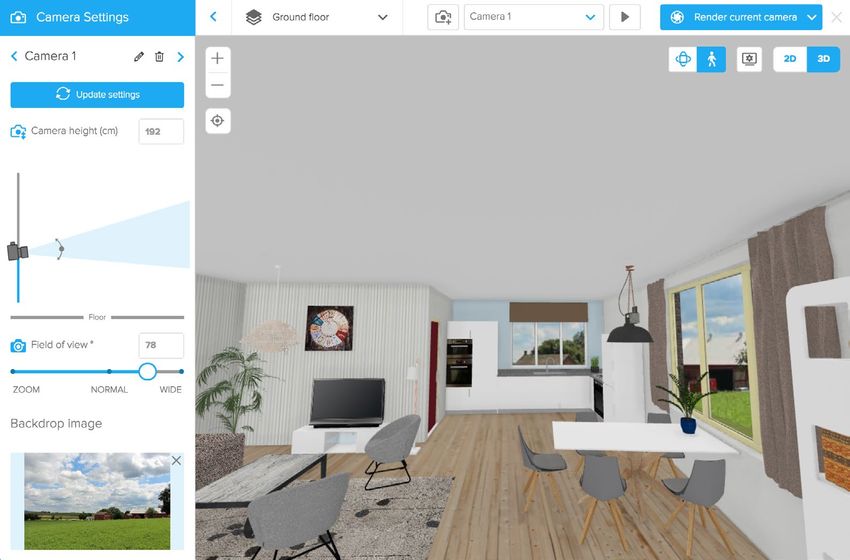
Editor manual www.floorplanner.com page 10 of 534c 3D view: Adding cameras
Per floor you can add multiple cameras. This way
you can save different views. Furthermore you can
easily jump from viewpoint to viewpoint. You can use
them for a flythrough presentation of your house.
In the side bar you can handle the
Create a new Click the dropdown to Click the play button
active camera
camera with the see all the cameras you to start the fly-through
current view. have in the active floor. presentation.
rename your camera This button will also
show up in the view-
Switch to next/previous camera mode of your project.
remove active camera
Update the last changes
Drag your active
to the current camera.
camera up or down to
change the order.
Change the camera
height and vertical angle
Change the camera
field of view.
Editor manual www.floorplanner.com page 11 of 534d 3D view: Scenery image For each camera you can upload a scenery image. This will show up outside your windows. Click on Add image in the bottom of the sidebar It has to be a .jpg image. Best is to use images in a 16:9 ratio, on a high resolution Editor manual www.floorplanner.com page 12 of 53
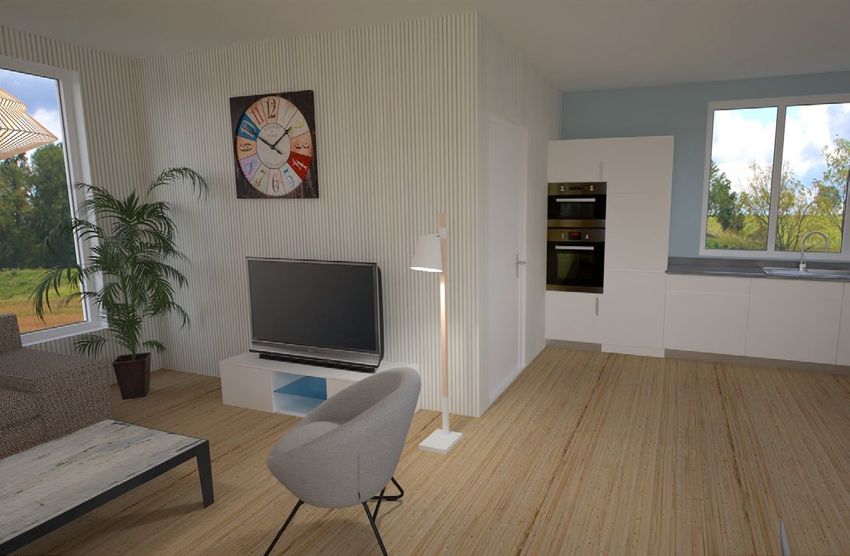
4d 3D view: Create a render
With a camera you can create a photorealistic image.
                                                        The export levels are:
There are several render quality levels you can get.,
depending on which level your project is.

                                                                                 for all project levels

                                                                                 for level II projects

                                                                                 for level III projects

                                                                                 for level IV projects

                                                                                                    SD render
                                                                                                    960 x 540 pixels

                                                                                                                      HD render
                                                                                                              1920 x 1080 pixels

Editor manual    www.floorplanner.com                                                                                  page 13 of 53
5a Project Settings: Levels
Level I Level II Level III Level IV
Export options Export options Export options: Export options:
2D: SD; JPG,PNG 2D: HD; JPG,PNG,PDF 2D: HD; JPG,PNG,PDF 2D: HD; JPG,PNG,PDF
3D: SD 3D: HD 3D: SD,HD,360 pano 3D: SD,HD,360 pano,IRAY
Publish: None Publish: None Publish: Viewer, Spaceplanner Publish: Viewer, Spaceplanner
Download: Products list Download: FML, Products list Embedded viewer Embedded viewer
Download: FML, Products list Download: FML, Products list
Editor manual www.floorplanner.com page 14 of 535b Project Settings: Exit, Rename & Collaborate
Exit Project Name
Rename your project here.
Go back to your Dashbaard here, to see your project overview,
account settings, billing info etc.
Collabarate
The Collaborate option lets you give
someone else the option to edit your
project for 14 days. He or she gets full
controll over the project in the editor,
without need of a floorplanner account.
Any changes saved will be saved to the
original project.
Editor manual www.floorplanner.com page 15 of 535c Project Settings: Share
You can share your plan in a Viewer Share in a viewer as a separate page
or as a Spaceplanner. or embedded in a website. Someone
can view each floor in 2D and 3D and
zoom in and out, but can’t add any
furniture, modify or save anything.
To share the project in a viewer it must be set to public
Share in a Spaceplanner:
Let someone play around with the plan and furnish
it with a limited set of furniture.
A link to the plan is sent by chat or by email.
The original plan is not changed when a user
saves a layout, the user receives a copy by email.
(no need for a floorplanner account)
Editor manual www.floorplanner.com page 16 of 535d Project Settings: Download and Light Settings Download FML Light settings For level 2 and higher you have the option to download an FML Controll your light settings in here, for the lighting in your 3D exports format. This can be used for some real estate platforms like Funda. You can also use this as a local backup of your plan. Download Product list For the active design you can download a product list from this location Editor manual www.floorplanner.com page 17 of 53
6a The Floor menu
Buildings usually have multiple floors. Each floorplanner project
represents one house or another kind of property. The floor menu is
the place where you can add and manage your floors.
                                                                                                             Floors & Project levels
      Add a new floor                                                                                        Upgrade your project level to store more
      Start a brand new floor here                                                                           floors and designs in your project.

                                                                                                             Level                           # Floors # Designs / floor

                                Floor settings                                                                                               1		 1
                                Set the ceiling height or change
                                                                                                               I

                                the floor sequence.

                                Duplicate the floor
                                                                                                               II                            5		 10
                                Copy your entire floor to reuse the layout
                                                                                                              III                            5		 10
                                Remove floor
                                Including all designs
                                in this flooor                                                                IV                             many		          many

                                Rename your floor
                                                                                                              V                              many		          many

                                Duplicate your design

                                Rotate or flip your design
                                                                        You can add a design and create duplicates of a floor layout. This way
                                Retrieve older                          you can play with the interior syle or interior layout in each floor like in
                                versions                                the example below. See also the chapter on furniture collections

                                Rename your design

                                Add a new design
                                Each floor can have
                                multiple designs,
                                variants in the interior
                                design or floor layout.
                                                                             interior in urban style          interior in industrial style      interior in contemporary style

Editor manual    www.floorplanner.com                                                                                                                               page 18 of 53
6b The Floor menu: Design actions In the floor menu there are several useful actions to perform on a design level. 1) Click on the design in the 3) Click the restore button to retrieve a floor you want to change previously saved version. 2) Click the transform button to rotate or mirror the entire design. Editor manual www.floorplanner.com page 19 of 53
7a Build: Walls and Rooms
In floorplanner you can draw your floorplan by drawing room by room,
or wall by wall. You can draw quicker room by room.
                                                                       3) Release your mouse. You’ll get automatic
                                                                       dimensions showing the interior room dimen-
                                                                       sions and exterior dimensions.
Draw Room
1) Go to the build section, click the draw room
icon and setup your wall thickness and height.

2) Click in your canvas
and drag your mouse
towards the direction
and size you want your
room to be.

                                                                       4) You can click the
                                                                       inner dimensions
                                                                       to set the exact
                                                                       room size. Click the
                                                                       arrows to indicate
                                                                       which wall should
                                                                       move.

Editor manual     www.floorplanner.com                                                                               page 20 of 53
7a Build: Walls and Rooms
Drawing wall by wall is less quick but lets you draw any shape you want. 3) Repeat this to any
A space enclosed by walls becomes a room, and is given a room surface corner of your room.
automatically.
Tip: guidelines will help
you find the end of a
room or vertical or hori-
Draw Wall by Wall zontal direction
1) Go to the build section, click the draw wall
icon and setup your wall thickness and height.
4) Close the room by
starting on the starting
point. A room surface
will appear.
NB: Keep in mind that
wall thickness affects
the wall length when
going around a corner.
2) Click in the canvas and drag
your mouse in the direction you
want your wall.
Release where you want your
wall to end or type in your You can also use this
desired length and press Enter. tool to draw separate
wall segments.
Tip: the blue circle indicates your
wall thickness.
Editor manual www.floorplanner.com page 21 of 537a Build: Walls and Rooms
Walls are very interactive elements. You can adjust your room shape by splitting
and dragging walls or wall corners. In a few examples we explain the basic
functionality.
Create a wall on an angle
1) Move your mouse over a wall
Create an alcove corner, click and drag it to change the
1) Click on a wall wall angle.
segment, and press
this icon to split the
wall
2) Click a bit further
on a wall segment, 2) Release the corner wherever you
and press this icon to want.
split the wall again
3) Now you can click and drag the
new wall segment in the middle.
Release your mouse to form your
alcove.
Tip: the blue arrow indicates the Create a curved wall
distance to the opposite wall.
1) Click a wall segment. Then click
While you are dragging, you can
the curve icon
type in the size this distance should
and move
have, and confirm by ENTER.
your mouse to
That’s a quick way to get an exact
curve the wall.
dimension.
2) Release your mouse when your
satisfied with the curve.
Tip: to uncurve the wall, click the
curve icon again and move your
mouse. The wall will snap to a
straight line.
Editor manual www.floorplanner.com page 22 of 537a Build: Walls and Rooms
Draw wall from point Removing a wall segment
1) click on a wall 1) Click on a wall
segment where you segment, and press
want to start a wall. the fourth icon to
Then click the third icon. remove the segment.
2) Move your mouse to where you
want your wall to end and click
again.
2) If the space is not enclosed
anymore by this action, the
floor will disappear. If two
rooms are connected this way,
the two separate floors merge
into one.
Editor manual www.floorplanner.com page 23 of 537a Build: Walls and Rooms
When working with different wall thicknesses, you may encounter situations when
the wall inside a room jumps due to this thickness difference. To solve this, we’ve
introduced an option to move the wall perpendicular to the axis.
Move wall across axis
1) Click on the thickest wall 3) Then hit Escape or
segment that creates a jump. click the cross to exit
the wall menu.
Your change will be applied.
2) Move the slider called move wall
across axis
Editor manual www.floorplanner.com page 24 of 537a Build: Walls and Rooms: Create sloped walls
Drawing sloped walls is done by adjusting the height of wall corners 4) View 3D to see the
result
Drawing room
1) First draw the exte-
rior walls of your floor
plan.
5) After setting the
correct slope for the ex-
terior walls, use the wall
by wall tool to create
your inner rooms.
2) Click in the canvas Tip: Start and end each
and drag your mouse in room on an exterior
the direction you want walls if possible. The
your wall. walls you draw will
inherit the wall height
at the point where you
connect with the exteri-
or walls.
3) Repeat this to any
corner of your room.
4) View 3D to see the
Tip: guidelines will help result
you find the end of a
room or vertical or hori-
zontal direction
Editor manual www.floorplanner.com page 25 of 537b Build: Surfaces
To create a surface without walls, we have a surface tool. You can create 3) To finish your surface, on the first point
surface shapes for various purposes. For instance for outdoor spaces, for or press ESC on your keyboard.
areas within your room, to create sloped surfaces like roofs or to create
a hole in a floor (for downward stairs).
Draw a surface shape
1) Go to the build section and click draw surface
NB: You can setup the surface properties
before or after you draw the surface:
4) You can drag edges and corners to reshape your
surface, or drag the white dots to create a curved edge.
2) Click and drag on each spot in the canvas
where you want a surface corner.
Tip: To have an exact edge length, type in the
desired size and hit ENTER.
5) Click on a surface
edge to add a corner.
Click on a corner to
remove it or edit its
height.
Editor manual www.floorplanner.com page 26 of 537b Build: Surfaces: sloped and elevated surfaces
Surfaces are drawn by default on floor level. In some cases you want a Elevated surface
surface at a higher level, or a sloped surface. For instance for gardens,
Click the surface shap you drew. Use the raise slider in the sidebar to raise the
for custom ceilings or roofs.
entire surface to the desired height.
Sloped surface
Click the surface shap you drew. Then click on each corner that should have an
elevation and move the raise slider in the sidebar.
Click 3D to check out how it looks
Click 3D to check out how it looks
Tip: divide your sloped surfaces in parts to make sure the 3D geometry will
display correctly. Use separate rectangles or triangles next to each other for
each section that has a slope.
Editor manual www.floorplanner.com page 27 of 537b Build: Surfaces: cutouts
With surfaces you can create a hole in the floor to have for instance In 3D you will have a staircase leading downwards.
a staircase coming up from the floor below.
Sloped surface
Click the surface shap you drew. Then toggle the cutout switch to have it
create a hole in the floor below
Tip: note that in this plan, also the walls have a negative raise.
If you placed a staircase, you can can lower it below floor level.
We added stair railings, and some resized and lowered beams, from
the decorate architecture section (see below), to make it look real.
Editor manual www.floorplanner.com page 28 of 537b Build: Surfaces: sloped ceilings
Follow these steps to create a sloped ceiling in your
room with a correct ceiling surface.
2 Lower the wall corners
where necessary.
3 Check the 3D view: you see that the automatic ceilings is showing up
1 Draw a room, split the walls where they should start to go downwards. incorrectly. Check this option off in the 3D view settings. We’ll draw them
manually.
Editor manual www.floorplanner.com page 29 of 537b Build: Surfaces: sloped ceilings
4 Draw the first sloped 6 Now we’ll create the ceiling surface manually. Draw a surface covering the
ceiling surface. Click the entire room. Select it and give it an elevation at your wall level. Mark it as a roof
corners that should be to show above other elements in 2D.
low, and set the eleva-
tion.
Do this for the high
corners too.
7 Click the camera icon or 3D icon.
5 Draw the second
sloped ceiling surface.
Click the corners and
raise them to the desired
height.
Editor manual www.floorplanner.com page 30 of 537c Build: Doors and Windows
Doors and windows are placed on a wall, and can be modified in size. 3) From the list, drag and drop your door or window onto a wall.
They work in the same way.
Adding doors/windows
1) Click on the doors
or windows button
2) You can view the list of doors or windows
in 2D top view or 3D view.
4) Click the door or window to adjust the wall
side, hinge side and an option to duplicate and
remove.
5) Set the width, height
and raise from the floor
in the side bar.
You can also pick a col-
or for the window frame
door frame and door.
Editor manual www.floorplanner.com page 31 of 537d Build: Structures
The structures library has a selection of objects that can be 3) From the list, drag and drop your element into your plan.
used as architectural elements in your plan.
Adding structures
1) Click on the
structures button.
2) You can view the list of structures in 2D
top view or 3D view.
4) Click the item to adjust the dimensions, rotate or mirror the object.
Editor manual www.floorplanner.com page 32 of 536d Build: Structures
5) Check in 3D or camera view your plan. In this example we used Tip: the Structures is just a se-
several elements from the structures set: lection. We have much more
achitectural items in our furniture
library divided in categories and
Folding stairs Ceiling beam Wood stove subcategories. Search the archi-
tecture collections on for instance
staircase or fireplace and you will
get a lot more results.
Editor manual www.floorplanner.com page 33 of 537e: Build: Background image
If you have an image of your floorplan already, you can upload it and 4) First rotate the image if necessary so most of
trace it to draw your floorplan quicker and more accurate. the walls are horizontal and vertical. Set your
units to meter or feet in the bottom left corner.
1) Click on the Build icon Click Set scale to scale your drawing.
and select the Background
settings button
2) Click “Choose a file“
to add your drawing
5) Zoom in to something in your plan of which you
3) Navigate to your file and upload it. It has to be a PNG JPG or PDF image. know the distance. Click on both sides of this element
You’ll see these options: to draw a line and enter the distance and press OK.
Editor manual www.floorplanner.com page 34 of 537e: Build: Background image 6) Now your background is scaled. Zoom out to start tracing. 7) Click the room tool and set your wall thickness to correspond to the wall thick- ness of your interior walls. Then start out by tracing the drawing room by room. Proceed after that with setting exterior wall thickness. Editor manual www.floorplanner.com page 35 of 53
8a Information: Roomtypes
A floorplan with roomtypes assigned to each space is better readable.   4) Apply as many room
These roomtypes can also help you to find furniture for each room.      types as you need.

Applying room types
1) Go to the info section
and click on the roomtypes
button.

2) You can select
a set of room types.

Tip: with a Pro account you can
create your own set of room types
that you frequently need.

3) From the list, drag and drop
your roomtypes onto the room
surfaces.                                                               5) You can set the size
                                                                        of roomtypes to make
                                                                        readability even better.

                                                                        6) If you select a room
                                                                        you’ll find that you can
                                                                        change or remove a
                                                                        room type in the side
                                                                        bar.

                                                                        Find out how room
                                                                        types can be more
                                                                        useful on this page.

Editor manual     www.floorplanner.com                                                             page 36 of 53
8b Information: Text Label
You can use a text label to add comments, or extra information In the example we’ll show where you can use text labels
to a plan. Text can be colored, rotated etc.
1) Go to the info section combine text label with
and click on the room- a line to add a remark
types button. somewhere.
2) Your text label appears directly in your plan and you
can type and format your label in the sidebar.
Use a rotated text label with a
dashdotted line to indicate the
height of a sloping ceiling.
Editor manual www.floorplanner.com page 37 of 538c Information: Icons and Symbols We have a library of symbols for electric plans, plumbing plans etc, and also a set of icons to make legends, create emergency plans or other purposes like wayfinding. 1) Go to the details section and click on the symbols button. 2) Select the set of icons you need. 3) From the list, drag and drop your icon into your plan. Editor manual www.floorplanner.com page 38 of 53
8d Information: Lines
You draw lines to indicate something in your plan.   In an example we’ll show where you can use lines

1) Go to the info section
and click on the line
button or hit L

2) You can setup the
line appearence in the
side bar. Then click,
drag and release in
your canvas to draw
your line.

Tip: type in the
length you want
your line to be while
you are dragging
your mouse, and hit
Enter to confirm.

3) Select a line to remove it
with the trash bin, or change
its appearance in the side bar.

                                                      Use a dashdotted line to indicate
                                                      the height of a sloping ceiling.

Editor manual     www.floorplanner.com                                                                  page 39 of 53
8e Information: Dimension lines
Floorplanner generates autmotic dimensions around your walls. This will
give you direct cntroll over the size of your rooms, but also decrease the
time you need for getting a dimensioned floorplan.
You can change the room size by click-
ing on a dimension line and typing the
Mostly the auto generated size you need. Use one of the arrow
dimensions will suffice. But buttons to indicate which wall to move.
sometimes you miss one or
you want to alter the auto-
matic densions lines.
For adding a custom dimen-
sion line, see the next page.
If you’re done with your
plan, and you just want to
change some of the auto
generated dimension lines,
then you can convert them all
to custom dimension lines.
See page 35
Inner wall
dimensions
Exterior wall dimensions
Editor manual www.floorplanner.com page 40 of 538e Information: Custom Dimension lines
You draw custom dimension lines if the automatic dimension lines don’t show In the example we show where you can use custom dimension
up where you want them to. lines to supplement te automated dimension lines.
1) Go to the details
section and click on Dimensions of rooms that don’t
the line button or hit d appear as auto-dimensions,
can be drawn as a custom
dimension line.
2) Set up your dimen-
sion appearence in
the sidebar.
3) Draw a dimension
line by click, drag
and release in your
canvas.
Some dimension lines like this one, you would want
Tip: type in the length you want your
to merge. First convert your generated dimensions
line to be while you are dragging your
to separate dimension. (see page ...) Then you can
mouse, and hit Enter to confirm.
delete one and modify the other.
Editor manual www.floorplanner.com page 41 of 538e Information: Custom dimension lines You can change custom dimension lines after you draw them. Edit a custom dimension line 1) Click on the dimension line you want to change. Select the dimension value to edit. Tip: You can distinguish a custom dimension line from a generated dimension line by the blue dots on either side and the presence of a trashbin. 2) Type in the size you want the dimension line to be. Then click on one of the arrows buttons to move one of the arrowhead to it’s new position. 3) Your dimension is altered. You can also use the blue dots to move the line. Editor manual www.floorplanner.com page 42 of 53
8l: Build: Dimension Settings
Floorplanner generates automotic dimensions around your walls. You
can convert them to editable

1) Go to the details
section and click on                                                 Tip: Once the dimenions are converted to separate lines, you can
the line button or hit d                                             select move and remove or modify them without affecting your rooms.

2) You can change the size and
appearance of your dimensions in
the top.

3) You can toggle to show them hori-
zontal or aligned to the dimension

4) You can toggle this switch on
and off to see which dimensions are
auto-generated.

5) Convert your generated dimen-
sions to custom dimensions with the
blue button

6) You can also delete all
dimensions at once.

Editor manual      www.floorplanner.com                                                                                          page 43 of 53
9a Decorate: Colors
Make your floorplan alive! You can
                                        Pick your own color
apply colors or materials to rooms,
surfaces and walls.                     Click on the       button and
                                        enter or paste or type an RGB
                                        hexcode to generate a custom
Apply colors                            color.
                                        You can drag and drop that
1) Click the decorate icon and          on a room, wall or surface.
choose paint.

Find colors by picking a hue,
then drag a teint of the list
below and drop it on a room,
wall or surface.

                                        NB: for rooms and surfaces,
                                        colors will only show in 2D
                                        when these two icons are set
                                        on in the 2D view settings.

Editor manual    www.floorplanner.com                                   page 44 of 53
9b Decorate: Materials
Apply materials
1) Click the decorate icon and
4) Drag the material and drop it on
choose materials.
top of a room or surface. To color a
wall: you hold it over a wall segment.
2) Select one of the icons to Then drop it on either of the circles
choose a material category: appearing next to it.
Wood
Carpet
Stone
Tiles
Wallpaper
Outdoor materials
3) Scroll through the list, or do a
search on the selected category.
Editor manual www.floorplanner.com page 45 of 539c Decorate: Furniture
We have a huge library of furniture items in floorplanner. You can find 5) After you select this item, you can find and
the items you need by doing a search, or by selecting a category to edit it’s properties in the side bar.
refine and sub category to refine your search.
1) Click on the
furniture tab
2) Specify a search, like table or glass
3) To narrow your search findings,
select a category, and subcategory,
or just scroll through the list.
4) Drag and drop an item into your
plan.
Mirror Delete
Rotate 90º
Click this icon
to easily scale Drop item
or rotate it by on surface
surrounding below
handlers.
Editor manual www.floorplanner.com page 46 of 539c Decorate: Furniture 6) By choosing ”relevant furniture”, you will get a list of items similar to this one. as displayed below. Editor manual www.floorplanner.com page 47 of 53
9c: Decorate: Selecting Furniture
You can select multiple pieces of furniture to
perform quick actions on all of them.

There are 2 ways
1) Just click on mulitple items after each other to
make a temporary group.
2) Hold Shift and drag a rectangle around the items
you want to add.
                                                      Selected groups you can:
                                                      -delete
                                                      -duplicate
                                                      -move
                                                      -rotate
                                                      -give a relative raise

                                                                             Tip: to select items that you
                                                                             can’t see, use the rectangle
                                                                             selection by holding SHIFT.

Editor manual     www.floorplanner.com                                                          page 48 of 53
9d: Auto-layout A very quick way to furnish a room is use our auto-layout feature. After you applied a room type to your room, you can select it and you will see an option to have Floorplanner create an automatic furniture arrangement in a selected style. Editor manual www.floorplanner.com page 49 of 53
10a: Export 2D
You can export your plan to a 2D plan. Exports will be sent to an email
address. Available formats are JPG, PNG or PDF.

Choose Export 2D image to
open the export options.

All options are listed below. Make sure you use a working email address!

                                                                           The export will show
                                                                           as your current view
                                                                           2D settings.

Editor manual    www.floorplanner.com                                                             page 50 of 53
10b: Export 3D
You can export your plan to a 3D overview image, for the current plan or
for all floors in your project at once.* Exports will be sent to an email ad-
dress. Available formats are JPG, PNG or PDF.
The export will show
as in your current
view 3D settings.
* for each floor, only the default
design will be exported
Editor manual www.floorplanner.com page 51 of 5311: Keyboard shortcuts Learn to use these shortcuts to speed up your drawing. Some shortcuts are essential for drawing. Function Key(s) Mode Function Key(s) Mode Exit mode esc Drawing or selected item Draw wall w In 2D view Delete items del or backspace While item is selected Draw room r In 2D view Disable snap s Hold while drawing or moving stuff Draw surface f In 2D view Move around In Camera or 3D view Add text t In 2D view Move item 1 step While item is selected Draw dimension d In 2D view Rectangle select shift Click and drag mouse in canvas Draw line l In 2D view Hide/show drawing b While tracing background image Tape measure m In 2D view Tip: Get accustomed to hold 1 hand on your mouse, keep the other on your keyboard. Also, typing in values is usually quicker than using the sliders. Editor manual www.floorplanner.com page 52 of 53
12: More help

                                                                               Any questions still unanswered?
                                                                               Try our contact form: floorplanner.com/contact

If you are still in need of some guidence using floorplanner: We also have a
series of Youtube movies with which you can learn how to use floorplanner.
Go to youtube.com/floorplanner

Editor manual     www.floorplanner.com                                                                                          page 53 of 53
You can also read