Authorize.Net Mobile Application - Version 3.7.1 for iOS and Android User Guide May 2019
←
→
Page content transcription
If your browser does not render page correctly, please read the page content below
Authorize.Net Mobile Application
       Version 3.7.1 for iOS and Android

                                User Guide

                                         May 2019

                          Authorize.Net Developer Support
                            https://developer.authorize.net
                         Authorize.Net LLC 082007 Ver.2.0
Authorize.Net LLC (“Authorize.Net”) has made efforts to ensure the accuracy and completeness of the
information in this document. However, Authorize.Net disclaims all representations, warranties and conditions,
whether express or implied, arising by statute, operation of law, usage of trade, course of dealing or otherwise,
with respect to the information contained herein. Authorize.Net assumes no liability to any party for any loss or
damage, whether direct, indirect, incidental, consequential, special or exemplary, with respect to (a) the
information; and/or (b) the evaluation, application or use of any product or service described herein.
Authorize.Net disclaims any and all representation that its products or services do not infringe upon any existing
or future intellectual property rights. Authorize.Net owns and retains all right, title and interest in and to the
Authorize.Net intellectual property, including without limitation, its patents, marks, copyrights and technology
associated with the Authorize.Net services. No title or ownership of any of the foregoing is granted or otherwise
transferred hereunder. Authorize.Net reserves the right to make changes to any information herein without
further notice.

Authorize.Net Trademarks
Advanced Fraud Detection Suite™
Authorize.Net®
Authorize.Net Your Gateway to IP Transactions™
Authorize.Net Verified Merchant Seal™
Automated Recurring Billing™
eCheck.Net®

                                                                                                                    2
CONTENTS
Contents
Recent Revisions to This Guide 6
About This Guide 7
Audience and Purpose 7
Conventions 7
Note and Important Statements 7
Text and Command Conventions 7
Customer Support 8
Chapter 1 Introduction 9
What’s New? 9
Hardware Support 9
Mobile Devices 9
Compatible Card Readers 9
For More Information 10
Feedback 10
Chapter 2 Setting Up 11
Reviewing Payment Form Settings 11
Configuring Address Verification Service (AVS) Settings 12
Updating Business Information 12
Managing Mobile Devices 13
Downloading and Launching the Authorize.Net Mobile Application 13
Accepting Terms and Conditions 13
Logging In to Your Account 14
Using a Sandbox Account 14
Allowed Special Characters 14
Using the Tutorial 14
Updating Your Card Reader 14
Using the Menu Button 15
Authorize.Net Mobile Application User Guide | May 2019 3Contents
Setting Up the Application 15
Card Readers 15
Connect 15
Updates 16
Check Reader Update on Login 16
Catalog Management 17
Tax Types 17
Sales Departments 17
Sales Categories 17
Sales Items 18
Set Default Landing View 19
Using the Template 20
Transaction Settings 21
Default Sales Tax 21
Receipts 21
Signature 22
Tipping 22
Shipping 22
Merchant Info 23
About 23
Chapter 3 Transactions 24
The Transaction Page 24
Quick Add 25
Categories 26
All Items 26
Checking Out With a Card Reader 27
Checking Out Without a Card Reader 28
Transaction Summary 29
Logging Out of the Authorize.Net Mobile Application 29
Response Reason Codes 29
Chapter 4 Transaction History 30
Searching Transactions 30
Appendix A Android Audio Considerations 31
Phone Audio Settings 31
Audio Warning 31
Method 1 - Warning Opens Automatically 32
Method 2 - Warning Opens in Setting When User Changes Volume 32
Authorize.Net Mobile Application User Guide | May 2019 4Contents
Method 3 - Warning When Opening a Music or Video App 32
Method 4 - Warning When User Maximizes Volume 32
Appendix B Supported Printers 33
Authorize.Net Mobile Application User Guide | May 2019 5REVISIONS
Recent Revisions to This Guide
Release Changes
May 2019 Removed a section that described how to enable transaction details in the
merchant interface. That step is no longer required. All accounts are now
enabled for transaction details.
September 2018 Printed receipts for supported USB and Bluetooth printers, as well as
network printers.
Star AllReceipts integration.
Ability to set whether the signature line appears, based on custom
amounts.
May 2018 Added support for Bluetooth card readers.
February 2018 Sort, browse, and search while you manage the catalog.
iOS 11 Support.
ADA Compliance updates to support application accessibility.
November 2017 Tips are now enabled for manually keyed-in transactions. For more
information, see "Checking Out Without a Card Reader," page 28.
Ability to create or update multiple catalog items at a time using a CSV
template. For more information, see "Using the Template," page 20.
Quick Chip technology is automatically used for EMV transactions.
Remote updates enable you to update the firmware of supported card
readers from within the app. For more information, see "Card Readers,"
page 15.
February 2017 Added the section "About," page 23.
Authorize.Net Mobile Application User Guide | May 2019 6ABOUT GUIDE
About This Guide
Audience and Purpose
This guide is written for merchants who use the Authorize.Net mobile application to
process transactions. Some operations require administrator privileges in the
Authorize.Net Merchant Interface.
Conventions
Note and Important Statements
A Note contains helpful suggestions or references to material not contained in
the document.
Note
An Important statement contains information essential to successfully
completing a task or learning a concept.
Important
Text and Command Conventions
Convention Usage
bold Field and service names in text; for example:
Include the ics_applications field.
Items that you are instructed to act upon; for example:
Save.
Authorize.Net Mobile Application User Guide | May 2019 7About This Guide
Customer Support
For support information about any Authorize.Net service, visit the Support Center:
https://support.authorize.net/
Authorize.Net Mobile Application User Guide | May 2019 8CHAPTER
Introduction
1
The Authorize.Net Mobile Application enables Authorize.Net merchants to easily and
securely accept payment from customers.
What’s New?
Printed receipts for supported USB and Bluetooth printers, as well as network printers.
Star AllReceipts integration.
Ability to set whether the signature line appears, based on custom amounts.
Hardware Support
Mobile Devices
The Authorize.Net Mobile Application for Android supports devices running Android
5.0 or later, with connectivity from a wireless carrier or Wi-Fi provider.
The Authorize.Net Mobile Application for iOS supports devices running Apple iOS 9.0
or later, with connectivity from a wireless carrier or Wi-Fi provider.
Compatible Card Readers
Supported mobile card readers may be purchased through our partner POS Portal. For
more information, visit https://partner.posportal.com/authorizenet/auth/.
Authorize.Net Mobile Application User Guide | May 2019 9Chapter 1 Introduction
For More Information
For more information about this product, including availability, pricing, and transaction
rates, contact your merchant bank and your Authorize.Net sales contact.
Also, see our EMV FAQs page.
Feedback
If you have any comments or suggestions about the Authorize.Net Mobile Application,
please contact feedback@authorize.net.
If you have any comments or suggestions about this document, please contact
documentation@authorize.net.
Authorize.Net Mobile Application User Guide | May 2019 10CHAPTER
Setting Up
2
Before downloading the app, you should review settings in the Authorize.Net Merchant
Interface which might affect your processing.
After you complete the tasks in the Merchant Interface and download and install the app,
you can use the app’s Settings page to set up your payment options - see Using the Menu
Button.
Reviewing Payment Form Settings
The Payment Form settings in the Merchant Interface enable you to specify certain fields
as being required when transactions are submitted to Authorize.Net. Because the fields
passed to Authorize.Net from the Authorize.Net Mobile Application are already defined,
you may experience transaction errors (Reason Response Code 33) if you have other
fields selected as required in the Payment Form settings. To prevent these errors, log in to
the Merchant Interface and review the Payment Form settings.
To review payment form settings:
Step 1 Log in to your account at https://account.authorize.net.
Step 2 From the main toolbar, click Account.
Step 3 Under Transaction Format Settings, click Payment Form.
Step 4 Click Form Fields.
Step 5 Uncheck all selected fields in the Required column.
Step 6 Click Submit.
Changes made to the Payment Form settings will affect any software solution that posts
transactions using the Authorize.Net API. Contact your developer to ensure that other
solutions are not adversely affected by these changes.
Authorize.Net Mobile Application User Guide | May 2019 11Chapter 2 Setting Up
Configuring Address Verification
Service (AVS) Settings
AVS helps detect suspicious payment card transactions. It compares the billing address
provided by the cardholder with the billing address on file at the payment card issuing
bank. A transaction is accepted or rejected based on your AVS settings in the Merchant
Interface. When a transaction is rejected, the application displays a status of Declined.
To configure your AVS settings:
Step 1 Log in to the Merchant Interface at https://account.authorize.net/.
Step 2 From the main toolbar, click Account.
Step 3 Select Settings.
Step 4 In the Security Settings section, click Address Verification Service.
Step 5 Check the AVS codes for which the payment gateway should reject transactions.
Step 6 Click Submit.
Changes made to the AVS settings will affect any transaction submitted using the
Authorize.Net API. Contact your developer to ensure that other solutions are not adversely
affected by these changes.
Updating Business Information
To edit your business information, you must log in to the Authorize.Net Merchant Interface.
If you have not entered merchant information in the app, the receipt will use the
information entered in this section. If merchant information is entered in the app, the
information in the app takes precedence.
To update your business information:
Step 1 Log in to the Merchant Interface at https://account.authorize.net/.
Step 2 In the main toolbar, click Account.
Step 3 In the left menu, click Merchant Profile.
Authorize.Net Mobile Application User Guide | May 2019 12Chapter 2 Setting Up
Step 4 Click Edit Business Information.
Step 5 Update your business information as needed by editing the provided text fields and drop-
down menus.
Step 6 Click Submit.
Managing Mobile Devices
Using the Authorize.Net Merchant Interface, an account administrator can enable, disable,
or delete mobile devices from an account.
To manage mobile devices:
Step 1 Log in to the Merchant Interface at https://account.authorize.net.
Step 2 Navigate to Account > Settings > Security Settings > General Security Settings >
Mobile Device Management.
Step 3 Select a device in the Device ID column.
Step 4 Click one of the following options: Enable Device, Disable Device, or Delete Device.
Downloading and Launching the
Authorize.Net Mobile Application
You can download the Authorize.Net Mobile Application from Google Play (Android),
Apple’s App Store or iTunes (iOS), by searching for Authorize.Net. Once the application is
finished downloading, it will be in the Applications menu on your home screen.
Accepting Terms and Conditions
The first time you launch the Authorize.Net Mobile Application on your mobile device, you
are prompted to accept the Terms and Conditions specific to the Authorize.Net Mobile
Application. You will continue to be subject to your existing Authorize.Net Payment
Gateway Merchant Service Agreement.
Authorize.Net Mobile Application User Guide | May 2019 13Chapter 2 Setting Up
Logging In to Your Account
After you accept the Terms and Conditions, the login page appears. Enter your Merchant
Interface credentials, choose whether to use a sandbox account, and tap Log In. You can
set the slider to Remember Me so that your credentials are saved.
Using a Sandbox Account
We recommend that you test your implementation using your sandbox account before
processing live transactions. Tap the Use Sandbox Account slider on the login page.
If you do not have a sandbox account, tap the Create Sandbox Account link.
Allowed Special Characters
The following table shows which special characters are allowed, and for which fields.
Table 1 Allowed Special Characters
Special Login ID Password Name Email
Character
& No No Yes No
% Yes Yes Yes No
- (Hyphen) Yes Yes Yes Yes
_ (Underscore) Yes Yes Yes Yes
# Yes Yes Yes No
Using the Tutorial
The first time you log in to the app, a tutorial is displayed. You can swipe right to view all
the tutorial panes. On each pane, you can choose Try Now to try the functionality for that
pane, or you can choose Skip to go into the setup.
Updating Your Card Reader
The first time you log in to the app, it will attempt to update your card reader’s firmware.
You can skip this step by tapping Skip or check for an update by tapping Check Now.
Authorize.Net Mobile Application User Guide | May 2019 14Chapter 2 Setting Up
Using the Menu Button
To access the app menu, tap the Menu button in the upper-left corner. The button
resembles three horizontal bars. Tapping the Menu button brings up the app menu.
Menu Button
Options in the app menu include:
Current Transaction—see "Transactions," page 24 for more information.
Transaction History—see "Transaction History," page 30 more information.
Settings—see "Setting Up the Application," page 15 more information.
Customer Support
User Guide
Terms and Conditions
Tutorial
Logout
Setting Up the Application
When you log in for the first time, you are given the choice to update settings or accept
payments. We recommend that you update your settings before accepting payments. You
can also navigate to the Settings page at any time by tapping the Menu button and
choosing Settings.
Card Readers
Options for connecting and configuring a card reader are found here.
Connect
To connect a Bluetooth reader:
Step 1 Turn the reader on.
Step 2 Pair the reader through your device’s Settings menu.
Authorize.Net Mobile Application User Guide | May 2019 15Chapter 2 Setting Up
Step 3 In the POS app, tap Connect if you are using Android and the radial button if you are
using iOS.
Step 4 Tap BT Connection.
Step 5 Choose your card reader by tapping the radial button next to it.
Step 6 If your account can process EMV transactions set the reader to Chip.
Step 7 Tap Connect.
To connect an audio jack reader:
Step 1 Turn the reader on.
Step 2 Pair the reader through your device’s Settings menu.
Step 3 In the POS app, tap Connect if you are using Android and the radial button if you are
using iOS.
Step 4 Tap Audio Jack.
Step 5 Choose your card reader by tapping the radial button next to it.
Step 6 If your account can process EMV transactions set the reader to Chip.
Step 7 Tap Connect.
Updates
To update the card reader’s firmware, tap Card Reader Updates and then tap Check For
Updates. Please allow up to 15 minutes for the card reader to check for updates, and to
download and install them to the reader.
Updates are only available for BBPOS Chipper 2X/Anywhere Commerce Walker C2X
readers.
Note
Check Reader Update on Login
When this box is checked, the application will check for reader updates each time it starts.
Authorize.Net Mobile Application User Guide | May 2019 16Chapter 2 Setting Up
Catalog Management
The POS Setup page contains several important options that enable you to add
departments, categories, and items.
Tax Types
This feature enables you to create specific tax types that can be selected at checkout.
To add a tax type:
Step 1 Tap + Add Tax Type. The Add Tax Type page displays.
Step 2 Tap the Tax Type field and enter a name for the tax type.
Step 3 To modify an existing tax type, tap Base Tax (Optional) and select the existing tax type.
Step 4 Tap Tax Rate Name and enter a name for the tax rate.
Step 5 Tap the Rate (%) field and enter the tax rate percentage.
Step 6 Tap Save to return to the Tax Types page.
Sales Departments
This feature enables you to add sales departments. For example a sales department
might be Electronics. Departments can contain categories, making them the top level of
the hierarchy.
To add a sales department:
Step 1 Tap + Add Department. The Add New Department page displays.
Step 2 Tap Department Name and enter a name for the department.
Step 3 Tap Select Tax Type to select a tax type. If no tax type exists, you can add one from the
POS Setup page.
Step 4 Tap Save to return to the Sales Department page.
Sales Categories
This feature enables you to create sales categories, which can be contained within a sales
department. For example, within the Electronics sales department, you can create a
Television category.
Authorize.Net Mobile Application User Guide | May 2019 17Chapter 2 Setting Up
Sorting Categories
You can sort through existing categories by using three sorting options, all of which can be
found at the top of the screen next to Sales Categories List:
Search— To search for a particular category by its name, tap the magnifying glass icon to
bring up the search field. Enter the category name or a keyword. Matches will
automatically be shown and you can tap one to select it.
Grid View—Tap the grid icon to display multiple categories per row.
List View—Tap the List icon to display one category per row.
Creating Categories
To create a sales category:
Step 1 Tap Category Name and enter the name of the category.
Step 2 Tap Upload Images to add an image associated with this category. The image will be
scaled to fit your device. The minimum size is 50kb and the maximum is 5MB. Most
popular image types are accepted, including JPG, PNG, and BMP.
Step 3 Tap Select Department to select an existing sales department. If no sales department
exists, you can create one from the POS Setup page.
Step 4 Tap Select Tax Type to select a tax type. If no tax type exists, you can add one from the
POS Setup page.
Step 5 Tap Save to return to the Sales Categories page.
Sales Items
This feature enables you to create specific sales items that can be contained within a
sales category. For example, within the Television sales category, you could create an
item called 50-inch 4K Display.
Sorting Items
You can sort through existing items by using three sorting options, all of which can be
found at the top of the screen next to Sales Items List:
Search— To search for a particular item by its name, tap the magnifying glass icon to
bring up the search field. Enter the item name or a keyword. Matches will automatically be
shown and you can tap one to select it.
Grid View—Tap the grid icon to display multiple items per row.
Authorize.Net Mobile Application User Guide | May 2019 18Chapter 2 Setting Up
List View—Tap the List icon to display one item per row.
Creating Sales Items
When you tap Add Sale Item in the Sales Items screen of the POS setting, you are given
two options:
To add a single item using the app, tap Add One.
To use a template for creating more than one item at a time, tap Use Template.
To create one sales item using the app:
Step 1 Tap + Sales Item. The Add Sales Item page displays.
Step 2 Tap Item Name and add a name for the item.
Step 3 Tap Item ID and add the ID number for this item.
Step 4 Tap UPC and add the Universal Product Number for this item.
Step 5 Adjust the Available slider to show whether this item is in stock.
Step 6 Tap Upload Image to upload an image associated with this item. The image will be scaled
to fit your device. The minimum size is 50kb and the maximum is 5MB. Most popular
image types are accepted, including JPG, PNG, and BMP.
Step 7 Tap Retail Price and enter the pre-tax price of the item.
Step 8 Tap Select Category to select an existing sales category. If no sales category exists, you
can create one from the POS Setup page.
Step 9 Tap Select Tax Type to select a tax type. If no tax type exists, you can add one from the
POS Setup page.
Set Default Landing View
To configure the app to open to a particular area each time you log in, select one of the
following:
Quick Add
Categories
All Items
Authorize.Net Mobile Application User Guide | May 2019 19Chapter 2 Setting Up
Using the Template
The bulk item upload feature enables you to upload multiple items at once by adding them
to a spreadsheet application and uploading the spreadsheet to the app. Tapping the Bulk
Upload link in the Settings page brings up the Bulk Upload page. You must first create
your catalog.
Catalog Creation Workflow
Before creating items using a template, you must first use the app to manually create any
categories, departments, and taxes that the items will use. Use the following workflow:
1 Tax Types
2 Sales Departments
3 Sales Categories
After these catalog items are complete, you can begin the bulk upload process, in which
the catalog elements that you created are put into a CSV file that you can open with a
spreadsheet application.
To use the template to create multiple items:
Step 1 Tap Step 1 and then tap Export.
The app exports all your catalog elements to a CSV file on your device.
Step 2 Transfer the file to your computer and add items to it according to the following table.
Table 2 Spreadsheet Data
Spreadsheet Row Required/ Format Description
Optional
System Generated ID N/A N/A This is a System Generated ID that we
assign to each item in your Catalog. This
column should not be changed or added
to.
Item ID Required String. Merchant-assigned ID for each item.
64-character maximum.
Item Name Required String. Name of the item.
64-character maximum.
UPC Optional String. Universal Product Number for the item.
64-character maximum.
Category Required String. Category assigned to the Item.
64-character maximum. Note The Category must already exist
in your Catalog. This field is not used for
adding new Categories.
Authorize.Net Mobile Application User Guide | May 2019 20Chapter 2 Setting Up
Table 2 Spreadsheet Data (Continued)
Spreadsheet Row Required/ Format Description
Optional
Tax Type Optional String. Tax Type assigned to the Item.
64-character maximum.
Available Flag Optional TRUE or FALSE Setting this field to TRUE makes the item
available in your catalog. Setting it to
FALSE makes it unavailable.
Retail Price Optional Price for the item.
Image Optional filename.jpg or filename.png The app supports .png and .jpg files. In
this column you only need to include the
filename with extension. The actual
image files should be in the same folder
on your device that the Bulk Upload file
was downloaded to.
Action Optional A or U A is used for adding new items to your
Catalog. U is used for updating existing
items.
When you finish, tap the Step Completed button.
Step 3 Tap Select Your File and select the updated CSV file from your device. Then tap Upload.
A confirmation page appears.
Step 4 Tap Start Import.
Transaction Settings
The following settings apply to payment transactions.
Default Sales Tax
Tap the slider to enable the sales tax feature. Then tap Default Sales Tax to set the default
sales tax rate for payment transactions. Use the number dials to select the default sales
tax percentage. When you are finished, tap OK to return to the Settings page.
The Default Sales Tax applies to Quick Add Items only. Catalog items are taxed
at rates assigned in the POS Setup section.
Note
Receipts
This section of Settings provides you with variety of options for printing receipts. For a list
of supported Bluetooth and USB printers, see "Supported Printers," page 33.
Authorize.Net Mobile Application User Guide | May 2019 21Chapter 2 Setting Up
BT Printer
To connect a Bluetooth printer to the app, first verify that the printer is on and Bluetooth is
enabled for your device. Pair the printer in your device’s Settings menu. Then tap the BT
Printer option.
USB Printer
To connect a USB printer to the app, first verify that the printer is connected to your device
by a USB cable. Then tap the USB Printer option.
Other Printer
To a connect a network printer, tap the Other Printer option and select a print service.
Cloud Print and Default Print Service are included in the app. You can also tap + Add
service to select a service from a list.
Auto Print Receipts
Enable this setting to print receipts automatically.
Star Cloud Services
The app supports the Star AllReceipts service, which is a customer digital convenience
and merchant loyalty opportunity program. Tap the Star Cloud Services option to enable
it. The Cloud Services menu appears. Enter a username and password and tap Register.
Signature
If you choose to enable the Signature option during checkout, you can specify an amount
that triggers the signature. To set a custom amount, tap the For purchase > 0 link in the
Signature section and enter the amount that will trigger the signature during checkout.
Tipping
Tap the slider to enable the tipping feature in the transaction page.
When tipping is enabled, a signature is always required. Keep this requirement
in mind when adjusting the Skip Signature option later in the Settings page.
Note
Shipping
Tap the slider to enable a shipping option during checkout. Doing so enables you to add
shipping address information at the Transaction page. Shipping information includes:
First name
Last name
Address one
Authorize.Net Mobile Application User Guide | May 2019 22Chapter 2 Setting Up
Address two
City
State
ZIP code
Phone number
Merchant Info
Enter the following information about the merchant.
Business name
Address
City
State
ZIP code
Phone number
Email address
About
This section shows the version of the app and the date it was last updated.
Authorize.Net Mobile Application User Guide | May 2019 23CHAPTER
Transactions
3
To take a payment from a customer, use the Transaction page. To display a transaction,
tap the menu button and then tap Current Transaction.
The Transaction Page
There are three tabs at the top of the Transaction page which enable you to add items to
the order:
Quick Add—You can use this page to add items that are not defined in the Manage
console by typing in their name, amount, and other order information.
Categories—Select items from a hierarchy of categories.
All Items—A list of all items that are defined in the Manage console.
Authorize.Net Mobile Application User Guide | May 2019 24Chapter 3 Transactions
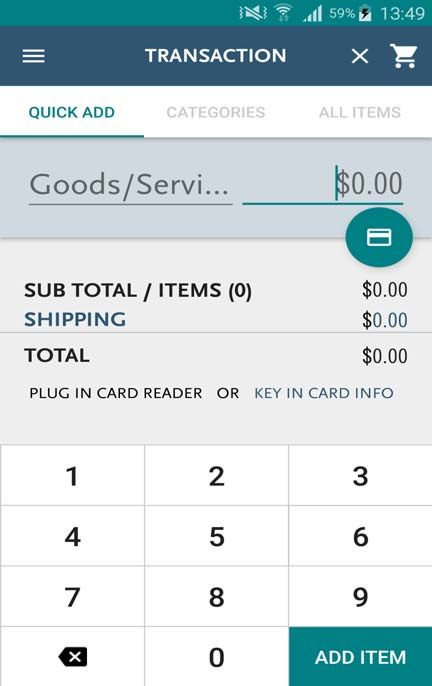
Quick Add
Figure 1 The Quick Add Page
To quick-add an item:
Step 1 Tab the Quick Add tab to display the Quick Add page.
Step 2 Tap the Goods/Services field to enter the name of the item. If a name is not entered here,
the item is recorded as Goods/Services.
Step 3 Enter a price in the $0.00 field.
Step 4 If you enabled sales tax and you did not set a default, or you want to use a tax rate
different from the default, tap the Sales Tax field and enter the tax rate.
Step 5 If you enabled shipping in the Settings page, tap the Shipping field and enter the shipping
charge and the customer’s shipping information.
Authorize.Net Mobile Application User Guide | May 2019 25Chapter 3 Transactions
Step 6 Tap the Add Item button in the bottom-right corner of the Transaction page. The item is
added to the order and the shopping cart icon in the upper-right corner shows the number
of items for this order.
Step 7 Repeat steps 1-6 to quick-add more items.
Categories
The categories tab contains a hierarchy of categories selected from the Management
page.
To select an item from a category:
Step 1 Tap the Categories tab to display the Categories page.
Step 2 Tap a category from which to select an item.
You can select an item by tapping it. Each time you tap it, an additional item will be
added to the order.
Tap the plus (+) icon next to the item to add a single item.
Tap the plus (+) sign again to display the item quantity pop-up window. Choose
the number of items, either by tapping the plus (+) or minus (-) icons, or by tapping
the quantity and typing the number directly. Then choose either Update or
Remove All.
Step 3 Repeat steps 1-3 to add additional items from categories.
All Items
This tab contains all items that have been created in the Management page.
To select an item from the All Items page:
Step 1 Tap the All Items tab to display the All Items page. All items from every category are
displayed.
Step 2 Select an item in one of several ways:
You can select an item by tapping it. Each time you tap it, an additional item will be
added to the order.
Tap the plus (+) icon next to the item to add a single item.
Tap the plus (+) sign again to display the item quantity pop-up window. Choose
the number of items, either by tapping the plus (+) or minus (-) icons, or by tapping
Authorize.Net Mobile Application User Guide | May 2019 26Chapter 3 Transactions
the quantity and typing the number directly. Then choose either Update or
Remove All.
Step 3 Repeat steps 1 and 2 to add additional items from categories.
Checking Out With a Card Reader
When you are finished adding items to the order, you can tap the card swipe icon to check
out with a card reader. Alternatively, you can review the order before checking out. To
review, tap the shopping cart icon in the upper-right corner of the app to display all
selected items. Review the items and either the back arrow to return to the transaction, or
tap Checkout to continue to the checkout page.
The checkout page displays the amount of the transaction.
To pay by credit card using a card reader:
Step 1 Turn on and connect the card reader. For more information on setting up the card reader,
see Card Readers, page 15.
Step 2 Insert the smart-chip card into the slot or swipe the card’s magnetic strip. See the card
reader’s documentation for more information about this process.
Step 3 If tips are enabled, the customer chooses a tip option. For more information about tips,
see "Transaction Summary," page 29.
Step 4 Unless you enabled Skip Signature in the Setting page, have the customer sign their
name.
Step 5 Tap Authorize. Do not remove the card or reader while the amount is authorizing. After
authorization is complete, the Transaction Summary screen displays.
Authorize.Net Mobile Application User Guide | May 2019 27Chapter 3 Transactions
Do not reduce or mute the volume while the card reader is plugged in to the
headphone jack. The reader draws power from your device’s headphone jack.
Important When you plug in the reader, your device’s volume is automatically set to
maximum. If you manually decrease or mute the volume level while the
reader is plugged in, the reader might not have enough power to read credit
card data, and you will receive an error.
If you are using Android device, see "Android Audio Considerations,"
page 31.
Checking Out Without a Card Reader
Without a card reader plugged in, you can either key in credit card information manually,
or have the customer pay by cash.
To manually enter credit card information:
Step 1 Tap Key In Card Info.
Step 2 Tap the Card Number field and enter the valid credit card number.
Step 3 Tap the MM/YY field and enter the card’s valid expiration date in the format MM/YY.
Step 4 Tap the ZIP field to enter the ZIP code that is associated with the card.
Step 5 Tap the Charge button. The Authorize page appears.
Step 6 If you enabled tips in the Settings page, tap the Tip field and have the customer enter a tip
amount.
Step 7 Unless you enabled Skip Signature in the Settings page, have the customer enter their
signature.
Step 8 Tap Authorize. After authorization is complete, the Transaction Summary screen
displays.
To pay with cash:
Step 1 Tap Key In Card Info.
Authorize.Net Mobile Application User Guide | May 2019 28Chapter 3 Transactions
Step 2 Tap the Cash tab.
To enter an exact amount, tap the Cash Tendered field.
To enter individual bills, tap the number of the denomination for each bill.
To simple accept the full transaction amount, tap Exact Amount.
Step 3 Tap Accept Cash.
Transaction Summary
After the transaction is successfully submitted, the Transaction Summary page displays. A
Transaction ID is provided and the customer’s receipt is shown. To email the receipt to the
customer, tap the Email field and enter their valid email address. The receipt is sent but is
not stored on your device. To begin a new transaction, tap New Transaction.
Logging Out of the Authorize.Net Mobile
Application
To log out of the application, tap to the Options button, tap Log Out, and then confirm that
you want to log out.
If the application is idle for 30-minutes, the next action prompts the user to log in. This also
happens after every 8-hour interval.
Response Reason Codes
Response Reason Codes may be displayed in parentheses within the Authorize.Net
Mobile Application when an error occurs during processing. To view information
associated with specific codes, use our Reason Response Code Tool:
https://developer.authorize.net/api/reference/responseCodes.html
Authorize.Net Mobile Application User Guide | May 2019 29CHAPTER
Transaction History
4
To view the transaction history, tap the Menu button and select Transaction History.
You can choose the following types of transactions:
Last Transaction—this option is chosen by default and it displays the details of the
last transaction processed by this device. You can refund the transaction by tapping
the Refund button.
Unsettled Transactions—this option displays purchases or refunds that are pending
settlement. Tap a transaction to display its details. You can void an unsettled
transaction from the detail page by tapping Void.
Settled Transactions—this option displays purchases that have already settled as
part of the standard Authorize.Net settlement process. Tap a transaction to view its
details. You can refund a transaction from the details page by tapping Refund.
Voided Transactions—this option displays voided transactions, which are defined as
unsettled transactions that were canceled before settlement. Tap a transaction to view
its details.
Refunded Transactions—this option displays those settled transactions that were
refunded to the original card. Tap a transaction to view its details.
Cash Transactions—This option displays transactions that were paid for by cash.
Cash transactions are only stored on the device (not in the Merchant Interface), and
only for 7 days.
Searching Transactions
You can search for specific transactions from the Transaction History page by tapping the
Transaction ID field. Enter a valid Transaction ID, tap the magnifying glass icon, and the
details for that transaction appear.
Authorize.Net Mobile Application User Guide | May 2019 30APPENDIX
Android Audio
Considerations
A
Credit card readers that plug into a mobile device draw power from the device’s audio
power, and they rely on that device’s audio power being set to maximum in order to work
properly. Various audio settings can interrupt this power.
Phone Audio Settings
When using an Android device, all audio permissions should be allowed.
All special audio settings should be off. This includes but is not limited to:
Dolby
MI Sound
Beats Audio
Boom Sound
BesAudEnh
DTS
DAC
Audio Warning
A volume warning was added in Android versions 4.2 and newer that limits the maximum
volume of sound. This may affect the communication between the Android device and
your card reader. To ensure that the device can output high volume, the user must accept
the warning. Most Android devices will show the warning automatically, but some devices
will require the user to manually make this change. The user will be prompted to accept
this warning after each reboot. The following methods can be used:
Authorize.Net Mobile Application User Guide | May 2019 31Appendix A Android Audio Considerations
Method 1 - Warning Opens Automatically
If the warning was not accepted before, it will show automatically when the first Controller
command is called. You must accept the warning.
Method 2 - Warning Opens in Setting When User
Changes Volume
Step 1 Plug the card reader into the headphone jack.
Step 2 Open Settings in the App menu and choose Sound.
Step 3 Select “Music, video, games and other media”, then maximize the volume.
Method 3 - Warning When Opening a Music or Video
App
Step 1 Plug the card reader into the headphone jack.
Step 2 Open the music or video app.
Step 3 Press volume-up button on the phone to maximize the volume.
Method 4 - Warning When User Maximizes Volume
Step 1 Plug the card reader into the headphone jack.
Step 2 Press volume-up button on the phone to maximize the volume.
Authorize.Net Mobile Application User Guide | May 2019 32APPENDIX
Supported Printers
B
The app supports the following Bluetooth and USB printers:
Star TSP143IIU FuturePrint USB printer:
Android—USB type B-to-micro USB
iOS—USB to Lightning cable
Star TSP143IIBI FuturePrint Bluetooth printer
Star SM-T300i Bluetooth printer
Epson TM –T88IV USB printer—Android only, USB type B-to-micro USB; iOS not
supported
[Product Name and Doc Title] | May 2019 33You can also read