PrettyMay Call Center for Skype - User Guide Released 4i
←
→
Page content transcription
If your browser does not render page correctly, please read the page content below
User Manual v4.1

            PrettyMay Call Center for Skype
                                 User Guide

                                 Released 4i

Copyright © 2005-2010 PrettyMay Team. All Rights Reserved | www.prettymay.net     1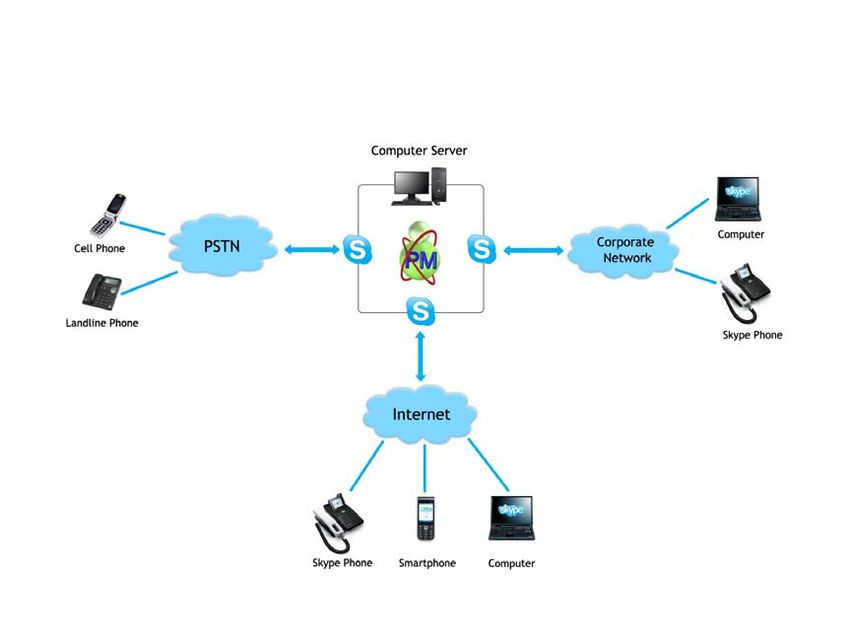
User Manual v4.1
Contents
Preface ............................................................................................................................................ 4
How to use this guide ................................................................................................................. 5
Finding Out What’s New ............................................................................................................. 5
Related User Guides.................................................................................................................... 5
Training and Support .................................................................................................................. 6
About PrettyMay ........................................................................................................................... 6
Your Feedback .............................................................................................................................. 6
Chapter 1, Introduction............................................................................................................... 7
Why use PrettyMay Call Center for Skype ..................................................................... 7
How PMCCs works? ............................................................................................................ 7
System requirements .......................................................................................................... 9
Chapter 2, Installation ............................................................................................................... 10
Before You Install............................................................................................................... 10
Install Skype and PMCCs ................................................................................................. 10
Launch PMCCs ................................................................................................................... 10
Chapter 3, Inbound Call Center Settings ............................................................................. 15
System Option ............................................................................................................ 15
Extension manager settings ................................................................................... 19
Voice Menu Node ....................................................................................................... 20
Extension Node .......................................................................................................... 22
Public Contacts List (Company Phonebook)...................................................... 28
Dial By Name ............................................................................................................... 30
Call Personalization Node ........................................................................................ 32
Call Conference Room .............................................................................................. 38
Voicemail System....................................................................................................... 41
• Personalize Voicemail Greeting ..................................................................... 41
• Voicemail to Email Forwarding....................................................................... 42
• Voicemail SMS Notification ............................................................................. 44
• Remote Access Voicemail/Greeting .............................................................. 44
Out of Hours Settings ............................................................................................... 46
How to import and export the call flow ................................................................ 49
Chapter 4, Outbound Call Center Settings .......................................................................... 52
• Set Authenticated Outbound Users ...................................................................... 52
• Outbound Call Recording ........................................................................................ 52
• Outbound Call Rule ................................................................................................... 53
• Speed Dial Number .................................................................................................... 53
• Smart Dialing ............................................................................................................... 54
• Direct Dial Out through PMAAs .............................................................................. 55
Copyright © 2005-2010 PrettyMay Team. All Rights Reserved | www.prettymay.net 2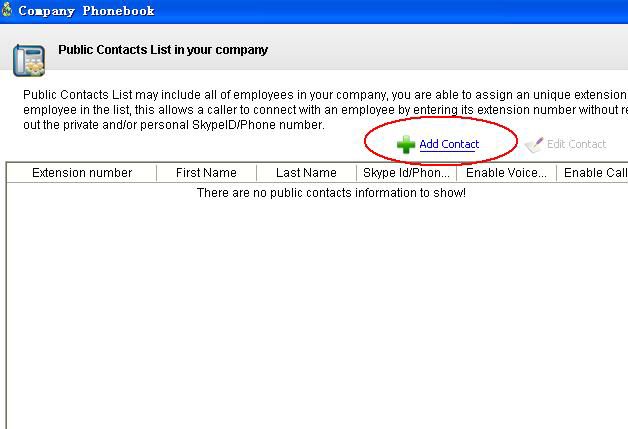
User Manual v4.1

Chapter 5, Lines Management ................................................................................................ 56
Chapter 6, Voicemail Management ........................................................................................ 57
Chapter 7, Call Record Management .................................................................................... 58
Chapter 8, Call Log Management ........................................................................................... 59
Chapter 9, Support Resources ............................................................................................... 61

              Copyright © 2005-2010 PrettyMay Team. All Rights Reserved | www.prettymay.net                                  3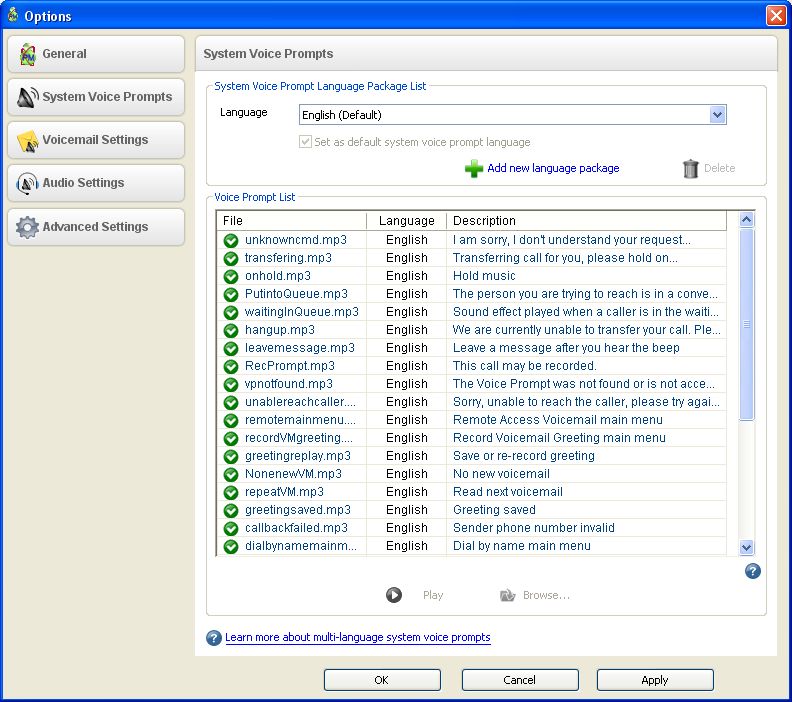
User Manual v4.1
Preface
Welcome to Release 4i of the PrettyMay call center user guide.
This user guide includes the information you need to work with
PMCCs effectively. It contains detailed information about the
following:
Overview and reference information
PMCCs implementation suggestions
How to use PMCCs windows
PMCCs functions and features
PMCCs system setup
This preface explains how this user guide is organized and introduces
other sources of information that can help you.
Copyright © 2005-2010 PrettyMay Team. All Rights Reserved | www.prettymay.net 4
User Manual v4.1
How to use this guide
This guide contains the information you need to understand and use
PMCCs.
This preface explains how this user guide is organized and introduces
other sources of information that can help you. This guide contains the
following chapters:
Chapter 1 provides a brief introduction of the PMCCs and also the system requirement
to install the PMCCs.
Chapter 2 contains how to install the PMCCs and the main GUI of the PMCCs.
And it also details how to use the quick support function.
Chapter 3 tells you how to setup the inbound call center and the function of each option.
It tells you how to use the voicemail to email function, conference feature as well as the
call queue functions.
Chapter 4 describes how to configurate the outbound call center. There you can also
Study the call recording setups of each agent.
Chapter 5 introduces the line management function.
Chapter 6 details you the usage of the voicemail function.
Chapter 7 tells the function of the call recording frame.
Chapter 8 introduces the track history function, you can export it to analyze the daily
call logs.
Chapter 9 tells you how to get a support from the PrettyMay.
Finding Out What’s New
From the website of http://www.prettymay.net/callcenter/whats_new.htm, you will see the
detailed change log of each new version.
Related User Guides
PMCCs has a client plugin for the agents which called the agents assistant, for the detail,
please refer to PrettyMay agents assistant user guide at below URL:
http://www.prettymay.net/callcenter/PMAAS_User_Manual.pdf
Copyright © 2005-2010 PrettyMay Team. All Rights Reserved | www.prettymay.net 5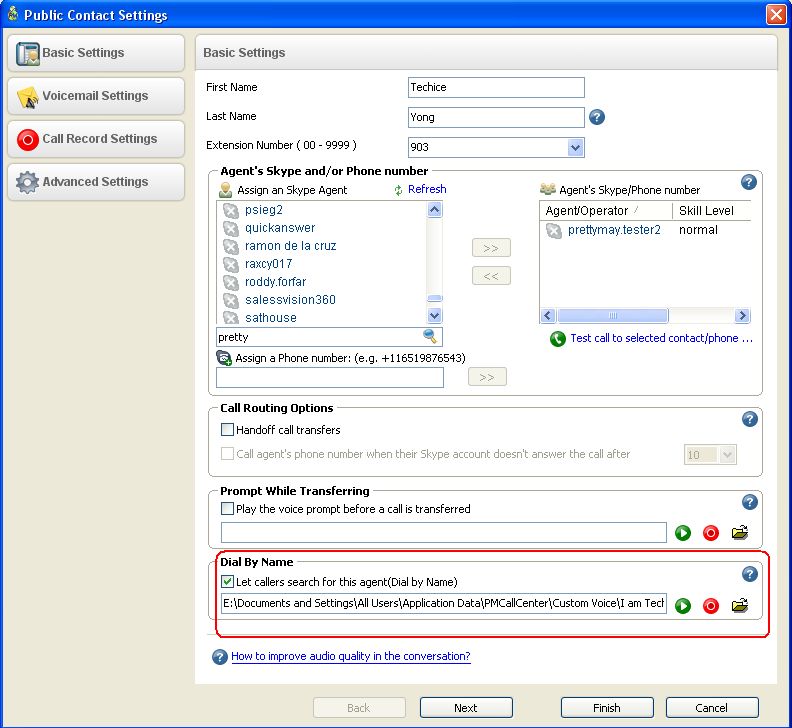
User Manual v4.1

Training and Support
We provide a knowledge base to let you easily study and troubleshooting at below URL:
http://www.prettymay.net/callcenter_faq/index.php?pid=knowledgebase
Also, once you purchase the PMCCs, we provide three years free supports, you can easily
find one online support at below URL:
http://prettymay.net/support.htm
You can also drop us email at support@prettymay.net or raise ticket at:
http://www.prettymay.net/callcenter_faq/index.php?pid=newticket

About PrettyMay
PrettyMay provides skype based solution for small business which includes the PrettyMay
Call center solution, Skype PBX gateway as well as the Skype call recording. Please refer
to our website to know PrettyMay more at:
www.prettymay.net

Your Feedback
Thank you for using PMCCs and this user guide.
We value your comments and feedback. You can explain what you like or
dislike about PMCCs or this user guide. Mail your comments to
contact@prettymay.net

          Copyright © 2005-2010 PrettyMay Team. All Rights Reserved | www.prettymay.net     6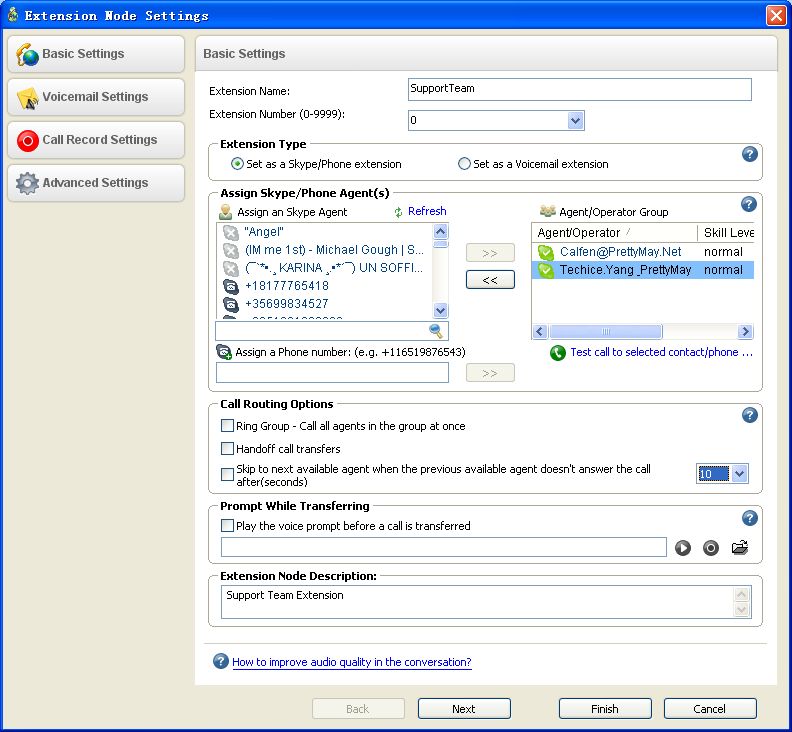
User Manual v4.1

Chapter 1, Introduction
This chapter gives an overview of the PMCCs as well as the system requirement to install
the PMCCs.

      Why use PrettyMay Call Center for Skype
     PrettyMay Call Center for Skype (PMCCs) is a 100% software-based Skype PBX that
     replaces traditional proprietary hardware PBX / PABX.

     It allows Small Business to quickly and affordably implement a Skype PBX / PABX
     system with Auto-Attendant, Interactive Voice Response (IVR), Automatic Call
     Distribution (ACD), Call Recording and Voicemail capabilities and a lot more as well.
     It's truly affordable, easy to set up, simple to use and maintain.

     A Windows Based Skype PBX phone system offers numerous benefits:

      • No need of the traditional PSTN lines, phones use Skype network.
      • Low costs, priced at US$350 for 5 users package license and US$650 with unlimited
        edit, no monthly fee or other fees.
      • Employees use Skype compatible device which can be Skype software, Skype phones,
        or mobile phones.
      • Save on phone costs by using SkypeIn, Skypeout service.

      How PMCCs works?

     Server PC: PMCCs and the main Skype account need to run on a separate computer as
     the call center server. All calls are received /made through the main Skype account, and
     PMCCs delivers them to appropriate Skype or phone agents.

     Callers: Callers can use any cell phone/landline phones, or Skype clients to call the
     SkypeIn number/SkypeID to dial into the system.

     Agents: Agents/Operators can use Skype clients or cell phones to take/make calls. If the
     Skype agents/Operators, they can also use the Agents assistant system to easily handle
     inbound/outbound calls, for the details, please refer to the note about the agents
     assistant.
          Copyright © 2005-2010 PrettyMay Team. All Rights Reserved | www.prettymay.net     7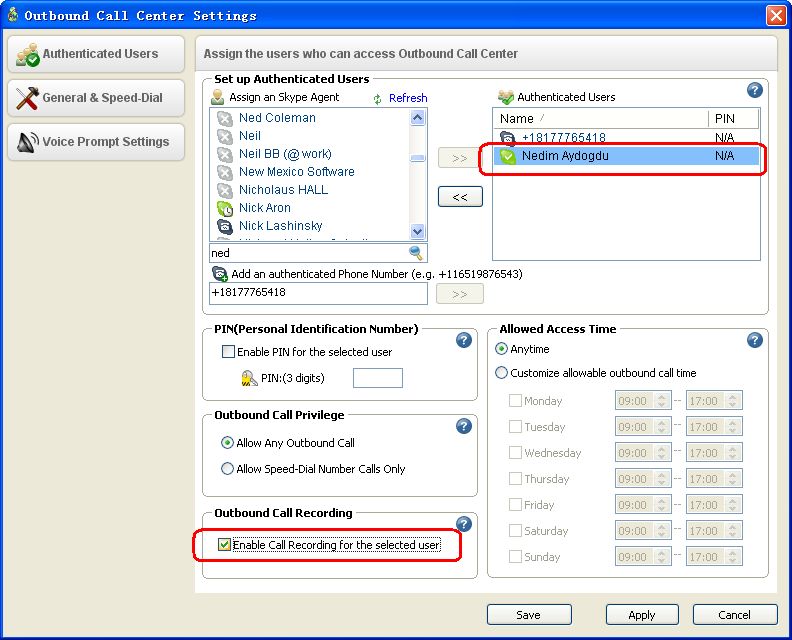
User Manual v4.1

 System architecture: Callers, call center server and agents.

Note: The PrettyMay Agent Assistant for Skype
PrettyMay Agent Assistant for Skype (PMAAS) is a compact utility which allows your
agents/managers to easily manage your extension with a few mouse clicks – rather than via
DTMF tones and limited Skype interface.
PMAAS is NOT the software to replace Skype for your agents to make/answer calls, but a
small Skype plug in which need to run together with agent’s Skype on a Windows PC. It is
the client for the PrettyMay call center.

Calls are made and answered on Skype, PMAAS provides the following functions: Easy Call
Transfer, Presence, Call monitoring, Queue monitoring and Direct dialing out.
For more information about the PMAAS, please refer to the PMAAS user manual which can
be found at:
http://www.prettymay.net/callcenter/PMAAS_User_Manual.pdf

      Copyright © 2005-2010 PrettyMay Team. All Rights Reserved | www.prettymay.net     8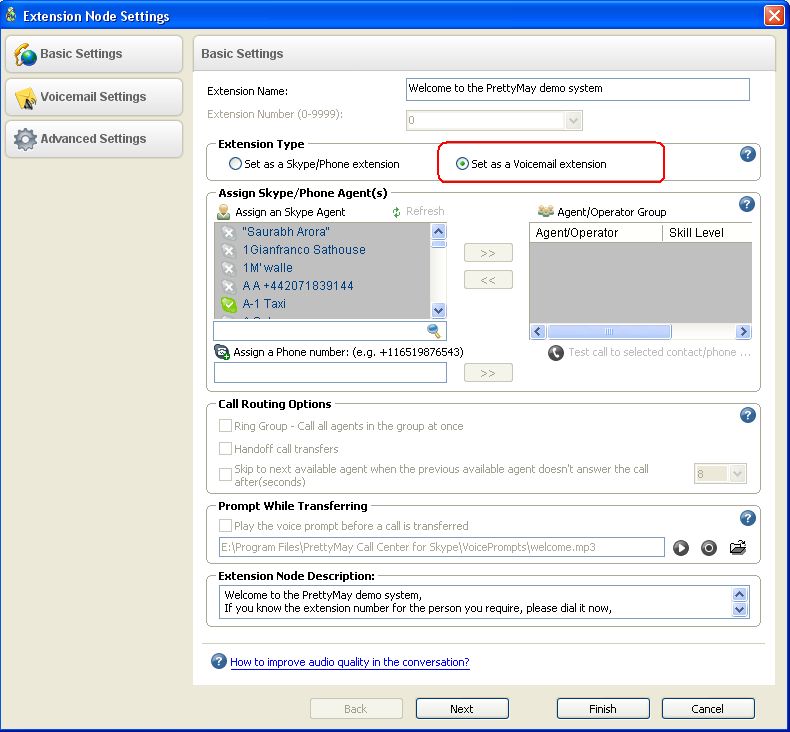
User Manual v4.1

System requirements
  Skype Lines                  1                        5                     10                      30
                     CPU: Intel Pentium III   CPU: Intel Pentium D   CPU: Intel Core 2 Duo   CPU: Intel Xeon
                     Processor or higher      2.8G or higher         E6600 or higher         5410 2.33G or

  PC Server          256MB RAM or higher      1GB RAM or higher      2GB RAM or higher       higher
                                                                                             2GB RAM or
                                                                                             higher

  Operating          Windows XP/Server        Windows XP/Server         Windows Server        Windows Server

  System             2003/Vista/Server        2003/Vista/Server        2003/Vista/Server     2003/Vista/Server
                     2008 32bit/Seven         2008 32bit/Seven         2008 32bit/Seven       2008 32bit/Seven

  Skype version      Skype 3.8/Skype 4.i      Skype 3.8/Skype 4.i    Skype 3.8/Skype 4.i     Skype 3.8/Skype 4.i

  Network            Download speed: ≥ 15     Download speed: ≥ 75   Download speed: ≥       Download speed: ≥

  Connection         Kilobytes/sec            Kilobytes/sec          150 Kilobytes/sec       450 Kilobytes/sec
                     Uplink speed: ≥ 10       Uplink speed: ≥ 50     Uplink speed: ≥ 100     Uplink speed: ≥ 300
                     Kilobytes/sec            Kilobytes/sec          Kilobytes/sec           Kilobytes/sec

   Copyright © 2005-2010 PrettyMay Team. All Rights Reserved | www.prettymay.net                      9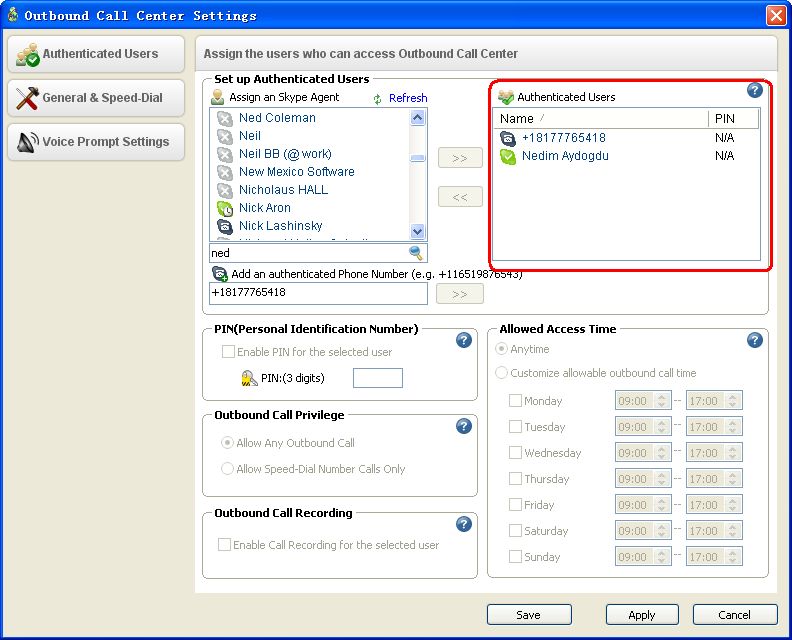
User Manual v4.1
Chapter 2, Installation
This chapter contains how to install the PMCCs and the main GUI of the PMCCs.
It also details how to use the quick support function.
Before You Install
Make sure the computer with PrettyMay installed meets the minimum system
requirements and has an installation of Windows XP/Server 2003/Vista/Server
2008/Seven.
Make sure the computer has internet access.
Make sure the computer has sound device, if no sound card, you can install a VAC.
Make sure the Windows user account you are using to install PrettyMay has Administrator
privileges. If the OS is Windows Vista or Windows 2008 or Windows 7, please make
sure the UAC is disabled.
Note:
After disable the UAC, please re-start the computer/server.
Install Skype and PMCCs
1). If you don’t have Skype installed, please download the latest version of Skype
at http://www.skype.com/intl/en/download/skype/windows/, then install it.
2). Download latest version of PMCCs at
http://www.prettymay.net/PMCallCenter-setup.exe, then install it.
Launch PMCCs
1. Double click the PrettyMay Call Center for Skype icon on your desktop to launch
PMCCs, if you launch it at the first time, you will need to specify how many lines to be
launched, see below for more detail information.
Copyright © 2005-2010 PrettyMay Team. All Rights Reserved | www.prettymay.net 10User Manual v4.1
Note: You can choose how many lines to launch based on your requirement. You can
also change the number of lines later at the PMCCs “Line Management”tab.
2. After clicking “Ok” button on the “Concurrent lines settings” dialog, the
number of Skype clients will be launched by PMCCs, see the screenshot below,
generally, you need to sign in the same main Skype account on all those Skype
instances.
For example, suppose “pmcallcenter.support” is the main Skype account for your
company, you will sign in “pmcallcenter.support” on all instances launched.
3. Then Skype will pop up the “Access Control” dialog to ask you whether you
allow PrettyMay to use Skype, you MUST select “Allow this program to use
Skype” option, then click “OK” button.
Copyright © 2005-2010 PrettyMay Team. All Rights Reserved | www.prettymay.net 11User Manual v4.1
Note: Each Skype instance will pop up the dialog separately, please give the access for
each instance, see below screenshot:
Skype 3.8
Skype above 4.0
4. Check the line status in the “Line Management” tab, see whether all lines are
“connected”, see below screenshot:
Question : There is “Unknown” or “Searching…” item in the “line
management” list, how to fix it?
Answer:Please refer to here.
Copyright © 2005-2010 PrettyMay Team. All Rights Reserved | www.prettymay.net 12User Manual v4.1
5. Quick help.
If it is the first time to launch PrettyMay call center, you will see the quick support
frame at the right of the main call center window. We suggest you to do the system
diagnostics. Please see below screenshot for more detail information.
• Quick Start Guide –Once click, it will show you THREE steps to quickly
setup your call center system.
• System Diagnostics– Easily checking the system configurations as following:
Copyright © 2005-2010 PrettyMay Team. All Rights Reserved | www.prettymay.net 13User Manual v4.1 • Get Online Number (SkypeIn) –To get a skype online number. • Get Skype Credit (SkypeOut) –To get skype credit. • Get Skype Unlimited Calls –To get skype subscription, it will save money for doing outbound calls. • Knowledge Base –PrettyMay knowledge base, there you can easily troubleshooting yourself or raise support tickets to PrettyMay. • Get Email Support –You can drop us email if any help needed. Copyright © 2005-2010 PrettyMay Team. All Rights Reserved | www.prettymay.net 14
User Manual v4.1
Chapter 3, Inbound Call Center
Settings
This chapter tells you how to setup the inbound call center and the function of each option.
It tells you how to use the voicemail to email function, Call personalization feature as well
as the call queue functions.
System Option
In the “General”Tab:
Start PrettyMay call center when I start windows – If you have this option
enabled, when you start the PMCCs computer, it will automatically start the
PMCCs.
Start skype when I start PrettyMay call center – If you have this option enabled,
when you start the PMCCs, it will automatically start the skype instances.
Skype slient mode settings – If you have this options checked, it will
automatically closes the skype windows when the call is finished.
Notification – If will send a notification message to the agents if a caller is in the
waiting queue.
Answer settings
Answer incoming calls after: Define the PMCCs pick up the inbound calls delay time.
Delay to start the welcome message after (seconds): Define the welcome message delay time.
Duration of silence before prompting for inputs(seconds):Time range to input the extension
DTMF tone.
Numbers of silence prompts before closing the calls: Numbers of the prompts played if the callers
don’t have any DTMF tone.
Call transfer timeout settings – Ring tone timeout to agents.
Skype agents available status settings – As the default setups, just the status with
online/Skype Me are considered as available.
Copyright © 2005-2010 PrettyMay Team. All Rights Reserved | www.prettymay.net 15User Manual v4.1
Hold music for PSTN transfer – If you enable this function, it will enable the
onhold music for the PSTN agents.
Running log – You can enable the running log for system diagnosis purpose.
Language settings – Setup a default language.
In the “System Voice Prompts”Tab:
System Voice Prompt language package list – You can setup a system default
language package.
Copyright © 2005-2010 PrettyMay Team. All Rights Reserved | www.prettymay.net 16User Manual v4.1
Add new language package – Click this button to add new language package.
Note: Please refer to below URL to study how to add multiple language packages:
http://www.prettymay.net/callcenter_faq/index.php?pid=knowledgebase&cmd=viewent
&id=8
Voice Prompt List – Here lists all the system default prompts for inbound call center.
Note: You can customize the system default greetings, please make sure the name same
with the original ones and also please put the greetings in a public folder.
In the “VoiceMail settings”Tab:
Please refer to the voicemail system section for the details.
In the “Audio settings”Tab:
System sound device – You can define the system audio device.
File format – Define the files format when you record the calls.
Copyright © 2005-2010 PrettyMay Team. All Rights Reserved | www.prettymay.net 17User Manual v4.1
In the “Advanced settings”Tab:
Enable auto chat reply – You can use this function to notify the clients this skype
account is used for call center if the clients send chat message.
Copyright © 2005-2010 PrettyMay Team. All Rights Reserved | www.prettymay.net 18User Manual v4.1
Extension manager settings
Extension manager can use the Agents assistant to monitor all the Agents status and
calls information, for example, who are busy and how many calls are in the waiting
queue etc.
Navigation:
Call centertoolsextension manager settings
Please choose the extension mangement from the main skype account contact list and
assign to the extension manager group, see below for the details:
Note: Please refer to the agents assistant user guide for more details at:
http://www.prettymay.net/callcenter/PMAAS_User_Manual.pdf
Copyright © 2005-2010 PrettyMay Team. All Rights Reserved | www.prettymay.net 19User Manual v4.1
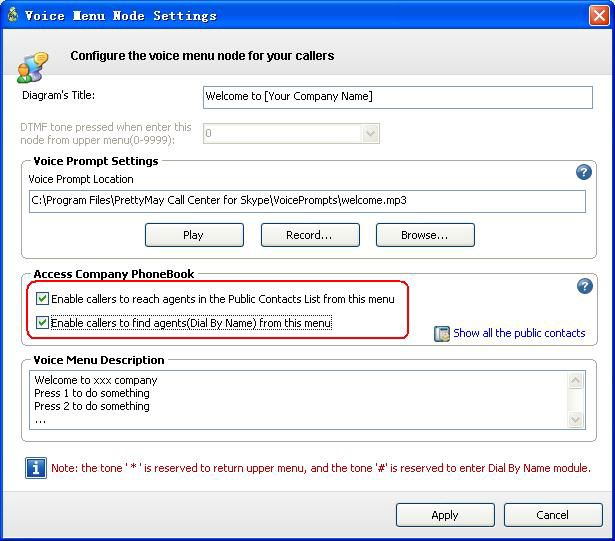
Voice Menu Node
Introduction
A Voice Menu Node represents a pre-recorded message which can be recorded and
played to a caller like “Press 1 for sales, Press 2 for service…”. Please see below
screenshot of the voice menu node:
Record a main menu prompt
Choose “Inbound Call Flow Design” tab, right click the default main voice menu
node, select menu “Edit”, then you can click “Record…” or “Browse…”
button to record your own voice or select an existing .mp3/.wav file as the voice
prompt for this node.
Voice Menu Node options
In the “Basic Settings”tab:
• Voice Menu Name –Specify a name of the voice menu node.
• Key to enter this menu – DTMF tones pressed from upper voice menu node to
enter this menu.
• Voice Prompt – The pre-recorded message will be played to a caller.
• Enable Callers to reach agents in the public contact list from this menu – this
option will enable a caller to enter the number of extension that listed in the public
contact list.
• Enable callers to find agents (Dial By Name) from this menu – this option will
enable a caller to use dial by name function from this menu.
• Voice Menu Description.
Copyright © 2005-2010 PrettyMay Team. All Rights Reserved | www.prettymay.net 20User Manual v4.1
In the “Advanced Settings” tab:
• Timeout Sec – If no action within the timeout sec, it will timeout.
• Action – The behavior when the timeout reaches.
Repeat Prompt: Once time out, will repeat the greeting to the callers.
Connect to extension: Once timeout, will transfer the call to a pre-defined extension node.
Connect to voice menu: Once timeout, will transfer the call to a pre-defined voice menu node.
• Language of system voice prompts – If you have multiple languages of voice
prompt packages, you can choose the language of system voice prompt.
Copyright © 2005-2010 PrettyMay Team. All Rights Reserved | www.prettymay.net 21User Manual v4.1
Extension Node
Introduction
There are two types of extension node:
• Skype/Phone extensions – You can assign staff’s SkypeID/Landline/Cell phone
number into the extension, and then your staff can use Skype software, Skype phones,
cell phones, landline or any other Skype compatible devices to take/make calls.
• Voicemail extension – You can set up a single voicemail inbox, so that caller can
leave the voice message after he enters the extension number. You need to select
“Set as a Voicemail extension” option in the “Extension Type” field as below
screenshot.
Note: You can use this feature for out of hours and just record the callers’
information and then call back when you are on duty.
Add an Extension Node
Select an existing Voice Menu Node, right-click the mouse, select menu “Add
Extension Node”. See below screenshot:
Copyright © 2005-2010 PrettyMay Team. All Rights Reserved | www.prettymay.net 22User Manual v4.1
Extension Options
In the “Basic Settings” tab:
• Extension Name – Specify a name of the extension node.
• Extension Number – Keys pressed from upper menu to enter this extension.
• Extension Type – Set this extension as a Skype/Phone extension or voicemail
extension.
• Assign Skype/Phone agent(s) options:
Assign an Skype agent – Assign one or more Skype agent(s) into the
Agents/Operator group, and then these agents can use Skype to answer/make calls.
Assign a phone number – Assign cell phone or landline phone numbers into the
Agent/Operator group, and then these agents can use cell phone/landlines to
answer/make calls.
Skill Level – Specify the priority for an agent to receive calls, agent with higher
Skill level will receive calls first. You can choose one agent and right click to setup
the skill level, please refer to below screenshot.
Note: Suppose that you setup two agents in this agent/Operator group with different
skill levels and both the two agents are available (Available means the agents are
online and free to pick up the call). Then when inbound calls come, it will ring to
the high skill level agent first.
Copyright © 2005-2010 PrettyMay Team. All Rights Reserved | www.prettymay.net 23User Manual v4.1
• Call Routing Options:
Ring Group – This option enables PMCCs ring all of the agents at once, and once
one of the agents picks up the call, it will stopping ringing to the others.
Handoff call transfers – This option enables PMCCs and the main Skype account
leave the conversation once the caller connects to an agent, this will save the
system resources on the call center PC.
Skip to next available agent – This option enables PMCCs ring to the next
available agent when the previous agent doesn’t pick up the call in a certain time,
you can define the timeout based on the requirement.
Note: You can use the call routing options combined with the skill level. For
example, you define two agents in the extension with different skill levels, then
when calls come in, it can ring to the higher skill level agent, if the high skill level
agent is not available, it will ring to the next skill level agent.
• Prompt While Transferring
Play the voice prompt before a call is transferred – If you enable this function,
PMCCs will play the specified prompt before a call is transferred to agents. After
the prompt is played, the call can be transferred to the agents.
• Extension node description
Extension node description – You can give a note about this extension.
Copyright © 2005-2010 PrettyMay Team. All Rights Reserved | www.prettymay.net 24User Manual v4.1
In the “Voicemail Settings”tab, you can enable the voicemail option for this
extension:
• Enable Voicemail – If this function is enabled, if the agents are not available, the
callers will be put into the voicemail to leave the agents voicemail.
• Allow agent(s) to remote access voicemail and manage greeting – If this is
checked, the agents can dial into the call center, then enter their own extension
number to access voicemail and manage greeting, they can hear the new greeting or
change the greeting.
• Enable Voicemail to email – If this is checked, PMCCs will forward voicemails to
the specified email addresses as attachments.
• Email Addresses – Email address (es) to receive voicemails.
• Enable SMS notification when a new voicemail is received – If this is checked,
PMCCs will send a SMS to the specified cell phone number when got a voicemail.
• Phone number(s) to receive SMS.
• SMS Content.
• Limit sending SMS notification to certain hours – Specify a time interval to send
SMS message.
Copyright © 2005-2010 PrettyMay Team. All Rights Reserved | www.prettymay.net 25User Manual v4.1
In the “Call Record Settings” tab, you can enable PMCCs to record calls for this
extension:
• Enable call recording between caller and agents who are setup in this extension
– If you have this function enabled, the system will record the inbound calls for this
extension.
• Proportion of calls to be recorded – You can define 100% record or partially
record the inbound calls for this extension. For example, you can choose 50%, and
then 50% calls will be recorded.
• Prompt to play when call recording initiated – You can give a prompt to the caller
before the call is recorded.
• Call record storage folder – You can define a customize location for the recording
files.
Copyright © 2005-2010 PrettyMay Team. All Rights Reserved | www.prettymay.net 26User Manual v4.1
In the “Advanced Settings” tab, there are following options:
• Call Queue options.
Introduction Voice Prompt – Specify a prompt to be played to a caller when
he is put into the waiting queue. You can use the system default one or
customize one greeting.
Music on Hold – Music for a caller in the waiting queue. You can use the
system default one or customize one greeting.
Maximum Queue Wait Time (Seconds) –The maximum time for a caller
waits in the queue before the call is forwarded to voicemail.
Enable a caller in a queue to enter voicemail by pressing – Specify a key
that a caller can press to enter voicemail.
• Notification of incoming calls.
Send chat message to an agent when an incoming call comes – If it is
checked, PMCCs will send a Skype chat message of the call info to the ringing
agent.
• Return to the main menu – If it is checked, when a caller is in the voicemail of
this extension, the caller is enable to press the specified keys to return to main voice
menu.
Copyright © 2005-2010 PrettyMay Team. All Rights Reserved | www.prettymay.net 27User Manual v4.1
Public Contacts List (Company Phonebook)
Introduction
The Public Contacts List is a directory where you can list all of your employees here,
and each extension represents an employee, and been assigned with an unique extension
number, see below screenshot for the details:
Add contact – Add a new contact to the public contact list.
Edit contact – Modify one exist contact information.
Delete contact – To delete one exist contact information from the public contact
list.
Import phonebook –You can use this function to easily import an
exist phonebook to the PMCCs public contact list.
Export phonebook –You can use this function to export the defined public contact
list to your computer for backup purpose.
Copyright © 2005-2010 PrettyMay Team. All Rights Reserved | www.prettymay.net 28User Manual v4.1 Different from the extension node set in the “Inbound Call Flow Design” panel, extensions in the Public Contacts List can be reached from any “Voice Menu Node” with the checkbox “Enable callers to reach agents in the Public Contacts List from this menu” selected. Another advanced feature to use the Public Contact List is callers can find the person in the list by using Dial By Name method, so they don’t even have to know the extension number of the person they try to reach, they just need to enter the first three digits of a person’s last name. To enable the Dial By Name function, you need to select the checkbox “Enable callers to find agents (Dial By Name) from this menu” in the Voice Menu Node where caller enter into it. See below screenshot: Copyright © 2005-2010 PrettyMay Team. All Rights Reserved | www.prettymay.net 29
User Manual v4.1
Dial By Name
Once you enable the Dial By Name feature for an agent, callers don’t need to know
the extension number for the agent, just press the first three letters of the last name for
the agent, then PMCCs will connect to the agent.
To enable the Dial By Name feature, you need to initial the Public Contacts List, click
the “Company Phonebook” button on the toolbar, then click the “Add
Contact” link in the dialog, see below screenshot:
You will be able to set an extension for an agent, set the appropriate options, make
sure the “Let callers search for this agent (Dial By Name)” is checked, and
specify/record a sound file which contains the audio of the person’s name. Do as
above for each of your employees. See below screenshot:
Copyright © 2005-2010 PrettyMay Team. All Rights Reserved | www.prettymay.net 30User Manual v4.1 After you finish the initialization of the Public Contacts List, open the Entry Node (the top node in the inbound call flow) or any other Voice Menu Node where you want the callers to enter the Dial By Name module. Stick the checkbox “Enable callers to reach agents in the Public Contacts List from this menu” as well as the checkbox “Enable callers to find agents (Dial By Name) from this menu”. Then click “Apply” button. After these settings are done, your callers can enter Dial By Name module by pressing from the Voice Menu you set. Copyright © 2005-2010 PrettyMay Team. All Rights Reserved | www.prettymay.net 31
User Manual v4.1
Call Personalization Node
Introduction
Call Personalization node can be used to route calls differently based on the caller’s
telephone number or the SkypeIn number that the caller dials.
There are two ways to use the Call Personalization nodes in your call flow, they
are:
1). Set the Call Personalization node as the entry node in the call flow.
In this way, the caller will be identified as soon as the PMCCs answers the call, then
routes the call depending on the call personalization setting you designed in the call
personalization node.
To set the call personalization node as the entry node, right click the main voice menu
node, select the “Change to Call Personalization Node” menu.
You may create a routing rule to do something as simple as "if important client A calls,
transfer the call directly to one extension rather than have to do the auto-attendant" –
in this case:
- Create a new Call Personalization by clicking the "Add Call Personalization"
button in the dialog.
- In the "Caller Identification" tab, under "Caller Phone Number/Skype ID" field,
enter client A’s telephone number (you can add a comment in the Note section).
- Go to the "Personalization Settings" tab and select "Transfer the call to an
extension" and select or create one extension, please see below screenshots for the
details:
Copyright © 2005-2010 PrettyMay Team. All Rights Reserved | www.prettymay.net 32User Manual v4.1 Copyright © 2005-2010 PrettyMay Team. All Rights Reserved | www.prettymay.net 33
User Manual v4.1

Note: If the system can’t identify the incoming calls and the calls is excluded from
the identifications, if will go to the default one. For this case, it will go to Business A.

   Copyright © 2005-2010 PrettyMay Team. All Rights Reserved | www.prettymay.net           34
User Manual v4.1

You can also run multiple auto-attendants for multiple businesses. In this case,
suppose that you would like to give different greetings for two businesses-business A
and business B:

- Create a new Call Personalization by clicking the "Add Call Personalization"
button in the dialog.

- In the "Caller Identification" tab, under "Dialed SkypeIn Number/Skype ID",
enter the SkypeIn number/Skype ID for business A (you can add a comment in the
Note section).

- Go to the "Personalization Settings" tab and select "Transfer the call to a Voice
Menu Node" and create a voice menu node for business A by clicking the “Add new
Voice Menu Node” button, and point it to the greeting for business A. Please see
below screenshots for the details:

Please follow the same scenarios to setup business B.

   Copyright © 2005-2010 PrettyMay Team. All Rights Reserved | www.prettymay.net     35
User Manual v4.1

You can setup dialed SkypeIn or Skype ID

   Copyright © 2005-2010 PrettyMay Team. All Rights Reserved | www.prettymay.net     36
User Manual v4.1

2). Add the Call Personalization node under a Voice Menu Node.

In this way, the caller will be identified after the sound file in the Voice Menu Node
played, then route the call depending on the call personalization setting you designed
in the call personalization node.

To add the call personalization node under a Voice Menu Node, right click the existing
Voice Menu Node, select the “Add Call Personalization Node” menu. See below
screenshots for the details:

   Copyright © 2005-2010 PrettyMay Team. All Rights Reserved | www.prettymay.net         37
User Manual v4.1
Then add call personalization identifications
Note: For more cases, please refer to below URL for the detail:
http://www.prettymay.net/callcenter_faq/index.php?pid=knowledgebase&cmd=viewent&id
=61
Call Conference Room
Call Conference allows you to easily setup unlimited participants in one conference room,
the participant can be landlines, mobile phones or Skype users.
Note: this feature is ONLY available in Professional license.
Add a Conference Room
Select a voice menu node, right click mouse, then select “Add Conference Room
Node”, See below screenshots for the details:
Copyright © 2005-2010 PrettyMay Team. All Rights Reserved | www.prettymay.net 38User Manual v4.1
Configure conference room node:
Conference Room Name: You can specify the name of the conference.
Conference Extension Number: Specify a number where the caller presses from the
upper menu to enter the conference.
Skype Line for this Conference Room: Each conference room requires a dedicated
Skype line, and the SkypeID of the conference line MUST NOT be the same as the
SkypeID of the normal lines. Typically, you may need to create a new SkypeID for a
conference line, then click “Add new Skype Line for conference” button to launch a
conference line of Skype, and sign in the dedicated SkypeID on new Skype instance.
Copyright © 2005-2010 PrettyMay Team. All Rights Reserved | www.prettymay.net 39User Manual v4.1
Enable password protection: Enable this option if you want the participants to be
required to enter the password before they join the conference.
Password: password of the conference.
Records store folder: Specify a folder to save the recordings of conference calls.
After you finishing the configuration, you will see a conference room node in the call
flow:
Also, you can see the conference line with a dedicated SkypeID in the “line management”
list:
indicates a normal inbound/outbound call line.
indicates a conference line.
Note: SkypeID of normal line and conference line MUST be different.
Copyright © 2005-2010 PrettyMay Team. All Rights Reserved | www.prettymay.net 40User Manual v4.1
Voicemail System
• Personalize Voicemail Greeting
You can personalize voicemail greeting for each extension, Open the extension node,
choose “Voicemail Settings” tab, click “Personalize Greeting…” link, then in
the pop up dialog, click “Record…” or “Browse…” button to record/replace a
new greeting. See below screenshots for the details:
Copyright © 2005-2010 PrettyMay Team. All Rights Reserved | www.prettymay.net 41User Manual v4.1
• Voicemail to Email Forwarding
Once you enable the voicemail to email forwarding feature, all new voicemails will be
forwarded to a specified email address as the attachment.
To enable voicemail to email forwarding feature, follow the steps below:
1). Stick the “Enable Voicemail Inbox for this extension” checkbox in the
“Voicemail settings” tab in the extension node option dialog, and specify the email
addresses of agents who will receive the new voicemails, See below screenshot:
Copyright © 2005-2010 PrettyMay Team. All Rights Reserved | www.prettymay.net 42User Manual v4.1 2). Configure the SMTP settings Click the “SMTP setting…” link, configure the settings as below screenshot: “Sender Name” - The name from which Emails sent from PMCCs will appear to be from. “Mail address” - The Email address from which Emails sent from PMCCs will appear to be from. “Server name / Address” - The name or IP address of your SMTP mail server. “Port” - The port number of your SMTP mail server. In most cases this port is 25. “Server connecting requires SSL” - Check this if your SMTP server requires a secure SSL connection. “Server requires authorization” - Check this if your SMTP server requires username and password. “User name” - If your SMTP server requires a username, you may specify it here. “Password” - If your SMTP server requires a password, you may specify it here. 3). Send a test email for checking the settings. Send a test Email message to determine if your settings are correct by clicking the “Send a test mail” link. Copyright © 2005-2010 PrettyMay Team. All Rights Reserved | www.prettymay.net 43
User Manual v4.1

• Voicemail SMS Notification
  Once you enable the Voicemail SMS notification, PMCCs will send a SMS message
  through Skype to inform you the new voicemail.

To enable this option, open the extension node, choose “Voicemail Settings” tab, in
the “SMS notification” field, stick “Enable SMS notification when a new
voicemail is received” checkbox, then specify a cellphone number that receives the
SMS message. See below screenshot:

• Remote Access Voicemail/Greeting
  Agents can use their Skype/Cellphone/Legacy phone to remote access new voicemails
  and manage its voicemail greeting.

 To use the remote access feature, follow the steps below:

1). Open the extension node, choose “Basic settings” tab, set an agent’s
SkypeID/phone number or legacy phone to “Agent/Operator group”. E.g. Skype
agent “Kevin Lee” and its phone number “+8613905121111” are assigned into
“Agent/operator group”. See as following:

    Copyright © 2005-2010 PrettyMay Team. All Rights Reserved | www.prettymay.net     44
User Manual v4.1 2). Choose “Voicemail Settings” tab, stick both “Enable voicemail inbox for this extension” and “allow agent(s) assigned this extension to remote access voicemail and manage greeting” option. See below screenshot: 3). The agent can use it’s Skype account or cellphone to call the main SkypeID or SkypeIn number, then press the its own extension number to enter its own extension, Copyright © 2005-2010 PrettyMay Team. All Rights Reserved | www.prettymay.net 45
User Manual v4.1
then PrettyMay will lead it to voicemail system, and listen new voicemails or manage
greetings.
Note: if an agent has been assigned into authenticated user list in outbound call center,
when the agent dial into PrettyMay, it will go to outbound call center first, press
to forward into inbound call center, then press its extension number to enter
the voicemail system.
Out of Hours Settings
You can set up different call flows based on time, e.g. you may need to set up a
out-of-hours call flow running during non-business hours each day.
Click PMCCs menu “Tools””Add new call flow”, in the “Call Flow Run
Schedule” dialog, set up time interval that you want to create a new call flow to run
at.
For example, I want to set up a call flow running at out of business hours (09:00 –
17:00). See below screenshot for the details:
Copyright © 2005-2010 PrettyMay Team. All Rights Reserved | www.prettymay.net 46User Manual v4.1
After you finish the settings, you will see a new call flow listed in the “Call Flow
List”, see below screenshot:
You can just setup a voicemail for the out of business hours to let the callers leave
voicemail.
Right click voice menuChange to extension node
Copyright © 2005-2010 PrettyMay Team. All Rights Reserved | www.prettymay.net 47User Manual v4.1
The default call flow runs at the time outside any scheduled time-specific call flows.
The green arrow indicates the current running call flow.
Copyright © 2005-2010 PrettyMay Team. All Rights Reserved | www.prettymay.net 48User Manual v4.1
How to import and export the call flow?
Imports call flow
Choose one call flow and click “Replace call flow”
Select one exist call flow
Click “Yes”
Copyright © 2005-2010 PrettyMay Team. All Rights Reserved | www.prettymay.net 49User Manual v4.1
Call flow is imported.
Export call flow:
Choose the call flow that you would like to export
Copyright © 2005-2010 PrettyMay Team. All Rights Reserved | www.prettymay.net 50User Manual v4.1
Save the call flow
Note: You can use the call flow import and export function to backup the call flow and easily
configurate a new one.
Copyright © 2005-2010 PrettyMay Team. All Rights Reserved | www.prettymay.net 51User Manual v4.1
Chapter 4, Outbound Call Center
Settings
This chapter describes how to configurate the outbound call center. There you can also
Study the call recording setups of each agent.
• Set Authenticated Outbound Users
Choose “Outbound call flow” tab, click “Outbound Call Center settings”, then
select “Authenticated users” page, and you can assign outbound users from Skype
contact list or cellphone/mobile phone numbers.
• Outbound Call Recording
If you want to record outbound calls in PMCCs, you can enable the call recording
option for outbound users, Choose “Outbound call flow” tab, click “Outbound
call center settings”, then select a user in the “Authenticated users” list, stick the
“Enable Call Recording for the selected user” checkbox in the “Outbound call
recording” field. See below screenshot:
Copyright © 2005-2010 PrettyMay Team. All Rights Reserved | www.prettymay.net 52User Manual v4.1
• Outbound Call Rule
When an authenticated user dials into outbound call center, and hears the voice prompt,
the user is able to dial a phone number or speed dial number, and end with “#”, the
detailed format as following:
Country/Region code + area code + phone number + “#”.
For example: if you want call the phone number: “+8651251551234”, you need to
input “8651251551234#”.
• Speed Dial Number
To add a speed dial number, choose “Outbound call flow” tab, click “Outbound
call Settings” button on the toolbar, then select “General &Speed Dial Number”
page, click "Add" button, and you input a speed dial and a corresponding SkypeID or
phone number.
Then, you can use test the speed dial number by using an authorized extension to dial
into outbound call center, and input the speed dial and end with “#”.
E.g. if you set a speed dial number “6” for SkypeID : www.prettymay.net, when you
press “6#”, PMCCs will ring SkypeID : www.prettymay.net.
Copyright © 2005-2010 PrettyMay Team. All Rights Reserved | www.prettymay.net 53User Manual v4.1
• Smart Dialing
Smart dialing feature is used to pre-set a country/region where you frequently make
outbound calls to, so that you don’t need to input the country/region code every time
you make the outbound call.
To enable the smart dialing option, choose "Outbound call flow" tab, click "outbound
call center settings", choose "General & Speed Dial" page, choose the country in the
"Smart dialing" field. See below screenshot:
After you set it, the outbound call rule will change as following:
1). Dialing a national phone number, the rule is:
“0” + area code + phone number + “#” (“0” represents the country/region
you pre-set).
2). Dialing an international phone number, the rule is:
“9” + country/region code + area code + phone number + “#”.
For example: I you set “China (+86)” as the default country, when I want to call a
Chinese phone number “+8651251556542”, I need to input “051251556542#”.
Copyright © 2005-2010 PrettyMay Team. All Rights Reserved | www.prettymay.net 54User Manual v4.1
When I want to call an international phone number such as U.S. phone number
“+12182062978”, I need to dial “912182062978#”.
Note: “#” sign is used to confirm the speed dial number or phone number you input.
• Direct Dial Out through PMAAs
An easy way for an agent to dial out is through PrettyMay Agent Assistant for Skype
utility, if you have installed PMAAs on your desktop, you can launch it, and make sure
your PMAAs connects to the call center server, then you can enter the phone number in
the “Call Phones” panel in PMAAs, then click “Start Call” button, see as
following:
Dial Pad Dialing Out
Copyright © 2005-2010 PrettyMay Team. All Rights Reserved | www.prettymay.net 55User Manual v4.1
Chapter 5, Lines Management
This chapter introduces the line management function
Choose “Line Management”, you will see all lines are list there.
To add/remove a Skype line, you can click “Add a new line” or “Delete one line”
button on the toolbar.
Question : There is “Unknown” or “Searching…” item in the “line
management” list, how to fix it?
Answer:Please refer to here.
Copyright © 2005-2010 PrettyMay Team. All Rights Reserved | www.prettymay.net 56User Manual v4.1
Chapter 6, Voicemail Management
This chapter details you the usage of the voicemail function
Choose “Voicemail Management” tab, you will see the current day’s new voicemails
listed there.
Voicemail management Tab options:
Save –Save the selected Voicemail to another folder.
Edit –Edit one note for the selected voicemail.
Delete –Delete selected voicemail.
Copyright © 2005-2010 PrettyMay Team. All Rights Reserved | www.prettymay.net 57User Manual v4.1
Chapter 7, Call Record
Management
This chapter tells the function of the call recording frame.
Choose “Call Record Management” tab, you will see the current day’s call
recordings listed there, see as following:
Call record management Tab options:
Save –Save the selected call recording file to another folder.
Edit –Edit one note for the selected Call recording file.
Delete –Delete the selected call recording log.
Copyright © 2005-2010 PrettyMay Team. All Rights Reserved | www.prettymay.net 58User Manual v4.1
Chapter 8, Call Log Management
This chapter introduces the track history function, you can export it to analyze the daily
call logs.
Choose “Track History” tab, you will see the current day’s call logs listed there.
Echo call log includes: Type call (inbound/outbound), callee’s name, Caller ID, call
duration, call start time, call rate, call fee, etc. See below screenshot:
Copyright © 2005-2010 PrettyMay Team. All Rights Reserved | www.prettymay.net 59User Manual v4.1
Track history Tab options:
Save –Save the selected call log files to another folder.
Automatically export the call log–You can use this function to export a time
range call log to xls format and use it to do some call analysis reports.
Show column –You can use this function to show or hidden column displayed in
the track history tab.
Delete–Delete the selected call log.
Copyright © 2005-2010 PrettyMay Team. All Rights Reserved | www.prettymay.net 60User Manual v4.1
Chapter 9, Support Resources
This chapter tells you how to get a support from the PrettyMay.
If you have any problem or suggestion after using the PMCCs, you can get help in the
following way:
1). Visit PMCCs FAQ at: http://www.prettymay.net/callcenter_faq
2). Go to our support forum at: http://www.prettymay.net/forum/
3). Contact us via email at: support@prettymay.net
4). Contact our online support team directly at: http://www.prettymay.net/support.htm
Copyright © 2005-2010 PrettyMay Team. All Rights Reserved | www.prettymay.net 61You can also read