Parallels Toolbox User's Guide
←
→
Page content transcription
If your browser does not render page correctly, please read the page content below
Parallels Toolbox User's Guide
Parallels International GmbH
Vordergasse 59
8200 Schaffhausen
Switzerland
Tel: + 41 52 672 20 30
www.parallels.com

Copyright © 1999-2018 Parallels International GmbH. All rights reserved.

This product is protected by United States and international copyright laws. The product’s underlying technology,
patents, and trademarks are listed at http://www.parallels.com/about/legal/.

Microsoft, Windows, Windows Server, Windows Vista are registered trademarks of Microsoft Corporation.
Apple, Mac, the Mac logo, OS X, macOS, iPad, iPhone, iPod touch are trademarks of Apple Inc., registered in the US
and other countries.
Linux is a registered trademark of Linus Torvalds.
All other marks and names mentioned herein may be trademarks of their respective owners.
Contents
Welcome to Parallels Toolbox .................................................................................. 4
      Installing Parallels Toolbox ............................................................................................... 5
Basics ........................................................................................................................ 8
Parallels Toolbox Preferences ................................................................................ 11
      General ......................................................................................................................... 11
      Location........................................................................................................................ 11
      Shortcuts ...................................................................................................................... 11
The Tools ................................................................................................................. 13
      Images, Audio, and Video.............................................................................................. 13
      Focus and Time Management ....................................................................................... 21
      Security and File Management ....................................................................................... 26
      Optimization .................................................................................................................. 30
Get Help ................................................................................................................... 33
      Check for Updates ........................................................................................................ 34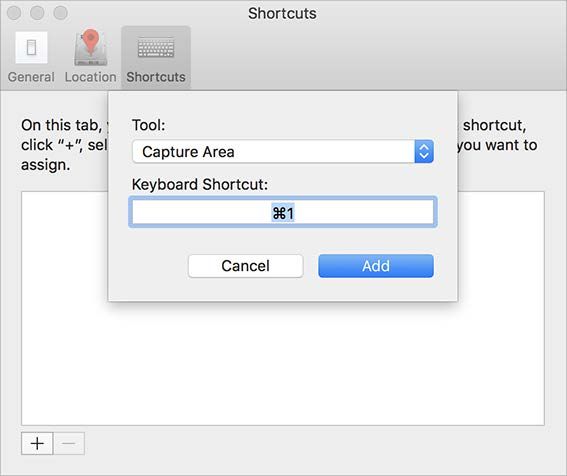
CHAPTER 1
Welcome to Parallels Toolbox
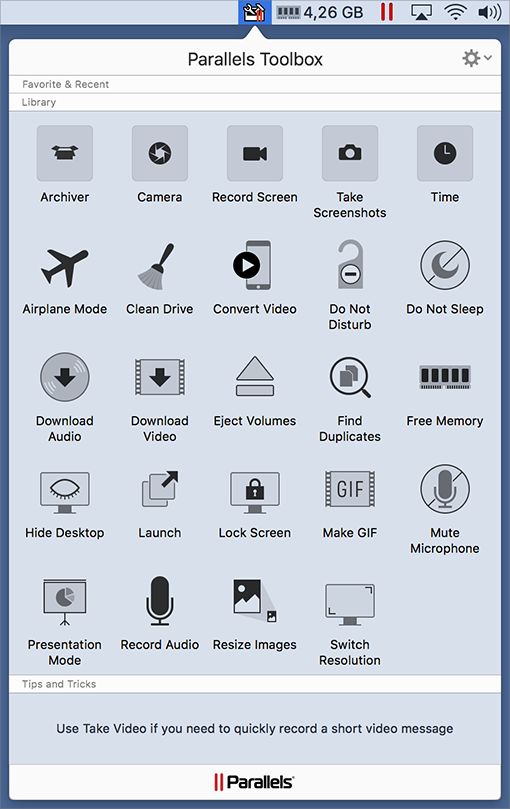
Parallels Toolbox is a collection of convenient, easy-to-use, lightweight applications, or tools, to
help you focus, manage time, get things done, and stay secure. It provides quick access to many
common functions that are either hidden, require hard-to-remember keyboard shortcuts, or are just
not available.
With Parallels Toolbox, you can:
• Take screenshots or record video of any part of your screen, any window, or your full screen
• Take screenshots of entire web pages even if they are not fully displayed on the screen
• Resize images and convert them to a different format
• Prevent your Mac from going to sleep so you can be sure an important task won't be
interrupted
• Quickly disable distracting notifications so you can focus on the task at hand
• Simultaneously eject all volumes and removable media from your computer
• Open several predetermined applications or documents at once
• Hide all the items on your desktop with one click, for clean presentations or screenshots
• Record audio from your computer's microphone, and record video or take pictures from your
computer's camera
• Block your computer's microphone or camera to prevent unauthorized recordings
• Lock the screen with a single click to prevent access without a password
• Easily download video from many popular Internet video sites
• Easily download audio files or playlists from the Internet
• Convert video for playback on your iPhone or iPad, and transfer it to iTunes for easing syncing
• Set an alarm, a countdown to a specific date, a stopwatch, or a timer
Welcome to Parallels Toolbox

•    Create archives from multiple files to save space or easily share. And you can password protect
     them for security.
•    Unpack archives encoded in various formats
•    Make GIFs from video files
•    Find and delete duplicate files
•    Get more free space and optimize your Mac by deleting unnecessary files
•    Release inactive memory and optimize memory consumption on your Mac
•    Easily change the screen resolution
•    Quickly turn off all wireless communication (Wi-Fi, Bluetooth, etc.) on your Mac
•    Minimize various distractions when showing a presentation
The Toolbox is just one click away in the menu bar, and tools can also be launched from the Finder
or from the Dock.

In This Chapter
Installing Parallels Toolbox ...................................................................................... 5

Installing Parallels Toolbox
If you install or upgrade to Parallels Desktop 12 or later, you'll be prompted to install Parallels
Toolbox.

Otherwise, you can download Parallels Toolbox from www.parallels.com/toolbox.

To install Parallels Toolbox:

                                                                                                                          5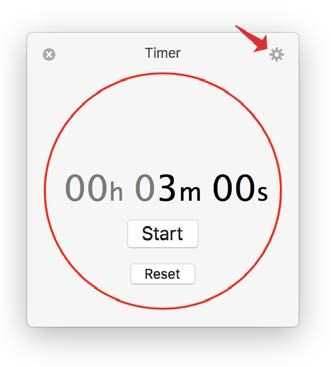
Welcome to Parallels Toolbox

1   Open the image file you downloaded and double-click Install Parallels Toolbox.

    Parallels Toolbox is installed in your Applications folder and is immediately ready to use. To get
    started, just click    in the menu bar at the top of your screen.

6
Welcome to Parallels Toolbox
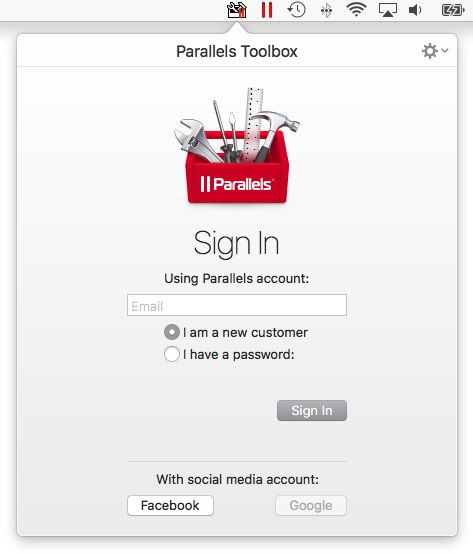
2 If necessary, sign in to your Parallels account. Or create a new one if you don't have one
already.
Note: If you have Parallels Desktop, you may not need to sign in.
7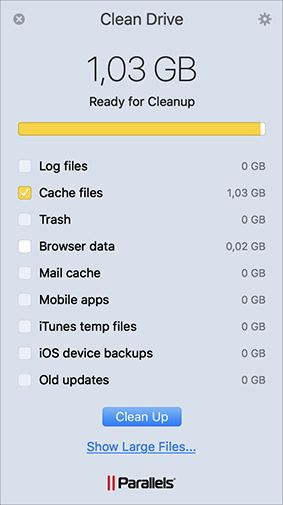
CHAPTER 2

Basics

In this section learn the basics for accessing all the tools in Parallels Toolbox.

Open a tool

Click    in the menu bar at the top of your screen to open the toolbox and then click the tool you
want.
Basics

 Tips: Some tools start working as soon as you open them. For example, when you open the Record
 Audio tool a recording starts right away.

 You can also activate some tools, such as Archiver or Download Video, by dragging files or other
 objects onto them. See the instructions for each tool (p. 13) for more information.

Quickly access the tools you use most

You can put the tools you use most in easy-to-access places so you can find them even more
quickly and conveniently. Just click  in the menu bar and drag a tool to place it where you want
it.

You can drag tools to:
•   The Dock at the bottom of the screen

•   The menu bar at the top of the screen

•   The Favorite & Recent area at the top of the toolbox

    This area also shows the five most recent tools you've used.

 Tip: To remove a tool from the Dock or Favorite & Recent area, just drag it out. To remove a tool from
 the menu bar, hold down the Command key on your keyboard and drag the tool out.

See whether a tool is active

By looking at a tool's icon in the Dock, menu bar, or Favorite & Recent area in the toolbox, you
can see whether it's active and sometimes see other information about its state.

                                                                                                          9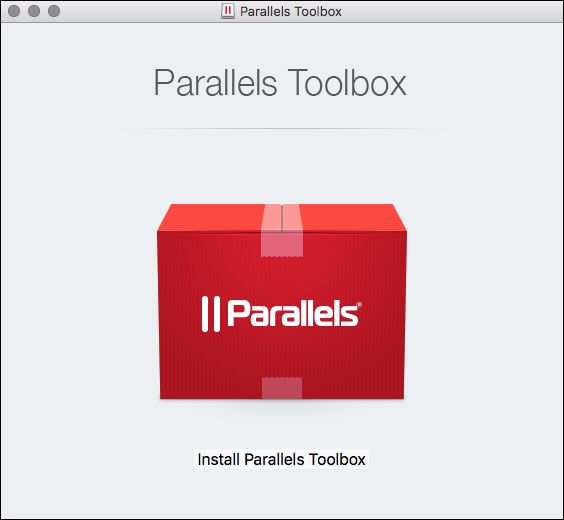
Basics

For example, below the Record Window icon is blinking red to show a window is being recorded,
and the Timer icon shows how much time is left.

Change a tool's settings

Many tools have settings you can change. For example, in tools that record audio you can set the
sound source.

To access a tool's settings, do one of the following:

•    Click    in the menu bar, then right- or Control-click the tool and choose Preferences.
•    In tools that have windows, open the tool and click        in the window.

 Tip: Notifications let you know when a tool needs your attention. You can disable (or re-enable)
 notifications for any tool in System Preferences > Notifications.

Quit Parallels Toolbox

By default, Parallels Toolbox is always available in the menu bar. You can quit Parallels Toolbox by
doing the following:

1    Click    in the menu bar.
2    Click   and click Quit Parallels Toolbox.

 Note: Some tools, such as Timer and Stopwatch, stop working when Parallels Toolbox isn't running.

10
CHAPTER 3

Parallels Toolbox Preferences

This section describes what you can do in Parallels Toolbox preferences. To open the preferences:

1   Click        in the menu bar.
2   Click       and click Preferences.

    In This Chapter
    General................................................................................................................... 11
    Location ................................................................................................................. 11
    Shortcuts ................................................................................................................ 11

General
On the General tab, you can choose whether Parallels Toolbox starts together with your Mac and
disable automatic updates.

Location
When you create or download some file using Parallels Toolbox, the file is placed on your desktop
or to the Downloads folder by default.

On the Location tab, you can change the default location where screenshots, camera shots,
recordings, downloads and converted files are saved.

Shortcuts
On the Shortcuts tab, you can create keyboard shortcuts to launch tools.

To create a shortcut, do the following:
1   Click "+" at the left bottom corner of the window.
2   Select a tool from the Tool menu.
Parallels Toolbox Preferences
3 Click the Keyboard Shortcut field and press the key combination you want to use to launch
the selected tool.
4 Click Add.
12CHAPTER 4 The Tools This section has instructions for using each of the tools in Parallels Toolbox. In This Chapter Images, Audio, and Video ....................................................................................... 13 Focus and Time Management ................................................................................ 21 Security and File Management ................................................................................ 26 Optimization ........................................................................................................... 30 Images, Audio, and Video Parallels Toolbox offers tools for taking screenshots, recording video of what's on your screen, taking photos, recording audio and video using your computer's camera and microphone, and downloading and converting video. TAKING SCREENSHOTS The four tools below help you capture images of whatever is on your screen. This can be helpful, for example, if you need technical support and want to send someone an image to show them what's happening on your screen, if you want to save a record of something, or if you're putting together a presentation. Tip: Press and hold the Control key while taking a screenshot to copy it to the clipboard. To access these tools, click in the menu bar, click Take Screenshots, and then click the tool you want. By default, all these tools save screenshots on the desktop. If you want to change the default location, right-click any of the tools, select Preferences and specify another location. If you use the Capture Area, Capture Screen and Capture Window tools, you can choose to make screenshots with a delay. Right-click any of the tools, point to Run with delay and specify the time interval you need.
The Tools

When you make screenshots using Capture Area, Capture Screen and Capture Window, the
default file format is PNG. You can change the default format to JPEG, TIFF, PDF or GIF. Right-
click any of these tools, select Preferences and choose the format you need from the Image
format menu.

Capture Area

Use this tool to take a screenshot of a part of the screen.
1    Open the tool, then click and drag to highlight the area you'd like to capture.
     You can adjust the selection by dragging the corners.
2    Then click inside the selection box to take the screenshot.

Capture Screen

Use this tool to take a screenshot of the entire screen.
•    Open the tool, then click anywhere to take the screenshot.
     If your Mac has more than one display, click the screen you want to capture.

Capture Window

Use this tool to take a screenshot of a single window.
•    Open the tool, then click any window to take the screenshot.

Screenshot Page

Use this tool to take a screenshot of the entire web page even if it's not fully displayed on the
screen.
•    Open the tool.
     If you open it for the first time, you will be asked to install a special extension for the Safari web
     browser. This extension adds a button to the left of the Safari address bar. Click this button to
     make a screenshot of the currently displayed web page. You can choose whether you want to
     take a screenshot of the whole web page or only of its visible part.
14
The Tools
SCREEN RECORDING
The three following tools let you record a video of whatever is happening on your screen. You can
record a single window, a selected area, or the full screen.
Set the audio source
As you record video using any of the tools below, by default audio is also recorded from whatever
input source your Mac is set to use (usually the built-in microphone), so you can narrate the video if
you like.
You can set the tool to record from a different source, including:
• Another microphone connected to your computer
• System audio, so the sounds from your computer are recorded
Note: The first time you set a tool to record system audio, you are prompted to install a sound driver
and restart your computer. Just follow the onscreen prompts.
• No sound, for a silent video
To set the audio source:
1 Click in the menu bar, right- or Control-click the tool, and choose Preferences.
2 Choose a source from the Audio source pop-down menu.
Videos are recorded in .mov format, for easy playback.
To access a screen recording tool, click in the menu bar, click Record Screen, and then click
the tool you want.
By default, all these tools save videos on the desktop. If you want to change the default location,
right-click any of the tools, select Preferences and specify another location.
Tip: You can change default folders where various tools save resulting files also on the Location tab (p.
11) of the Parallels Toolbox preferences.
You can also choose to start recording videos with a delay. Right-click any of the tools, point to
Run with delay and specify the time interval you need.
If you're recording a tutorial or some educational video and need to show mouse clicks, right-click
any of the tools, select Preferences and choose Highlight mouse clicks.
15The Tools
You can also choose the video resolution between original, medium and small. Right-click any of
the tools, select Preferences and select the resolution you need from the Resolution menu. The
smaller the resolution - the smaller the file size.
Record Area
Use this tool to record video from a selected area of your screen.
1 Open the tool, then click and drag to highlight the area you'd like to record.
You can adjust the selection by dragging the corners.
Tip: If you change your mind and don't want to record, you can press the Esc key to cancel.
2 To start the recording, click inside the selection box.
The Record Area icon appears in the Dock and flashes red to confirm you are recording.
3 To stop recording, click the Record Area icon in the Dock.
Record Screen
Use this tool to record video of your entire screen. When activated, click anywhere to start
recording. If your Mac has more than one display, click the display you want to record from. To
stop recording, click the Record Screen icon in the Dock or in the menu bar.
Record Window
Use this tool to record video from a single window.
1 Open the tool, then click any window to begin recording.
The Record Window icon appears in the Dock and flashes red to confirm you are recording.
2 To stop recording, click the Record Window icon in the Dock. The video file appears on
your desktop.
16The Tools
Record Audio
Use this tool to record audio from your computer's built-in microphone.
1 To start a recording, just click Record Audio in the Parallels Toolbox window.
The blinking icon in the Dock lets you know that audio is recording.
2 To stop recording, click the tool's icon again (in Toolbox or in the Dock). By default, Record
Audio saves recordings to the desktop. If you want to change the default location, right-click
the tool, choose Preferences and specify a new location.
Clicking the icon again starts a new recording to be saved as a new file.
Tips: Record Audio stores files in .m4a format, which can be played by the iTunes app, iPhone, iPod,
and Android devices.
You can also choose the file size of your recordings. Right-click Record Audio, select Preferences and
choose the file size you need from the Size menu. But please note, the smaller the file size - the lower the
quality.
TAKING PHOTOS AND VIDEO
You can use the following tools to quickly take a picture or video with your built-in or connected
camera.
To access these tools, click in the menu bar, click Camera, and then click the tool you want.
Take Photo
Use this tool to take a picture using your computer's built-in camera.
• Open the tool. A preview appears. Click the camera button to take a picture.
By default, an image file appears on the desktop. To change the default location, right-click the
tool, select Preferences and specify another folder.
Note: If your Mac has two or more cameras, right-click the tool, select Preferences and choose the
camera you want to use from the Camera menu.
You can set Take Photo so that it takes a picture immediately when you open it, instead of
showing a preview.
17The Tools
1 Open Take Photo and click .
2 Deselect Show Preview.
Tip: If you disable showing a preview, you can access Take Photo settings again by clicking in the
menu bar, Control- or right-clicking the tool, and choosing Preferences.
Take Video
Use this tool to record video using your computer's built-in camera. As you record video, audio is
also recorded from your computer's microphone (by default).
1 Open the tool. A preview appears. Click the camera button to start recording.
2 When you're finished recording, click the stop button.
By default, a video file appears on the desktop. To change the default location, right-click the
tool, select Preferences and specify another folder.
Videos are recorded in .mov format, for easy playback.
Note: If your Mac has two or more cameras, right-click the tool, select Preferences and choose the
camera you want to use from the Camera menu.
You can set Take Video to record from a connected microphone or to not record sound. To
change the audio source:
1 Click in the menu bar, right- or Control-click the tool, and choose Preferences.
2 Choose a source from the Audio source pop-down menu.
You can set Take Video so that it starts recording immediately when you open it, instead of
showing a preview.
1 Open Take Video and click .
2 Deselect Show Preview.
Tip: If you disable showing a preview, you can access Take Video settings again by clicking in the
menu bar, Control- or right-clicking the tool, and choosing Preferences.
ONLINE VIDEO
You can quickly and easily download video from your favorite video websites, and you can convert
video for use on your iPhone, iPad, or iPod.
18The Tools
Download Video
Use this tool to download videos from the Internet. Many popular video sharing sites are supported.
• Open the tool. If you open it for the first time, you're asked to install a special extension for the
Safari web browser. This extension adds a button to the left of the Safari address bar. Use this
button to download the video from the currently opened web page.
By default, videos are saved to the Downloads folder. To change the default location, right-click
the tool, select Preferences and specify another folder.
To manage file sizes or time taken to download a video, you can set the maximum resolution to
download. To do so:
1 Open Download Video and click in the upper-right corner
2 Choose a maximum resolution from the Preferred quality pop-down menu. You can choose:
• Low (up to 360p): The fastest to download.
• Normal (up to 720p)
• High (up to 1080p)
• Max (maximum available): Up to 4k
Your choice is saved for subsequent downloads.
Tip: You can download several videos simultaneously using the Download Video tool.
Convert Video
Use this tool to convert videos so they can be played in the Video app on an iPhone or iPad. The
tool can convert almost any video format.
1 Open the tool. A window appears.
2 Drag a video, for example your favorite movie or TV show, to the window and it is converted. By
default, the converted video appears in the same folder is the original.
You can also use Convert Video to optimize video for playback on your iPhone, iPad, or iPod. Then
you can use iTunes to send the video to your device. To do so:
1 Open Convert Video and click in the upper left corner of the window that appears.
2 Choose iTunes from the Save video to pop-down menu, and click Done.
This setting is saved for subsequent conversions unless you change it.
19The Tools
3 Drag a video to the window to convert it.
The video appears in iTunes under Movies > Home Videos.
4 Be sure your device is connected to your computer, then right-click or Control-click the video in
iTunes and choose Add to Device > [your device].
To manage file sizes, you can set the maximum resolution to convert a video to. To do so:
1 Open Convert Video and click .
2 Choose a maximum resolution from the Video quality pop-down menu. You can choose:
• Normal (up to 720p)
• High (up to 1080p)
Subsequent videos are converted at the resolution you choose.
Download Audio
Use this tool to download audio files from the Internet. You can download audio files one by one or
the whole playlist at once. Or you can download audio from a video file.
To download an audio file:
1 Launch Download Audio from the Parallels Toolbox window.
2 Do one of the following:
• To download an audio file, drag the link to the audio to the tool's icon in the Dock or to the
tool's window. You can also right-click an audio, select Copy Link, then click the tool's
window and press Command + V.
• To download a playlist from a webpage, drag the page URL (from the browser address bar)
to the tool's window or icon.
• To download audio from a video file, drag the video file URL to the tool's window or icon.
Note: By default, audio files are downloaded to your Downloads folder. To change the default location,
right-click the tool, select Preferences and specify another folder.
Make GIF
Use this tool to create animated GIF files from videos.
Before you start creating a GIF, you may want to change the GIF file settings such as size and
frame rate. Right-click Make GIF in the Parallels Toolbox window, click Preferences and choose
the size and frame rate you need from the corresponding menus.
20The Tools
To create a GIF file, do the following:
1 Launch Make GIF from the Parallels Toolbox window.
2 Do one of the following:
• Drag some video to the tool's window.
• Move the mouse pointer to the tool's window, click Open and select the video from which
you're going to create a GIF file.
3 Choose your start and end points.
Note: To set the start and end points more accurately, you can use the slider that allows you to zoom
in the timeframe.
4 Set how you want to play the frames. You can choose between Normal, Reverse and Back
and Forth.
5 If you want, add some caption to the corresponding field.
6 Click Make GIF to create a GIF file. The resulting GIF file is saved to the same folder where the
original video is located.
Resize Images
Use this tool to resize images or convert them to a different format.
1 Launch Resize Images from the Parallels Toolbox window.
2 Drag a picture (or a group of pictures) to the Resize Images window.
3 Do the following:
• If you want to change the file format, select the format you need from the Format menu.
• If you want to resize the picture, specify another width and hight in the corresponding fields.
Note: Use the Lock icon to constrain proportions.
4 Click Resize. By default, the resulting file or files are saved to the Pictures folder. To change the
default location, right-click the tool, select Preferences and specify another folder.
Focus and Time Management
Parallels Toolbox can help you stay on task and get things accomplished by minimizing
distractions, getting your computer ready for presentations and other tasks, and keeping track of
important events and deadlines.
21The Tools
FOCUS
These next few tools are for when you want to make sure there's nothing to distract or interrupt
you or others from your work.
Do Not Sleep
When activated, this tool prevents your Mac from going to sleep and your display from dimming.
This is useful when you want to ensure a task won't be interrupted.
• To prevent your computer from sleeping, simply open this tool. All settings that would allow the
computer go to sleep are disabled.
To deactivate this mode and restore all sleep settings, simply launch the tool again.
By default, when you turn on Do Not Sleep your computer is set not to sleep until the end of the
day, at 12:00 a.m. You can choose another setting for how long your computer is prevented from
going to sleep:
1 Right-click Do Not Sleep and select Preferences.
2 Choose for how long you computer is prevented from going to sleep.
Tips: Use the Do Not Sleep tool when you need the computer to remain active and accessible, for
example, if you plan to access it remotely.
Drag the Do Not Sleep tool to the menu bar or Dock so you can see the current status. If the icon is red,
then your computer is set not to sleep.
Do Not Disturb
Use this tool to quickly disable all notifications so you can focus on the task at hand.
• To turn on Do Not Disturb mode, simply open this tool.
Do Not Disturb turns off automatically at 12:00 a.m.
To turn off this mode, launch the tool again. All previous notification settings are restored.
Tip: Do Not Disturb mode is useful when giving a presentation or recording onscreen video.
22The Tools
Hide Desktop
Use this tool to hide all the files, folders, and other icons on your desktop.
• To hide everything on your desktop, simply open this tool.
To show the icons again, click the tool again.
Tip: The Hide Desktop tool is useful when, for example, you're doing a presentation, taking
screenshots, or recording your screen.
Presentation Mode
Use this tool when showing a presentation. When Presentation Mode is on, the macOS
notifications and animations in the Dock are disabled, the Mac is prevented from going to sleep,
and the files on your desktop are hidden.
Notes:
1. When you connect an external display, Presentation Mode may turn on automatically.
2. You can edit the Presentation Mode settings (for how long the presentation mode is on, whether the
mode turns on automatically, whether the notifications and animations are disabled, etc.) according to
your preferences. To edit the settings, right-click Presentation Mode in the Parallels Toolbox window and
choose Preferences.
Airplane Mode
Use this tool to quickly turn off all wireless communication (Wi-Fi, Bluetooth, etc.) on your Mac.
To activate the airplane mode, simply click the Airplane Mode icon in the Parallels Toolbox window.
To disable the airplane mode, click this icon again.
TIME
The following four tools can help you keep track of time sensitive tasks or events. To access these
tools, click in the menu bar, click Time, and then click the tool you want.
23The Tools
Alarm
Use this tool to alert you at a specific time with a notification and a repeating sound.
1 To set the alarm, right-click the Alarm tool, select Preferences and set time and day of the
week (or several days of the week).
2 Choose an alarm sound from the Sound pop-up menu. Or you can use any sound file by
choosing Choose file and selecting the file.
3 Click Done and click the switch to turn the alarm On.
The alarm will go off as scheduled, even if the tool is not open, and will repeat each week
unless you change the schedule or turn it off.
When the alarm goes off, you're prompted to turn it off. Or you can click the Snooze button to
be alerted again in 5 minutes.
Date Countdown
Use this tool to set up a countdown to a specific date, such as a birthday, a deadline, or a
vacation.
1 To set a date to count down to, open the tool and click in the upper-right corner of the tool
that opens.
2 Enter the date, and enter a title for the event.
If you like, select Repeat every year. The day after the event, the countdown will start again for
the same date the next year.
3 Click Done. Date Countdown starts counting down the days.
When the date arrives, a message is displayed.
4 If you want to see the count down each day, place Date Countdown in the Dock (p. 8). The
number of days remaining in the countdown are shown in the icon in the Dock.
Tip: Date Countdown continues its countdown even after you restart your computer.
Stopwatch
Use the Stopwatch tool to measure elapsed time, as you would with any stopwatch. You might
use it, for example, to measure how long it takes to perform a certain action on your computer.
24The Tools
• To use the Stopwatch tool, open it and click Start. Click Stop to stop, and click Reset to reset
the timer.
Timer
Use the Timer to count down from a time you specify to zero.
• To begin a countdown, open the tool, enter a time and click Start.
Even if you close the application, it continues counting down and notifies you when the timer
reaches zero.
To set which sound plays when the timer reaches zero, click in the upper-right corner and
choose a sound.
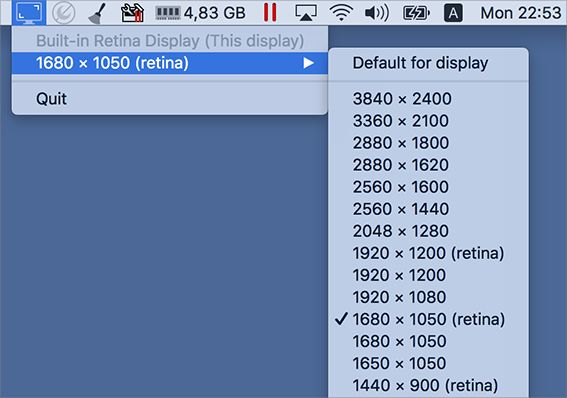
Switch Resolution
Use this tool to quickly change the screen resolution on any display connected to your Mac.
25The Tools When you launch Switch Resolution, its icon appears in the macOS menu bar. To change the screen resolution, click this icon and choose the resolution you need. Security and File Management Parallels Toolbox can help keep your computer, your files, and your environment safe and private. You can also use it to simplify file-management tasks; for example, you can open multiple files or other items at once, eject multiple volumes, create an archive with multiple files (password- protected if you like), and unarchive files that someone else sent. Lock Screen Activate this tool to immediately lock your screen to prevent unauthorized access to your computer. No need to wait until the password-protected screen saver kicks in, or to remember which corner activates what — simply click the Lock Screen tool. To unlock the computer and continue, just enter your user account password. Tip: For a convenient way to lock your computer's screen with just one click, place the Lock Screen tool in the Dock. Just click in the menu bar and drag Lock Screen to the Dock. 26
The Tools

Mute Microphone

Use this tool to mute your computer's microphone to prevent unauthorized listening by other apps.
•   To mute the microphone, just open this tool. The built-in microphone is muted and no app
    receives input from the microphone. The tool's icon indicates that it's active and that the
    microphone is muted.
    To disable muting, click the icon again.

 Tip: When active, the Mute Microphone tool warns you if another application tries to unmute the
 microphone, and prevents the app from doing so.

Block Camera

Use this tool to block your computer's built-in camera to prevent recording by other apps.

1   Click    in the menu bar, click Camera, and then click Block Camera.
2   If prompted, click Restart to restart your computer. You only need to restart your computer the
    first time you use the tool.
3   Restart any apps that may have been using the camera.
The camera is blocked and no app receives input from it. The tool's icon indicates that it's active
and that the camera is inoperable.

To re-enable the camera, open the tool again.

 Tip: When active, the Block Camera tool warns you if another application tries to turn the camera back
 on, and prevents the app from doing so.

Launch

Using the Launch tool, you can specify a set of documents and applications to open all at once.
This can help save time if your workflow requires opening the same items repeatedly.

To use this tool:

1   Open the tool and drag files and apps to it that you want it to open. Or click Open and choose
    items.

                                                                                                          27
The Tools
To remove an item, click X next to it.
2 To open the set of items, click Launch or open the tool again.
Tip: To change which files and apps this tool opens, right-click or Control-click the tool and choose
Preferences.
Eject Volumes
Use this tool when you want to quickly eject and unmount all volumes connected to your computer,
including things like external hard drives, USB drives, network volumes (SMB, AFP, etc.), and disk
images (DMG, ISO, etc.).
• To eject all volumes, just open the tool.
To choose which types of volumes eject:
1 Right-click or Control-click the tool and choose Preferences.
2 Deselect volume types that you don't want to eject when you use the tool. Volume types
include:
• External volumes: Hard drives, USB drives, etc.
• Network volumes: SMB shares, AFP shares, etc.
• Local volumes: Mounted disk images (DMG, ISO, etc.)
Eject Volumes doesn't eject your startup disk.
Archive
Use Archive to create a compressed archive from multiple files. This can save space, and you can
easily share the archive with friends or colleagues.
Tip: Unlike the built-in OS X compression utility, Archive lets you archive files from multiple locations
without having to move them to the same folder, and you can password-protect your archive for greater
security.
To create an archive of multiple files:
1 Click in the menu bar, click Archiver, and then click Archive.
2 Either drag files to the window that opens, or click Open and select a file you want to archive.
To add more files, drag them to the window, or click Add and select more files.
28The Tools
3 If you'd like to password-protect the archive, click , select Protect by Password, and enter a
password.
Be sure to let anyone who you want to have access the files know the password.
Tip: Unless you change the password or deselect the option, subsequent archives you create will use
that password.
4 Click Archive. The archive file is saved in the same location as the first file in the archive.
Tip: You can create archives by dragging files and folders to the Archive icon in the Dock.
Unarchive
Use this tool to unpack archives, including those not supported by the built-in compression utility.
For example, this tool can unpack archives formatted as 7z, RAR, RPM, XAR, and Z.
1 To unpack an archive, click in the menu bar, click Archiver, and then click Unrchive.
2 Either drag an archive to the window that opens, or click Open and select an archive.
Unarchive also supports password-protected archives. When you attempt to unarchive a
password-protected archive, you are prompted to enter a password.
Tip: Make Unarchive the default app to unpack supported archives by setting them to be so in Finder's
Get Info dialog. Then you can just double-click an archive to unpack it.
29The Tools
Optimization
Parallels Toolbox can help you to optimize your Mac by deleting unnecessary files (duplicate files,
temporary files, cache files, etc.).
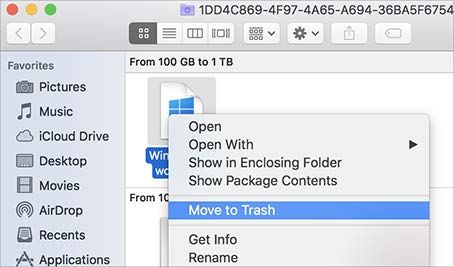
Clean Drive
Use Clean Drive to get more free space by deleting unnecessary files like cache, logs, temporary
files, etc. To clean up your Mac:
1 Launch the tool. Clean Drive scans your Mac and calculates how much space can be freed up.
2 Select the categories of files you want to delete and click Clean Up.
You can also use Clean Drive to delete your old and large files. Do the following:
1 Launch Clean Drive and click Show Large Files at the bottom of the tool's window. A new
window opens. In this window, all your files are sorted out by size.
30The Tools
2 Right-click the file you want to delete and select Move to Trash.
Find Duplicates
Use this tool to find and delete duplicate files on your Mac.
1 Launch Find Duplicates and do one of the following:
• Drag one or more directories you want to check for duplicates (for example, your
Documents and Downloads folders) to the tool's window.
• Move the mouse pointer to the tool's window, click Select and choose the directories you
want to check for duplicate files.
Find Duplicates scans the folders you chose and shows the list of detected duplicate files. In
this list, you can see how many duplicates and their copies have been detected.
Note: You can use the menu at the top of the list to sort the files by name, size, type, or to show only
some particular type of files.
2 For each detected duplicate, select the copies you want to delete and click Move to Trash.
Free Memory
Use this tool to release inactive memory and optimize memory consumption on your Mac.
1 Launch Free Memory from the Parallels Toolbox window.
At the bottom of the Free Memory tool you can see the apps that use a significant amount of
memory.
2 Click Free Memory.
31The Tools Tip: To always see how much memory is available and release inactive memory with just a few clicks, drag the Free Memory tool to the macOS menu bar. If you need to remove Free Memory from the menu bar, press the Command key and drag it out. 32
CHAPTER 5

Get Help

For more information and support using Parallels Toolbox:

1   Click    in the menu bar.
2   Click   and choose Help > Support Center.
There you can find answers to common questions, and you can contact Parallels Support for help.

Tips and Tricks

You can also get helpful tips and tricks for using Parallels Toolbox by clicking      in the menu bar. A
tip appears at the bottom of the window. Click the tip to see another tip.

 Tip: To learn more about any tool, move the pointer over the tool and press the Space bar. A window
 opens with information about the tool.
Get Help

Suggest a Feature

Have an idea for a great feature for Parallels Toolbox? You can share it in the Feature Suggestion
forum. And you can also vote for features that other users have suggested.

To access the forum:

1    Click       in the menu bar.
2    Click      and click Suggest a Feature.

In This Chapter
Check for Updates ................................................................................................. 34

Check for Updates
Periodically, Parallels provides free updates to improve Parallels Toolbox. If an update is available, it
is automatically installed.

To check for updates manually:

1    Click       in the menu bar.
2    Click      and click Check for Updates.

34
You can also read