Sentral
Prerequisites for
the New School
Year 2021
←
→
Page content transcription
If your browser does not render page correctly, please read the page content below
Sentral Prerequisites for the New School Year 2021
Sentral Prerequisites for the New School Year 2021                                                                       2

Sentral Prerequisites for the New School Year 2021
At the start of each year, Sentral will require a refresh to set up for the new school year. This will enable the 2021
classes, students, households, and teachers to flow from your enrolments admin system and timetable systems
into Sentral.

This document has been designed to support schools with standard setups. In some cases, schools with
unique or individual requirements will need to refer to the Sentral Help Centre and refer to our guides, videos,
and knowledge base. Alternatively, you can lodge a case for our Helpdesk to assist.

Within this document when we refer to your school administration system we are referring to EBS4,3PI,
CASES21/eduHub, EDSAS, MAZE, SAS2000, Sentral Enrolments etc.

Below is a list of tasks that must be completed at the beginning of the school year. It is itemised for each
module. Please use this guide as a checklist to help you through the process for Rollover.

Important to Note: A number of these tasks require Administrator access to the modules, or to the entire
Sentral Suite.
Sentral Prerequisites for the New School Year 2021                     3

         Contents
         Sentral Prerequisites for the New School Year 2021        2

         SETUP – Data Synchronisation                             4

         SETUP – Manage User Accounts                             4

         SETUP – School Details                                   11

         SETUP – Term Dates and Holidays                          11

         ADMINISTRATION – Enrolments (Independent Schools Only)   17

         STUDENT ADMIN – Health                                   18

         ATTENDANCE - Attendance                                  18

         ATTENDANCE – Roll Assignments                            19

         ATTENDANCE – Update Automatic Staff Notifications        20

         ATTENDANCE – School Times                                20

         ATTENDANCE – Update Automatic Absence Notification       21

         ATTENDANCE – Staff Absences                              22

         ATTENDANCE – Kiosk and Biometrics                        22

         TIMETABLES                                               23

         PxP – Period Setup                                       24

         PXP - Automatic Absence Notifications                    24

         COMMUNICATION – Messaging                                24

         COMMUNICATION – Issue Tracking                           25

         COMMUNICATION – Documents                                26

         INSIGHTS – Profile                                       26

         WELLBEING – Wellbeing                                    26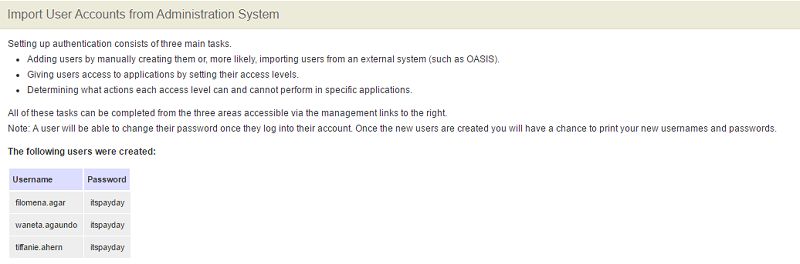
Sentral Prerequisites for the New School Year 2021                                                                 4

         SETUP – Data Synchronisation
         Schools should only be performing this once the administration system has been rolled over or
         enrolments have been updated for 2021. The sync enables students, staff, roll class and household
         data to flow into Sentral.
         Click on the Sentral Cog (top right corner next to Logout), select Data Synchronisation.

         Click on the Synchronise Now                 button top right-hand side of screen.
         NOTE: Data synchronisation is performed at 5am every day.

         SETUP – Manage User Accounts
         This section will go through how to manage user accounts now you have synced your data. You may
         need to delete users (staff) who are no longer working within your school or you may have new staff
         that need to have access to Sentral. You may also need to setup notification settings for users.
         From within these settings, Sentral Administrators can:
            •     Manage User Access Levels
            •     Change Passwords
            •     Create New Users (Sentral recommend users are synced from your data source)
            •     Import and merge users
            •     Modify notification settings
            •     Modify User Details.
         There are different user access levels available within Sentral:

         Access Level Default permission
         No Access         No access to the data
         Viewer            Can see but not change anything
         Teacher           Can see and change data relevant to their own classes
         Coordinator       Can see and change data but no access Setup
         Executive         Can see and change all data but no access to Setup

         To add, view or change staff access levels, click on the Sentral Cog (top right corner next to Logout).
         Select Manage User Accounts.
         The following User Accounts setup screen appears.

         pg. 3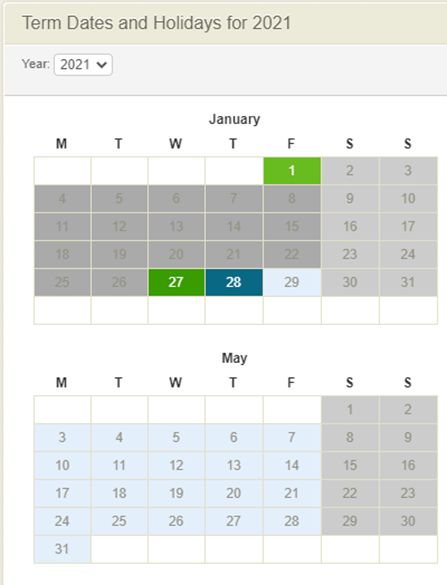
Sentral Prerequisites for the New School Year 2021                                                                 5

         From here you can edit an existing user or delete a user.

         MANAGE PROVIDERS
         The Sentral Authentication Providers function allows you to integrate authentication with your existing
         school-based systems e.g. Active Directory, Novell Netware or SAML. If changes have been made to
         those that differ to the settings in Sentral, please ensure the changes are applied to Sentral or users
         may be unable to log in. If usernames have been updated, this will create new users to log in to
         Sentral and duplicate user accounts will need to be merged.
         If schools are using same sign on (SSO), then users simply need to sign into Sentral. No import of
         users is required. Usernames and passwords cannot be edited in Sentral.

         IMPORT USERS
         Users can be imported directly from your external administration system if supported (not applicable
         to AD or SAML setup).
         Go to Manage Users > Import Users and the following screen is displayed. This creates local
         accounts that can be linked to Admin system e.g.,3P1,Eduhub.

         By clicking the Import button – this will import new users from your Administration System.
         If you have Require users to change their passwords on first login ticked, the new users will be
         prompted to change their password when they first login into Sentral. This is recommended.
         To import staff put a tick in the top left-hand column under Import (this puts a tick in the check box
         against all your staff to be imported).
         The following screen is displayed listing imported users.

         pg. 4
Sentral Prerequisites for the New School Year 2021                                                                6

         Once the Import is complete, you will then need to go into each new user and set up their default
         access levels. From here you can go into Manage Users and make any necessary changes.

         SETUP NEW USER (if required). May be recommended for casual staff. New users can be set up in
         different ways.
             •    Setup individual local users
             •    Users flow through from their external administration system
             •    Import Users

         If you want to manually enter a username (as opposed to importing them) click on the New
         User              button. (This is called a Local User).

         Enter the User Details, Default Access, and Email address.
         Enter the first few initials of the user's name in the search box. This links the user in the School’s
         Administration system. It is strongly recommended email address be entered.
         Click on the Save button.

         pg. 5
Sentral Prerequisites for the New School Year 2021                                                              7

         MERGE USERS
         If users appear in Sentral more than once, you can merge them together, so users do not login to the
         wrong account.
         Go to Manage Users > Merge Users and the following screen is displayed.

         Note: You can only merge one set of duplicate users at a time.
         Select the duplicate users you wish to Merge and click on the Merge            button. The following
         screen is displayed.

         Select a Primary user by clicking in the Primary column. The username and password selected
         should remain the same – if the user’s password stops working please reset their password.
         Click on the Save button.

         EDIT USER
         To edit an active user’s details, click on the Edit button aligned with the staff member.

         MODIFY ACCESS LEVELS
         There are 2 ways to manage staff Access levels.
         1.GROUPS
         You may choose to create groups, assign staff to groups, and assign an Access Level to the group.

         pg. 6
Sentral Prerequisites for the New School Year 2021 8
Go to Manage User > Groups > Local Groups > Create groups and assign staff to relevant groups
and assign access levels.
The access levels are displayed for each group. Select each module and give the relevant access
level.
Click on the Save button.
1.Indivudal
Define what each staff member has access too. next to each staff member name in Manage Users,
under Access level column, set each staff member to teacher, executive, administrator etc. If you
need to promote a teacher to have admin access to a module, select Access button and
select modules and increase level of access. A red asterisk (*) will then appear next to their the
Access Level column and the Access button changes .
The following screen is displayed where you can select the different access levels to each module
within Sentral.
pg. 7Sentral Prerequisites for the New School Year 2021 9
Click on the Save button.
REMOVE USER ACCOUNTS
At the beginning of the year, staff changes may apply. Staff may have left and need to be removed as
a user from the Sentral User accounts.
To do this click on Remove button aligned with their name.
Note: If you remove a user, they will be deactivated from all integrated Sentral applications. This
should only be used when necessary. The same effect can be done in a less permanent way by
setting the user’s access to None to all applications.
All data that the user entered in modules such as Wellbeing incidents are still there. Please refer to
the next section on Deactivated Users.
DEACTIVATED USERS
Any users shown on this list are no longer active in the system which means that they have been
removed at some point in time and are no longer able to login.
These users are retained for historical information only; however, if a user was removed by accident,
you can reinstate that account by clicking the Reinstate button.
Go to Manage Users > Deactivated Users and the following screen is displayed.
Any users shown on this list are no longer active in the system which means that they have been
deleted at some point in time and are no longer able to login.
REVISE GLOBAL PERMISSIONS
Sentral already has set global access permissions for each user level e.g. Viewer, teacher,
coordinator, and executive for all modules. These permissions for the program features can be
modified.
pg. 8Sentral Prerequisites for the New School Year 2021 10
Go to Manage Users > Manage Permissions and the following screen is displayed.
The first step is to select the Module from the drop-down list at the top left of the screen.
You can change the permissions for each of the settings by clicking on a different radio button.
NOTE: The default settings are standard in most schools however some schools like to tweak what
an executive or teacher can and cannot do in certain modules.
Click on the Save button.
pg. 9Sentral Prerequisites for the New School Year 2021 11
SETUP – School Details
School details is where you have all your school information such as School name, Principal name,
school contact and address details. You may need to go into here and change some details.
To access the Data Sources, click on the Sentral Cog (top right corner next to Logout), select School
Details.
To prevent emails being sent to users and parents from Sentral modules (e.g. Portal or automatic
notifications) are not blocked or identified as SPAM, ensure the school email address is configured in
the School Sender Email field:
If you wish to make any changes, click in the field, and make the necessary changes and then click
on Save at the bottom of the screen.
SETUP – Term Dates and Holidays
You will need to setup the Term Dates and holidays if this has not been done already. Standard
national holidays e.g. Australia Day, Easter are set up by default in Sentral.
Go to Sentral Setup by clicking on the Cog Wheel > School Details > Term Dates and
Holidays from the School Information menu.
The Calendar is the reference database that the Attendance modules refer to, in order to display
school holidays, public holidays, and special events.
pg. 10Sentral Prerequisites for the New School Year 2021 12
These recorded holidays and special events are registered in the Attendance records as a non-
teaching day.
Administrators can modify these settings and add both recurring and one-off holidays to the system.
Once a holiday is entered then the corresponding day on the attendance roll system is greyed out.
To select the calendar year, choose from the drop-down list. The default will always be the current
year.
You can view your Calendar in the Month View as shown above or a Term View as shown
below. To change the view, click on the tabs in the right corner.
ADD A HOLIDAY OR SPECIAL EVENT
These recorded holidays and special events are registered in the Attendance records as a non-
teaching day.
Administrators can modify these settings and add both recurring and one-off holidays to the system.
Once a holiday is entered then the corresponding day on the attendance roll system is greyed out.
Please add all curriculum days and state-based holidays. If you have a staggered start for K, P, R and
7 students, you can apply this in term dates calendar by selecting year group the event relates to. If it
relates to all students, do not select any years.
pg. 11Sentral Prerequisites for the New School Year 2021 13
To add a Holiday or special event, click on a specific date. A new window will appear for details.
Name: enter the name of the holiday and tick the Recurring box if appropriate.
Recurring holidays will happen every year on the same date and thus only must be entered once, for
example, Christmas Day, New Year’s Day.
Once off holidays are specific for the current year. This can include holidays that are not on a specific
date, for example, Good Friday, Staff Development Days.
School Years: select if this non-teaching day is only for specific years. Leave empty if this affects all
students.
Click on the Save button.
EDIT TERM DATES
Click on Edit Term Dates button to the right of the screen. The following screen is displayed. You
can manually enter the term dates to suit your school.
Click on the date box to bring up a calendar to select your date.
Click on the Save button.
pg. 12Sentral Prerequisites for the New School Year 2021 14
SETUP – Portal Console
This article assumes your school has switched to Parent Portal 2 and have Portal Console
visible as one of your menu items in the module listing. For schools who have not switched to
Parent Portal 2, the relevant setup items can be accessed under the Sentral Setup cog (top
right) > Student and Parent Portal.
The Student and Parent Portal is where students and parents can access information.
By default, no student or parent has any access to the portal. Each school needs to decide what
aspects are made visible, and who is allowed into the system. Students can be set to use their school
computer login or the DEC portal login.
At the beginning of the year, there are new students at the school and their parents will need to have
access to the Parent Portal.
Parents will need to:
• Have a family access key generated (or individual student access if required).
• Receive a letter from your school, with their registration URL and personal access key (portal
and/or app)
• Register online, and then enter their private access key.
GENERATE ACCESS KEYS AND LINK PARENTS TO ACCESS KEYS
This is a five-step process:
1. Generate Access Keys (Family or Student Keys) – completed by Administrators in Portal
Console Setup.
Go to Parent Access > Family keys. Your current list of all family keys will be listed. However, you
do not wish to generate keys for existing families so using the Filter options, search for students
without keys or a year level (e.g. Kindergarten) to narrow your search.
Select All or individually tick each family and Click on the Action button.
It is up to the school as to how you wish to send the key to the families so you will select either
Generate Keys and Print Letter OR Generate Keys and Send Emails.
pg. 13Sentral Prerequisites for the New School Year 2021 15
If the latter, you will get a verification of the email being sent.
2. Parent Registration & Log in – completed by Parent as per instructions within the Access Key
letter. Parent will receive the Portal URL, sign in with email and password and then be required to
add the Access key for the children to appear in their account.
NOTE: Student Key generation is required for circumstances where there are custody issues unique
family situation that mean contacts have their own accounts. Follow the same process and ensure
you validate the list of parents that will receive this separate access key.
• Parent/Guardian(s) of the residential Family household should be provided Family Access
Key; and
• Parent/Guardian(s) of a non-residential household should be provided a Student Access Key
for the student(s) they have custodial access to.
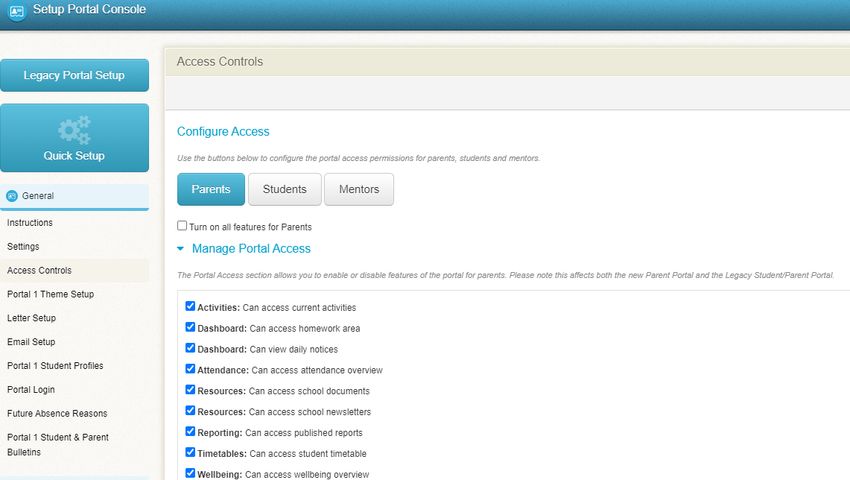
Ensure you review the Access Controls found within Portal Console > Setup Portal Console (top
right) > General (left menu) > Access Controls > Configure Access – Parents.
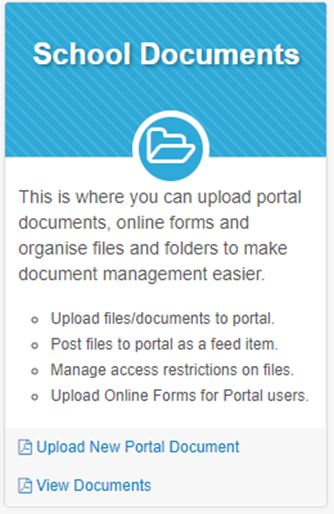
UPDATE SCHOOL DOCUMENTS DISPLAYED
This is a repository for documents that you want to be accessed by the Staff and Parents (via the
Portal).
Each school need to revise and update newer version of documentation.
Go to the Documents module to upload any school, personal or Portal documents.
pg. 14Sentral Prerequisites for the New School Year 2021 16
To upload a document, enter the Document Name, Description and select the Years it is for from the
drop-down list.
Click on the Choose File to select your file.
Once you can see your file name next to the Choose File button, click on the Save button.
You will now see your document on the list of school or portal documents.
To remove a document from the list, click on the red cross aligned with the name of the file.
pg. 15Sentral Prerequisites for the New School Year 2021 17
ADMINISTRATION – Enrolments (Independent Schools
Only)
NOTE: This is only applicable if you are licensed for the Enrolments Module under the Administration
Tab.
The steps to complete a successful rollover are:
1. Create new academic period (if it does not exist yet)
2. Add new students against NEW academic period
3. Create roll classes against NEW academic period
4. Initiate rollover wizard
NOTE: Do not Click on Data Sync until Sentral has reactivated the automatic sync in mid January.
Step 1: Confirm the academic year which is ending and the new one that is commencing
Step 2: Review Year Level Allocation – Check to ensure the correct year levels are progressing and
in incorrect review year levels and set correctly.
Step 3: Customise Student Allocation – select a Year level to view first and then specify if that student
is not continuing or is repeating.
Step 4: Roll Class Allocation – allocate students to New Roll Classes
Step 5: Final Review – last chance to cross check students, future roll class and year levels before
Applying Changes.
pg. 16Sentral Prerequisites for the New School Year 2021 18
STUDENT ADMIN – Health
As a result, to ensure up-to-date medical information appears in Sentral, it is required that you run a
periodic manual export or sync into Sentral. Once you begin doing so, it is vital it is done on a regular
basis to ensure the latest information is displayed within Sentral. For all Independent Schools you will
need to add Medical conditions via enrolments module.
Whilst medical conditions and data are synced and flagged within Sentral, actual medication, health
and emergency care plans are not.
It is the responsibility of all schools to add all this data via the Health module and update regularly.
A review of all Student Medications currently stored at the school should take place.
Once updated, students’ records need to be reviewed and modified for the new year. This would
include reviewing current and new students but also medication types and administration of these.
ATTENDANCE - Attendance
The following tasks need to be completed before making yearly rollover changes within
the Attendance Administration module.
1. The Administrator MUST be setup within Administration level access by the Sentral
Administrator.
2. Current Year’s enrolments MUST be updated into School Administration system and added to
valid Roll Classes.
3. Current Year’s roll class lists of students MUST be created in School Administration system or
Sentral enrolments.
4. Current Year's roll class teachers should be assigned to their classes in School Admin system -
or Sentral enrolments.
5. School Administration System should be successfully synchronised using one of the below:
• ESBS4/3PI for NSW DEC
• Cases21/eduHub for VIC DEECD
• EdSAS (South Australia)
• SAS2000 for CEO
• Sentral Enrolments Module
• Other
6. The Timetable Module needs to have been synchronised with the school's external Timetable
application, examples listed below:
• EDVAL
• Timechart
• TimeTabler
• FirstClass - School Edge
pg. 17Sentral Prerequisites for the New School Year 2021 19
ATTENDANCE – Roll Assignments
Users are automatically assigned their roll classes based on your student administration system's
record of who teaches the roll class. You can manually assign classes to a staff member by using the
Edit Assignment buttons below.
Users will need to logout and login again or click the Refresh my class assignments button on the
Attendance home screen to see the changes applied here.
Users with an asterisk next to their name are not correctly linked to a staff member and so will need to
be manually assigned their roll
Once in Attendance, go to Setup Attendance > Select Roll Assignments to manually assign any
staff that did not get auto assigned.
Once complete, any users without a roll assignment can be manually allocated a roll or rolls by
clicking the Edit Assignments button next to their name.
Select the appropriate class(es) and then click on Save.
Once you have updated the Roll Assignments, advise class teachers that they will need to do the
following to access their updated rollclass(es) within Attendance. This will remove classes marked as
“__(inactive)” from view and allow them to commence marking their daily rolls.
Navigate to the Attendance module > click green Refresh Classes in the right-hand menu-bar of the
home screen, as pictured here:
pg. 18Sentral Prerequisites for the New School Year 2021 20
ATTENDANCE – Update Automatic Staff Notifications
Automatic Notifications specify the rules in which one or more staff members will be sent a
notification by the administrator.
At the beginning of the new school year, there may be staff changes with staff leaving and new staff
coming into the school. You will need to check your automatic notifications setup to make necessary
changes.
Once in Attendance, go to Setup Attendance > Automatic Staff Notifications.
To edit an existing rule, click on the Edit button to the right of the notification. The following screen is
displayed.
Make the relevant changes where required. Click Save when your changes are made.
ATTENDANCE – School Times
Sentral Attendance supports several different and flexible school times for roll marking and PxP
attendance. It must be consistent with times noted in your school Administration system (if applicable)
and your Timetable package. This is vital to ensure student attendance is accurately recorded.
Once in Attendance, go to Setup Attendance > School Times.
pg. 19Sentral Prerequisites for the New School Year 2021 21
From here you can add a new rule, edit remove an existing one. To edit click on the Edit button
to the right of the rule you wish to change.
Make the necessary changes and click on the Save button.
ATTENDANCE – Update Automatic Absence
Notification
You can set up Automatic Absence Notifications to trigger an email/SMS.
Note: once a rule is a setup, you cannot delete it, but you can enable/disable it.
Check to make sure automatic Absence Notifications are set up correctly.
Access the Attendance Module > Setup Attendance > Automatic Absence Notifications.
To add a new rule – click on the Add Rule button. The following screen is displayed. Most of
the fields are drop lists.
pg. 20Sentral Prerequisites for the New School Year 2021 22
ATTENDANCE – Staff Absences
If your school's staff ID have changed formats since the previous year, please ensure that you link all
your Manage User Accounts to their updated Staff ID under Sentral Setup.
ATTENDANCE – Kiosk and Biometrics
Biometrics- ensure new fingerprints are enrolled into the system.
Go to Attendance Setup > Biometrics
Kiosk - if you have a new Kiosk ensure it is setup as an active account
Go to Sentral Setup Cog > User Accounts > Manage Service Accounts.
A list of Service Accounts will display. Select New Service Account to add a new one.
Once added go to Attendance Setup > Kiosk Setup > Kiosk Configuration > Add Profile
Complete the online details and Save. Complete the Menu Configuration for the new kiosk and
review and update other kiosks if required.
Add New Reasons or Edit as required.
pg. 21Sentral Prerequisites for the New School Year 2021 23
TIMETABLES
Within the timetabling module you will need to check the following:
1. Ensure Timetable is updated and synced.
2. Check students and teacher’s data are there.
3. Structural Timetable – change period times to include before and after school care if applicable.
TIMETABLE SYNCHRONISE
You will need to ensure that the Timetables module is synchronised with your external timetable
software.
Access the Timetables Module. On the top left side of the screen, displays when it was last synced.
TIMETABLE – CHECK STUDENTS AND TEACHERS DATA IS IN THE MODULE.
Access the Timetable Module and use the Timetable Search function to check data is there.
STRUCTURAL TIMETABLE
You may need to change the settings of your Timetable to include before and after school times.
Access the Timetable Module > Setup Timetables > Period Times.
This screen allows you to set the start times for corresponding periods that have been imported from
your Timetable system. This is advisable if you wish to use Period by Period roll marking. e.g.
Flexible timetabling will function correctly.
pg. 22Sentral Prerequisites for the New School Year 2021 24
To save time, you can use the copy drop-down menu next to each Timetable Day name to fill the time
with existing period times – for slight variations, you can copy and then make manual changes to
individual fields where necessary.
Once finished click on the Save button.
PxP – Period Setup
After Timetables sync, assessment of PXP structure is required especially if period start and end
times have altered.
Ensure Period structure matches 2021 Timetable and denote official period for start if each day.
Review Incursions - go to Attendance setup > Incursions if you are tracking class attendance to
manage explained vs truanting students.
Roll Display - what information will be displayed on the roll for teachers.
PXP - Automatic Absence Notifications
You can set up Automatic Absence Notifications to trigger an email/SMS.
Note: once a rule is a setup, you cannot delete it, but you can enable/disable it.
Check to make sure automatic Absence Notifications are set up correctly. Access the PxP Module >
Setup PxP > Automatic Absence Notifications.
COMMUNICATION – Messaging
STAFF SIGNATURES FOR EMAILS
If there are any staff changes – need to check the emails that go out are set up with correct
signatures.
To change the signatures in emails that get sent out – need to go to Communications > Messaging
> Setup Messaging, select General Settings and the following screen is displayed.
Scroll down to the bottom of the screen to Signature (for E-Mails only) and make the necessary
changes.
pg. 23Sentral Prerequisites for the New School Year 2021 25
USER CONTROL
You can control who can and cannot send messages. So, if there are staff changes you will need to
access this area to update access levels.
Please go to Communications > Messaging > Setup Messaging, select Customer User
Rights and the following screen is displayed.
Make the necessary changes and click on Save.
New Families & Groups for 2021
Household details get updated all the time; it is important to check the Address. Check the
Messaging Module to ensure this is up to date.
To look for individuals go to Address Book > Contacts > and search or filter
To look for groups go to Address Book > Groups and
• Remove old groups
• Add Groups
• Edit Groups
Parents can be unassigned from a group if the family has left the school or the child has moved into a
new year group or class.
Templates
Review any past absences templates to ensure the information is current and up to date.
COMMUNICATION – Issue Tracking
You may need to change Assignees/Groups if there are staff changes and access
settings. Notifications can be sent to staff via email and/or Sentral Dashboard Alerts with Issues
created, assigned, or changed.
Go to Communication > Issue Tracking > Setup Issue Tracking. The following screen is
displayed.
pg. 24Sentral Prerequisites for the New School Year 2021 26
COMMUNICATION – Documents
Update any school documents that are available on the portal or in general for staff.
Go to Communication > Documents.
The following screen is displayed.
From within this screen, you can delete old documents and add new school documents or view
current documents.
INSIGHTS – Profile
Staff can review generalist data around school year numbers, houses, and gender splits.
Staff may be asked by past parents to provide or look for information for students that have left.
To look for inactive students, go to the search bar and click on the arrow. Click on Inactive students to
complete your search.
WELLBEING – Wellbeing
This requires Administrator level access to Wellbeing.
Go to Wellbeing > Setup Wellbeing > Levels > Reset Placements.
pg. 25Sentral Prerequisites for the New School Year 2021 27
If staff members have changed you may need to go into Notifications and change who receives
Notifications to an incident.
Go to Wellbeing > Setup Wellbeing > Notifications. The following screen is displayed showing
the Automatic Notifications setup.
WELLBEING – House Points
The purpose of the Rollover function is to save time. It allows you to replicate a previous Scoring
Period and roll it over into a new scoring period. The settings for Activities and Awards (in House
Points) are also duplicated.
Important Note Please make sure that reporting period you wish to replicate is set up correctly before
starting this process. Otherwise, you may as well create a new scoring period and click everything
manually as required.
To access Rollover, go to Wellbeing > House Points > Setup House Points > Rollover.
The following screen is displayed.
• Select your Source from the drop list.
• Select your Destination from the drop list.
• Select the Rollover Items accordingly.
NOTE: If you grey out both items; there will be an alert specifying No data to Rollover and the
process will fail.
If you have both items highlighted, then both settings will replicate.
If you have one item highlighted, then one item will replicate and the other will open in a full greyed
out screen.
Click Save. Screen refreshes and a flash message appears.
EXECUTING A ROLLOVER INTO A NEW SCORING PERIOD
pg. 26Sentral Prerequisites for the New School Year 2021 28
(This is a 5-part process that will require you to double check things as you go along.)
Part 1 - Create a new scoring period.
If you want to create a new Scoring Period, click on the Create New Scoring Period button (top right
of the screen).
• Enter the name for this scoring period.
• Select the date this scoring period will start tallying house points by clicking the calendar icon.
• Select the date this scoring period will stop tallying house points.
• Click on the Save button.
Part 2 - Double Check the Setup of the New Scoring Period
In the left-hand panel, click both Awards and Activities. Each click will open a new screen and both
screens should be completely highlighted.
Part 3 - Double Check the settings of the Scoring Period you wish to use as a Source.
To do this, you must make that Scoring Period the new default.
In Setup House Points, click the Set Default button at the end of the row of your chosen Scoring
Period.
Screen refreshes with a floating message, the dark default button is now in the relevant row.
(Alternatively, you can click the Name hyperlink, which opens a new screen and click Update. This will
refresh back to Managing Scoring Periods, displaying a new default Scoring Period.)
Using the left-hand panel, click the Awards hyperlink. You will see which buttons are highlighted.
Repeat this step for the Activities. Using the left-hand panel, click the Activities hyperlink. You will
see which buttons are highlighted.
Part 4 - Perform the Rollover
pg. 27Sentral Prerequisites for the New School Year 2021 29
Click Rollover.
Select your Source and Destination, leave the Rollover Items alone (for this process) and
click Save. Screen refreshes with a flash message.
Part 5 - Final double check - Compare the screenshots with the Rolled Scoring Period.
We know that before the Rollover: the new Scoring Period had ALL the buttons highlighted and the
Source had some greyed-out buttons, and we took screenshots to record this.
This step requires you to go to the new Scoring Period and check that the buttons match the
screenshots you took.
Therefore, there must now be a 100% match (of highlighted/greyed out buttons) in both Scoring
Periods. This will prove that the replication was a success.
Click Scoring Periods on the left-hand panel and make the new scoring period the default by
clicking Set Default button. Screen refreshes with a flash message.
Go to the left-hand panel and click the Awards hyperlink.
The screen that is displayed, must match the screenshot in the MS Word document.
Go to the left-hand panel and click the Activities hyperlink.
The screen that is displayed, must match the screenshot in the MS Word document.
The Rollover process can now be considered complete and a success.
pg. 28For more information visit Connect with us sentral.com.au
You can also read