SECURE PROVIDER PORTAL REFERENCE GUIDE EPICCARE LINK
←
→
Page content transcription
If your browser does not render page correctly, please read the page content below

Secure Provider Portal Reference Guide
EpicCare Link
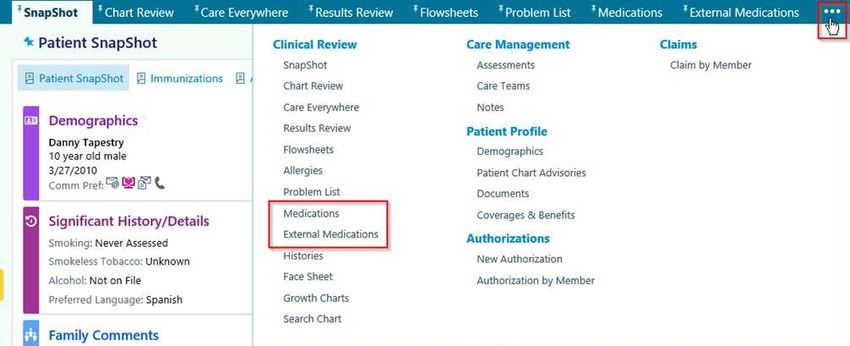
Table of Contents
Getting Started ........................................................................................................................ 3
   Terms and Conditions .......................................................................................................... 3
New Account Requests ............................................................................................................ 4
   Site Admin User ................................................................................................................... 4
   Logging in to EpicCare Link for the First Time.......................................................................14
Reviewing the Secure Provider Portal Homepage.....................................................................14
   Navigating in EpicCare Link .................................................................................................15
Accessing Patient Charts .........................................................................................................18
   Selecting a Patient Already on the Provider’s My Patients tab ...............................................18
   Viewing Primary Care Patients .............................................................................................20
   Locating a Patient Not Found on the Provider’s My Patients tab ...........................................21
   Patient SnapShot.................................................................................................................22
Care Management ..................................................................................................................24
   Open the Plan Of Care (POC)...............................................................................................24
   View the Member’s Care Team ............................................................................................24
      Access Care Teams via POC..............................................................................................24
      Access Care Teams from the Toolbar Activity....................................................................24
   Adding Yourself to the Care Team .......................................................................................25
   Locating the Assigned LTSS Service Coordinator ..................................................................26
   Documenting Delivery Notifications.....................................................................................27
      Creating a New Assessment .............................................................................................27
   Documenting High Risk Pregnancy Notifications ..................................................................28
   Viewing External & Internal Medication Reports...................................................................31
      External Medication .........................................................................................................31
      Internal Medication..........................................................................................................32
Working with Authorizations in EpicCare Link ..........................................................................33
   Create a New Authorization.................................................................................................33
      General Information Section.............................................................................................34
      Authorization By Section ..................................................................................................35
      Authorization To Section..................................................................................................35

Revised: 05/06/2021                                                                                                      Page 1 of 56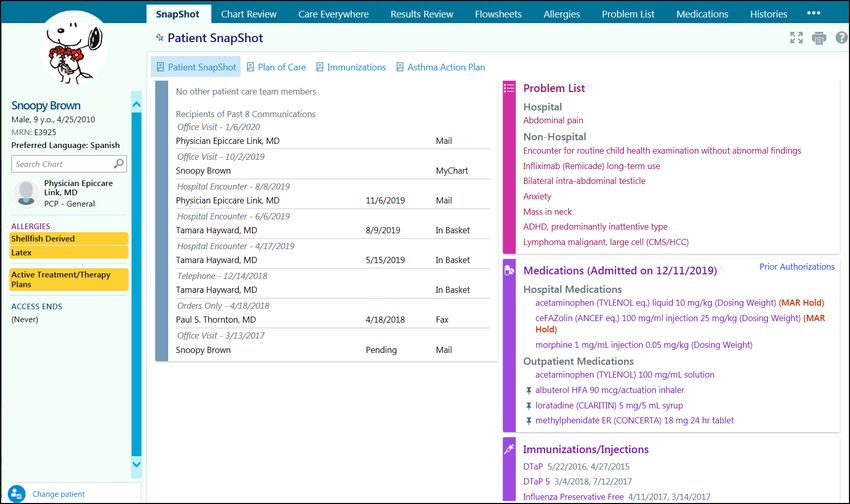
Diagnoses Section ...........................................................................................................38
      Services Section ...............................................................................................................38
      Contact Information and Signature Confirmation Section..................................................40
      Notes Section ..................................................................................................................41
      Authorization Summary ...................................................................................................41
   Reviewing Authorizations ....................................................................................................42
   Reviewing Authorization Letters...........................................................................................43
      Allow Other Users to Access Your In Basket ......................................................................44
      Attach another Users’ In Basket to your account ...............................................................46
Eligibility Review in EpicCare Link ............................................................................................46
   Review Coverage and Benefits .............................................................................................46
Claims Review in EpicCare Link................................................................................................49
   Review AP Claims ................................................................................................................49
   Reviewing and Printing Remittance Advices .........................................................................51
Customer Service Request (CSR).............................................................................................51
   Creating a CSR ...................................................................................................................51
   Reviewing CSR Responses ..................................................................................................53
Login Issues or Password Reset ...............................................................................................54
Glossary .................................................................................................................................55

Revised: 05/06/2021                                                                                                        Page 2 of 56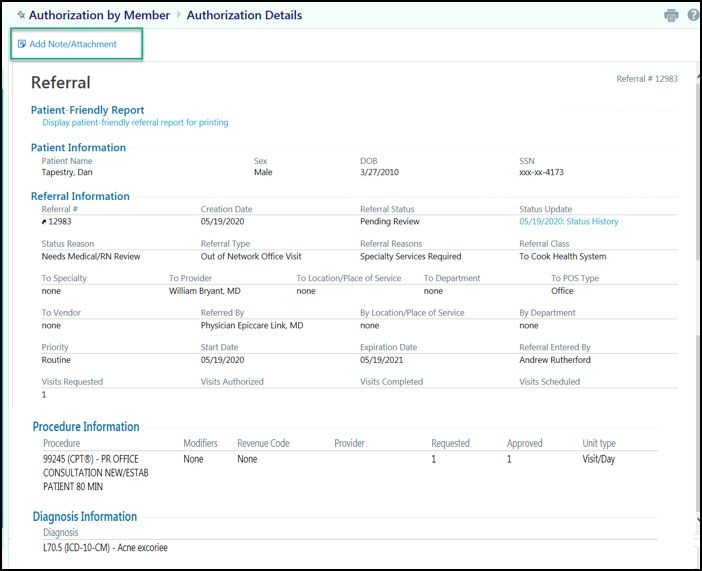
Getting Started
EpicCare Link is an online portal where Providers can access clinical or managed care data. By
granting Network Providers and other Users access to Epic over the web the amount of paper

authorizations, manual claim status requests, and customer service calls are reduced. Receiving
this data electronically allows Users to spend less time transcribing them into Epic!

Terms and Conditions
All healthcare personnel have a legal obligation to protect patient information. In fact, with very
few exceptions, essentially all patient information is considered highly confidential. In general,
no employee should look up patient information, including relatives, without a job-related
reason or disclose patient information without proper authorization.

All jobs or roles must be evaluated to determine what Protected Health Information (PHI) access
is required. If you do not have a job-related reason to access PHI, you must not access it. Access
includes PHI that is on paper, in electronic form and spoken verbally.

As a portal User, you are required to review, agree upon and adhere to the Terms and
Conditions. Site Admin Users are responsible for ensuring portal Users are not viewing
patient information without a job-related reason. Access to the Secure Provider Portal is
monitored by our Protenus system. Inappropriate use of the portal will result in corrective
action from the health plan, which will include outreach from the health plan to

determine appropriate use or misconduct.

Please ensure you are only accessing information needed to complete your job responsibilities.
   •   Accessing your child or relatives eligibility
   •   Accessing your child or relatives claims
   •   Accessing your child or relatives medical records
   •   Using your child or relative to train yourself or others on the portal

Revised: 05/06/2021                                                                      Page 3 of 56
Patients and Families can access their information via the myCookChildren’s patient portal.

New Account Requests
Check with your office or practice manager to ensure you do not already have portal access
established for the office
    •   If the office has established access, request the Site Administrator (Site Admin) for your
        office to submit your access request
    •   If the office has not established access you will need to select an Site Admin
        o   Each Office/Group/Practice must have an Site Site Admin

        o   You may have more than one Site Admin
        o   The Site Admin User is responsible for maintaining the Users associated with the
            Office/Group/Practice such as adding new Users and deleting Users who are
            terminated or resigns
    •   Access requests received from individuals not listed as a Site Admin will be denied

Site Admin User
Determine the type of access you need to request.

New User/New Site
    •   From the initial login screen, click Request New Account

Revised: 05/06/2021                                                                      Page 4 of 56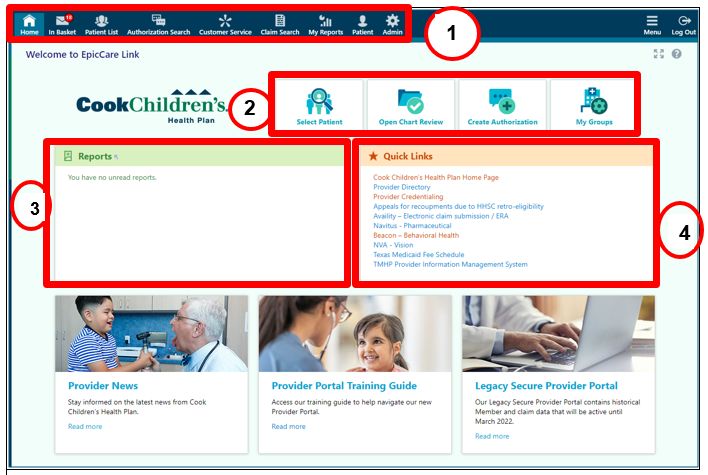
o If you select Request New Account you MUST select create a New Site
– Choose the first option to add a New Account/Site
DO NOT select add Users to an existing site
o Select the type of User you are requesting access for
Revised: 05/06/2021 Page 5 of 56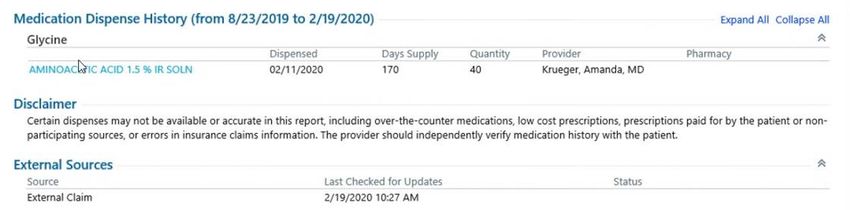
o Site Admin should select the appropriate level of access needed for the User to
perform the functions of their job
– Not all Users will need Clinical access
– Since we are an integrated Health System, anyone with clinical access will have
access to clinical information for Cook Children’s health plan Members and Cook
Children’s patients
If selecting the Provider/Advanced Practice Provider please note the User
Name must match the name associated with the National Provider Identifier
(NPI)
If the NPI does not match the User Name, the request will be denied.
– Complete the required data elements for the User
The field requirements vary depending on the User’s role
Revised: 05/06/2021 Page 6 of 56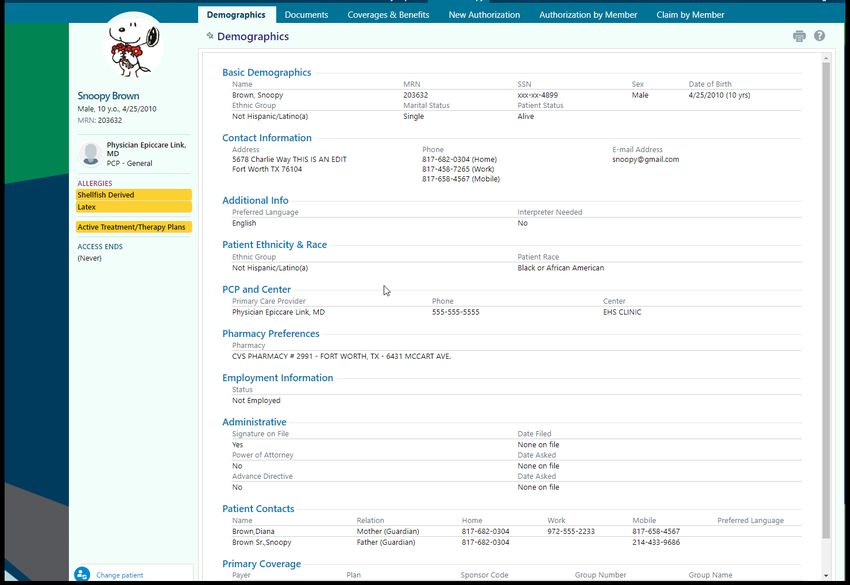
At least one of the Users must be marked as the Site Admin or the request
will be denied
Each User should have a unique business email address
o Users with email addresses for Yahoo, Hotmail and Gmail will not be
approved
o The User will receive their User ID and temporary password via Secure
Email to the email address they were registered with
o We do not recommend offices share email addresses
– Fill in your Site information including your Tax ID in the comments field
Revised: 05/06/2021 Page 7 of 56
‒   Once prompted, add ALL Users that need access as part of this same request
           ‒   Click Accept

           –   Print the confirmation page

Revised: 05/06/2021                                                               Page 8 of 56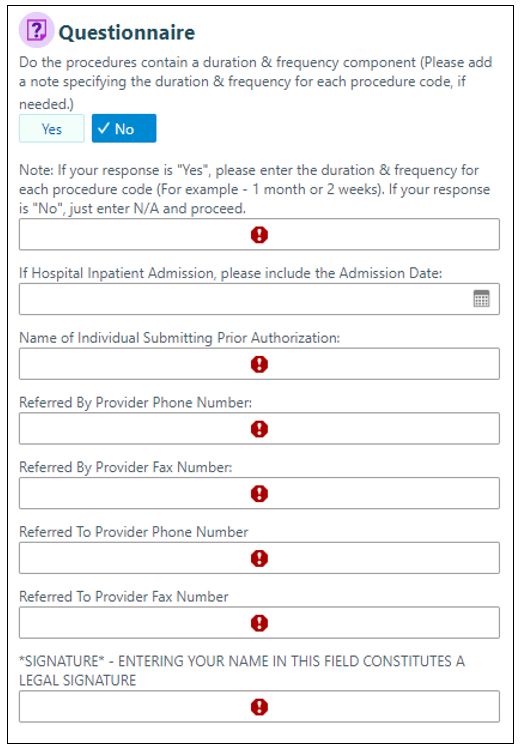
New Tax ID
• Site Admin Users should login to the Portal and click on the My Groups speed button
on the homepage
o Do not submit this request from the Request New Account link on the initial login
screen
• Site Admin must submit this request using the My Groups function
o Click the Account Requests tab, and click Request New Account (from the My Groups
tool)
o Click the first option, health plan Account
o Complete the New Site information, including the Tax ID in the comments field
– List out each User ID that should be associated with this New Tax ID
Even if the Users already have a portal account
New User for an Exisiting Site
• Site Admin Users must login the Portal and click on the My Groups speed button on the
homepage
Revised: 05/06/2021 Page 9 of 56o Do not submit this request from the Request New Account link on the initial login
screen
• Click the Account Requests tab, and click Request New Account (from the My Groups
tool)
• Select the type of User you are requesting access for
o Site Admin should select the appropriate level of access needed for the User to
perform the functions of their job
– Not all Users will need Clinical access
Revised: 05/06/2021 Page 10 of 56– Since we are an integrated Health System, anyone with clinical access will have
access to clinical information for Cook Children’s health plan Members and Cook
Children’s patients
If selecting the Physician/APP please note the User Name must match the
name associated with the National Provider Identifier (NPI)
If the NPI does not match the User Name, the request will be denied
o Complete the required data elements for the User
– The field requirements vary depending on the User’s role
Revised: 05/06/2021 Page 11 of 56o Complete the Site information, including the Tax ID in the comments field
o You will be able to submit one User per request at a time
– Submit your User request, then repeat step 2 for each additional User you will
need to add
o Indicate if the User should be a Site Administrator, which allows them to add and
remove Users on the Organizations behalf
– If yes, check the box
Revised: 05/06/2021 Page 12 of 56– If no, leave the box blank
o Click Submit Request.
o Print the confirmation page.
The printer icon in the upper right hand corner of confirmation is visible throughout
EpicCare Link. This icon can be used to print various items including patient lists,
claims and eligibility information, and authorizations. The icon will display in any
activity where printing is allowed.
For login issues, please call the Provider Hotline at 888-243-3312.
Site Verification
The Site Admin has the ability to view the list of Secure Provider Portal Users
• Login and click on the My Groups speed button on the homepage
• Click Site Verification tab
o View list of site(s)/group(s) on the left side bar
o You can choose to activate or deactive a User
Revised: 05/06/2021 Page 13 of 56Logging in to EpicCare Link for the First Time
1. Navigate to the CCHP homepage at cookchp.org and select the Provider’s tab. From
there, you can access the Secure Provider Portal
2. Enter the User ID and password that you received for the Secure Provider Portal
a. Each User will receive his/her own unique login
3. You may be required to verify via 2 Factor Authentication. Click the Remember Me
checkbox for the system to remember you for 30 days. Please note this check box only
works if you are using the same browser
Reviewing the Secure Provider Portal Homepage
The Secure Provider Portal Homepage provides an overview of the application. It displays quick
links to other documents and buttons to take you to your most frequently used activities.
1. The main toolbar takes you to multiple activities
2. Speed buttons allow you to access and view specific patient information; as well as
create or review authorizations
3. Reports provide Users access to Membership, Claims and Authorizations reports
4. Quick Links provide resource information that will help you as you use EpicCare Link
Additional items: such as newsletters and webcast, may be found on the homepage from time
to time.
Revised: 05/06/2021 Page 14 of 56Navigating in EpicCare Link
While logged in to EpicCare Link, navigation tools are available to assist Users while moving
around the system. Some of the tools are only available within a specific activity.
Navigation Tabs: These tabs are found on the main toolbar. Use these tabs to open various
activities in EpicCare Link. Each tab contains one or more related activities. When you click a tab,
the default activity for that tab opens.
• In Basket: Epic’s task management system used to securely send and receive Customer
Service messages.
Revised: 05/06/2021 Page 15 of 56• Patient List: Displays a list of all of your patients you have access to base on a claim,
authorization, or PCP relationship with the patient. You will have access to all patients for
which your entire organization has a relationship with, based on your Tax ID.
• Authorization Search: Allows you to look up authorizations sent by or to community
Providers.
• Customer Service: Allows you to send messages and forms directly to CCHP.
• Claims Search: Allows you to view your patient’s claim information and status.
• My Reports: Allows Users to view the results of their reports.
• Patient: Once you open a patient, this will show you the patient’s record you are
currently viewing.
• Admin: Allows Users to perform administrative actions like handling account requests
and maintaining Users.
Action Options: Use these buttons, located on the top right of the screen, to see all of your
available activities or to log out.
Menu: Use this menu to open the various activities that are contained in the selected
navigation tab. This menu is viewable from the Patient tab.
Revised: 05/06/2021 Page 16 of 56• If there are more activities than can fit on the screen, hover over the ellipsis on the far
right of the menu to see all the activities contained in the tab
• You can also click to pin an activity so it appears first in the menu. If you pin multiple
activities, they appear in the order that you pinned them. Click and drag pinned activities
in the menu to change their order. Pinning activities will change the view of this menu
Site Admin will see an additional tab for “Admin” and the “My Groups” button on the
homepage, which allows them to add, remove, and maintain the Users that are a part of
their organization.
You can also navigate using the Speed buttons on the homepage.
• Select Patient: This activity allows you to select your patient’s chart from a list of your
current patients and takes you to the patient’s SnapShot
• Open Chart Review: This activity takes you directly to Chart Review after selecting a
patient
**Note: Not all Users will have access to the member’s chart
• Create Authorization: This activity allows you to create an authorization after selecting
a patient
Revised: 05/06/2021 Page 17 of 56• My Groups: This activity shows a list of associated Users within your Organization, and
allows you to add, remove, and maintain Users within that Organization
**Note: This activity is for Site Admin Users only
Accessing Patient Charts
Selecting a Patient Already on the Provider’s My Patients tab
Patients that have been previously accessed by a Provider in EpicCare Link, had eligibility verified
or have a claim or authorization by the Provider will display on the Provider’s My Patient tab
based on the Provider’s associated Tax ID.
1. Click Patient, Patient List or the Select Patient speed button to navigate to the My
Patients tab
2. My Patients is sorted in alphabetical order by last name making it easy to locate your
patient on the list
3. Once your patient is found, click a patient’s name to open the record
Revised: 05/06/2021 Page 18 of 56If you have access to many patients, your patients might appear on more than one page. To search
for a patient on your list, enter the patient’s name (last name, first name) in the Name or MRN
field.
• You can select Additional Search Criteria and enter a partial first and last name or
search by sex, SSN and date of birth
• If a match is found, the system will prompt you to review the search results and choose
the appropriate patient
Revised: 05/06/2021 Page 19 of 56Viewing Primary Care Patients
Primary Care Providers can view a list of their Primary Care Patients via the Patient List activity.
1. Click on the main toolbar
2. Click the dropdown arrow in the Filter by PCP field and select the Provider’s name
3. Once the list has been filtered, the list will only show the Primary Care Patients for that
Provider
Revised: 05/06/2021 Page 20 of 56Locating a Patient Not Found on the Provider’s My Patients tab
If a Patient does not appear on your My Patients tab or your Patient List, you can search for
them by clicking Search All Patients located on the bottom of the page.
• To gain access to the patient you are searching for enter one of the following sets of
data for the patient:
o Name, DOB and Sex
o Medicaid ID and Name
o Medicaid ID and DOB
• Click Search.
• Verify that the correct patient has been located
o If the correct patient has not been found, click Cancel and modify your search criteria
• Click Select
• To gain access to the patient, enter a reason for accessing the patient must be entered
o You will not be able to proceed without a reason
Revised: 05/06/2021 Page 21 of 56• Click Accept.
o Users with Clinical access will be able to view the Snapshot
Patient SnapShot
From the Snapshot, you can review available clinical information on file for the Member;
including recent visits and medication.
• Only Users with Clinical access will be able to view this clinical data
o Your Site Admin determines who should have Clinical access
– A User should only have Clinical access if it is needed to perform the functions of
their job
– Since we are an integrated Health System, anyone with Clinical access will have
access to clinical information for Cook Children’sHealth Plan Members and Cook
Children’s patients
• Below you will see the clinical view vs the non-clinical view
Revised: 05/06/2021 Page 22 of 56Clinical View Non-Clinical View Revised: 05/06/2021 Page 23 of 56
Care Management
Open the Plan Of Care (POC)

   1. Open a Member’s chart.
       •   Click SnapShot
   2. Click Plan of Care on the report toolbar to view the report

   3. You can view Allergies, Social Determinants of Health, OP Medications, and Care Team
       information

View the Member’s Care Team
This activity can be accessed from either the POC or the toolbar activity.

Access Care Teams via POC
   •   Click the Care Teams Link

Access Care Teams from the Toolbar Activity
   •   Click the ellipses to review the full menu
   •   Select Care Team located under the Care Management section of the menu

Revised: 05/06/2021                                                             Page 24 of 56
Adding Yourself to the Care Team • Once the Care Team activity is opened, click Add Team Member • Add yourself as the Provider and indicate the appropriate Relationship • Once your information has populated the fields, click Accept Revised: 05/06/2021 Page 25 of 56
Locating the Assigned LTSS Service Coordinator
The LTSS Service Coordinator can be found on the POC as indicated in screenshot 1 or the Care
Team activity as indicated in screenshot 2.

Screenshot 1:

Screenshot 2:

Revised: 05/06/2021                                                              Page 26 of 56
Documenting Delivery Notifications
You can access your Delivery Notification assessment through the Assessment activity.

       This is not an authorization for service. If an authorization is required you must submit an
       authorization request.

Creating a New Assessment
   •   Select the Delivery Notification radio button
   •   Click New/Modify Assessment

   •   Document the Member’s delivery with the following required fields:
       o   Delivery Facility

Revised: 05/06/2021                                                                    Page 27 of 56
o Member ID #
o Baby A Gender
o Delivery Date
o Delivery Type
• Click Submit Assessment
o The Utilization Management & Delivery Notification Reports will be triggered in
hyperspace
This is not an authorization for service. If an authorization is required you must submit an
authorization request.
Documenting High Risk Pregnancy Notifications
You can access your High Risk Pregnancy Notification assessment through the Assessment
activity.
Revised: 05/06/2021 Page 28 of 56• Select the High Risk Pregnancy Notification radio button
• Click New/Modify Assessment
o If the assessment has already been assigned to you, click the actual assessment
• Document the assessment
Revised: 05/06/2021 Page 29 of 56• Click Submit Assessment
o The Utilization Management & Delivery Notification Reports will be triggered in
Hyperspace
Revised: 05/06/2021 Page 30 of 56Viewing External & Internal Medication Reports You can view internal medications using the Medications tab and external medications within the External Medications tab. You can also access these functions under the clinical review section of the full menu. External Medication You can view external medications inside the activity as shown below: If you click on the external medication hyperlink you will see a med report as shown below: Revised: 05/06/2021 Page 31 of 56
Internal Medication
For internal medications, you can access the med report by clicking on the report icon as shown
below:

The internal med report will look like this:

Revised: 05/06/2021                                                                Page 32 of 56
Working with Authorizations in EpicCare Link
Providers who have access to EpicCare Link have the ability to enter authorizations electronically.

All requests for Prior Authorization must be submitted via the Secure Provider Portal. You can
only create Authorizations for members that have an active Managed Care coverage.

Create a New Authorization
   •   Click the Create Authorization quick button on the homepage
       o   Click the name of the patient requiring an authorization
            –   You can also create an authorization from inside a patient’s record that you

                already have open by clicking New Authorization
       o   Enter the primary procedure, and then click Next
            –   Additional procedure codes can be added on the Services form within the
                authorization

            –   After the primary procedure is requested, the Authorization then prompts Users
                to collect basic information about the type of service being requested, where the
                request came from, where it is going and the Authorization’s priority

Revised: 05/06/2021                                                                   Page 33 of 56
– All of the fields with red stop signs are required and must have a value entered
before the Authorization can be submitted
o If the authorization is for an admission, select an Admission type
General Information Section
• The Priority field defaults to Routine, but can be modified by clicking the magnifying
glass and selecting the appropriate priority
o Routine authorization requests will be processed within three working days
o Urgent authorization requests will be processed within one working day
– Requests submitted as urgent that are not urgent in nature, but rather
submitted as urgent based on the delay in provider submission will be
processed as a routine authorization request
• The Type field is used to identify the type of service being requested
o Example: Private Duty Nursing, Acute Physical Therapy (120 days from onset of injury)
• The Class field is used to indicate if the authorization is going to a Cook Children’s
Health Care System Provider or to a Provider outside of the Cook Children’s Health Care
System
o Select the appropriate Class
• Enter the requested Start date and Expiration Date
Revised: 05/06/2021 Page 34 of 56Authorization By Section
• Enter the name of the Referring Provider in the Provider field
o Click the magnifying glass to select the Provider
o If the Provider is not listed enter the Provider name in the “Other provider” field
o Click on the magnifying glass to search for the Referring Provider.
• The Location/POS and Provider address fields are not required but can be populated if
needed
• If you select Other Provider in the Provider field you will receive
Authorization To Section
1. Enter the name of the Authorized To Provider in the Provider field
• If the name of the Provider is not known or found, enter the default Provider,
Tapestry Generic PCP (47080)
• When entering the name of the Provider, the system may prompt you to select the
Provider from a search results
Revised: 05/06/2021 Page 35 of 56• Select the appropriate Provider along with the associated location you would like the
patient to be seen, then click Accept
• You may receive a pop-up message; this is an internal system warning. To bypass the
Place of Service warning, click Yes
2. If the Location/POS did not populate from the previous step, then enter the location
where the patient will be seen in the Location/POS field, if it is known
• If the location is known, you can type a partial name and click enter for a list of
locations meeting your search criteria
• You can also click the magnifying glass to search for a location
Revised: 05/06/2021 Page 36 of 56o Enter your search criteria, then click Search
• Click the name of the location to select it
3. If the Location/POS type did not populate from one of the steps above then enter the
Location/POS type, then click Next
4. If the Provider address did not populate from one of the steps above, click the
magnifying glass in the address field, then select the appropriate address
Revised: 05/06/2021 Page 37 of 56The Authorization To section is now complete.
Diagnoses Section
1. Enter the coded diagnoses
• You can type text in the coded diagnosis field to search for a list of related coded
diagnoses
• Click to add additional diagnosis codes
• Code to the highest specificity
o Avoid using unspecified diagnoses
Especially R69, Illness Unspecified
Services Section
1. The service code entered at the beginning of the Authorizations populates the Services
field.
• To add additional services click
• Please make sure the codes you select in the Services/Procedure section are valid
CPT or HCPCS codes
Revised: 05/06/2021 Page 38 of 56• If you enter an invalid code you will receive the following error message
2. You are required to indicate the number of visits, units or procedures needed for these
services
3. If modifiers are needed, enter all appropriate modifiers in the Modifiers field
• Separate multiple modifiers using a comma. (Ex: 59, 25, 91)
4. Select the appropriate type (visit, unit)
Revised: 05/06/2021 Page 39 of 56Questionnaire
1. If your response is “Yes”, enter the duration & frequency for each procedure code (For
example-1 month or 2 weeks). If your response is “No”, enter N/A and proceed.
• Enter an Admission Date if there is an applicable Hospital Inpatient Admission
• Enter the Name of the Individual submitting the Authorization
• Enter the Referring Provider’s phone number
• Enter the Referring Provider’s fax number
• Enter the Referred to Provider’s phone number
• Enter the Referred to Provider’s fax number
Revised: 05/06/2021 Page 40 of 56• Sign the Authorization
Notes Section
The notes section is used to send additional communication regarding the authorization such as
orders, notes, etc. You can add any supporting clinical documentation by clicking Add File.
This section will allow you to attach one document/file up to 100 MB.
Click Request Authorization to submit the authorization
Authorization Details
1. You are now viewing a summary of the submitted authorization
2. If additional notes or attachments are needed after the authorization is submitted click Add
Note/Attachments to add the information
When attaching a document to an authorization the User must enter a Note in the Note
Summary. If not, the User will receive an error.
Revised: 05/06/2021 Page 41 of 563. If you make a mistake or need to make changes to an authorization you submitted you will need to add a note to the original authorization Reviewing Authorizations 1. Navigate to the patient’s chart 2. Click the ellipses and select Authorization by Member Revised: 05/06/2021 Page 42 of 56
3. A list of the patient’s active Authorizations is displayed
       •   To see all of the patient’s authorizations, select Show All Authorizations in the View

           Options field
   4. The status of the authorization can be viewed from this screen
   5. To get additional information regarding the authorization, click on the ID number link

   6. Click the Status History link to see an audit trail for this Authorization

Reviewing Authorization Letters
   1. Navigate to the In Basket

Revised: 05/06/2021                                                                 Page 43 of 56
• Only the Referred By and the Referred to Providers (Physicians, Therapists, etc.) will
receive the authorization in their In Basket
2. Click the Referral Notification Letter folder to review Authorization or Denial letters
associated with your Authorizations
• This will display letters where you (as the Provider) are listed as the Referred To
Provider on the Authorization
Allow Other Users to Access Your In Basket
The Provider might want a staff Member to have access to the Authorization Letters that are
sent to their In Basket. In this case, you have the ability to “attach” an In Basket to another User.
The Provider must first “grant” access to the User requesting access, then that User will be able
to access the Provider’s In Basket.
To “grant’ access for another User to access you In Basket, follow the steps below.
1. When you are logged in as the Provider, navigate to the In Basket
Revised: 05/06/2021 Page 44 of 562. Click on the Attach button
3. Click the Grant Access tab
4. Choose the User(s) you would like to grant access for
• To choose a User, start typing their name in the Grant Access to field or click the
magnifying glass to select from a list of Users
5. Once the User has been selected, click Save
Revised: 05/06/2021 Page 45 of 56Attach another Users’ In Basket to your account
Once the above steps are complete, follow the steps below to “attach” the Provider’s In Basket
to yours.
1. Login with your own User, and navigate to the In Basket
2. Click on the Attach button
3. Under Persistent Attachments, find the Provider whose In Basket you would like to
attach
4. The selected Provider will populate the User field
5. Click Save
6. You can now view that Provider’s In Basket within your In Basket
Eligibility Review in EpicCare Link
Review Coverage and Benefits
EpicCare Link can be used to review a Member’s coverages and benefits
1. Click Select Patient
2. Locate your patient
3. Navigate to the Coverages and Benefits tab
Revised: 05/06/2021 Page 46 of 56• You may need to click the ellipses to see it
4. Select View all coverages on file.
• From here, you can view a Member’s current and past coverages
5. Click Benefits Summary to see the benefits for the selected coverage
6. Review the benefit categories, then click the plus sign to expand that section of the
benefits list
• You can also enter a partial topic in the Jump to field, then the select the category to
expand that section of the benefits list
Revised: 05/06/2021 Page 47 of 567. Click Back to exit Benefits Summary
8. Click the Coverage Detail Report to view more information about the coverage and the
subscriber
Revised: 05/06/2021 Page 48 of 56Claims Review in EpicCare Link
Review AP Claims
EpicCare Link can be used to review claims submitted by your organization. There are two ways
to search for a claim
Claims Search by Member the
• Click Select Patient
• Locate your patient
• Click the Claim by Member tab
• You may need to click the ellipses to see it
Claim Search
• Click Claim Search
• Search by vendor, tax ID, provider, member id, or claim ID
Revised: 05/06/2021 Page 49 of 56• The drop down value should be selected depending on the information you enter.
• The Advanced Search option can be used to drilldown your search by specific claim
details including billed amount, Claim ID, Claim Type and check number
• Claim Search by Claim ID. You will need to enter CCHP claim number under the Claim
ID field
• The date range defaults to one year, but can be updated if needed
• Select the appropriate Claim #
• To review the details of the claim, click the Claim # link
• This will display the details related to the status such as
o payment amount
o associated coverages
o authorizations
Revised: 05/06/2021 Page 50 of 56o applicable claim codes
Reviewing and Printing Remittance Advices
This is currently in development. The functionality will be available soon.
Customer
Customer is a communication tool between you and the health plan’s Customer Service team.
Customer Service Request (CSR) are created to provide or request information regarding various
topics such as appeals, other health insurance and claim status.
Creating a CSR
1. Click Customer Service on the homepage
2. Select the appropriate topic from the dropdown
Revised: 05/06/2021 Page 51 of 563. Fill in the required fields Revised: 05/06/2021 Page 52 of 56
4. Attach any accompanying documentation (if applicable)
5. Click Submit
• Your message has been sent
6. Click OK
7. An acknowledgement is sent to your In Basket and a CRM number is provided
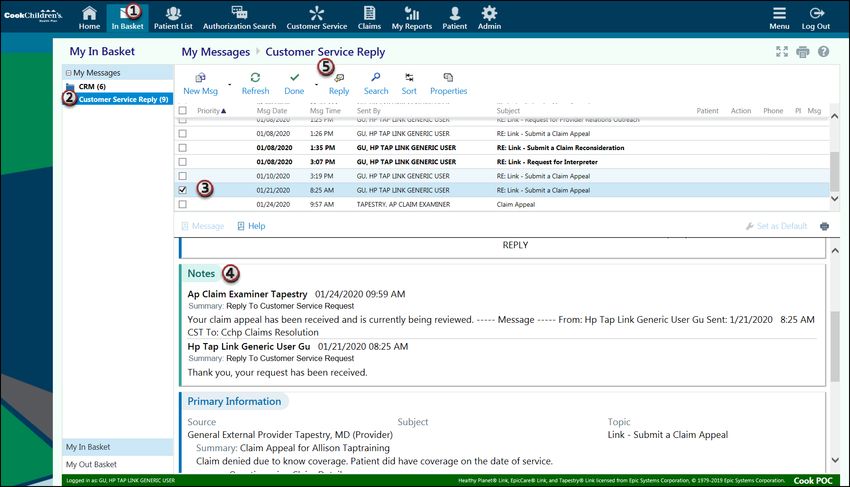
Reviewing Customer Service Responses
When the health plan respond via Link, the reply shows up in the User’s In Basket. In Basket is a
quick and easy way to review and respond to messages from the health plan’s Customer Service
team.
1. Click In Basket on the main toolbar
2. Navigate to the Customer Service Reply folder to review your received messages
3. Click the message you want to review
4. Scroll down to the Notes section to review the response
5. Click Reply on the toolbar to respond to the message (if needed)
Revised: 05/06/2021 Page 53 of 566. If a reply is needed, enter your comment in the Note section, then click Send Message
Login Issues or Password Reset
1. Login Issues
• Please call the Provider Support Services hotline 888-243-3312
2. Password Resets
• The User should email CCHPNetworkDevelopment@cookchildrens.org and provide
their User ID and request their password be reset
• The User will receive a Secure Email in 1-3 business days with their new temporary
password
Revised: 05/06/2021 Page 54 of 56Glossary Site Admin – User has the ability to add and remove Users on behalf of their Organization Affiliate – Participating Provider AP – Accounts Payable Clinical – Users granted access to view a patient’s clinical chart information CRM – Customer Relationship Management (CRM) allows the User to submit a message directly to the health plan CSR – Customer Service Request (CSR) allow the User to submit a message directly to the health plan Coverage – Eligibility DOB – Date of Birth EpicCare Link – Secure Provider Portal External Medication - Referring to medications ordered/entered in Epic by other Providers or via claims ID – Identification In Basket – Messages Internal Medication – Referring to medications ordered/entered in Epic by Cook Providers Location – Physical Place of Service (Physical address) POC – Plan of Care MRN – Medical Record Number (Cook Specific) OB – Obstetrics or Obstetrician Patient – CCHP Member PCP- Primary Care Provider Physician/APP – Medical Provider assigned an National Provider Number POS – Place of Service Type (Office, Inpatient Hosp, etc.) Procedure Code – HCPCS/CPT code Referrals – Authorizations SnapShot – High level overview of Member’s clinical chart Revised: 05/06/2021 Page 55 of 56
SSN – Social Security Number

Revised: 05/06/2021            Page 56 of 56
You can also read