PROGRESSBOOK PARENTACCESS ADMINISTRATION GUIDE - OHCONNECT.ORG
←
→
Page content transcription
If your browser does not render page correctly, please read the page content below
ProgressBook
  ParentAccess
Administration Guide
ProgressBook ParentAccess Administration Guide
(This document is current for v20.4.1 or later.)

© 2021 Software Answers, LLC. All Rights Reserved. All other company and product names
included in this material may be Trademarks, Registered Trademarks, or Service Marks of the
companies with which they are associated. Software Answers, LLC reserves the right at any time
and without notice to change these materials or any of the functions, features, or specifications of
any of the software described herein.

Software Answers, LLC                                                          www.progressbook.com
6770 Snowville Rd., Suite 200
Brecksville, Ohio 44141

Change Log

Change Log

The following Change Log explains by Product Version, Heading, Page, and Reason where
changes in the ProgressBook ParentAccess Administration Guide have been made.

 Product
                      Heading                Page                             Reason
 Version
           “Frontline ProgressBook Parent
 20.4.1                                          65    Added new section.
           & Student”
 20.4.1    Entire Guide                          N/A   Updated text to reference the Frontline ProgressBook
                                                       Parent & Student app where applicable.

ProgressBook ParentAccess Administration Guide                                                                i
Table of Contents

Change Log                                                                                                                       i

About this Guide                                                                                                                1

District Setup                                                                                                                  2
     Maintain District Settings .............................................................................................2
     Set Page Level Security...............................................................................................4
          Menu Items ............................................................................................................6
          Providing Access to VirtualClassroom ...................................................................8
     Maintain Event Categories......................................................................................... 11
          Set Up Event Categories ..................................................................................... 11
          Update or Delete Event Categories .....................................................................12
     Maintain Alerts ...........................................................................................................14
          Understand Alert Processing Requirements ........................................................14
          Set Up Alerts ........................................................................................................15
          Run Alerts ............................................................................................................16
          Update or Delete Alerts........................................................................................18

Manage Website Content                                                                                                        20
     Maintain District Greeting Page .................................................................................20
          Set Up District Greeting Page..............................................................................20
          Update District Greeting Page .............................................................................23
     Enable Public Calendar .............................................................................................24
     Maintain News and Information .................................................................................25
          Post News and Information..................................................................................26
          Update News and Information .............................................................................32
     Maintain Events .........................................................................................................33
          Post Events..........................................................................................................34
          Update Events .....................................................................................................37
     Maintain Forms ..........................................................................................................38
          Post Forms...........................................................................................................38
          Update Forms ......................................................................................................41

Manage Accounts                                                                                                               43
     Maintain Registration Keys ........................................................................................43
          Generate Registration Keys by School ................................................................43

ii                                                                              ProgressBook ParentAccess Administration Guide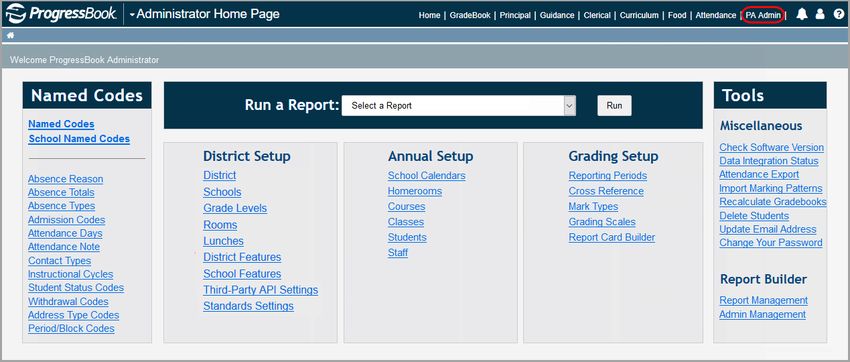
Generate Individual Registration Keys.................................................................45
         Generate Parent Registration Keys .....................................................................47
         Look Up Registration Keys ..................................................................................48
         Delete Registration Keys by School.....................................................................49
         Delete Individual Registration Keys .....................................................................50
         Export Registration Keys .....................................................................................52
    Maintain ParentAccess Accounts...............................................................................54
    Import Accounts .........................................................................................................57
         Import Accounts from CSV...................................................................................57
         Import Accounts from StudentInformation............................................................62

Frontline ProgressBook Parent & Student                                                                                   65

ProgressBook ParentAccess Administration Guide                                                                                    iii
About this Guide

About this Guide

The purpose of this guide is to assist you in setting up and maintaining ParentAccess. Some of
the information that displays in ParentAccess also displays in the Frontline ProgressBook Parent
& Student app.
If you have the GradeBook role of Master or School Administrator, you can access all of the
features described in this guide. If you have a different role but have District or School Web Author
privileges, only some of these features are available to you.
You perform all of the tasks in this guide from the ParentAccess Administration screen. To
access this screen, click PA Admin at the top of your home screen.

1                                                        ProgressBook ParentAccess Administration Guide
District Setup

District Setup

Use the District Setup area of the ParentAccess Administration screen to maintain the
following items:
    •   District settings (such as the alias, logo, and document upload options) – See
        “Maintain District Settings”
    •   Page level security – See “Set Page Level Security”
        •   LMS access – See “Providing Access to VirtualClassroom”
    •   Event categories – See “Set Up Event Categories”
    •   Alerts – See “Maintain Alerts”

Maintain District Settings
This topic explains how to maintain your district settings, including the alias, home page link, and
logo that display in ParentAccess. It also explains how to enable/disable ParentAccess for your
district, indicate file upload permissions for teachers, and assign parent password reset privileges.
    1. On the ParentAccess Administration screen, below District Setup, click District
       Settings.

        The District Setup screen displays.
    2. (Optional) If you want to add a direct link from your school website to the ParentAccess
       Sign In screen (so users bypass the District Selection screen), use the Direct link to
       login URL.
    3. (Optional) In the District Alias field, enter the name of your school district as you want it
       to display on the Districts screen and on the ParentAccess banner.
    4. In the District Home Page field, replace the default value with the URL of the district
       website where you want to direct ParentAccess users when they click the district alias on
       the ParentAccess banner.
    5. (Optional) If you want a logo to display on the Districts screen, in the Logo File Name
       field, enter the file name of the logo. A logo Preview displays to confirm that you have
       completed this field correctly.

ProgressBook ParentAccess Administration Guide                                                     2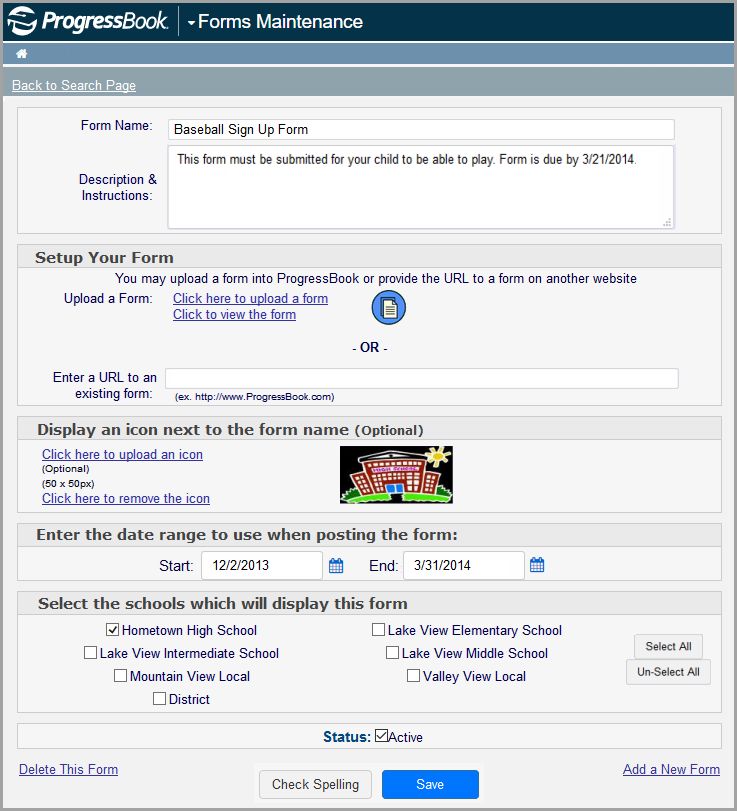
District Setup

    6. For the Enable this District? option, select Yes to enable ParentAccess for the district or
       No to disable it.

        Note: Regardless of your selection, principals, teachers, and guidance
        counselors can still view ParentAccess within the GradeBook application. To
        disable ParentAccess within the GradeBook application, refer to the
        ProgressBook GradeBook System Manager Guide.

    7. For the Allow users to sign up for account? option, select Yes to display the sign-up
       and forgot password links on the Sign In screen in ParentAccess and the Frontline
       ProgressBook Parent & Student app, or select No to hide the links.
        •   Selecting No for this option prohibits parents from creating accounts for their children
            and from resetting their children’s passwords.
        •   Selecting No for this option prevents teachers from resetting student passwords.
    8. For the Allow teachers to upload images? option, select Yes to let teachers upload
       images to ParentAccess and the Frontline ProgressBook Parent & Student app or No to
       disallow image uploads.
    9. For the Allow teachers to upload documents? option, select Yes to let teachers upload
       documents to ParentAccess and the Frontline ProgressBook Parent & Student app or No
       to disallow document uploads.

        Note: The size and number of files that teachers can upload to ParentAccess
        depend on the available space on the server. The default file size is 500 MB per
        each file, but you can modify this setting in the appSettings.config file. The default
        file size applies to all files uploaded by all districts that use that server.

    10. For the Allow schools to use Google OAuth? option, select Yes to let students log into
        ParentAccess and the Frontline ProgressBook Parent & Student app using Google™
        accounts, or select No to allow only standard sign-in.
    11. In the School Preferences section, for each school:
        a. In the Password area, select the radio button beside either Allow only masters and
           school admins to change parent passwords or Allow principals, clerks,
           masters, and school admins to change parent passwords to designate which
           roles that you want to be able to reset parent passwords.

            Note: Master and School Administrator roles can change parent passwords at
            their assigned schools regardless of this setting. In addition, all users with
            access to the ParentAccess Account Maintenance screen can change
            student passwords. (See “Maintain ParentAccess Accounts.”)

        b. In the Attendance Comments area, select the radio button beside either Show
           attendance comments in ParentAccess or Hide attendance comments but show
           attendance codes in ParentAccess to designate how you want attendance to
           display on the Attendance screen for parents and students.
        c. In the Student schedules area, select the radio button beside either Show
           schedules in ParentAccess before the start of school or Hide schedules until
           start of school to designate when you want schedules to display to students and
           parents in ParentAccess and the Frontline ProgressBook Parent & Student app.

3                                                         ProgressBook ParentAccess Administration Guide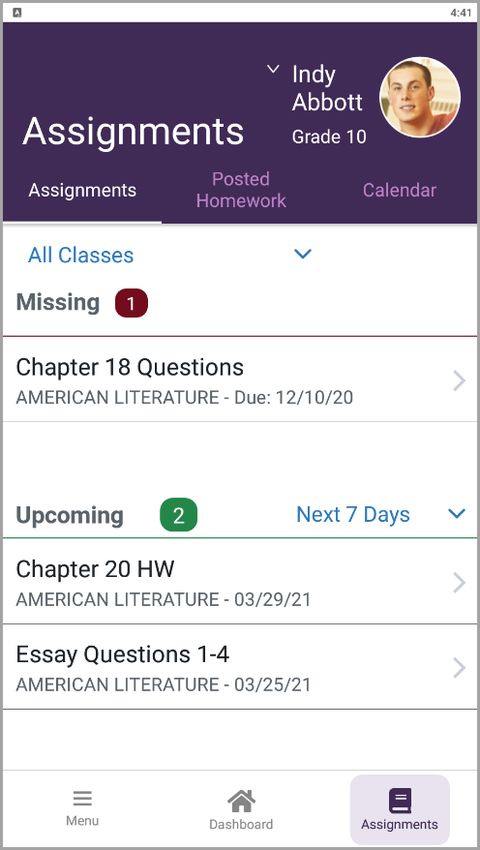
District Setup

            i.   If you select Show schedules in ParentAccess before the start of school, the
                 On this date field is required. In this field, designate the date on which students
                 and parents can begin viewing schedules in ParentAccess and the Frontline
                 ProgressBook Parent & Student app.

                 Note: The School start date listed reflects the earliest course term start
                 date for the current school year for that school.

            ii. (Optional) If you select Show schedules in ParentAccess before the start of
                school but you do not want students or parents seeing teachers’ names before
                school, select the Hide teacher names checkbox.
    12. Click Save.

Set Page Level Security
This topic explains how to allow or deny access to specific screens or options in ParentAccess
based on whether the user is a GradeBook user (e.g., teacher, principal, or guidance counselor),
parent, or student.

ProgressBook ParentAccess Administration Guide                                                     4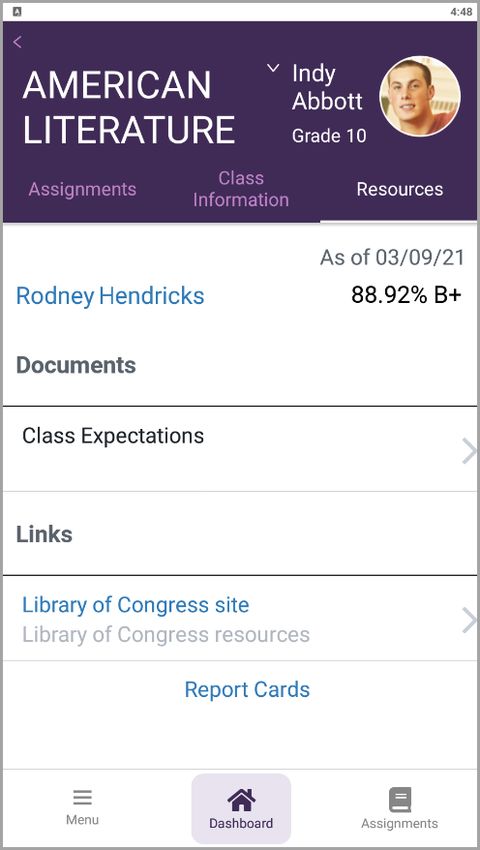
District Setup

    1. On the ParentAccess Administration screen, below District Setup, click Page Level
       Security.

        The Page Level Security screen displays. You can set the security access for any screen
        or option for roles that are not grayed out.

        Note: If a menu item has any subitems, each subitem controls specific
        functionality for the related screen. You can select a main menu item without
        enabling any of its subitems; for instance, you may want to give users limited or
        read-only access to a screen. If you enable a subitem to provide users with
        additional privileges, by default, the main menu item is automatically selected.

    2. In the row of each ParentAccess screen or option to which you want to grant access for a
       particular security role, select the checkbox in the column of the role (GradeBook, Parent,
       and/or Student).
    3. In the row of each ParentAccess screen or option to which you want to deny access for a
       particular security role, deselect the checkbox in the column of the role.
    4. Click Save.

        Note: For an explanation of each menu item and subitem, see “Menu Items.”

5                                                       ProgressBook ParentAccess Administration Guide
District Setup
Menu Items
• “Student”
• “School”
• “Family”
ProgressBook ParentAccess Administration Guide 6District Setup
Student
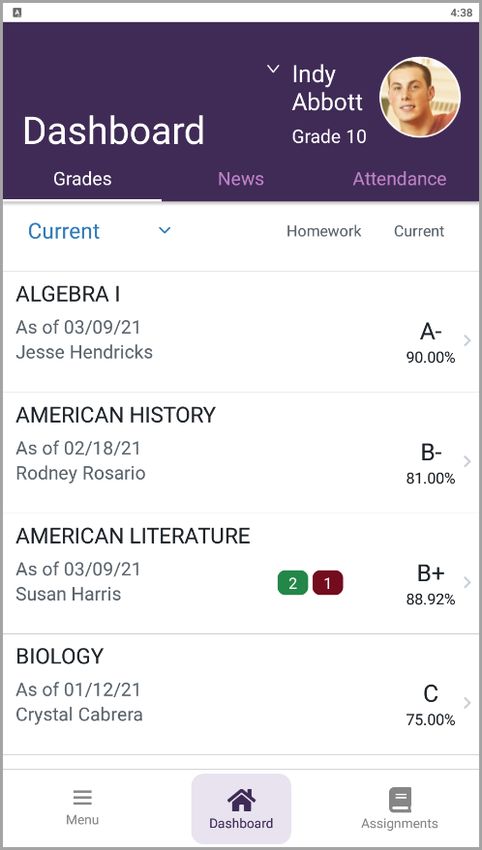
• Home – Access to the Home screen for parents and the Dashboard screen for students
• Attendance – Access to the Attendance screen
• Attendance Totals – Access to absence and tardy totals on attendance details
screens
• Grades –
• Homework Planner – Access to the Planner screen
• Schedule – Access to the Schedule screen (which may also include locker,
transportation, and counselor information)
• View Transportation – Access to transportation information on the Schedule screen
in ParentAccess and the Class Schedule tab in the Frontline ProgressBook Parent &
Student app (when the Parent role is selected, only the primary contact can access
the information)
• View Locker – Access to locker information (number and combination) on the
Schedule screen in ParentAccess and the Class Schedule tab in the Frontline
ProgressBook Parent & Student app (when the Parent role is selected, only the
primary contact can access the information)
• View Homeroom – Access to homeroom number on the Schedule screen in
ParentAccess and the Class Schedule tab in the Frontline ProgressBook Parent &
Student app
• Report Card – Access to the Report Card screen (not official grades) in ParentAccess
and Report Cards tab in the Frontline ProgressBook Parent & Student app. If enabled, in
order for report cards to display on the Report Card screen, on the Report Card Builder
screen, you must select Yes for the Post on Parent Access? option (see the GradeBook
System Manager Guide for more information).
• View Official Report Cards – Ability to click the View Paper Report Card link that
downloads a PDF version of the official report card in ParentAccess and Report
Cards tab in the Frontline ProgressBook Parent & Student app (when the Parent role
is selected, only the primary contact can access the information)
• Course Request – Access to the Course Request screen
• Activities – Access to the Activities screen (only to view activities, not to submit them)
• Submit Student Activity – Ability to submit responses to assigned VirtualClassroom
activities
• Resources – Access to the Resources screen (VirtualClassroom resources)
• Fees – Access to the Fees screen as well as to a notification that may display on the
Schedule screen (when the Parent role is selected, only the primary contact can access
this information)
School
• News – Access to the News screen (information posted by the district administrator) in
ParentAccess and the News tab in the Frontline ProgressBook Parent & Student app
• Calendar – Access to the Calendar screen
• Class Information – Access to the Class Information screen (information posted by
teachers on the Class Information Page Maintenance screen) in ParentAccess and the
Class Information tab in the Frontline ProgressBook Parent & Student app
7 ProgressBook ParentAccess Administration GuideDistrict Setup
Family
• Alerts – Access to the Alerts screen for notification of low grades and missing
assignments
• My Account – Access to the My Account screen
• Profile – Access to the My Account screen Account Info tab
• Change Password – Access to the My Account screen Change Password tab
• Manage Student – Access to the My Students tab
• Create Student Accounts – Access to the Create Account button on the My
Student screen
• Reset Student Password – Access to the Reset Password button on the My
Student tab
• Student Contacts – Access to the Student Contact screen (populated from SIS)
• Edit Contact – Ability to click Edit on contacts (excluding the primary contact’s main
address and main phone number)
• Student Profile – Access to the Student Profile screen (Profile and Address areas)
• View Notes (i.e. SIS Medical and Custody Alerts) – Access to the Notes area of
the Student Profile screen
Providing Access to VirtualClassroom
Providing Access to Online Activities
To give students access to online activities in ParentAccess, complete the following steps.
1. On any GradeBook screen, in the banner, click PA Admin.
ProgressBook ParentAccess Administration Guide 8District Setup
2. On the ParentAccess Administration screen, in the District Setup section, click Page
Level Security.
3. On the Page Level Security screen, in the Student area, in the Activities row, select the
checkbox for each role that should have access to view online activities.
4. On the Page Level Security screen, in the Student area, in the Submit Student Activity
row, select the checkbox for each role that should be allowed to submit online activities for
grading.
Note: When you enable the parent role for Activities, parents have read-only
access to the activities, but you cannot allow them to submit student activities.
5. Click Save.
Selected users can now access and/or submit online activities in ParentAccess.
9 ProgressBook ParentAccess Administration GuideDistrict Setup
Providing Access to Resources
To give students access to VirtualClassroom resources in ParentAccess, complete the following
steps.
1. On any GradeBook screen, in the banner, click PA Admin.
2. On the ParentAccess Administration screen, in the District Setup section, click Page
Level Security.
ProgressBook ParentAccess Administration Guide 10District Setup
3. On the Page Level Security screen, in the Student area, in the Resources row, select
the checkbox for each role that should have access to view resources.
4. Click Save.
Selected users can now access VirtualClassroom resources in ParentAccess.
Maintain Event Categories
Event categories provide a way to group events on the ParentAccess calendar for all the schools
in a district. Default event categories are included in GradeBook, but you can also create your
own.
• For information on setting up event categories, see “Set Up Event Categories.”
• For information on updating or deleting event categories, see “Update or Delete Event
Categories.”
Set Up Event Categories
1. On the ParentAccess Administration screen, below District Setup, click Event
Categories.
11 ProgressBook ParentAccess Administration GuideDistrict Setup
The Event Category Maintenance screen displays.
2. In the Category Name column, enter an event name in the first blank row.
3. Click Save.
Update or Delete Event Categories
Note: You cannot delete event categories if any events are associated with them.
1. On the ParentAccess Administration screen, below District Setup, click Event
Categories.
ProgressBook ParentAccess Administration Guide 12District Setup
The Event Category Maintenance screen displays.
2. Make any updates or deletions to the list as follows:
• To update an event category name, in the Category Name column, change the
name.
• To delete an event category, in the Del? column, select the checkbox for the event.
3. Click Save.
13 ProgressBook ParentAccess Administration GuideDistrict Setup
Maintain Alerts
Alerts notify parents when their child has not completed an assignment or has received a low
mark. You can schedule alerts to be sent all at once, or you can schedule specific alerts to be sent
only from selected schools at specified intervals and times. For example, the high school may
send missing assignment and low mark alerts daily at 3:00 pm, but the elementary schools send
only missing assignment alerts weekly on Mondays at 7:00 am.
• For information on how alerts are processed, see “Understand Alert Processing
Requirements.”
• For information on setting up alerts, see “Set Up Alerts.”
• For information on running alerts, see “Run Alerts.”
• For information on updating or deleting alerts, see “Update or Delete Alerts.”
Understand Alert Processing Requirements
All Alerts
GradeBook sends out each alert type (missing assignment alert or low assignment mark alert)
only once for a specific assignment. You must have the alert type selected for a specific school,
and it must be active.
Missing Assignment Alerts
GradeBook sends out a missing assignment alert only after a teacher marks the assignment as
missing in GradeBook.
Low Mark Alerts
Only assignments that meet the following criteria are able to generate alerts:
• Used in a class that does not use the Custom Setup 2 grading scale
• Possible points are more than 0
• Included in the student’s average
• Marks are posted to ParentAccess
• Due date is on or after the date the parent or student subscribed to alerts
GradeBook sends low assignment mark alerts for assignments with a grade equal to or lower than
a specific threshold set by the parent. The comparison uses numeric value equivalents, as shown
in the following examples.
Letter grade example:
A teacher gives a “C” (numeric value equivalent=2) for a classwork assignment. If a parent
has subscribed to low assignment mark alerts and selected “B” (numeric value equivalent=3)
as the threshold, GradeBook sends the parent a low assignment mark alert.
Points/percentage example:
A teacher gives 7 points for a homework assignment that is worth 10 points
(percentage=70%). According to the range in the grading scale, this score is equivalent to a
“C” (numeric value equivalent=2). If a parent has subscribed to low assignment mark alerts
and selected “B” (numeric value equivalent=3) as the threshold, GradeBook sends the parent
a low assignment mark alert.
ProgressBook ParentAccess Administration Guide 14District Setup
Set Up Alerts
1. On the ParentAccess Administration screen, below District Setup, click Alert Setup.
The Parent Access Alerts screen displays
2. Click Add an Alert.
3. On the Add Alert window, enter an Alert Name.
4. In the Alert Type(s) area, select if this alert is for Missing Assignments and/or Low
Assignment Marks.
5. Select a Run Frequency for the alert:
• Daily – Send the alert every day at a specified time
• Weekly – Send the alert weekly on a specified day and time
• Manual – Send the alert only when the GradeBook system manager runs it manually
6. If you selected Daily or Weekly in step 5, select a Run Time at which to send the alert.
7. If you selected Weekly in step 5, select a Run Day on which to send the alert.
8. Select the Active? checkbox.
15 ProgressBook ParentAccess Administration GuideDistrict Setup
9. In the Select the schools that will use this alert area, select individual school(s) or All
Schools.
10. Click Save, and close the window.
11. Run the alert at least once manually. (See “Run Alerts.” )
Run Alerts
You can run an alert manually at any time even if it is previously scheduled.
1. On the ParentAccess Administration screen, below District Setup, click Alert Setup.
ProgressBook ParentAccess Administration Guide 16District Setup
The Parent Access Alerts screen displays. In the Action column, an alert is available to
run if displays in color (not grayed out).
2. In the row of the alert you want to run, click .
3. On the window that opens, click Yes to confirm that you want to run the alert now.
The alert runs and displays a status of Submitted in the Result column.
As the alert cycles through the following stages, the alert status in the Result column
changes.
Alert Status with Description
Event Status Description
Submitted The Alert Service has received the request to run.
User clicks .
The previously scheduled
The alert is being processed for each school
time has already occurred
In Progress building. This could take several minutes depending
or user clicks . on the number of buildings.
The alert has processed successfully for all school
The alert has processed. Completed
buildings.
The alert has not The alert has not processed successfully for all
Failed
processed. school buildings.
17 ProgressBook ParentAccess Administration GuideDistrict Setup
Update or Delete Alerts
You can update alerts at any time.
1. On the ParentAccess Administration screen, below District Setup, click Alert Setup.
The Parent Access Alerts screen displays.
2. In the row of the alert you want to update, click .
3. On the Alert Maintenance window:
• To update an alert, make any desired changes, and then click Save.
ProgressBook ParentAccess Administration Guide 18District Setup
• To delete an alert, click Delete, and on the delete confirmation window, click Yes.
19 ProgressBook ParentAccess Administration GuideManage Website Content
Manage Website Content
Use the Manage Website Content area of the ParentAccess Administration screen to maintain
the following items:
• District greeting – See “Maintain District Greeting Page”
• Public calendar – See “Enable Public Calendar”
• News and information – See “Maintain News and Information”
• District and school events – See “Maintain Events”
• District and school forms – See “Maintain Forms”
Maintain District Greeting Page
If you choose to enable a district greeting page, ParentAccess users see the district greeting page
instead of the standard Sign In screen when signing in.
• For information on setting up a district greeting page, see “Set Up District Greeting Page.”
• For information on updating a district greeting page, see “Update District Greeting Page.”
Set Up District Greeting Page
1. On the ParentAccess Administration screen, below Manage Website Content, click
District Login Maintenance.
ProgressBook ParentAccess Administration Guide 20Manage Website Content
The District Login Maintenance screen displays.
2. Select the Active checkbox beside Custom Greeting.
3. In the Format the Custom District Greeting area, enter the greeting that you want to
display to ParentAccess users on their Sign In screen.
4. (Optional) To check the spelling of your greeting text, at the bottom of the screen, click
Check Spelling.
21 ProgressBook ParentAccess Administration GuideManage Website Content
5. (Optional) If you want an image to display on the district greeting screen, do the following:
a. Click Upload a picture.
The File Upload Utility window displays.
b. Click Browse, and then browse to and select the image from your computer.
c. Click Upload.
d. In the Display the picture on the... drop-down list, select where on the district
greeting screen you want the image to display (Left, Right, Top, or Bottom).
6. Click Save.
Your district greeting now displays to ParentAccess users on their Sign In screens.
ProgressBook ParentAccess Administration Guide 22Manage Website Content
Update District Greeting Page
1. On the ParentAccess Administration screen, below Manage Website Content, click
District Login Maintenance.
The District Login Maintenance screen displays.
23 ProgressBook ParentAccess Administration GuideManage Website Content
2. Make any updates as follows:
• To disable the district greeting screen, deselect the Active checkbox beside Custom
Greeting.
• To update the greeting text, in the Format the Custom District Greeting area, make
any needed updates.
• To remove an image, click Remove the picture.
3. Click Save.
Enable Public Calendar
You can enable access to a public calendar that does not require viewers to be registered
ParentAccess users. The public calendar displays events that are of interest to the school
community in general, so any interested community member can click the link to view the calendar
and is not required to sign in to ParentAccess.
1. On the ParentAccess Administration screen, below Manage Website Content, click
District Login Maintenance.
The District Login Maintenance screen displays.
2. Select the Active checkbox beside Public Calendar.
3. Click Save.
ProgressBook ParentAccess Administration Guide 24Manage Website Content
The District Calendars link now displays on the ParentAccess Sign In screen.
4. (Optional) If you want to provide a direct link from your school or district website to the
public calendar, do the following:
a. Click Show URL.
The calendar’s web address displays.
b. Use the web address to create the link on your school or district website.
Maintain News and Information
You can post news articles, documents, and web links for ParentAccess and the Frontline
ProgressBook Parent & Student app users. These display on the News screen in ParentAccess
in the main News area, below Information or below Links. They also display in the Frontline
ProgressBook Parent & Student app News tab.
Note: To post a document to appear in the Forms area of the News screen in
ParentAccess, see “Post Forms.”
• For information on posting news, see “Post News and Information.”
• For information on updating news, see “Update News and Information.”
25 ProgressBook ParentAccess Administration GuideManage Website Content
Post News and Information
1. On the ParentAccess Administration screen, below Manage Website Content, click
News & Information (Content).
The Content Search screen displays.
2. Click Add New Content.
ProgressBook ParentAccess Administration Guide 26Manage Website Content
The Content Maintenance screen displays.
3. In the Format the News Content area, in the Enter a Title field, enter a title for the news
item.
4. In the Status area, select the Active checkbox.
5. In the Date Range fields, enter or select the start and end dates during which this news
item should display.
6. In the Display Section area, select where in ParentAccess you want this news item to
display (News Section, Info Section, or Links Section).
Note: An image of the ParentAccess News screen displays as a guide to the
screen’s layout.
Note: In the Frontline ProgressBook Parent & Student mobile app, all segments
(News Section, Info Section, or Links Section) display together based on the
Sort Order.
7. In the Sort Order field, enter a number to indicate the order in which you want the news
item to display in ParentAccess and the Frontline ProgressBook Parent & Student app.
Note: It is a good idea to leave space between the numbers (for example, use
increments of 10) so that you can insert items between others later if needed.
27 ProgressBook ParentAccess Administration GuideManage Website Content
8. In the Select the schools which will display this item area at the bottom of the screen,
select one or more schools that should display the news item on their News screen in
ParentAccess and News tab in the Frontline ProgressBook Parent & Student app. (To
select all of the schools, click Select All.)
9. Return to the Format the News Content area at the top of the screen, and select the
Content Type you are uploading (News Article, Document, or Web Link). Then follow
the steps for that type of content listed below:
• “Post News Article”
• “Post Document”
• “Post Web Link”
Post News Article
1. In the Format the News Article area in the middle of the screen, in the Full Article field,
enter the text of the news article. You can use the options in the text editor to format the
text.
ProgressBook ParentAccess Administration Guide 28Manage Website Content
2. (Optional) If you want an image to display with the news article, do the following:
a. Below Article Picture, click Upload a picture.
The File Upload Utility window displays.
b. Click Browse, and then browse to and select the image from your computer.
c. Click Upload.
d. In the Picture Position drop-down list below the image you just uploaded, select
where in relation to the news article text you want the image to display (Left, Right,
Top, or Bottom).
3. (Optional) If you would like to display only a summary of the news item with a button users
can click to open the full news item, do the following:
a. In the Format the News Content area, select the Include Summary checkbox.
b. In the Format the News Article area, in the Summary field, enter the text that you
want to display as a summary of the news article.
c. (Optional) To include an image with the summary, do the following:
i. Below Summary Picture, click Upload a picture.
The File Upload Utility window displays.
ii. Click Browse, and then browse to and select the image from your computer.
iii. Click Upload.
iv. In the Picture Position drop-down list below the summary image you just
uploaded, select where in relation to the summary text you want the image to
display (Left, Right, Top, or Bottom).
29 ProgressBook ParentAccess Administration GuideManage Website Content
d. (Optional) To include an image with the full news article that displays in the window
after users click the button to read more, do the following:
i. Below Popup Picture, click Upload a picture.
The File Upload Utility window displays.
ii. Click Browse, and then browse to and select the image from your computer.
iii. Click Upload.
iv. In the Picture Position drop-down list below the popup image you just uploaded,
select where in relation to the text of the full news article you want the image to
display (Left or Right).
4. (Optional) To check the spelling of all of your entries on this page, click Check Spelling.
5. Click Save.
Post Document
1. In the Upload the Document area in the middle of the screen, click Upload a new form.
The File Upload Utility window displays.
ProgressBook ParentAccess Administration Guide 30Manage Website Content
2. Click Browse, and then browse to and select the document from your computer.
3. Click Upload.
4. (Optional) To include an image with the document, do the following:
a. Below Document Picture, click Upload a picture.
The File Upload Utility window displays.
b. Click Browse, and then browse to and select the image from your computer..
c. Click Upload.
d. In the Picture Position drop-down list below the image you just uploaded, select
where in relation to the document link you want the image to display (Left, Right,
Top, or Bottom).
5. (Optional) To display a summary description of the document, enter a description in the
Summary field.
6. (Optional) To check the spelling of all of your entries on this page, click Check Spelling.
7. Click Save.
Post Web Link
1. In the Format the Web Link area in the middle of the screen, in the URL field, enter the
full URL (website address) of the web link, including http:// (for example:
http://www.progressbook.com).
2. (Optional) To include an image with the link, do the following:
a. Below Link Picture, click Upload a picture.
31 ProgressBook ParentAccess Administration GuideManage Website Content
The File Upload Utility window displays.
b. Click Browse, and then browse to and select the image from your computer.
c. Click Upload.
d. In the Picture Position drop-down list below the image you just uploaded, select
where in relation to the web link you want the image to display (Left, Right, Top, or
Bottom).
3. (Optional) To display a summary description of the website to which you are linking, enter
a description in the Summary field.
4. (Optional) To check the spelling of all of your entries on this page, click Check Spelling.
5. Click Save.
Update News and Information
1. On the ParentAccess Administration screen, below Manage Website Content, click
News & Information (Content).
ProgressBook ParentAccess Administration Guide 32Manage Website Content
The Content Search screen displays.
2. (Optional) If you do not see the news item you want to update, search for it by entering or
selecting any known information in the School, Start Date, End Date, and Status fields
and/or by entering a partial or full word in the Text field, and then click Search.
A list of news items matching the search criteria you entered displays.
3. Make any needed updates to the news item as follows:
• To change the order in which the news item displays in the list, update the Seq# field.
• To modify the date range in which the news item should display, update the dates in
the Start Date and End Date fields.
• To change the status of the news item, select or deselect the Active? checkbox.
4. Click Save.
• To update the news details, click , update any fields on the Content
Maintenance screen, and click Save.
Note: To delete the news item, at the bottom of the screen click Delete This
Content, and then click Yes on the Delete Home Page Content window.
Maintain Events
You can post district and school events for ParentAccess users. These appear on the Calendar
and Event List screens in ParentAccess.
• For information on posting events, see “Post Events.”
• For information on updating events, see “Update Events.”
33 ProgressBook ParentAccess Administration GuideManage Website Content
Post Events
Note: In order to post an event, an event category with which to associate the
event must already exist. See “Providing Access to VirtualClassroom.”
1. On the ParentAccess Administration screen, below Manage Website Content, click
District & School Events.
The Event Search screen displays.
2. Click Add an Event.
The Event Maintenance screen displays.
3. In the Choose the Event Category drop-down list, select the appropriate event category
for the event you are posting.
4. In the Enter the Event Summary field, enter the name and/or description of the event.
5. In the Date field, enter or select the date on which the event will occur.
ProgressBook ParentAccess Administration Guide 34Manage Website Content
6. (Optional) If the event is not an all-day event, deselect the All Day checkbox, and select
a Start Time and End Time.
7. (Optional) If the event is a recurring event (for example: football games that occur every
Friday between August and October), click Add Recurring Dates, and perform the
following:
a. On the Add Recurring Days window, in the Enter the Start Date field, enter or select
the first date of the recurring event.
b. In the Enter the End Date field, enter or select the last date of the recurring event.
c. In the Select the days of the week to schedule this event options, select the day(s)
of the week on which the event will occur.
d. (Optional) In the Enter additional information for these days field, enter more
detailed information, if desired.
e. Click Add these dates.
35 ProgressBook ParentAccess Administration GuideManage Website Content
8. (Optional) Enter event details in the Enter Additional Event Details area. You can use
the options in the text editor to format the text.
9. (Optional) If you want an image to display with the event, do the following:
a. In the Display a picture with your event details area, click the link that reads Click
here to upload a picture.
The File Upload Utility window displays.
b. Click Browse, and then browse to and select the image from your computer.
c. Click Upload.
d. In the Display the picture on the... drop-down list, select where in relation to the
event you want the image to display (Left, Right, Top, or Bottom).
10. In the Select the schools which will display this event area, select the schools that
should display the event. (To select all of the schools, click Select All.)
ProgressBook ParentAccess Administration Guide 36Manage Website Content
11. Select the Active checkbox.
12. (Optional) To check the spelling of all of your entries on this screen, click Check Spelling.
13. Click Save.
Update Events
1. On the ParentAccess Administration screen, below Manage Website Content, click
District & School Events.
The Event Search screen displays.
2. (Optional) If you do not see the event you want to update, search for it by entering or
selecting any known information in the School, Start Date, End Date, Status, and
Category fields and/or by entering a partial or full word in the Text field, and then click
Search.
37 ProgressBook ParentAccess Administration GuideManage Website Content
A list of events matching the search criteria you entered displays.
3. Make any needed updates to the event as follows:
• To change the status of the event, in the Active? column, select or deselect the
checkbox, and then click Save.
• To update the event details, click , update any fields on the Event Maintenance
screen, and click Save.
Note: To delete the event, click Delete This Event at the bottom of the screen,
and then click Yes on the Delete an Event window.
Maintain Forms
You can post forms for ParentAccess users by uploading the forms or providing links to existing
forms on other websites. These appear on the News screen in ParentAccess below Forms.
Note: To post a document to appear in ParentAccess in either the main News
area of the News screen or below Information or Links, see “Post News and
Information.”
• For information on posting forms, see “Post Forms.”
• For information on updating forms, see “Update Forms.”
Post Forms
1. On the ParentAccess Administration screen, below Manage Website Content, click
District & School Forms.
ProgressBook ParentAccess Administration Guide 38Manage Website Content
The Form Search screen displays.
2. Click Add a Form.
The Forms Maintenance screen displays.
3. In the Form Name field, enter a name for the form.
4. In the Description & Instructions field, enter a description of the form.
39 ProgressBook ParentAccess Administration GuideManage Website Content
5. In the Setup Your Form area, select one of the following options:
• To upload your own form, click Click here to upload a form.
• To link to an existing form on another website, in the Enter a URL to an existing
form field, enter the full URL (website address) of the form, including http:// (for
example: http://www.progressbook.com/Release-Notes.pdf).
6. (Optional) If you want an icon to display beside the link, do the following:
a. Click Click here to upload an icon.
The File Upload Utility window displays.
b. Click Browse, and then browse to and select the image from your computer.
c. Click Upload.
7. In the Enter the date range to use when posting the form area, enter or select the Start
and End dates during which the link to this form should display.
8. In the Select the schools which will display this form area, select one or more schools
that should display the link to this form in ParentAccess on the News screen below Forms.
(To select all of the schools, click Select All.)
9. In the Status field, select the Active checkbox.
10. (Optional) To check the spelling of all of your entries on this screen, click Check Spelling.
11. Click Save.
ProgressBook ParentAccess Administration Guide 40Manage Website Content
Update Forms
1. On the ParentAccess Administration screen, below Manage Website Content, click
District & School Forms.
The Form Search screen displays.
2. (Optional) If you do not see the form you want to update, search for it by entering or
selecting any known information in the School and Status fields and/or by entering a
partial or full word in the Text field, and then click Search.
41 ProgressBook ParentAccess Administration GuideManage Website Content
A list of forms matching the search criteria you entered displays.
3. Make any needed updates to the form as follows:
• To change the status of the form, in the Active? column, select or deselect the
checkbox, and then click Save.
• To update the form details, click , update any fields on the Forms Maintenance
screen, and click Save.
Note: To delete the form, click Delete This Form at the bottom of the screen,
and then click Yes on the Delete a Form window.
ProgressBook ParentAccess Administration Guide 42Manage Accounts
Manage Accounts
Use the Manage Accounts area of the ParentAccess Administration screen to maintain the
following items:
• Registration keys – See “Maintain Registration Keys”
• ParentAccess accounts – See “Maintain ParentAccess Accounts”
• Imported accounts – See “Import Accounts”
Maintain Registration Keys
If the option is enabled, parents and students can use registration keys to create their accounts.
Parents use a distinct parent registration key for all of their children to create their own parent
account in which they see the information related to all of their children. Students use a student
registration key to create their own student accounts in which they see only their own information.
Note: Creating registration keys is not necessary for student Google OAuth
accounts. Parent accounts always require registration keys.
Note: When you create student accounts via the ParentAccess User Import
screen, any registration keys previously created for that student are deleted.
Note: All parent and student accounts are shared between ParentAccess and the
Frontline ProgressBook Parent & Student app; once the parent or student has
registered an account with either application, they can sign in to the other one with
the same credentials.
This topic explains how to perform the following tasks in GradeBook related to maintaining
ParentAccess registration keys:
• “Generate Registration Keys by School”
• “Generate Individual Registration Keys”
• “Generate Parent Registration Keys”
• “Look Up Registration Keys”
• “Delete Registration Keys by School”
• “Delete Individual Registration Keys”
• “Export Registration Keys” (for parent and/or student letters)
Generate Registration Keys by School
This procedure generates parent and student registration keys (based on school buildings you
choose) for all active students without linked accounts and for whom keys do not already exist.
To generate parent and student registration keys for a single student, see “Generate Individual
Registration Keys.” To generate parent keys for a group of students, see “Generate Parent
Registration Keys.”
43 ProgressBook ParentAccess Administration GuideManage Accounts
1. On the ParentAccess Administration screen, below Manage Accounts, click
Registration Key Maintenance.
The Registration Key Maintenance screen displays.
2. Click the Generate New Keys tab.
3. Select the schools for which you want to generate registration keys, or select All My
Schools to generate keys for all buildings to which you have access.
4. Click Generate Registration Keys.
GradeBook generates keys for the primary contact of all active students in the selected
school(s) without linked accounts and for whom keys do not already exist. Parent keys
begin with the letters “PA” and student keys begin with “SA.”
5. (Optional) To see the generated keys, see “Look Up Registration Keys.”
ProgressBook ParentAccess Administration Guide 44Manage Accounts
Generate Individual Registration Keys
This procedure generates parent and student registration keys for a single student.
To generate parent and student registration keys for all active students for whom keys do not
already exist, see “Generate Registration Keys by School.” To generate parent keys for a group
of students, see “Generate Parent Registration Keys.”
1. On the ParentAccess Administration screen, below Manage Accounts, click
Registration Key Maintenance.
The Registration Key Maintenance screen displays.
2. Search for the student by selecting the School the student attends and/or by entering a
partial or full Student Id and/or Student Last Name, and then click Go.
A list of students matching the search criteria you entered displays.
3. (Optional) To further filter the list of students by enrollment status, for the Select Students
option, click Active, Inactive, or All.
4. In the row of the student for which you want to generate a registration key,
click .
45 ProgressBook ParentAccess Administration GuideManage Accounts
The Student Key Information window opens.
5. You can add registration keys for students or parents:
• To add a student registration key, click Add a Key for Student Use.
The key displays in the Keys for Student Use field.
Note: Because each student is only permitted one account, if you have
already created a student key, you cannot create another.
• To add a parent registration key, click Add a Key for Parent Use.
The Select a Contact window opens.
i. Select the radio button next to the contact for whom you want to generate a key.
ii. Click Generate a Parent Key.
Note: Because each contact is only permitted one account, if you have
already created a parent key for a particular contact, you cannot create
another for that same contact.
ProgressBook ParentAccess Administration Guide 46Manage Accounts
The Select a Contact window closes automatically. The Student Key
Information window displays the newly created registration key(s).
Note: You must reload the Registration Key Maintenance screen before
the newly created keys display.
Generate Parent Registration Keys
This procedure generates parent registration keys for a group of students. The generated keys
are automatically associated with each student’s primary contact, so if you want to generate a
registration key for a non-primary contact for a single student, see “Generate Individual
Registration Keys.” To generate parent (primary contact) and student registration keys for all
active students for whom keys do not already exist, see “Generate Registration Keys by School.”
1. On the ParentAccess Administration screen, below Manage Accounts, click
Registration Key Maintenance.
The Registration Key Maintenance screen displays.
2. Search for the students by entering a full or partial Student Last Name, and then click Go.
A list of students matching the search criteria you entered displays.
3. (Optional) To further filter the list of students by enrollment status, for the Select Students
option, click Active, Inactive, or All.
47 ProgressBook ParentAccess Administration GuideManage Accounts
4. Click Generate Parent Keys for Results.
GradeBook generates one parent key for the primary contact of each student in the search
results (unless a parent registration key or account has already been created for the
student).
Look Up Registration Keys
1. On the ParentAccess Administration screen, below Manage Accounts, click
Registration Key Maintenance.
The Registration Key Maintenance screen displays.
2. Search for the student by selecting the School the student attends and/or by entering a
partial or full Student Id and/or Student Last Name, and then click Go.
A list of students matching the search criteria you entered displays, along with each
student’s registration keys.
ProgressBook ParentAccess Administration Guide 48Manage Accounts
3. (Optional) To further filter the list of students by enrollment status, for the Select Students
option, click Active, Inactive, or All.
Delete Registration Keys by School
This procedure deletes all unused parent and student registration keys by school building. To
delete only select parent and student registration keys, see “Delete Individual Registration Keys.”
1. On the ParentAccess Administration screen, below Manage Accounts, click
Registration Key Maintenance.
The Registration Key Maintenance screen displays.
2. Click the Delete Unused Keys tab.
3. Select the schools for which you want to delete all registration keys, or select All My
Schools to delete all unused registration keys for all buildings to which you have access.
49 ProgressBook ParentAccess Administration GuideManage Accounts
4. Click Delete Unused Registration Keys
A window displays to confirm that you want to delete all unused parent and student
registration keys in the selected schools.
5. Click OK.
Delete Individual Registration Keys
This procedure deletes parent or student registration keys for an individual student. To delete all
unused parent and student registration keys by school, see “Delete Registration Keys by School.”
1. On the ParentAccess Administration screen, below Manage Accounts, click
Registration Key Maintenance.
The Registration Key Maintenance screen displays.
2. Search for the student by selecting the School the student attends and/or by entering a
partial or full Student Id and/or Student Last Name, and then click Go.
A list of students matching the search criteria you entered displays, along with each
student’s registration keys.
3. (Optional) To further filter the list of students by enrollment status, for the Select Students
option, click Active, Inactive, or All.
ProgressBook ParentAccess Administration Guide 50Manage Accounts
4. In the row of the student whose registration key(s) you want to delete, click .
The Student Key Information window opens.
5. Click Delete next to the key you want to delete, or click Delete All Keys to delete all of the
keys for this individual student.
6. On the Confirm Delete window, click Ok.
7. Close the Student Key Information window.
Note: You must reload the Registration Key Maintenance screen to see that
keys have been deleted.
51 ProgressBook ParentAccess Administration GuideManage Accounts
Export Registration Keys
Once you generate ParentAccess registration keys, you can extract the keys along with the
parent/guardian contact information in the system and then merge this information into a letter to
parents explaining how to create their ParentAccess and/or Frontline ProgressBook Parent &
Student app accounts.
1. On the ParentAccess Administration screen, below Manage Accounts, click Export
Registration Keys for Letters.
The Parent Access Export Registration Keys screen displays.
2. Below Select Extract Method, select how you want to extract the keys (By District,
By School, or By Teacher).
3. In the Registration Key Creation Date(s) area, enter the Start Date and End Date range
during which you created the keys. These fields are required with the Start Date defaulting
to a week prior to the current date and the End Date defaulting to the current date.
ProgressBook ParentAccess Administration Guide 52Manage Accounts
4. In the Parent / Student Keys area, select the key type(s) you want to export (Parent Keys
and/or Student Keys).
5. (Optional) To include inactive students in the export, select the Include Inactive Students
checkbox.
6. Depending on your selection in step 2, perform the following additional steps:
• If you selected By District, skip this step.
• If you selected By School, in the Select Schools area, select one or more schools
for which you want to export keys. (To select more than one school, hold down the
CTRL key while making your selections.)
Note: To display inactive schools in the Select Schools multi-select list,
select the Show Inactive School(s) checkbox.
• If you selected By Teacher, in the Select Schools area, select one or more schools
for which you want to export keys, and then in the Select Staff for Extract area,
select one or more staff members for whose students you want to export keys. (To
select more than one school or staff member, hold down the CTRL key while making
your selections.)
7. (Optional) To generate an export file that includes one row per student, with separate
columns for each key, select the Output single row per student checkbox. (The default
output contains a row for each key.)
Note: If more than one address type exists for a student, the row repeats for each
address type.
8. (Optional) To create a file name of your choosing for the export file, enter the desired name
in the Filename field.
9. Click Submit.
10. On your Internet browser’s pop-up window, select whether to open or save the extracted
file.
The file opens in your spreadsheet software or saves to the location you selected.
11. In a word processing application, create a letter to parents explaining how to create their
ParentAccess and/or Frontline ProgressBook Parent & Student app account.
12. Merge the spreadsheet file into the letter file.
Note: For more specific instructions about performing a mail merge, see the help
documentation for the word processing application.
53 ProgressBook ParentAccess Administration GuideYou can also read