Business Line CommPortal Guide - Business Services User Guide - wowbusiness.com
←
→
Page content transcription
If your browser does not render page correctly, please read the page content below
Effective April 21, 2021.

Business Services

Business Line
CommPortal Guide
User Guide

wowbusiness.com
Effective April 21, 2021.

                            Business Line CommPortal Guide Table of Contents
                            Getting Started............................................................................................. 2
                            Home Screen ................................................................................................ 3
                            Account Settings .......................................................................................... 4
                               Personal Details ...................................................................................... 4
                               Security .................................................................................................... 4
                               Support.................................................................................................... 4
                               Change Your Password ......................................................................... 5
                               Change Your Call Service PIN .............................................................. 5
                               Change Your Voicemail PIN ................................................................. 5
                            Messages and Calls ..................................................................................... 6
                               Messages ................................................................................................ 6
                               Missed Calls ............................................................................................ 6
                               Dialed Calls ............................................................................................. 6
                               Received Calls ........................................................................................ 6
                            Contacts ........................................................................................................ 7
                               Contacts .................................................................................................. 7
                               Finding a Contact List Entry .................................................................. 7
                               Extensions ............................................................................................... 8
                               Short Codes ............................................................................................ 9
                            Call Manager .............................................................................................. 10
                               Status: Available ................................................................................... 11
                               Normal Callers ...................................................................................... 12
                               Ring my phones at the same time...................................................... 12
                               Forward to another phone.................................................................. 13
                               Send to voicemail................................................................................. 14
                            Advanced Settings..................................................................................... 15
                               Anonymous Callers .............................................................................. 15
                               Distinctive Ringing ............................................................................... 16
                               Selective Forwarding ........................................................................... 17
                               Unwanted Callers ................................................................................. 18
                               Find Me Follow Me .............................................................................. 19
                               Status: Do Not Disturb ........................................................................ 20
                               Status: Forward All Calls ..................................................................... 21
                            Your Services .............................................................................................. 22
                               Call Settings .......................................................................................... 23
                               Message Settings ................................................................................. 24
                               Mailbox Access..................................................................................... 25
                               Voicemail Greetings ............................................................................ 26
                               Recording a message .......................................................................... 28
                               Notifications .......................................................................................... 30
                               Message Waiting Indicator ................................................................. 30
                               Pager ..................................................................................................... 30
                               Outdial................................................................................................... 31
                               Override ................................................................................................ 31
                               Group Mailbox ..................................................................................... 32
                               Fax to E-mail ......................................................................................... 33
                            Dialer ........................................................................................................... 35
                            Additional Support .................................................................................... 36

                                                                                                                                               1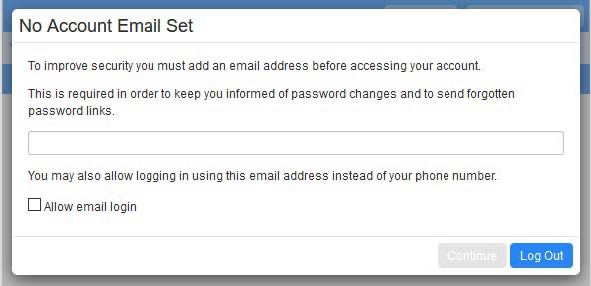
Effective April 21, 2021.
Getting Started
When you go to the WOW! Business Voice Web Portal link (https://voice.wowway.com/wow), the first screen that
appears is your login screen. Enter your email address or telephone number and password.
NOTE – Your initial password is provided by calling WOW! Business support at 888-969-4249 or contacting your
System Administrator.
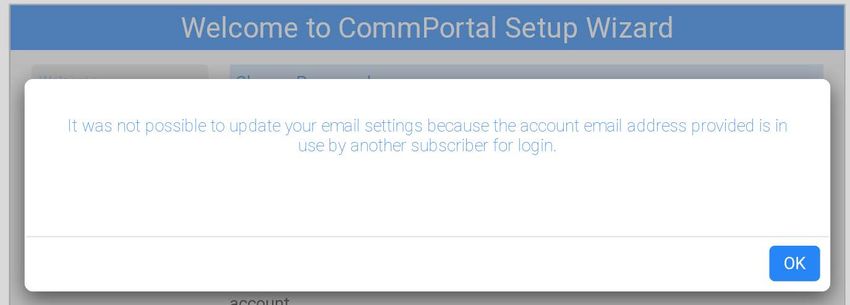
If you are attempting to log in to an existing account without having an account email setup, the following dialog will
display:
If the checkbox for allowing email login is checked but the email entered is currently in use on another account, the
following dialog will display. Only one account for a given email address can be used for the purposes of logging in.
Please note: you will need to change your password. For security reasons, your new password must be 6–10 digits.
For improved security, passwords cannot have a letter or number that repeats three or more times (for example
“AMJ25554”), can only have up to two sequential numbers (for example “AMJ2345”) and the password cannot be
the phone number. To change your Password see the “Account Settings” section below and the subsection “Change
Your Password”.
NOTE: This document shows an account with all features activated. Your actual screens may differ due to the
features assigned to your account.
2
Effective April 21, 2021.

    Home Screen

    The Home Screen is the main view for the web portal. On this page you see the number of voicemails, missed calls,
    contacts and the Call Manager settings. You can also quickly change your status for incoming calls. For more
    advanced incoming call settings, see the Call Manager section of this guide.
    To access help, click View Account Settings in the bottom right of the screen and then click help in the menu.

                                                                                                                        3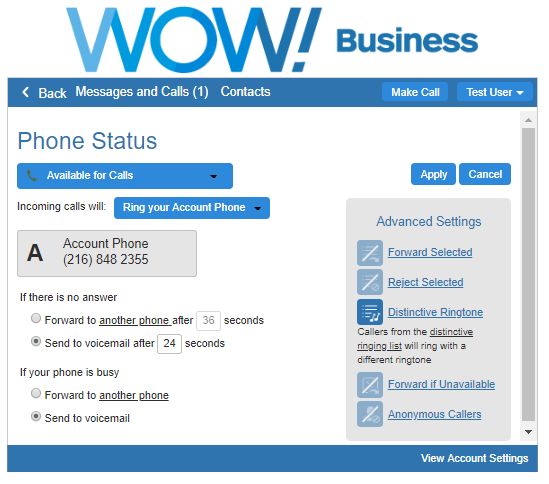
Effective April 21, 2021.

    Account Settings

    Account Settings are accessed by clicking the View Account Settings link in the bottom right corner on the Home
    Screen.

    Personal Details
       • Subscriber name: This is the name that is associated with your Messaging account. It is used in the “From”
         address when you forward a message as an email.

    Security
    The security page allows you to perform the following operations:
       • Change Password
       • Change Call Services PIN
       • Change Voicemail PIN

    Support
    The support page allows you to access help information and send feedback on feature improvements or bugs you
    may encounter using CommPortal.

                                                                                                                      4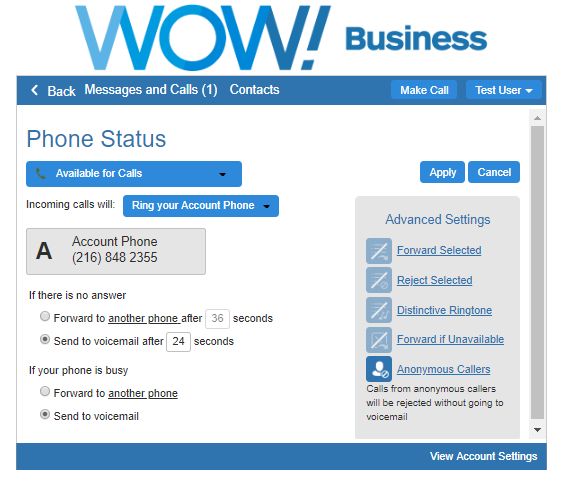
Effective April 21, 2021.

    Change Your Password
    To change your password, enter your current password, enter the new password, and then confirm it by entering it
    again, in the respective boxes. For security, the text will be hidden as you type. Click Confirm to make the change.

     Password requirements:
       •   Must have a minimum length of 8 characters.
       •   A maximum length of 20 characters
       •   Minimum number of numeric digits: 1
       •   Minimum number of special characters: 1
       •   Minimum number of alphabet letters: 1
       •   Max number of times in a row a character can be repeated: 2
       •   Allowable special characters: !”#$%&’()*+,-./:;?@[\]^_`{|}~

    Change your Call Services PIN
    To update your Call Services PIN, update the current PIN field to your chosen value and click Change to make the
    change.

    Change your Voicemail PIN
    To change your Voicemail PIN, update the current PIN field to your chosen value and click Change to make the
    change.

                                                                                                                           5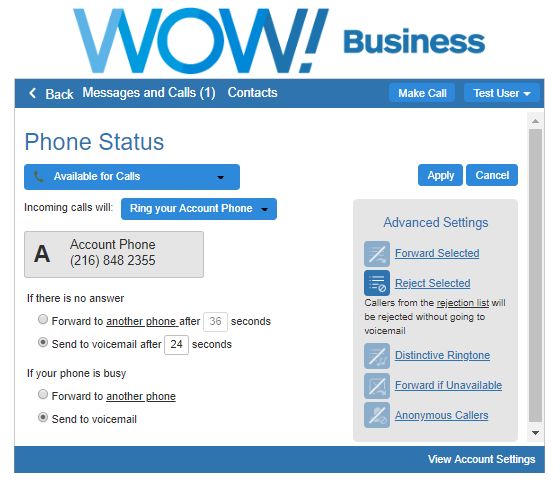
Effective April 21, 2021.

    Messages and Calls

    Messages
    To play a message, click on the        icon to bring up the Voicemail Player. To delete the message, click on the icon
        and click Yes to confirm.

    Missed Calls
    This tab lists your recent missed calls. To add an unrecognized caller to your contact list, click on the number and
    select “Add to contacts” from the menu.

    Dialed Calls
    This tab lists your recent dialed calls. To add a dialed number to your contact list, click on the number and select
    “Add to contacts” from the menu. To go to a contact’s entry in your contact list, click on their name and select “View
    contact” from the menu.

    Received Calls
    This tab lists your recent received calls.

                                                                                                                             6
Effective April 21, 2021.

    Contacts

    Contacts
    To add a new contact to the list, click the New Contact button below the contact list column. Once you have finished
    entering the details for the new contact, click the Save button to submit your changes. If you wish to discard the new
    entry, click Cancel. To import contacts, contacts must be in a CSV file format.

    Finding a Contact List Entry
    There are multiple ways of finding an existing contact list entry.
       • Alphabetically by name. Scroll through the names in the contact list column, and click on the one you want to
         view the details of.

       • Searching by name. To search by name type the first few letters of any component of the name into the search
         box at the top of the contact list column. Matching proceeds as you type, and the more you type, the more
         constrained the list of matches is. Matching is performed against contacts’ first and last names, and also against
         various other text fields within the contact.

       • Searching by number. To search for a contact by number type the first few digits of one of their telephone
         numbers into the search box.

                                                                                                                              7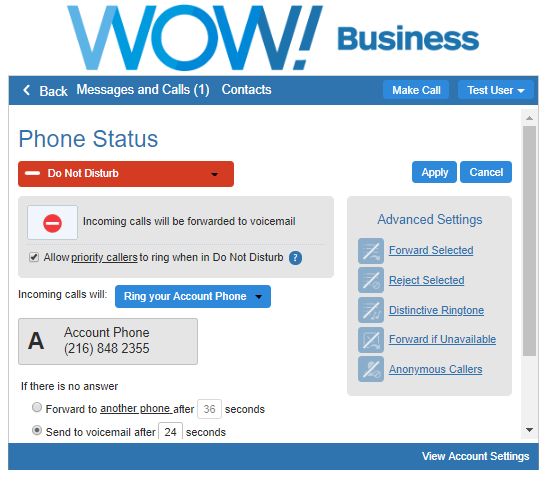
Effective April 21, 2021.

    Extensions
    Extensions allow you to quickly dial other numbers in your Business Group. A Business Group contains all the phone
    numbers provisioned to this account by WOW! Business. You can search by typing in the search box above the
    table. The list will be restricted to those items that match.

                                                                                                                         8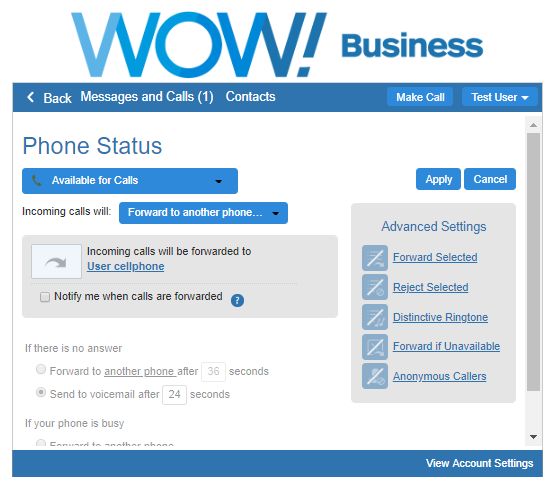
Effective April 21, 2021.

    Short Codes
    Short codes allow you to quickly dial common numbers. You can search by typing in the search box above the table.
    The list will be restricted to those items that match.

                                                                                                                        9
Effective April 21, 2021.
Call Manager
Call Manager is accessed by clicking on the Open Call Manager button on the Home Screen.
Call Manager allows you to change your status between:
• Available
• Do Not Disturb which will send all your calls immediately to Voicemail.
You can also define how different callers can reach you depending on whether they are:
• Anonymous callers
• Priority contacts
• Unwanted - Barred contacts
10Effective April 21, 2021.
Status: Available
This is your default status. Incoming calls will ring to your phone. You can also choose to:
• Ring your phones in order
• Ring your phones together
• Forward to another phone
11Effective April 21, 2021.
Normal Callers
Ring my phones at the same time
You can choose to have multiple phones ring at once so that you can be reached on any of your phones when you
receive a call.
1. Select the Ring your phones together option from the Incoming Call drop down box.
2. To add more phone numbers to this list, click the + symbol below your current account number. Be sure to add
a “9” before the number if your service has been set up to require a 9 for an outside line. Also add a “1” after the
“9” if the number added is considered to be “Long Distance” from your calling area.
3. In the Select Forwarding Number window, enter additional names and numbers in the boxes provided. Click X
to delete any that you no longer want.
4. Click OK.
5. Click Apply to save changes.
12Effective April 21, 2021.
Forward to another phone
You can choose to forward calls to a particular number when you are unable to answer, if your line is busy, or if your
line is unavailable. To forward calls that come in while you are unable to answer.
1. Select the Forward to another phone radio button.
2. Set the timer to determine how many rings will occur before a call is forwarded (5 seconds = 1 ring).
3. Click the “another phone” link.
4. You will now see the Select Forwarding dialog box. Click on a saved number from the list or enter a temporary
number that you want to forward your calls to.
5. Click OK.
6. Click Apply to save changes.
To enable the Delayed Call Forwarding feature directly from your phone, dial *92. To disable, dial *93.
To forward calls that come in while your phone is busy.
1. Select the Forward to another phone radio button.
2. Click the “another phone” link.
3. You will now see the Select Forwarding dialog box. Click on a saved number from the list or enter a temporary
number that you want to forward your calls to.
4. Click OK.
5. Click Apply to save changes.
To enable the Busy Call Forwarding feature directly from your phone, dial *90. To disable, dial *91.
13Effective April 21, 2021.
Send to voicemail
You can choose to send calls to voicemail when you are unable to answer or your line is busy.
To send calls to voicemail when you are unable to answer,
1. Select the Send to voicemail radio button.
2. Set the timer to determine how many rings will occur (5 seconds = 1 ring).
3. Click Apply to save changes.
To send calls to voicemail when your line is already busy,
1. Select the Send to voicemail radio button.
2. Click Apply to save changes.
14Effective April 21, 2021.
Advanced Settings
Anonymous Callers
You can choose to direct calls differently when the caller’s identity is unknown or withheld.
1. From the Call Manager tab, click on the Advanced Settings arrow to display additional features.
2. Click on the Anonymous Callers option.
3. Click Apply to save changes.
To enable the Anonymous Call Rejection feature directly from your phone, dial *77. To disable, dial *87.
15Effective April 21, 2021.
Distinctive Ringing
To enable a distinctive ring tone for incoming calls from selected numbers,
1. From the Call Manager tab, click on the Advanced Settings arrow to display additional features.
2. Click on Distinctive Ringtone.
3. Click on the distinctive ringing list option.
4. The Distinctive Ringtone Screening list will appear. Enter a 10-digit phone number to utilize the distinct tone
and click on Add New.
5. Click OK.
6. Click Apply to save changes.
To enable or disable the Distinctive Ringing feature directly from your phone, dial *61 or *81.
16Effective April 21, 2021.
Selective Forwarding
You can choose to forward calls from a select list to a different line than Normal callers.
1. From the Call Manager tab, click on the Advanced Settings arrow to display additional features.
2. Click on Forward Selected.
3. Click on the forwarding list option.
4. The Selective Call Forwarding Screening List will appear. Enter a 10-digit phone number to be forwarded and
click on Add New, and then click OK.
5. Now from the Advanced Settings tab, click on the “another phone” option.
6. Click on a saved number from the Select Forwarding Number list or enter a temporary number that you want to
forward these calls to.
7. Click OK.
8. Click Apply to save changes.
To enable the Selective Call Forwarding feature directly from your phone, dial *63. To disable, dial *83.
17Effective April 21, 2021.
Unwanted Callers
You can choose to reject calls from unwanted callers without sending them to voicemail.
1. From the Call Manager tab, click on the Advanced Settings arrow to display additional features.
2. Click on Reject Selected.
3. Click on the rejection list option.
4. The Selective Call Rejection Screening List will appear. Enter a 10-digit phone number to be rejected and click
on Add New.
5. Click OK.
6. Click Apply to save changes.
To enable or disable the Selective Call Rejection feature directly from your phone, dial *60 or *80.
18Effective April 21, 2021.
Find Me Follow Me
You can choose to have calls attempt to reach several different numbers in sequence.
1. Select the Ring your phones in order option from the Incoming Call drop down box.
2. Click on the Add phones here box to select the order in which the phones will ring.
3. Enter a 10-digit phone number and name for the line, and then click on Add.
4. Click OK.
5. Add additional numbers by clicking the + box.
6. Adjust ring timers.
7. Click Apply to save changes.
19Effective April 21, 2021.
Status: Do Not Disturb
1. From the main Call Manager screen, click the Available for Calls tab.
2. Select the Do Not Disturb option from the drop down box.
3. Click on Apply to save changes.
To enable the Do Not Disturb feature directly from your phone, dial *78. To disable, dial *79.
To allow priority callers to reach your line while in Do Not Disturb mode,
1. From the main Call Manager screen, click the Available for Calls tab.
2. Select the Do Not Disturb option from the drop down box.
3. Click on the check box next to Allow priority callers to ring in Do Not Disturb.
4. Click on the “priority callers” option.
5. In the Priority Callers Screening List window, enter a 10-digit phone number allowed to ring through, and click
on Add New.
6. Click on OK.
7. Click on Apply to save changes.
To enable the Selective Call Acceptance feature directly from your phone, dial *64. To disable, dial *84.
20Effective April 21, 2021.
Status: Forward All Calls
You can use the Call Manager tab to unconditionally forward all your calls to another number.
1. Select the Forward to another phone option from the Incoming Call drop down box.
2. Click on the Incoming calls will be forwarded to option to open the Select Forwarding Number window.
3. Click on a saved number from the list or enter a temporary number to forward calls to.
4. Click OK.
5. Click Apply to save changes.
To enable the Unconditional Call Forwarding feature directly from your phone, dial *72. To disable, dial *73.
21Effective April 21, 2021.
Your Services
The options presented will reflect the services that you have subscribed to. No changes that you make on these
pages will be applied until you press the Apply button.
22Effective April 21, 2021.
Call Settings
Clicking the Call Settings button will provide access to a number of settings that you are unlikely to need to change
on a regular basis.
General: This provides you with options to manage inbound and outbound Caller ID.
Call Forwarding: This provides you with options to be prompted for a forwarding number when forwarding is
turned on using an access code.
Call Blocking: This provides you with options for blocking the line from making specific types of calls.
23Effective April 21, 2021.
Message Settings
General
You can select to forward all your received voicemails to the email account you enter. When doing this forwarding,
you have the choice of leaving the messages so you can still access them here, or deleting them. Should you check
the box for “Leave Original in Inbox”, your voicemail box may become full and you will need to manually delete
some messages before you receive any additional voice mail messages. The best practice is to not check this box.
24Effective April 21, 2021.
Mailbox Access
These settings allow you to customize your experience when accessing your mailbox via the telephone.
• Fast Login. Generally when you dial into your mailbox you are asked to enter both your phone number and PIN.
However, if Fast Login is enabled, then when accessing your mailbox from your own telephone, your phone
number is recognized automatically and you only need to enter your PIN.
• Skip PIN. If Skip PIN is enabled, then when accessing your mailbox from your own telephone you are not
required to enter your PIN. This saves you time, but reduces security as anybody with access to your telephone
can then access your mailbox.
• Auto-Play Voicemail. If auto-play is enabled, then when you log into your mailbox, instead of hearing the main
menu your messages will start playing immediately.
• Voicemail Playback. When your messages are played to you, you can choose whether you wish to hear the
message details (who the message is from and when it was left), the message itself, or both.
25Effective April 21, 2021.
Voicemail Greeting
The Voicemail Greeting options allow you to configure which greeting will be played to callers who reach your
voicemail. You can choose to either use a standard system greeting, record or upload and use a personal message
of your choice.
As well as defining the default greeting that you wish callers to hear, you can also
• Configure alternative greetings to be played outside business hours.
• Choose to play an extended absence greeting, and optionally prevent callers from leaving messages while you
are away.
• Choose to play a different greeting when a caller comes from within your business group.
After making any changes in the Voicemail Greeting panel you must press Apply to apply them.
26Effective April 21, 2021.
Setting your default greeting
For your default greeting, you should select a greeting from the list of available greetings in the dropdown box. The
list of greetings includes the following standard system greetings.
• • System - this plays the normal system greeting, with no identifying information.
• • System with Number - this plays the normal system greeting, including your phone number.
• • System with Name - this plays the normal system greeting, but includes your recorded name.
You can also choose to use a greeting where you can record or upload a personal message. Greetings that already
have a recording will be marked with a * beside the name in the list. You can choose to re-record or upload a
greeting if you wish by selecting it as your chosen greeting and clicking edit. Greetings that do not yet have a
recording will display the record link that you can click to launch the Greeting Recorder popup. See message
recording.
Once you have chosen, and if necessary recorded or uploaded, your voicemail greeting, expand the more options
link to configure additional settings. These options will vary depending on the greeting that you are using.
For system and personal greetings, you can choose to do one of the following:
• Play a different message outside of business hours. Use the record or edit link to create the greeting that will
played instead of your default greeting when a caller is put through to voicemail because of the time of day that
they are calling. You can configure your business hours by dialing into your mailbox.
• Play a different message when the caller is a colleague in your business group. Use the record or edit link to
create the greeting that will be played when one of your Business Group colleagues is put through to your
voicemail.
Configure an extended absence greeting
If you are going to be away for an extended period, you can choose to use an extended absence greeting as your
default greeting. If you have not already recorded or uploaded the message, you will see a record link alongside the
message selection box. Click this link to launch the Greeting Recorder and record or upload your message.
When you are using an extended absence greeting as your default greeting, you can use the more options link to
• Choose whether or not callers can leave you a message by clicking the “Allow callers to leave a message”
checkbox. If you do not select this option then callers will be prevented from leaving you messages while you
are absent. You may wish to do this to avoid your mailbox filling up while you are away.
• Play a different message to colleagues in your business group when you have selected the “Extended Absence”
greeting, by clicking the checkbox. Use the record or edit link to create the greeting that these callers will hear.
Use same greeting as primary telephone number
If you wish to use the same greeting as your primary telephone number, simply select “Same as primary” as your
default greeting.
Download Greetings
To download a greeting, click the Download Greeting button, displayed in the greeting recorder, right below the
recording buttons. Note that the download button will only be displayed if the greeting is already recorded and
saved.
27Effective April 21, 2021.
Recording a message
A number of controls are provided for recording your message.
• Starts recording. This will overwrite any message you have previously recorded.
• Stops recording the message.
• Plays back your recorded message. This action will be unavailable if you have not yet recorded a message.
• Stops playing the message.
• This control allows you to adjust the gain of your microphone. Click and then adjust the slider to set the
required volume level. While recording, the lights above this control will show how loud the
signal is from your microphone. If the gain is set correctly then several green lights should appear while you are
recording. If only one or two appear, then the gain is set too low and your message will be too quiet. If red lights
appear then the gain is set too high and your message will be distorted.
• This control allows you to adjust the playback volume. Click and then adjust the slider to set the required
volume level.
• This control allows you to view and change your Adobe Flash Player Settings, for example to adjust the
settings for your microphone.
When you first attempt to record a message, an “Adobe Flash Player Settings” overlay will appear. Ensure that the
“Allow” radio button is selected, and if you do not wish to be shown these settings in future tick the “Remember”
checkbox.
To record a message you need to carry out the following steps.
• When you are ready to record your message, press the button.
• Read your message into your microphone, and when you have finished, press the button.
• Playback your message to check that it has recorded correctly by pressing the button. If you want to stop the
playback, press . If there is a problem with the recording, e.g. you cannot hear it, or it is very quiet, see the
section on troubleshooting below.
• If you are not happy with your message content, then record a new message by pressing the record button
again. This will overwrite your previous message.
28Effective April 21, 2021.
Troubleshooting
I have recorded my message, but when I try to play it back I cannot hear anything.
• Check if you have actually recorded something. The length of the current recording is shown as e.g. 0:01:35 (1
minute and 35 seconds). If the current recording length is 0 or much lower than expected then try recording
your message again.
• Check that playback volume is turned up high enough. Volume can be adjusted using the volume slider
described above.
• Try re-recording the message, and as you are recording, watch the lights on the player.
– If no lights appear, or only one or two appear, then check the following.
Increase the gain of your microphone by clicking and moving the gain control nearer to the top end.
If you are using an external microphone, check that this is plugged in correctly.
If this still doesn’t solve the problem, then it may be that your microphone has been muted by the operating
system (e.g. Windows) - refer to your operating system help for further information.
• If several green lights appear consistently while recording your message, then it is likely that your message has
recorded correctly and the problem is occurring when playing it back. If you are using external speakers, check
that these are plugged in correctly and turned on. If this does not resolve the problem, then it may be that your
speaker has been muted by the operating system (e.g. Windows) - refer to your operating system help for
further information.
I have recorded my message, but when I try to play it back it is distorted.
This may be because your microphone gain is set too high. Reduce the gain by clicking and moving the gain
control nearer to the bottom.
29Effective April 21, 2021.
Notifications
Message Waiting Indicator
You can use this panel to specify your other phones whose message waiting indications should be triggered when
messages are received, and which types of messages cause the indication.
• To add another of your phones to the list, press New Entry. You are prompted for a phone number — this should
be the number of another phone you own under the same account as this one; you cannot trigger indicators on
arbitrary other phones.
• To change the types of messages that trigger the notification use the checkboxes.
• To delete a phone from the list, press the icon.
• To clear the entire list, use the Clear List button.
If the shows, these notifications are enabled. Clicking this will switch between the enabled and disabled
states.
You must press the Apply button for any of your changes to take effect.
Pager
If this is part of your service, this feature enables you to configure the voicemail system to page you when you
receive a new message. You can choose whether you want to be paged every time you receive a message, or only
when you receive a certain type of message, for example, an urgent voicemail.
If the shows, pager notifications are enabled. Clicking this will switch between the enabled and disabled
states.
If you wish, you can prevent pager notifications being generated at certain times, or on certain days by configuring a
notification schedule.
To configure a new pager to receive notifications, press the New Entry button. You will then need to configure
information about your pager, and the type of notifications you want to be generated.
First you must configure whether you use a telephone or email pager gateway. If people page you by sending an
email then you should select email. Otherwise you should select telephone.
Once you’ve configured your new pager, press Add to add it to your notification list, and return to the main
configuration screen. Note: your new configuration will not actually be saved until you subsequently click the Apply
button to commit your changes. To remove a pager from your notification list, press the icon.
You must press the Apply button for any of your changes to take effect.
30Effective April 21, 2021.
Outdial
If this is part of your service, this feature enables you to configure the voicemail system to call you whenever you
receive a new message. You can choose whether you want to be called every time you receive a message, or only
when you receive a certain type of message, for example, an urgent voicemail.
If the shows, outdial notifications are enabled. Clicking this will switch between the enabled and disabled
states. If you wish, you can prevent outdial notifications being generated at certain times, or on certain days by
configuring a notification schedule.
To configure outdial notifications — enable the service by clicking to make it
• Enter the phone number you wish to be called on when a new message is received.
• Select which types of messages you wish to be notified about.
• If you want to be notified immediately, select Immediate in the Delay for normal messages or Delay for urgent
messages dropdown.
• If you only want to be notified after a delay, select the delay in hours in this dropdown.
You can also choose how many times you wish to be called for each new message.
• If you want to just be called once, set Number of outdial retry attempts to zero.
• If you want to be called repeatedly until either you answer the call or until you have actually read the new
message.
• Select either Stop retries when you answer the call or Stop retries only when the message has been read.
• Configure the maximum number of times you want the call to be retried.
• Configure how long you want the system to wait between retries.
You must press the Apply button for any of your changes to take effect.
Override
If this is part of your service, this feature enables you to configure the voicemail system to notify you differently for a
period of time. For example, while you are on vacation, you might only want to be notified of urgent messages and
you might want to be notified in a different way from normal. Or, if you are normally notified by outdial, you might
prefer to be notified by pager instead.
To override your normal notifications, enable the service by clicking to make it .
If you wish, configure a notification schedule, so that notifications are only generated at certain times or on certain
days.
• Choose whether you want to be notified by pager or outdial.
• Specify when your notifications should reset back to normal by clicking the icon and choosing from the
calendar, or by typing in the month, day and year fields.
• Configure your pager notification or outdial notification as usual in the fields in this view.
You must press the Apply button for any of your changes to take effect.
31Effective April 21, 2021.
Group Mailbox
The Group Mailbox tab allows you to administer your group mailboxes, and create new ones.
For each group mailbox, you can configure the following properties.
• Whether the secondary mailbox is currently enabled. If you disable a mailbox, then it is not possible to either
leave messages in it, or retrieve messages from it. However all settings and content will be maintained, and you
can re-enable the mailbox whenever you wish.
• The name of the mailbox user. This name is used, for example, when the user of the mailbox forwards a message
as an email (the name is used to identify the user in the “From” field of the email).
• The mailbox PIN. This is the PIN used when dialing in to this mailbox, and when logging into the Web UI.
Password. This is the password used when logging into the Web UI as this mailbox.
• MWI aggregation. If you enable MWI aggregation for a secondary mailbox, then any MWI notifications
configured for your primary mailbox will also be triggered by messages left in this secondary mailbox. This is
useful if, say, you share a single physical telephone with the user of the secondary account - enabling this feature
means that the MWI indicator on the telephone will light if either of you have new messages.
• Message count aggregation. If you enable Message count aggregation for a secondary mailbox, then when you
access your primary mailbox by dialing in from a telephone you are told both how many new and saved
messages you have in your primary mailbox, and also how many you have in this secondary mailbox.
To add a new group mailbox, press the New Mailbox button. Once you have created a new secondary mailbox, you
should login as the mailbox user, and record the user’s name and personal greeting. You can either do this by
dialing into the mailbox from your handset, or by recording your “system with name” and “personal” greetings on
the greetings tab on this page.
To delete an existing group mailbox, press the icon. Warning: deleting a group mailbox is an irreversible
operation that will result in the loss of all messages and configuration associated with that mailbox.
32Effective April 21, 2021.
Fax to E-mail
To configure fax forwarding to an e-mail account, go to the Settings tab, then select Messages. Click on “add an
email address” to define that e-mail address that you would like your faxes forwarded to.
Optionally, you may choose to have your faxes delivered to your messaging in-box as shown below.
This tab lists all of the faxes in your inbox. New faxes (those you have not yet read) appear in bold type.
For each fax in your inbox, you can see who sent the message, when the message was received, and how many
pages the message contains. If the fax has been sent from a telephone number that appears in your contact list or
the sender’s name was provided, then the name of the sender will be displayed. Otherwise, you will just see the
number that the fax was sent from.
Your inbox may also contain special System Messages, such as delivery failure reports.
The following actions are available to you on this tab.
• View a fax or save a local copy on your computer
• Manage your faxes by deleting them, or marking them as either new or read
• Forward a fax
• View contact details or add new callers to your contact list.
View or save a fax
• To read a fax, click on the icon corresponding to the fax you wish to view.
• To save a local copy of a fax on your computer, right click on the icon, and select Save Target As... or
Save Link As...
• To download a free PDF reader, click here.
Manage your faxes
• To delete a fax, press in the row corresponding to the fax that you want to erase. To delete all faxes, press
Delete All.
• Faxes are automatically marked as read to when you play them. To mark a fax you have previously read as new
(so that it appears in bold again), click the icon in the row corresponding to that fax and select “Mark as new” in
the dropdown menu that appears.
• Similarly, to mark a fax as read without viewing it, click the icon in the row corresponding to that fax and select
“Mark as read” in the dropdown menu that appears.
Forward a fax
If you wish, you can forward a fax as an email to one or more email addresses (the fax will be attached to the email as
a PDF file). Alternatively, if you wish to forward a fax to another user (or users) on the same messaging system, you
can forward the message as a fax so that it appears in their fax inbox.
To forward a fax as an email:
• Click the icon corresponding to the message you wish to forward, and select Forward as Email to bring up the
Forward as Email overlay.
• Enter one or more recipients in the “To” field. If the recipient is configured in your contact list, then you can
identify them by name. Otherwise you must enter their complete email address. You can specify multiple
recipients by separating them with semicolons.
33Effective April 21, 2021.
• The Forward as Email overlay also allows you to optionally
– Specify additional recipients in the Cc or Bcc fields
– Adjust the subject line of the email message
– Add text to be included along with the fax attachment.
• When you are done, press the Send button to send the message.
Note: when forwarding a message as an email, the “From” address specified will include your name as configured
on the settings page.
To forward a fax to one or more other users on the same messaging system:
• Click the icon corresponding to the fax you wish to forward, and select Forward as Fax to bring up the Forward
as Fax overlay.
• Enter one or more recipients in the “To” field. The recipients specified must be other users on the same
messaging system, or the attempt to send the message will fail. If a recipient is configured in your contact list,
then you can identify them by name, otherwise you must enter their fax number directly. You can specify
multiple recipients by separating them with semicolons.
• You can optionally flag the fax as Urgent.
• When you are done, press the Send button to send the fax.
View contact details or add new callers to your contact list
• If a fax has been sent from a telephone number that appears in your contact list, then the name of the sender will
be displayed. To view your contact list entry for the sender, click on their name and select “View contact”.
• Otherwise you will just see the telephone number that the fax was sent from. In this case, you can create a
contact list entry for the sender by clicking on their number, and selecting “Add to contacts”.
34Effective April 21, 2021.
Dialer
CommPortal includes a dialer function to allow users to dial using the application. It can be accessed by pressing the
“Make Call” button next to your phone number.
The CommPortal dialer will initiate a call from your phone by default. You can also choose to have the dialer initiate
a call from another phone. Within the dialer, simply click on the “Change” link, then, “Enter a New Number.” When
complete, click “Dial” to begin your call.
NOTE: Regardless of the number used, the outbound caller ID will still appear as your primary phone number.
35Effective April 21, 2021.
Additional Support
Additional user guides and tutorials to assist you with your WOW! Business services can be found at
wowforbusiness.com/support.
36You can also read