Partner Portal User Guide - San Diego Workforce Partnership
←
→
Page content transcription
If your browser does not render page correctly, please read the page content below
Partner Portal User Guide

Introduction
Welcome to the Partner Portal! This is a community of partners, hosted by the San
Diego Workforce Partnership, that is open to members of the business services
collaborative and other selected partners who share the goal of connecting job seekers
with employers in the Southern Border Region of San Diego. Here are some key
functions of the Partner Portal:
    1. Share job postings.
    2. Refer candidates to jobs.
    3. Share events and track RSVP and attendance.
    4. Collaborate with partners on areas such as resources, best practices, and
       employer engagement.

These functions allow us to improve our efficiency in the following ways:
   1. Access a larger candidate pool.
   2. Move from email communications to structured referral processes that promote
      better visibility and collaboration.
   3. Track referrals and outcomes at the individual and team level.
   4. Increase market penetration as we spend less time engaging the same
      employers and gain better insights into our current trends in industries and
      populations served as a collective group.

The following materials will serve as a guide to help you navigate this new system, so
please feel free to use this as reference. If you have a question about a business
process, we encourage you to ask a question on the community (see the Support
section) so that others in the community who may have the same question can benefit
from the answers you receive. If you have a technical error and would like to contact our
Salesforce support team, please feel free to either submit a support ticket (see the
Support section) or email SalesforceSupport@workforce.org.
Table of Contents
Introduction ................................................................................................................................ 1
Getting Started ........................................................................................................................... 1
Jobs ........................................................................................................................................... 2
   Viewing Open Jobs................................................................................................................. 2
   My Jobs .................................................................................................................................. 3
   Open Jobs .............................................................................................................................. 4
      Search Jobs ........................................................................................................................ 5
      Filter Jobs ........................................................................................................................... 5
   Creating New Job Records ..................................................................................................... 6
      Job Fields ........................................................................................................................... 7
   Viewing Job Details ................................................................................................................ 9
Matches ....................................................................................................................................11
   Refer Your Candidate to a Job ..............................................................................................12
   Match Process.......................................................................................................................13
      Approval Actions ................................................................................................................13
   Email Notifications .................................................................................................................15
      Managing Your Pending Approval Requests ......................................................................15
Contact Management ................................................................................................................16
   Case Management ................................................................................................................16
Events .......................................................................................................................................20
Chatter ......................................................................................................................................21
   Feed Types ...........................................................................................................................21
      Tags...................................................................................................................................23
      Chatter Discussion groups .................................................................................................24
   Topics....................................................................................................................................26
      Chatter Topics ...................................................................................................................26
      Record Topics....................................................................................................................27
   Direct Messaging ...................................................................................................................28
Support .....................................................................................................................................29
   Business Support - Discussion Questions .............................................................................29
   Technical Support - Support Tickets ......................................................................................29
   Global Search........................................................................................................................31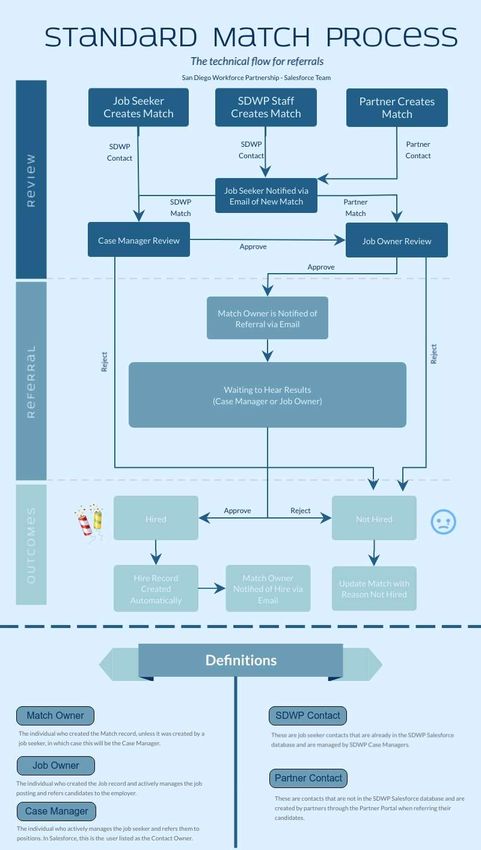
Partner Portal User Guide

Getting Started
In order to log in to the Partner Portal, please navigate to https://sdwp-
jobs.force.com/Partner/. You will enter your username and password and click the Log
in button to access the site.

If you do not currently have login credentials, please click the link that says Need an
account? Request one here! This will submit a request for an account to the San
Diego Workforce Partnership for review, which should be completed within 10 business
days. If you have not received instructions on next steps for accessing the Partner
Portal after this time, please contact Business@workforce.org to verify the status of
your request.

If you forget your password, you can click the Forgot your password? link to have
Salesforce send you a self-service link to reset your password. If you do not receive this
email within 10 minutes of submitting the request for a reset link, then you either do not
have an active account or there is a technical error. For help troubleshooting this error,
please email technical support at SalesforceSupport@workforce.org and describe the
issue you are experiencing.

                                            1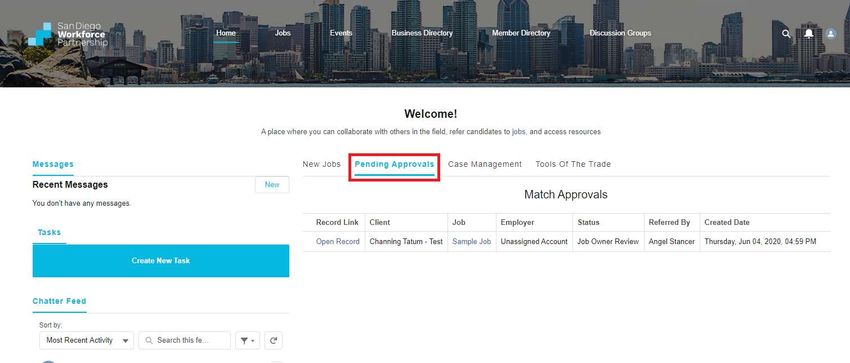
Partner Portal User Guide

Jobs
Viewing Open Jobs
In order to create or view Jobs on the Partner Portal, you must navigate to the Jobs tab
using the navigation menu.

Once you have navigated to the Jobs page, the first tab, Jobs, will be selected by
default. In this tab you will see:
   1. My Jobs – A list of jobs you have created. At the top-right corner of this list is the
      Create New Job button, which you can click to create new job listings.
   2. Open Jobs – A list of jobs that have been posted by partners and are accepting
      applications for referral.

                                             2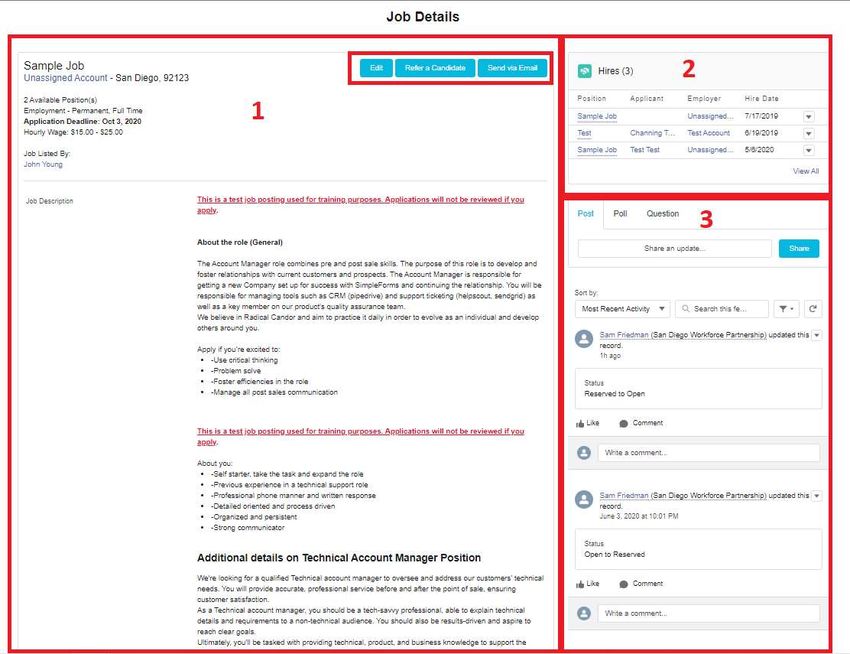
Partner Portal User Guide
My Jobs
In the My Jobs list, you will see Job listings you have personally created. This list has
the following columns:
Position – title of the job and a link to the job listing details.
Employer
Type – description of the nature of employment. Options are:
o Employment (sometimes AKA regular employment)
o Apprenticeship
o Independent Contractor (1099)
o Internship-Paid
o Internship-Unpaid
o Externship
o Undisclosed
City
Zip code
# Matches – this is the total number of candidates who have been referred to this
position in the Partner Portal.
Date Posted – this is the date that the job listing was created.
Please Note: If the My Jobs list is empty, then that means you have not yet created any
job records.
3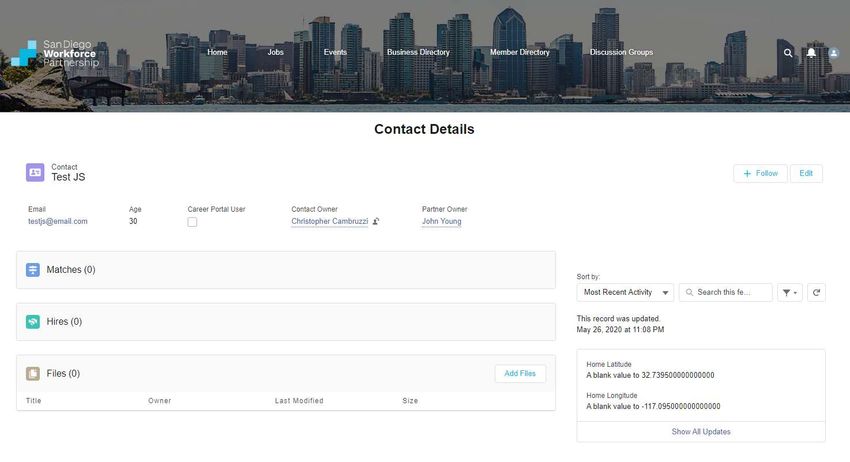
Partner Portal User Guide
Open Jobs
In the Open Jobs list, you will see Job listings that have been created by Partner Portal
members (including yourself) that have a status of Open, meaning that they are
available for partners to refer their candidates to. This list has the following columns:
Position – title of the job and a link to the job listing details.
Employer
Type – description of the nature of employment. Options are:
o Employment (sometimes AKA regular employment)
o Apprenticeship
o Independent Contractor (1099)
o Internship-Paid
o Internship-Unpaid
o Externship
o Undisclosed
Work Schedule – whether the job is full time, part time, or both.
City
Zip code
Current Openings – this is the maximum number of candidates that can be hired
for the listed job.
Date Posted – this is the date that the job listing was created.
4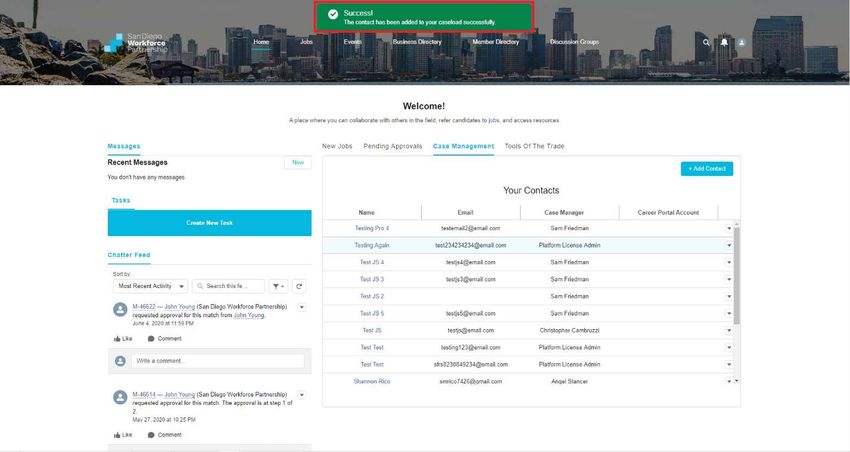
Partner Portal User Guide
Search Jobs
In order to search for a job record, you can use the search bar at the top of the Open
Jobs list. Simply enter a job title, employer name, zip code, or any other information
available on the job record and hit enter to get a list of matching records.
In order to clear the search results, click on the Clear Search link beneath the search
bar.
Filter Jobs
In addition to searching the Open Jobs list for key terms, you can also filter the list based
on:
Work Schedule – using this filter returns all results that include what you enter (i.e.
if you select “Full Time,” it will return jobs that are listed as either “Full Time” or
“Full Time and Part Time.”
o Full Time
o Part Time
City – results will include any job listing where the City field contains what you enter
(i.e. if you enter “Vista” as your city filter, it will return results for both Vista and
Chula Vista).
Note: You can use a combination of the search bar and any of the filters, and all that are
selected will be applied.
5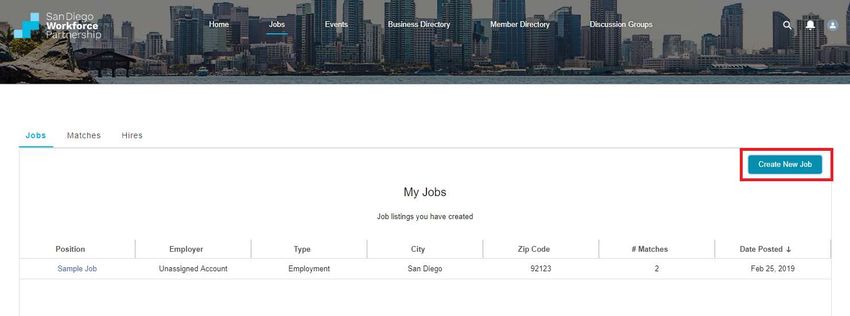
Partner Portal User Guide

Creating New Job Records

In order to create a new Job record, navigate to the Jobs page. Click on the button
labeled Create New Job at the top right of My Jobs list, as shown below.

Once you click the button, a window will open that allows you to enter information to
create a new job listing. Required fields are marked with a red asterisk (*) to the left of
the field name, as show in the image below. It is important that you follow our
guidelines during this process. Once you are finished entering your job details, click
Save.

                                             6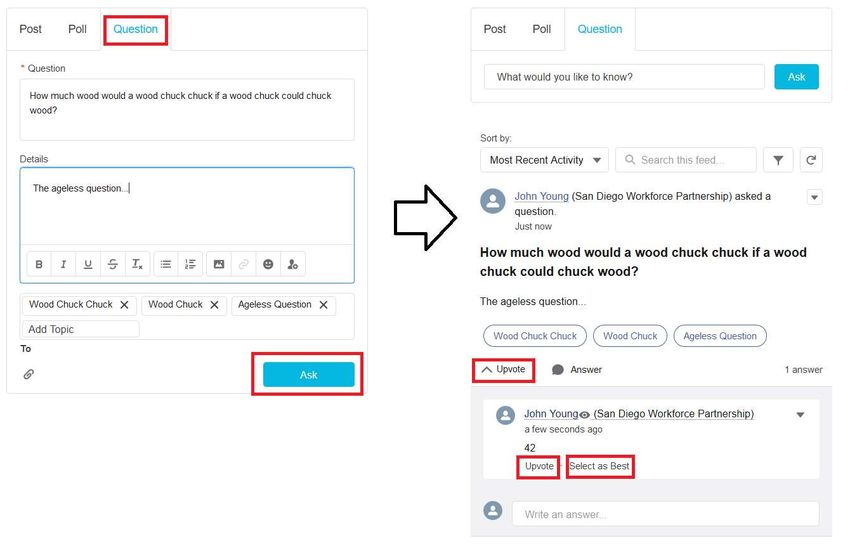
Partner Portal User Guide

Job Fields

The fields that you are required to fill in order to save a new job listing are:
   1. Information
          a. Job Title
          b. Account (AKA employer)
                  i. Note: Try searching our database for existing businesses!
                 ii. If unable to find a matching employer in our database, then click on
                     “+ New Account” to create a new employer record.
          c. Total Openings
                  i. This is the maximum number of candidates that can be hired for
                     this job.
          d. Application Deadline
                  i. This is the last day that partners have to refer their candidates
                     before the job listing is automatically removed from the list of
                     Open Jobs on the Partner Portal.
          e. Status
                  i. Reserved – The job is reserved to only be shown to partners who
                     work at the same organization as the individual who created the job
                     listing, and it is only shown to job seekers in the Career Portal who
                     are managed by an individual at that organization.
                          1. This status will automatically be selected if any value is
                              selected in the field below, Reserve for My Organization.
                 ii. Open – The job is available for partners to refer their candidates to,
                     and if Show in Portals is checked, this job will be visible to all
                     members of both the Partner Portal and the Career Portal.
                iii. Closed – The job is not available for partners to refer their
                     candidates to and will not be seen in the Partner Portal or Career
                     Portal job lists.
          f. Reserve for My Organization
                  i. Can select 3, 5, or 7 days, or an unlimited duration, to only show
                     this job to individuals at your own organization and the job seekers
                     that they manage.
                 ii. Upon selecting any of these values, the Status of the job will be
                     changed to reserved. At the end of the duration, the Status of the
                     job will automatically update to “Open.”
          g. Show in Portals
                  i. Check this box to show this job to partners on the Partner Portal
                     and job seekers on the Career Portal.

                                               7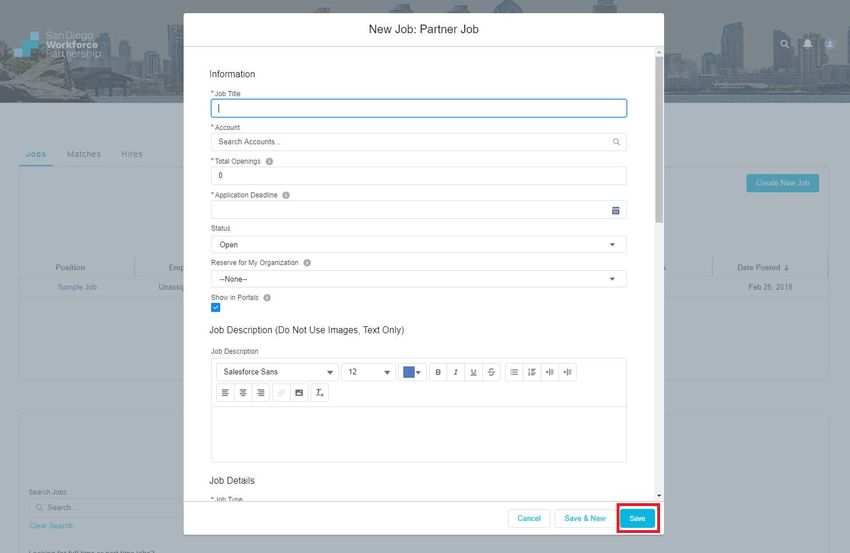
Partner Portal User Guide

                ii. Note: you can only check this box if the Status of the job is “Open”
                    or “Reserved” and the Application Deadline is set for a future date.
                    If any of these conditions are not met, this checkbox will remain
                    unchecked, as we will not show closed jobs or jobs that are past
                    their listed application deadline on our portal sites.
2.   Job Description
3.   Job Details
        a. Job Type
        b. Position Duration
        c. Full Time / Part Time
        d. Hours Per Week
        e. Hourly Wage Minimum
        f. Hourly Wage Maximum
        g. Maximum Annual Salary
                 i. Only fill this out if hourly wage information is unavailable.
4.   Address Information
        a. Street, City, State, Zip Code, and Country where the job will be located.
        b. If this is a position that does not have a single, permanent location, then
            enter the Job Street Address as “Various.”
5.   Candidate Considerations
        a. Career Level
        b. Education Required
        c. Years Experience
6.   Additional Comments
        a. These may include instructions or best practices for partners who are
            referring their clients to this job. If none, then leave blank.

                                           8
Partner Portal User Guide
Viewing Job Details
In order to open one of these Job records, click on the linked job title in the Position
column.
9Partner Portal User Guide
After clicking on the Position, it will display the Job Details page, which includes:
1. Job listing details and action buttons
a. Edit – opens up a window to edit the details of the job listing.
i. Note: Edit is only available on your own job listings.
b. Refer a Candidate – opens a form to refer a candidate to the job listed.
c. Send via Email – opens a form asking for an email address. Upon
completing this form, a the details of the current job listing will be emailed
to whatever email address is entered here.
2. Any individuals who have already been hired for the current job listing.
3. The record level Chatter feed for the current Job record, where you can
collaborate with other members of the Partner Portal and ask questions related to
the job listing.
a. Note: Chatter is visible to all members of the Partner Portal who view the
job listing.
10Partner Portal User Guide
Matches
A Match is a record of your referral of a candidate to a job. Matches can be created in 3 different
ways:
1. Partner Portal Referral
a. A partner refers a candidate to a job listing in the Partner Portal.
2. Career Portal Self-Referral
a. A job seeker refers themselves to a job listing in the Career Portal.
3. San Diego Workforce Partnership Staff
a. A staff member of the San Diego Workforce Partnership refers a candidate to a
job listing in Salesforce, the CRM database that holds all Partner Portal and
Career Portal data.
As a Partner Portal member, you are only able to refer a candidate through the first method
listed above, but it is important these other methods for creating Matches in order to better
understand the Match process.
11Partner Portal User Guide
Refer Your Candidate to a Job
In order to refer one of your candidates to a job:
1. Open the Job record that you want to refer your candidate to.
2. Click the Refer a Candidate button at the top right of the record.
3. Fill in the required information
1. Reason for Referral – this should explain why you feel your candidate is
well suited to this particular job.
4. Upload your candidate’s resume (if you don’t have it, you can upload it later).
5. Click finish to complete the process.
12Partner Portal User Guide
Match Process
When a Match record is created by referring your candidate, it will automatically enter
an approval process (shown on the next page). For each step of this process, the
assigned individual, or approver, must approve the candidate in order for the Match to
continue to the next step. If the approver rejects the record, the process will end and the
status of the Match will be moved to “Not Hired,” which signifies that the candidate was
not hired for the position. Here are the approval process steps and what they mean:
1. Case Manager Review – Matches created on the Partner Portal will not Only
applicable when SDWP staff create a match or if a job seeker creates a match
through the Career Portal.
2. Job Owner Review – The job owner is listed on the job record and is the
individual who created the job record by default. This person will review all
matches for their job and will choose which candidates to refer to the employer.
3. Waiting to Hear Results – This status applies to both the case manager and job
owner, either of which may approve a record in this stage based on whoever
hears whether or not the candidate was hired or not.
4. Hired – This status reflects that the candidate was hired, and a Hire record will
automatically be generated and linked to the Match record when this status is
reached.
5. Not Hired – This status reflects that the candidate was not hired, and the match
owner will be encouraged to update the Match with more information on the
reason they were not hired in the Reason Match Closed field.
Approval Actions
Approve: This means that the candidate will move to the next status in the approval
process.
Reject: This means that the candidate will not move forward in the hiring process and
the Match will reflect the Not Hired status.
**In the approval email you receive as the assigned approver for a Match, detailed
instructions will be provided concerning each of these statuses and what actions you
are expected to take.
13Partner Portal User Guide 14
Partner Portal User Guide
Email Notifications
There are several email notifications associated with this process that are sent
automatically based on whether the Match record is approved or rejected. These are
listed below and are also reflected on the flow chart on the previous page.
- Approver Email: This is sent to whoever the assigned approver is for a certain
approval process step (see above for the 5 steps in this process).
- Match Owner Notification: The Match Owner, who is usually the individual who
created the Match, will be notified:
o When the candidate has been referred to the employer.
This occurs when the Job Owner approves the Match and it moves
to Waiting to Hear Results.
o When the candidate has been hired.
- Job Seeker Notification: The job seeker will be emailed when the Match is first
created (at the email address you provided when creating the Match) to let them
know that they have a new Match.
Managing Your Pending Approval Requests
It is possible that you may receive multiple approval requests for Matches if you have
listed a job on the Partner Portal. In order to track all of your pending approvals,
navigate to the Home page and click on the “Pending Approvals” tab.
15Partner Portal User Guide
Contact Management
A Contact is an individual that is stored as a record in the Partner Portal’s database.
When any member of the Partner Portal refers a candidate to a job, that candidate is
added to the database, or if they already exist, is updated.
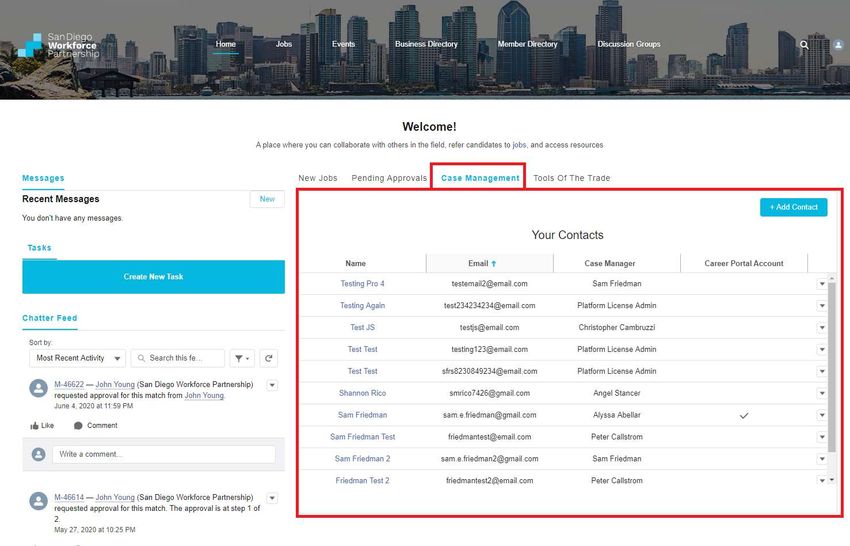
Case Management
For KRA staff who work at the San Diego Career Centers, there is a case management
feature available on the home page to manage these Contact records.
This table shows you Contacts where you are listed as the Partner Owner. In this table
you can see the Contacts’:
1. Name
2. Email
3. Case Manager – this will be the name of the Workforce Partnership staff member
they have been assigned to as a case manager.
4. Career Portal Account – there will be a checkbox in this column of the Contact
has created a Career Portal Account.
16Partner Portal User Guide
In this case management tab, you can:
Access Contact records that you have added to your caseload. In each Contact
record you can view basic contact information, files, Matches, and Hires
(placement records).
o To access a Contact record, click on their name.
Create Career Portal accounts for your Contacts, or remove them from your
caseload.
17Partner Portal User Guide
Add Contacts to your caseload.
o To add a Contact record, click the “+ Add Contact” button in the top right
corner of the case management window.
o Then search for your Contact’s name or other identifiable information in
the window that pops up and click “+ Add This Contact” button next to the
Contact you want to add.
o If you add a Contact that has already been added by someone on the
Partner Portal (including yourself), you will see the message below. Click
on their name to open their profile, where you can send them a direct
message if you wish to request them to transfer the Contact to you.
18Partner Portal User Guide
o If you cannot find your Contact through the search, click the green “Create
Contact” button at the bottom of the window and fill out their basic info to
create a new Contact record. Click the “Save” button to save the Contact
record.
Once your Contact is created, you will be returned to the home screen and you will see
the following message at the top of your screen.
19Partner Portal User Guide
Events
The Partner Portal has an Events tab on the navigation menu. When you click on this
tab, it will open a new tab with the workforce.org events calendar, and it will show
upcoming employer events in San Diego County.
20Partner Portal User Guide
Chatter
Feed Types
Chatter is a chatting function that allows you to tag people and records when making
comments, fostering collaboration and efficient communication. A Chatter feed is a
window that displays Chatter comments, with the newest comments at the top. There
are two types of Chatter feeds:
1. Your home page Chatter feed
a. This has updates on records that you +Follow and comments that you are
tagged in.
b. When you comment on this Chatter feed, the only way others will see your
post is if you tag people or if other Partner Portal members are following
you, which you can see in your User Profile.
2. Record Chatter feed
a. Any Chatter feed that is located on a record, whether it is a Job, Event,
Match, etc.
b. When you comment on this type of Chatter feed, it will automatically be
linked to the record it is associated with.
Chatter feeds are sortable, filterable, and searchable, giving you easy access to
whichever updates are most important to you.
Home page Chatter Feed:
21Partner Portal User Guide
Record Chatter Feed:
You will generally use the Post function on Chatter to post comments, but you can also
use the Poll and Question functions to meet your needs. Poll results will show up
anonymously, which makes it helpful to gather feedback from staff, while questions can
help others who might have the same question find the best answer quickly.
Poll Example:
22Partner Portal User Guide
Question Example:
Tags
In order to tag another person in a Chatter post, use the @ symbol. Once you type @
and begin to type someone’s name, it will offer suggestions, and you can click on the
appropriate person listed in the dropdown dialog window, as shown below.
23Partner Portal User Guide
Tagging another person notifies that individual via email, showing the comment and
allowing them to directly open the location of that comment from their email. You can
also tag a Chatter Discussion Group using the @ symbol, which will populate your post
in the main discussion group Chatter feed; this can be useful for collaboration on a
particular issue or record.
Chatter Discussion groups
There are also Chatter Discussion Groups that are set up to foster collaboration
within certain teams.
In order to see all active, public groups, click on the Discussion Groups navigation
menu tab, which will take you to the Groups List page. From here click on the list view
on the top left of the page to select the Active Groups list.
In each group there is a Chatter feed where members of the group (or non-members if
the group is public) can post messages to the group. Group members can post to the
Chatter feed via email by using the Group Email listed under the Group Details section;
any text that is sent to this email address will be posted as text in the Chatter feed of the
group.
24Partner Portal User Guide
In order to create a new group, navigate to the Groups List page and click the New
button at the top right of the list view, fill out the group details, and click save.
You can share Files in Chatter Groups by navigating to the group detail page and either
attaching the file to a Chatter post or uploading it in the Files tab on the right side of the
page under the Members tab.
25Partner Portal User Guide
Topics
Topics are useful for grouping records and Chatter posts through the use of topic tags.
You can click on a topic to access other Chatter posts and records that have been
tagged under the same topic.
Chatter Topics
You can add a topic to a Chatter post at the bottom of the Chatter post window, as seen
below. Often recommended topics will automatically populate on your posts based on
its wording content.
In order to add a topic to a reply comment, use a # followed by your topic tag.
26Partner Portal User Guide
Record Topics
Just as you can add topic tags to your Chatter posts to group them together, you can
also do so for records under the Topics tab. You are able to assign up to 100 topics to a
single record. When you click on one of the topics, it will take you to the topic discussion
page, where you can see other posts that have also been tagged with that topic.
27Partner Portal User Guide
Direct Messaging
In order to communicate directly with other members of the Partner Portal, you can use
direct messaging. Recent messages can be seen on your home page, and you can also
create messages from here directly by clicking on the New button next to Recent
Messages, as shown below.
You are also able to add or remove people from a conversation, allowing you to
maintain a private conversation but do so with a group of other people. This can be
accomplished from the message screen, which is opened when you click on a
message.
28Partner Portal User Guide
Support
Business Support - Discussion Questions
In order to address business related questions, there are a couple of different support
options. First and foremost, we encourage members of the Partner Portal to pose their
question to the community, tagging topics and individuals as desired to get the attention
of others. This is a good practice because it allows other current and future members of
the community to also find the answer to your question, and this practice will therefore
promote institutional knowledge and partner collaboration.
The second support option is to email Business@workforce.org, which will put you in
touch with the San Diego Workforce Partnership business services team. This is for
questions that either require urgency or are too specific or private to ask the community.
Technical Support - Support Tickets
In order to receive technical support, there are once again two options. The first step to
both is to click Contact Support on your profile menu, which will take you to the Contact
Support page.
From this page, we recommend using the Ask a Question button for issues such as
‘how to create a referral’ or ‘where to access resources’, since these are technical
questions but do not necessarily require dedicated technical support, and there may be
others who can benefit from the answers you receive to these questions from the
community.
29Partner Portal User Guide
For immediate technical assistance when encountering errors, please create a support
ticket by navigating to the lower half of the Contact Support page and clicking the
Create a Support Ticket button.
From here you will be prompted to answer a few questions, after which a support ticket
will be created and will be shown in a list underneath the button. If you have any
difficulty in creating a support ticket by this means, such as if you are not able to log into
the Portal, then please contact support at SalesforceSupport@workforce.org instead.
Please do not create a ticket AND send an email, as this will unnecessarily create
duplicate support tickets.
30Partner Portal User Guide
Global Search
In order to perform a more robust search of all Jobs in our Salesforce database, you
can also use the Global Search, which is located at the top right of the page header as
a magnifying glass icon.
Once you enter your search term into the Global Search, it will populate a limited set of
search results in real time in a window under the search bar, as seen below. If you do
not see any immediate results based on your keyword, you can perform a full search by
hitting enter on your keyboard.
Once you hit enter, you will be redirected to a search results page, where all relevant
Salesforce Jobs, Accounts, and Discussion & Topic results will show, based on your
search terms.
31Partner Portal User Guide
Below, we can see that 5+ jobs are shown based on the search for the word Host.
Since there are more than 5 Job records found that are related to that search term, you
can view all of the results for this search by either clicking the View More link at the top
right of the search results or by clicking the Jobs tab on the left side of the search
results under All (shown below).
32Partner Portal User Guide
You can choose to Filter these search results by using the fields on the left side of the
search results screen under the words Refine By, further narrowing your results. One
important consideration when searching for records using the Global Search is that you
will see all records stored in our Salesforce database, not just those shown in the Jobs
list on the Jobs page. This will include Jobs that are outdated and closed. Therefore, it
is important to properly filter your results when using this powerful search feature so that
you are getting the desired results.
In the case of Jobs, using the Status filter will allow you to only view jobs that are
currently Open to applications, rather than closed, as shown below.
Please also note that Global Search will search all fields on a job record, including the
job description, address, education required, and any other field you can see when you
open a job record. For example, the Bartender position above does not have the search
term, Cashier, in its title, but you will find if you open the Job record that the word
Cashier can be found in its job description.
33You can also read