SendPro Online Quick Reference Guide - Shipping & Mailing Outbound and Inbound Package Management - Pitney Bowes
←
→
Page content transcription
If your browser does not render page correctly, please read the page content below
Shipping & Mailing
Outbound and Inbound Package Management

SendPro® Online
Quick Reference Guide

 Users                    Addresses            Carriers   Postage   Printing Labels

 Printing Stamps          Tracking & History
Users                                                                            Once the invited user receives the email, they should follow these steps to
                                                                                 sign in within 7 days:
The Admin manages the SendPro account. By adding users, the Admin
can grant others permissions to ship and mail from the account. In SendPro          1. Select the Sign In link in the email.
Online, users are added by "inviting" them.                                         2. Enter a name and a password if prompted.
                                                                                    3. Sign in to SendPro Online.

Adding Users                                                                     Resending expired invitations
You can add users in SendPro Online by "inviting" them. These users can          User invitations expire after 7 days. If an invitation has expired,
be used to sign in to the SendPro Tablet and the Trackable Label                 the Admin can resend the invitation. For multi-location
application on SendPro C, SendPro+ meters.                                       invitations, the Admin can resend invitations for all locations, while Location
                                                                                 Admins can resend invitations for users at their location only.
Only users with the role of Admin can perform this procedure.
                                                                                 To resend an invitation:
  1. Select Settings > Users.
  2. Select Invite.                                                                 1. Select Settings > Users.
     Note: If your SendPro Online subscription does not allow for multiple          2. Select the user settings icon to the right of the status field for the user
     users, the Invite option is disabled. To upgrade your subscription to
     one that allows for more users, select the Click to see upgrade                   you wish to edit.
     options link next to the Want to invite more users? notice in the              3. Select Resend invitation.
     upper right.
  3. Enter the new user's email address into the email address field. To
     add more than one email address, press Enter after each address.            Managing Users
  4. Select a role (Admin or User) from the Role menu. The selected role         You can use SendPro Online to view users' status and change user roles.
     applies to all users you are inviting. You can change their role later if
     needed.                                                                     Only users with the role of Admin can perform this procedure. For multi-
  5. If you have a multi-location subscription, select a Location for the        location subscriptions, only users with the role of Admin and Location
     invited user.                                                               Admin can perform this procedure.
  6. Select Invite. Each invited user receives an email and appears in the
     list of users with a Status of Invited.

Pitney Bowes   Quick Reference Guide   February, 2021                                                                                                 Page 2 of 36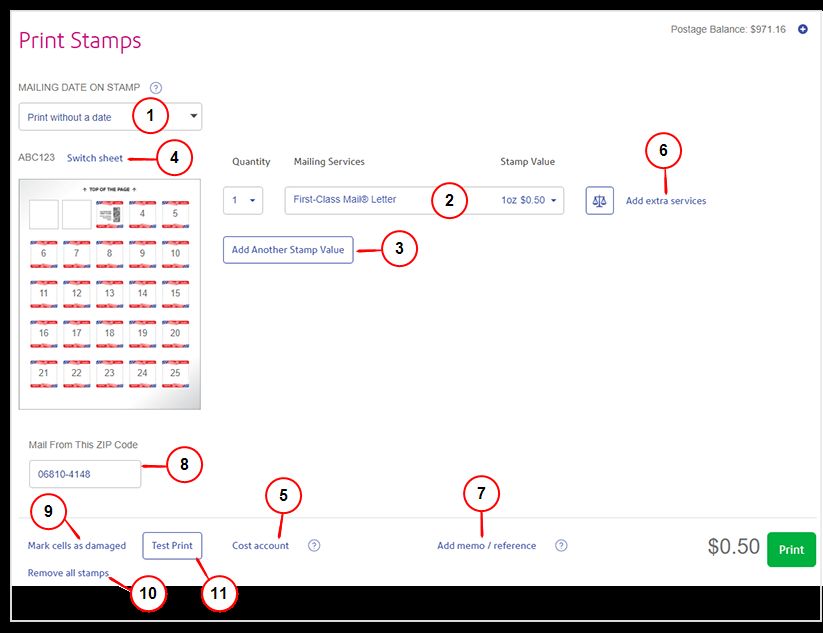
1. Select Settings > Users.                                                      l   Inviting (adding) users in SendPro Online
  2. On the Users tab, locate the user you wish to view:
      l To filter the list by status, select the down arrow next to All

        Users.
      l To search, enter part of the user's name or email address in the

        Search field.
  3. Select the user settings icon to the right of the status field for the user

       you wish to edit.
        l If the user status is Active, you can edit the user's status, role, or

          delete the user.
        l If the user status is Inactive, you can edit the user's status or

          delete the user.
        l If the user status is Invited, you can resend the invitation or

          delete the user.

Note: The user settings icon is disabled for the Admin user who originally
signed up for SendPro Online.
If you have a multi-location subscription, you can change the Location for
users with the role of User. The Location Admin's location cannot be
changed. To request a location change for and Account Admin or Location
Admin, contact your Pitney Bowes sales representative.
To view the permissions for each role:
  1.   Select Settings > Users.
  2.   Select the Roles & Permissions tab.
  3.   On the left side, select the role you wish to view.
  4.   On the right side, select the permissions category to view the
       individual tasks in that category.

The permissions for the roles cannot be changed.
Related topics

Pitney Bowes   Quick Reference Guide     February, 2021                                                                            Page 3 of 36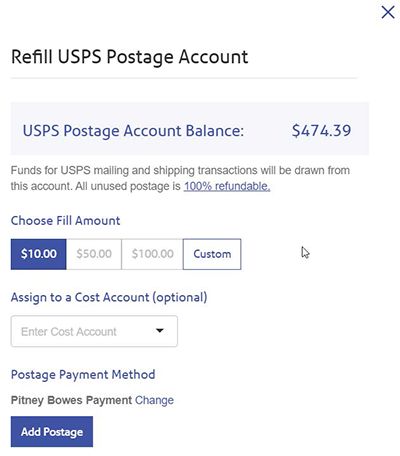
Addresses                                                                   Addresses added in SendPro Online are also visible on other SendPro
                                                                            products.
You can easily add recipients to the SendPro address book, or import your
entire address book from another source.                                    The SendPro Online address book can hold an unlimited number of
                                                                            addresses. However, on SendPro C, SendPro+, and SendPro P-Series
                                                                            meters, only 1000 addresses are visible.
Adding an Address to the Address Book                                         1. If you are importing addresses from another application, export/save
                                                                                 those addresses as a .csv file. Make sure that your file meets the
Addresses added in SendPro Online are also visible on other SendPro
                                                                                 guidelines below.
products.
                                                                              2. From the menu at the top, select Address Book.
The SendPro Online address book can hold an unlimited number of               3. Select the + (plus) icon.
addresses. However, on SendPro C, SendPro+, and SendPro P-Series
meters, only 1000 addresses are visible.
  1. From the menu at the top, select Address Book.
  2. Select the + (plus) icon.                                                4. Select Import multiple addresses.

  3. Enter the contact details. When entering a street address,
     suggested addresses are displayed. If you paste in a complete
     address, the system automatically separates it into the separate
     fields. However, apartment, suite, and unit numbers must be entered
     manually.
  4. Select Save.

Related topics
    l   Importing addresses into SendPro Online

Importing Addresses
You can use SendPro Online to import addresses from other sources into
your address book.

Pitney Bowes   Quick Reference Guide   February, 2021                                                                                     Page 4 of 36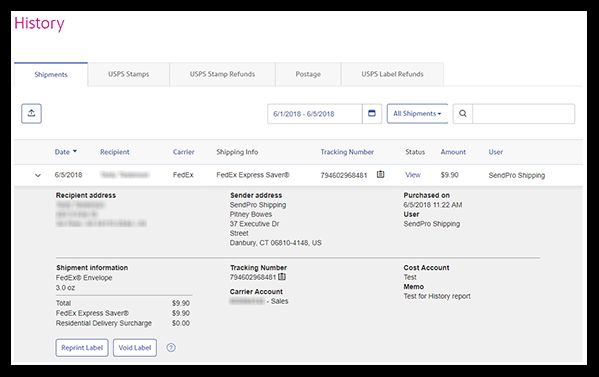
5. (Optional) To use SendPro Online’s template to create your import       imported.
     file, select Download a .csv template. The file template.en-us.csv
     will be downloaded. You can insert your addresses into this template,
     or copy the headers (first row) from this template into your own
     address file. However, this is not necessary because SendPro will
     walk you through mapping your address data later. Make sure that
     your file meets the guidelines below.
  6. Once you have created your .csv file of addresses to import, select
     Browse and navigate to your file.
  7. If you wish to remove all existing addresses in your address book and
     replace them with the addresses in the import file, select Replace
     my current Address Book data with my imported data. If this is
     not checked, the addresses in the import file will be added to the
     addresses already in your address book.
     Note: If you use a shared address book, the replace option is not
     available.
  8. If you are importing a file that was exported from your UPS or FedEx
     account, select Addresses are from my UPS/FedEx address
     book.
  9. Select Continue. If you are importing a UPS or FedEx file, you are
     finished. If importing any other file, proceed with steps 10-11.
 10. The mapping screen appears. Match your address book fields on the
     left with the SendPro Online address book fields on the right. If
     SendPro Online could not determine which field to map, the right side
     will say Ignore Field. Review the list and make sure that all of the
     fields are mapped correctly. For any that say Ignore Field, choose
     the correct field. If you choose Ignore Field, that field will not be

Pitney Bowes   Quick Reference Guide   February, 2021                                    Page 5 of 36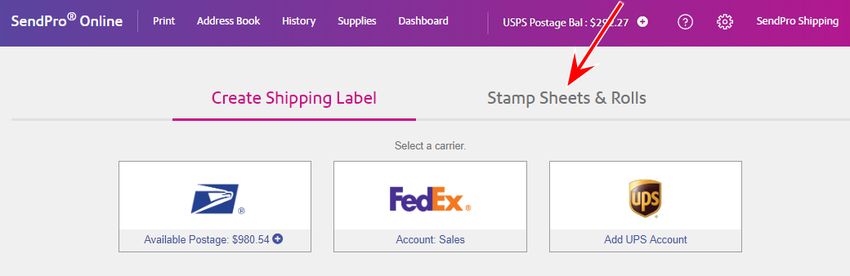
11. Select Continue to import your address data.

                                                        SendPro address import guidelines
                                                           l   SendPro requires the first and last names to be in a single field called
                                                               Name. If the first and last names are in separate columns in your
                                                               data file, you can use Excel's concatenate function to put them into a
                                                               single column. You may also include the title and middle name or
                                                               middle initial in the Name field if you choose.
                                                           l   The order of the columns in the import file does not matter.
                                                           l   Because addresses must pass USPS validation when used in
                                                               SendPro, the following fields are required. You can import addresses
                                                               that do not contain these fields, but before you can use them, they
                                                               must be filled in.
                                                                 l Full Name

                                                                 l Company Name

                                                                 l Street Address 1

                                                                 l City

                                                                 l State/Province

                                                                 l ZIP Code

                                                                 l Country

                                                           l   The number of address fields mapped from the imported .csv to the
                                                               SendPro Online address book cannot exceed the maximum number
                                                               of fields available in SendPro Online. You can use only fields that
                                                               correspond to those available in SendPro Online. For example, .csv
                                                               files exported from Google accounts usually contain many more
                                                               fields than those available in the SendPro Online address book.

Pitney Bowes   Quick Reference Guide   February, 2021                                                                      Page 6 of 36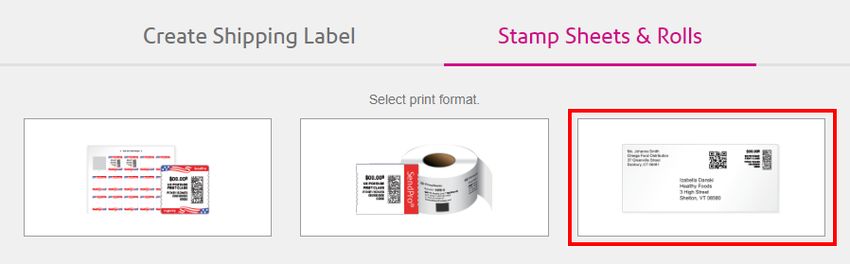
Carriers                                                                       4. Enter your FedEx account:
                                                                                   l If you already have a FedEx account, select the Enter My

Your SendPro Online account is automatically set up to work with USPS                FedEx Account button.
from the moment you sign in.                                                       l If you do not have a FedEx account, select the Create New

For UPS and FedEx, your accounts must be added to SendPro before you                 FedEx Account button. This provides you with a link to the
can use them.                                                                        FedEx website where you can sign up and get a FedEx account
                                                                                     number.
                                                                               5. Enter your 9-digit FedEx account number.
Setting up a FedEx Account                                                     6. (Optional) Enter a nickname for this account.
Use SendPro Online to set up your FedEx account. After you set up your         7. Fill in your name and address exactly as they appear on your FedEx
FedEx account, you can use it for other SendPro products.                         billing statement. Use your most recent FedEx invoice to enter this
                                                                                  information.
Only users with the role of Admin can perform this procedure. For multi-
                                                                                    l P.O. Box addresses cannot be used.
location subscriptions, only users with the role of Admin or Location admin
                                                                                    l If your address contains a suite, unit, apartment number, etc., put
can perform this procedure.
                                                                                        it in the Address Line 2 field. If it is included on the Address Line 1
  1. Select Settings > Shipping Carriers.                                               field, you may not be able to add the account.
  2. In the FedEx section, select one of these options to open the Add              l To use a contact name and address different from your FedEx

     FedEx Account screen:                                                              billing address, select My contact name or address....
       l If you have not yet set up a FedEx account in SendPro, select
                                                                               8. If your FedEx account includes SmartPost, select My Account
          Account Setup.                                                          includes SmartPost and select the Hub ID that was assigned to
       l If you have already set up a FedEx account in SendPro, and wish          you by FedEx.
          to add another one, select Add Account.                              9. If you have a multi-location subscription, select the Location(s) that
  3. (Optional) If you have a FedEx invoice in PDF format, you can import         will have access to this FedEx account in the Locations with
     it:                                                                          access to this FedEx account field. If all locations do not share the
      a. Select Import a FedEx invoice.                                           same FedEx account, go to Settings > Shipping
      b. Click the Browse button and select your FedEx invoice PDF file.          Carriers to add additional FedEx accounts.
      c. Click Next.                                                          10. Select I accept the FedEx End-User License Agreement.
      d. Review the form to make sure everything is correct.                  11. Select the Add Carrier button. When your FedEx account has been
      e. Skip to step 10.                                                         added, the message "Settings have been saved successfully"
                                                                                  appears.
                                                                              12. (Optional) To add another FedEx account, select the Add Account
                                                                                  link in the FedEx section.

Pitney Bowes   Quick Reference Guide   February, 2021                                                                                              Page 7 of 36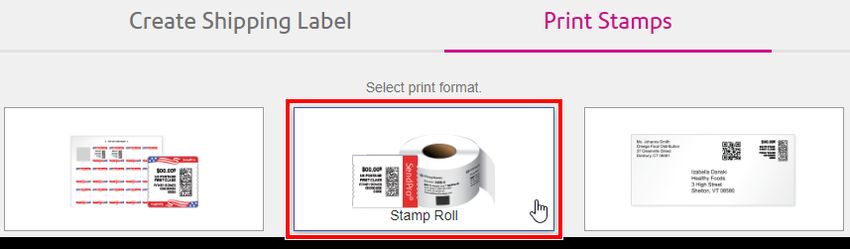
13. If any SendPro-compatible meters are associated with the SendPro         If for any reason you need to add an account that is not a SendPro UPS
     account, sign out and back in to SendPro on the meter in order to        Rate Account and does not receive SendPro's pre-negotiated rate
     access FedEx shipping functions.                                         discounts, select the Enter My UPS Account tab and follow these steps:
                                                                                1. Select one of these options to open the Add UPS Account screen:
                                                                                    l If you have not yet set up a UPS account in SendPro, select
Setting up a UPS Account                                                              Account Setup.
You can use SendPro Online to set up your UPS account. After you set up             l If you have already set up a UPS account in SendPro, and wish

your UPS account, you can use it for other SendPro products.                          to add another one, select Add Account.
Only users with the role of Admin can perform this procedure. For multi-        2. (Optional) If you have a UPS invoice in PDF format, you can import it:
location subscriptions, only users with the role of Admin or Location Admin        a. Select Import a UPS invoice.
can perform this procedure.                                                        b. Click the Browse button and select your UPS invoice PDF file.
To create a SendPro UPS Rate account and receive pre-negotiated rate                c. Click Next.
discounts:                                                                         d. Review the form to make sure everything is correct.
                                                                                   e. Skip to step 10.
  1. Select Settings > Shipping Carriers.
                                                                                3. If you already have a UPS account, skip to step 5. If you do not have
  2. 1. Select one of these options to open the Add UPS Account
                                                                                   a UPS account:
        screen:
                                                                                   a. Select Create New UPS Account at the top.
          l If you have not yet set up a UPS account in SendPro, select

            Account Setup.                                                         b. Click the provided link to go to the UPS website and create an
                                                                                        account.
          l If you have already set up a UPS account in SendPro, and

            wish to add another one, select Add Account.                            c. Once your UPS account has been created, return to SendPro
                                                                                        and select Enter My UPS Account at the top.
  3. On the Create SendPro UPS Rate Account tab, the UPS
     Account Nickname will already be filled in. You can change this if         4. In the UPS Account Number field, enter your 6-digit UPS account
     you wish, but make sure that the name allows you to differentiate this        number. The account number is case-sensitive.
     account from any other UPS accounts you may have.                          5. (Optional) Enter a nickname for this account.
  4. Your SendPro Online name and address will already be filled in.            6. If your UPS account is less than 90 days old, select the UPS
     Confirm your contact information, ensuring that your email address            account is newer than 90 days box and enter your name,
     and phone number are filled in.                                               address, and other account information exactly as they appear on
  5. Select the I accept the UPS Technology Agreement and the                      your UPS account. Sign in to your UPS account to view it if
     exclusive SendPro UPS Rate Agreement box.                                     necessary.
  6. Select Add Carrier.

Pitney Bowes   Quick Reference Guide   February, 2021                                                                                         Page 8 of 36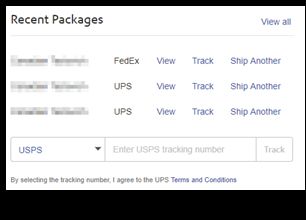
7. If you have shipped with UPS in the past 90 days, get your most
     recent UPS invoice. If you do not have a copy, sign in to your UPS
     account to view it.
     a. In the UPS Invoice Amount field, enter the "amount due this
          period" shown on the UPS invoice. Omit any commas.
     b. Enter the Control ID from your UPS invoice. This is case-
          sensitive. If the Control ID is ****, contact UPS to acquire this
          information.
      c. Enter the Shipped From address, if there is one on your UPS
          invoice. Omit the +4 portion of the ZIP code. This information is
          case-sensitive. If your UPS invoice contains a P.O. Box mailing
          address, do not enter it. If the invoice mailing address doesn't
          work and there is a different address in the upper left corner of
          your invoice, try that address instead.

      Important: All information is case-sensitive and must match your
      UPS account information exactly. You get three attempts to enter the
      information correctly before you are locked out of your UPS account
      for 30 hours.

  8. If you have a multi-location subscription, select the Location(s) that
     will have access to this UPS account in the Locations with access
     to this UPS account field. If all locations do not share the
     same UPS account, go to Settings > Shipping
     Carriers to add additional UPS accounts.
  9. To continue, select the I accept the UPS Technology Agreement
     box.
 10. Select the Add Carrier button at the bottom. When your UPS
     account has been added, the message, "Settings have been saved
     successfully" appears.
 11. (Optional) To add another UPS account, select the Add Account
     link in the UPS section.

Pitney Bowes   Quick Reference Guide   February, 2021                         Page 9 of 36
Comparing Carrier Rates
When creating a shipping label, you can compare rates from each carrier you use.
1. Create a label as you normally would, selecting My Box or Envelope as your package type.
2. When you get to the Choose Your Service screen, select the carrier tabs to view services from other carriers.
3. Select the desired carrier and services and print the label as usual.
Related topics
l Creating and printing a domestic shipping label in SendPro Online
l Creating an international, military, or U.S. territory shipping label in SendPro Online
Pitney Bowes Quick Reference Guide February, 2021 Page 10 of 36Postage
You can add postage to your USPS account through SendPro Online, and automatically add postage to your USPS account when your balance falls
below a certain threshold.
For UPS and FedEx, your shipping costs are billed directly to your UPS or FedEx account.
Adding Postage
In order to print USPS labels and postage in SendPro Online, you must have sufficient funds in your USPS postage account. If your balance is lower than
the cost of your current transaction, you will be prompted to add more postage, but you can add postage at any time.
Only users with the role of Admin can perform this procedure.
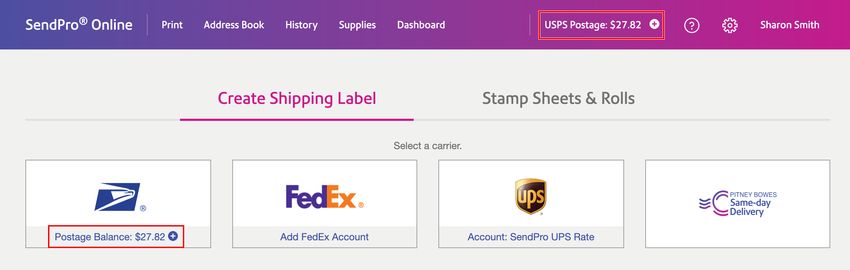
1. Select your USPS postage balance in the upper right from any screen, or in the USPS tile on the Home screen.
Note: If you do not see the + sign next to your postage balance, then you do not have an Admin role. Contact your SendPro Admin.
Pitney Bowes Quick Reference Guide February, 2021 Page 11 of 362. Select the amount you wish to add, or select Custom to enter a different amount. The minimum you can add is $10.00. Your postage balance
cannot exceed $500.00.
3. (Optional) To assign this postage purchase to a cost account, select the desired account from the menu.
4. Select Add Postage.
Notes
l This is for USPS only. For UPS and FedEx, your postage costs are billed directly to your UPS or FedEx account.
l When adding postage using a credit card as the payment method, a 3.5% administrative fee will be added. When a Reserve Account or Purchase
Power are used as the payment method, there is no administrative fee.
l Postage refills can be viewed on the Postage tab in your History.
Related topics
l Paying for Postage
l Automating postage refills in SendPro Online
l Viewing your history in SendPro Online
Pitney Bowes Quick Reference Guide February, 2021 Page 12 of 36Automating Postage Refills
You can have SendPro automatically add postage to your USPS account when the balance falls below a certain threshold.
1. Select Settings > Postage Refills.
2. Select I want to automatically add postage.
3. In the Set the minimum postage threshold amount field, enter the threshold amount. When your postage balance goes below this amount,
funds will be automatically added to your USPS account.
4. In the Add this postage amount field, enter the amount of funds you want added to your postage balance when the threshold is reached. The
minimum you can add is $10.00. Your postage balance cannot exceed $500.00.
5. If you wish to receive an email notification when an automatic postage refill is set to occur, enter the address in the Postage Refill Email field.
6. If you use cost accounts, you can associate a cost account with postage refills. Select the Search for Cost Accounts field and select the desired
account.
7. Select Save.
Related topics
l Adding postage in SendPro Online
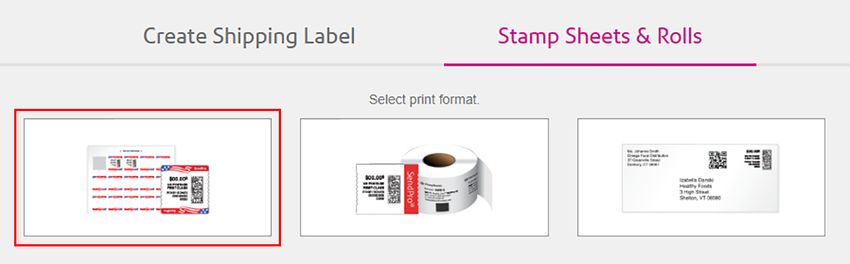
Pitney Bowes Quick Reference Guide February, 2021 Page 13 of 36Printing Stamps SendPro allows you to print postage stamps or print postage directly on envelopes. Printing Stamp Sheets Stamps can be printed either from the SendPro Online software or from the web version of SendPro Online. Stamps without a date can only be printed from the SendPro Online software. Stamps must be printed on compatible SendPro postage sheets, which are available in our online shop (item #SL- SPM01). Each stamp sheet has a unique serial number and contains 25 blank stamp stickers. SendPro keeps track of how many stamps you print with each serial number so you do not have to use the entire sheet at once. The postage value printed is as-is and is not a USPS Forever Stamp. If USPS postal rates change, you can print a postage correction stamp which can be used with an already printed stamp to add additional postage. 1. From the SendPro Home screen, select Stamp Sheets & Rolls. Pitney Bowes Quick Reference Guide February, 2021 Page 14 of 36
2. Select Stamp Sheet.

   3. Enter the serial number of the SendPro Online stamp sheet you will print and select Accept. If you have printed stamps before, the most recently
      used sheet is already selected.
   4. From the Quantity menu, choose the number of stamps you wish to print. The stamp sheet image shows a preview of the stamps that will print.
   5. Perform any of the optional tasks below to set up the stamps as needed.
   6. Select Print.
       l If printing from a web browser, a PDF of the stamp sheet opens in a new browser window or tab. Use your browser's print function to print this

         file.

Pitney Bowes   Quick Reference Guide   February, 2021                                                                                        Page 15 of 36
Optional tasks
1. Changing the mailing date or Printing stamps with no date 6. Adding extra services
2. Changing the postage class or amount 7. Entering notes for your transaction history
3. Printing additional stamps with a different value on the same sheet 8. Changing the ZIP code the mail is being sent from
4. Changing the stamp sheet 9. Marking cells as damaged
5. Assigning the stamp cost to a cost account 10. Starting over
11. Printing a test stamp sheet
Pitney Bowes Quick Reference Guide February, 2021 Page 16 of 36Changing the mailing date
Select the desired date from the Mailing Date on Stamp menu [1].
Printing stamps with no date
To print stamps with no date on them, choose Print without a date from the Mailing Date on Stamp menu [1]. Stamps without a date can only be printed
from the SendPro Online software.
Changing the postage class or amount
From the Mailing Services / Stamp Value menu [2], choose the value of the stamps you wish to print.
l To choose a mail class that is not listed, select Choose another mail class, choose the desired Type and Weight, and select Accept.
l International letter is found under Choose another mail class.
l The maximum weight for a stamp is 13 ounces. To send something that weighs more than that, create a shipping label.
l If you have the attached USB scale, you can select the scale icon to weigh the item on the scale.
Printing additional stamps with a different value on the same sheet
Select Add Another Stamp Value [3] and choose the number and stamp class.
Changing the stamp sheet
To use a different stamp sheet, select Switch sheet > Add a new stamp sheet [4].
Assigning the stamp cost to a cost account
Select Cost account at the bottom [5], then choose the desired account from the menu that appears.
Adding extra services
To add extra services such as certified mail:
1. Select Add extra services [6].
2. Select the desired services.
3. Select Accept.
Pitney Bowes Quick Reference Guide February, 2021 Page 17 of 36Entering notes for your transaction history
Select Add memo / reference [7], enter the memo (up to 50 characters), and select Accept.
Changing the ZIP code the mail is being sent from
Enter the ZIP code in the Mail From This ZIP Code field [8].
Marking cells as damaged
To mark cells as damaged so that they will not be printed on (for example, if a stamp was accidentally pulled off):
1. Select Mark cells as damaged [9].
2. Select the cells that are damaged.
3. Select Remove.
Starting over
To clear the stamp selections and start over, select Remove all stamps [10].
Printing a test stamp sheet
Select Test Print [11]. Test Prints are for testing alignment only and do not use postage.
Related topics
l Printing stamp rolls in SendPro Online
l Printing envelopes in SendPro Online
l Setting up default stamp and envelope printing options in SendPro Online
l Ordering supplies for SendPro Online
Pitney Bowes Quick Reference Guide February, 2021 Page 18 of 36Printing Stamp Rolls Stamps can be printed either from the SendPro Online software or from the web version of SendPro Online. Compatible postage stamp rolls for SendPro are available in our online shop. The postage value printed is as-is and is not a USPS Forever Stamp. If USPS postal rates change, you can print a postage correction stamp which can be used with an already printed stamp to add additional postage. 1. From the SendPro Home screen, select Stamp Sheets & Rolls. 2. Select Stamp Roll. 3. From the Quantity menu, choose the number of stamps you wish to print. Pitney Bowes Quick Reference Guide February, 2021 Page 19 of 36
4. Perform any of the optional tasks below to set up the stamps as needed.
   5. Select Print.

Optional tasks

   1. Changing the postage class or amount                                   5. Entering notes for your transaction history
   2. Printing additional stamps with a different value                      6. Changing the ZIP code the mail is being sent from
   3. Adding extra services                                                  7. Starting over
   4. Assigning the stamp cost to a cost account                             8. Printing a test stamp sheet

Changing the postage class or amount

From the Mailing Services / Stamp Value menu [1], choose the value of the stamps you wish to print.
    l   To choose a mail class that is not listed, select Choose another mail class, choose the desired Type and Weight, and select Accept.
    l   International letter is found under Choose another mail class.

Pitney Bowes   Quick Reference Guide     February, 2021                                                                                       Page 20 of 36
l The maximum weight for a stamp is 13 ounces. To send something that weighs more than that, create a shipping label.
l If you have the attached USB scale, you can select the scale icon to weigh the item on the scale.
Printing additional stamps with a different value
Select Add Another Stamp Value [2] and choose the number and stamp class.
Adding extra services
To add extra services such as certified mail:
1. Select Add extra services [3].
2. Select the desired services.
3. Select Accept.
Assigning the stamp cost to a cost account
Select Cost account at the bottom [4], then choose the desired account from the menu that appears.
Entering notes for your transaction history
Select Add memo / reference [5], enter the memo (up to 50 characters), and select Accept.
Changing the ZIP code the mail is being sent from
Enter the ZIP code in the Mail From This ZIP Code [6] field.
Starting over
To clear the stamp selections and start over, select Remove all stamps [7].
Printing a test stamp sheet
Select Test Print [8]. Test Prints are for testing alignment only and do not use postage.
Related topics
l Printing stamp sheets in SendPro Online
l Printing envelopes in SendPro Online
l Setting up default stamp and envelope printing options in SendPro Online
l Ordering supplies for SendPro Online
Pitney Bowes Quick Reference Guide February, 2021 Page 21 of 36Printing Envelopes Envelopes can only be printed from the SendPro Online software. Envelopes cannot be printed from the web version of SendPro Online. Need the app? 1. Double-click on the SendPro desktop shortcut icon, or select Windows Start > All Programs > SendPro to launch the SendPro Online software. 2. From the SendPro Home screen, select Stamp Sheets & Rolls. 3. Select Envelopes. 4. Perform any of the optional tasks below to set up the envelope as needed. 5. Select Print. Pitney Bowes Quick Reference Guide February, 2021 Page 22 of 36
Optional tasks

   1. Changing the postage class or amount                                                8. Assigning the envelope to a cost account
   2. Adding extra services                                                               9. Entering notes for your transaction history
   3. Printing addresses on the envelope                                                 10. Changing the ZIP code the mail is being sent from
   4. Printing more than one envelope with the same settings                             11. Seeing how the envelope will look when printed (print preview)
   5. Printing multiple envelopes with different addresses and the same postage amount   12. Printing a test envelope
   6. Changing the envelope size                                                         13. Clearing the selections and starting over
   7. Changing the mailing date                                                          14. Adding a QR code

Pitney Bowes   Quick Reference Guide   February, 2021                                                                                            Page 23 of 36
Changing the postage class or amount

To print a postage amount other than First-Class Letter:
   1. Select the First-Class Mail Letter menu [1] and select Choose another mail class.
   2. Enter the Weight.
       l If you have the attached USB scale, place the item on the scale and select the scale icon to weigh it.

   3. Select the Mail Class you wish to use.
   4. Select Accept.

Adding extra services

To add extra services such as certified mail:
   1. Select Add extra services [2].
   2. Select the desired services.
   3. Select Accept.

Printing addresses on the envelope
   1. Select the Add sender address or the Add recipient address box [3] on the envelope.
   2. Enter the address, or select the Choose from Address Book icon to choose an address from the address book.
   3. Select Accept & Verify. In order for the address to be verified, the city, state, and ZIP Code must match.

Printing more than one envelope with the same settings

Select the number of envelopes from the "1" drop-down menu [4].

Printing multiple envelopes with different addresses and the same postage amount
   1. Select Print multiple envelopes with multiple addresses [5], then select Add Addresses.
   2. In the Add Recipient Address window, either:
        l Enter the address manually and select Accept & Verify, or

        l Select the Choose from Address Book icon to choose addresses from your address book, check the boxes next to the desired addresses,

           and select OK.

Pitney Bowes   Quick Reference Guide   February, 2021                                                                               Page 24 of 36
Changing the envelope size Select Change size [6] and choose the desired size. Only #9 and #10 envelopes are supported. Changing the mailing date Select the desired date from the Mailing Date on Stamp menu [7]. Assigning the envelope cost to a cost account Select Cost account at the bottom [8], then choose the desired account from the menu that appears. Entering notes for your transaction history Select Add memo / reference [9], enter the memo (up to 50 characters), and select Accept. Changing the ZIP code the mail is being sent from Enter the ZIP code in the Mail From This ZIP Code [10] field. Seeing how the envelope will look when printed (print preview) To turn off the dotted lines so that you can see how the envelope will look when printed: 1. Select Print Preview [11]. 2. If multiple addresses are selected, use the arrows to scroll through the envelope previews. 3. When finished, select Design View to return to editing the envelope. Printing a test envelope Select Test Print [12]. Test Prints are for testing alignment only and do not use postage. Starting over Select Clear envelope [13]. In the Confirm Clear Envelope window, select Clear. Adding a QR code Select the desired Add QR code [14] location on the envelope. Related topics Pitney Bowes Quick Reference Guide February, 2021 Page 25 of 36
l   Installing the SendPro Online app
    l   Printing stamp sheets in SendPro Online
    l   Printing stamp rolls in SendPro Online
    l   Setting up default stamp and envelope printing options in SendPro Online

Pitney Bowes   Quick Reference Guide   February, 2021                              Page 26 of 36
Printing Labels 10. Once the service has been selected, choose any extra services you
wish to add. The total cost for the label is shown at the bottom of the
You can access rates and services from major carriers, and easily compare screen. The total cost may differ from the amount next to the services
rates from different carriers to save money and time when shipping. due to taxes and surcharges.
11. When you are ready to print the label, select Print.
12. In the Select a print size field, select either Roll - 4 x 6 or Plain
Creating and Printing a Domestic Shipping Label Paper - 8.5 x 11.
1. From the SendPro Online Home screen or the Print menu, select a 13. To add a note about the shipment, enter it in the Memo field. You can
carrier. enter up to 40 characters for USPS and up to 35 characters for
2. If you use Cost Accounts, select the desired account from the Cost FedEx and UPS. This memo appears on the label and in your history
Account menu. file.
3. Enter the recipient address, or select the Choose from Address 14. To print a receipt along with the label, select the Print receipt with
Book icon to select an address from the address book. label box (USPS only). You can select this option only when printing
4. To email the tracking number when you print the label, select on 8.5 x 11 printers.
the Email the tracking number box and enter the email address. 15. Select Print. The label opens in PDF format in a new window or tab,
5. Select Continue. from which you can print.
6. If prompted to verify the address, select Use Verified.
7. On the Choose Your Packaging screen, select the type of package Carrier Services and Packaging
and enter the package information. If you have an attached USB l *If you select a carrier-specific package type, you will only see rates
scale, select the scale button and place the package on the scale.For from that carrier. To see rates from all carriers, select My Box or
more information about carrier services and packaging, see the Envelope.
Carrier Services and Packaging section below. l For USPS Priority Mail Express, the delivery date shown is the
8. Select Continue. "guaranteed" delivery date from USPS, the latest time the package
9. On the Choose Your Service screen, select the shipping date, then will be delivered. Priority Mail Express normally has a one day
select the service you wish to use. Use the tabs and menus at the top turnaround time, but actual delivery times depend on multiple factors
to change the carrier*, ship date, carrier account, or ship from ZIP including creation time, pickup time, and routing.
Code as needed. l To charge the transportation costs of a shipment to the recipient's or
other third party's FedEx or UPS account, select Other billing
options from the bottom of the Carrier Account menu at the top of
the screen.
l Rates shown in SendPro Online may differ from rates shown on the
carrier's website for the same item. For more information, see
SendPro Online Rate and Carrier Rate Differences.
Pitney Bowes Quick Reference Guide February, 2021 Page 27 of 36l FedEx Home Delivery vs. FedEx Ground: In order to ship something
via FedEx Home Delivery or FedEx Ground in SendPro Online, you
must select My Box or Envelope. If you choose FedEx One Rate or
FedEx Standard, the FedEx Home Delivery and FedEx Ground
services are not available.
l When using your own packaging and shipping to a residential
address, the Ground option shown is FedEx Home Delivery.
l When using your own packaging and shipping to a commercial
address, the Ground option shown is FedEx Ground.
For more information about specific carrier services, visit the carrier's
website:
l USPS
l UPS
l FedEx
Pitney Bowes Quick Reference Guide February, 2021 Page 28 of 36Creating a Return Label
You can create a return label for a shipment so that the recipient can send it back to you. Return label procedures vary by carrier.
l USPS
l UPS
l FedEx
USPS
USPS return labels may be created up to 7 days from the date of the original shipping label. USPS return labels are dated, so they are not intended to be
put into an outgoing package just in case the recipient may want to return the shipment. If the recipient requests a return label, you should create it at that
time and email them a PDF of it on the day of creation.
You can create a USPS return label from a shipping label you just printed, or from the shipping History screen.
To create a return label for a shipping label that you just printed:
1. At the top of the Home screen, under the confirmation of the label you just printed, select Create Return Label.
2. Create and print the label as usual.
To create a return label from the History screen:
1. From the History menu, select Shipping & Postage History.
2. Select the desired shipment.
3. Select the Create Return Label button.
4. Create and print the label as usual.
UPS
UPS labels do not expire.
1. Add your customer's address to your address book as a sender.
2. Add your address to your address book as a recipient.
3. Create and print the label as usual, choosing My Box as your packaging.
Pitney Bowes Quick Reference Guide February, 2021 Page 29 of 364. Select the desired class.
5. Select UPS Print Return Label. This option is only available when choosing My Box as your packaging. UPS Print Return Label is not available
for UPS Next Day Air Saver.
6. Enter the description of merchandise.
FedEx
FedEx labels do not expire.
1. Add your customer's address to your address book as a sender.
2. Add your address to your address book as a recipient.
3. Create and print the label as usual, choosing My Box as your packaging.
4. Select the desired class.
5. Select FedEx print return label. This option is only available when choosing My Box as your packaging. FedEx print return label is not available
for FedEx Express Saver.
Related topics
l Creating and printing a domestic shipping label in SendPro Online
Creating a Same-day Delivery Label
Pitney Bowes Same-day Delivery is a service that will pick up packages and deliver them across town. Availability varies based on various factors,
including location and delivery window.
1. From the Home screen, select Same-day Delivery.
2. Enter the recipient address, or select the Choose from Address Book icon to select an address from the address book.
3. The pickup location defaults to your default sender address. To change the pickup location, select the Change link next to the Pickup Location. The
pickup location must already be in your address book as a sender address.
4. To add pickup instructions for the carrier, click in the Add Pickup Instructions field and enter the instructions.
5. To send text notifications, select Send mobile text notifications and enter the phone number.
6. To email the tracking number when you print the label, select the Email the tracking number box and enter the email address.
7. Select Continue.
Pitney Bowes Quick Reference Guide February, 2021 Page 30 of 368. Select the package type and size. 9. Enter the value of the package in the Package Value field. 10. Select Continue. 11. In the Pickup Time Window section, select the start and end times between which you want the package to be picked up. 12. In the Delivery Time Window section, select the start and end times between which you want the package to be dropped off. 13. In the Delivery Instructions field, enter any delivery instructions for the carrier. 14. Select Continue. 15. On the Choose Your Service screen, select the desired service. 16. In the Extra Services section, select any desired services. 17. Select Print. You can track your same-day delivery live from the History screen. Pitney Bowes Quick Reference Guide February, 2021 Page 31 of 36
Tracking & History
You can track packages right from the Home screen, and the History screen allows you to see all the details of the shipments you've sent.

Viewing Your History
You can view the history of your shipping labels, stamp printing, postage purchases (refills), and refunds. SendPro history data is kept online for 25
months.
   1. From the menu at the top, select History > Shipping & Postage History.
   2. By default, the Shipments tab is displayed, showing the history of your past shipments.

        l   To view your USPS stamp printing history, select the USPS Stamps tab.
        l   To view your USPS stamp refund history, select the USPS Stamp Refunds tab.
        l   To view your postage purchases (refills), select the Postage tab.
        l   To view your USPS label refund history, select the USPS Label Refunds tab.

Pitney Bowes   Quick Reference Guide   February, 2021                                                                                            Page 32 of 36
3. To view the details of a particular item in the list, select the arrow to open it.
4. (Optional) To filter the history report, use the date or other filters at the top of the list.
5. (Optional) To export the current report, select the Export icon at the top of the list.
Related topics
l Exporting a history report from SendPro Online
l Searching for a shipment in SendPro Online
Pitney Bowes Quick Reference Guide February, 2021 Page 33 of 36Tracking a Shipment
You can view tracking information for packages sent through SendPro in your history, or view tracking information for any package from the SendPro
Online Home screen.
To track a package from the Home screen:
1. In the Recent Packages section on the SendPro Online Home screen, enter a tracking number into the Enter tracking number box.
2. (Optional) Select the carrier from the menu.
3. Select Track.
To view tracking information for packages sent through SendPro on the History screen:
1. From the menu at the top, select History > Shipping & Postage History.
2. Click the arrow to the left of the desired shipment to view the details of that shipment, including the tracking number.
Note: If there is no tracking number, then the mail piece did not include tracking. Tracking availability is determined by the carrier and service
selected for the shipment.
Pitney Bowes Quick Reference Guide February, 2021 Page 34 of 363. (Optional) To copy a tracking number to your clipboard so that you can paste it elsewhere, select the Copy tracking number icon.
For Same-day deliveries, select Track live.
4. (Optional) To view a map showing the package's movement, select Map. On the map, select any of the points for more information. Select Details
to exit map view and return to details view.
Related topics
l Printing a USPS shipping label with a tracking number in SendPro Online
Pitney Bowes Quick Reference Guide February, 2021 Page 35 of 363001 Summer Street Stamford, Connecticut 06926 www.pitneybowes.com For Service or Supplies SV63371 Rev. A ©2021 Pitney Bowes Inc. All Rights Reserved
You can also read