ELog - 2021 General Electric Company
←
→
Page content transcription
If your browser does not render page correctly, please read the page content below

eLog

       © 2021 General Electric Company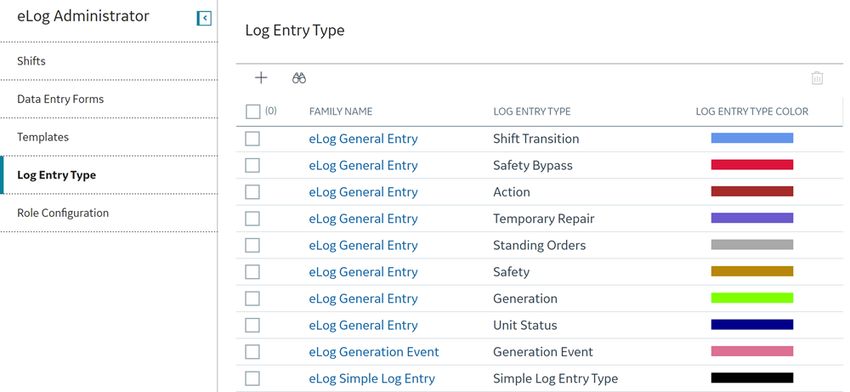
Contents

     Chapter 1: Overview                        1
         Overview of the eLog Module            2
         Access the eLog Overview Page          2
         eLog Workflow                          5

     Chapter 2: Workflow                        6
         Product Workflow                       7

     Chapter 3: Shift Summary                 10
         Overview                              11
         Assignments                           13
         Log Entries                           18
         Sign-in and Sign-out Logs             22

     Chapter 4: Shift Report                  25
         Generate the Shift Report             26

     Chapter 5: Recommendations               27
         About eLog Recommendations            28
         Access Recommendations in eLog        28
         Create a Recommendation               28

     Chapter 6: Admin                         29
         Access the eLog Administrator Page    30
         Administrator Workflow                30
         Shifts                                31
         Data Entry Forms                      32
         Templates                             34
         Log Entry Type Records                36

ii                                            eLog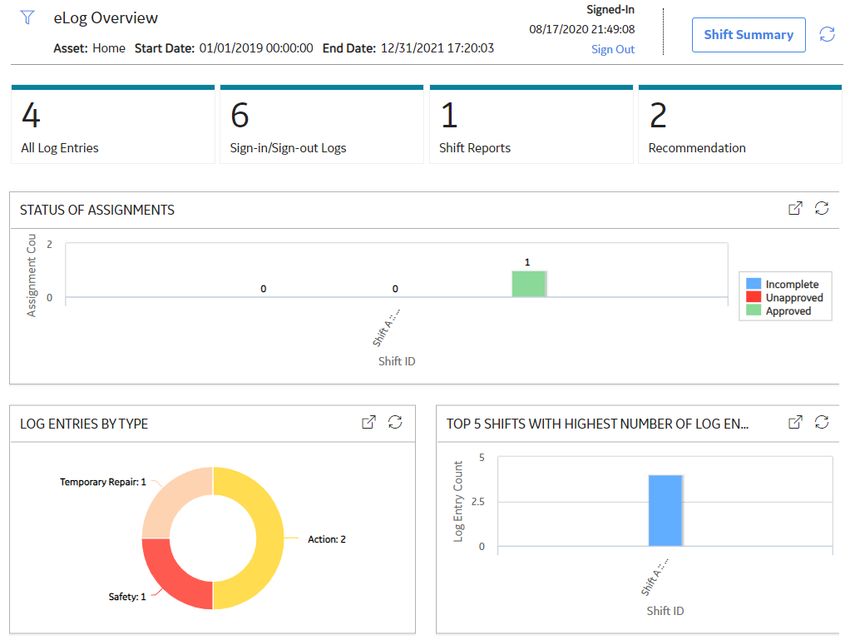
Role Configuration                    38

Chapter 7: Deployment                     40
    Deploy eLog for the First Time        41
    Upgrade eLog                          41

Chapter 8: Reference                      42
    General Reference                     43
    Catalog Items                         48
    Family Field Descriptions             50
    Shift Period and Shift Sign-in Time   69

Chapter 9: Release Notes                  71
    First Quarter of 2021                 72
    Fourth Quarter of 2020                72
    Second Quarter of 2020                72
    Third Quarter of 2019                 73
    First Quarter of 2019                 73
    Third Quarter of 2018                 76

                                           iii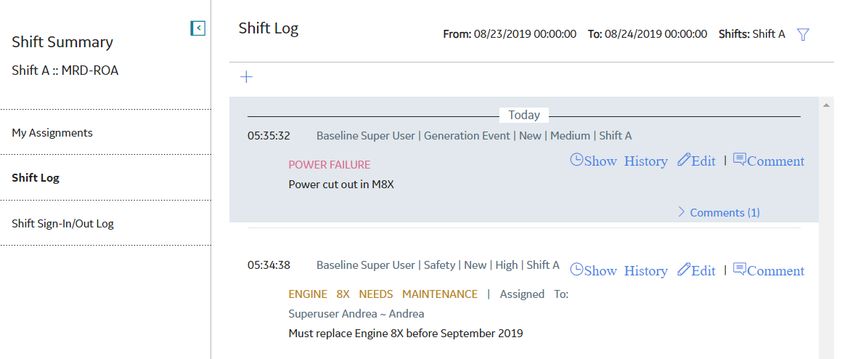
Copyright GE Digital
     © 2020 General Electric Company.

     GE, the GE Monogram, and Predix are either registered trademarks or trademarks of All other trademarks
     are the property of their respective owners.
     This document may contain Confidential/Proprietary information of and/or its suppliers or vendors.
     Distribution or reproduction is prohibited without permission.
     THIS DOCUMENT AND ITS CONTENTS ARE PROVIDED "AS IS," WITH NO REPRESENTATION OR
     WARRANTIES OF ANY KIND, WHETHER EXPRESS OR IMPLIED, INCLUDING BUT NOT LIMITED TO
     WARRANTIES OF DESIGN, MERCHANTABILITY, OR FITNESS FOR A PARTICULAR PURPOSE. ALL OTHER
     LIABILITY ARISING FROM RELIANCE UPON ANY INFORMATION CONTAINED HEREIN IS EXPRESSLY
     DISCLAIMED.
     Access to and use of the software described in this document is conditioned on acceptance of the End
     User License Agreement and compliance with its terms.

iv                                                                                 © 2021 General Electric Company
Chapter
1
Overview
Topics:
• Overview of the eLog Module
• Access the eLog Overview Page
• eLog Workflow
© 2021 General Electric Company 1Overview of the eLog Module
Most manufacturing organizations use the concept of a shift to define the work routine for personnel who
work directly on the processes of their business. In such organizations, the personnel sign in to their shifts
when they enter their workplaces, and they sign out of their shifts when they leave their workplaces.
The eLog module can be used by personnel (that is, Team Members) working shifts to communicate and
document their work. It provides an interactive and auditable electronic logbook for use by the personnel
who work in a pre-defined schedule. Using eLog, you can create a log entry of reports related to your shift.
The log entry covers aspects such as the shift transition, safety issues, and occurrences pertaining to the
operation of assets.
The log entry from each shift can determine the subsequent activities, as needed. This log entry, when
published, forms an auditable record of work.
Access the eLog Overview Page
Procedure
In the module navigation menu, select Health > eLog.
Tip: You can also access the eLog information for a specific asset hierarchy level (that is, an Equipment or
a Functional Location). To do so:
a. In the main navigation bar, select .
The Asset Hierarchy appears.
b. Select the asset for which you want to access the eLog Overview page.
The workspace for the selected asset appears. In the Health section, in the eLog row, the count of all
log entries and the count of sign-in and sign-out logs appear as a link. These log entries and sign-in and
sign-out logs are associated with the selected asset hierarchy level for the last 30 days.
c. Select the link.
The eLog Overview page appears, displaying the following sections:
• All Log Entries: Contains a table of all log entries. The table contains the following columns:
◦ HEADLINE: Contains the headline of the log entry.
◦ LOG ENTRY TYPE: Contains the type of the log entry.
◦ PRIORITY: Contains the priority of the log entry.
◦ STATUS: Contains the status of the log entry.
◦ FUNCTIONAL LOCATION: Contains the Functional Location associated with the log entry.
◦ SHIFT: Contains the Shift associated with the log entry.
◦ CREATED BY: Contains the name of the Team Member who created the log entry.
◦ CREATION TIMESTAMP: Contains the date and time when the log entry was created.
• Sign-in/Sign-out Logs: Contains a table of sign-in and sign-out logs of all Team Members. The table
contains the following columns:
◦ EMPLOYEE: Contains the name of the Team Member who signed in to the Shift associated with
the log.
◦ ROLE: Contains the Role that the employee used when signing in to the Shift (that is, the value
that the employee selected in the Role box in the Sign In window).
2 © 2021 General Electric Company◦ TAKING OVER FROM: Contains, if applicable, the name of the Team Member from whom the
employee took over the Shift (that is, the value that the employee selected in the Taking Over
From box in the Sign In window).
◦ SIGN IN TIME: Contains the date and time when the employee signed in to the Shift.
◦ SIGN OUT TIME: Contains the date and time when the employee signed out of the Shift.
Note: If the employee is still signed in to the Shift, this column will be blank.
◦ FUNCTIONAL LOCATION ID: Contains the Functional Location associated with the log.
◦ SHIFT ID: Contains the Shift associated with the log.
• Shift Reports: Contains a table of reports configured for Shifts. The table contains the following
columns:
◦ REPORT NAME: Contains the name of the report.
◦ REPORT PATH: Contains the path of the report.
Note: By default, only the Shift Log Entry Report appears in the Shift Reports section. You can,
however, create alternative templates for the Shift report in the following location: Public
\Meridium\Modules\eLog\SSRS. The alternative Shift reports will then appear in the Shift
Reports section.
• Recommendation: Contains a table of recommendations associated with the Shifts. The table
contains the following columns:
◦ RECOMMENDATION ID: Contains the unique ID of the Recommendation.
◦ TYPE: Contains the type of the Recommendation.
◦ STATE: Contains the current state of the Recommendation.
◦ HEADLINE: Contains a short description of the Recommendation.
◦ FUNCTIONAL LOCATION ID: The Record ID of the Functional Location record linked to the Shift
record with which the Recommendation is associated.
◦ ASSET ID: Contains the unique ID of the Asset record with which the Recommendation is
associated.
◦ CREATED ON: Contains the date on which the Recommendation was created.
◦ CREATED BY: Contains the name of the Security User who created the Recommendation.
◦ ASSIGNED TO: Contains the first and last name of the person to whom the recommendation is
assigned.
◦ PRIORITY: Contains the priority value used to rank the importance of the Recommendation.
◦ TARGET COMPLETION DATE: Contains the date by which the Recommendation is intended to be
implemented
• STATUS OF ASSIGNMENTS: Contains a bar chart that represents the distribution of the following
statuses for the assignments in each Shift:
◦ Incomplete: Represents an assignment that has been completed or modified (that is, the value in
the State column in the Filled Assignments section is New or Modified).
◦ Unapproved: Represents an assignment that has been submitted for review.
◦ Approved: Represents an assignment that has been approved.
Note: Shifts that do not contain an assignment are not represented in the bar chart.
The category (x) axis represents Shifts that contain assignments; these assignments are categorized
based on their statuses (that is, Incomplete, Unapproved, and Approved). The value (y) axis represents
the count of the assignments.
• LOG ENTRIES BY TYPE: Contains a doughnut chart that represents the distribution of the log entries
in the Shifts based on the log entry types.
© 2021 General Electric Company 3• TOP 5 SHIFTS WITH HIGHEST NUMBER OF LOG ENTRIES: Contains a bar chart that represents the
top five Shifts with the highest number of log entries in descending order. The x-axis represents the
Shifts that contain log entries; the y-axis represents the count of the log entries.
Note:
◦ If two of the six Shifts that qualify to be represented in the bar chart have the same number of log
entries, only the oldest of the two Shifts is represented in the chart along with the remaining four
Shifts.
◦ If two of the five Shifts that qualify to be represented in the bar chart have the same number of log
entries, between these two Shifts, the oldest of the two appears first in the chart.
Note: The Shifts associated with the contents in each section are based on the asset filter (that is, Asset,
Start Date, and End Date). Using , you can filter the contents based on the following information:
• Asset: Indicates the asset hierarchy level for the Shift.
• Start Date: Indicates the start date and time of the period.
• End Date: Indicates the end date and time of the period.
Note: To access the detailed chart, select .
4 © 2021 General Electric CompanyeLog Workflow
About This Task
This workflow provides the basic, high-level steps for using eLog. The steps and links provided in the
workflow do not necessarily reference every possible procedure.
Procedure
1. Sign in to a Shift.
2. Complete the assignment for the Shift, and then submit it for review.
3. Approve or reject the assignment.
4. Modify the rejected assignment, and then resubmit it for review.
5. Create a log entry for the Shift.
6. Sign out of the Shift.
© 2021 General Electric Company 5Chapter
2
Workflow
Topics:
• Product Workflow
6 © 2021 General Electric CompanyProduct Workflow
This workflow describes the process for:
• Creating a Shift for a Functional Location and Team.
• Defining a data entry form.
• Defining a Template for the data entry form.
• Applying the Template to the Shift.
• Defining a log entry type record for the subfamilies of the eLog Entry family.
• Defining a Role Configuration record for the Team Member (that is, the Team Member Role).
• Signing in to the Shift.
• Managing an assignment for the Shift.
• Creating a log entry for the Shift.
• Signing out of the Shift.
• Generating the Shift report.
The blue text in the boxes indicates that a corresponding description has been provided in the sections
that follow the workflow diagram.
Define Team
Persona: Solution Administrator
Create a Team comprising Team Members who belong to the eLog Security Groups. Assign a Role to each
of the Team Members.
Define Shift
Persona: Solution Administrator
Create a Shift for a Functional Location.
© 2021 General Electric Company 7Assign Team
Persona: Solution Administrator
Assign the Team to the Shift.
Define Data Entry Form
Persona: Solution Administrator
Create a data entry form using the Data Entry Form Definition and Data Entry Form Field records.
Define Template
Persona: Solution Administrator
Create a Template for an assignment using the data entry form.
Apply Template to Shift
Persona: Solution Administrator
Apply the Template to the Shift.
Define Log Entry Type
Persona: Solution Administrator
Modify or create a log entry type record for the subfamilies of the eLog Entry family (that is, eLog General
Entry and eLog Generation Event).
Define Role Configuration
Persona: Solution Administrator
Modify or create a Role Configuration record using the Team Member Role.
Sign in to Shift
Persona: Analyst
Sign in to the Shift using the Role Configuration record.
Manage Assignment
Persona: Analyst
Complete the assignment for the Shift using the Template, and then submit the assignment for review.
If you are the reviewer, review the assignment that has been submitted for review, and then approve or
reject it as needed.
If the assignment has been rejected, modify it, and then resubmit it for review.
Create Log Entry
Persona: Analyst
Create a general log entry or a generation event log entry for the Shift using the log entry type record.
8 © 2021 General Electric CompanySign out of Shift
Persona: Analyst
Sign out of the Shift.
Generate Shift Report
Persona: Analyst
Generate a report for a given Shift and period.
© 2021 General Electric Company 9Chapter
3
Shift Summary
Topics:
• Overview
• Assignments
• Log Entries
• Sign-in and Sign-out Logs
10 © 2021 General Electric CompanyOverview
About Shift Summary
A Shift summary contains the following information:
• Assignments: Tasks that are automatically created for a Shift based on eLog Templates. Depending on
eLog Role Configuration records, they are directed to the Team Members assigned to the Shift. This
information appears in the My Assignments workspace in the Shift Summary page.
• Log entries: Auditable record of activities conducted by Team Members assigned to a Shift. This
information appears in the Shift Log workspace in the Shift Summary page.
• Sign-in and sign-out logs: Records that are automatically created each time a Team Member signs in to
the Shift or signs out of the Shift. The records show the time when the Team Member signed in to the
Shift and signed out of the Shift. This information appears in the Shift Sign-In/Out Log workspace in
the Shift Summary page.
Sign in to a Shift
About This Task
You can sign in to one or more Shifts depending on the value in the Sign in to Multiple Shifts? field in the
associated Role Configuration record. This topic describes how to sign in to one or more Shifts.
Note: The earliest time that you can sign in to a Shift is two hours before the daily start time of the Shift.
Before You Begin
• Ensure that a Role Configuration record exists for your role.
• Ensure that your Team is assigned to a Shift.
Important: You can sign in to a Shift only if you belong to either the MI eLog Administrator Security
Group or the MI eLog Contributor Security Group.
• Ensure that you do not attempt to sign in to a Shift after the daily end time of the Shift.
Procedure
1. Access the eLog Overview page.
2. Select the Sign In link.
The Sign In window appears.
© 2021 General Electric Company 11Note: The date and time that appear in the Sign In window are based on your time zone.
3. As needed, enter values in the available fields.
4. Select Sign In.
Results
• You are signed in to the selected Shift. The date and time when you signed in to the Shift appear in the
eLog Overview page.
• The Shift Summary button is enabled.
Next Steps
• Access the Shift Summary page.
Access the Shift Summary Page
Procedure
1. Sign in to a Shift.
2. Select Shift Summary, and then select the Shift whose Shift Summary page you want to access.
The Shift Summary page for the selected Shift appears, displaying the following workspaces:
• My Assignments: Contains assignments for the Shift.
• Shift Log: Contains log entries for the Shift.
12 © 2021 General Electric Company• Shift Sign-In/Out Log: Contains sign-in and sign-out logs for the Shift.
Sign out of a Shift from the eLog Overview Page
About This Task
This topic describes how to sign out of one or more Shifts from the eLog Overview page, depending on
the Role Configuration record for your role.
Note: The latest time that you can sign out of a Shift is two hours after the daily end time of the Shift. If
you do not sign out of a Shift, you are automatically signed out of it.
Procedure
1. Access the eLog Overview page.
2. Select the Sign Out link.
The Sign Out window appears, asking you to confirm that you want to sign out of the Shift.
3. Select Yes.
Results
• You are signed out of the Shift.
Note: If you were signed in to multiple Shifts, you are signed out of all the Shifts.
• The Shift Summary button is disabled.
Assignments
Access an Assignment
Before You Begin
• Create a Template for assignment (that is, the value in the Type field is Assignment).
• If you want to access your assignment, ensure that you are the assignee of the Template (that is, the
value in the Assignee(s) field corresponds to your role).
• If you want to access an assignment that has been submitted for your review, ensure that you are the
reviewer of the Template (that is, the value in the Reviewer(s) field corresponds to your role).
• Apply the Template to the Shift for which you want to access an assignment.
Procedure
1. Access the Shift Summary page for the Shift whose assignment you want to access.
The My Assignment(s) workspace containing a table of assignments for the current Shift appears.
The table contains the following columns:
• Template ID: Contains the linked assignment from the source template.
• Priority: Contains the priority of the assignment.
• Type: Indicates the template type.
A section appears below the table, where you can manage Filled Assignments.
2. In the Template ID column, select the link for the assignment that you want to access.
The data entry form for the assignment appears.
© 2021 General Electric Company 13Note: With the exception of the assignments in the Filled Assignments section, you can modify the
values in the available fields as needed, and then select Save to save your changes.
Complete an Assignment
Before You Begin
• Create a Template for assignment (that is, the value in the Type field is Assignment).
• Ensure that you are the assignee of the Template (that is, the value in the Assignee(s) field
corresponds to your role).
• Apply the Template to the Shift for which you want to complete an assignment.
Procedure
1. Access the Shift Summary page for the Shift in which you want to complete an assignment.
2. In the My Assignment(s) section, in the Template ID column, select the link in the row that contains
the assignment that you want to complete.
The data entry form for the assignment appears.
14 © 2021 General Electric Company3. As needed, enter values in the available fields.
4. Select Save.
The assignment is completed. The completed assignment appears in the Filled Assignments section
with the value New in the State column.
Note: You can modify the completed assignment.
Next Steps
• Submit the assignment for review.
Submit an Assignment for Review
Before You Begin
• Complete an assignment.
Procedure
1. Access the Shift Summary page for the Shift whose assignment you want to submit for review.
2. In the section that appears below the table in the My Assignment(s) workspace, select the row that
contains the assignment that you want to submit for review.
The selected assignment is highlighted.
© 2021 General Electric Company 153. Select , and then select Propose, followed by Done.
The state of the assignment is changed to Pending Review.
Next Steps
• Approve or reject the assignment.
Approve or Reject an Assignment
Before You Begin
• Ensure that an assignment has been submitted for review.
• Ensure that you are the reviewer of the Template associated with the assignment (that is, the value in
the Reviewer(s) field corresponds to your role).
Note: You can approve or reject an assignment only if you belong to the MI eLog Administrator
Security Group.
Procedure
1. Access the Shift Summary page for the Shift whose assignment you want to approve or reject.
2. Select the row that contains the assignment that you want to approve or reject.
The selected assignment is highlighted.
16 © 2021 General Electric Company3. Select , and then select Approve or Reject, followed by Done.
• If you selected the Approve option, the assignment is Approved.
• If you selected the Reject option, the state of the assignment is changed to Modified.
Next Steps
• Modify the rejected assignment.
Resubmit an Assignment for Review
About This Task
If your assignment has been rejected, you can modify it, and then submit it for review again. This topic
describes how to resubmit an assignment.
Procedure
1. Access the Shift Summary page for the Shift whose assignment you want to resubmit for review.
2. In the section that appears below the table in the My Assignment(s) workspace, select the row that
contains the assignment that you want to resubmit for review.
The selected assignment is highlighted.
3. Select , and then select Resubmit, followed by Done.
The assignment is resubmitted for review.
Next Steps
• Approve or reject the assignment.
© 2021 General Electric Company 17Log Entries
Access a Log Entry from the eLog Overview Page
Procedure
1. Access the eLog Overview page.
2. Select the All Log Entries tab.
A table appears with the log entries.
3. In the Headline column, select the link in the row that contains the log entry that you want to access.
The Shift Log workspace appears, displaying the log entry.
Note: The log entries that were created between the midnight of the day when the selected log entry
was created and that of the next day (inclusive) also appear in the workspace.
Note: To access the log entries for a different period and for a different Shift of the Functional Location
whose log entry you have accessed, select . In the Filter By Date Range window that appears,
modify the values in the From, To, and In boxes as needed, and then select Apply.
Access Log Entries from the Shift Summary Page
Procedure
1. Access the Shift Summary page for the Shift whose log entries you want to access.
2. Select the Shift Log tab.
The log entries that were created between the midnight of the current day and that of the next day
(inclusive) appear for the Shift.
Note: To access the log entries for a different period and for a different Shift of the Functional Location
whose log entry you have accessed, select . In the Filter By Date Range window that appears,
modify the values in the From, To, and In boxes as needed, and then select Apply.
18 © 2021 General Electric CompanyModify a Log Entry
About This Task
This topic describes how to modify a log entry, which can be a general log entry or a generation event log
entry.
Before You Begin
• Sign in to the Shift that contains the log entry that you want to modify.
Important:
◦ You can modify a log entry only if it was created in that occurrence of the Shift to which you have
signed in.
◦ You can modify a log entry only if you belong to either the MI eLog Administrator Security Group or
the MI eLog Contributor Security Group.
Procedure
1. Access the log entry that you want to modify, from the eLog Overview page or the Shift Summary
page.
2. In the Shift Log workspace, select Edit next to the log entry that you want to modify.
The Edit Log Entry window appears.
3. As needed, modify the values in the available fields, and then select .
The changes are saved.
Note: To view the history of the Log Text field, select Show History next to the corresponding log
entry in the Shift Log workspace.
Add a Comment to a Log Entry
Before You Begin
• Sign in to the Shift that contains the log entry to which you want to add a comment.
Important: You can add a comment to a log entry only if you belong to either the MI eLog
Administrator Security Group or the MI eLog Contributor Security Group.
Procedure
1. Access the Shift Summary page for the Shift that contains the log entry to which you want to add a
comment.
2. Select the Shift Log tab.
The log entries for the Shift appear.
3. Select next to the log entry to which you want to add a comment.
The Comment window appears.
4. As needed, enter values in the available fields.
5. Select Add.
The comment is added to the log entry.
© 2021 General Electric Company 19Tip: You can add multiple comments to a log entry. To access all the comments for a log entry, select
the Comments link in the log entry.
Create a Log Entry
About This Task
This topic describes how to create a log entry, which can be a general log entry or a generation event log
entry.
Before You Begin
• Sign in to the Shift for which you want to create a log entry.
Important: You can create a log entry only if you belong to either the MI eLog Administrator Security
Group or the MI eLog Contributor Security Group.
Procedure
1. Access the Shift Log workspace for the Shift for which you want to create a log entry.
2. Select , and then select the option eLog General Entry or eLog Generation Event, as needed.
The New Log Entry window appears.
Note: This window appears when you select the eLog General Entry option.
3. As needed, enter values in the available fields.
4. Select .
The log entry is created. It appears in the Shift Log workspace with the following information:
• Created by
• Log Entry Type
• Status
• Priority
• Shift Name
• Headline
• Assigned to
• Log Text
Create a Simple Log Entry
About This Task
This topic describes how to create a simple log entry.
Before You Begin
• Sign in to the Shift for which you want to create a simple log entry.
Important: You can create a simple log entry only if you belong to either the MI eLog Administrator
Security Group or the MI eLog Contributor Security Group.
Procedure
1. Access the Shift Log workspace for the Shift for which you want to create a simple log entry.
20 © 2021 General Electric Company2. Select , and then enter the log text.
3. Select Add.
The simple log entry is created. It appears in the Shift Log workspace with the following information:
• Created by
• Log Entry Type
• Status
• Priority
• Shift Name
• Log Text
Note:
• You can modify the log text by selecting Edit next to the simple log entry.
• You can add a comment by selecting Comment next to the simple log entry.
Create an Event for a Log Entry
About This Task
This topic describes how to create a Primary Event for a generation event log entry.
Note: You can create only one Primary Event for a generation event log entry.
Before You Begin
• Ensure that your Generation Availability Analysis (GAA) license is active.
• Ensure that you belong to the MI GAA Administrator or MI GAA Analyst Security Group.
Note: For more information, refer to the GAA Security Groups topic in the General Reference section
of the Generation Availability Analysis (GAA) documentation.
• Create a generation event log entry.
Procedure
1. Access the Shift Summary page for the Shift that contains the generation event log entry for which
you want to create a Primary Event.
2. Select the Shift Log tab.
The log entries for the Shift appear.
3. Select next to the generation event log entry for which you want to create a Primary Event.
The Edit Log Entry window appears.
4. Select , and then select Create Primary Events, followed by the Create Event or Create
Descriptive Event option, as needed.
Tip: If you want only the required fields to appear in the datasheet of the Primary Event, select the
Create Event option. Otherwise, select the Create Descriptive Event option.
The datasheet of the Primary Event appears in a new tab.
Note: This datasheet appears when you select the Create Event option.
5. As needed, enter values in the available fields.
Note: For more information about the available fields, refer to the Event Records topic in the Family
Field Descriptions section of the GAA documentation.
© 2021 General Electric Company 216. Select .
The Primary Event is created.
Results
The new Primary Event appears in:
• The Associated Event Id box in the generation event log entry, as a link.
Note: You can select the link to access the Primary Event.
• The Events Under Review section in the Generation Availability Analysis page, in the GAA module.
• The Events workspace in the Unit Summary page for the Unit associated with the Primary Event, in
the GAA module.
Sign-in and Sign-out Logs
Access Sign-in and Sign-out Logs from the eLog Overview Page
Procedure
1. Access the eLog Overview page.
2. Select the Sign-in/Sign-out Logs tab.
A table appears with the sign-in and sign-out logs.
3. In the Employee column, select the link in the row that contains the sign-in and sign-out log that you
want to access.
The Shift Sign-In/Out Log workspace appears, displaying the sign-in and sign-out log in a table that
contains the following columns:
• Employee: Contains the name of the Team Member who signed in to the Shift.
• Role: Contains the Role that the employee used when signing in to the Shift (that is, the value that
the employee selected in the Role box in the Sign In window).
• Sign In Time: Contains the date and time when the employee signed in to the Shift.
• Sign Out Time: Contains the date and time when the employee signed out of the Shift.
Note: If the employee is still signed in to the Shift, this column will be blank.
• Shift Name: Contains the name of the Shift.
• Taking Over From: Contains, if applicable, the name of the Team Member from whom the
employee took over the Shift (that is, the value that the employee selected in the Taking Over
From box in the Sign In window).
• Emergency Sign Out performed by: Contains, if applicable, the name of the Team Member who
ended the session of the employee.
Note:
• The sign-in and sign-out logs that were created between the midnight of the day when the selected
sign-in and sign-out log was created and the midnight of the next day (inclusive) also appear in the
Shift Sign-In/Out Log workspace.
• To access the sign-in and sign-out logs for a different period and for a different Shift of the
Functional Location whose sign-in and sign-out log you have accessed, use .
22 © 2021 General Electric CompanyAccess Sign-in and Sign-out Logs from the Shift Summary Page
Procedure
1. Access the Shift Summary page for the Shift whose sign-in and sign-out logs you want to access.
2. Select the Shift Sign-In/Out Log tab.
The sign-in and sign-out logs appear in a table that contains the following columns:
• Employee: Contains the name of the Team Member who signed in to the Shift between the
midnight of the current day and that of the next day (inclusive).
• Role: Contains the Role that the employee used when signing in to the Shift (that is, the value that
the employee selected in the Role box in the Sign In window).
• Sign In Time: Contains the date and time when the employee signed in to the Shift.
• Sign Out Time: Contains the date and time when the employee signed out of the Shift.
Note: If the employee is still signed in to the Shift, this column will be blank.
• Shift Name: Contains the name of the Shift.
• Taking Over From: Contains, if applicable, the name of the Team Member from whom the
employee took over the Shift (that is, the value that the employee selected in the Taking Over
From box in the Sign In window).
• Emergency Sign Out performed by: Contains, if applicable, the name of the Team Member who
ended the session of the employee.
Note: To access the sign-in and sign-out logs for a different period and for a different Shift of the
Functional Location to which you are signed in, use .
End the Session of a Team Member
About This Task
Under certain conditions, a Team Member may leave their Shift without signing out of it. To cover this
contingency, the following methods are available:
• Automatic sign-out: When the latest time that a Team Member can be signed in to a Shift expires, the
Team Member is automatically signed out of the Shift.
• Emergency sign-out: You can end the session of the Team Member.
This topic describes how to end the session of a Team Member.
Before You Begin
• Ensure that you have the permission to end the session of a Team Member (that is, the Perform
Emergency Sign Off? check box in the Role Configuration record for your role has been selected).
Procedure
1. Access the Shift Sign-In/Out Log workspace from the eLog Overview page or the Shift Summary
page for the Shift to which the Team Member whose session you want to end is signed in.
2. Select the row that contains the sign-in log of the Team Member whose session you want to end.
Tip: If the Team Member has not signed out of the Shift, the Sign Out Time column will be blank.
The Emergency Sign Out button is enabled.
3. Select Emergency Sign Out.
© 2021 General Electric Company 23The Sign Out window appears, asking you to confirm that you want to end the session of the Team
Member for the Shift.
4. Select Yes.
The Team Member is signed out of the Shift. For the row that contains the sign-in log of the Team
Member whose session you have ended, the following columns are automatically populated:
• Sign Out Time: Contains the date and time when you ended the session of the Team Member.
• Emergency Sign Out performed by: Contains your name.
Sign out of a Shift from the Shift Summary Page
About This Task
This topic describes how to sign out of a Shift from the Shift Summary page.
Note: The latest time that you can sign out of a Shift is two hours after the daily end time of the Shift. If
you do not sign out of a Shift, you are automatically signed out of it.
Procedure
1. Access the Shift Summary page for the Shift from which you want to sign out.
2. Select the Shift Sign-In/Out Log tab.
A table appears with the sign-in and sign-out logs.
3. Select Shift Sign Out.
The Sign Out window appears, asking you to confirm that you want to sign out of the Shift.
4. Select Yes.
You are signed out of the Shift.
24 © 2021 General Electric CompanyChapter
4
Shift Report
Topics:
• Generate the Shift Report
© 2021 General Electric Company 25Generate the Shift Report
You can generate a report for one or more Shifts for a given period. The generated report contains records
of log entries, assignments, and sign-in and sign-out logs pertaining to the Shifts for the defined period.
Before You Begin
• Ensure that the SQL Server Report Server (SSRS) has been configured.
Procedure
1. Access the eLog Overview page.
2. Select the Shift Reports tab.
A table containing reports configured for Shifts appears.
3. In the REPORT NAME column, select the link for the Shift report that you want to generate.
The report page appears, displaying the Enter Parameter Values window.
4. In the window, select values as described in the following table.
Box Description
Shift Name(s) Select the Shifts for which you want to generate a report.
Start Date Select the start date for the report.
End Date Select the end date for the report.
5. Select Done.
Note: Report generation may take some time.
The Shift report is generated, and it appears in the report page.
Note: You can download the report using .
26 © 2021 General Electric CompanyChapter
5
Recommendations
Topics:
• About eLog Recommendations
• Access Recommendations in
eLog
• Create a Recommendation
© 2021 General Electric Company 27About eLog Recommendations
As a Team Member, you can create a Recommendation to specify the corrective actions that must be
performed to mitigate the risks associated with the workplace and its assets. In the Recommendation,
you can specify the actions that must be performed as a result of:
• An activity that you conducted as part of your shift assignment.
• An event that occurred at the workplace during your shift.
• A safety issue related to the workplace or any asset located at the workplace.
When you create a Recommendation, the Recommendation is linked to your shift. However, you can
additionally link the Recommendation to a log entry or asset for which the recommended action is
applicable.
Access Recommendations in eLog
Procedure
1. Access the Shift Summary page for the shift whose Recommendation records you want to access.
2. Select .
The Recommendations pane appears, displaying the list of Recommendation records related to the
shift.
3. Select the Recommendation record whose details you want to view.
The datasheet for the Recommendation appears.
Create a Recommendation
Procedure
1. Access the Shift Summary page of the shift for which you want to add a Recommendation.
2. Select .
The Recommendations pane appears.
3. Select .
The Recommendation datasheet appears, displaying the General Information section.
4. Complete the fields in the General Information and Alert sections.
5. Select .
The Recommendation is created for the shift.
28 © 2021 General Electric CompanyChapter
6
Admin
Topics:
• Access the eLog Administrator
Page
• Administrator Workflow
• Shifts
• Data Entry Forms
• Templates
• Log Entry Type Records
• Role Configuration
© 2021 General Electric Company 29Access the eLog Administrator Page
Access the eLog Administrator Page
Procedure
In the module navigation menu, select Admin > Application Settings > eLog.
The eLog Administrator page appears, displaying the following workspaces:
• Shifts: Contains a table of Shifts for all the Functional Locations.
• Data Entry Forms: Contains a table of data entry forms.
• Templates: Contains a table of Templates.
• Log Entry Type: Contains a table of log entry type records.
• Role Configuration: Contains a table of Role Configuration records.
Administrator Workflow
eLog Administrator Workflow
About This Task
This workflow provides the basic, high-level steps for using eLog. The steps and links provided in the
workflow do not necessarily reference every possible procedure.
Procedure
1. Create a Shift for a Functional Location and Team.
2. Create a data entry form.
3. Create a Template for the data entry form.
4. Apply the Template to the Shift.
5. Modify or create a log entry type record for the subfamilies of the eLog Entry family (that is, General
Entry and Generation Event).
6. Modify or create a Role Configuration record for the Team Member (that is, the Team Member Role).
30 © 2021 General Electric CompanyShifts
About Shifts
A Shift, which is a recurring period in which a Team Member works, is defined by a Functional Location and
a period. It is used in assignments and log entries. Individuals are assigned to Shifts based on team
membership. When a Team is assigned to a Shift, all members of that Team are assigned to the Shift.
Access a Shift
Procedure
1. Access the eLog Administrator page.
2. In the Shifts workspace, in the Shift Name column, select the link in the row that contains the Shift
that you want to access.
Tip: You can also access a Shift for a specific Functional Location. To do so:
a. In the pane containing the list of Functional Locations, select the Functional Location for which you
want to access the Shift.
b. In the Shifts section, in the Shift Name column, select the link in the row that contains the Shift
that you want to access.
The datasheet of the Shift appears.
Note: As needed, you can modify the values in the available fields, and then select to save your
changes.
Create a Shift
About This Task
A Shift is created for a Functional Location. You can create multiple Shifts for a given Functional Location.
Before You Begin
• When creating a Shift, if you want to assign a Team to the Shift, ensure that the Team exists. In
addition, ensure that the Team is assigned to the Site to which the Functional Location of the Shift
belongs.
Note: For more information, refer to the Teams section of the documentation.
Procedure
1. Access the eLog Administrator page.
2. In the Shifts section, in the pane containing the list of Functional Locations, select the Functional
Location for which you want to create a Shift.
3. Select .
The Add New Shift page appears.
4. As needed, enter values in the available fields.
5. Select .
© 2021 General Electric Company 31The Shift is created.
Delete Shifts
About This Task
This topic describes how to delete a Shift from the eLog Administrator page.
Important: You cannot delete a Shift if it is associated with one of the following:
• Template
• Log entry records
Procedure
1. Access the eLog Administrator page.
2. In the Shifts section, select the check box next to each Shift that you want to delete.
Tip: You can also delete Shifts for a specific Functional Location. To do so:
a. In the pane containing the list of Functional Locations, select the Functional Location for which you
want to delete the Shifts.
b. In the Shifts section, select the check box next to each Shift that you want to delete.
3. Select .
The Delete Shift(s) window appears, asking you to confirm that you want to delete the Shifts.
4. Select Yes.
Important: If the Shift is associated with a Template or a log entry record, a warning message
appears, indicating that you cannot delete the Shift.
The Shifts are deleted.
Data Entry Forms
About Data Entry Forms
A data entry form provides fields for the template of an assignment. You can configure it as needed.
Access a Data Entry Form
About This Task
This topic describes how to access a data entry form, which consists of a Data Entry Form Definition
record and a Data Entry Form Field record.
Procedure
1. Access the eLog Administrator page.
2. Select the Data Entry Forms tab.
A table of data entry forms appears.
32 © 2021 General Electric Company3. In the Form ID column, select the link in the row that contains the data entry form that you want to
access.
A page containing the following sections appears:
• Form: Contains the Data Entry Form Definition datasheet.
• Form Designer: Contains the Data Entry Form Field datasheet.
Note: As needed, you can modify the values in the available fields in the Form section, and then select
to save your changes. In addition, as needed, you can modify the values in the available fields in the
Form Designer section, and then select to save your changes.
Create a Data Entry Form
About This Task
This topic describes how to create a data entry form, which consists of a Data Entry Form Definition
record and a Data Entry Form Field record.
Procedure
1. Access the eLog Administrator page.
2. Select the Data Entry Forms tab.
A table of data entry forms appears.
3. Select .
The New Data Entry Form page appears, displaying the Form section and the Form Designer
section.
4. In the Form section, as needed, enter values in the available fields.
5. Select .
The Data Entry Form Definition record is created.
6. Select the Form Designer tab.
The Form Designer section appears.
7. As needed, enter values in the available fields.
Tip: You can enter additional values in the next row.
8. Select .
The Data Entry Form Field record is created.
© 2021 General Electric Company 33Results
The data entry form is created.
Delete a Data Entry Form
About This Task
This topic describes how to delete a Data Entry Form, which consists of a Data Entry Form Definition
record and a Data Entry Form Field record.
Important: You cannot delete a Data Entry Form if it is associated with a Template.
Procedure
1. Access the eLog Administrator page.
2. Select the Data Entry Forms tab.
A table of data entry forms appears.
3. Select the row containing the data entry form that you want to delete.
4. Select .
The Delete Data Entry Form window appears, asking you to confirm that you want to delete the data
entry form.
5. Select Yes.
Important: If the Data Entry Form is associated with a Template, a warning message appears,
indicating that you cannot delete the Data Entry Form.
The data entry form is deleted.
Templates
About Templates
An eLog Template defines the basis and format for an assignment created for a Shift. In addition, the
Template provides a data entry form, assignees, and reviewers for the assignment.
Access a Template
Procedure
1. Access the eLog Administrator page.
2. Select the Templates tab.
A table of Templates appears.
3. In the Template ID column, select the link in the row that contains the Template that you want to
access.
The datasheet of the Template appears.
Note: As needed, you can modify the values in the available fields, and then select to save your
changes.
34 © 2021 General Electric CompanyCreate a Template
Before You Begin
• Create a data entry form.
Procedure
1. Access the eLog Administrator page.
2. Select the Templates tab.
A table of Templates appears.
3. Select .
The New Template page appears.
4. As needed, enter values in the available fields.
5. Select .
The Template is created.
Next Steps
• Apply the Template to Shifts.
Apply a Template to Shifts
About This Task
To use an eLog Template in an assignment for a Shift, you must apply the Template to the Shift. This topic
describes how to apply a Template to Shifts.
Procedure
1. Access the eLog Administrator page.
2. Select the Templates tab.
A table of Templates appears.
3. Select the row that contains the Template that you want to apply to Shifts.
4. Select Apply.
The Apply Template to Shifts window appears.
5. Select Add Row.
A row appears with drop-down list boxes in the Functional Location and Shift columns.
6. In the Functional Location column, in the drop-down list box, select the Functional Location that is
associated with the Shifts to which you want to apply the Template.
7. In the same row, in the Shift column, in the drop-down list box, select the Shifts to which you want to
apply the Template.
Tip: You can select Shifts for a different Functional Location in the next row.
8. Select Apply.
The Template is applied to the Shifts. The count of Shifts to which the Template is applied appears in
theShift Count column in the Templates workspace.
© 2021 General Electric Company 35Delete a Template
About This Task
This topic describes how to delete a Template from the eLog Administrator page.
Important: You cannot delete a Template if it is associated with an Assignment.
Procedure
1. Access the eLog Administrator page.
2. Select the Templates tab.
A table of Templates appears.
3. Select the row containing the Template that you want to delete.
4. Select .
The Delete Template window appears, asking you to confirm that you want to delete the Template.
5. Select Yes.
Important: If the Template is associated with an Assignment, a warning message appears, indicating
that you cannot delete the Template.
The Template is deleted.
Log Entry Type Records
About Log Entry Type Records
Log entry type records are used to:
• Define the types of log entries for the sub families of the eLog Entry family.
• Assign colors to log entry types.
• Differentiate the log entries in the Shift Summary page based on color.
In the Shift Log workspace, when a log entry is created for a given log entry type, the log entry appears in
the color that you have assigned to the log entry type in the associated log entry type record.
The Log Entry Type workspace in the eLog Administrator page contains the baseline log entry type
records.
Access a Log Entry Type Record
Procedure
1. Access the eLog Administrator page.
2. Select the Log Entry Type tab.
A table of log entry type records appears.
36 © 2021 General Electric Company3. In the Family Name column, select the link in the row that contains the log entry type record that you
want to access.
The Edit Log Entry Type window appears.
Note: As needed, you can modify the values in the available fields, and then select to save your
changes. However, you can modify only the Log Entry Type Color for the Simple Log Entry Type record.
Create a Log Entry Type Record
About This Task
This topic describes how to create a log entry type record for one of the following families:
• eLog General Entry
• eLog Generation Event
Important: You cannot create a log entry type record for the eLog Simple Log Entry family.
Procedure
1. Access the eLog Administrator page.
2. Select the Log Entry Type tab.
A table of log entry type records appears.
3. Select .
The New Log Entry Type window appears.
4. As needed, enter values in the available fields.
5. Select .
The log entry type record is created.
Delete Log Entry Type Records
About This Task
This topic describes how to delete a log entry type record created for one of the following families:
• eLog General Entry
• eLog Generation Event
Important: You cannot delete the Simple Log Entry Type record.
© 2021 General Electric Company 37Procedure
1. Access the eLog Administrator page.
2. Select the Log Entry Type tab.
A table of log entry type records appears.
3. Select the check box next to each log entry type record that you want to delete.
Tip: To select all the check boxes at once, select the check box next to the first column heading.
4. Select .
The Delete Log Entry Type window appears, asking you to confirm that you want to delete the log
entry type records.
5. Select Yes.
The log entry type records are deleted.
Role Configuration
About Role Configuration Records
Role Configuration records determine the behavior of roles associated with the Team Members assigned
to a Shift. Depending on the data provided in these records, you can:
• Sign in to a Shift using a different role.
• Sign in to multiple Shifts.
• Take over the Shift from multiple Team Members.
• End the session of a Team Member.
The Role Configuration workspace in the eLog Administrator page contains the baseline eLog Role
Configuration records (that is, Operator and Supervisor).
Access a Role Configuration Record
Procedure
1. Access the eLog Administrator page.
2. Select the Role Configuration tab.
A table of Role Configuration records appears.
3. In the Team Member Role column, select the link in the row that contains the Role Configuration
record that you want to access.
38 © 2021 General Electric CompanyThe datasheet of the Role Configuration record appears.
Note: As needed, you can modify the values in the available fields, and then select to save your
changes.
Create a Role Configuration Record
Procedure
1. Access the eLog Administrator page.
2. Select the Role Configuration tab.
A table of Role Configuration records appears.
3. Select .
The New Role Configuration page appears.
4. As needed, enter values in the available fields.
5. Select .
The Role Configuration record is created.
Delete a Role Configuration Record
About This Task
This topic describes how to delete a Role Configuration record from the eLog Administrator page.
Important: You cannot delete a Role Configuration record in the following scenarios:
• The Team Member Role is used at least once in the CAN SIGN IN AS column.
• The Team Member Role is associated with an active template or shift.
Procedure
1. Access the eLog Administrator page.
2. Select the Role Configuration tab.
A table of Role Configuration records appears.
3. Select the row that contains the Role Configuration record that you want to delete.
4. Select .
The Delete Role Configuration window appears, asking you to confirm that you want to delete the
Role Configuration record.
5. Select Yes.
The Role Configuration record is deleted.
© 2021 General Electric Company 39Chapter
7
Deployment
Topics:
• Deploy eLog for the First Time
• Upgrade eLog
40 © 2021 General Electric CompanyDeploy eLog for the First Time
Before You Begin
The following table outlines the steps that you must complete to deploy and configure this module for the
first time.
These tasks may be completed by multiple people in your organization. GE Digital recommends, however,
that the tasks be completed in the order in which they are listed.
Before you begin completing these tasks, review the system requirements for this module to identify the
supported features for this module in GE Digital APM.
Results
Step Task Note
1 Assign Security Users to one or more of This step is required.
the eLog Security Groups or Roles.
Upgrade eLog
Before You Begin
The following tables outline the steps that you must complete to upgrade this module to the latest
version of GE Digital APM .
These tasks may be completed by multiple people in your organization. We recommend, however, that the
tasks be completed in the order in which they are listed.
Procedure
• Upgrade to the latest version of GE Digital APM.
This module will be updated to the latest version of GE Digital APM automatically. No additional steps
are required.
© 2021 General Electric Company 41Chapter
8
Reference
Topics:
• General Reference
• Catalog Items
• Family Field Descriptions
• Shift Period and Shift Sign-in
Time
42 © 2021 General Electric CompanyGeneral Reference
eLog Data Model
The following diagram shows the relationships between the families used in eLog.
Note: In the diagram:
• Boxes represent entity families.
• Arrows that are labeled represent relationship families that are configured in the baseline database.
• Arrows that are not labeled represent foreign key relationships.
• Arrows that are dotted represent a relationship between a family and its subfamily.
You can determine the direction of each relationship from the direction of the arrow head: the box from
which the arrow originates is the predecessor, and the box to which the arrow head points is the
successor.
© 2021 General Electric Company 43eLog Security Groups
The following table lists the baseline Security Groups available for users within this module, as well as the
baseline Roles to which those Security Groups are assigned. In Predix APM, Roles are assigned to Security
Users through permission sets.
Important: Assigning a Security User to a Role grants that user the privileges associated with all of the
Security Groups that are assigned to that Role. To avoid granting a Security User unintended privileges,
before assigning a Security User to a Role, be sure to review all of the privileges associated with the
Security Groups assigned to that Role.
Security Group Roles
MI eLog Viewer Log Viewer
MI APM Viewer
MI eLog Contributor Log Contributor
MI Health User
MI eLog Administrator Log Administrator
MI Health Admin
MI Health Power
The baseline family-level privileges that exist for these Security Groups are summarized in the following
table.
Family MI eLog Viewer MI eLog Contributor MI eLog Administrator
Entity Families
Data Entry Form Definition View View View, Insert, Update, Delete
Data Entry Form Field View View View, Insert, Update, Delete
eLog Assignment View View, Insert, Update View, Insert, Update, Delete
eLog Assignment Answer View View, Insert, Update View, Insert, Update, Delete
eLog Entry View View, Insert, Update View, Insert, Update, Delete
eLog Entry Comment View View, Insert, Update View, Insert, Update, Delete
eLog Entry Type Color View View View, Insert, Update, Delete
eLog Login View View, Insert, Update View, Insert, Update, Delete
eLog Role Configuration View View View, Insert, Update, Delete
eLog Template View View View, Insert, Update, Delete
Shift View View View, Insert, Update, Delete
Relationship Families
eLog Assignment Has View View, Insert, Update View, Insert, Update, Delete
Assignment Answers
44 © 2021 General Electric CompanyFamily MI eLog Viewer MI eLog Contributor MI eLog Administrator
eLog Entry Has Causing Asset View View, Insert, Update View, Insert, Update, Delete
eLog Has Primary Events View View, Insert, Update View, Insert, Update, Delete
eLog Template Has Data Entry View View View, Insert, Update, Delete
Form
eLog Template has eLog View View, Insert, Update View, Insert, Update, Delete
Assignments
eLog Template Has Shifts View View View, Insert, Update, Delete
eLog URLs
The URL route that is associated with eLog is elog. The following table describes the various paths that
build on the route, and the elements that you can specify for each path.
Tip: For more information, refer to the URLs section of the documentation.
Element Description Accepted Value(s) Notes
elog/dashboard/0: Displays the eLog Overview page.
elog/dashboard/shift-summary//assignments: Displays the My Assignments workspace in the Shift Summary page.
Represents the Entity Key of Numeric Entity Key that You must be signed in to the
the Shift that is associated corresponds to a Shift. Shift to access this URL.
with the assignments that you
want to access.
elog/dashboard/shift-summary//shift-logs/0: Displays the Shift Log workspace in the Shift Summary page.
Represents the Entity Key of Numeric Entity Key that None.
the Shift that is associated corresponds to a Shift.
with the log entries that you
want to access.
elog/dashboard/shift-summary//shift-logs/: Displays the log entry in the Shift Log workspace in the
Shift Summary page.
Represents the Entity Key of Numeric Entity Key that None.
the Shift that is associated corresponds to a Shift.
with the log entry that you
want to access.
Represents the Entity Key of Numeric Entity Key that None.
the log entry that you want to corresponds to a log entry.
access.
elog/dashboard/shift-summary//sign-in-out/0: Displays the Shift Sign-In/Out Log workspace in the Shift Summary
page.
Represents the Entity Key of Numeric Entity Key that None.
the Shift that is associated corresponds to a Shift.
with the sign-in and sign-out
logs that you want to access.
© 2021 General Electric Company 45Element Description Accepted Value(s) Notes
elog/dashboard/shift-summary//sign-in-out/: Displays the sign-in and sign-out log in the Shift Sign-
In/Out Log workspace in the Shift Summary page.
Represents the Entity Key of Numeric Entity Key that None.
the Shift that is associated corresponds to a Shift.
with the sign-in and sign-out
log that you want to access.
Represents the Entity Key of Numeric Entity Key that None.
the sign-in and sign-out log corresponds to a sign-in and
that you want to access. sign-out log.
elog/admin/shifts: Displays the Shifts workspace in the eLog Administrator page.
elog/admin/data-entry-forms: Displays the Data Entry Forms workspace in the eLog Administrator page.
elog/admin/data-entry-forms/: Displays the data entry form.
Represents the Entity Key of Numeric Entity Key that None.
the data entry form that you corresponds to a data entry
want to access. form.
elog/admin/templates: Displays the Templates workspace in the eLog Administrator page.
elog/admin/templates/: Displays the Template.
Represents the Entity Key of Numeric Entity Key that None.
the Template that you want to corresponds to a Template.
access.
elog/admin/eLogMapping: Displays the Log Entry Type workspace in the eLog Administrator page.
elog/admin/role-configuration: Displays the Role Configuration workspace in the eLog Administrator page.
elog/admin/role-configuration/: Displays the Role Configuration record.
Represents the Entity Key of Numeric Entity Key that None.
the Role Configuration record corresponds to a Role
that you want to access. Configuration record.
URLs
URL Destination
elog/dashboard/shift-summary/ The My Assignments
12345678912/assignments workspace for the Shift whose
Entity Key is 12345678912.
elog/dashboard/shift-summary/ The Shift Log workspace for the
12345678912/shift-logs/0 Shift whose Entity Key is
12345678912.
elog/dashboard/shift-summary/ The Shift Log workspace for the
12345678912/shift-logs/ Shift whose Entity Key is
23456789123 12345678912, displaying the log
entry whose Entity Key is
23456789123.
46 © 2021 General Electric CompanyYou can also read