Interactive Presentation Utility 2 - VPL-SW636C/SW631C VPL-SW635C/SW630C/SW620C VPL-SW536C/SW526C User's Guide - pro.sony
←
→
Page content transcription
If your browser does not render page correctly, please read the page content below
4-465-082-18 (1)

Interactive
Presentation Utility 2

User’s Guide
Before operating the unit, please read this manual thoroughly and retain it for future reference.

VPL-SW636C/SW631C
VPL-SW635C/SW630C/SW620C
VPL-SW536C/SW526C

© 2013 Sony Corporation
Table of Contents
    For Windows ...................................... 3
       System Requirement .................... 3
       Feature .......................................... 3
       Desktop mode ............................... 4
       Whiteboard mode ......................... 6
       Dual-user (Dual pen) .................... 7
       Calibration Auto/Manual ............ 8
       Saving calibration data ................ 9
       Pen tracking speed adjustment .... 9
       Pen detection sensitivity
         adjustment ................................ 9
       Management Tools ..................... 10
       Drawing Tools ............................ 12
       Assistant Tools ........................... 24
       Resource Panel ........................... 30
       Video Conference ....................... 34
    For Mac ............................................ 35
       System Requirement .................. 35
       Feature ........................................ 35
       Desktop mode ............................. 36
       Whiteboard mode ....................... 37
       Dual-user (Dual pen) .................. 38
       Calibration Auto/Manual .......... 39
       Saving calibration data .............. 40
       Pen tracking speed
         adjustment .............................. 40
       Pen detection sensitivity
         adjustment .............................. 40
       Management Tools ..................... 41
       Drawing Tools ............................ 43
       Assistant Tools ........................... 53
       Resource Panel ........................... 57

2     Table of Contents
For Windows
System Requirement Feature
• CPU: Celeron 2.1GHz or faster • Calibration Auto
• Memory: 256MB or more (512MB • Dual-user (Dual pen)
Recommend) • Handwriting Recognition
• Available hard drive space: 1GB or more • Whole and partial Screen Capture &
• OS: Screen Record
Windows XP/Vista/Windows 7*1/ • Editable object drawing
Windows 8*1/Windows 10*1 • Hopping tool
*1: 32bit edition and 64bit edition • Adjustable Floating Tools
• Rich education tools
Notes (2D & 3D Figures, Ruler, Graphs, Math
• Running this software is limited to 30 times Functions)
with projector disconnected. The limit will • Enhanced Assistant Tools
be reset to 30 when the projector is • Courseware Making Panel
connected.
• Calibration cannot be performed in the
Extended Display mode.
• Set the DPI (Dots Per Inch) to 100% before
using this software. Settings other than 100%
may result in incorrect display.
System Requirement / Feature 3Desktop mode
1 23
4
5
6
7
a Lock/Unlock the Floating Tools from one side to the
other. This function allows you to access
b Switch Display Mode the Floating Tools conveniently on large
Switches Vertical/Horizontal display of screen.
the Floating Tools. Dock Floating Tools
Move the Floating Tools to any edge of
c Minimize the screen and the toolbar will
Minimizes the Floating Tools. automatically hide itself. To show the
Floating Tools, move the cursor to the
d Whiteboard/Desktop tabs edge to which the Floating Tools is
Switches Whiteboard mode/Desktop docked, or click the icon.
mode by clicking the tab.
g Insert annotation to MS app.
e Operate Windows Insert to Office/Clear/Save/Exit.
When you are not in Annotation mode, Insert to Office
you can perform normal computer If you have opened a Word, Excel or
operations as you usually do with a PowerPoint document and made an
mouse. In Annotation mode, you can annotation directly on it, you can click
also perform normal computer the icon in the lower right corner to save
operations by clicking the icon on the your annotation to the document in
Floating Tools. original form. Word/Power point/Excel
f Hopping tool (2003-2010) support built-in annotation.
Switch Floating Tools position Clear
Wherever the Floating Tools is, there is Click the icon in the lower right corner to
a position switching arrow on the clear all annotations created by
contrary side. Click this arrow to move Interactive Presentation Utility 2.
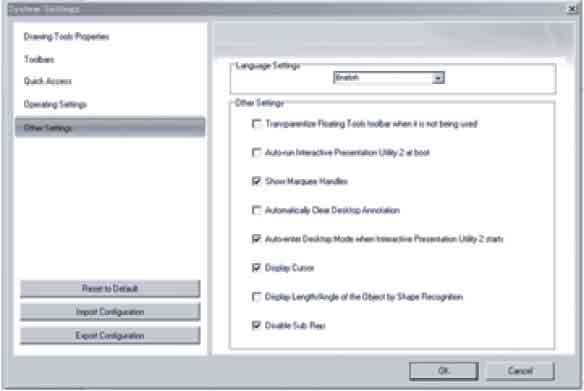
4 Desktop modeAuto-clear annotation
All annotations created by Interactive
Presentation Utility 2 will be auto-
cleared when you switch or shut down
the window. To enable this function,
select “Automatically Clear Desktop
Annotation” in “Other Settings” from
“System Settings.” This function is
selected by default.
To enable the mouse function at PC
startup, select “Other Settings” from
“System Settings,” then select “Auto-run
Interactive Presentation Utility 2 at
boot.”
Save
Click the icon in the lower right corner to
capture the current screen to the
whiteboard page. All annotations can be
edited at a later time.
Go to Previous or Next page of an
Office file
You can click and on the Floating
Tools to go to the Previous or Next page
of the office file.
Mouse Mode
By selecting “Mouse Mode,” only the
mouse function of the Interactive Pen
Device will be enabled, with a simplified
user interface. This is convenient for
educational computer software or other
applications using only the mouse
function. Click the icon for Interactive
Presentation Utility 2 in the task bar to
display the pop-up menu, then select
“Mouse Mode.” Selecting again will
disable it.
Desktop mode 5Whiteboard mode
1 2
3
4
5
6
7 8
a Common tools
b Assistant tools
c Drawing tools
d Resource Panel
e Hopping tool (page 4)
f Full Screen/Move Toolbar
(Moves toolbar up or down)/
Move Resource Panel (Moves
Resource panel)/Hide Preview
g Preview
h Annotation recording (Reviews
operations)
Play/Stop/Settings/Previous Page/Next
Page
6 Whiteboard modeDual-user (Dual pen)
Main Pen toolbar (Floating Tools)
• The main pen toolbar is displayed when Interactive Presentation Utility 2 is
activated.
• For customizing, click “System Setting” > “Toolbars” > “Floating Tools” in
the whiteboard mode.
• Functions which are not activated are displayed in gray in the desktop mode.
• Click to move the Floating Tools.
Note
This is for the main pen only.
Sub Pen toolbar
• Push the button on the sub pen to display the sub pen toolbar.
Notes
• This is for the sub pen only.
• The sub pen toolbar cannot be customized.
Disable sub pen
Select “Other Settings” from “System Settings,” then select “Disable sub pen.” Only the main
pen will be enabled.
Dual-user (Dual pen) 7Calibration Auto/Manual
Calibration aligns the points where the pen • If Calibration Auto still does not calibrate
(Main and Sub) is pointing and where the properly after reducing the lighting as
projector displays the cursor on the screen. suggested above, click “Calibration Main”
“Calibration Auto” allows you to execute the and “Calibration Sub”, then calibrate
calibration automatically. manually.
• If you use a screen which is not white,
Main Pen toolbar Calibration Auto may be inaccurate.
a
b
c
d
a Calibration Auto
b Calibration Main
c Calibration Sub
d Saving calibration data
Click “Calibration” to select “Calibration
Auto.” The calibration starts automatically.
Note
Observe the precautions noted below during
the calibration.
• Avoid placing obstacles between the
interactive detector and the screen.
• Do not move the projector and the screen.
If Calibration Auto does not calibrate properly,
try the following methods.
• Shield the screen from strong, direct outside
light.
• Reduce the ambient light while Calibration
Auto is performed.
8 Calibration Auto/ManualSaving calibration data Pen tracking speed
Calibration data for respective operating adjustment
conditions can be saved. You can use the Tracking speed of the Interactive Pen Device
interactive function with the settings can be adjusted. If you are concerned about
specified for certain operating conditions by shakes in drawn lines, set it toward “Slow”.
selecting the saved data. However, setting toward “Slow” results in a
slow response when you draw fast. If you set
“Auto,” the pen tracking speed is
automatically adjusted according to the
1_a drawing speed.
2
3
1_b
Pen detection sensitivity
adjustment
If you are using the Interactive Pen Device in
a Save (name/overwrite) too bright a room, the pen position may not
Press the button to display the be detected accurately and may cause
calibration data list. Press the [Add] drawing errors. This function adjusts the pen
button to save the current calibration detection sensitivity to optimize the system
data with a new name. The saved data to the brightness of the room.
will be added to the calibration data list.
While using the Interactive Pen Device, the
b Apply the selected save data pen may not be able to draw or the lines may
Select your desired data from the list and cut intermittently under the following
press the [OK] button to apply it. conditions. In this case, click this button to
improve the symptoms.
c Delete the selected save data
Select the unwanted data from the list • A bright light is used or there is sunlight
and press the [Delete] button to delete it. and the entire environment is bright.
• The screen is directly exposed to a bright
light or sunlight.
Note
During adjustment, the picture will turn black.
Please wait a while.
Saving calibration data/Pen tracking speed adjustment/Pen detection sensitivity adjustment 9Management Tools
File Management Page Management
New New Page
Create a new file. Insert a Blank Page after the current one.
Open Delete Page
You can open .cdf, .cdp, .iwb, .pdf, .doc, Delete the current page.
.ppt, .xls, .docx, .pptx and .xlsx files. Copy/Cut/Paste
Close Select the thumbnail of the page you want to
Click “File” and select “Close” on the Menu copy/cut/paste on the Page tab.
bar to close the current file.
Save/Save as
You can save the current file in a choice of
formats, including .bmp, .emf, .wmf, .iwb,
.pdf, .cdp, .jpg, .html, .gif, .png, .tif, .doc,
.ppt, .xls, .docx, .xlsx, .pptx, .cdf, The file
will be named by the current time
automatically.
Save as Template
If the layout of the current file is likely to be
frequently used in the future, you can also
save it as a template, which can be retrieved
from the Template tab. Click “File” and
“Save as Template” on the Menu bar to save Clone
the current file as a template. Click the menu arrow on the page thumbnail
Auto Save and select “Clone Page” or right-click on the
The Auto Save function can minimize your page thumbnail and select “Clone Page.”
data loss in the event of unexpected The cloned page appears immediately after
problems. Click “File” and select “Auto the current page.
Save” on the Menu bar to set the Auto Save Insert page number
function. Click “Insert” and select “Page Number” on
the Menu bar, then you can set the page
number position and start page number in
the Page Number window that appears.
Print
You can print a file in Interactive
Presentation Utility 2. Click “File” and
select “Printer Settings” to set the printer,
then click “Print” or “Print Current Page” to
print the pages you need.
Send E-mail
Click “File” and select “Send E-mail” to
send the current file as an e-mail attachment
in .cdf, .pdf, .ppt formats.
10 Management ToolsZoom Note
By default, the whiteboard pages are
.xls or .xlsx files can not be embedded while
displayed in their actual dimensions. But other .xls or .xlsx files are open.
you can use the zoom tools to enlarge or
reduce the size of the whiteboard page. Open To reopen the file or
-Zoom in / Zoom out webpage you want to
After the mouse pointer becomes a embed.
magnifier, click the page to enlarge or reduce Edit To read the file or webpage
it. When you click, you can also hold and you have opened.
drag a square to zoom in an area. Play To play the opened file.
-Restore Page
Restore a page to 100%. You can also select Stop To stop playback.
from 50% to 200% from a drop-down menu. Save To save a word or excel file
-Fit Page revised by the current user.
Make the entire page fit your display. Zoom in To zoom in the opened
Move Page office document or
A whiteboard page can be infinitely webpage.
extended. You can move a page to obtain Zoom out To zoom out the opened
more space or to display any part of the page office document or
on screen. webpage.
Return Page
Return a moved page to its original position. Maximize To Maximize the window.
Insert Page Background Restore To restore the maximized
You can specify a single color, gradient, grid window to original.
pattern, or an image (.jpg, .jpeg, .wmf, .emf, Close To close an embedded
.png, .bmp) as a page background. window. It is displayed as an
object on the whiteboard
page.
Frequently Used Applications
Other management tools You can quickly access an external program
or file. To access Frequently Used
Embedded Window Applications, click “Frequently Used
You can embed an Office documents (doc, Applications” on the Menu bar, or click the
xls, ppt, docx, xlsx, and pptx) or a website in icon on the Toolbars. The Application
a whiteboard page. To add an embedded toolbar appears (displaying IE Program by
window on a whiteboard page, select default).
“Embedded Window” on the Menu bar, or
click the icon on the Toolbars, then move the
cursor to the position you want to embed and
click it. The window appears as follows: Click a shortcut icon on the Application
toolbar to directly open the external program
or file. Meantime, you can click to add or
delete an application.
Management Tools 11Drawing Tools
Freehand Drawing Tools
Freehand Drawing Tools are the most frequently used tools, with which you can annotate, write
and draw on the interactive screen. Freehand Drawing Tools include Pencil , Brush Pen ,
Creative Pen and Magic Pen . Properties can be adjusted as required. Objects drawn by
Magic Pen will fade out in 8 seconds. Magic Pen also provides Tool Recognition to open
Reveal Screen, Spotlight, Magnifier and even to delete an object by drawing given shapes. You
can customize the properties of Freehand Drawing Tools as follows.
Color, Thickness, Transparency
Double-click any color, thickness or transparency button or click the menu arrow of sections to
adjust them.
Color Transparency Thickness Pattern Gradient
Line Type
Lock:
Keep the Sub Pen toolbar on the screen while drawing.
Line Type Show Length
Click the menu arrow of the Line section, When you add a line to the whiteboard page,
then select the line style you want from the you can display the line length. Click and
list. You can also select Line Style from select “Show Length.” You can also set the
“Customize Line Style” window. unit and decimal digits of length from
“Length Settings.”
12 Drawing ToolsShape Recognition Shapes
Pencil tool also provides a Shape
Recognition function. If you enable this Different kinds of 2D and 3D shapes are
function, a stroke drawn by Pencil tool will provided. You can customize the properties
be automatically revised to Solid Line, Arc, of the Shapes tool.
Circle, Rectangle, Triangle or Polygon, and Shapes style
adjacent solid lines will be automatically 3 shape buttons are provided on the
combined to form a polygon. Click Pencil Properties toolbar of Shapes tool, including
tool icon to show the Property toolbar. Then Rectangle, Triangle and Circle by default. To
click to activate the Shape Recognition apply other shapes, double-click any shape
function. Select the shape to show its points, button or click the menu arrow of the Shape
then click and drag any point to change the section.
shape.
2D Shapes 3D Shapes
Tool Recognition
Magic Pen tool also includes a Tool
Recognition function. If you enable this
function, you can open Spotlight, Magnifier,
Reveal Screen and Object Eraser with Magic
Pen.
Draw a circle to open
Spotlight. Other Settings
Draw a square to open Click “Settings” on the Properties toolbar to
Magnifier. apply other settings.
Draw a left or right arrow
to open Reveal Screen
(Left-right).
Draw an up or down arrow
to open Reveal Screen
(Top-bottom).
Draw an inclined arrow to
open Reveal Screen (All-
Directions).
Scribble on an object to
clear it.
Drawing Tools 13Functions Point to Point
More than 20 kinds of function graphs are This tool allows you to create a Polygon or a
provided. Click the Function tool to choose Polyline. To create a polygon or a polyline,
one of the available function graphs, then click the icon, and click different points to
click where on the screen you want to place create a polygon or polyline. Double-click
the function graph. You can click on the the last point to end the polygon or polyline.
function curve to select only the function You can also overlap the last point with the
curve, or select the whole function graph by first one to make a shape. All the points can
clicking on the coordinate system. be removed. Point to Point tool can also be
Function Expression customized.
To customize your own function expression,
click the icon to show the properties. Click Overlap the last point to the first point.
the menu arrow. Select “Customized” to
show the “Customize Function” window.
Click “Frequently Used Functions.” The
function expression is displayed on the
right-hand side. You can define the Function,
Domain, Scale Value and other settings.
Click the
first point.
Double click the last point.
Table
In creating a table, you can set Frame color,
Thickness, Transparency, Row number and
Column number in the Property toolbar. You
Share Coordinate System can then create a table by pressing where you
You can put all functions together on one
want to place the table on the screen and
coordinate system by clicking at the bottom
of the Properties toolbar. If Share Coordinate dragging until the table is the desired size.
System is selected already, you can click it
again to cancel.
14 Drawing ToolsRow and Column Number -Add Objects to Cell
You can select row and column numbers Select the target object and drag it to the
from 1 to 20. Enter numbers directly, or table cell.
adjust numbers by the arrow buttons.
Table Operation
After selecting a cell, the following -Move Object from Cell
operations become available: Select the target object, then drag it from one
-Text Input cell to another, or to the page.
You can also double-click a cell to insert text
into it.
-Insert Row/ Insert Column
A new row or column will appear next to the
current one.
-Delete Row/Delete Column
The selected row or column will be deleted.
-Split Cell
Fill
Select a cell and click the icon. A “Split
Cell” window appears. Enter row and You can fill Color, Gradient, Trellis or Image
column numbers to split the cell. (jpg, jpeg, bmp, png, wmf, emf) to any
-Merge Cells closed geometry.
Select several cells to merge them.
-Move
Click the square in the upper left corner
of the table, then drag the table to a different
position on the page.
-New Table Fill with Gradient
If you select multiple cells and drag them to Six gradients are provided by default. To
a different position on the page, you will apply another gradient, double-click any
create a new table consisting of the selected gradient fill button, or click the menu arrow,
cells and their contents. then set the gradient in Gradient Editor. To
add a new gradient, please click below the
gradient bar to define color stop(s). You can
also select a gradient direction.
Drawing Tools 15Fill with Pattern Eraser
Six patterns are provided by default. To
apply another pattern, double-click any Five erasing methods are provided,
pattern fill button, or click the menu arrow, including Small Circle Eraser, Middle Circle
then set the foreground color and Eraser, Large Circle Eraser, Object Eraser,
background color. Circle Eraser, Area Eraser and Erase All.
1 2 3 4 5
a Eraser (Small/Middle/Large)
b Object Eraser
Select the icon and click an object to
clear it.
c Circle Eraser
Select the icon and draw a circle around
the object(s) you want to erase.
Fill with Image
Double-click the image fill button, or click
d Area Eraser
the menu arrow to select an image file to fill. Select the icon and drag a Rectangle
around the object(s) you want to erase.
e Erase All
Select the icon and click on a page to
remove all objects from the page.
Objects created by “Shapes” or “Point to
Point” tool can only be erased by the Object
Eraser or the Erase All. The Circle Eraser or
the Area Eraser cannot be used in this case.
Text
Select and click the button where you want
the text to start on the page. The Text box
and Font toolbar will appear.
Clear the Fill Effect
Click on the Property toolbar, then click Font toolbar
the geometry. The Fill effect will be cleared.
Text box
Input Text
You can input text with On-screen Keyboard
or Handwriting Recognition . You can
also import text from .txt file to the Text box.
16 Drawing ToolsHandwriting Recognition
Interactive Presentation Utility 2 can
recognize your handwriting as letters,
numbers or symbols. You can click on the
Handwriting Recognition toolbar, and select
the recognition type.
Change Text Format
Change the text format, including Font,
Bold, Italic, Underline, Color and others,
with Font toolbar if necessary. You can also
annotate Phonetic for text in English by
clicking .
Note
If you are teaching Chinese in your class, you
need to change the interface language to
Chinese first. Activate Text tool the same way,
and you can click to annotate Phonetic
(Pinyin) for text in Chinese. However, you need
to install Microsoft Pinyin IME 2003 to enable
this function.
Edit Text
Right-click on the selected text to copy, cut,
paste, delete, select all or undo the text.
Right-click can be performed by a long push
of the Pen tip (main only), or clicking .
Drawing Tools 17Pie Chart and Bar Chart
Select the button, then click where on the screen you want to put the Pie Chart or the Bar Chart.
The above setting windows allow you to set a Name, the Value and Transparency for either type
of chart.
Additional settings are as follows:
Pie Chart: You can set a Title, Background color, Transparency, 3D Effect and Pie type.
Bar Chart: You can set a Title, Category(X) axis, Value(Y) axis, Background color,
Transparency, 3D Effect and Bar type.
The above setting windows allow you to do the following:
Pie Chart: You can adjust the size of individual sectors and use the Fill tool to set the color for
sectors.
Bar Chart: You can adjust the size of individual bars directly and use the Fill tool to set the color
for bars.
18 Drawing ToolsFormula Editor
Formula Editor allows you to add complicated math formula or chemistry equations on the
whiteboard page. Select the button and click on the page, then the Formula Editor window will
appear.
Formula Editor window
Edit box
Enter a formula in the Edit box .
Click on the page, and the formula you input will appear.
Note
In Windows 7, you can click in Formula Editor to enable the Formula Recognition function,
which allows you to enter a handwritten formula.
Drawing Tools 19Manipulate Objects
Marquee Handles
Frequently used edit tools will be provided in Marquee Handles according to the object you
select. You can choose from these tools to edit the object.
1 2 3 4 5 6 7 8 9 0
qa
qs
qd
a Color h Send Backward
b Width i Solid/Hollow
c Transparency j Settings
d Clone k Rotate
e Delete l Right-click menu
f Lock/Unlock m Scale
g Bring Forward
Other functions
Review Freehand Drawing
Group/Ungroup
Text Input
20 Drawing ToolsRight-click Menu Rotate Object
When an object is selected, a selection
Copy, Cut, Paste, Clone rectangle appears around the object. You can
You can copy, cut, or clone any object on a find a rotation handle above the rectangle.
page, and paste it on the same or different By default, the object rotates around its
pages. central point. You can define another base
Right-click menu point by dragging the central point.
Click and hold here to
rotate the object.
Center
You can show or hide the center point of an
object.
Zoom Object
You can select one or several objects, and
drag the resize handle to resize objects.
Infinite Cloner
You can clone one or more objects as many
times as you want.
Click and hold here
to resize the object.
Move Object
You can move objects to another position on
the same page. You can also move objects to
Delete another page.
Delete one or more selected objects.
Select All
Select all the objects on the page.
To move an object to another position on the
same page, select one or more objects, then
drag to a new position on the page.
To move objects to another page, select one
or more objects, then drag onto the
thumbnail of another page on the Page tab.
Drawing Tools 21Save Object
You can save one or more objects as image files
in .bmp, .png, .gif, .jpg, .emf, .wmf, or .tif
format.
Lock Object
You can lock an object to prevent its
modification, movement or rotation. You may
also unlock it at any time.
Add Hyperlink to Object
You can hyperlink any object on the
whiteboard page to a web page, or a file on
your computer. Right-click the selected object,
then select “Hyperlink.” The Hyperlink
Group Objects (Ungroup) window appears as follows:
You can group several objects together, and
manipulate or edit them as though they were
a single object.
Note
You cannot group Label Tools (Math Tools),
Function Tools, Pie Chart or Bar Chart.
Order Objects
If the objects overlap you can change their
placement. Select “Bring to Front,” “Send to
Back,” “Bring Foward,” or “Send Backward.”
Align Objects You can hyperlink the object to a file, web
You can align the bottom, top, left/right sides or page, FTP, or website. If you want to add a
centers of selected objects. sound effect when launching the hyperlink,
Layout Objects browse and select an audio file in for Sound
Auto Layout and Customized Layout are Effect section. You can choose to open the link
available. by clicking the Corner Icon or the Object itself.
Mirror Object
You can insert a mirror object quickly by
selecting “Mirror Left,” “Mirror Right,”
“Mirror Up” or “Mirror Down.”
Show/Hide Object
You can choose to show or hide object(s).
Insert Annotation
Interactive Presentation Utility 2 allows you to
add your own notes and annotations to an
object. Inserted annotations can be re-edited or
removed.
Flip Object
You can flip an object horizontally or
vertically.
Insert to Background
You can insert one or more selected objects to
background. The object(s) inserted to
background cannot be manipulated or edited.
22 Drawing ToolsReview Operation (all objects)
When you are creating and manipulating objects, Interactive Presentation Utility 2
automatically records your operations, allowing you to review them anytime.
Review Freehand Drawing
(The operation by one pen only can be recorded)
Drawing Tools 23Assistant Tools
Screen Tools Highlight
You can click in the bottom right of the
Interactive Presentation Utility 2 provides
screen to adjust the properties of Highlight,
various kinds of screen tools, including
such as Background color and Transparency.
Spotlight, Reveal Screen, Screen Arrow,
You can also select Single Spotlight or Multi
Highlight and Black Screen. You can get
Spotlights to highlight single or multiple
these tools from “Tools” in the Menu bar,
areas for attention.
Toolbars or Floating Tools.
Spotlight
You can drag the rim to zoom and move the
spotlight. The lower layer of highlighted
area can be operated. You can click on the
bottom right of the screen to adjust the
properties of spotlight.
Text to Speech
The text on the board page can be read with
voice. To use the Text to Speech tool, select
“Text to Speech” on the Menu Bar, or click
.
Reveal Screen
Move the cursor to the text you want voice
Three reveal methods are provided: Top- reading and click the text. Voice reading of
bottom, Left-right, all directions. The the text begins. By default, the text is read in
uncovered area can be operated. You can English or the same language as your OS.
click on the bottom right of the screen to You can click on the above setting bar to
adjust the properties of the Reveal Screen select another language (depends on the OS
function. installed in your PC.) You can also adjust the
reading speed and volume .
Note
User can download and install another TTS
speech database from the Internet. After
installation, the installed language will be
added to the Setting list.
24 Assistant ToolsLabel Tools (Math Tools) Starts here
Interactive Presentation Utility 2 provides
various kinds of Label Tools, including
Ends here
Dimension Label, Angle Label, Dividers,
Ruler, Protractor, Isosceles Right Triangle
and 30° Right Triangle. You can access Ends here
Label Tools by selecting from “Tools” on
the Menu Bar, Toolbars or Floating Tools.
Starts here
1 2 3 4 5 6 7 8
c Dividers
You can use Dividers tool to draw an arc
or a sector. To move dividers, click the
a Dimension Label top or left foot of the dividers, and hold
You can use Dimension Label for while moving the dividers to the next
annotating distance between two points. position. To change radius, click the
To add a dimension label on a page, right foot of the dividers, and hold while
move the cursor onto the page, moving to the left or right horizontally.
determine the start point of the The new radius length is displayed on
dimension and click, then move the the dividers. To draw an arc or a sector,
cursor to another point and click. These click and hold the drawing tool on the
two points will be linked automatically, dividers, then rotate to draw. You can
and the length will be displayed. change properties from the Right-click
menu, such as color, transparency,
decimal digits, units (The drop-down
menu includes cm, mm, pix, inch). You
can also type in a unit manually.
Top
Displays radius length
b Angle Label Drawing tool
You can use Angle Label tool to measure
an angle, and modify the magnitude of
the angle again. To add an angle label on d Ruler
a page, move the cursor onto the page You can use Ruler to measure objects
and click to determine the vertex, click and to draw a line in any particular size
again to determine one side of the angle, (10cm by default; can be extended
then move the cursor. The relevant angle infinitely). To add a ruler on a page,
will be displayed on the page. please move the cursor onto the page,
determine the position of the ruler and
Note click. The ruler will be displayed on the
The displayed degree of the angle label is whiteboard page.
that which is created by the second plane,
rotating clockwise from the first plane.
Assistant Tools 25You can also use Line tool to draw a f Isosceles Right Triangle
straight line of a chosen length along the g 30°Right Triangle
scales of the ruler. When rotating the Two Right Triangle tools are provided,
ruler, the current angle of rotation is Isosceles Right Triangle and 30° Right
displayed in the center of the ruler. Triangle. To add a Right Triangle on the
whiteboard page, move the cursor onto
the page, determine the position of the
right triangle and click. The right
triangle will be displayed on the page.
e Protractor
You can add a protractor on the
whiteboard page. You can also use the
protractor to measure angles and draw
arcs of a chosen angle. To add a
protractor on the whiteboard page, move
the cursor onto the page, determine the
position of the protractor and click. The
protractor will be displayed on the page.
Isosceles Right Triangle 30–Right Triangle
You can use Line tool to draw a straight
line along the scales of a right triangle.
When you rotate the right triangle, the
current rotation angle will be displayed
in the center of the right triangle.
You can also select Arc, Solid Sector or
Hollow Sector from the Right-click h Lock/Unlock
menu, and then use Line tool to draw a
selected shape along the protractor Special Tools
scales. Interactive Presentation Utility 2 also
provides some useful tools, including
Calculator, Magnifier, Tickertaps, Clock and
On–screen Keyboard, Layer Perspective,
and Video Capture.
Calculator
Interactive Presentation Utility 2 can call
calculator from your operating system.
Magnifier
Magnifier allows you to magnify areas of the
screen. From the Right-click menu, you can
change the Magnifier Properties, such as
magnifying shape, scale, window size, etc.
26 Assistant ToolsOn-screen Keyboard Layer Perspective
With Layer Perspective, multiple object
Clock and Timer layers can be displayed in perspective, and
The Clock tool allows you to display a clock objects and images can be layered for a
or a count on the screen. You can customize desired depth of field. To use Layer
the Clock by clicking . Perspective, move it onto the superimposed
layers.
1
2
By default, one perspective layer is set, but
you can right-click the tool or click at top
right to set the shape, transparency, and
number of perspective layers.
Video Capture
With Video Capture, a connected camera or
DV video can be displayed. You can also
capture the video onto the whiteboard page.
To use Video Capture, click on the Video
Capture window. The connected camera or
DV video will be displayed on the software.
Click to set the resolution of the video.
Assistant Tools 27Note Screen Record and Play
If there are several cameras and DV videos To activate the Screen Record function, you
connected to the computer at the same time, can click “Tools” on the Menu bar, or click
you can change the video source. on the Toolbars, or click on the
You can also click to set to insert the Floating Tools.
captured video to the current page or a new Screen Record
page, then click to start the capture.
To record a screen, select the recording style
Screen Capture you want from “Options.” Video Quality can
also be adjusted. You can choose whether to
To activate Screen Capture function, click record only the operation window or the
“Tools” on the Menu bar, or click on the entire screen image. By connecting a
Toolbars, or click on the Floating Tools. microphone to the PC, you can also record
sound.
1 2 3 4 5 6
a Full Screen Capture
Click the icon to capture the whole
screen.
b Window Capture
Click the icon then click the corner of
the window you want to capture.
Click to open “Save as” window.
c Area Capture
Click the icon, then press and drag the
cursor to define the rectangular area you
want to capture.
d Freehand Capture
Click the icon, then press and drag the
cursor to freely define the area you want
to capture.
e Settings
You can also click to select the
inserting method of a captured screen.
“Insert to Current Page” and “Insert to Note
New Page” are available. You can make the video saving path as the
default by selecting “Options” > “Record
Setting...” > “Save Path” > “Default Path.”
During recording, you can click to pause
your recording; and you can click to finish
the recording.
f Lock/Unlock
28 Assistant ToolsVideo Player
Click . The “Player” window opens. Click
“Open File” and select the file to play.
Convertor
You can convert an AVI to SWF, AVI to
WMV/FLV, and SWF to EXE.
Assistant Tools 29Resource Panel
The Resource Panel includes Page , You can annotate comments about the flash
Template , Resource Library , Local or video, which are inserted onto the page.
and Courseware Making Panel . While annotating, the flash or video pauses.
When the flash or video play resumes, the
Page annotations move to the next layer.
Page tab provides two preview modes: List
Mode and Tile Mode. To rename a page, Local
double-click the title under the page Local tab allows you to add EDF, BMP,
thumbnail, then enter a new name. EMF, WMF, TIF, JPG, GIF, PNG, CDF,
SWF, AVI, WMV, ASF, DAT, MPG, MPEG,
Template RM, RMVB, MOV and FLV files in your
Template tab offers various templates in cdf computer to the whiteboard page. For a file
format. From the Right-click menu, you can in another format, double-click the
also delete, make a new folder, import a file thumbnail to open it. To insert a file into the
or folder, and export a folder for the page as an object, select the relevant file in
template. To open a template, select the the preview area, then click on the page or
template thumbnail you want to insert into drag the file onto the page.
the whiteboard in the preview area, and click
on the page (you can also drag the template Courseware Making Panel
onto the page), then the relevant template (Operation on PC basis, not PJ)
will be inserted into the next page. In Courseware Making Panel, you can add
animation effects for Object and Page, and
Resource Library Question into your courseware.
Resource tab provides a huge resource of
pictures and multimedia for you to use in a Object Effect
presentation. You can also save a created You can set effects for any object on a page.
object into Resource Library. There are three -Add Effect
ways to add a picture or multimedia resource You can add four kinds of animation,
to a whiteboard page: “Entrance,” “Emphasis,” “Exit” and
“Motion Paths,” for a single or several
1 Select a resource thumbnail and click selected objects on the current page. To add
on the page, then the resource will be an object effect, select one or several objects,
inserted into the page. and click “Add Effect,” then select an effect
type from the drop-down menu. After
adding effects, the effects will be displayed
2 Select a resource thumbnail and drag a in the Effects list according to the order.
rectangle on the whiteboard page, then
the resource will be displayed
according to the size of the rectangle.
When dragging the object, you can
press the “Shift” key to maintain its
aspect ratio.
3 Select a resource thumbnail and drag
it onto the page, then the resource will
be inserted into the page.
30 Resource PanelThe system offers you more than 20 kinds of
sound effects.
-Set Effect
You can customize the currently selected
effects.
The drop-down menu of property may vary
according to different animation effects. You
can adjust the property value to change the
playing effect.
You can customize the playback mode of an
effect. The system offers you three ways:
“On Click” (default), “With Previous” and
“After Previous.”
-Edit Effect
You can change animation effects and adjust
their playing order. To change an effect,
select the object that you want to change,
and click “Change,” then select appropriate
animation effects from the drop-down menu.
You can customize the speed of effects from To change the playing order, select an object
drop-down menu. You can also adjust speed from the Animation Object list, then click
by increasing or decreasing the length of the “Move up” or “Move down” .
timeline for an effect.
The system offers many different kinds of
repeat times.
Resource Panel 31Click “Apply to All Pages.” All other pages
-Remove Effect will share the same effects with the current
You can remove the object effects that you one.
do not need from the Animation Object list.
Select the animation object that you want to
remove, then click “Remove.”
Notes
• When the object is removed, all the effects
added on it will be deleted automatically.
• You can remove several animation objects at
the same time by pressing the “Shift” key.
-Current Preview
You can preview a selected object effect.
Select the object that you want to preview,
then click “Current Preview.” After the effect
the preview is over, the software will stop
preview automatically.
-Playing Preview
This function enables you to preview all of -Customize Page Effect
the object effects from the current page. You can customize the page effects,
including playing Speed and Sound. Select
Page Effect the page effect you want to customize, then
-Add Page Effect select the desired speed from the Speed list.
To add effects to a page, click “Page,” and You can also adjust the playing speed by
select the relevant effect from the drop-down increasing or decreasing the length of the
menu. timeline for an effect. You can select the
desired sound effect from the Sound list.
-Change Page Effect
You can change page effects upon actual
needs. Click “Change” and select the page
After adding effects, the effects will be effect you want to change, then choose a
displayed in the Effects list according to the desired page effect.
order, and a small icon will appear in the top
left corner of the page thumbnail.
32 Resource Panel-Delete Page Effect -Customize Question
You can delete any page effect as desired. You can change the properties of your
Select the page effect you want to delete, question.
then click “Remove.”
-Add Interactive Quiz Note
Interactive Presentation Utility 2 provides In Blank Filling, the subject fills in two parts of
you with Common and Vote question types, a mathematical sum or equation to form a
including Single Answer, True or False, correct answer. Several correct answers may be
Multiple Answer, Blank Filling and Vote, set. For example, “_+_ = 2” could be answered
which can help to improve student interest as “1,1,” “0,2” or “2,0.”
and participation. Click the icon of the
question type you want to insert on Question -Response Settings
setting panel and click “Insert.” The question You can add a Link and Sound for correct
type you select will be shown on the current and wrong responses.
page.
-Edit Question
You can edit the interactive questions you
insert. To activate the Title or Options text -Courseware Information
box, double-click text box, or click Text tool You can check the total number of questions,
and text box in consequence, or select the the total number of points scored, the total
text box and click on Marquee Handles. time taken and the number of questions not
answered.
Text box
Edit the question in the text box. To exit the
text box, simply click any blank part of the
page. You can drag a title or option text box
to change its position.
Resource Panel 33Video Conference
Interactive Presentation Utility 2 offers you an instant video conference (VC) function by using
a camera connected to a PC in the whiteboard mode. It allows you to display images of yourself
and others, for easy presentation of distance learning lectures.
1
a Video Conference
-Create
Becomes a VC host.
-Join
Connects to other sites through IP address.
Note
Guests can browse a VC host's annotations, but
cannot add their own.
-Exit
34 Video ConferenceFor Mac
System Requirement Feature
• CPU: Pertium III or above • Calibration Auto
• Memory: 256MB or more (512MB • Dual-user (Dual pen)
Recommend) • Whole and partial Screen Capture &
• Available hard drive space: 250MB Screen Record
• OS: Mac OS X 10.6.x/10.7.x/10.8.x/ • Editable object drawing
10.9.x/10.10.x • Hopping tool
• Adjustable Floating Tools
Notes • Rich education tools
• Running this software is limited to 30 times (2D & 3D Figures, Ruler, Graphs)
with projector disconnected. The limit will • Enhanced Assistant Tools
be reset to 30 when the projector is • Animation
connected.
• Calibration cannot be performed in the
Extended Display mode.
• Annotation of Interactive Presentation
Utility 2 is not available for Power Point or
Keynote. If you want to annotate a Power
Point document by the mouse function of the
Interactive Pen Device (main only), press
and hold the pen button to display the pop-up
toolbar of Power Point, then select “Ink”.
System Requirement / Feature 35Desktop mode
2
1
3
4
5
a Minimize
Minimizes the Floating Tools.
b Lock/Unlock
c Whiteboard/Desktop tabs
Switches Whiteboard mode/Desktop
mode by clicking the tab.
d Operate Windows
When you are not in Annotation mode,
you can perform normal computer
operations as you usually do with a
mouse. In Annotation mode, you can
also perform normal computer
operations by clicking the icon on the
Floating Tools.
e Hopping tool
Switch Floating Tools position
Wherever the Floating Tools is, there is
a position switching arrow on the
contrary side. Click this arrow to move
the Floating Tools from one side to the
other. This function allows you to access
the Floating Tools conveniently on large
screen.
Dock Floating Tools
Move the Floating Tools to any edge of
the screen and the toolbar will
automatically hide itself. To show the
Floating Tools, move the cursor to the
edge to which the Floating Tools is
docked, or click the icon.
36 Desktop modeWhiteboard mode
1 2
3
4
5
6
7 8
a Common tools
b Assistant tools
c Drawing tools
d Resource Panel
e Hopping tool (page 36)
f Full Screen/Move Toolbar
(Moves toolbar up or down)/
Move Resource Panel (Moves
Resource panel)/Hide Preview
g Preview
h Annotation recording (Reviews
operations)
Play/Stop/Settings/Previous Page/Next
Page
Whiteboard mode 37Dual-user (Dual pen)
Main Pen toolbar (Floating Tools)
• The main pen toolbar is displayed when Interactive Presentation Utility 2 is
activated.
• For customizing, click “Interactive_Presentation_Utility_2” >
“Preferences…” > “Toolbars” > “Floating Tools”.
• Functions which are not activated are displayed in gray in the desktop mode.
• Click to move the Floating Tools.
Note
This is for the main pen only.
Sub Pen toolbar
• Push the button on the sub pen to display the sub pen toolbar.
Notes
• This is for the sub pen only.
• The sub pen toolbar cannot be customized.
Disable sub pen
Select “Other Settings” from “Preferences…” then select “Disable sub pen.” Only the main
pen will be enabled.
38 Dual-user (Dual pen)Calibration Auto/Manual
Calibration aligns the points where the pen • If Calibration Auto still does not calibrate
(Main and Sub) is pointing and where the properly after reducing the lighting as
projector displays the cursor on the screen. suggested above, click “Calibration Main”
“Calibration Auto” allows you to execute the and “Calibration Sub”, then calibrate
calibration automatically. manually.
• If you use a screen which is not white,
Main Pen toolbar Calibration Auto may be inaccurate.
a
b
c
d
a Calibration Auto
b Calibration Main
c Calibration Sub
d Saving calibration data
Click “Calibration” to select “Calibration
Auto.” The calibration starts automatically.
Note
Observe the precautions noted below during
the calibration.
• Avoid placing obstacles between the
interactive detector and the screen.
• Do not move the projector and the screen.
If Calibration Auto does not calibrate properly,
try the following methods.
• Shield the screen from strong, direct outside
light.
• Reduce the ambient light while Calibration
Auto is performed.
Calibration Auto/Manual 39Saving calibration data Pen tracking speed
Calibration data for respective operating adjustment
conditions can be saved. You can use the Tracking speed of the Interactive Pen Device
interactive function with the settings can be adjusted. If you are concerned about
specified for certain operating conditions by shakes in drawn lines, set it toward “Slow”.
selecting the saved data. However, setting toward “Slow” results in a
slow response when you draw fast. If you set
“Auto,” the pen tracking speed is
automatically adjusted according to the
1_a 2 drawing speed.
3
1_b
Pen detection sensitivity
adjustment
a Save (name/overwrite) If you are using the Interactive Pen Device in
Press the button to display the too bright a room, the pen position may not
calibration data list. Press the [Add] be detected accurately and may cause
button to save the current calibration drawing errors. This function adjusts the pen
data with a new name. The saved data detection sensitivity to optimize the system
will be added to the calibration data list. to the brightness of the room.
b Apply the selected save data While using the Interactive Pen Device, the
Select your desired data from the list and pen may not be able to draw or the lines may
press the [OK] button to apply it. cut intermittently under the following
conditions. In this case, click this button to
c Delete the selected save data
improve the symptoms.
Select the unwanted data from the list
and press the [Delete] button to delete it. • A bright light is used or there is sunlight
and the entire environment is bright.
• The screen is directly exposed to a bright
light or sunlight.
Note
During adjustment, the picture will turn black.
Please wait a while.
40 Saving calibration data/Pen tracking speed adjustment/Pen detection sensitivity adjustmentManagement Tools
File Management Page Management
New New Page
Create a new file. Insert a Blank Page after the current one.
Open Delete Page
You can open .cdf, .iwb, .pdf files. Delete the current page.
Close Copy/Cut/Paste
Click “File” and select “Close” on the Menu Select the thumbnail of the page you want to
bar to close the current file. copy/cut/paste on the Page tab.
Save/Save as
You can save the current file in a choice of
formats, including .bmp, .iwb, .pdf, .jpg,
.html, .png, .cdf, The file will be named by
the current time automatically.
Save as Template
If the layout of the current file is likely to be
frequently used in the future, you can also
save it as a template, which can be retrieved
from the Template tab. Click “File” and
“Save as Template” on the Menu bar to save
the current file as a template.
Auto Save
The Auto Save function can minimize your
data loss in the event of unexpected Clone
problems. Click “File” and select “Auto Click the menu arrow on the page thumbnail
Save” on the Menu bar to set the Auto Save and select “Clone Page” or right-click on the
function. page thumbnail and select “Clone Page.”
The cloned page appears immediately after
the current page.
Insert page number
Click “Insert” and select “Page Number” on
the Menu bar, then you can set the page
number position and start page number in
the Page Number window that appears.
Print
You can print a file in Interactive
Presentation Utility 2. Click “File” and
select “Printer Settings” to set the printer,
then click “Print” or “Print Current Page” to
print the pages you need.
Management Tools 41Zoom
By default, the whiteboard pages are
displayed in their actual dimensions. But
you can use the zoom tools to enlarge or
reduce the size of the whiteboard page.
-Zoom in / Zoom out
After the mouse pointer becomes a
magnifier, click the page to enlarge or reduce
it.
-Restore Page
Restore a page to 100%.
-Fit Page
Make the entire page fit your display.
Move Page
A whiteboard page can be infinitely
extended. You can move a page to obtain
more space or to display any part of the page
on screen.
Insert Page Background
You can specify a single color, gradient, grid
pattern, or an image (.jpg, .jpeg, .png, .bmp)
as a page background.
Other management tools
Frequently Used Applications
You can quickly access an external program
or file. To access Frequently Used
Applications, click “Frequently Used
Applications” on the Menu bar, or click the
icon on the Toolbars. The Application
toolbar appears (displaying Safari by
default).
Click a shortcut icon on the Application
toolbar to directly open the external program
or file. Meantime, you can click to add or
delete an application.
42 Management ToolsDrawing Tools
Freehand Drawing Tools
Freehand Drawing Tools are the most frequently used tools, with which you can annotate, write
and draw on the interactive screen. Freehand Drawing Tools include Pencil , Brush Pen .
Properties can be adjusted as required.
Color, Thickness, Transparency
Double-click any color, thickness or transparency button or click the menu arrow of sections to
adjust them.
Color Transparency Thickness Pattern Gradient
Line Type
Lock:
Keep the Sub Pen toolbar on the screen while drawing.
Line Type Show Length
Click the menu arrow of the Line section, When you add a line to the whiteboard page,
then select the line style you want from the you can display the line length. Click and
list. You can also select Line Style from select “Show Length.” You can also set the
“Customize Line Style” window. unit and decimal digits of length from
“Length Settings.”
Drawing Tools 43Shape Recognition Shapes
Pencil tool also provides a Shape
Recognition function. If you enable this Different kinds of 2D and 3D shapes are
function, a stroke drawn by Pencil tool will provided. You can customize the properties
be automatically revised to Solid Line, Arc, of the Shapes tool.
Circle, Rectangle, Triangle or Polygon, and Shapes style
adjacent solid lines will be automatically 3 shape buttons are provided on the
combined to form a polygon. Click Pencil Properties toolbar of Shapes tool, including
tool icon to show the Property toolbar. Then Rectangle, Triangle and Circle by default. To
click to activate the Shape Recognition apply other shapes, double-click any shape
function. Select the shape to show its points, button or click the menu arrow of the Shape
then click and drag any point to change the section.
shape.
2D Shapes 3D Shapes
Other Settings
Click “Interactive_Presentation_Utility_2”
> “Preferences…” on the Properties toolbar
to apply other settings.
44 Drawing ToolsPoint to Point Row and Column Number
You can select row and column numbers
This tool allows you to create a Polygon or a from 1 to 20. Enter numbers directly, or
Polyline. To create a polygon or a polyline, adjust numbers by the arrow buttons.
click the icon, and click different points to
create a polygon or polyline. Double-click
the last point to end the polygon or polyline.
You can also overlap the last point with the
first one to make a shape. All the points can
be removed. Point to Point tool can also be
customized.
Overlap the last point to the first point.
Click the
first point.
Fill
Double click the last point.
You can fill Color, Gradient, Trellis or Image
(jpg, jpeg, bmp, png) to any closed
Table
geometry.
In creating a table, you can set Frame color,
Thickness, Transparency, Row number and
Column number in the Property toolbar. You
can then create a table by pressing where you
want to place the table on the screen and
dragging until the table is the desired size.
Fill with Gradient
Six gradients are provided by default. To
apply another gradient, double-click any
gradient fill button, or click the menu arrow,
then set the gradient in Gradient Editor. To
add a new gradient, please click below the
gradient bar to define color stop(s). You can
also select a gradient direction.
Drawing Tools 45Fill with Image
Double-click the image fill button, or click
the menu arrow to select an image file to fill.
Fill with Pattern
Six patterns are provided by default. To
apply another pattern, double-click any
pattern fill button, or click the menu arrow,
then set the foreground color and
background color. Clear the Fill Effect
Click on the Property toolbar, then click
the geometry. The Fill effect will be cleared.
Eraser
Five erasing methods are provided,
including Small Circle Eraser, Middle Circle
Eraser, Large Circle Eraser, Object Eraser,
Circle Eraser, Area Eraser and Erase All.
1 2 3 4 5
a Eraser (Small/Middle/Large)
b Object Eraser
Select the icon and click an object to
clear it.
46 Drawing Toolsc Circle Eraser
Select the icon and draw a circle around
the object(s) you want to erase.
d Area Eraser
Select the icon and drag a Rectangle
around the object(s) you want to erase.
e Erase All
Select the icon and click on a page to
remove all objects from the page.
Objects created by “Shapes” or “Point to
Point” tool can only be erased by the Object
Eraser or the Erase All. The Circle Eraser or
the Area Eraser cannot be used in this case.
Text
Select and click the button where you want
the text to start on the page. The Text box
and Font toolbar will appear.
Text box
Input Text
You can input text with On-screen Keyboard
. You can also import text from .txt file to
the Text box.
Change Text Format
Change the text format, including Font,
Bold, Italic, Underline, Color and others,
with Font toolbar if necessary.
Edit Text
Right-click on the selected text to copy, cut,
paste, delete, select all or undo the text.
Right-click can be performed by a long push
of the Pen tip (main only), or clicking .
Drawing Tools 47You can also read