Accessibility Guide for Participants - January 6, 2014 Version 12.6
←
→
Page content transcription
If your browser does not render page correctly, please read the page content below

Version 12.6

Accessibility Guide for
Participants
January 6, 2014
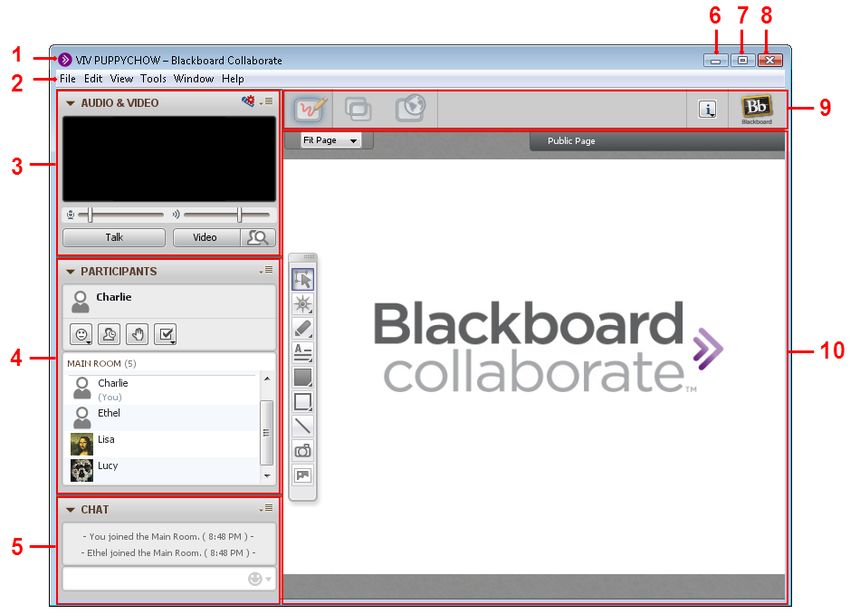
Table of Contents

Preface                                                   1
 Conventions Used in this Guide                            1
   Variables                                               1
   Notes                                                  2
   Typographical Conventions                              2
 Getting Help                                             3
   Documentation and Learning Resources                   3
   Technical Support                                      3
   Community                                              3
 Blackboard Collaborate Product Feedback                  4
Chapter 1 Getting Started                                 5
 System Requirements                                      5
   Blackboard Collaborate Web Conferencing                6
   Operating System                                       6
   Java                                                   6
   Screen Readers                                         6
     Java Access Bridge                                   7
 Getting Ready for a Blackboard Collaborate Session       7
 Using this Guide                                         7

                                                      Page i
Chapter 2 The Blackboard Collaborate Web Conferencing Room                 11
     The Content Area Modes                                                13
     Managing Panels and Windows                                           15
       Working with Windows                                                15
       Working with Panels                                                 17
Chapter 3 Navigation                                                      19
     Keyboard Navigation                                                  20
       Navigating Between Modules                                         20
       Navigating Between Elements                                        20
       Navigating Within a Toolbar of a Module Window                      21
       Navigating Within Drop-Down Menus                                   22
     Navigating Between and Within Content Modes                           22
       Navigating within Whiteboard Content Mode                           22
       Navigating within Application Sharing Mode                          23
       Navigating within Web Tour Mode                                     24
     Navigating Between and Reading Whiteboard Pages                       24
     Navigating Between Chat Conversation Tabs                             25
     Using Mnemonic and Keyboard Shortcuts                                 26
       Mnemonics                                                           26
       Keyboard Shortcuts                                                  27
         Hot Keys                                                          32
         Configuring Hot Keys                                              33
Chapter 4 The Activity Window                                             37
     Opening and Closing the Activity Window                              38
     Displaying Events                                                     39
       Filtering Events for Display                                       40
         Audible Notifications Filter                                     40
         Module Event Filter                                               41
         Importance Event Filter                                           41
         Event Filtering Preferences Panel                                 43
       Resizing Activity Window Text                                       44
       Showing/Hiding Time Stamps                                          44
     Reading Events with a Screen Reader                                   45
     Entering Commands                                                     46

ii                                                           Table of Contents
Live Session Commands                                47
       Raise or Lower Hand                               47
       Set Audio Mode                                    47
       Talk or Stop Talking                              47
       Send Chat Message                                 47
       Display Video                                     48
       React (show emotion)                              48
       Enter Polling Response                            48
       Step Away or Come Back                            48
    Recording Playback Command                           48
Chapter 5 Closed-Captioning                              49
  Closed-Captioning Activity and Permission Indicators   50
  Entering Closed-Captioning Text                        50
  Viewing Closed-Captioning Text                         51
    Changing the Closed-Captioning Source                52
  Saving Closed-Captioning Text                          52
  Window Display Options                                 53
  Closing and Reopening the Closed Captioning Window     54
Chapter 6 Accessibility Options                          57
  Managing Audio                                         57
    Using the Audio Setup Wizard                         57
       On Windows or Linux                               58
       On Mac OS X                                       59
    Adjusting Microphone and Speaker Levels              60
       Microphone Level                                  60
       Speaker Level                                     61
  Setting Notification Preferences                       61
    Audible Notifications                                61
    Visual Notifications                                 63
  Application Sharing Options                            65
    Viewing a Shared Application                         65
       Scaling the Shared Content                        65
       Maximizing the Content Area                       65
       Emphasized Cursor                                 66

Table of Contents                                         iii
Hosting Options 66
Chat Options 68
Changing the Chat Text Size 68
Adding Emoticons to your Chat Message 69
Changing the Notes Text Size 70
Appendix A: Chat Emoticon Text Strings 73
Blackboard Collaborate Copyright 77
Trademarks 77
iv Table of ContentsPreface
This guide is written for Blackboard Collaborate web conferencing users with visual, auditory or
motor disabilities. It describes the accessibility features intended for these users in the desktop
version of Blackboard Collaborate.
Note: For a complete instructions on using Blackboard Collaborate, refer
to the Participant's Guide available on the On-Demand Learning Center at
http://www.blackboard.com/Platforms/Collaborate/Services/On-
Demand-Learning-Center/Web-Conferencing.aspx.
See Getting Started on page 5 for a list of which sections in this guide are relevant to your
particular needs.
Conventions Used in this Guide
Variables
There are a few places in Blackboard Collaborate web conferencing that are populated with data
specific to the session. Because we do not know in advance what those data (e.g., words or
names) will be, in this guide they are represented by variables enclosed in angle brackets. For
example, the variable is used in the discussion of Restoring Default Preference
Settings to represent the name of the currently selected panel.
Page 1Notes
Six types of notes may be used in this guide to highlight information:
Note: Notes are used to highlight important information or to present
asides relevant to the topic at hand.
Tip: Tips provide helpful information on how to most effectively use a
particular feature of the product.
Caution: Cautions alert you to potentially confusing terminology or
difficulties that may occur when using the product.
Warning: Warnings alert you to potentially serious problems.
Notes of this format are used to highlight Linux-specific information.
Notes of this format are used to highlight Mac-specific information.
Notes of this format are used to highlight information specific to mobile
devices (mobile phones and tablets).
Typographical Conventions
Convention Description
1. Number Indicates a step in a task.
Indicates that there are several options available for completing a task, but
o Hollow bullets
only one is necessary.
Represents clickable elements in the user interface (e.g., text links, but-
Bold
tons, tabs, etc.). Also used to give emphasis to words.
Represents menu items, options and parameters. Also used for cross ref-
Italics
erences and names of documents.
Monospace Indicates pathnames, filenames, folders and command lines.
Indicates variables.
2 PrefaceGetting Help
Documentation and Learning Resources
Documentation and learning resources (for all Blackboard Collaborate products) are available on
the On-Demand Learning Center, which can be reached as follows:
o In your browser, enter the following address:
http://www.blackboard.com/Platforms/Collaborate/Services/On-Demand-Learning-Center.aspx
o From within Blackboard Collaborate web conferencing, select Additional Documentation
from the Help menu.
You can directly open the following documents from within Blackboard Collaborate web
conferencing by selecting them from the Help menu:
n Keyboard Shortcuts
n Accessibility Guide for Participants
n Blackboard Collaborate Essentials for Participants
Technical Support
Blackboard Collaborate technical support and the support Knowledge Base are available through
the Support Portal:
http://support.blackboardcollaborate.com
Community
We encourage Blackboard Collaborate users of all levels (administrators, instructors and
students) to submit questions to Ask the Doctors, a free question-and-answer forum
moderated by an expert team of your fellow Blackboard Collaborate users. Their goal is to
provide quality answers to your questions in a highly responsive manner, while building a global
knowledge base for online teaching and learning.
You can find Ask the Doctors at the link below:
http://discussions.blackboard.com/forums/default.aspx?GroupID=9
Messages posted in the Ask the Doctors forum do not go to our Support Team. If you require
technical support assistance to resolve a problem, please contact Technical Support (see the
headingTechnical Support in this section).
Preface 3Blackboard Collaborate Product Feedback Blackboard Collaborate welcomes your comments and suggestions. If you have an idea for a new feature or enhancement, or would like to send other feedback, please send an email to BBCollaborateFeedback@blackboard.com. Your feedback will be sent directly to our Product Management Team. 4 Preface
Chapter 1
          Getting Started
Before you begin using the accessibility features of Blackboard Collaborate web conferencing, we
recommend you do the following:

   l   Ensure your system meets the necessary requirements (see System Requirements below).
   l   Get Blackboard Collaborate ready to use accessibility features (see Getting Ready for a
       Blackboard Collaborate Session on page 7).
   l   Read the parts of this guide that are most relevant to you (see Using this Guide on page 7).
   l   Familiarize yourself with the Blackboard Collaborate user interface (see The Blackboard
       Collaborate Web Conferencing Room on page 11).

System Requirements
In order to use the accessibility features in Blackboard Collaborate web conferencing, you must
meet the following system requirements.

               Note: You can find the accessibility system requirements for all recent
               versions web conferencing via the Knowledge Base article System
               Requirements For Blackboard Collaborate Web Conferencing Accessibility
               Features.

                                                                                             Page 5
Blackboard Collaborate Web Conferencing
The full set of accessibility features are available only in the English version of Blackboard
Collaborate.
Operating System
Only Windows operating systems support all of the Blackboard Collaborate accessibility
features:
l Windows XP (32 bit), Windows Vista (32 bit or 64 bit), Windows 7 (32 bit or 64 bit) or
Windows 8 (64 bit)
l 20 MB free disk space
l 256 MB RAM
Linux (Ubuntu 11.10 or higher) and Mac (Mac OS X 10.6 or higher) users can use only some of
the Blackboard Collaborate accessibility features (e.g., keyboard navigation). There is no screen
reader capability on these systems.
Note: Accessibility features are not officially supported on Linux and Mac
systems.
Java
Java 7, update 6, or higher (32-bit or 64-bit) is required to run Blackboard Collaborate and the
Java Access Bridge (see below).
To check to see if you have the correct version of Java, open the following web page:
http://support.blackboardcollaborate.com/ics/support/default.asp?deptID=8336&task=knowledge&questionID=1473
The “Step 1- Checking System Requirements” will tell you whether or not you have the required
version of Java Web Start and, if not, provide a link to the Java download page.
Screen Readers
JAWS (version 13 or 14) is the only supported screen reader for Blackboard Collaborate.
Note: JAWS 13 and 14 support both 32-bit and 64-bit OSs/JVMs.
6 Getting StartedJava Access Bridge
The Java™ Access Bridge is a technology that enables assistive technologies (such as screen
readers, magnifiers, etc.) to access Java applications and applets. Because it comes bundled with
Java 7 (update 6), there is no need to install it.
In order to use Blackboard Collaborate web conferencing version 12.6 or higher with the JAWS
screen reader, you must enable Java Access Bridge version 2.0.3 or higher. For instructions ,
please see Knowledge Base article 2868.
Getting Ready for a Blackboard Collaborate Session
If you will be using JAWS to navigate through the Blackboard Collaborate web conferencing
interface, be sure to do the following:
1. Start JAWS before you log in to the session.
2. Verify that the Java Access Bridge is working.
3. Configure JAWS to read all access keys so the mnemonic keys are spoken aloud; other-
wise, you won’t be able to identify them. This setting is found under the basic settings of
JAWS.
It is advisable to enter the room early (before the session starts) so you can configure your
Blackboard Collaborate interface to suit your particular needs. How early you can enter the
room is set by the session creator. The default is 30 minutes but the session creator may change
that.
1. For those using audio in your Blackboard Collaborate session, run the Audio Setup Wizard
to ensure your microphone and speakers are set to suitable levels. For details, see Using
the Audio Setup Wizard on page 57.
2. For all users, set which Audible and Visual Notifications you wish to receive in the session.
For details, see Setting Notification Preferences on page 61.
Using this Guide
Blackboard Collaborate web conferencing has been designed to meet the needs of users of
various abilities. Some of the accessibility features are helpful to those whose mobility make it
difficult for them to use a mouse, others are for users who are deaf or hard of hearing and
others are for users with limited vision (including color blindness) or no vision.
The following table lists the various target audiences and the accessibility features from which
each would benefit, including a reference to the relevant section in this document.
Getting Started 7User Issue Accessibility Features
Low Vision Maximizing window and panel sizes: refer to Managing Panels
and Windows on page 15
Activity Window: refer to The Activity Window on page 37
Audible Notifications: refer to Audible Notifications on page 61
Keyboard Shortcuts: refer to Keyboard Shortcuts on page 27
Hot Keys: refer to Hot Keys on page 32
Keyboard Navigation: refer to Keyboard Navigation on page 20
Chat text size options: refer to Changing the Chat Text Size on
page 68
Notes text size options: refer to Changing the Notes Text Size on
page 70
Application Sharing hosting option Emphasize cursor: refer to
Hosting Options on page 66
Application Sharing viewing features to scale the shared content
and maximize the content area: refer to Application Sharing
Options on page 65
Blind Activity Window: refer to The Activity Window on page 37
Audible Notifications: refer to Setting Notification Preferences on
page 61
Keyboard Shortcuts: refer to Keyboard Shortcuts on page 27
Hot Keys: refer to Hot Keys on page 32
Keyboard Navigation: refer to Keyboard Navigation on page 20
Deaf or Hard of Activity Window: refer to The Activity Window on page 37
Hearing Visual Notifications: refer to Setting Notification Preferences on
page 61
Closed-Captioning: refer to Closed-Captioning on page 49
Audio volume controls: refer to Adjusting Microphone and
Speaker Levels on page 60
Audio Setup Wizard: refer to Using the Audio Setup Wizard on
page 57
8 Getting StartedUser Issue Accessibility Features
Mobility Keyboard Shortcuts: refer to Keyboard Shortcuts on page 27
Hot Keys: refer to Hot Keys on page 32
Mnemonic Keys: refer to Mnemonics on page 26
Keyboard Navigation: refer to Keyboard Navigation on page 20
Color Blind Closed-Captioning window display options: refer to Window
Display Options on page 53
Application Sharing hosting options Shared Region Highlight
Color and Emphasize cursor: refer to Hosting Options on page 66
Getting Started 9Chapter 2
The Blackboard Collaborate Web
Conferencing Room
The Blackboard Collaborate web conferencing room consists of six main components: the menu
bar at the top, three panels on the left (Audio & Video panel on top, the Participants panel in the
middle and Chat panel on the bottom), the Collaboration toolbar at the top of the right side and
the main content area on the right (for displaying Whiteboard, Application Sharing and Web
Tour content).
Note: For mobile device users, the Web Conferencing room will not be
exactly as described in this chapter. For a discussion of attending sessions
on mobile devices, refer to the Mobile User's Guide for your device (iOS or
Android) on the On-Demand Learning Center:
http://www.blackboard.com/Platforms/Collaborate/Services/On-Demand-
Learning-Center/Web-Conferencing.aspx#documentation
Page 11Term Meaning
Menu bar The Menu bar contains the File, Edit, View, Tools, Windows and
Help menus.
Audio & Video panel The Audio & Video panel enables you to participate in conversations
using either a microphone and speakers (or headset) or via a tel-
econference. You also can transmit and receive Video during the ses-
sion and preview your video before transmitting it.
Participants panel The Participants panel provides a list of all Participants and Mod-
erators in the session and information about their current activities,
such as talking (Audio), transmitting Video, sending a Chat message,
using the Whiteboard drawing tools and conducting an Application
Sharing session. Above the Participants list is a small toolbar con-
taining buttons for raising your hand and stepping away from the
session and menus for selecting polling responses and feedback
options.
Chat panel The Chat panel enables you to send Chat messages to everyone in
the room or to Moderators only. By selecting names in the Par-
ticipants list, you can send private Chat messages to individuals. Mes-
sages can be printed and saved to track session communication.
Collaboration toolbar The Collaboration toolbar (at the top of the Content area) contains
three buttons for switching between the three content modes
(Whiteboard, Application Sharing and Web Tour) in the Content
area; an Information menu for obtaining session information (e.g.,
connection type) and starting the Timer; a Load Content button for
loading content into the session; and the Record button.
Content area The Content area is the main presentation window. Moderators use
this region to load presentations. Everyone can use the tools on the
Whiteboard to draw or write. All the objects and images on the
Whiteboard are dynamic and can be modified. Everyone can print
the Whiteboard pages or save them to a file to review later (unless
the Whiteboard has been protected).
12 The Blackboard Collaborate Web Conferencing Room1 Title bar 6 Minimize button
2 Menu bar 7 Maximize button
3 Audio & Video panel 8 Close button
4 Participants panel 9 Collaboration toolbar
5 Chat panel 10 Content area
The Content Area Modes
The content area on the right side of your Blackboard Collaborate web conferencing interface,
enables you to exchange information and ideas with others through three different features:
n the Whiteboard, for sharing presentations and drawings;
n Application Sharing, for sharing individual applications or your entire desktop; and
n Web Tour, for sharing web pages.
The Blackboard Collaborate Web Conferencing Room 13These features share space in the content area, with each representing a "mode" in the content
area, so you will be able to see the content of only one mode at a time. The Whiteboard content
is persistent so will be there when you move to another mode and then return to the
Whiteboard. Application Sharing content is persistent but you need to Resume Sharing when
you return to Application Sharing in order to see it. Web Tour content will always have to be
reloaded (URL entered again) when you switch modes and return to Web Tour.
Only certain users can switch between modes:
n Moderators can switch between all modes.
n Participants with Application Sharing permission can switch to Application Sharing mode
and back to Whiteboard mode.
n Participants with Web Tour permission can switch to Web Tour mode and back to White-
board mode.
Note: Participants who have Whiteboard permission but not Application
Sharing or Web Tour permission are not able to switch to Whiteboard
mode from either of the other two modes. This safeguards against
Participants switching modes during someone else's Web Tour or
Application Sharing presentation.
When someone switches modes, everyone in the session will follow them to the new mode.
Caution: Be careful not to inadvertently switch modes on someone else
who is presenting content. Everyone in the session will follow you to the
new mode.
To switch modes, do one of the following:
o Click on the button in the Collaboration toolbar associated with the desired mode.
o Select the desired mode from the View menu.
o Use the keyboard shortcut associated with the desired mode:
Whiteboard mode: Ctrl+Alt+W (Command-Option-W on Mac)
Application Sharing mode: Ctrl+Alt+A (Command-Option-S on Mac)
Web Tour mode: Ctrl+Alt+U (Command-Option-U on Mac)
14 The Blackboard Collaborate Web Conferencing RoomYou can easily see which mode is selected by noting which button in the Collaboration toolbar is
colored. In the Collaboration toolbar below, the current mode is Whiteboard mode.
1 Whiteboard mode button 3 Web Tour mode button
2 Application Sharing mode button
Managing Panels and Windows
The Blackboard Collaborate web conferencing interface consists of panels and windows. Panels
can be collapsed, expanded, detached and reattached, resized and, in their detached state, can be
moved. The side panels (Audio & Video, Participants and Chat) also can be hidden. For details,
see Working with Panels on page 17.
The main application window can be minimized, maximized, moved, resized and closed. Other
windows can be opened, moved, resized and closed. For details, see Working with Windows
below.
Working with Windows
There are a number of different kinds of windows in Blackboard Collaborate web conferencing:
the main application window, module windows (such as the Notes window and the Multimedia
Library), dialog boxes (such as the Preferences dialog and Create Breakout Rooms dialog) and
utility windows (such as the Object Explorer and Page Explorer).
Below are the ways you can manage your windows:
n Open the main application window: To open the window you need to join the ses-
sion by clicking on a link.
The Blackboard Collaborate Web Conferencing Room 15n Open a main module window: To open the window of one of the main modules,
select it from the Window menu or, if available, open it using its associated keyboard
shortcut (see Keyboard Shortcuts on page 27.)
n Move a window: Grab the window by its title bar and, while holding down your mouse,
drag it to the desired location and then drop it by releasing the mouse.
n To resize a window: Grab a window border and drag it. Hold your mouse over any side
or a corner and, when the cursor changes to a two-headed arrow, click and drag the
border of the window to contract or expand it.
n Minimize or maximize the main application window: Use the standard
conventions of your operating system for minimizing and maximizing windows. For
example, on Windows, use the Minimize and Maximize buttons in the window's title bar:
n Un-obscure a window: If part of a window is obscured by another window or panel,
click on the window itself to bring it to the front of the other window or panel.
Tip: If you can't find a window because it is hidden beneath other
windows, an easy way to find it is to select Restore Default Layout
from the View menu and then open your window again.
16 The Blackboard Collaborate Web Conferencing Roomn Close a main module window: To close a main module window, do one of the fol-
lowing:
o Click on the window’s Close button in the title bar of the window.
o Enter Ctrl+W (Command-W on Mac)
o Enter Alt+F4 (Windows and Linux only)
n Close the main application window: If you close the main application window you
will leave the session. For details, see the Moderator's Guide.
Working with Panels
The default when you first join a Blackboard Collaborate web conferencing session is for the
Participants and Chat panels to be expanded and attached and the Audio & Video panel to be
collapsed and attached. Blackboard Collaborate will remember the state in which you left your
panels (expanded or collapsed and attached or detached) from one session to the next (but only
if you are logged in to the same computer).
Below are the ways you can manage your panels:
n Collapse and expand a panel: By default, the panels are expanded. If you want to
make more room for one of the panels, you can collapse the others.
To collapse a panel, click on the Collapse button in the panel's title bar:
To expand the panel back to its former state, click on the Expand button in the panel's
title bar:
n Move a panel: Grab the panel (either attached or detached) by its title bar and, while
holding down your mouse, drag it to the desired location and then drop it by releasing the
mouse.
The Blackboard Collaborate Web Conferencing Room 17n Detach and reattach a panel: Panels can be detached so you can move them to a
more convenient location.
To detach a panel, do one of the following:
o From the Options menu, select Detach Panel.
o Drag and drop the panel out of the main application window. (See Move a panel
above.)
To reattach a panel, do one of the following:
o From the Options menu, select Attach Panel.
o Drag and drop the panel back into the main application window. (See Move a
panel above.)
o From the View menu, select Restore Default Layout.
o Click on the panel's Close button:
n Reorder an attached panel: Drag and drop the panel up or down within the side bar
area (left side) of the main application window. (See Move a panel above.)
n Hide attached side panels: You can make the Content area larger by hiding the side
bar area (left side) of the main application window. To do so, in the View menu, unselect
(uncheck) Show Side Bar. To restrore the side bar, reselect it. Alternatively, you can grab
the border of any one of the panels and drag it all the way to the left. To bring the side bar
back, grab it again and move to the right.
n Resize a panel: Grab a panel border and drag it. Hold your mouse over any side (either
attached or detached) or a corner (detached only) and, when the cursor changes to a two-
headed arrow, click and drag the border of the panel to contract or expand it.
n Un-obscure detached panels: If part of the panel is obscured by another panel or win-
dow, click anywhere on the panel to bring it to the front of the other panel or window.
18 The Blackboard Collaborate Web Conferencing RoomChapter 3
Navigation
Before using Blackboard Collaborate web conferencing, it may be useful to familiarize yourself
with the user interface. See The Blackboard Collaborate Web Conferencing Room on page 11
for a description of the main user interface components.
There are three ways to navigate through the Blackboard Collaborate user interface without
having to use a mouse:
l Keyboard navigation – see Keyboard Navigation on next page
l Mnemonics – see Mnemonics on page 26
l Shortcut keys – see Keyboard Shortcuts on page 27
For information about navigating within some specific areas, refer to the following:
l Navigating Between and Within Content Modes on page 22
l Navigating Between and Reading Whiteboard Pages on page 24
l Navigating Between Chat Conversation Tabs on page 25
Page 19Keyboard Navigation
There are four levels of keyboard navigation in Blackboard Collaborate web conferencing:
n between modules in the main application window
n between elements (both within and across modules)
n within toolbars of a secondary window
n within menus
Using the navigation methods described in the following sections, navigate to the desired
function to bring it into focus. When you wish to activate that function (execute the command),
press Space.
Navigating Between Modules
When you join an Blackboard Collaborate session, the Participants panel is in focus. Press F6
(the same on the Mac) to cycle keyboard focus between the main Blackboard Collaborate
modules, in the order listed below:
l Participants panel: focus goes to the top name in the Participants list.
l Chat panel: focus goes to the Message text box.
l Collaboration toolbar: focus goes to the Whiteboard mode button.
l Action bar: focus goes to the New Page button.
l Audio & Video panel: focus goes to the Talk button.
Note: If you change the order of the panels, the F6 navigation order will
be different. For information on reordering the panels, see Working with
Panels on page 17.
Navigating Between Elements
You can navigate through the Blackboard Collaborate user interface one element (e.g., button,
field, option, etc.) at a time by tabbing. The Tab key moves you forward through the Blackboard
Collaborate elements in the sequence described below. To move backwards in the sequence,
enter Shift+Tab.
Note: Within each panel or window, tabbing moves through its elements
from left to right and top to bottom.
20 NavigationYour tabbing sequence may differ from that described below since the elements you see in the
user interface depends on your permissions, including whether or not you are a Moderator or
Participant.
n Participants List – When you join a Blackboard Collaborate session, focus will be on
the top name in the Participants list. Within the list you can move through the names
using the up and down arrow keys. Press Space to open the Participant Options menu for
the person currently in focus.
n Chat Panel –Next you will tab through the elements in the Chat panel: Expand/Collapse
button, Options menu, Conversation pane, Message text box and Conversation tabs. (For
instructions on moving between Conversation tabs, see Navigating Between Chat Con-
versation Tabs on page 25.)
n Collaboration Toolbar – Next you will tab through the elements in the Collaboration
toolbar: Whiteboard Mode button, Application Sharing Mode button, Web Tour Mode but-
ton, Timer elements (if the Timer is running), Information menu, Load Content button
and Record button. (For instructions on changing modes, see Navigating Between and
Within Content Modes on next page.)
n Action Bar – Next you will tab through the elements in the Action bar for the currently
selected mode or, the Available Share Selection dialog for Application Sharing Mode.
n Audio & Video Panel – Next you will tab through the elements in the Audio and Video
panel: Expand/Collapse button, Audio Setup Wizard button, Options menu, Microphone
Level slider, Speaker Level slider, Talk button, Transmit Video button and Preview Video
button.
n Participants Panel – Next you will tab through the elements in the Participants panel:
Expand/Collapse button, Global Options menu, Feedback menu, Step Away button, Raise
Hand button, Polling Response menu and then, finally, back to the Participants list.
Navigating Within a Toolbar of a Module Window
When you open a module's window, you can use tabbing to navigate through the various
elements of its interface, with one exception: toolbar buttons. The Closed Captioning, File
Transfer Library and Notes windows have graphic tool bars with buttons represented by icons.
You must explicitly enable tabbing to access these buttons.
To do so, enter Alt+F8 (Option-F8 on the Mac). To turn toolbar tabbing off, enter Alt+F8
(Option-F8 on the Mac) again.
Navigation 21Navigating Within Drop-Down Menus
To open an Options menu, Participant interaction menu (Feedback and Polling Response
menus) or other drop-down menu, tab to it and press Space. Using up and down arrow keys,
move to the desired menu option and press Space to activate it. If the menu option is a sub-
menu, press Space or the right arrow key to open it.
To close the menu without selecting a menu option, press Escape.
Tip: To access the main menus (e.g., File, Edit, etc.) use mnemonic keys.
(See Mnemonics on page 26.) You cannot use tabbing to open these
menus; however, once a menu is open, you can use your arrow keys to
navigate within it and Space to execute the menu item command.
Navigating Between and Within Content Modes
When you open a new session, the Whiteboard is your default content mode. You can use
keyboard navigation or keyboard shortcuts to move between content modes and keyboard
navigation to move within content modes.
Note: To switch to a content mode, you must be a Moderator or a
Participant with permission to use that mode.
Navigation within each content mode is unique, as described below.
Navigating within Whiteboard Content Mode
Follow the steps below to switch to Whiteboard mode and access the functions in the Action
bar:
Note: If you are a Participant or a Moderator without the Whiteboard
permission, F6 navigation will place focus on the Scaling menu of the
Whiteboard Action bar.
1. To switch to Whiteboard mode, do one of the following:
o Keyboard Shortcut
Enter Control+Alt+W (Command-Option-W on Mac)
o Keyboard Navigation
Press F6 (the same on the Mac) to cycle keyboard focus to the Collaboration tool-
bar. By default, you will be in Whiteboard Mode.
2. Press F6 again to move to the Whiteboard Action bar.
22 Navigation3. Use Tab, Shift+Tab and the arrow keys to move between the elements in the Action bar
and the adjacent Navigation bar.
4. Press Space to activate the selected function.
Navigating within Application Sharing Mode
Follow the steps below to switch to Application Sharing mode and start hosting an Application
Sharing session:
Note: If someone else is already hosting an Application Sharing session
(you are already in Application Sharing mode), F6 navigation will place
focus on the Scale to Fit option of the Application Sharing Action bar.
1. To switch to Application Sharing mode, do one of the following:
o Keyboard Shortcut
Enter Control+Alt+A (Command-Option-A on Mac)
o Keyboard Navigation
i. Press F6 (the same on the Mac) to cycle keyboard focus to the Collaboration
toolbar. By default, you will be in Whiteboard Mode.
ii. Press Tab or Right Arrow once to move to the Application Sharing Mode
button.
iii. Press Space to activate Application Sharing Mode. The Application Sharing
Selections dialog will open.
2. Press Tab five times to move through the elements in the Collaboration toolbar to the
Share Desktop (the first) field of the Application Sharing Selections dialog.
3. You have two options:
o Share your entire desktop: Press any of the arrow keys to select Share Desk-
top, press Tab three times to move to the Share button and press Space to start
sharing your desktop.
o Share a specific application only: Press Tab to move to the list of available
applications and then, using the arrow keys, select the desired application from the
list. Press Tab twice to move to the Share button and press Space to start sharing
the selected application.
Navigation 23Navigating within Web Tour Mode
Follow the steps below to switch to Web Tour mode and start hosting a Web Tour:
Note: If someone else is already hosting a Web Tour session (you are
already in Web Tour mode) and you don't have Web Tour permission, F6
navigation will place focus on the Back button of the Web Tour Action
bar.
1. To switch to Web Tour mode, do one of the following:
o Keyboard Shortcut
Enter Control+Alt+U (Command-Option-U on Mac)
o Keyboard Navigation
i. Press F6 (the same on the Mac) to cycle keyboard focus to the Collaboration
toolbar. By default, you will be in Whiteboard Mode.
ii. Press Tab or Right Arrow twice to move to the Web Tour Mode button.
iii. Press Space to activate Web Tour Mode. The Web Tour Action bar will open
and focus will be in the Address text box.
2. Use Tab, Shift+Tab and the arrow keys to move between the elements in the Action
bar.
3. Press Space to activate the selected function or, if in the Address text box, open the spec-
ified web page.
Navigating Between and Reading Whiteboard Pages
If you are using a JAWS screen reader, you can read the text of presentations imported into the
Whiteboard via the Activity Window. Navigate to the desired page (as instructed below) and open
the Activity Window using Control + / (Command- / on Mac) to read the textual content of that
page. You will need to move focus to the bottom of the window. (For details on using the
Activity Window, see The Activity Window on page 37.)
Note: You can freely navigate between pages in breakout rooms but must
be given permission by the Moderator to navigate between pages of the
Main room. You will know you are free to move between Main room
pages when you see a red border around your Whiteboard content area.
To move directly to a specific Whiteboard page, select it from the Go to Page menu in the
Whiteboard navigation bar. For instructions on keyboard navigation to that menu, see
Navigating within Whiteboard Content Mode on page 22.
24 NavigationTip: If using a screen reader, you’ll know you are in the Go to Page menu
when you hear, “Go to the selected Whiteboard page.”
To move to the next page, use any of the following methods:
o Keyboard Shortcut
Enter Alt+Page Down (Option-Page Down on Mac).
o Mnemonic Keys
Using mnemonics keys, from the Tools menu select Whiteboard followed by Go to Next
Page. (For instructions on using mnemonic keys, see Mnemonics on next page.)
o Keyboard Navigation
Navigate to and activate the Next Page button in the Whiteboard Navigation bar.
If focus is on the Go to Page menu of the Navigation bar, press the Down Arrow.
(For instructions on keyboard navigation in Whiteboard Mode, Navigating within White-
board Content Mode on page 22.)
To move to the previous page, use any of the following methods:
o Keyboard Shortcut
Enter Alt+Page Up (Option-Page Up on Mac).
o Mnemonic Keys
Using mnemonics keys, from the Tools menu select Whiteboard followed by Go to
Previous Page. (For instructions on using mnemonic keys, see Mnemonics on next page.)
o Keyboard Navigation
Navigate to and activate the Previous Page button in the Whiteboard Navigation bar.
If focus is on the Go to Page menu of the Navigation bar, press the Up Arrow.
(For instructions on keyboard navigation in Whiteboard Mode, Navigating within
Whiteboard Content Mode on page 22.)
Navigating Between Chat Conversation Tabs
You can use keyboard navigation to move between the private Chat conversation tabs in the
Chat panel.
Tip: If you want to know when a new private Chat message has been
received, enable the Audible Notification "Private Chat Message Received".
For details, see Audible Notifications on page 61.
Navigation 251. Press F6 (the same on the Mac) to cycle keyboard focus to the Chat panel.
2. Press Tab twice to move to the currently open conversation tab. (By default, this is the
Room conversation.)
3. Use the arrow keys to move to the desired conversation tab.
4. Press Space to open the conversation.
If there are too many conversation tabs to fit in the Chat panel, they will be added to a drop-
down menu to the right of the displayed conversation tabs. To open a conversation tab in the
menu, do the following:
1. From your currently open conversation tab, press Tab. This will move focus to the
conversation drop-down menu.
Note: if there is no conversation drop-down menu, focus will move
to the Collaboration toolbar.
2. Press Space to open the menu.
3. Use the arrow keys to move to the desired conversation.
4. Press Space to open the conversation.
Using Mnemonic and Keyboard Shortcuts
Instead of using your mouse to select a menu option, you can use your keyboard. Using
mnemonic or Keyboard Shortcuts saves time because you do not have to complete multiple steps
(e.g., clicking on a menu and then clicking on an option), nor do you have to take your hand off
the keyboard to issue the command.
Note: Mnemonic and standard Keyboard Shortcuts are enabled only
when you have input focus on the Blackboard Collaborate web
conferencing window. Focus is not required for Hot Keys.
Mnemonics
A mnemonic is an underlined letter or number that appears in a menu title or menu option that,
when pressed in conjunction with the ALT key, activates a command or navigates to an element
in the user interface.
Mac Note: Keyboard mnemonics are not supported on the Mac.
26 NavigationNote: On Windows, depending upon your configuration, you may have to
toggle ALT the key before the options in the menus will display the
underlined character or number.
To choose a menu option with mnemonics, do the following:
1. Press the ALT key, note which letter or number (mnemonic) is underlined in the desired
menu name and enter it on your keyboard. The menu options for that main menu will
appear. For example, if you press ALT+F, the File menu will appear.
2. Again, note the mnemonic for the desired option in the menu and enter it, with or with-
out the ALT key.
To select a menu option from a sub-menu, repeat step 2.
Keyboard Shortcuts
You can quickly accomplish tasks you perform frequently by using keyboard shortcuts (both
standard keyboard shortcuts and hot keys). Keyboard shortcuts are one or more keys you press
in combination to perform a function within Blackboard Collaborate web conferencing. For
example, instead of clicking the Raise Hand button in the Participants panel or selecting Raise
Hand from the Interaction menu, you can press Ctrl+R (Command-R on Mac OS X) to raise
your hand.
Hot keys differ from standard keyboard shortcuts in some important ways. For details, and a
discussion of hot keys, see Hot Keys on page 32.
Note: The keyboard shortcuts were defined with an extended (full)
keyboard layout in mind. If your keyboard does not have a key used in a
keyboard shortcut, you will need to use the menu item or toolbar button
to perform the desired function.
Caution: If you are sharing an application that has a keyboard shortcut
identical to one in Blackboard Collaborate, and focus is on Application
Sharing, the shortcut will activate its associated command in the shared
application, not in Blackboard Collaborate.
The following table lists the keyboard shortcuts (both standard and hot keys) present in
Blackboard Collaborate to quickly perform a number of common functions.The first column
describes the function to be performed, the second column lists the Windows and Linux
keyboard shortcuts and the third column gives the Mac keyboard shortcuts. Keys are grouped
into sections based on the Blackboard Collaborate module being used.
Note: To access the list of keyboard shortcuts while in a session, select
Keyboard Shortcuts from the Help menu.
Navigation 27Function Windows, etc. keys Mac keys
Application, Window and File Functions
Quit Blackboard Collaborate Alt+F4 Command-Q
Ctrl+Q
Hide Blackboard Collaborate N/A Command-H
Hide other applications N/A Option-Command-H
Close window (Notes, Activity, Closed- Alt+F4 Command-W
Captioning, Calculator) Ctrl+W
Switch to Whiteboard Mode Ctrl+Alt+W Command-Option-W
Switch to Application Sharing Mode Ctrl+Alt+A Command-Option-A
Switch to Web Tour Mode Ctrl+Alt+U Command-Option-U
Open Preferences dialog box Ctrl+Comma Command-Comma
Save Participants list, Chat conversation or Ctrl+S Command-S
Whiteboard
Print Participants list or Whiteboard Ctrl+P Command-P
Keyboard Navigation Functions
Move to the next main module in the user F6 F6
interface. The default order is Participants
panel, Chat panel, Collaboration toolbar,
Action bar and Audio& Video panel. (If you
change the order of the panels, the order
will change.)
Open the Action bars of Whiteboard Mode F6 F6
and Web Tour mode
Move to the previous main module in the Shift+F6 Shift-F6
user interface. (See F6 above for the order
of modules.)
28 NavigationFunction Windows, etc. keys Mac keys
Move to the next user interface element Tab Tab
(e.g., button, field, option) in a main
module or UI element. For example, if
focus is in the Collaboration toolbar, Tab
and Shift-Tab can be used to move between
the three modes (Whiteboard, Application
Sharing and Web Tour), the Information
menu, the Load Content button and the
Record button.
Move to the previous user interface Shift+Tab Shift-Tab
element (e.g., button, field, option) in a
main module (see example for Tab above)
Activate the currently selected function Space Space
Enable tabbing in toolbars of secondary Alt+F8 Option-F8
windows (Closed Captioning, Notes, Activity
Window, File Transfer)
Move keyboard focus between open Alt+F6 Command-`
windows (Notes, File Transfer, Activity, (Windows XP and Linux
Closed-Captioning, Calculator) only)
Open Options menu of the panel or toolbar Ctrl+Shift+O Command-Shift-O
in focus (Audio & Video, Chat, Participants,
Whiteboard action bar, Whiteboard
navigation bar or Web Tour)
Activity Window Functions
Open Activity Window Ctrl+/ Command-/
Close Activity Window Ctrl+/ Command-W
Alt+F4
Ctrl+W
Audio Functions
Press the Talk button Ctrl+F2 Control-F2
(Note: this is a Hot Key ─ see Hot Keys on
page 32.)
Release the Talk button Ctrl+F2 Control-F2
(Note: this is a Hot Key ─ see Hot Keys on
page 32.)
Navigation 29Function Windows, etc. keys Mac keys
Adjust microphone level down Ctrl+Shift+Down Arrow Command-Shift-
Down Arrow
Adjust microphone level up Ctrl+Shift+Up Arrow Command-Shift-Up
Arrow
Adjust speaker level down Ctrl+Alt+Down Arrow Command-Option-
Down Arrow
Adjust speaker level up Ctrl+Alt+Up Arrow Command-Option-Up
Arrow
Video Functions
Start Video transmission Ctrl+F3 Control-F3
(Note: this is a Hot Key ─ see Hot Keys on
page 32.)
Stop Video transmission Ctrl+F3 Control-F3
(Note: this is a Hot Key ─ see Hot Keys on
page 32.)
Whiteboard Functions
Select all objects in Whiteboard Ctrl+A Command-A
Open Page Explorer window Ctrl+Shift+P Command-Shift-P
Open Object Explorer window Ctrl+Shift+T Command-Shift-T
Copy selected object(s) or text in Ctrl+C Command-C
Whiteboard
Cut selected object(s) or text in Whiteboard Ctrl+X Command-X
Paste copied or cut object(s) or text to Ctrl+V Command-V
Whiteboard
Group selected objects Ctrl+G Command-G
Ungroup selected objects Ctrl+U Command-U
Delete selected object(s) or text in Delete Delete
Whiteboard Backspace Backspace
Go to next page Alt+Page Down Option-Page Down
Go to previous page Alt+Page Up Option-Page Up
Move to first page at this topic level Alt+Home Option-Home
30 NavigationFunction Windows, etc. keys Mac keys Move to last page at this topic level Alt+End Option-End Application Sharing Functions Take back control of Application Sharing Ctrl+Space Control-Space (Note: this is a Hot Key ─ see Hot Keys on next page.) Stop Application Sharing Ctrl+Shift+S Control-Shift-S (Note: this is a Hot Key ─ see Hot Keys on next page.) Chat Functions Move cursor to the Message text box of the Ctrl+M Command-M Chat panel Select all Chat text in conversation pane Ctrl+A Command-A Copy selected Chat text in conversation Ctrl+C Command-C pane Paste copied Chat text to Chat Message text Ctrl+V Command-V box, Whiteboard or external application Participant Panel Functions Raise or lower your hand Ctrl+R Command-R Show that you have stepped away or come Ctrl+Shift+A Command-Shift-A back Show smiley face Alt+1 Option-1 Show LOL Alt+2 Option-2 Show applause Alt+3 Option-3 Show confusion Alt+4 Option-4 Show approval Alt+5 Option-5 Show disapproval Alt+6 Option-6 Show Slower (when you want the presenter Alt+7 Option-7 to slow down) Show Faster (when you want the presenter Alt+8 Option-8 to speed up) Show None (when you want to clear all Alt+0 Option-0 displayed emoticons) Navigation 31
Function                                           Windows, etc. keys            Mac keys
Notes Functions
Open Notes window                                Ctrl+E                   Command-E
Close Notes window                               Alt+F4                   Command-W
                                                 Ctrl+W
Closed-Captioning Functions
Open Closed-Captioning window                    Ctrl+F8                  Command-F8
Close Closed-Captioning window                   Alt+F4                   Command-W
                                                 Ctrl+W
Polling Functions
Yes - polling response                           Ctrl+1                   Command-1
No - polling response                            Ctrl+2                   Command-2
A - polling response                             Ctrl+1                   Command-1
B - polling response                             Ctrl+2                   Command-2
C - polling response                             Ctrl+3                   Command-3
D - polling response                             Ctrl+4                   Command-4
E - polling response                             Ctrl+5                   Command-5
None                                             Ctrl+0                   Command-0

Hot Keys
Hot keys are a type of keyboard shortcut but differ from standard keyboard shortcuts two ways:

     n   You can modify the definition of these keys.
     n   You do not need to have input focus on the Blackboard Collaborate web conferencing win-
         dow to use them (they are available system-wide).

By default, seven hot keys have been defined for the commonly used features in Blackboard
Collaborate. You can use these default hot keys (listed in the following table) or define your own
in the Preferences dialog. For instructions, see Configuring Hot Keys on the facing page.

                 Linux Note: Num Lock and Caps Lock must be turned off for Hot Keys
                 to work in a Blackboard Collaborate session running on Linux.

32                                                                                       Navigation
The default values for the two Talk hot keys are the same and the default values for the two
Video hot keys are the same. If you keep the default values for the Talk keys, you can use
Ctrl+F2 (Control-F2 on Mac) to toggle the Talk button on and off. If you keep the default values
for the Video keys, you can use Ctrl+F3 (Control-F3 on Mac) to start and stop Video.
Tip for Screen Reader Users: With toggle commands, it is not always
easy to remember which state you are currently in. You can always be sure
that you are sending the desired command by redefining one of the hot
keys in each toggle pair. For example, if you keep the default for pressing
the Talk button Ctrl+F2 (Control-F2 on the Mac) and redefine the hot key
for releasing the Talk button to something else, Ctrl+F2 (Control-F2 on
the Mac) will always turn on the Talk button and your redefined hot key
will always turn off the Talk button -- you will never have to know
whether or the Talk button it is currently turned on or off.
The default hot keys are listed in the following table where the first column describes the
function to be performed, the second column lists the Windows and Linux hot key and the third
column gives the Mac hot key.
Function Windows & Linux Key Mac Key
Press the Talk button Ctrl+F2 Control-F2
Release the Talk button Ctrl+F2 Control-F2
Take back control of Application Sharing Ctrl+Space Control-Space
Stop Application Sharing Ctrl+Shift+S Control-Shift+S
Start Video transmission Ctrl+F3 Control-F3
Stop Video transmission Ctrl+F3 Control-F3
Configuring Hot Keys
Exercise caution when changing the default definitions of hot keys. Ensure you do not change a
hot key definition to that of a hot key used by another application. You also should avoid key
combinations that conflict with standard keyboard shortcut operations.
Note: On Windows and Linux, the hot key is restricted to one character.
You may include one or more modifier keys (Shift, Control or ALT on
Windows).
Mac Note: Mac OS X users must include at least one modifier key in the
keystroke: ⇧Shift, ^ Control, ⌥ Option or ⌘ Command) .
Navigation 33Configure your hot keys in the Preferences dialog.
1. Open the Preferences dialog in one of the following ways:
o From the Edit menu, select Preferences… (Windows & Linux)
From the Blackboard Collaborate web conferencing menu, select Preferences
(Mac OS X)
o Enter Ctrl+Comma (Windows & Linux)
Enter Command-Comma (Mac OS X)
2. In the left pane of the Preferences dialog, select Hot Keys under General. The Hot Keys
preferences panel appears.
Note: If you see an X under the Valid column, this indicates that
the hot key is not available. It is likely being used by another open
application. Either redefine the hot key to something valid or close
the other application.
34 Navigation3. From the Hot key preferences panel, select the hot key you wish to revise and click
Modify…. The Edit Hot Key dialog opens.
4. Assign the keystrokes. Click on the down arrow to select a key from the key option list
and then select the desired modifier keys by clicking on their check boxes. For example,
the keystroke in the screen capture above is Ctrl+F2.
5. Click on OK to save the hot key configuration and close the Edit Hot Key dialog, or
Cancel to close the Edit Hot Key dialog without saving your changes.
6. Click on OK to save your preferences and close the Preferences dialog, Apply to save
your preferences and leave the Preferences dialog open or Cancel to close the Preference
dialog without saving any of your changes.
When you configure preferences, Blackboard Collaborate web conferencing will remember the
settings each time you join another session on the same computer.
Navigation 35Chapter 4
The Activity Window
The Activity Window is an accessibility feature of Blackboard Collaborate web conferencing that
can be useful to both hard of hearing/deaf and low vision/blind users. It is a stand-alone
window that reports various events that take place in Blackboard Collaborate throughout the
duration of a session. The window has a simple design so you can use a screen reader to navigate
through the user interface and read the events as they occur. The Activity Window also enables
you to perform simple functions through a command line interface. The window consists of the
following main components:
Page 371 Show/Hide Command Input field
2 Audible Notification Filter
3 Module Event Filter
4 Importance Event Filter
5 Close button
6 Tool bar
7 Event panel
8 Command Input field
The Tool Bar, at the top of the window, contains the Show/Hide Command Input Field
button, the Audible Notifications Filter, the Module Event Filter and the Importance Event
Filter. (These are described a little later.)
The Event Panel, in the middle of the window, reports the events that have occurred in the
session.
The Command Input Field, at the bottom of the window, enables you to type commands to
perform some basic tasks in Blackboard Collaborate.
Opening and Closing the Activity Window
Opening and closing the Activity Window is simple so you can access it without your attention
being diverted from the session in progress. If you move to a different window in Blackboard
Collaborate web conferencing, you easily can bring the Activity Window back into focus (activate
it).
You also can move, resize or close the Activity Window so it is not obtrusive.
Note: On Windows, Linux and Mac OS X platforms, the Activity Window
always remains in front of the Blackboard Collaborate main window. On
Solaris, if you click on the main Blackboard Collaborate window, the
Activity Window will move behind the main window.
38 The Activity WindowTo open or activate (bring into focus) the Activity Window, do one of the following:
o Enter the keyboard shortcut Control+/ (Command- / on Mac)
o From the Window menu, select Show Activity (on Windows or Linux, you can use the
mnemonic Alt+W+A to select it)
To close the Activity Window, do one of the following:
o Enter the keyboard shortcut Control+W or Alt+F4 (Command-W on Mac)
o From the Window menu, select Show Activity (on Windows or Linux, you can use the
mnemonic Alt+W+A to select it)
o Click on the Close button in the top-right corner of the window
Displaying Events
Notable events that occur in an Blackboard Collaborate web conferencing session are displayed
in the Event panel of the Activity Window. By default, events of all Blackboard Collaborate
modules are displayed and the approximate time each event occurred is noted. Moderators can
see all events and Participants can see only a subset of events.
When a new event is reported, keyboard focus stays at the last place you had it (the last cursor
position is maintained and the window will not scroll to the new message at the bottom). You
need to manually move focus to the new event using your arrow keys or scroll bar so you can
read the new text.
Note: The complete list of events is shown in the Event Filtering
Preferences panel. (For details, refer to Event Filtering Preferences Panel
on page 43.)
You can manage your display in three ways:
l Filter which events are to be displayed in the event panel (see Filtering Events for Display
on next page).
l Change the text size in the event panel (see Resizing Activity Window Text on page 44).
l Show or hide the time stamps associated with events (see Showing/Hiding Time Stamps
on page 44).
Tip: Although there is no Save or Export function in the Activity
Window, if you want to save a history of the activity, simply copy and
paste the events into a text editor.
The Activity Window 39Filtering Events for Display
You can select which events you want displayed in your own Event panel through the Module
Event Filter and the Importance Event Filter menus in the Activity Window or through the
Event Filtering preferences panel.
Note: The events you hide or display will affect what is displayed in your
own Event panel only – it will not affect what others see in their own
Event panels.
You can select which events for which you want to be audibly notified through the Audible
Notifications Filter in the Activity Window or through the Audible Notifications Preferences
panel.
Audible Notifications Filter
Audible notifications are system messages sent by Blackboard Collaborate web conferencing to
notify users when certain important events occur within the session. These notifications are
presented as sounds.
To open the Audible Notifications Filter menu, click on the
Audible Notification Filter button in the tool bar. You
can specify which set of audible notifications you would like
to hear (all, basic or custom) from the Audible Notifications
Filter. These are the same set of notifications you can
configure in the Audible Notifications Preferences panel. See
Audible Notifications on page 61 for details.
Custom Audible Notifications are the set of individual notifications that you selected in the
Audible Notifications Preferences panel, rather than selecting All or Basic.
Note: The filtering options set in the Audible Notifications Filter are
reflected in the Audible Notifications Preferences panel. Likewise, if you
make a change to the options in the Audible Notifications Preferences
panel, you will see these changes in the Audible Notifications Filter as
well.
40 The Activity WindowModule Event Filter
The Module Event Filter is used to include or exclude all events associated with a particular
Blackboard Collaborate module. By default, all modules are included.
Note: The filtering options set in the Event
Filtering Preferences panel always override
the filtering set in Module Event Filter.
To open the Module Event Filter menu, click on the
Module Event Filter button in the tool bar. To
exclude events of a module, de-select the module name
from the menu: Activity (messages related to the
commands you enter in Command input field, such as
usage tips and error messages), Application Sharing,
Audio, Chair, Chat, File Transfer, Interaction,
Multimedia, Participants, Quiz Manager, Recorder,
Timer, Video and Whiteboard.
To turn display of a module’s events back on, select the
module name again.
Note: To display some but not all events
associated with a module, use the Event
Filtering Preferences panel. For details,
refer to Event Filtering Preferences Panel
on page 43.
Importance Event Filter
The Importance Event Filter is a menu that enables you to
filter events based on what is important or relevant. It also
has an option to turn off/on the time stamps that appear in
the Event panel.
Note: Hide Notifications and Hide My Events
operate independently from All Events, Common
Events and Important Events. For example, if
you hide your own events, they will not be
displayed even if you have selected All Events.
The Activity Window 41You can also read