Best Practices for Creating E-Learning - For OutStart Trainer Development
←
→
Page content transcription
If your browser does not render page correctly, please read the page content below
10/30/2006 Best Practices – OutStart Trainer

                                                 Best Practices for Creating E-Learning
                                                                 For OutStart Trainer Development

                                                                            OutStart, Inc.
                                                                            100 Colonial Center Parkway
                                                                            Suite 400
                                                                            Lake Mary, Florida 32746
                                                                            407.548.0444
                                                                            www.outstart.com

                        © by OutStart, Inc. and its content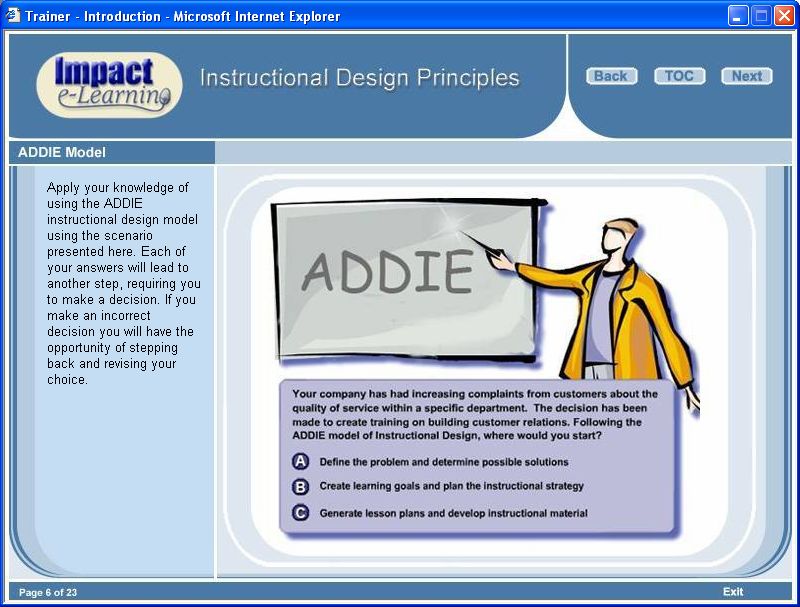
Best Practices – OutStart Trainer                   January 2005

  © 2006 OutStart, Inc. All rights reserved.

  No part of this publication may be reproduced, stored in a retrieval system, or transmitted in
  any form or by any means, electronic, mechanical, photocopying, recording, or otherwise,
  without prior written permission.

© OutStart, Inc.                                                                          Page 2 of 34
Best Practices – OutStart Trainer                                           January 2005

                                                                                                                  Introduction
This document provides a high-level overview of best practices for designing and creating e-
Learning in general, and creating e-Learning with OutStart Trainer in particular. Business
considerations such as planning and development processes are explored, with additional related
best practices.

This is not an instructional document. It is assumed that readers have at least a basic knowledge
of how to use OutStart Trainer.

This document is divided into the following sections:

Introduction.................................................................................................................................... 3

What is e-Learning? ...................................................................................................................... 4

Planning for e-Learning ................................................................................................................ 5

Ensuring a High Quality Product ............................................................................................... 10

Instructional Principles for E-Learning ..................................................................................... 16

Page-Based Design with OutStart Trainer ................................................................................ 19

Designing Tests/Assessments................................................................................................... 30

Designing for Deployment with OutStart Trainer..................................................................... 33

Suggested Resources for More Information ............................................................................ 34

© OutStart, Inc.                                                                                                                   Page 3 of 34
Best Practices – OutStart Trainer                    January 2005

                                                                           What is e-Learning?
There are many definitions and assumptions regarding the question “What is e-Learning?” While
many are correct to a certain point, very few seem to capture the essence of what e-learning is.
Here are some common definitions:
     •    Education via the Internet, network, or CD-ROM.
     •    Electronic transfer of skills and knowledge.
     •    The component of distributed learning that includes digital content, is experienced
          through a technology interface, and is Internet-enabled.

All of the above are correct, but they could just as easily be describing a shared document, a
PowerPoint presentation, a Knowledge Base, or an online book. Good e-Learning is much more
than that. The following definitions better capture the essence of e-Learning.
     •    E-Learning is a vibrant, dynamic, and exciting way to learn new skills and concepts.
     •    E-Learning is all about learners – capturing their attention with content specifically
          designed to meet their immediate needs in a self-paced and comfortable environment.
     •    E-Learning is interactive, holding learners’ attention by involving them in the learning
          process every step of the way.
     •    E-Learning allows learners to learn by doing, by being involved, by receiving immediate
          feedback, and by allowing them to monitor their progress with quizzes, tests, and hands-
          on activities.
     •    E-Learning uses learners’ senses – appealing to their auditory, visual, and tactile senses.

            E-Learning is NOT pictures on a page with bullet points.

Traditional classroom learning can be effective or ineffective - depending very much on how it is
presented by the teacher. E-Learning is no different – it too can be good or bad, depending on
the skills of the designer/developer.

© OutStart, Inc.                                                                             Page 4 of 34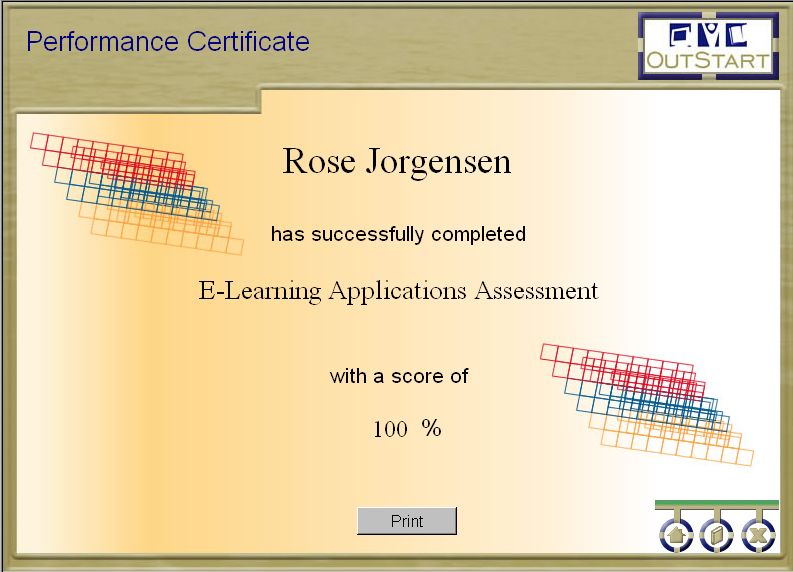
Best Practices – OutStart Trainer                        January 2005

                                                                  Planning for e-Learning
While OutStart Trainer is an excellent course development application, creating good e-Learning
is not just about opening Trainer and beginning to develop your courseware. Courses should be
pre-planned – good e-Learning design starts outside of the development application.

Where do you start? You start with a development plan for the following reasons:
     •    A Course Development plan can be shared with all those involved in the project so that
          individuals know exactly what the expectations are, and what their own role is in the
          overall process.
     •    A well planned process leaves little room for the misunderstanding of objectives.
     •    Developing a plan allows for time, resources, and cost management factors to be worked
          into the big-picture.
     •    If management approval needs to be petitioned, a good development plan will permit you
          to submit a clear and valid proposal.

Of course, the complexity and extent of the development plan will depend very heavily on
individual organization needs and the time and resources it can allow. However, all development
plans should consist of the following stages which make up the Course Development Process.

  Process Stage                     Roles                                           Tasks

Design                 •   Instructional Designer(s)             •    Analysis of Content
                                                                 •    Design Documents
                                                                 •    Storyboards
                                                                 •    Creating Standards
Development            •   Instructional Designers               •    Page Design, Content Input,
                       •   Course Developers                          Interactive Content.
                       •   Subject Matter                        •    Graphic Design, Flash Development,
                           Expert/Content Provider                    Sound & Video Recording.
                       •   Media Developers                      •    Checkpoint Reviews.

Review                 •   Reviewers                             •    Design, Editorial, and Subject Matter
                                                                      integrity Reviews.
Deploy                 •   Instructional Designers               •    Publish
                       •   Technical Specialists                 •    Import to LMS
                                                                 •    CD ROM

Depending on the size of the organization and the extent of the course development project(s),
the above Process Stages may be carried out by a team of people, or one full-time
Designer/Developer with partial Media and Review assistance.

        The number of individuals involved in the process is not as important as
ensuring the incorporation of the Best Practice process stages and elements within the
development plan, as outlined above.

© OutStart, Inc.                                                                                 Page 5 of 34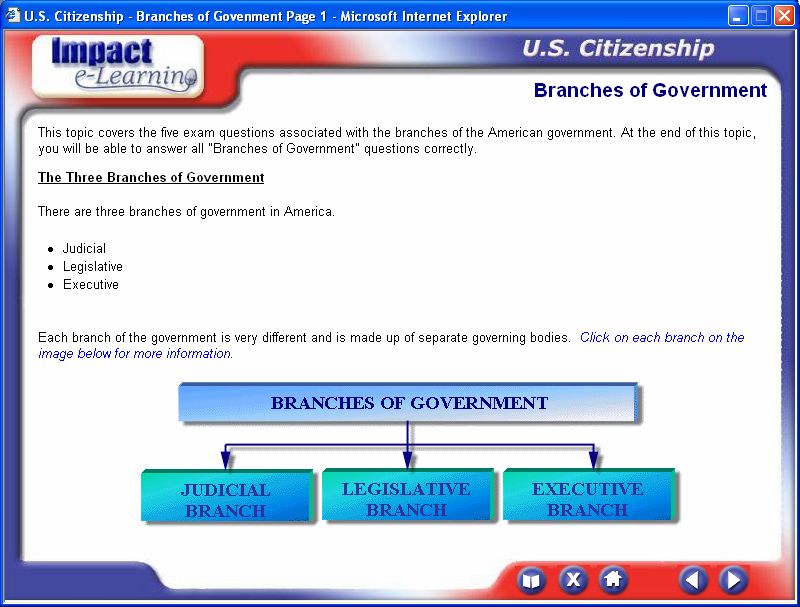
Best Practices – OutStart Trainer                   January 2005

                   Sample Development Process
The following Development Process is an overview of a process that OutStart uses for some
course development projects. You will see that it contains all the essential elements of best
practices for course development.

   OutStart’s RED (Rapid Education Development) process is intended to provide a
   methodology that can be adapted and modified based on content requirements, resources,
   time, delivery requirements, and distinct implementation needs. The number of passes, the
   tasks within the passes, the timelines, and activities associated by role can and should
   change with each implementation according to the individual project development needs.

   The table below shows a typical Pass Cycle (Group), and some of the major tasks involved in
   each pass.

          Pass              Major Tasks
          Pass 0            Content Analysis; Design Document; Internal project plan;
                            Instructional Design Model; Templates; Mapping; etc.
          Pass 1            Mapping; Content Development; Graphics, animations,
                            slideshows design & development.
          Pass 2            Design & development of interactions; Design &
                            development of assessments; Initial internal review and
                            editing/QA; Beta testing.
          Pass 3            External Review.
          Pass 4            Review comment implementations, Revisions.
   __________________________________________________________________________

© OutStart, Inc.                                                                        Page 6 of 34
Best Practices – OutStart Trainer                January 2005

Vendor Packages
If contracting courseware development with third-party vendors, it is essential to provide them
with all the material required to ensure that course design and development proceeds
productively, is consistent to your organizational standards, and allows for as few
misunderstandings of requirements as possible.

The following is a suggested list of items that may be included in a vendor package:
     •    Software (Trainer) installation
     •    Software User Guide and other related documentation
     •    Project Plan containing:
               o   Outline of development process
               o   Expectations and assumptions
               o   Timelines
               o   Deliverables
               o   Contacts
     •    Design Document (course outline) and/or Storyboard – should be designed around
          objectives
     •    Style Guides, including:
               o   Writing and Textual standards
               o   Graphical standards
               o   Page Design standards and guidelines
               o   Questions and Tests standards and guidelines
               o   Interactivity standards and guidelines
               o   Audio/Video standards
               o   GUI/Template/Master Page guidelines
               o   Miscellaneous standards and guidelines
     •    Interface graphics including buttons
     •    Page and/or Course Templates
     •    Review/QA Checklists
     •    Course specific resource material such as:
               o   Subject matter source material (Documentation, Presentations, Texts, Internet)
               o   Related graphics/media
               o   Reference material

© OutStart, Inc.                                                                         Page 7 of 34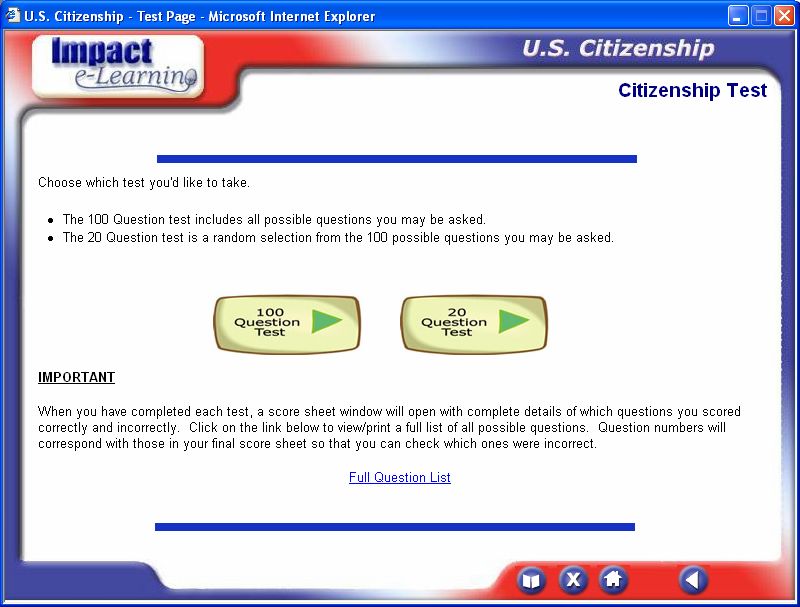
Best Practices – OutStart Trainer               January 2005

The ADDIE Model of Instructional Design
It may also be helpful to consider any development process within the context of an Instructional
Design Model, such as the ADDIE Model. Most contemporary Instructional Design Models are
based to some extent on the ADDIE model as shown below.

The basic premise of the ADDIE Model is as follows:

     •    Analyze - The Analyze stage is where the training problem is identified, defined, and
          possible training solutions determined. Steps include: identifying the training need,
          identifying the constraints, analyzing the audience.

     •    Design - The Design phase should produce an effective curriculum and storyboard that
          will achieve the desired learning outcomes when implemented. Steps include: identifying
          the learning outcomes, collecting the available resources, determining the delivery mode,
          choosing your tools, creating a script/storyboard for your lesson/course.

     •    Develop - The Develop phase is where the actual development of the lesson plans and
          materials takes place. All instruction, media, supporting documentation, and any
          appropriate hardware and/or software are prepared.

     •    Implement - The Implementation phase is concerned with the effective delivery of the
          instruction. The implementation of the instruction should ensure learners' understanding
          of materials, support the mastery of objectives, and promote the transfer of knowledge
          from the instruction to the job.

     •    Evaluate - The Evaluation phase measures the effectiveness and efficiency of the
          instruction. This phase should happen on a regular basis throughout the entire
          instructional design process and may be Formative or Summative.

                   For More Information about Instructional Design Models:

     •    The ADDIE Model

     •    Introduction to ISD

© OutStart, Inc.                                                                          Page 8 of 34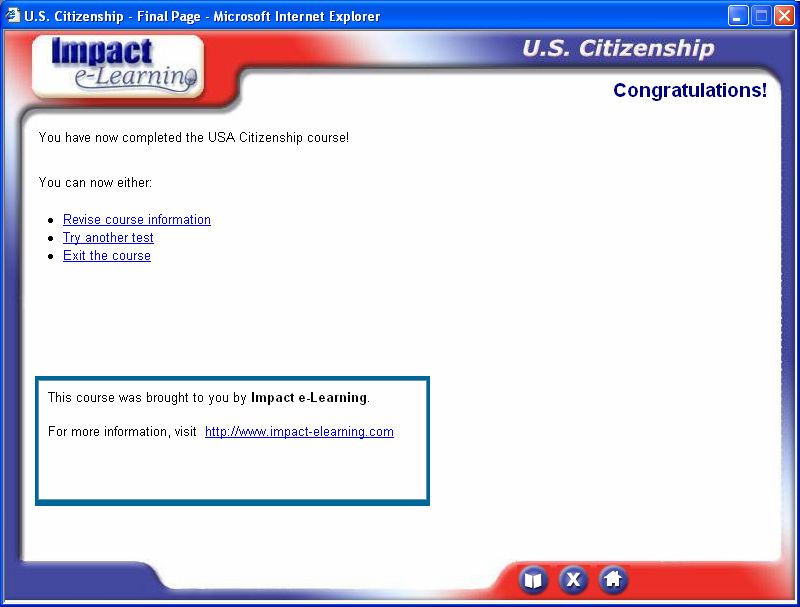
Best Practices – OutStart Trainer January 2005
Best Practices: Planning for e-Learning – Summary
Successful e-Learning development begins with a well-designed course development plan. While
many of the factors of a development plan may vary according to organization size and extent of
work, the following stages should always be implemented:
• Design – Typically the Design stage will be conducted by one or more Instructional
Designers, and maybe a Project Manager. The first stage of the development plan’s
process should include:
Analysis of content – breaking it up (mapping) into logical course structure
objects.
Creating a Design Document and/or Storyboard.
Creating and distributing Standards Guidelines.
Creating Master Pages, Page Templates and Course Templates.
• Develop – The Development stage of the process would include Instructional Designers,
Course Developers, Graphic Designers, and Reviewers. Some of the activities involved
with this stage may be:
Content input
Page layout
Multi-media development
Interactive content design and development
Standards checklists
Quiz and Test development
• Review – The Review stage should be conducted by Editorial, Instructional Design, and
Subject Matter Expert (SME) Reviewers. These roles can often be taken on by one or
two people.
After content has been reviewed, courses may have to go through a second stage of
development, depending on the Review outcomes. Final content approval should come
from a lead Instructional Designer.
Content should be reviewed for the following:
Editorial review for spelling, grammar, punctuation, and standards.
Instructional review for standards, instructional design, and instructional integrity.
This review may possibly also be conducted by a learner to get learner-based
perceptions.
SME review for informational integrity.
• Deploy – The Deployment stage involves the packaging and delivery of content to the
location at which learners access the course. This may be a CD-ROM, Learning
Management System (LMS), an Internet website, or an internal network. See Designing
for Deployment for more information.
If 508 Compliance is required, ensure that you plan for it wherever possible to
cater for all audience types, such as the sight and hearing impaired. Considerations for
508 Compliance should occur at all stages of the Development Process.
© OutStart, Inc. Page 9 of 34
Best Practices – OutStart Trainer                  January 2005

                                             Ensuring a High Quality Product
Ensuring high-quality courseware begins with creating, communicating, and maintaining
consistent development standards. Designing and creating the standards for your organization
may be a time-consuming task but once created and communicated, the standards can save
countless hours in development time and error-checking.
By creating standards, learners will develop a feeling of comfort and familiarity when viewing the
courses. The following items are a basic list of standards that should be created and then passed
on to all developers.
     •    Writing Style Guide
     •    Media Style Guide
     •    Master Page Style Guide
     •    Designing and Using Page Templates
     •    File-Naming Conventions
     •    Other Important Standards

           Remember - Consistency, Consistency, Consistency! Consistency in courseware
is the ultimate foundation on which high quality products are built!

Writing Style Guide
When multiple developers are developing courseware to be used across an organization, it can
be difficult to maintain a consistent writing style. This can be rather difficult to overcome as
writing styles can be as individual as the people themselves. However, there are certain writing
style guidelines that can be standardized across an organizational development team that will go
far in maintaining consistency.

           Best Practices: Standardized Writing Style Guidelines
The following are examples of items you may include in a Writing Style Guide.
     •    Establish a protocol for acronyms – e.g. When using an acronym for the first time, include
          the full term (i.e. WAC (Women’s Army Corps)). When using the same acronym in
          further text, just use the acronym.
     •    Establish a protocol for organizational and industry “jargon” – e.g. Never assume that a
          learner will understand terminology that is particular to an organization or an industry
          unless you are sure of your learners’ background. Unless you are prepared to explain
          the terminology, do not use jargon.
     •    Outline learning elements to be used for certain learning events – e.g. When writing a
          procedure, always use a numbered list format.
     •    Standardize commonly-used terminology, e.g. if you are developing software application
          training, you may want to create a list of standards to be used in procedural steps – i.e.
          Use “Click the Enter button” instead of “Hit the Enter button” or “Click on the Enter
          button”.

© OutStart, Inc.                                                                         Page 10 of 34
Best Practices – OutStart Trainer January 2005
• Standardize font formatting – e.g. When referring to a specific button, checkbox, or radio
button, always bold the name of it (i.e. Click the Enter button). When referring to a
document/book/URL, always italicize the name.
• Create Voice guidelines – e.g. Write in the active voice as much as possible and be
concise (i.e. Click OK to close the dialog box). Never write documents in the first person
(I), as the subject. Using the second person, (you) as subject is appropriate for task lists
and in instructional text. Third person (it) is also appropriate.
Media Style Guide
While the potential for media inconsistencies are not as great as those of Writing Styles, there is
still a need to establish some recommendations for media standards. Media is so often the basis
for learner interactivity and adding relevance to text that it is not an instructional element to be
taken lightly.
Best Practices: Standardized Media Elements
The following are examples of items you may include in a Media Style Guide.
• Ensure static images are a common web-graphic format, such as .gif, jpg, or .png.
• Images should NEVER be blurry or of poor quality. Ensure that images are always crisp
and clear – it is better to use no image at all than one of poor quality.
• Be very conscious of media file sizes. If your course is to be delivered via the internet,
each media element has to be downloaded into the learner’s cache before it can be
viewed. Keeping file sizes small ensures that learners will not experience any viewing
delays. This is important for all media types, e.g. images, shockwaves, audio, and video.
If a large file is necessary, such as a video file, ensure that your learners know that there
is an element loading, so as to avoid confusion.
• Audio should be recorded at a quality level that allows for clear sound without
background noise, but at a low enough bit-rate to not result in an undue file size. Audio
files should always be captured and edited at the highest bit-depth and sample rate
available - usually 16-bit 44.1 kHz stereo audio on most consumer level hardware.
However, once you are done editing you can compress the audio using a codec
compression format such as MP3 to decrease the size of the file.
• If using a large size shockwave, ensure that there is a “loading...” screen.
• When mapping images for HotSpots or Image Maps, keep in mind that the more mapped
areas there are on an image, the longer the page will take to load.
• Ensure media dimensions allow space for introductory and supporting text to be added to
the page. No media should ever use more than two-thirds of page space.
• If using image icons (such as the clipboard above) do not make them so small that
learners are unable to see what they are supposed to represent.
© OutStart, Inc. Page 11 of 34Best Practices – OutStart Trainer January 2005
Master Page Style Guide
In Trainer, Master Pages are the most important feature of courses, in that:
• They define the “look and feel” standards of the course as a whole.
• Global page changes only need to be made to the Master Page and the changes are
reflected on any page using the Master Page.
It is recommended that Master Pages always be used for courses created in Trainer. The
elements included on Master Pages are at the designer’s discretion, but at a minimum they
should define the page background, navigation, and course titles.
Best Practices: Creating Master Pages
The following are suggestions of best practices for creating and using Master Pages.
• Master Pages should always be created in their own separate Book.
• Use a variety of Master Pages for each course. At a minimum, create Master Pages for
the following:
Standard Tutorial Pages (full navigation)
Test Pages (partial navigation)
No Navigation Pages (pages that do not have any navigational items on them for use
as hidden, pop-up pages)
Start Pages (no Previous button)
End Pages (no Next button)
• Ensure that any background image used on a Master Page does not use any more Page
“real estate” than absolutely necessary.
• Background images should be the exact size of the Trainer page which is 800 x 600
pixels.
• If using a background image, insert it as a Background Image and not just as an Image.
If using the latter function, other page elements may disappear behind the Image.
• If applicable, use a company logo on the Background Image.
• Any text boxes used over a colored Background image should always have the
background color set to transparent.
• Try to always use white as the content area of a background image. This is the easiest
color to contrast other elements with, and it will help prevent having to use transparent
.gifs more than necessary.
• Always include a Table of Contents button so that learners can quickly navigate to
different chapters and pages within the course. Hidden chapters and pages will not
appear in the Table of Contents.
• The following page elements are recommended for use on Master Pages:
Background color or image
Course Title
Navigational images or panel including, Table of Contents button, Home button, Next
button, Previous button, Exit button, Audio on/off button (if applicable).
© OutStart, Inc. Page 12 of 34Best Practices – OutStart Trainer January 2005
Figure: Example of a Master Page containing some of the recommended Page elements
Designing and Using Page Templates
Page layout styles and standards can also be maintained by using Page Templates. If designing
and using Page Templates, ensure that all developers have access to the appropriate templates.
Best Practices: Designing and Using Page Templates
The following are suggestions of best practices for designing and using Page Templates.
• If creating more than one “look and feel” template, create new template groups containing all
the page templates within those groups that you need. The new template groups will be
created on your local PC in your Trainer directory (e.g. C:\Program Files\OutStart\Trainer
2006\template\new_template_group). The template group(s) should be passed on to all
developers who will need to use them, along with the appropriate instructions.
• If your organization has firm page design practices, create templates for all page scenarios
that meet your needs. The pre-configured templates that come packaged with Trainer will
give you guidance on some of the different types of scenarios you could apply.
© OutStart, Inc. Page 13 of 34Best Practices – OutStart Trainer January 2005
• Page templates can also help with productivity. For example, you could design a template for
a question with complex configurations. Developers can use this template and just input the
question and answers without having to newly configure it each time.
• It is highly recommended that you apply any templates that are used often within a course, as
master pages. In this way, any changes made to the master page will be applied to every
page in the course using that master page.
File-Naming Conventions
It is good practice to establish a standard for naming all types of files associated with course
development. This is particularly helpful when you have a lot of files and are searching for one
you know already exists. The following list gives some examples of possible file naming
conventions:
Best Practices: File Naming Conventions
• Course files (.dtc) are best named for the title of the course. But if updating courses on a
regular basis, you may want to include the date, or version number in the file name (e.g.
Instructional Principles_v5.4.dtc)
• Be mindful of the length of the .dtc file name. Some applications such as CD-burning
software applications do not like long file names. When distributing courses to HTML,
some files use the course file name and then append further naming information to it. It
is best to confine the .dtc file name to no more than approximately 50 characters.
• Image files should include course name initials, a descriptive name, and a version
number if applicable. Image file names should never contain blank spaces (e.g.
ip_global_interface_bg_v3.jpg).
• External files such as documents, presentations, simulations, shockwaves etc. should
include the course name initials, a descriptive title, and something to indicate its purpose
(e.g. ip_page_design_dragdrop_test.swf).
Other Important Standards
The previous standards covered those that would be applicable to nearly all organizations and
are considered best practices across the Trainer Course Development spectrum. However, there
may be other standard practices that are more applicable to some organizations than others.
Decide on the course design and development standards that are important to your organization,
and then implement them accordingly.
Miscellaneous Best Practices: Creating Standards
The following are suggestions of standards best practices that may be important to your
organization.
• Depending on the types and number of courses created within an organization, there
may be a need to develop a standard course structure template. Master Pages can be
designed and saved with the skeleton structure.
© OutStart, Inc. Page 14 of 34Best Practices – OutStart Trainer January 2005
The necessary components of the course structure are at the instructional designer’s
discretion; however refer to the following image as an example.
Figure: An example of what a Course Structure Template may look like
• If you are using external content within your courses, such as documents, simulations,
etc, you may want to consider how you will present the content. For example, will you
present it within a Web Browser window, or from a hyperlink? Will you have it open in the
Trainer page window, or should it always open in a new window?
• E-learning courses should always include an explanation to learners of how to navigate
the course. Ideally, this explanation should include images of the navigational buttons.
• Always ensure that learners know exactly what the technical requirements are before
taking a course. For example, if you are using multi-media in a course, it’s important that
learners know exactly what plug-ins they will need before they begin. If they need
Windows Media Player, and a Shockwave plug-in, make it standard practice to inform
them prior to the commencement of any tutorials.
• If using audio within courses, always ensure that there is a textual transcript supplied for
hearing impaired learners and those with no speakers/sound card on their PCs.
While creating and maintaining standards is easily one of the most important
aspects of creating high quality courses, be careful that you don’t make them so
“absolute” that you stifle any creative flexibility in course design. There are ALWAYS
exceptions.
© OutStart, Inc. Page 15 of 34Best Practices – OutStart Trainer January 2005
Instructional Principles for E-Learning
Instructional Principles for design and development of instruction can be said to be based to
some extent on “Gagne’s Nine Events of Instruction”.
Instructional theorist Robert Gagne, developed nine events of instruction that when put together,
make up a practical process for effective learning. Most instructional design is based on these
events and the process is widely used in teaching practices. These principles of instruction
should also apply in any design of e-Learning.
Figure: Gagne’s Nine Events of Instruction
Best Practices: Applying Instructional Principles to E-Learning
Gagne’s Events of Instruction adapt exceptionally well in e-Learning design. When all of the
Instructional Principles are put together into one course, the end result is a compelling and solid
learning package that will motivate learners and achieve the desired results.
These best practices address each of the Events of Instruction in a way that will provide
guidelines for applying sound instructional principles to e-Learning.
• Gaining Attention – While using effective means of gaining and holding learners’
attention is important throughout a course, it is particularly so at the beginning of a
course. “Startling” a learner is a good way of grabbing their attention, and should occur
on one of the first pages of a lesson. This can be achieved by using the learner's auditory
and/or visual senses, or with a statement that is immediately thought-provoking or
relevant to their learning needs. Instructional designers will often use a Flash
presentation as it can provide all the components mentioned.
© OutStart, Inc. Page 16 of 34Best Practices – OutStart Trainer January 2005
• Objectives - Well constructed and presented learning objectives provide both guidance
and motivation. Learning Objectives in e-Learning are no different than for traditional
instructor-led training. The most important things to remember are:
Learners should be informed of the objectives before the lesson begins. Ideally
objectives would accompany the lesson/course outline.
Learning content presented should provide all the information needed to meet the
objectives.
Assessment questions should be based on and test against the learning objectives.
With e-Learning, prescriptive learning can be constructed based on the learning
objectives.
• Stimulate Recall – Stimulating recall of prior learning provides the learner with a sense
of personal relevance and stimulates motivation. With e-Learning, this can be achieved in
a variety of ways:
Providing prerequisites helps to remind the learner of prior learning in the subject
matter.
Pre-tests can test for and stimulate prior knowledge and experience.
Assumptions of prior knowledge can be made clear in the lesson/course overview.
Lesson content may contain references and questions to necessitate recall of prior
knowledge and experience. With e-Learning, learners can obtain immediate
feedback on their recall.
• Presenting Content - Presentation of content (subject matter) is where traditional
Instructor-Led Training (ILT) and e-Learning differ greatly. In the absence of an
instructor, e-Learning designers must rely heavily on the content presentation of their
lessons. The way in which content is presented in e-learning, and especially with a
“Page-Based” development application such as Trainer is of prime importance and can
“make or break” a course.
Note: Presenting content has been given its own topic in this document, (see Page-
based Design with OutStart Trainer).
• Learning Guidance - Wherever possible, additional guidance should be provided to the
learner to facilitate recall. E-Learning is perfect for providing any of the learning guidance
strategies, especially anything of an interactive nature. Strategies used for this guidance
can include the following:
Examples and Non-examples
Analogies
Simulations
Case Studies
Graphical Representations
© OutStart, Inc. Page 17 of 34Best Practices – OutStart Trainer January 2005
• Elicit Performance – It is important to elicit learner performance by providing the
opportunity to practice new skills and confirm understanding. This should happen at the
end of each section/topic/lesson, before going on to a new one. E-Learning enables a
variety of dynamic, interactive, and "hands-on" practice opportunities, such as:
Interactive Questions
Controlled Simulations
Real on-the-job Activities
More detailed information about learner practice questions/activities is given in Page-
based Design with OutStart Trainer > Creating Questions/Activities.
• Feedback - Providing formative feedback to learners within the context of practicing new
skills and behaviors is crucial to confirming understanding. This is even more important
within e-Learning in the absence of instructor feedback, which is largely dependent on
the practice activity involved.
More detailed information about question/activity feedback is given in Page-based Design
with OutStart Trainer > Creating Questions/Activities.
• Assessment – As with any instruction, e-Learning should give learners the opportunity to
assess their knowledge. It is important to remember the following points:
Assessment/Test questions must be used to test against the objectives set for the
lesson/course.
Assessment/Test results should include remediation to guide the learners in areas
where they may need to reinforce or review their knowledge.
Assessments/Tests should provide the learner with their resulting scores. Scoring
can trigger the delivery of a certificate for print, if appropriate.
More detailed information about Assessment is given in Page-based Design with
OutStart Trainer > Creating Questions/Activities.
• Enhance Retention - To enhance a learner's retention so that they may transfer new
knowledge and skills to their jobs can be achieved in a variety of ways in e-Learning. For
example, repetition of content can be achieved in creative ways, such as
simulations/activities that first show the learner, then let them try for themselves.
Learners can be provided with "Job Aids" to take away from training. These job aids can
be made available to learners by providing opportunities to print or download items such
as cheat-sheets, procedure tables, and training guides and materials.
Giving learners further information in the form of textual references, related websites, or
further training recommendations can also serve to enhance their retention.
© OutStart, Inc. Page 18 of 34Best Practices – OutStart Trainer January 2005
Page-Based Design with OutStart Trainer
As with any page-based course development application, great attention must be paid to the
overall look and feel of every single page of the course. Pages should not be boring, yet they
should not be so busy that they confuse the learner. Learners should always be comfortable
within a course, yet not so comfortable that their attention wanders. Pages should always
present a good balance of vibrancy and instruction.
Best Practices for Page-Based Design
The sections that follow will deal with major page-design points from a general instructional
design point of view, with focus and examples from a Trainer perspective.
Page Templates / Interfaces
Page templates/interfaces should be simple in design, consistent from one page to another, and
allow for adequate instructional real estate. Interfaces not only provide an attractive and
consistent back-drop for instructional content – they can also be functional in that they can
contain navigational elements, course titles, and company logos.
See the following for examples of well-designed interfaces for Trainer pages.
Figure: Page interface – Example 1
© OutStart, Inc. Page 19 of 34Best Practices – OutStart Trainer January 2005
Figure: Page interface – Example 2
Page navigation should always be part of designing and applying the page interface. Design
buttons, breadcrumbs, table of contents, side-bars, etc so that they contrast well with the
interface and are self-explanatory.
Navigation is easily one of the most important aspects of a page interface, both in design and
functionality. Learners should never become lost while navigating a course.
Page Layout Consistency
Page layout consistency is extremely important. Styles for fonts, colors, spacing, backgrounds,
headings, etc should always be consistent. For example, use a different font style for some text
that IS different, such as a special note that you want learners to focus on, or sub-titles. Styles
should be consistent throughout the course.
The following example shows a Trainer page with four different font styles, each of them
represent something significantly different to the others, and all of these styles are used
consistently on all pages in the course.
1. The Topic title on the page is bold, navy blue, and larger than the instructional text.
2. The instructional text is consistent with all other instructional text in the course.
3. Subtitles have a bold, underlined style.
4. Text indicating learner interaction instruction is denoted with a bright blue, italicized font.
© OutStart, Inc. Page 20 of 34Best Practices – OutStart Trainer January 2005
Figure: Trainer page displaying consistent font styles
The same consistency should apply with all page elements, not just text. For example, if you
display video controls for learners to use with one video file, then you should allow the learner
control for all video files within the course. If a special note is displayed within a bordered box
and icon on one page, then it should be displayed that way consistently throughout the course.
Get used to jotting down styles for page elements as you design and develop if
these have not already been established. This will ensure that you do maintain
consistency as much as possible.
Using Text
The fastest way to lose the attention of a learner is to include large amounts of text on pages.
The more reading they have to do; the faster they will become bored. However, text is a
necessary part of transferring instructional information so a happy medium has to be found. Here
are some tips:
• Avoid using large chunks of text. Break text up into lists, tables, and paragraphs. Also
use multiple text boxes on a page rather than having all text in one text box – this
enables you to move text around the page, creating more space between text boxes.
© OutStart, Inc. Page 21 of 34Best Practices – OutStart Trainer January 2005
• Don’t use any more instructional text on a page than is necessary to pass on the required
information to meet the objectives. If you want to supply learners with extra information,
use a “For More Information” link to a hidden page, external document, or website.
• Consider animating text to appear in small, easily digestible chunks. Text points can be
associated with graphics/buttons to appear when a learner is ready for the next piece of
information. You can also use the transitions feature of Trainer to animate text.
• Use graphics to take the place of text. Graphics can often convey as much or more
information than the same amount of space taken using text. If you can convey the
instructional information using graphics and some supporting text, this is an ideal and
preferred solution.
• Associate text with a popup text box to create the illusion of less text on a page.
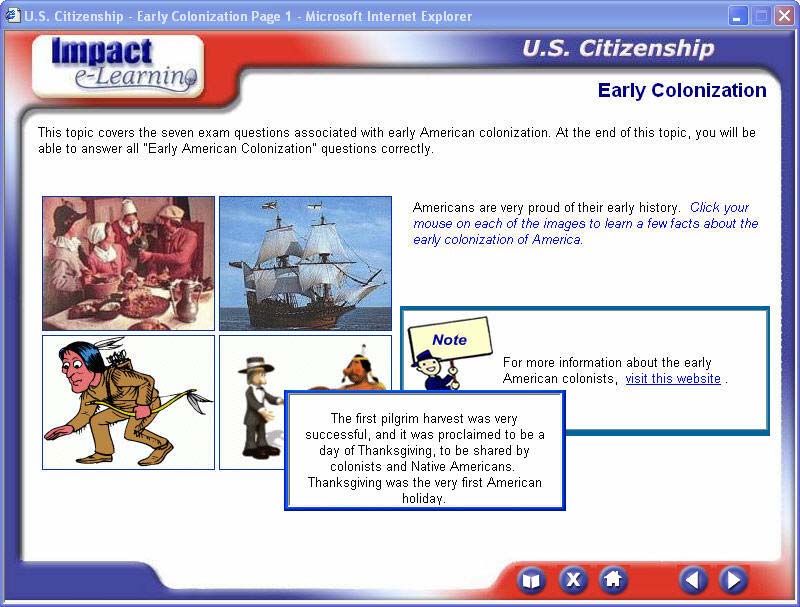
The image below demonstrates the following creative ways of minimizing text.
• Text is spaced well using multiple text boxes and bullet points.
• The graphic demonstrates Branches of Government very well. This concept would have
taken a lot of text to explain.
• The graphic is mapped so that “on click” a popup text box is displayed with more
information.
Figure: Creative ways of minimizing text
© OutStart, Inc. Page 22 of 34Best Practices – OutStart Trainer January 2005
Using Graphics and other Media
Graphics can be the most important interest generating factor on instructional pages. Graphics
are more appealing to learners than text and tend to capture learners’ attention very easily.
The following are some best practice suggestion for using graphics.
• "Pictures can say a thousand words" - often pictures can be used in place of large
amounts of text to demonstrate some instruction or concept and should be used
wherever appropriate.
• Always caption graphics or explain/introduce them in a text box.
• Graphics should always be relevant to the subject under discussion – using a
disassociated graphic will lead to learner confusion.
• Graphics should always be crisp and clear and not be so big that they overwhelm a page.
If you don’t have the use of a graphic designer, learn how to use a good graphics editor
to resize and modify graphics.
• Avoid using graphics with a different color background than the page color. Either
change the color of the graphics background to the same color as your page or make it
transparent.
• Consider using icons as consistent indicators of certain types of information, such as the
icons you see in this document. Icons can be used to indicate:
For More Information
Hints, Tips, and Notes
“How To” procedures
Activities
Alerts
Important Points
• Graphics can be animated using Trainer’s transitions and effects the same as text can.
Avoid over-using this feature, but used occasionally it can add some interest.
• If applicable, consider using your graphics to create learner interactivity. The more you
can keep learners busy by interacting with content, the less chance there will be of losing
their attention.
• Always be sure of your copyright information – do not use graphics that are copyrighted
to someone else. If you have the use of a graphics designer, this will not be an issue.
• Subscribe to a graphics bank such as Clipart.com, or take advantage of the many free
graphics websites available on the Internet. Trainer comes with a large bank of
copyright-free graphics, called the “Max Media Library”. This is available for download
from the OutStart support site, and includes thousands of photos, video clips, and audio.
• Use video to visually demonstrate a process, introduce a topic, or generate interest.
While the use of video in e-Learning is widely used and has many applications, it can use
a lot of bandwidth so it is advisable to keep the file-size small if possible.
• Add audio if appropriate, in the form of text voice-overs, adding depth to interactions, or
even for added navigation interest (clicking sound).
© OutStart, Inc. Page 23 of 34Best Practices – OutStart Trainer January 2005
Applying Interactivity
E-Learning should be dynamic and interactive to keep the learner stimulated in the absence of an
instructor. With well designed slideshows, mouse-overs, simulations, image maps, flash
animations, etc., it is possible to demonstrate complex procedures and explain difficult concepts
in an interactive and graphical format.
The following are suggestions and best practices for applying interactivity to your pages:
• Trainer has several tools that you can use to create learner interaction. Use the HotSpot
feature for graphics to create many interactive events. The HotSpot feature can be used
to create interactions such as:
Popup text boxes and images
Links to other pages
Launch a test
Link to hidden questions so that it becomes the visible question
Launch external content and applications (e.g. audio, video, simulations, documents)
Jump to websites
Activating a Web Widget
• Use hyperlinks for textual interaction, with the possibility of creating all the interactive
events as for HotSpots above.
• Insert a Web Browser window on a page to display relevant websites with full or limited
navigation abilities.
• Make use of Trainer’s packaged Web Widgets to create interactions such as Slideshows,
or create your own Web Widgets. If you have experience with JavaScript, VB Script,
HTML, or DHTML; there are many other possibilities for interactive content. Note:
Custom Web Widgets are not supported by OutStart.
• Insert Shockwave items on a page. This is a good way of getting a lot of information on
one page. Shockwave items can also be used as test questions.
• Add links to simulations. Simulations are a good way of displaying “real” demonstrations,
adding very interactive activities, and (depending on the simulation application) adding
simulated test items.
• Practice and assessment questions should also be interactive as much as possible.
Drag and Drops and Hot Spots for example, keep learners active, interested, and
engaged. Learners are able to "demonstrate" knowledge and skills in a practical sense
where required, leaving other question types for conceptual testing.
• Any content that requires learner action should be accompanied with the necessary
directions. Never allow a learner to be confused.
The following images demonstrate how interactivity can be applied to Trainer pages.
1. The first displays a shockwave item on a page that allows learners to control and interact
with it, guiding their own learning.
2. The second shows a page with a HotSpot image launching a popup text box. This page
also has a hyperlink which takes learners to a website.
© OutStart, Inc. Page 24 of 34Best Practices – OutStart Trainer January 2005 © OutStart, Inc. Page 25 of 34
Best Practices – OutStart Trainer January 2005
Creating Questions/Activities
Including questions and activities is an all important component of any course. They enable
learners to affirm their understanding of the subject matter and in some cases, give them the
opportunity to practice their skills in a simulated or real environment.
Before creating questions and activities, it’s important to know how they will be used. Will they be
used inline with the course content, or will they be used within scored tests? Are you creating
questions that require learners interact with a question type, or are you including a form of activity
that requires learners to actually put newly learned skills into practice?
The following best practice points are divided into Practice Questions, Activities, and Assessment
Questions.
• Practice Questions – This type of question should be used throughout Tutorial sections
of a course. They allow learners a “check-point” in which they are able to confirm their
knowledge of information before going on to the next section of the Tutorial. The
following are important points about designing and developing Practice Questions:
Practice Questions should occur at regular and logical intervals throughout the
Tutorial section of a course. This allows learners to go back to prior pages if their
answers to questions show that they have not grasped the information given.
Practice Questions should focus on the course/section objectives, although non-
objective questions can be included if appropriate.
Choose from the variety of question types available within Trainer and if applicable,
create some Shockwave questions for more complex questions. Avoid using the
same question type exclusively. As with any other content, questions should present
variety, appeal, and interest.
A brief list of suggested question types is included at the end of this section.
Use graphics wherever applicable on a question page to add context and interest.
Use of question retries is a judgment call, but a general rule of thumb is to allow
question retries for difficult questions.
Always accompany any practice questions with learner feedback. At the very least,
feedback should inform learners if their answer was correct or incorrect. Some
suggestions for presenting feedback are as follows:
o Feedback may involve a popup text box after a correct or incorrect answer.
Correct feedback may re-iterate their answer, and incorrect feedback may
provide the correct answer, or provide a link to the original information for
remediation.
o Feedback may involve a popup graphic of a check-mark or an “X”.
o Feedback can be a “Good Answer” or “Wrong Answer” audio file. If using
audio for feedback, be sure to include some other feedback as well, to allow
for learners with hearing impairment or without speakers.
o As with any other page elements, feedback should be consistent. If you
decide to use popup text boxes, use them throughout the course.
© OutStart, Inc. Page 26 of 34Best Practices – OutStart Trainer January 2005
Figure: Example of using graphics to present feedback
• Activities – Activities are a different type of practice opportunity which generally requires
that learners get some type of “real” scenario experience. Some suggestions of activities
for learners are:
“Hands-on” simulations. Depending on your simulation application, learners can
access a simulation and follow pre-learned procedures/processes in which they are
given a score/feedback on completion.
Instructions on completing a task in a job-related environment. This usually means
that learners will need to depart from the course to complete the activity. These
types of activities are difficult to give feedback on, but if there is a tangible end-result
of the task, a graphic could be made available to them within the course that shows a
comparable example result.
Interacting with a trainer. Learners can be given a task to complete or a scenario to
consider that requires them to report results to a trainer. An email link can be
supplied, or use the Trainer Essay question type.
If the activity involves a computer application, downloadable materials can be
supplied within Trainer, with instructions for use. A comparable example end-result
can be supplied as feedback.
© OutStart, Inc. Page 27 of 34Best Practices – OutStart Trainer January 2005
• Test Questions – Test questions are presented in a different context of the course than
Practice questions. While Practice questions allow the learner to determine their own
progressive knowledge and skills, Test questions put learners into a slightly more
“challenging” environment in which their scores are not presented until the end of the
test, and scores are reported in some way to a third-party. Following are some best
practice points for designing and developing Test questions:
Test questions should directly test against the lesson/course objectives. Never test
against assumed learning – questions should always relate directly to the information
supplied in the lesson/course.
As with learner practice, test questions should be visually appealing to encourage
interest.
While much depends on organizational standards and requirements, test questions
generally should not allow for as much learner assistance as practice questions.
Test questions should not include hints, feedback, or extra coaching.
Test questions do not usually include retries.
A variety of interactive question types should be used, determined by how the
question should be answered.
Where applicable, always present questions in a second or third-person contextual
scenario. For example, “You want to create archiving rules in your email inbox that
will automatically start each morning. How would you order the steps below to
achieve this using as productive a process as possible?” is better than “Order the
steps below to reflect the correct procedure of automating archiving for an email
inbox”. The first example creates a sense of ownership and purpose by including the
learner in the process.
When designing and creating tests, ensure that you configure appropriate navigation
for learners. Ideally, learners should not be able to navigate outside of the test, so
any navigational buttons such as “Previous” and “Table of Contents” and “Home”
should be removed. Configure questions so that when they have been answered,
they automatically jump to the next question – in the absence of feedback, this can
be an indication to learners that they have answered the question.
It is recommended that developers have an understanding of how to strategize test
questions. For example, is the question testing for application or analysis; knowledge
or comprehension? Understanding the type/level of question asked, will also enable
you to apply appropriate language to questions. An example of this would be; if a
question is testing for “Application”, then key words to use in the question would be
“apply, demonstrate, calculate, etc”.
For more information on strategizing test questions, see a Summary of
Bloom’s Taxonomy.
© OutStart, Inc. Page 28 of 34Best Practices – OutStart Trainer January 2005
Example Question Types for Practice and Test Questions
Question Type Description
Multiple Choice The Multiple Choice questions can be Multiple Choice-Single Answer, and
Multiple Choice-Multiple Answer. Both allow the learner to make choices
from a pre-determined list.
Short Answer These consist of text entry questions such as Fill-in-the-Blank that are used
to prompt learners into entering answers into a text field.
TrueFalse The TrueFalse question provides a simple 'one-answer' decision question.
Ordering The Ordering question allows for the presentation of questions that require
learners to answer through sequential ordering.
Matching The Matching question test learners on identifying relationships between
items and answers.
HotSpot The HotSpot question prompts the learner to answer specific questions by
clicking on areas of a particular image.
DragDrop The DragDrop question provides answer choices that can be dragged to
target areas of a base media item.
© OutStart, Inc. Page 29 of 34Best Practices – OutStart Trainer January 2005
Designing Tests/Assessments
Testing is a very important component of any e-Learning course, given that it is the ultimate
validation of learned information and skills for learners. Feedback in terms of scoring and
remediation gives learners the information they need to know if they have achieved the objectives
or if they need to revise certain sections of a course. Testing also allows instructors to receive
scoring records of individual learners. This can be important if instructors are responsible for
enabling learners to move forward in organizations depending on skills learned.
When designing and creating tests/assessments, it is important that developers are aware of the
implications and guidelines involved. The following best practices will provide some Trainer-
specific information for designing and creating tests.
Best Practices: Designing Tests/Assessments
• Tests should always test against the course objectives. If objectives are multi-
segmented, then all aspects should be tested against. Never include questions that do
not relate directly to the objectives.
• Create a “Start Test” page. Learners should always know when they are about to take a
test. Ensure that learners are given adequate warning to enable them to go back and do
any necessary revision if required. The Start Test page should also include any other
instructions for understanding their scoring and remediation if applicable.
Figure: A Start Test page detailing options and instructions.
© OutStart, Inc. Page 30 of 34Best Practices – OutStart Trainer January 2005
• Create an “End Test” page that the test will jump to on completion. This will allow
learners to know that the test has ended. Jump pages can be designated according to
how learners’ score. For example, if learners reach the passing score or higher, they
may jump to a printable Certificate page. For learners who do not reach the passing
score, they may be jumped to a page with opportunities of remediation and another
chance to take the test.
Some recommended items to present on the End Test page includes:
Certification of completion or notification of non-completion
“For More Information” links to applicable resources
Questions that, while not part of the objectives, are still relevant to their learning
experience
Evaluation form with instructions
“What now?” directions – for example, names and email addresses of whom to
contact for reporting or further training purposes.
Figure: End Page displaying Certificate of completion with Print button
© OutStart, Inc. Page 31 of 34Best Practices – OutStart Trainer January 2005
Figure: Informative end-page with further options and informational links
• Present learners with their final test scores, either by using the Trainer Score-Card
option, and/or on the End Page by using the Trainer Score Display elements.
• When creating test questions, ensure that you configure each question with a unique and
descriptive question name, to allow the learner to easily recognize which sections of the
course to review, if necessary. This is only applicable if using the Score-Card option.
• Unless questions are following a logical sequence, it is recommended that questions be
randomized within a test. This discourages cheating, by ensuring that no two learners
are given the exact same test. It also makes it more difficult to memorize a test if there is
an opportunity of taking it more than once.
• If distributing a course to a SCORM-conformant LMS, ensure that you have only one test
per course. See Designing for Deployment with OutStart Trainer for more information.
© OutStart, Inc. Page 32 of 34You can also read