Using Avaya Collaboration Control for iOS - Release 9.2 Issue 1 January 2020 - Avaya Support
←
→
Page content transcription
If your browser does not render page correctly, please read the page content below
Using Avaya Collaboration Control for
iOS

                                   Release 9.2
                                       Issue 1
                                  January 2020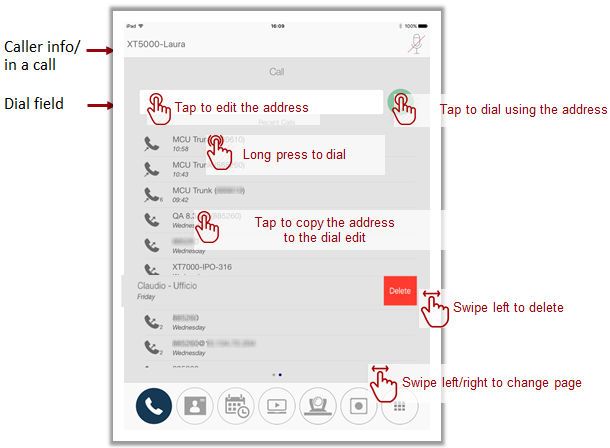
© 2010-2020, Avaya Inc.                                                    YOU DO NOT WISH TO ACCEPT THESE TERMS OF USE, YOU
All Rights Reserved.                                                       MUST NOT ACCESS OR USE THE HOSTED SERVICE OR
                                                                           AUTHORIZE ANYONE TO ACCESS OR USE THE HOSTED
Notice                                                                     SERVICE.
While reasonable efforts have been made to ensure that the                 Licenses
information in this document is complete and accurate at the time of
printing, Avaya assumes no liability for any errors. Avaya reserves        THE SOFTWARE LICENSE TERMS AVAILABLE ON THE AVAYA
the right to make changes and corrections to the information in this       WEBSITE, HTTPS://SUPPORT.AVAYA.COM/LICENSEINFO,
document without the obligation to notify any person or organization       UNDER THE LINK “AVAYA SOFTWARE LICENSE TERMS (Avaya
of such changes.                                                           Products)” OR SUCH SUCCESSOR SITE AS DESIGNATED BY
                                                                           AVAYA, ARE APPLICABLE TO ANYONE WHO DOWNLOADS,
Documentation disclaimer                                                   USES AND/OR INSTALLS AVAYA SOFTWARE, PURCHASED
“Documentation” means information published in varying mediums             FROM AVAYA INC., ANY AVAYA AFFILIATE, OR AN AVAYA
which may include product information, operating instructions and          CHANNEL PARTNER (AS APPLICABLE) UNDER A COMMERCIAL
performance specifications that are generally made available to users      AGREEMENT WITH AVAYA OR AN AVAYA CHANNEL PARTNER.
of products. Documentation does not include marketing materials.           UNLESS OTHERWISE AGREED TO BY AVAYA IN WRITING,
Avaya shall not be responsible for any modifications, additions, or        AVAYA DOES NOT EXTEND THIS LICENSE IF THE SOFTWARE
deletions to the original published version of Documentation unless        WAS OBTAINED FROM ANYONE OTHER THAN AVAYA, AN AVAYA
such modifications, additions, or deletions were performed by or on        AFFILIATE OR AN AVAYA CHANNEL PARTNER; AVAYA
the express behalf of Avaya. End User agrees to indemnify and hold         RESERVES THE RIGHT TO TAKE LEGAL ACTION AGAINST YOU
harmless Avaya, Avaya's agents, servants and employees against all         AND ANYONE ELSE USING OR SELLING THE SOFTWARE
claims, lawsuits, demands and judgments arising out of, or in              WITHOUT A LICENSE. BY INSTALLING, DOWNLOADING OR
connection with, subsequent modifications, additions or deletions to       USING THE SOFTWARE, OR AUTHORIZING OTHERS TO DO SO,
this documentation, to the extent made by End User.                        YOU, ON BEHALF OF YOURSELF AND THE ENTITY FOR WHOM
                                                                           YOU ARE INSTALLING, DOWNLOADING OR USING THE
Link disclaimer                                                            SOFTWARE (HEREINAFTER REFERRED TO
Avaya is not responsible for the contents or reliability of any linked     INTERCHANGEABLY AS “YOU” AND “END USER”), AGREE TO
websites referenced within this site or Documentation provided by          THESE TERMS AND CONDITIONS AND CREATE A BINDING
Avaya. Avaya is not responsible for the accuracy of any information,       CONTRACT BETWEEN YOU AND AVAYA INC. OR THE
statement or content provided on these sites and does not                  APPLICABLE AVAYA AFFILIATE (“AVAYA”).
necessarily endorse the products, services, or information described       Avaya grants You a license within the scope of the license types
or offered within them. Avaya does not guarantee that these links will     described below, with the exception of Heritage Nortel Software, for
work all the time and has no control over the availability of the linked   which the scope of the license is detailed below. Where the order
pages.                                                                     documentation does not expressly identify a license type, the
Warranty                                                                   applicable license will be a Designated System License as set forth
                                                                           below in the Designated System(s) License (DS) section as
Avaya provides a limited warranty on Avaya hardware and software.          applicable. The applicable number of licenses and units of capacity
Refer to your sales agreement to establish the terms of the limited        for which the license is granted will be one (1), unless a different
warranty. In addition, Avaya’s standard warranty language, as well as      number of licenses or units of capacity is specified in the
information regarding support for this product while under warranty is     documentation or other materials available to You. “Software” means
available to Avaya customers and other parties through the Avaya           computer programs in object code, provided by Avaya or an Avaya
Support website: https://support.avaya.com/helpcenter/                     Channel Partner, whether as stand-alone products, pre-installed on
getGenericDetails?detailId=C20091120112456651010 under the link            hardware products, and any upgrades, updates, patches, bug fixes,
“Warranty & Product Lifecycle” or such successor site as designated        or modified versions thereto. “Designated Processor” means a single
by Avaya. Please note that if You acquired the product(s) from an          stand-alone computing device. “Server” means a set of Designated
authorized Avaya Channel Partner outside of the United States and          Processors that hosts (physically or virtually) a software application
Canada, the warranty is provided to You by said Avaya Channel              to be accessed by multiple users. “Instance” means a single copy of
Partner and not by Avaya.                                                  the Software executing at a particular time: (i) on one physical
“Hosted Service” means an Avaya hosted service subscription that           machine; or (ii) on one deployed software virtual machine (“VM”) or
You acquire from either Avaya or an authorized Avaya Channel               similar deployment.
Partner (as applicable) and which is described further in Hosted SAS       License type(s)
or other service description documentation regarding the applicable
hosted service. If You purchase a Hosted Service subscription, the         Designated System(s) License (DS). End User may install and use
foregoing limited warranty may not apply but You may be entitled to        each copy or an Instance of the Software only: 1) on a number of
support services in connection with the Hosted Service as described        Designated Processors up to the number indicated in the order; or 2)
further in your service description documents for the applicable           up to the number of Instances of the Software as indicated in the
Hosted Service. Contact Avaya or Avaya Channel Partner (as                 order, Documentation, or as authorized by Avaya in writing. Avaya
applicable) for more information.                                          may require the Designated Processor(s) to be identified in the order
                                                                           by type, serial number, feature key, Instance, location or other
Hosted Service                                                             specific designation, or to be provided by End User to Avaya through
THE FOLLOWING APPLIES ONLY IF YOU PURCHASE AN AVAYA                        electronic means established by Avaya specifically for this purpose.
HOSTED SERVICE SUBSCRIPTION FROM AVAYA OR AN AVAYA                         Heritage Nortel Software
CHANNEL PARTNER (AS APPLICABLE), THE TERMS OF USE
FOR HOSTED SERVICES ARE AVAILABLE ON THE AVAYA                             “Heritage Nortel Software” means the software that was acquired by
WEBSITE, HTTPS://SUPPORT.AVAYA.COM/LICENSEINFO UNDER                       Avaya as part of its purchase of the Nortel Enterprise Solutions
THE LINK “Avaya Terms of Use for Hosted Services” OR SUCH                  Business in December 2009. The Heritage Nortel Software is the
SUCCESSOR SITE AS DESIGNATED BY AVAYA, AND ARE                             software contained within the list of Heritage Nortel Products located
APPLICABLE TO ANYONE WHO ACCESSES OR USES THE                              at https://support.avaya.com/LicenseInfo under the link “Heritage
HOSTED SERVICE. BY ACCESSING OR USING THE HOSTED                           Nortel Products” or such successor site as designated by Avaya. For
SERVICE, OR AUTHORIZING OTHERS TO DO SO, YOU, ON                           Heritage Nortel Software, Avaya grants Customer a license to use
BEHALF OF YOURSELF AND THE ENTITY FOR WHOM YOU ARE                         Heritage Nortel Software provided hereunder solely to the extent of
DOING SO (HEREINAFTER REFERRED TO INTERCHANGEABLY                          the authorized activation or authorized usage level, solely for the
AS “YOU” AND “END USER”), AGREE TO THE TERMS OF USE. IF                    purpose specified in the Documentation, and solely as embedded in,
YOU ARE ACCEPTING THE TERMS OF USE ON BEHALF A                             for execution on, or for communication with Avaya equipment.
COMPANY OR OTHER LEGAL ENTITY, YOU REPRESENT THAT                          Charges for Heritage Nortel Software may be based on extent of
YOU HAVE THE AUTHORITY TO BIND SUCH ENTITY TO THESE                        activation or use authorized as specified in an order or invoice.
TERMS OF USE. IF YOU DO NOT HAVE SUCH AUTHORITY, OR IF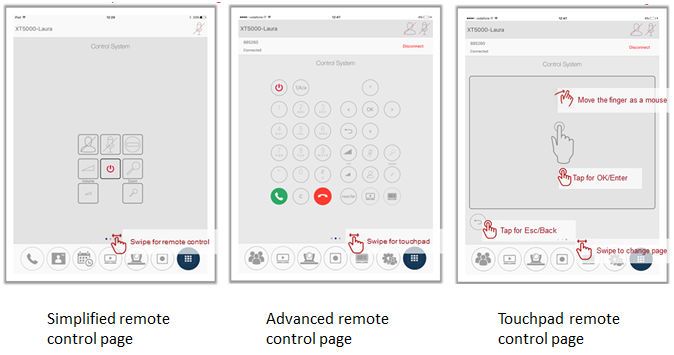
Copyright                                                                 PARTNER ACKNOWLEDGES AND AGREES THE AVAYA
                                                                          CHANNEL PARTNER IS RESPONSIBLE FOR ANY AND ALL
Except where expressly stated otherwise, no use should be made of         RELATED FEES AND/OR ROYALTIES. THE H.264 (AVC) CODEC
materials on this site, the Documentation, Software, Hosted Service,      IS LICENSED UNDER THE AVC PATENT PORTFOLIO LICENSE
or hardware provided by Avaya. All content on this site, the              FOR THE PERSONAL USE OF A CONSUMER OR OTHER USES
documentation, Hosted Service, and the product provided by Avaya          IN WHICH IT DOES NOT RECEIVE REMUNERATION TO: (I)
including the selection, arrangement and design of the content is         ENCODE VIDEO IN COMPLIANCE WITH THE AVC STANDARD
owned either by Avaya or its licensors and is protected by copyright      (“AVC VIDEO”) AND/OR (II) DECODE AVC VIDEO THAT WAS
and other intellectual property laws including the sui generis rights     ENCODED BY A CONSUMER ENGAGED IN A PERSONAL
relating to the protection of databases. You may not modify, copy,        ACTIVITY AND/OR WAS OBTAINED FROM A VIDEO PROVIDER
reproduce, republish, upload, post, transmit or distribute in any way     LICENSED TO PROVIDE AVC VIDEO. NO LICENSE IS GRANTED
any content, in whole or in part, including any code and software         OR SHALL BE IMPLIED FOR ANY OTHER USE. ADDITIONAL
unless expressly authorized by Avaya. Unauthorized reproduction,          INFORMATION FOR H.264 (AVC) AND H.265 (HEVC) CODECS
transmission, dissemination, storage, and or use without the express      MAY BE OBTAINED FROM MPEG LA, L.L.C. SEE HTTP://
written consent of Avaya can be a criminal, as well as a civil offense
                                                                          WWW.MPEGLA.COM.
under the applicable law.
                                                                          Compliance with Laws
Virtualization
                                                                          You acknowledge and agree that it is Your responsibility for
The following applies if the product is deployed on a virtual machine.
                                                                          complying with any applicable laws and regulations, including, but not
Each product has its own ordering code and license types. Unless
                                                                          limited to laws and regulations related to call recording, data privacy,
otherwise stated, each Instance of a product must be separately
                                                                          intellectual property, trade secret, fraud, and music performance
licensed and ordered. For example, if the end user customer or
                                                                          rights, in the country or territory where the Avaya product is used.
Avaya Channel Partner would like to install two Instances of the
same type of products, then two products of that type must be             Preventing Toll Fraud
ordered.
                                                                          “Toll Fraud” is the unauthorized use of your telecommunications
Third Party Components                                                    system by an unauthorized party (for example, a person who is not a
                                                                          corporate employee, agent, subcontractor, or is not working on your
“Third Party Components” mean certain software programs or
                                                                          company's behalf). Be aware that there can be a risk of Toll Fraud
portions thereof included in the Software or Hosted Service may
                                                                          associated with your system and that, if Toll Fraud occurs, it can
contain software (including open source software) distributed under
                                                                          result in substantial additional charges for your telecommunications
third party agreements (“Third Party Components”), which contain
                                                                          services.
terms regarding the rights to use certain portions of the Software
(“Third Party Terms”). As required, information regarding distributed     Avaya Toll Fraud intervention
Linux OS source code (for those products that have distributed Linux
OS source code) and identifying the copyright holders of the Third        If You suspect that You are being victimized by Toll Fraud and You
Party Components and the Third Party Terms that apply is available        need technical assistance or support, call Technical Service Center
in the products, Documentation or on Avaya’s website at: https://         Toll Fraud Intervention Hotline at +1-800-643-2353 for the United
support.avaya.com/Copyright or such successor site as designated          States and Canada. For additional support telephone numbers, see
by Avaya. The open source software license terms provided as Third        the Avaya Support website: https://support.avaya.com or such
                                                                          successor site as designated by Avaya.
Party Terms are consistent with the license rights granted in these
Software License Terms, and may contain additional rights benefiting      Security Vulnerabilities
You, such as modification and distribution of the open source
software. The Third Party Terms shall take precedence over these          Information about Avaya’s security support policies can be found in
Software License Terms, solely with respect to the applicable Third       the Security Policies and Support section of https://
Party Components to the extent that these Software License Terms          support.avaya.com/security.
impose greater restrictions on You than the applicable Third Party        Suspected Avaya product security vulnerabilities are handled per the
Terms.                                                                    Avaya Product Security Support Flow (https://
The following applies only if the H.264 (AVC) codec is distributed with   support.avaya.com/css/P8/documents/100161515).
the product. THIS PRODUCT IS LICENSED UNDER THE AVC                       Downloading Documentation
PATENT PORTFOLIO LICENSE FOR THE PERSONAL USE OF A
CONSUMER OR OTHER USES IN WHICH IT DOES NOT RECEIVE                       For the most current versions of Documentation, see the Avaya
REMUNERATION TO (i) ENCODE VIDEO IN COMPLIANCE WITH                       Support website: https://support.avaya.com, or such successor site
THE AVC STANDARD (“AVC VIDEO”) AND/OR (ii) DECODE AVC                     as designated by Avaya.
VIDEO THAT WAS ENCODED BY A CONSUMER ENGAGED IN A                         Contact Avaya Support
PERSONAL ACTIVITY AND/OR WAS OBTAINED FROM A VIDEO
PROVIDER LICENSED TO PROVIDE AVC VIDEO. NO LICENSE IS                     See the Avaya Support website: https://support.avaya.com for
GRANTED OR SHALL BE IMPLIED FOR ANY OTHER USE.                            product or Hosted Service notices and articles, or to report a problem
ADDITIONAL INFORMATION MAY BE OBTAINED FROM MPEG LA,                      with your Avaya product or Hosted Service. For a list of support
L.L.C. SEE HTTP://WWW.MPEGLA.COM.                                         telephone numbers and contact addresses, go to the Avaya Support
                                                                          website: https://support.avaya.com (or such successor site as
Service Provider                                                          designated by Avaya), scroll to the bottom of the page, and select
THE FOLLOWING APPLIES TO AVAYA CHANNEL PARTNER’S                          Contact Avaya Support.
HOSTING OF AVAYA PRODUCTS OR SERVICES. THE PRODUCT                        Trademarks
OR HOSTED SERVICE MAY USE THIRD PARTY COMPONENTS
SUBJECT TO THIRD PARTY TERMS AND REQUIRE A SERVICE                        The trademarks, logos and service marks (“Marks”) displayed in this
PROVIDER TO BE INDEPENDENTLY LICENSED DIRECTLY FROM                       site, the Documentation, Hosted Service(s), and product(s) provided
THE THIRD PARTY SUPPLIER. AN AVAYA CHANNEL PARTNER’S                      by Avaya are the registered or unregistered Marks of Avaya, its
HOSTING OF AVAYA PRODUCTS MUST BE AUTHORIZED IN                           affiliates, its licensors, its suppliers, or other third parties. Users are
WRITING BY AVAYA AND IF THOSE HOSTED PRODUCTS USE                         not permitted to use such Marks without prior written consent from
OR EMBED CERTAIN THIRD PARTY SOFTWARE, INCLUDING                          Avaya or such third party which may own the Mark. Nothing
BUT NOT LIMITED TO MICROSOFT SOFTWARE OR CODECS,                          contained in this site, the Documentation, Hosted Service(s) and
THE AVAYA CHANNEL PARTNER IS REQUIRED TO                                  product(s) should be construed as granting, by implication, estoppel,
INDEPENDENTLY OBTAIN ANY APPLICABLE LICENSE                               or otherwise, any license or right in and to the Marks without the
AGREEMENTS, AT THE AVAYA CHANNEL PARTNER’S EXPENSE,                       express written permission of Avaya or the applicable third party.
DIRECTLY FROM THE APPLICABLE THIRD PARTY SUPPLIER.                        Avaya is a registered trademark of Avaya Inc.
WITH RESPECT TO CODECS, IF THE AVAYA CHANNEL
PARTNER IS HOSTING ANY PRODUCTS THAT USE OR EMBED
THE H.264 CODEC OR H.265 CODEC, THE AVAYA CHANNEL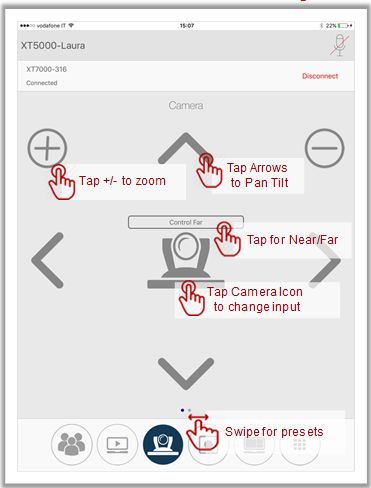
All non-Avaya trademarks are the property of their respective owners.
Linux® is the registered trademark of Linus Torvalds in the U.S. and
other countries.
Contents
Chapter 1: About Avaya Collaboration Control..................................................................... 7
Choosing Between Core and Extended Features....................................................................... 8
Minimum Requirements......................................................................................................... 10
Securing your Mobile Device in a Conference Room................................................................ 12
Chapter 2: First Time Setup of Avaya Collaboration Control............................................. 13
Installing and launching Avaya Collaboration Control on your mobile device............................... 13
Pairing Avaya Collaboration Control to your endpoint............................................................... 14
Connecting Avaya Collaboration Control to Scopia Desktop Server........................................... 16
About the Endpoint Virtual Remote Control Unit....................................................................... 17
Chapter 3: Starting or Joining a Meeting.............................................................................. 19
Starting a Meeting by Directly Dialing an Endpoint................................................................... 19
Starting a Meeting from the Directory...................................................................................... 21
Joining a Meeting.................................................................................................................. 23
Joining a Meeting from the Endpoint Calendar......................................................................... 24
Using Chat............................................................................................................................ 25
Chapter 4: Participating in Meetings with Avaya Collaboration Control........................... 28
Setting the PTZ Camera's Position......................................................................................... 28
Blocking Your Own Audio and Video....................................................................................... 32
Adjusting Volume.................................................................................................................. 32
Sharing Content.................................................................................................................... 32
Using the Presentation Slider................................................................................................. 34
Using the Presentation Pointer............................................................................................... 35
Using the Whiteboard............................................................................................................ 36
Changing Your Own Video Layout with Avaya Collaboration Control.......................................... 37
Blocking Incoming Calls......................................................................................................... 38
Chapter 5: Moderating Meetings with Avaya Collaboration Control................................. 39
Inviting Participants............................................................................................................... 39
Managing participants in a meeting......................................................................................... 42
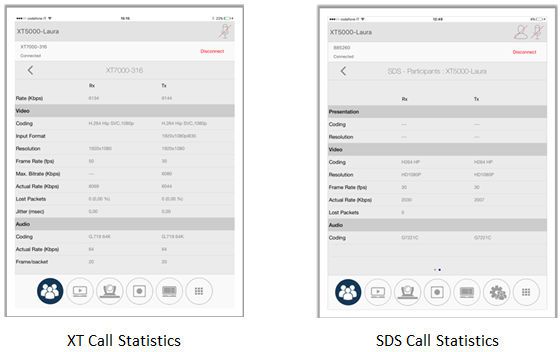
Viewing Call Statistics............................................................................................................ 43
Changing a Participant's Video Layout.................................................................................... 45
Recording a Meeting ............................................................................................................. 48
Disconnecting a Participant.................................................................................................... 50
Leaving or Ending a Meeting.................................................................................................. 51
Chapter 6: Resources............................................................................................................. 53
Documentation...................................................................................................................... 53
Finding documents on the Avaya Support website............................................................. 57
Accessing the port matrix document.................................................................................. 57
Avaya Documentation Portal navigation............................................................................ 58
Training................................................................................................................................ 59
January 2020 Using Avaya Collaboration Control for iOS 5
Comments on this document? infodev@avaya.com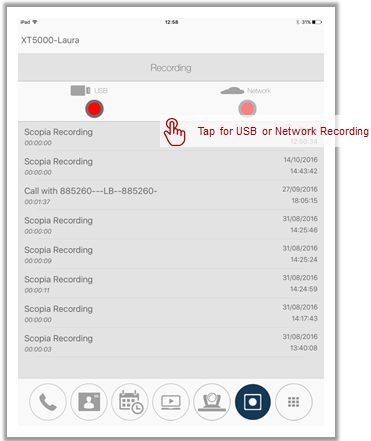
Contents

   Support................................................................................................................................ 59
      Using the Avaya InSite Knowledge Base........................................................................... 60

January 2020                                      Using Avaya Collaboration Control for iOS                                                6
                                                 Comments on this document? infodev@avaya.com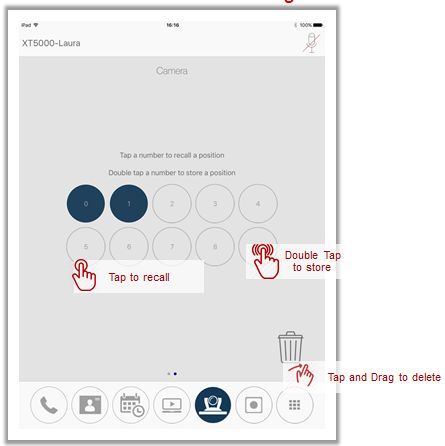
Chapter 1: About Avaya Collaboration
           Control

   Avaya Collaboration Control is an Apple® iPad™/iPhone™ app which enables you to control the
   following endpoints:
      • Avaya IX™ Room System XT Series
      • Avaya IX™ XT Telepresence
      • Personal Avaya XTE240
      • Avaya IX™ CU360 Collaboration Unit
   The intuitive user interface of Collaboration Control makes it easy to start calls, moderate meetings
   and view presentations, while the integrated calendar and enterprise directory make it easy to join
   meetings and invite others.
   With Collaboration Control you can access the calendar of the physical conference room, view
   scheduled meetings, and then join directly by tapping its entry. In most endpoint models, you can
   control your endpoint's camera by simply tapping the screen, or even control a remote camera in the
   meeting via far end camera control (FECC).
   You can moderate videoconferences whether they are hosted on the endpoint's built-in MCU, on
   Avaya Equinox® Media Server, or on Scopia Elite MCU. Moderators can manage the meeting's
   participants, including hiding their video, muting their audio, and changing the video layouts.
   Collaboration Control also enables you to view shared data like presentations or spreadsheets
   directly within the app on the device. When in an Avaya meeting, you can review previously shared
   content without interrupting the presenter.
   Collaboration Control supports:
      • Automatic detection of nearby endpoint using sonic pairing
      • Recording
      • Endpoint calendar
      • Endpoint contacts and contact groups
      • Presentation view and zoom
      • Remote control emulation and touchpad
      • Email invite to an Avaya meeting.
   Collaboration Control is a free app that you can download from the App Store.

January 2020                          Using Avaya Collaboration Control for iOS                            7
                                      Comments on this document? infodev@avaya.com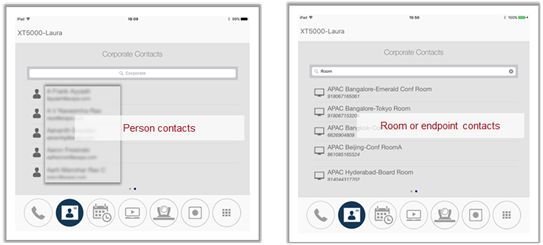
About Avaya Collaboration Control

       Note:
   This guide describes Collaboration Control features that relate to Avaya IX™ Room System XT
   Series release 9.2.1 and Avaya IX™ CU360 release 10.2. Earlier releases might have limitations or
   not work as described in this guide.
Related links
    Choosing Between Core and Extended Features on page 8
    Minimum Requirements on page 10
    Securing your Mobile Device in a Conference Room on page 12

Choosing Between Core and Extended Features
     Avaya Collaboration Control has a core set of features when it is connected only to an endpoint,
     including controlling the endpoint and moderating the built-in MCU. The built-in MCU is available
     by license on some endpoint models.
     You can enable more features by additionally connecting the app to your organization's Scopia
     Desktop Server, to add viewing the physical meeting room's calendar and moderating meetings
     on the external MCU, which can be Equinox Media Server or Scopia Elite MCU. These features
     are enabled because Scopia Desktop Server opens access to other video components like
     Equinox Media Server and Equinox Management (previously called Scopia Management).
         Note:
         Scopia Desktop Services are supported up to Scopia Solution 8.3.x and Equinox Solution
         9.0.2. You can use Collaboration Control with previous versions of the solution and configure
         the Scopia Desktop Server in the Settings section of the application for that purpose.

January 2020                          Using Avaya Collaboration Control for iOS                          8
                                      Comments on this document? infodev@avaya.com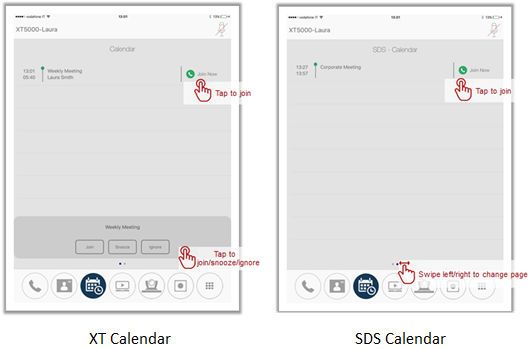
Choosing Between Core and Extended Features

       Figure 1: Extending the functionality of Collaboration Control by connecting to Scopia Desktop
                                                     Server

    Without Scopia Desktop Server, the core functionality of a standalone Collaboration Control paired
    only with an endpoint is as follows:
        • Controlling your local endpoint:
          - Dial to another endpoint or answer an incoming call with Collaboration Control. You can
            dial an IP address, endpoint number, or select from the endpoint's internal directory.
          - Share content like presentations or documents.
          - Toggle the status on your endpoint, send DTMF, mute, privacy, do not disturb.
          - Change your local videoconferencing layout, or enabling picture-in-picture.
          - Start and stop recording to a local USB storage device or to a network location when
            participating to an Equinox meeting.
          - Control your endpoint's camera or a remote camera by panning, tilting or zooming (PTZ).
            With the Avaya XTE240, PTZ is digital, not optical, while with Avaya IX™ XT Telepresence,
            PTZ is unavailable because camera positions are fixed.
        • Moderating a meeting hosted on the local built-in MCU, if available. This includes muting,
          inviting or disconnecting participants on the built-in MCU, or changing the video layout of all
          participants on the built-in MCU.
        • Activating a pointer tool in the XT Series presentation and move it by dragging. The pointer
          tool icon is shown locally on the XT monitor and is sent to remote parties when sharing
          occurs.

January 2020                           Using Avaya Collaboration Control for iOS                            9
                                      Comments on this document? infodev@avaya.com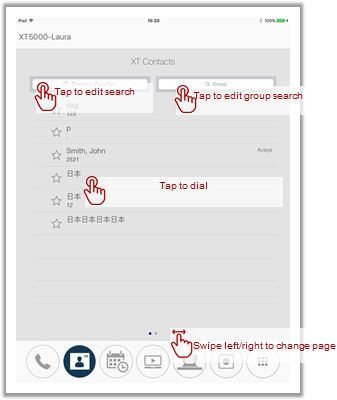
About Avaya Collaboration Control
• Controlling your endpoint with the mouse pointer.
• Using the whiteboard and its tools when connecting to an Avaya meeting with Web
Collaboration.
• Sending and receiving chat messages when connecting to an Avaya meeting with Web
Collaboration.
• Saving the references of the three latest controlled endpoints to quickly connect to any of
them.
To get the core functionality, your administrator must have added the endpoint to Equinox
Management.
The extended functionality with a Scopia Desktop Server connection is as follows:
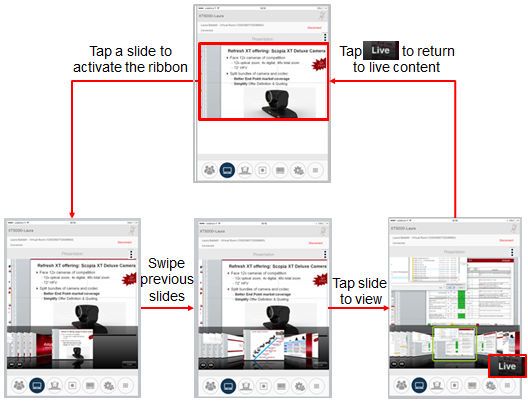
• Using Avaya Scopia Content Slider functionality to review previously shared content without
interrupting the presenter.
• Managing video layouts of the external MCU, locking/unlocking a meeting, sending an email
invitation.
• Streaming.
For more information on connecting Collaboration Control to an XT Series endpoint and Scopia
Desktop Server, see First Time Setup of Avaya Collaboration Control on page 13.
Related links
About Avaya Collaboration Control on page 7
Minimum Requirements
This section details the minimum requirements for Avaya Collaboration Control:
• Operating system:
iOS 8.1 or later
• Supported phones:
- iPhone 5, 5c, 5s
- iPhone 6, 6 Plus
- iPhone 6s, 6s Plus
- iPhone 7, 7 Plus
- iPhone 8, 8 Plus
- iPhone X, XR, XS
- iPhone 11
Connect the phone to a network that can reach the target endpoint.
January 2020 Using Avaya Collaboration Control for iOS 10
Comments on this document? infodev@avaya.comMinimum Requirements
• Supported tablets:
- iPad 2, 3, 4, Air, Air 2, Pro
- iPad Mini 1, 2,3, 4
Connect the device to a network that can reach the target endpoint.
The Collaboration Control application for iPad supports both portrait and landscape mode.
The Collaboration Control application for iPhone supports landscape mode for presentation
only.
• Licenses:
- Download the Collaboration Control app for free from the App Store.
- Some endpoint models require a separate license to use Collaboration Control. For more
information, download the latest product user guide from the Avaya Support site at http://
support.avaya.com, or contact Avaya Support.
• Some XT Series require a Scopia Control license to enable Collaboration Control. Connect
the iPad/iPhone to the endpoint via its network, and switch on the endpoint to pair with
Collaboration Control.
• Access to additional conferencing features
To enable access to the calendar of the physical meeting room or to the corporate directory
housed in Equinox Management, or to moderate meetings on the external MCU, your
deployment must include either:
- Scopia Desktop Server. Your administrator has configured this server in Equinox
Management. You must enable Scopia Desktop Services in Collaboration Control.
OR
- Equinox Management. To get the services, your administrator has added the XT Series as
a managed endpoint in Equinox Management.
Note:
Scopia Desktop Services are supported up to Scopia Solution 8.3.x and Equinox Solution
9.0.2. You can use Collaboration Control with previous versions of the solution and
configure the Scopia Desktop Server in the Settings section of the application for that
purpose.
Important:
Collaboration Control supports only a subset of the extended functionalities in the SMB
Solution using the Scopia XT Desktop Server (see Choosing Between Core and
Extended Features on page 8).
Related links
About Avaya Collaboration Control on page 7
January 2020 Using Avaya Collaboration Control for iOS 11
Comments on this document? infodev@avaya.comAbout Avaya Collaboration Control
Securing your Mobile Device in a Conference Room
Leaving an expensive mobile device like an Apple® iPad™/ iPhone™ in a meeting room brings
security risks. Follow these guidelines to ensure a secure setup of Collaboration Control in your
meeting room:
• Ensure the device does not contain any personal information or usernames and passwords,
including emails, contacts, calendar entries, notes, messages or documents. The easiest way
is to perform a reset (Settings > Reset > Reset All Settings) before installing Collaboration
Control.
• House the device in a third-party secure casing with a lock, attached via cable to the meeting
room table.
• The wireless login must have a dedicated network username and password for the device, to
avoid exposing someone's mail or documents.
Related links
About Avaya Collaboration Control on page 7
January 2020 Using Avaya Collaboration Control for iOS 12
Comments on this document? infodev@avaya.comChapter 2: First Time Setup of Avaya
Collaboration Control
This section details the installation and initial configuration of Collaboration Control, including how to
pair Collaboration Control to an endpoint, and how to configure the application for additional
functionality by connecting it to Scopia Desktop Services (SDS).
Related links
Installing and launching Avaya Collaboration Control on your mobile device on page 13
Pairing Avaya Collaboration Control to your endpoint on page 14
Connecting Avaya Collaboration Control to Scopia Desktop Server on page 16
About the Endpoint Virtual Remote Control Unit on page 17
Installing and launching Avaya Collaboration Control on
your mobile device
Procedure
1. Download and install Avaya Collaboration Control from Apple Store.
2. Tap the Avaya Collaboration Control logo to launch the application.
3. Accept the End User License Agreement.
The application displays the Welcome screen.
Next steps
Pairing Avaya Collaboration Control to your endpoint on page 14
Related links
First Time Setup of Avaya Collaboration Control on page 13
January 2020 Using Avaya Collaboration Control for iOS 13
Comments on this document? infodev@avaya.comFirst Time Setup of Avaya Collaboration Control
Pairing Avaya Collaboration Control to your endpoint
About this task
To use Collaboration Control, you must first connect or pair your application to the endpoint.
Important:
You can pair Collaboration Control and the endpoint only via their Wi-Fi network connections,
not via Bluetooth or the mobile network.
Figure 2: Collaboration Control pairs to the endpoint via network connection only
This section describes how to configure pairing between Collaboration Control and your target
endpoint.
After you complete the procedure, Collaboration Control connects automatically to the endpoint
every time you activate the app. The endpoint exits the screen saver when paired via sonic
pairing.
You can logout any time to pair to a different endpoint.
Every time the app is paired with an endpoint, it automatically creates a list of favorite endpoints.
Next time you launch the app, choose one of the favorites and you will be automatically
connected.
Before you begin
Verify the following:
• Connect your iOS device to the endpoint Wi-Fi network.
• You have user rights to access the target endpoint.
• Your endpoint has a Collaboration Control license installed.
January 2020 Using Avaya Collaboration Control for iOS 14
Comments on this document? infodev@avaya.comPairing Avaya Collaboration Control to your endpoint
• Your endpoint is connected to the same network as your Collaboration Control. Your endpoint
must be switched on, and its IP address must be reachable from Collaboration Control
• (Only for manual pairing) Make a note of the IP address of the target endpoint. This
information is located on the top bar of the endpoint’s home screen. For more details, ask
your system administrator.
Procedure
1. Download Collaboration Control as explained in Installing and launching Avaya
Collaboration Control on your mobile device on page 13.
2. Tap Continue in the Welcome page.
3. If sonic pairing is available:
a. The system performs an automatic detection of all endpoints that it can reach using
automatic sonic pairing. The system displays a list of nearby detected endpoints. If
the detection is unsuccessful, try to increase the device volume or to position it closer
to the Microphone Pod.
b. Tap on the relevant endpoint.
4. (Manual pairing) On the app connection screen, tap Choose it manually.
a. Choose from the list of the three more recently used enpdoints, or enter the IP
address and the password in the corresponding fields.
Table 1: Fields to enter details of the target endpoint
Field Description
IP Address Enter the endpoint’s IP address. It is located on the top
bar of the endpoint screen.
Password Enter the endpoint’s password for connecting
Collaboration Control as the remote control of the
device.
The default password is 1234.. You can change it in
the endpoint itself by navigating to Configure >
Advanced > Utilities > Remote Access > Scopia®
Control
b. Tap Connect.
5. Tap Continue to complete the setup.
6. Select Get started.
Related links
First Time Setup of Avaya Collaboration Control on page 13
January 2020 Using Avaya Collaboration Control for iOS 15
Comments on this document? infodev@avaya.comFirst Time Setup of Avaya Collaboration Control
Connecting Avaya Collaboration Control to Scopia
Desktop Server
About this task
If your organization's deployment includes Scopia Desktop Server, you can additionally connect it
with Collaboration Control to provide the following additional features:
• Using Avaya Scopia Content Slider functionality to review previously shared content without
interrupting the presenter.
• Managing video layouts of the external MCU, locking/unlocking a meeting, sending an email
invitation.
• Streaming.
Collaboration Control uses its connection with the Scopia Desktop Server to access other Equinox
Solution components, like Equinox Management and Equinox Media Server.
The Scopia Desktop Server connection requires that you enter the server's name or IP address,
and any valid Scopia Desktop login. Collaboration Control does not access the personal virtual
room details of that login. It is solely used as a means of accessing the server. Nevertheless we
recommend creating a login specifically dedicated to Collaboration Control's use.
Before you begin
Verify the following:
• Your video deployment must include Scopia Desktop Server and Equinox Management, and
verify the name of the Scopia Desktop Server. For more information, ask your system
administrator.
• You must have a Scopia Desktop login and password, preferably a dedicated login for
Collaboration Control.
• If you want the ability to moderate meetings hosted on an external MCU, your deployment
must also include Equinox Media Server .
Procedure
1. Launch Collaboration Control.
The app automatically attempts to connect using information already defined in its settings.
If it cannot connect, for example, when you start the app for the first time, it displays the
Welcome panel.
2. Enable Scopia Desktop Services in Settings > Scopia® Control by entering the relevant
information.
January 2020 Using Avaya Collaboration Control for iOS 16
Comments on this document? infodev@avaya.comAbout the Endpoint Virtual Remote Control Unit
Table 2: Fields to enter details of the Scopia Desktop Server
Field Description
Scopia Desktop Server Address The name or IP address of your organization's
Scopia Desktop Server. For example,
scopia.avaya.com. If you are not sure, ask your
system administrator.
Scopia Desktop user name Any Scopia Desktop user name. We recommend a
dedicated username for this device's connection.
Scopia Desktop user password The password associated with the Scopia Desktop
user name.
3. Select Connect to establish the connection.
Related links
First Time Setup of Avaya Collaboration Control on page 13
About the Endpoint Virtual Remote Control Unit
The app’s Control page that emulates the functionalities of a simple or advanced infrared remote
control unit and also provides a touchpad page for using the finger as a mouse pointer to control
the endpoint’s graphical user interface.
Each page may have additional pages. To browse pages, swipe left/right on the Dots at the
bottom of the current page.
To access the simplified page, tap on the button panel. To access the advanced page and the
touchpad page, swipe on the Dots at the bottom of the page.
January 2020 Using Avaya Collaboration Control for iOS 17
Comments on this document? infodev@avaya.comFirst Time Setup of Avaya Collaboration Control
Figure 3: Navigating the touchpad page
For information on how to use the virtual remote control unit, see the endpoint’s user guide.
Related links
First Time Setup of Avaya Collaboration Control on page 13
January 2020 Using Avaya Collaboration Control for iOS 18
Comments on this document? infodev@avaya.comChapter 3: Starting or Joining a Meeting
Depending on the information you have about the endpoints or where the meeting is hosted, there
are several ways you can start or join a meeting using Avaya Collaboration Control.
To start a videoconference with several participants, start a meeting with one participant as detailed
in this section, and then add or invite others to join (see Inviting Participants on page 39). For
videoconferences, your endpoint must be connected to the external Equinox Media Server, or your
endpoint must have a license to activate its built-in MCU.
Related links
Starting a Meeting by Directly Dialing an Endpoint on page 19
Starting a Meeting from the Directory on page 21
Joining a Meeting on page 23
Joining a Meeting from the Endpoint Calendar on page 24
Using Chat on page 25
Starting a Meeting by Directly Dialing an Endpoint
About this task
You can start a new videoconference with Avaya Collaboration Control by dialing directly the
address of the target endpoint. You can dial an endpoint in one of several ways:
• Enter its dial number.
You may need to add a dial prefix before the phone number to reach an endpoint. For
example, if a user's phone extension is 1234, you may need to insert 89 before their number
to access their endpoint: 891234. For more information on dialing endpoints in your
organization, ask your system administrator.
• Enter its H.323 name, or alias.
Aliases can have any format, and do not conform to any rigid pattern. For example, an
endpoint may be named johnsmith_1. For more information about the list of endpoint aliases
in your organization, ask your system administrator.
• Enter its IP address.
If you know the exact IP address of the participating endpoint, you can dial it directly. For
example 12.345.67.89. Verify with the endpoint's user that the address is valid from your
location.
January 2020 Using Avaya Collaboration Control for iOS 19
Comments on this document? infodev@avaya.comStarting or Joining a Meeting
• Enter its URI address.
URI is an address format where the address consists of the endpoint's name or number,
followed by the domain name of the server to which the endpoint is registered, such as
@.
Procedure
1. Launch Collaboration Control and wait for it to establish a connection to the endpoint. For
more information on pairing, see First Time Setup of Avaya Collaboration Control on
page 13. Alternatively, tap choose it manually.
2. Tap the Call button to view the list of recently dialed endpoints.
Collaboration Control displays the list of recently dialed endpoints (Figure 4: Direct dial or
choose a recently dialed endpoint on page 20).
3. Enter the IP address, URI address or number you wish to dial. Alternatively, tap an entry
from the list of recent dials (Figure 4: Direct dial or choose a recently dialed endpoint on
page 20), so its address appears in the dial field.
Before dialing, you can edit the final dial string by tapping it or change the settings if
required. The current dial string, protocol and call type is displayed in the Advanced
Calling Options page. Swipe right to change page.
Figure 4: Direct dial or choose a recently dialed endpoint
January 2020 Using Avaya Collaboration Control for iOS 20
Comments on this document? infodev@avaya.comStarting a Meeting from the Directory
4. (Optional) Edit the settings of the dial and swipe left to change page.
Figure 5: Editing dial settings
Option Description
Protocol Tap and scroll to select the protocol of the destination
endpoint you wish to dial. Video deployments are either
based on H.323 or SIP protocols. For more information,
ask your system administrator.
Call Rate Tap and scroll to change the call rate.
Audio Only Tap to choose between an audio only call and an audio-
video call. Video cannot be added to an audio-only call
during the meeting.
5. Tap the Phone button to contact the endpoint using the dial string you entered.
6. Invite other participants as required.
To start a videoconference with several participants, start a meeting with one participant as
detailed in this section, and then add or invite others to join (see Inviting Participants on
page 39). For videoconferences, your endpoint must be connected to the external
Equinox Media Server, or your endpoint must have a license to activate its built-in MCU.
Related links
Starting or Joining a Meeting on page 19
Starting a Meeting from the Directory
About this task
You can start a new videoconference by calling an endpoint selected from the directory list. Avaya
Collaboration Control can access several directory lists depending on your deployment:
• Browse the endpoint contacts.
• Browse the corporate directory hosted in Equinox Management, when Collaboration Control
is connected to the Scopia Desktop Server. You can access either Equinox Management's
local directory or its link to an external LDAP directory, depending on Equinox Management's
deployment.
January 2020 Using Avaya Collaboration Control for iOS 21
Comments on this document? infodev@avaya.comStarting or Joining a Meeting
Important:
Collaboration Control does not access iPad's native contacts.
Procedure
1. Launch Collaboration Control and wait for it to establish a connection to the endpoint. For
more information on pairing, see First Time Setup of Avaya Collaboration Control on
page 13. Alternatively, tap choose it manually.
2. Tap the Contacts button.
If Collaboration Control is not connected to Scopia Desktop Server, it displays only the
paired endpoint's current directory. However, when connected to Scopia Desktop Server it
displays also the corporate contacts in an additional page.
Swipe left or right to change pages and view contacts.
• The Contacts page displays the directory as configured on the paired endpoint.
Favorite contacts are represented by a star icon. Contacts from a remote directory are
represented by a book icon.
If a contact is part of a group, the group name is displayed. If a contact has multiple
associated numbers to calls, you can choose from a pop-up panel. You can also search
a specific contact or filter a group of contacts.
Figure 6: Viewing the Enterprise Directory
January 2020 Using Avaya Collaboration Control for iOS 22
Comments on this document? infodev@avaya.comJoining a Meeting
• The Corporate Contacts page displays the Equinox Management’s directory of users.
In the Corporate Contacts Page, the person icon is used for a person contact, while the
terminal icon is used for an endpoint contact.
Figure 7: Viewing Corporate Directory
Enter text in the search field to display endpoints whose name contains the text you
entered. Search by Group is not available in corporate contacts.
3. Tap a contact to dial.
The directory stores all the information needed to place the call for each endpoint,
including its protocol, number and IP address. To cancel the dial, tap Disconnect at the
top right corner of the screen.
4. Invite other participants as required.
To start a videoconference with several participants, start a meeting with one participant as
detailed in this section, and then add or invite others to join (see Inviting Participants on
page 39). For videoconferences, your endpoint must be connected to the external
Equinox Media Server, or your endpoint must have a license to activate its built-in MCU.
Related links
Starting or Joining a Meeting on page 19
Joining a Meeting
About this task
You can use Avaya Collaboration Control to join a videoconference, using the direct dial feature.
Before you begin
Verify you have the meeting ID or the contact information of the endpoint hosting the meeting.
January 2020 Using Avaya Collaboration Control for iOS 23
Comments on this document? infodev@avaya.comStarting or Joining a Meeting
Procedure
1. Launch Collaboration Control and wait for it to establish a connection to the endpoint. For
more information on pairing, see First Time Setup of Avaya Collaboration Control on
page 13. Alternatively, tap choose it manually.
2. If the meeting was scheduled in Equinox Management, you can join the meeting by
selecting it from the endpoint's calendar. For more information, see Joining a Meeting from
the Endpoint Calendar on page 24.
3. If the meeting is hosted on the endpoint’s built-in MCU, dial the endpoint's name or
address. For more information, see Starting a Meeting by Directly Dialing an Endpoint on
page 19.
4. If the meeting is hosted on an external Equinox Media Serveror MCU, dial the meeting ID
of the videoconference which was given by the meeting's host. For more information, see
Starting a Meeting by Directly Dialing an Endpoint on page 19.
5. If access to the meeting requires a PIN, use the keyboard. If it is not displayed, tap the
Control System button to enter the numeric PIN from the remote control emulation.
Related links
Starting or Joining a Meeting on page 19
Joining a Meeting from the Endpoint Calendar
About this task
In the Calendar page you can see today’s scheduled meetings in which your paired endpoint has
been invited. A similar page is available if you are using the Scopia Desktop Services with valid
credentials.
The endpoint’s calendar is different from the Scopia Desktop Server’s one:
• The endpoint calendar shows the meetings hosted by the Equinox Management Server
managing your endpoint. The calendar displays an alert when the meeting is about to start.
You can join, snooze, or ignore those meetings.
• The Scopia Desktop Server calendar shows the meetings hosted by the Equinox
Management associated with your configured Scopia Desktop Server. You can join these
meetings. The calendar does not display an alert when the meeting is about to start.
With Avaya Collaboration Control you can only view calendar entries to join meetings. To create or
edit a Equinox Management meeting, you must access the user portal, or use the 64-bit Avaya
Equinox® Add-in for Microsoft Outlook.
This procedure explains how to start a meeting from the calendar.
Procedure
1. Launch Collaboration Control and wait for it to establish a connection to the endpoint. For
more information on pairing, see First Time Setup of Avaya Collaboration Control on
page 13. Alternatively, tap choose it manually.
January 2020 Using Avaya Collaboration Control for iOS 24
Comments on this document? infodev@avaya.comUsing Chat
2. Tap the Calendar button to view today's entry in the calendar.
Figure 8: Calendar view of meetings from Collaboration Control
3. Tap Join Now to dial the meeting and participate.
Joining a meeting is completely automatic. All dial information, including the MCU hosting
the meeting, the protocol required to connect to it, and all other technical information is
contained within the button.
4. If access to the meeting requires a PIN, use the keyboard. If it is not displayed, tap the
Control System button to enter the numeric PIN from the remote control emulation.
Related links
Starting or Joining a Meeting on page 19
Using Chat
About this task
(Requires chat support) When you are in an Avaya meeting, you can use Avaya Collaboration
Control to send public or private chat messages to other participants and you can receive them. If
multiple users are controlling the same endpoint, they can use the chat together, but all their
messages are sent on behalf of the endpoint whose name is shown as associated to their
messages.
Chat is also available in the endpoint’s web interface.
January 2020 Using Avaya Collaboration Control for iOS 25
Comments on this document? infodev@avaya.comStarting or Joining a Meeting
Important:
When you use Avaya Collaboration Control to send a private message to someone, you are
acting on behalf of the endpoint. All the users controlling the same endpoint as you, via
Collaboration Control, can see the endpoint’s private messages.
Before you begin
Verify that your endpoint is upgraded to the latest release.
Procedure
1. Start the meeting.
2.
In the participants’s panel, tap to access the panel allowing to start or view a chat.
Figure 9: Starting or viewing a chat
When in chat mode, the tab turns dark gray ( ).
3. Tap the writepad icon to send a private message. Otherwise, send a public message.
January 2020 Using Avaya Collaboration Control for iOS 26
Comments on this document? infodev@avaya.comUsing Chat
4. Tap the participant’s name.
5. Compose the message.
6. Tap Done.
7.
Tap to send the message.
8.
Tap to switch conversation.
Related links
Starting or Joining a Meeting on page 19
January 2020 Using Avaya Collaboration Control for iOS 27
Comments on this document? infodev@avaya.comChapter 4: Participating in Meetings with
Avaya Collaboration Control
This section details the features available from Collaboration Control during point-to-point meetings,
or videoconferences hosted on an external Equinox Media Server, Scopia® Elite 6000 MCU, or
built-in MCU.
Related links
Setting the PTZ Camera's Position on page 28
Blocking Your Own Audio and Video on page 32
Adjusting Volume on page 32
Sharing Content on page 32
Using the Presentation Slider on page 34
Using the Presentation Pointer on page 35
Using the Whiteboard on page 36
Changing Your Own Video Layout with Avaya Collaboration Control on page 37
Blocking Incoming Calls on page 38
Setting the PTZ Camera's Position
About this task
You can change the position and zoom of the endpoint's camera paired to Avaya Collaboration
Control by altering its PTZ settings (pan, tilt and zoom) at any time, both in and outside a meeting.
Important:
Avaya XTE240's camera is static, and has only digital PTZ capabilities. As you increase the
zoom, it crops the camera image (known as digital zoom), displaying a smaller portion of the
original frame. This results in showing fewer pixels, which effectively lowers the resolution of
the zoomed image. In addition, you can pan or tilt the image only after zooming in, enabling
you to pan up to the width or length of the original camera image.
Avaya IX™ XT Telepresence cameras disable their PTZ after setup, since the position and
zoom of the cameras have been carefully calibrated and must remain constant to maintain the
telepresence effect.
January 2020 Using Avaya Collaboration Control for iOS 28
Comments on this document? infodev@avaya.comSetting the PTZ Camera's Position
You can also control the camera of a remote endpoint in a point-to-point meeting if it complies with
the FECC (far end camera control) standard protocols.
You can save your PTZ camera's position before or during a call for later use as one of several
presets. You can store up to 10 positions in the Camera panel. You can also recall presets for
remote cameras if they support FECC.
Before you begin
If you connected more than one camera to the paired endpoint, tap the Camera icon to decide
which camera you want to control. The endpoint will switch among the available ones connected
to the endpoint or to the remote endpoint supporting FECC. When hosting a multipoint call, you
can move or zoom the far camera of the active speaker.
Procedure
1. Launch Collaboration Control and wait for it to establish a connection to the endpoint. For
more information on pairing, see First Time Setup of Avaya Collaboration Control on
page 13. Alternatively, tap choose it manually.
2. Tap the camera button to access the Camera page.
January 2020 Using Avaya Collaboration Control for iOS 29
Comments on this document? infodev@avaya.comParticipating in Meetings with Avaya Collaboration Control
Figure 10: Controlling the camera settings from Collaboration Control
3. Tap the controls on the screen to move your local endpoint's camera as shown in Figure
10: Controlling the camera settings from Collaboration Control on page 30.
• Tap the arrows up, down, right and left to move or pan the image in that direction.
• Tap + or - to zoom in or out.
The center of the camera controls displays whether you affect your local camera (Control
Near) or the remote camera (Control Far). It also displays which input (USB, HD, DVI) you
are controlling.
4. If you connected more than one camera to the local endpoint, tap the Camera button to
select the video source.
The camera selection switches among the available ones connected to the endpoint
supporting FECC.
5.
To control a remote camera during a point-to-point meeting, tap the
button (see Figure 10: Controlling the camera settings from Collaboration Control on
page 30).
January 2020 Using Avaya Collaboration Control for iOS 30
Comments on this document? infodev@avaya.comSetting the PTZ Camera's Position
Important:
In a multi-party videoconference, you can only control the remote camera of the active
speaker.
6. To recall or store the selected input source and the position of the camera , swipe the Dots
from the Camera page and proceed as shown in the figure below.
A preset is the combination of the input source and its PTZ position.
Figure 11: Recalling or storing a camera position
Related links
Participating in Meetings with Avaya Collaboration Control on page 28
January 2020 Using Avaya Collaboration Control for iOS 31
Comments on this document? infodev@avaya.comParticipating in Meetings with Avaya Collaboration Control
Blocking Your Own Audio and Video
About this task
You can block your own video by toggling the Privacy button displayed during a meeting. When
blocked, your endpoint monitor displays the Privacy On button
To block your audio by muting your microphone, toggle the Microphone button displayed during a
meeting. When muted, your endpoint monitor displays the Mute button.
Related links
Participating in Meetings with Avaya Collaboration Control on page 28
Adjusting Volume
About this task
You can adjust the volume on your endpoint with Avaya Collaboration Control inside or outside a
call.
During a call, use the volume slider to adjust the overall volume of the endpoint, including audio
received from remote endpoints during a meeting and any local audio transmitted from a
connected computer (see Sharing Content on page 32).
When not in a call, use the volume slider to adjust the ringtone when the endpoint receives an
incoming call.
Related links
Participating in Meetings with Avaya Collaboration Control on page 28
Sharing Content
About this task
Using Avaya Collaboration Control, you can share content from a computer connected to your
endpoint. Shared content can include presentations, documents, spreadsheets, or any content
displayed on the screen of the computer.
With your iPad/iPhone, you can also see snapshots of the local or remote presentation. This
feature is available only if Collaboration Control is paired with an XT Series. When Collaboration
Control requires presentation snapshots, the web interface of the XT Series endpoint shows an
eye icon on its graphical menu bar.
Typically you share a presentation with other participants in a videoconference, but you can also
display it locally only in the room without transmitting it.
January 2020 Using Avaya Collaboration Control for iOS 32
Comments on this document? infodev@avaya.comYou can also read