Leading Zoom Meetings Handbook - How to Lead a Church Zoom Meeting 2021 Edition 2a March 2021 - Bath and Wells Diocese
←
→
Page content transcription
If your browser does not render page correctly, please read the page content below
Leading Zoom Meetings
Handbook

How to Lead a Church Zoom Meeting
2021 Edition 2a
March 2021
Getting Started with Zoom
Table of Contents
Getting Started with Zoom ......................................................................................................................... 2
   What is Zoom and When to Use it? .................................................................................................................................... 2
   Obtaining Zoom – Free Licence or Pro Licence?.................................................................................................................. 3
   Accessing your online account ........................................................................................................................................... 4
   Downloading the desktop program/app ............................................................................................................................. 5
   Inviting Participants ........................................................................................................................................................... 8
   Registration...................................................................................................................................................................... 11
   Starting a Zoom Meeting .................................................................................................................................................. 13
Leading a Zoom Meeting ......................................................................................................................... 13
   Preparing for the Meeting - Microphone and Video ......................................................................................................... 14
   Welcoming and Managing Participants ............................................................................................................................ 15
   Gallery, Speaker, Spotlight Views and Virtual Backgrounds .............................................................................................. 16
   Responses, Feedback, Polls, Voting .................................................................................................................................. 18
   Recording and Streaming ................................................................................................................................................. 19
   Participants Rights and Views........................................................................................................................................... 22
   Sharing files, screens and information .............................................................................................................................. 23
   Breakout Rooms ............................................................................................................................................................... 30
   Chat and Private Chat....................................................................................................................................................... 32
   Tips for Hosts ................................................................................................................................................................... 33
Settings...................................................................................................................................................... 34
   Settings created at Scheduling ......................................................................................................................................... 34
   Changing Settings during a Meeting ................................................................................................................................. 36
Troubleshooting ........................................................................................................................................ 38
What is Zoom and When to Use it?
Zoom is one of several online video conferencing programs that provides software for:
    •       Online sessions for up to 100 people
  • Webinars for up to 1000 people
There are many other programmes for video conferencing either one to one or small groups: (FaceTime,
Messenger, Skype, WhatsApp etc) or larger trainings or recordings: (Microsoft Teams, Cisco WebEx, Click
Meeting, Adobe Connect, Big Blue Button etc.) More are developing. Each has its strengths and
weaknesses. Zoom became popular in the 2020 Lockdown because of its price and its functionality.
Zoom has the following advantages:
    •      It allows up to 100 participants (for a small fee can be increased).
    •      A free version allows 40min meetings for 3+ and unlimited 1-1.
    •      The Pro version is reasonably priced and allows longer meetings with more capacity.
    •      The Host has control of the attendees.
   • It includes the ability to share any files etc. on your computer and have small group discussions.
There have been some security concerns which Zoom continually addresses. With normal internet
precautions and careful distributing of meeting details there should be no problems. Zoom has been used
for coffee mornings, interactive services, home groups, bible studies, PCC meetings, live streaming etc.
Note Zoom is constantly upgrading, and this booklet quickly becomes dated. Newer versions may be
available on the Diocesan website.
Image from: https://pixabay.com/illustrations/video-conference-online-home-office-5167472/
BW Leading Zoom Handbook 2021v2a.doc                             2                                                                                             21/04/2021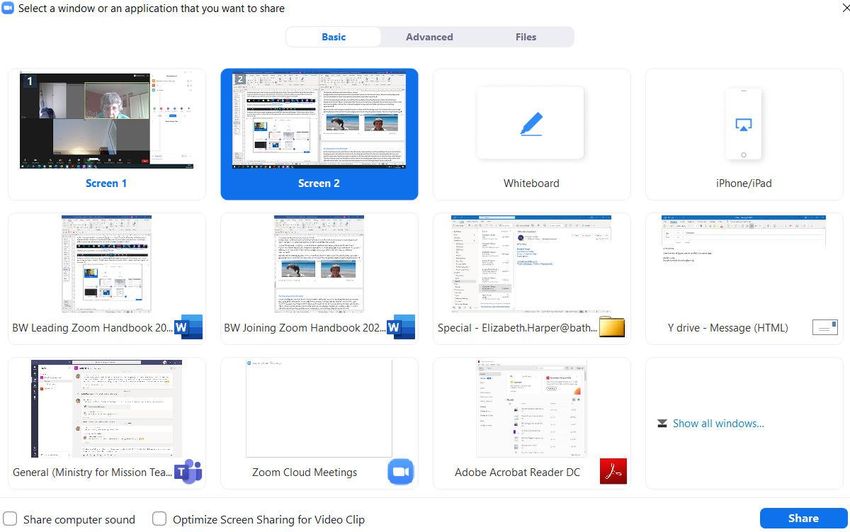
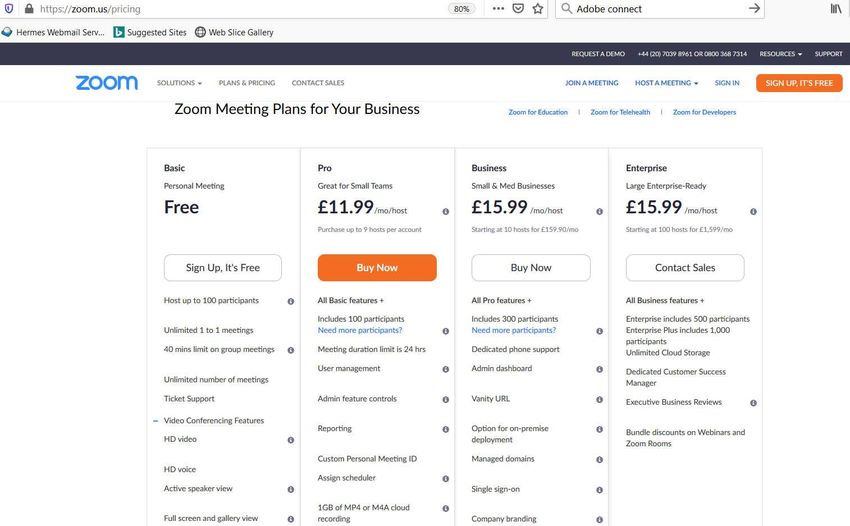
Obtaining Zoom – Free Licence or Pro Licence?
A free licence is useful for all. The following outlines the additional benefits of a Pro Licence (currently
£11.90 per month or £119.90 for an annual licence):
                                  Free Licence                   Pro Licence
    Cost                          Free                           Monthly charge
    Number of people who          100                            100 (+ at additional cost)
    can attend:
    Maximum length of             40mins for 3 or more people.   30 hours
    meeting                       24 hours for 2 people (but
                                  everyone can log back in)
    Controlling other users       -                              The facilitator can control participants
                                                                 adding, deleting, and making them co-hosts
    Recordings                    Must be saved on your own      Recordings can be stored in a Zoom cloud for
                                  computer.                      easy viewing by others.
    Live Streaming                -                              Can be live streamed to Facebook
    Dial-Up Attendance            -                              People can join on a landline.
    Polling                       -                              Online polls can be created for feedback
The main benefit is the length of sessions. Regular Sunday worship or zoom meetings with more than 10
people, really need a Pro licence. If you are using it with one-to-one meetings, services are less than 40
minutes, or small groups happy to log in again after 40 mins then the free program will be sufficient.

To purchase or get the free licence go to https://zoom.us/pricing.
If you decide you need a second licence because you regularly want two meetings at the same time, then it
is easiest to buy a separate licence and share log in details. Alternatively, you can buy a second licence on
your account. In which case you will need to add a second user in your account: Under Admin> User
Management > Users. This user will need a different email address to log in on the account and can then
set up additional meetings.

BW Leading Zoom Handbook 2021v2a.doc              3                                            21/04/2021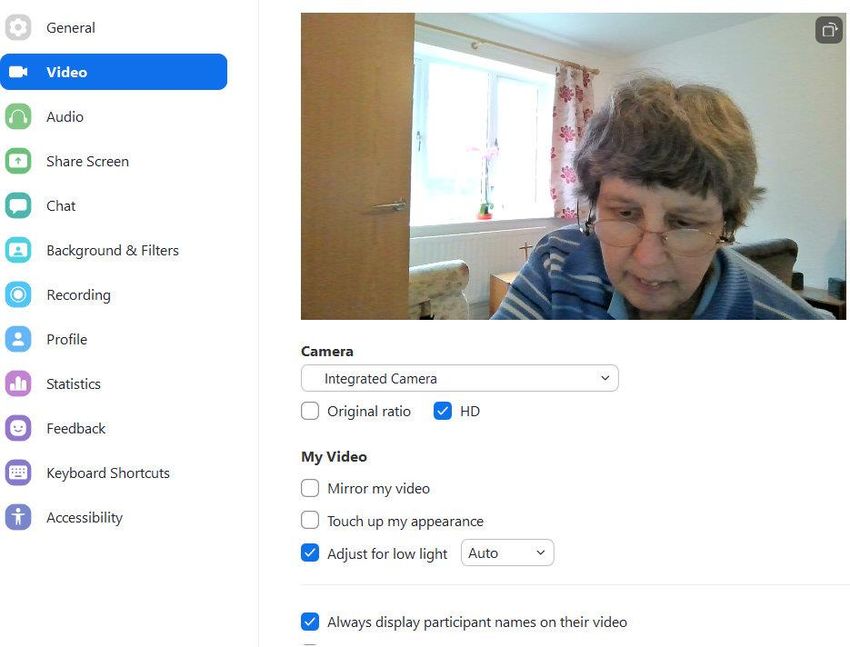
To obtain a free licence follow the online instructions. Click on the link that arrives by email to activate the
account. You will be asked for a password and account name (this is the name that will appear on your
                                                  photo, so make it meaningful, e.g., avoid "ipad" etc.).
                                                  Finally, you have the option to open a trial meeting to test
                                                  your audio and video or go straight to your settings.
                                                    With a pro licence, after paying for the licence you then go
                                                    through a similar process.
                                                    Once you have created a zoom account it can be accessed
                                                    online through your internet browser and/or an app on
                                                    your desktop, phone, or tablet for easy access.
                                If you are setting up a group/church account then use a corporate name (e.g.,
                                All Saints) and unique password. You do not need a licence for everyone
                                (expensive!), simply share the log in details with selected church members.

                                Accessing your online account
                                Your online account gives you access to the Zoom Settings and full control of
                                your account. Go to https://www.zoom.us/signin and enter your registered
                                email address and password.

  Profile allows you to edit your profile, password,
  add a picture for when video is off, etc.                      This menu provides a quick way to
  Meetings lets you schedule future meetings,                    schedule a meeting, join a meeting or
  create invitations, and start meetings.                        host a meeting immediately.
  Recordings lets you access recordings of meeting
  you have made.                                                 The final square (which will have your
  Settings lets you alter settings that will apply to            picture if you have set it in profile) holds
  every meeting you run (see below)                              the sign out button
  Admin has further settings for Pro Licences
BW Leading Zoom Handbook 2021v2a.doc               4                                            21/04/2021
Downloading the desktop program/app
This is optional but strongly advised. It provides a
handy, easy way to start a Zoom session and keep up
to date. Download the programme from:
https://zoom.us/support/download. The download
should happen automatically. Once completed, find
zoominstaller.exe in your downloads folder or use the
install link provided in your web browser. Once
installed the blue zoom icon will appear on your
desktop. Click on it. You will be asked whether you
want to join a meeting (i.e., someone else's meeting with the name and
password they send you) or sign in with your email and password.

Downloading the App for phone and tablet
From your Apple or Google Store, search for the free Zoom Cloud
Meetings App. Download and install it. With the App you can manually
join someone else's meeting with the ID and password sent to you or you
can Sign In and start and run your own Zoom sessions.

Layout of App and desktop program
                                                                   Top Menu:
                                                                   Home gives the most frequent actions.
                                                                   Chat: allows you to see saved chats from
                                                                   previous meetings.
                                                                   Meetings: lists your scheduled meetings and
                                                                   allows you to start them or copy the invite.
                                                                                           Contacts: lists any
                                                                                           contacts already
                                                                                           stored.

                                                                                          The Profile/ picture
                                                                                          button: includes a
New Meeting – lets you                 Settings allows you to                             drop-down menu
start a meeting now.                   change some settings                               where you can
                                       (these can also be                                 update your profile
Schedule – lets you set up a
                                       changed in a meeting                               and get new
meeting for a later time.
                                       from video settings) – To                          updates. Zoom is
Join – lets you join someone           access the full range of                           frequently updated,
else's meeting.                        settings you will need to                          and updates should
Share Screen is for specially          go to your online                                  be checked at least
configured meeting rooms               account through your                               monthly.
and not normally relevant.             internet browser.

Actions related to your computer, such as updating, have to be done through this app. Other actions
relating to your account, need to be done online through your online account login.
BW Leading Zoom Handbook 2021v2a.doc                  5                                       21/04/2021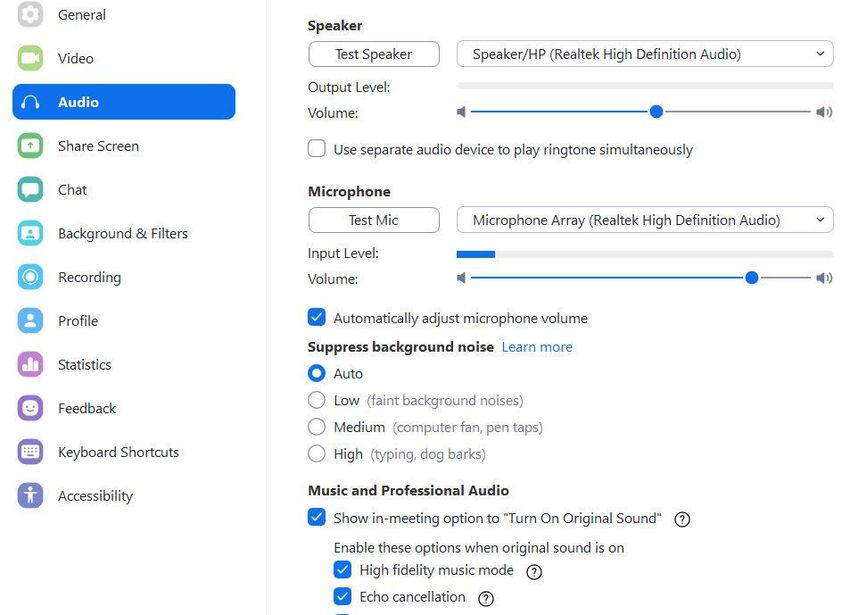
Setting up your first meeting.
To create your first meeting, with the desktop programme/ app, choose either
"new meeting" to immediately start a meeting or choose "schedule a meeting"
for later. By scheduling a meeting, you can create the link and email it to
everyone in advance.
If you use your online account (https://www.zoom.us/signin) you can schedule
a meeting from the top menu or using the meetings tab on the side menu:
You will see a list of scheduled meetings. Only one meeting can run at a time
on an account. Zoom does not warn you of a clash so take care to monitor it.

On a shared account you may want to schedule the meeting for half an hour before and after the expected
meeting time to give spare time to set up and run-on if necessary. Note that timings are only for scheduling
purposes. A meeting can be started at any time before the specified closing time. It can therefore be used
for trial purposes before the actual meeting.
You are now ready to schedule a basic meeting. To get full functionality out of Zoom (such as breakout
groups) you will want to ensure that all the right settings are in place. See the Section on Settings later in
this booklet.

Optional for the technologically savvy:
It is also possible to install a Zoom app into your online diary and connect and schedule meetings from
other programmes. See instructions here:
Outlook: https://support.zoom.us/hc/en-us/articles/115005223126-Office-365-Outlook-Web-Add-In
Google calendar: https://support.zoom.us/hc/en-us/articles/360020187492-Google-Calendar-add-on
Firefox: https://support.zoom.us/hc/en-us/articles/206337235-How-To-Use-Zoom-Firefox-Add-On
Chrome: https://support.zoom.us/hc/en-us/articles/201974323-Using-the-Zoom-Chrome-Extension

BW Leading Zoom Handbook 2021v2a.doc             6                                            21/04/2021
Choose Schedule a new meeting and fill in the sections as indicated. Note the screen shot is for the Pro
Licence. The free licence and the desktop app may have fewer options than shown.

                                                                          Add topic and description for
                                                                          clarity.

                                                                         Insert date, duration, and time.
                                                                         Allow a little time before and
                                                                         after. A recurring meeting will
                                                                         keep the same link every week.
                                                                         NB: You can run the meeting at
                                                                         any time. The times are
                                                                         indicative not restrictive.
                                                                         Registration: Sets up a Zoom
                                                                         online registration system for
                                                                         registering an interest.

                                                                       Passcode: This is mandatory. People
                                                                       on landlines must have a numeric
                                                                       code. Change with care.
                                                                       Waiting Room is set as default but
                                                                       can be removed.
                                                                       Require authentication is added
                                                                       security, leave as is.
                                                                       You can set video to start
                                                                       automatically. Individuals can
                                                                       override your choice.
                                                               Click Advance Options in the desktop
                                                               programme/ app to see these:
                                                               • Allow participants to join anytime, without
                                                               you having arrived in the room. Less secure but
                                                               lets people meet for a coffee morning without
                                                               you being there. You must also untick waiting
                                                               room.
                                                               • Mute participants on entry: This will mute
                                                               participants as they join the meeting. They can
                                                               unmute themselves after joining. Optional
                                                               • Breakout Room pre-assign: Allows you to set
                                                               up breakout rooms in advance. This only
                                                               appears if you have enabled it in settings.
                                                               • Automatically record meeting: Saves you
                                                               remembering to record but note that the files
Ensure you click save at the bottom of the page to             will be larger in the limited storage space.
complete the scheduling of the meeting.                        • Enable additional data centre regions.
                                                               Ignore this.
                                                               • Approve or block entry. Ignore this.

BW Leading Zoom Handbook 2021v2a.doc            7                                          21/04/2021
In the desktop programme/app you will then return
to the programme where it will tell you the next
meeting to start. You can see your scheduled
meetings by clicking on the Meetings Tab at the top
of the screen. On the left is a list of scheduled
meetings. Click on any meeting and you can:
   •    Start the Meeting.
   •    Copy the invitation to send people.
   •    Edit the settings for the meeting.
   •    Delete the Meeting.

If you scheduled your meeting in your online account, then you will get a confirmation screen where you
can check your meeting and start it if you are ready to do so. You can also set up polls and registration (see
below). Edit this meeting allows you to make changes to the meeting setup. If you have an outlook, google
or yahoo calendar, you can add the meeting to your calendar by clicking on the tab.

Inviting Participants

The best way to invite participants is to email them a link which contains the password. Zoom provides this
for you and you can copy and paste it into an email. If you use Zoom registration, then the link will be a
registration link with a registration form.
In the desktop programme (top picture) go to the Meeting tab on the top menu. Click on the meeting on
the left and choose copy invitation from the centre of the screen.
In the online settings (picture directly above) choose Meetings in the left-hand menu and then click on the
meeting to get the details shown above. Click on "Copy the invitation"
BW Leading Zoom Handbook 2021v2a.doc            8                                           21/04/2021
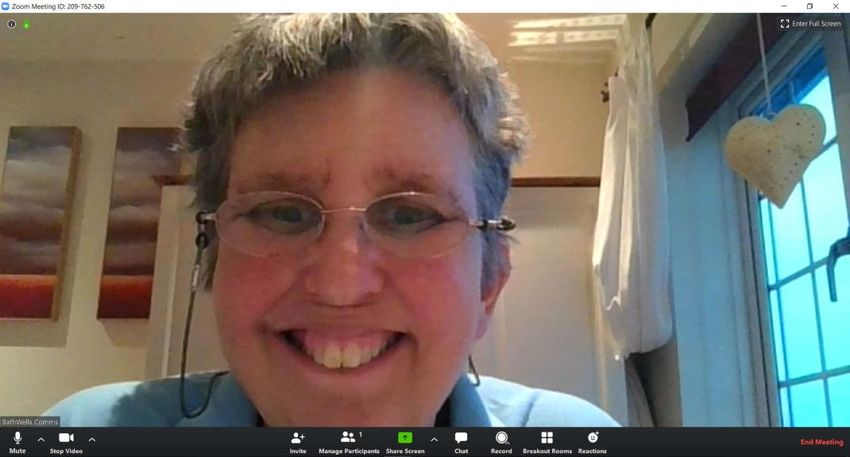
You can then paste the meeting invitation into an email (or send from your calendar if you have stored it).
            All Saints Church is inviting you to a scheduled Zoom meeting.
            Topic: PCC Meeting
            Time: Jun 5, 2020 01:30 PM London
            Join Zoom Meeting
            https://zoom.us/j/209762506?pwd=YUllYTdjV2tlZVFobWdSNGljc1NiZz09
            Meeting ID: 209 762 506
            Password: 458675

            One tap mobile
            +13126266799,,209762506# US (Chicago)
            +13462487799,,209762506# US (Houston)

            Dial by your location
                 +1 312 626 6799 US (Chicago)
                 +1 346 248 7799 US (Houston)
                 +1 646 558 8656 US (New York)
                 +1 669 900 9128 US (San Jose)
                 +1 253 215 8782 US
                 +1 301 715 8592 US
            Meeting ID: 209 762 506
            Password: 458675
            Find your local number: https://zoom.us/u/acw8m35Pav
NOTE: in the picture the link is not underlined, which means it is not live. To make it live press return at the
end of the link. Those on i-phones may not be able to use the link unless you do this.
Participants can join the meeting via:
   •    Desktop computers (they may need to add camera and microphone to their desktop)
   •    Laptop / tablet or i-pad (has inbuilt camera and microphone)
   •    Tablet/i-pad/smart phone (has inbuilt camera and microphone but slightly limited functions)
   • By landline telephone at national rates. (Voice only, no pictures).
By default, the American phone numbers are shown and are irrelevant to your participants. See Settings
later in the booklet for how to list the UK phone numbers. You can delete the extra details and tweak the
timings to make a simpler email. The email you send out might look more like this:
            Elizabeth Harper is inviting you to All Saints PCC Meeting

            Time: 5 December 2021 at 7:00pm
            To join the Meeting click on this link:
            https://zoom.us/j/209762506?pwd=YUllYTdjV2tlZVFobWdSNGljc1NiZz09
            Or if you have Zoom installed, you can join the meeting manually with these
            details:
            Meeting ID: 209 762 506
            Password: 458675
            If you wish to join the meeting by landline phone instead, please ask for further
            details.

BW Leading Zoom Handbook 2021v2a.doc             9                                           21/04/2021
Tables, i-pads, and phones have a different Zoom layout to desktops and laptops, for instance the main
menu is at the top rather than the bottom. If possible, try and look at Zoom on different media to get a feel
for what your participants might see, so you can guide them. The Bath and Wells Joining a Zoom Meeting
Handbook gives screenshots for different media and is designed for participants with some understanding,
but not a great deal of computer knowledge. It is free to circulate to your participants. The Zoom support
videos will also let you see different devices.
Participants joining on a Laptop or Computer.
Joining on a laptop or computer gives the fullest Zoom participation. The first time
they join a meeting they will need to download the basic Zoom app onto their
computer. The screen instructions should guide them in doing this, but they may
need help finding the programme after it has downloaded to run it. Running the
programme will ask them for their name and then they can press Join Meeting.
The main menu is along the bottom of the screen and can be accessed by hovering
the mouse along the bottom. Gallery/speaker view toggle is in the top right.
Participants joining on a Tablet or Smart phone.
Joining on a tablet or smartphone can be more convenient but the size of the
screen means that fewer people will be visible, and some facilities are
unavailable (e.g., files shared in chat are not available). Participants will need to
download the free Zoom Cloud Meetings App from their App Store and install it
before they can join a meeting.
The main menu is often along the top of the screen. Different screen views
(gallery/ speaker) are often achieved by swiping right or left.
Participants joining on a Landline.
If people do not have internet, they can still join a Zoom meeting with their
landline, but obviously cannot see anything. This is only possible if you as host
have a Pro licence. A meeting hosted on a free account can't be joined this way.
Detailed instructions for joining via a landline are found in the Joining a Zoom
Meeting Booklet. You will need to provide the participant with the number to call (see Settings below). The
numbers in January 2021 were the following national rate numbers:

                          London:      0203 481 5237
                          London:      0203 481 5240

The Participant will need the meeting id and passcode which will need to be
numeric. A trial meeting beforehand with anyone coming on via a landline is
recommended.

BW Leading Zoom Handbook 2021v2a.doc              10                                       21/04/2021
Registration Zoom provides an online registration platform for people to register for your meeting. If you want to allocate people to breakout rooms prior to the meeting, then you will need to use the registration facility. Tick the registration box when scheduling the meeting. Having saved the meeting, click on it and scroll to the bottom to set up. Manage registrants will let you view who has registered and resend the confirmation details. Registration Options sets out the conditions and information to be collected from registrants. Choose Edit and tick the desired boxes. Under Questions you can choose fields such as Name, email, address that must be given by the registrant. These can be made compulsory or optional to answer. Under Custom Questions you can add further fields of your own: BW Leading Zoom Handbook 2021v2a.doc 11 21/04/2021
Then Choose Email Settings. There you can edit the email contact and the Confirmation email.

The confirmation email will be
automatically sent to everyone who
registers. You can change the email at
any time and resend it. It can be useful
to rewrite the email and resend it as a
reminder a couple of days beforehand.

Each registrant gets a unique login, that
enables Zoom to recognise them when
they enter the session. This means you
can use the email address given to pre-
allocate breakout rooms in the
scheduling window.

Now scroll back up the scheduled
meeting to pick up the invitation from
the normal place. The invitation will now
be a registration invitation.

A list of those who have
registered is available in the
Admin Setting >Reports>
Meetings. Choose "Generate" to
generate a report of who has
registered. Then go to Report
Queue to download the list to
an Excel spreadsheet.

BW Leading Zoom Handbook 2021v2a.doc         12                                        21/04/2021
Starting a Zoom Meeting
You can start the Zoom Meeting from the confirmation
screen or from the Meetings tab if you have set up the
meeting beforehand. Click on start meeting.
You may be asked to download a Zoom app onto your
desktop if this is your first Zoom session. Or to launch
the Zoom App if you are starting from the online
settings.

You may be asked to choose your settings if you have
not already set defaults, e.g. join with video or audio. You may have the opportunity to test your speaker
and microphone to see that it works with Zoom.

If you are likely to run frequent
sessions, then a headset is
advisable. It prevents background
noise reaching participants and
sharpens the audio quality. You
can often use the headset
that came with your i-
phone. The main thing to
check is that your headset has the
right connection for your computer. If in
doubt a USB connection will work with
laptops and desktops.

It also pays to think about where you place your computer/laptop if you can move it. Different lighting will
make it harder or easier for people to see you. If your inbuilt camera is not good you may want to purchase
a specialised camera.1 Remember hard of hearing people may need to read your lips.

1
    Picture from: https://blog.zoom.us/wordpress/wp-content/uploads/2020/03/work-from-home-lighting.png
BW Leading Zoom Handbook 2021v2a.doc                  13                                             21/04/2021
Leading a Zoom Meeting
Preparing for the Meeting - Microphone and Video
The key to a good meeting involves setting everything in place before the meeting starts, so that delays are
minimised. You can log in before the session (provided no-one else is having a meeting) to do this. The
main controls are along the bottom. First check your microphone and camera work using the main menu:
Microphone button:
If you or your participants are having
problems with the microphone or sound,
check the settings from the up arrow by
the mute button. Check the right
microphone and speakers are selected
and test the microphone and speakers.
The mute button toggles the
microphone on and off.
Holding down the space bar should
unmute you for a quick comment. You
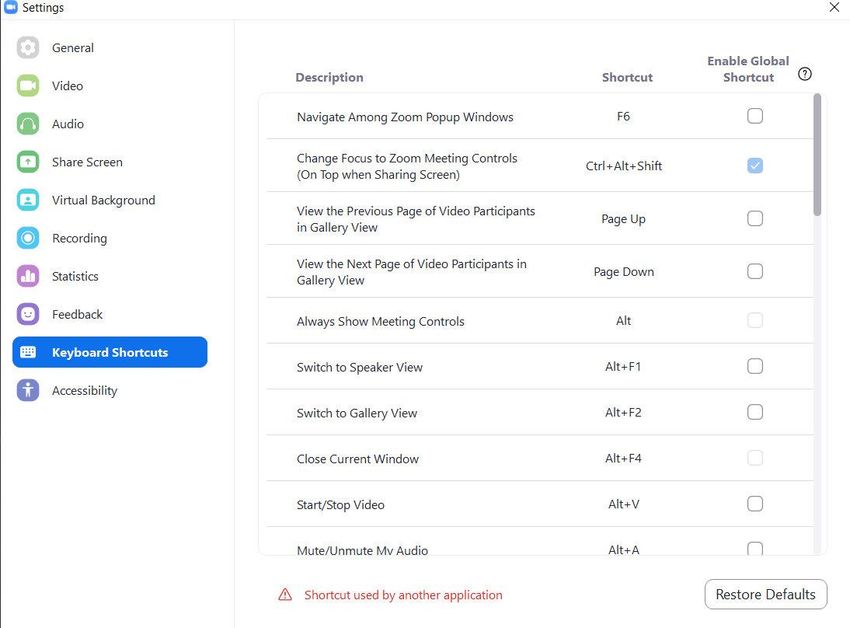
can also set a shortcut Alt A in shortcuts
to quickly mute and unmute yourself.
Video controls:
The video controls allow you to choose cameras, set
video settings and choose a virtual background or
video filter.
These are explained further below.
BW Leading Zoom Handbook 2021v2a.doc 14 21/04/2021Welcoming and Managing Participants
Participants arrive, by default, in a waiting room. This can be disabled when
scheduling or during the meeting. Personalise the waiting room in the
online account settings (see Settings).
Participants Panel
This panel shows who is in the meeting, their status and who is waiting.
If it appears in the centre of your screen obstructing the videos, then
choose Exit Full Screen from the View menu and it will jump to the side.
The Participants panel allows you to control participants e.g. mute,
spotlight, make co-host.
Controls are available at
the bottom of the
Participants panel. The More
"…" tab gives further useful
settingsl.
Participants only have the
Mute and invite options.
(Raise hand is now under
Reactions).
Controlling the Videos and Microphones – Mute/Unmute Participants
When participants are not using directional microphones (e.g., a headset or
specialised microphone), background noise or feedback can cause
problems. In a large meeting you may want participants to mute
microphones except when they are invited to speak. Hosts and co-hosts can mute everyone. If participants
routinely unmute themselves. You can untick "Allow Participants to Unmute Themselves" in the
Participants More button (see above) which will prevent everyone unmuting. Make any readers or guest
speakers co-hosts so they can speak. If a person has continual noise problems a headset should solve the
problems for future meetings.
For privacy purposes Zoom does not allow a host to unmute
participants. You need to ask them to unmute. It is possible to
collect that permission at the start of the meeting. This setting
needs to be enabled in the Settings (see below).
Security
The Security button on the main menu (hosts and co-hosts) allows quick
access to controlling participants and what they are able to do.
• Lock meeting prevents new people entering the meeting.
• Remove Participant - removes them from the Meeting> They cannot
return unless you have allowed this in your online account. You will
have the option to Report the Participant's behaviour to Zoom.
• Suspend Participant activities turns off all participant activity.
BW Leading Zoom Handbook 2021v2a.doc 15 21/04/2021Gallery, Speaker, Spotlight Views and Virtual Backgrounds
Zoom allows you and participants to arrange the camera views in two different ways:
• Speaker View has one big picture of the current speaker and small pictures of everyone else.
• Gallery View has equal sized pictures of everyone (to max of 25/49 depending on your settings)
These two views apply only to your own screen and participants are free to view their screen as the like.
There are 2 ways to control participant's screens: Spotlight view, overrides participants choices and forces
them into speaker view with the person you have highlighted dominant. Follow Host's video rearranges the
pictures on gallery view to match yours.
1. Speaker View
This is most useful if one person is doing most of the talking, as in a presentation or classroom. It is also
useful if your screen is small, or there are a large number of people. Depending on the device the small
pictures of other participants may be at the top or bottom of the screen.
On a laptop and desktop, you can change to speaker view by clicking on "View" in the top right corner.
On a phone and most tablets, you can change view by swiping the three dots at the bottom.
2. Gallery View
This is most useful in a small meeting or discussion group where everyone participates equally. Gallery
view tiles all the participants on the screen at equal size. The more people in the meeting the smaller the
tiles, with a maximum of 25/49 (if set) on a computer. A tablet/phone will
have a more limited number of tiles. Further participants can be seen by
scrolling with the arrow buttons. It is possibly to drag pictures around the
screen to create a desired order and see people where you would like to see
them. A host dragging pictures can then change the order for everyone, by
setting "Follow Host's Video Order" which now appears on the View menu.
Participants can only change their own screens and cannot even do that if
Follow Host's view is ticked:
BW Leading Zoom Handbook 2021v2a.doc 16 21/04/20213. Spotlight a Speaker. Spotlighting a speaker forces all participants to view the spotlighted person in speaker view. It is the one command that overrides participants screen layouts, although people can change back if they wish. It is particularly useful for the main speaker or the preacher in a service. Other participants can still be seen as small tiles that can be scrolled as in Speaker view. Up to 9 people can be spotlighted at a time. When recording or streaming only the spotlighted people appear which makes this a good privacy mechanism. It is also possible to highlight one speaker for your own benefit. Pin Video will make one picture visible for yourself only. To spotlight or pin a video, hover the mouse over the top of the chosen person's video picture and click the three dots 'more' menu to get up the menu. The same menu is available on the Participant's Panel. 4. Virtual Backgrounds The webcam will pick up whatever is behind you, which may be embarrassing or distracting for those watching. Zoom allows you and participants to choose a static or video virtual background, that may be less distracting. Take a look at the image on the cover of this booklet. Virtual backgrounds are not available on smartphones, tablets and older machines. Virtual backgrounds can be opened from the Stop Video up arrow button on the bottom menu. There are now also video filters to add humour or texture to your photo. Again both must be enabled in the account settings. On the Virtual background tab, you will find the available backgrounds under Choose Virtual background. If "None" is showing, then there are no pictures preloaded. If you have some of your own pictures in a folder, click on the + tab and navigate to your pictures folder and choose something appropriate. Blur blurs your background so that background is not identifiable. Untick green screen for best quality if allowed. The camera has to merge the picture of you with the background. You may find that your image gets badly distorted and the virtual background is more off putting than helpful. BW Leading Zoom Handbook 2021v2a.doc 17 21/04/2021
Responses, Feedback, Polls, Voting
1. Participant Responses
Participants have some quick visual responses that they can give to your presentation. Under the Reactions
tab on the main menu, they can choose an emoticon from
the top line. These appear in the top right of their video for
10 seconds and in the Participants Panel.

2. Non-verbal Feedback
It is possible to have participants give further responses by
enabling non-verbal feedback in the settings of your online
account. These icons also appear on the Reactions tab (they used to appear
in Participants panel). The Yes/No buttons are useful for a quick show of
hands or vote. On the host screen, in the Participants Panel, Zoom tallies the
yes and no numbers so that you know instantly how many are in favour or
against the vote.
The raise hand button is useful for participants to get your attention. With
large numbers, a waved hand is not always visible. By using the raised hand
reaction, the person's picture jumps to the top of the screen and their name
appears at the top of the Participant's List for easy identification.

3. Polls
If you wish to carry out a more extensive questionnaire of
participants or hold a secret ballot, then enabling Polls in
settings may be more helpful. This is now unavailable on the
free licence. Up to 25 polls can be created before the session
with single or multi choice options, and several questions in
each if desired. Unfortunately, open ended answers are not
possible.
After scheduling a meeting in the online account, look at the
meeting (click on its name) and you will find a polling section
(if enabled) at the bottom of the meeting details. Click on
"add", and a poll form will appear. You can make the poll
anonymous if desired.

BW Leading Zoom Handbook 2021v2a.doc            18                                      21/04/2021
Once in the meeting, click on Polls in the main menu. And the first poll will
come up. Clicking on the down arrow by edit will allow you to choose a
different poll.
Launch Poll to get responses. You will see the progress of the poll and how
many people have voted/ answered. When you are satisfied that all
answers are in, End Polling and you will see the full results which can be
shared with everyone. (Take a screen shot if you wish to retain the results)

Recording and Streaming
Sessions can be recorded using the record button on the bottom menu. Clicking on this will start the
recording. It can be paused or stopped, as necessary.

With a free licence the recording is stored on your own computer. With a pro licence there is the option to
store the record on the Zoom cloud or your own computer. Recordings of an hour's session produce very
large files. You may prefer to record the session in smaller chunks. The recording only records the main
meeting and screenshares, so pause during
breakouts to save a blank screen.
If saving to your computer, you will receive a
message when the meeting ends. If the session
is large, saving may take 15 mins or more. It
may ask you where to save the video. If not, the
file is normally saved in your Zoom folder
(automatically added to the bottom of your File
Explorer) or possibly in Downloads. M4a files are audio. MP4 files are video. If spotlighting has been used,
only those spotlighted will be seen in the video, which gives participants privacy. Programs like Dropbox or
WeTransfer can be used to send the files, which are likely to be too large to email.
To find your cloud saved recordings go to your Online account. Recordings are saved in the Recordings tab
under Personal on the left-hand side. From there you can send a link that enables people to view or
download the recording or download it yourself. You have 1 Gb of storage or about four 90min sessions.
You will need to regularly delete recordings to make space for new ones.

BW Leading Zoom Handbook 2021v2a.doc            19                                        21/04/2021
Streaming
It is possible to livestream your session to Facebook, You Tube or a custom site such as your website. This
may allow you to reach a larger audience. There are copyright issues involved in live streaming or posting
recordings publicly and you may need to have at least a CCLI streaming licence. Facebook and You Tube are
known to block content that their computer programme deems copyright protected, but it is possible to
contest this. Most churches have the music reinstated. Blocking often involves muting the song or sending
you a message and usually happens after the live stream is completed, so only disrupts those viewing later.
Facebook is more sensitive than You Tube and so some churches stream to You Tube and post a link on
Facebook. Copyright is complex, so do talk to CCLI about what you are doing and what licences are needed.
The following webpages might be helpful:
    • https://lawandreligionuk.com/2020/03/17/streaming-church-services-an-updated-guide-to-
      copyright-and-religion
    • https://www.churchofengland.org/resources/digital-labs/blogs/beginners-guide-going-live-your-
      service-or-event-free
    • https://www.churchofengland.org/resources/digital-labs/blogs/guide-getting-started-live-
      streaming
You will need to allow live streaming in the
Online Account settings> In Meeting
(Advanced). This will then provide a menu
item in the Host's menu. The streamed
service is often 20-30secs behind Zoom.
a) Facebook
    You can stream to your Facebook timeline, a Facebook group or
    your church Facebook page through Facebook Live. People
    watching the Facebook stream can comment in real time on the
    Facebook comments so that there is some interaction still possible.
    Open Facebook in your web browser before the meeting. Choose
    "Live on Facebook" from the Host's More Menu. When prompted
    choose where to post your video. Facebook will prepare a live
    stream preview. When completed click "Go Live". You will be
    returned to your desktop. Re-enter Zoom. Shortly you will be
    notified that you are live and then you can start the service. You
    can stop the live stream from the main menu or from the top right-
    hand corner. See https://support.zoom.us/hc/en-
    us/articles/115000350406-Live-streaming-meetings-or-webinars-
    on-Facebook for problems.

BW Leading Zoom Handbook 2021v2a.doc           20                                        21/04/2021
When live, the video can be watched by anyone looking at your Facebook news feed. People do not
need to belong to Facebook to see the video, but they will need to have a link, which you will need to
distribute. The link is only generated when you go live, so this can be a bit tricky. Some churches
delegate this task and start the service 5 mins early with some pre-recorded music. This gives time to
email out the link and have people join.
When completed the feed will be blank while Facebook process the live stream and it will then be
visible for people to watch at any time. Effectively you get a live stream and a recording for future
viewing.
b) You Tube
Open You Tube in your web browser prior to the service and log
into your account. In Zoom choose "Live on You Tube" from the
Host's More Menu. If prompted choose which You Tube Channel
to broadcast to (if you have more than one). When requested give
your Service a title and choose privacy settings. When completed
click "Go Live". You Tube will prepare for streaming and you will
see a progress counter. When it completes you will be returned to
your desktop or Zoom. Shortly you will be notified by Zoom that
you are live and then you can start the service. You can stop the
live stream from the main menu or from the top right-hand corner.
It is also possible to live stream to a YouTube Event that has been set up and prepared for before and
may be a recurring setting for every Sunday. This enables you to email prior notice. For further details
and any problems see:
https://support.zoom.us/hc/en-us/articles/360028478292-Live-streaming-meetings-or-webinars-on-
YouTube
c) Custom Service
You can use the custom service to live stream to
some other medium such as your website. You will
need to open the administration version of your
destination. In zoom, when you choose Live on
Custom Live Streaming Service you will be asked for
the details. When complete click "Go Live":
When it completes you will be returned to your
desktop or Zoom. Shortly you will be notified by
Zoom that you are live and then you can start the
service. You can stop the live stream from the main
menu or from the top right-hand corner.
OBS (Open Broadcaster Software) is a popular free software for video recording and live streaming. You
can use it to stream directly to Facebook, YouTube etc. but you can also integrate it into Zoom - as a virtual
webcam to feed into Zoom, or the more complex option of Zoom feeding into OBS. There are online
tutorials to help you, or use Facebook Groups such as TechnoChurch to find other churches who are doing
this.
BW Leading Zoom Handbook 2021v2a.doc 21 21/04/2021Participants Rights and Views
Participants see a similar screen to the host, but with fewer controls. If you have permitted these features
their menu may look like this (i.e., they can't see security, polls, breakout rooms):
The following permissions need to be set in your online account before they can be used by participants:
Permission Where enabled Permission Where enabled
Allow Participants to join Schedule Meeting Non-verbal feedback (Voting) In Meetings (Basic)
before or without host and Reactions
Chat and private chat In Meeting (Basic) Allow participants to rename In Meetings (Basic)
File Transfer In Meeting (Basic) Hide profile pictures In Meetings (Basic)
Co-hosting In Meeting (Basic) Allow virtual backgrounds filters In Meetings (Adv)
Screen-sharing including In Meeting (Basic) Annotation of whiteboard/ In Meetings (Basic)
desktop, whiteboard shared screens
If these permissions are enabled, then in the meeting you can control, i.e., turn on and off as needed:
Permission Where enabled Permission Where enabled
Muting and Unmuting Participants Panel Share screen Security, Share Screen
and Security Video Settings>Share
Chat Security and Chat Renaming themselves Security and
Show video (i.e., camera) Security Names on video pictures Video settings> Video
Accessibility e.g., captions Video Settings>
Accessibility
If you wish the Participant to participate more fully e.g., to give their own presentation or be the guest
speaker, then it is best to make them a co-host. Co-hosts have more rights and actions available than
Participants but are not able to rename, poll, make other co-hosts.
If you wish a meeting to continue, after you leave, then you will need to make someone else host in
Manage Participants. If they have a Pro licence, then the
meeting will carry on indefinitely. If not, then the meeting
may close 40 minutes after you leave.
Controlling Participants
Participants can be controlled from the Participant's Panel,
or, on a desktop/ laptop from the top right corner of their
video camera. The same menu is available in both places. It
includes individual muting and stop video, chat, pin,
spotlight (add or replace), make host or co-host, rename,
allow to record, remove or report to Zoom (for a serious
offence such as zoom bombing).
Participants only have chat and pin available from their
menus. Co-hosts have the same as hosts except they
cannot make hosts, co-hosts, report or rename
participants.
BW Leading Zoom Handbook 2021v2a.doc 22 21/04/2021Sharing files, screens and information
Starting Screenshare
It is possible to share a range of files and activities during a meeting. Such as:
• Whiteboard.
• PowerPoint.
• Word or Pdf Document.
• Web browser, You Tube videos and
websites.
• Any other programmes on your
computer.
• NB. To share the Zoom screen itself or
the Zoom App you need to turn on "Show my Zoom Windows to other participants when I am
screen sharing". This is only available with the Pro licence and can be found in Settings> Share
Screen. It does have the effect of seeing Zoom with Zoom which can be a bit disconcerting so you
may want to leave this off as default.
Preparation is the key to a smooth meeting. Before the meeting, it helps to open all the files/videos/
PowerPoints etc. in separate sizeable windows. Size each window so that that the Zoom menu at the top
and the video panel at the side will not overlap the window. Enter Zoom and screen share to check this is
the case. Then minimise each window so that you can quickly access them. On the screenshot below, the
blue line under a program indicates it is open and minimised. To keep the computer stable it is a good idea
to close any other programs you will not use in the session to minimise computer activity.
When ready to share your screen, choose the green screenshare from the bottom menu in Zoom (share
contents if you are using a tablet or smart phone).
BW Leading Zoom Handbook 2021v2a.doc 23 21/04/2021Basic Screensharing
Under the Basic Tab you will find a picture of all the screensharing options.
• First will be "Screen" or "desktop" options. These will share the computer desktop. Anything you do
on the desktop will be visible to the participants. This option allows you to demonstrate things and
swap between programmes such as You Tube videos, PowerPoints, and Word documents.
However, those watching do see your desktop and all that you do.
• Whiteboard - like a real whiteboard, a virtual whiteboard can be drawn or written on, with the
added bonus that participants can also draw or write on it, for a group activity.
• I-phone, i-pad, shares the screen of any i-pad or phone connected to your computer by cable or
wireless. You may need to install a plug in. See https://support.zoom.us/hc/en-
us/articles/201379235 for further details.
• Any applications or programmes that are open on your desktop - these will appear as separate
pictures. If there are too many to see you will need to click "Show all windows" to reveal further
options. It pays to close all programmes that are not relevant to the session to make these windows
manageable and prevent private information being inadvertently seen. Sharing these screens
differs from sharing screen/desktop above. Here you share only the application or programme and
the file currently open in it. These means you can do other
things on your desktop without being seen. You can click
multiple windows (ctrl and extra windows) if for instance you
want music and a PowerPoint separately.
If you are sharing an audio or video file, it is essential to tick the appropriate share computer sound/
optimise video in the bottom corner of the screen. If people cannot hear then check these are ticked.
BW Leading Zoom Handbook 2021v2a.doc 24 21/04/2021In Screenshare
Zoom is set by default to switch to full screen (this can be turned off in settings). To exit full-screen, click
Exit Full Screen in the top-right corner or press the Escape key. While sharing your screen you can still
control the meeting through the controls at the top of the screen:
You may initially only see the green "you are screen sharing" and red
stop share, if you have not ticked "always show meeting controls" in
settings. Hover over these and the full menu should appear above them.
The More button lets you control various other aspects of the meeting,
as in the meeting e.g., share the sound if you have forgotten to turn it on.
If you are using a dual monitor set-up, you can turn on the Use Dual
Monitors feature to see the screen sharing on one monitor and
participants on the second. See https://support.zoom.us/hc/en-
us/articles/201362583-How-To-Use-a-Dual-Monitor-Display.Once out of
screen share you may want to turn this off as it will open 2 Zoom
windows, one with controls and one without which can be distracting.
To end the screen sharing click on the red Stop Share button.
While screensharing the Zoom Meeting
webcam videos can appear in a floating video
panel on the screen. It can be hidden or
restored if not visible from the More>
Hide/Show Video Panel.
The four tabs at the top of this panel alter how the video panel looks (Minimised,
speaker mode, gallery, grid- for 6 or more people). The floating panel can be
dragged to another part of the screen if it is in the way. If dragged to the top or
bottom, it should change to horizontal mode and vertical mode if dragged to the
side. Note that the video panel will appear as a black box on participant's screen
so make sure it is not obstructing anything you wish them to see. Do size your
share windows to fit round the menu and video panel you will use.
Side by Side View
Those viewing a screenshare have a different range of options Next to the green box indicating who is
sharing there will be a view options dropdown menu. Side by side mode lets the video panel shared screen
and chat/Participants boxes be viewed side by side without
overlapping. Drag the slider to right or left .
BW Leading Zoom Handbook 2021v2a.doc 25 21/04/2021Whiteboard Sharing a whiteboard produces a whiteboard that you can write or draw on. You can also allow your participants to write or draw on it. To do this they will need to open the Annotate option to get the draw menu. On a desktop or laptop this is found on the View Options menu next to X is sharing their screen. On a tablet or iphone this may often be a pencil icon somewhere on the screen: You can open multiple whiteboards by clicking the plus in the bottom righthand corner. You can save the whiteboard(s) (as a png picture file or pdf) and email to all participants. Do this before closing the whiteboard as it is immediately cleared. PowerPoints When sharing you can control the PowerPoint just as normal with the mouse or the arrow keys. It is often quicker to take screenshots and display them in a PowerPoint rather than attempting to access multiple websites, handouts etc. during a meeting. If you have a dual screen, then you can set up the slide show in PowerPoint so that your notes are on the second screen (Slide Show> Set up Slide show). For the PowerPoint presentation "Browse by an Individuals" sets the show up in a sizeable window so you can access the rest of your screen. The Annotate tools are available in any screenshare so you can underline things in your PowerPoint or use the spotlight/arrow as a laser pointer. BW Leading Zoom Handbook 2021v2a.doc 26 21/04/2021
Word Processors
Sharing your word processor allows participants to see files. The annotate tools are available so people can
annotate the document. This is effectively a picture overlay, that will need to be saved before ending
screen share. The file itself is unchanged, so you may prefer to have one scribe who screenshares the file
and others make verbal comments.
In a breakout group you may like to get one person in the group to be a scribe on a word document they
share from their computer. You may even send them a pre-prepared document with the questions to
answer already set out.
NB: Unless you share screen/desktop, people will only see the one file open when you start. If you wish
them to see a different file you will need to share that separately. The application screen sharing does not
pick up new documents made after sharing has begun.

Sharing Participants Screens
Not only can you share your own screen, but you can allow participants to share their screens. This can be
useful e.g.
   •    For participants to give presentations with PowerPoint or similar. (Make them a co-host)
   •   For participants (particularly in breakout groups) to take notes of the discussion which can be
       circulated afterwards. The group could appoint a scribe who then shares their word processor.
You can control screenshare using the screenshare arrow on the bottom menu, allowing or disallowing
participants to share through the advanced sharing option. Further Settings for screenshare can be found
in the Video Settings (the up arrow by stop video in the bottom right corner)

BW Leading Zoom Handbook 2021v2a.doc            27                                         21/04/2021
Annotating Shared Screens
It is possible for you and participants to edit a screen that is shared, if this has been turned on for
screensharing in the initial setup of the meeting. This is particularly important for the whiteboard or a
Word Processor document that is recording the discussion.
If you have started a screenshare then the Annotation tools are available from the Zoom menu in
screenshare (if necessary hover over the green "you are screen sharing" to reveal the menu):
If someone else has started the screenshare, then the Annotation tools will be available from view options
on a desktop or laptop. Annotation tools are harder to find on tablets and smart phones. They may appear
as a pencil icon. If all participants can't annotate then it may be that annotation is turned off in the original
settings for the meeting. Making participants co-hosts may help.
The menu of options looks like:
Select: Selects something already drawn. Hosts and co-hosts can select anything participants can only
select their own work.
Text: allows writing (if there is much writing to be done, a word processor is a better option than
writing in a whiteboard)
Draw: has several drawing tools
Stamp: has some pre-set shapes
Arrow/ Spotlight: highlights a particular item on the screen by pointing a named arrow/ red dot at the
item. It disappears when the next person highlights something. This is the equivalent of the laser
pointers used for projections and can be useful in your PowerPoint.
Eraser erases items. Participants can only erase their own contributions. Hosts can erase everything.
Format: changes colours, line width, font etc.
BW Leading Zoom Handbook 2021v2a.doc 28 21/04/2021Advanced Share Screen The options in Advanced Screen Sharing bring your applications more directly into the Zoom environment: PowerPoint as Virtual Background Currently in Beta version so still under development, this brings in a PowerPoint as a virtual background to you. The screen moves to Spotlight/ speaker view with participants along the top. You are in the bottom right corner of the screen as well as at the top. You can drag your picture larger or smaller. Any slide can be chosen from the PowerPoint, and you can move through your PowerPoint, however it is only a picture background, so animations do not appear. Computer Audio/ Video These open your filing system to find video and audio tracks which are then run in Zoom through your computer audio and video programmes. They cannot be used for internet e.g.: You Tube clips but only for material found on your computer. The Computer Audio plays in the background and you can continue your zoom meeting in gallery or speaker view. The Video, however, converts the screen to speaker view. Share sound and optimise video are automatically turned on, unlike Basic Share screen. Portion of Screen and Content of 2nd Camera. These share part of your screen rather than all of it and content of a second camera, which might be a video camera or software that acts as a camera such as OBS. File Share Screen The third button "Files" allows you to share files from your various filing systems. BW Leading Zoom Handbook 2021v2a.doc 29 21/04/2021
Breakout Rooms
Setting up breakouts
Breakout rooms are available in all licences including the free licence, but they are turned off by default.
See the section on Settings.
When creating the meeting in your online account, you can do some preliminary set up by choosing
Breakout Room pre-assign. The panel allows you to add as many rooms as you want and add participants
email addresses (if using Zoom registration - this will not work with names you have not registered with
Zoom). You can change the breakout name by clicking the edit pencil next to the name.

If you have not pre-assigned people, you will need to assign once people start arriving. This takes a little
time and for a large group it is worth having a dedicated person devoted to this. Open the Breakout Rooms
tab in the main session menu (available to hosts and co-hosts). While all hosts and co-hosts can create
meetings, it is the first person to open the rooms that will have control of allocations. To avoid confusion
be clear as to who is creating the groups!

If you wish Zoom can divide people randomly into groups for
you, or you can assign them manually, or let people choose
(ensuring the groups are clearly named).
If you choose manual assignment, then after creating the groups
you will need to click on assign to add names one by one from
the list provided. To speed up the group preparations people can
be assigned as they enter the room at the start, so the breakout
groups are ready to go when needed.

From the Options button there are various
useful settings e.g., to set the length of the
breakouts, a closing countdown timer. There is also the ability to automatically move people into breakout
rooms. This is faster and easier. If unticked participants receive an invitation to join.

BW Leading Zoom Handbook 2021v2a.doc            30                                          21/04/2021
Starting Breakouts
To start the breakouts choose Open All Rooms from the Breakout Tab on the main screen. Depending on
your setting, participants will go directly to their groups or get an
invitation to join. If they decline, they will stay with you in the main
room.

The host and the person starting the breakouts do not get assigned to a group but may join any group at
any time. To do this open the breakout button on the main menu. Click Join next to the breakout room you
wish to join.

Changing Groups while in Breakouts
During the breakouts you can move or exchange people by hovering over their name and choosing Move
to/ Exchange. It is thus possible to combine or split groups while in session. It pays to give people a
warning.

Participants leaving Breakouts
If enabled, participants can choose to leave their breakout group at any
time (through the button on the lower right) in which case they will
return to the Main Meeting. They can then choose to re-join their
group, through the breakout button on their main menu. Otherwise,
participants stay in the room until forced out by the closure of the
breakout rooms.
Should anyone fall out of the meeting altogether, they will come back into the main meeting. They will
have lost their membership of the breakout group and will need to be reassigned. It can be helpful to ask
people to take note of what group they are in, if you do not have a copy.

BW Leading Zoom Handbook 2021v2a.doc           31                                        21/04/2021
You can also read