GPS Watch with Heart Rate Measurement
←
→
Page content transcription
If your browser does not render page correctly, please read the page content below
GPS Watch with Heart Rate Measurement

                  Operating instructions

Edition 04/2013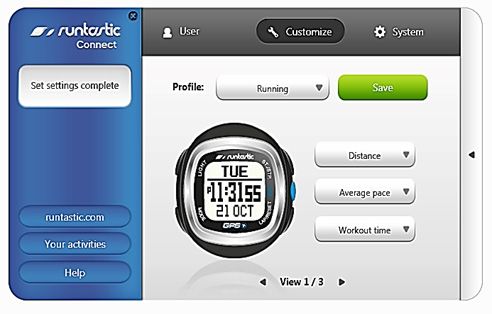
Table of Contents

1 Intro ................................................................................................................   6
2 Plesed Read Safety and Watch Care Notes Before Use ...                                                                   7
  2.1 Safety Instructions ..........................................................................                       7
  2.2 Repair .................................................................................................             8
  2.3 Water Resistance ...........................................................................                         8
  2.4 Shock Resistance ..........................................................................                          9
  2.5 Avoid from Magnetic Fields ....................................................                                      10
  2.6 Operating Temperature Range .............................................                                            10
  2.7 Battery Care ......................................................................................                  10
  2.8 Disposal .............................................................................................               12
  2.9 Maintenance .....................................................................................                    13
  2.10 Cleaning the Watch Exterior ...................................................                                     13
3 How to Use This Manual ....................................................................                              14
  3.1 Getting to know your watch.......................................................                                    14
     3.1.1 What’s in the box .......................................................................                       14
     3.1.2 Watch Buttons ............................................................................                      15
4 Before Using Your GPS Watch / First Steps ............................                                                   16
  4.1 Charge the GPS Watch’s Battery ............................................                                          17
  4.2 Heart Rate Monitor Chest strap ............................................                                          18
   4.3 Acquire GPS Signal Before Starting a Workout ...........                                                            19
5 GPS Watch Modes ...............................................................................                          20
6 Basic Settings .........................................................................................                 21
  6.1 Navigating the Settings Menu ..................................................                                      21
    6.1.1 Menu Structure .............................................................................                     21
  6.2 General Settings .............................................................................                       24
   6.2.1 Watch Buttons ............................................................................................        24
  6.3 System Settings .............................................................................                        25
  6.4 Check Memory Usage ................................................................                                  27
7 Time mode- Watch/Timer/Alarm/Battery ....................................                                                28
  7.1 Time and date ...................................................................................                    28

                                                                  2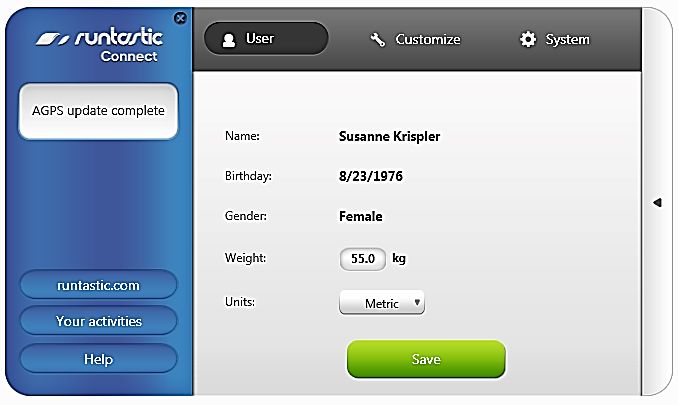
7.2 Battery Level display .................................................................... 30
   7.3 Setting a Count-down Timer ..................................................... 31
   7.4 Alarm ..................................................................................................... 32
   7.5 Dual Time – Display two time zones .................................... 33
8 GPS-Workoute mode ........................................................................... 34
   8.1 Heart Rate Monitoring .................................................................. 35
     8.1.1 Heart Rate Training Zones ..................................................... 35
     8.1.2 Sports Profiles and training data ....................................... 39
     8.1.3 Using GPS during workout sessions ................................ 42
     8.1.4 GPS Status Display .................................................................... 43
     8.1.5 A-GPS ............................................................................................... 46
     8.1.6 Laps .................................................................................................. 46
   8.2 After training-RECALLING Workout ...................................... 48
   8.3 GPS-Navigation-mode ................................................................. 49
   8.4 Waypoints-Creating a Path on the Watch:
   Finding your Way..................................................................................... 50
   8.5 Navigation-display ......................................................................... 53
     8.5.1 Navigation Mode ........................................................................ 54
   8.6 Starting the GPS Navigation ..................................................... 55
   8.7 Navigating to a waypoint: Go-to-display.. .......................... 57
   8.8 Compass-mode............................................................................... 57
     8.8.1 Compass calibration ................................................................ 59
     8.8.2 Adjust for Declination for better compass accuracy
............................................................................................................................. 59
9 To Save Battery Life ............................................................................ 61
10 Lighting the display ........................................................................... 61
11 Charging the battery, replacement of batteries .................. 62
   11.1 Charging the battery of the GPS watch.............................. 62
   11.2 Replacement of the battery of chest strap ..................... 64
12 Connecting to a Computer to Upload Training data and
change watch settings ............................................................................ 64
   12.1 Download the Runtastic Connect installation files ...... 64
     12.1.1 How to Install Runtastic Connect ...................................... 65

                                                               3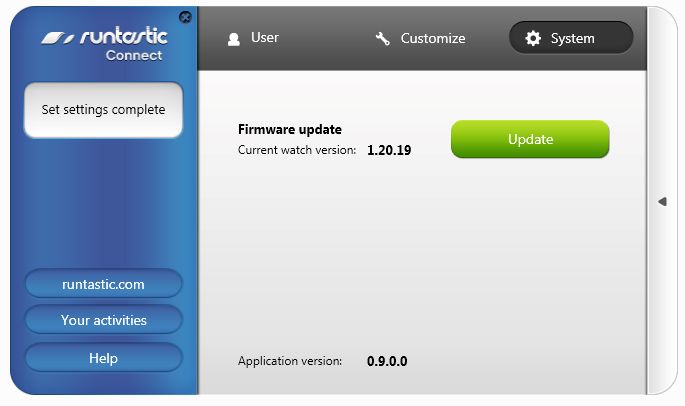
12.2 Using Runtastic Connect ..........................................................                        65
13 Technical Data......................................................................................          68
14 Declaration of compliance .............................................................                       69
15 FAQ/Correction of errors .................................................................                    71
16 Warranty...................................................................................................   74

                                                            4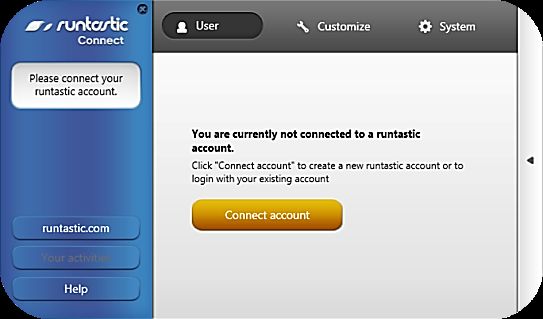
5
1 Intro
The GPS Watch with Heart Rate Monitor works together with the
heart rate chest strap to measure and record your heart rate. It has
built-in GPS to track your route and speed during workouts. The
watch is also equipped with a compass and can mark points along
your route (“waypoints”) to help you find your way back to the
beginning of your path or let you know how long it will take to reach
a particular point on the path.
The The GPS-watch, RUNGPS1 is equipped with a navigation system
that can determine user's location by connecting to a GPS satellite
network.
The included GPS uses the American GPS satellite network. It
can measure distance, speed, altitude gain/loss, and can
determine GPS location. It is designed for sports types like
jogging, cycling, camping, sailing, skiing etc.
The GPS-watch is not fit for an exigent use in sky diving,
gliding.
The RUNGPS1 is designed for private purposes and it is not
made for commercial use.
The GPS-watch can also be used to display heart rate for the
purpose of training and is not intended for use as a medical
device.
Any use other than the ones described in the operating instructions
is not allowed, and may lead to deterioration, or injuries. No
responsibility is taken for the damages that result from the
improper use of the GPS watch. Further instructions and
clarifications can be found here in the operating instructions.
All the indicated data are only nominal data. The right to technical
modifications is preserved.
6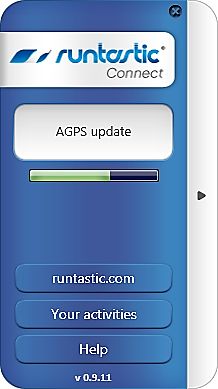
2 Please Read Safety and Watch Care
Notes Before Use
2.1 Safety Instructions
Please read this chapter carefully and follow all the specified
indications. This way you ensure the adequate functioning and a
long period of operation for your GPS-watch.
Keep the wrapping and operating instructions well, so that, in case
of alienation, you can hand them on to the new owner.
For safety reasons, do not operate the GPS-watch while driving
a car. Stop or let a co-passenger carry on the settings. It is
dangerous not to watch the street and it may lead to an
accident, in which you or someone else could get hurt.
Do not open the case of the GPS-watch or the chest strap; it
does not include parts that must be maintained (excepting the
opening of the strap part with the battery, for replacing the
battery, see point 9.2 “Replacement of the battery of chest
strap”).
Do not place any object on the GPS-watch and do not put any
pressure on the display or the display may break.
Do not touch the screen with sharp objects, in order to avoid
damaging.
The use of this product depends on satellites, as many of the
GPS products, satellites that are operated by the American
government. If modifications at the level of the satellite network
take place, this may influence the execution and accuracy of
this GPS-watch.
Risks for children and individuals requiring assistance
7 This device is not intended for use by individuals (including
children) with limited physical, sensorial or emotional
capacities or limited experience and / or knowledge unless
they are supervised by an individual responsible for their
safety or receive instructions from the latter as to how the
device should be used. Children should be supervised in order
to ensure that they do not play with the device.
Important: Always consult your doctor, before starting a regular
training program. The RUNGPS1 watch is not a medical device; it is
a helping training gadget for the measurement and display of your
cardiac frequency.
Wearers of cardiac pacemakers may use devices for cardiac
frequency measurement only after consulting with their doctor.
Note: The chest strap may contain latex elements. Individuals with
allergies or sensitivity to latex may experience skin irritations and
redness. While this is rare, stop using the chest strap if any redness
appears, and contact a skin specialist (dermatologist).
2.2 Repair
Do not attempt to repair the watch or strap. If technical problems
occur, see the enclosed warranty information and contact our
service center.
2.3 Water Resistance
The RUNGPS1 watch has 3-bar water resistance. The table below
shows which activities and conditions the watch can withstand. Data
are based on a verification of aquatic impermeability according to
DIN 8310.
8Rain, Nautical
Car wash Shower Bath, pool
Splash sports
Yes, do not
flood the
Yes, No No No
watch in
water
Dry the watch thoroughly before touching any button as water can
enter the case through the buttons, damaging the watch. Always
use a wet rag to remove residue if the watch is splashed with salt
water or mineral water from hot springs. Residue on the watch can
lead to corrosion of the metallic elements.
Water resistance cannot be guaranteed when moving from one
temperature extreme to another(e.g., from sauna to the swimming-
pool, or from the beach to cold sea). The temperature difference
may cause condensation water to form inside the watch and
damage the electronics and mechanism.
The chest strap is water resistant against water splatter.
The following applies:
Rain, Nautical
Car wash Shower Bath, pool
Splatter sports
Yes, No No No No
2.4 Shock-resistance
The GPS-watch can withstand athletic shaking and vibration as well
as bumps that may occur during normal wrist wear.
92.5 Avoid from Magnetic Fields
Do not wear the watch near powerful magnetic fields (e.g.
transformers) as they can alter the watch’s ability to accurately
track time and location and lead to deterioration of the watch.
2.6 Operating Temperature Range
The GPS-watch can be operated in a temperature range from 32 °F
to 122 ° F, and stored at 14 °F up to 140 °C. Avoid high temperatures
(e.g. in stopped vehicles or under direct sun influence) and
sustained humidity.
NOTE:
Display problems at 14° F up to 32° C are usually due to the cold
temperature and are not a malfunction of the GPS-watch. The
electro-chemical processes of the batteries and watch accumulator
are strongly influenced by environmental temperature. The lower
the temperature, the more powerfully the processes are influenced
during discharge. That is why you should note that at temperatures
below freezing, the battery may "freeze" which could lead to
reduced battery life.
2.7 Battery Care
Your GPS-watch operates on a permanent lithium-polymer battery.
The chest strap operates on a lithium battery 3V CR2032.
Do not remove the GPS watch battery.
Do not expose the GPS watch to direct heat sources, or high
temperature environments, e.g. direct exposure to sunlight in a
vehicle.
Do not perforate or burn the GPS-watch.
10 Charge the battery of the GPS watch only with a USB cable
delivered together with it. If the battery is charged otherwise,
this can lead to overheating, explosion or fire.
Do not charge the battery of the GPS watch near heat sources
or in a car, under direct sunlight. Powerful temperature leads to
the destruction of the battery and may lead to overheating,
explosion or fire.
The inobservance of these indications may lead to the shortage of
the service life of the inserted battery or to the damaging of the
GPS watch.
Further you will find some indications regarding the manipulation of
batteries:
Only replace a battery in the chest strap with a CR2032 or
similar type of battery.
Batteries must not be charged or re-activated by other means;
do not attempt to open or disassemble battery. Do not throw in
fire or attempt to short-circuit battery.
Keep batteries out of reach of children. Keep the batteries and
chest strap out of reach of small children. If a battery is
swallowed, seek immediate medical attention.
Never expose batteries to high heat such as direct sun, fire or
other heat source. There is a danger of leakage. The
inobservance of these indications may lead to the deterioration
and, under certain circumstances, to the explosion of the
battery.
Immediately take out dead battery from the chest strap to
avoid leakage. Avoid contact of battery acid with skin, eyes
and mucosa. In case of accidental Wash immediately the parts
affected by the acid of the battery with a lot of water and
require immediately medical help. If need be, clean the
11contacts of the battery and the contacts from the device. Keep
operating instructions for consulting the information on
batteries.
Ignoring these instructions can lead to the deterioration of the
battery and in extreme cases can cause the battery to
explode.
Information regarding the replacement of the battery of chest strap
can also be found at point 9.2 "Replacement of the battery of chest
strap.”
2.8 Disposal
Please discard batteries appropriately. Batteries are
special waste. For the correct disposal of the batteries,
there are special containers in the shops where batteries
are sold, and in other hazardous waste disposal
receptacles. If you want to throw the GPS watch and its
accessories away, eliminate them in conformity with
current dispositions.
Information will be received in communal places.
KRIPPL-WATCHES
Warenhandels GmbH
Maria-Theresia-Straße 41
4600 Wels, Austria
Eliminate the wrapping of the GPS watch in conformity with
current dispositions. Information will be received in communal
places.
122.9 Maintenance
The GPS watch and chest strap do not require maintenance.
However, we recommend cleaning the sensor surfaces of the chest
strap after each use.
2.10 Cleaning the Watch Exterior
If problems occur when charging the GPS watch, check the
contact pins on the back of the watch. If they have become
soiled with sweat deposits and skin scales, clean them with a
sharp metallic object (e.g. tweezers) or a cotton swab
moistened with rubbing alcohol
Clean the GPS watch and chest strap only with a soft, moist
towel without naps.
Do not use diluents, corrosive cleaning agent or gas.
Be careful not to leave water drops on the display of the GPS
watch. Water may cause permanent stains.
Do not expose the display to direct sunlight for extended
periods of time. Also avoid direct ultraviolet beams.
133 How to Use This Manual
The manual has been organized by first steps, then by features and
modes. For further questions or support, email
service@runtastic.com.
3.1 Getting to know your watch
3.1.1 What’s in the box
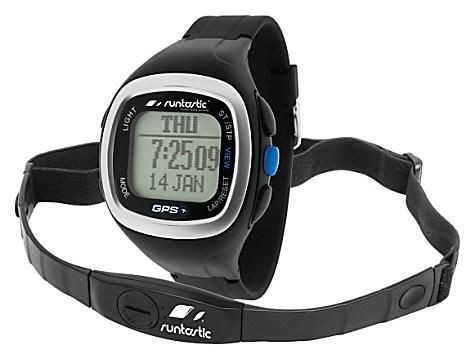
1 GPS watch (Art.-Nr. RUNGPS1, Type: D02I280)
including integrated lithium-polymer battery
1 chest strap
(formed by sensors and elastic strap )
(Art.-Nr. RUNGPS1, Type: T00018D)
incl. lithium battery (3V, CR2032)
1313
Sensor:
Elastic strap:
1 USB cable
1 bike support
incl. 2 cable clamps and 1 installing plate
1 Quick Start User Manual
143.1.2 Watch Buttons
"St./Stp."
Starts/Stops Workout
Navigates UP in menus
"LIGHT" button
illuminates display
"View"
Toggles through views in
watch mode, workout mode,
and navigation mode.Long
press turns on Heart Rate
"MODE"-button— monitor or GPS.Selects item in
Switches watch modes, Long Menu/Settings
press opens Menu/Settings,
While in Menu, press to
return to previous menu
"Lap/Reset"
Press to manually mark a lap in
workout or navigation mode.
Navigates DOWN in Menu/Settings.
GPS antenna: For the best
GPS reception, the GPS
antenna should be directed
towards the sky
Contact points for USB
charger. Fit the curved
edge of the charger over
the curve marking on the
watch
154 Before Using Your GPS Watch /First
Steps
Remove and dispose of the protective plastic on the watch screen.
Caution! This protection film for the watch screen poses an
asphyxiation danger and must be kept out of reach of babies and
young children!
The watch is delivered in off-line mode. To start the GPS watch,
PRESS and HOLD the “LAP/RESET”-button for 5 seconds, or until the
time and date is displayed. The first mode displayed is the Time
Mode.
The GPS watch can be worn as a watch or can be attached to the
handlebars of your bike using the included bike mount.
To attach the bike mount to your handlebars:
Clip the bike mount around the handlebars of your bike.
If the support is too weak you can use plastic cable ties for a
more secure mount.
Attach the watch on the bike mount.
164.1 Getting to know your watch
The GPS watch is equipped with a rechargeable lithium-polymer
battery. Before the first use, charge the watch for 3 hours or until
the battery is full.
To charge the watch, attach the clamp-on USB charger to the
watch. Be sure that the pins on the charger fit into the contacts on
the back of the watch. Plug the USB into a USB wall adapter or your
computer.
To avoid corrosion, we recommend you to dry the contact points of
the GPS watch well before starting a charging process.
.
When the USB charger/connection cable is securely attached to the
watch this symbol will appear on the watch display.
If the cable is connected, but the symbol does not appear, press
the View button. If it still doesn’t display, check that the clamp is
17correctly positioned and making contact. If the contacts become
clogged with dirt or sweat, gently clean them with a cotton swab
and dab of alcohol. When the charge is complete, a message will
appear "Battery Full!"
A full battery charge will yield up to 16 hours of watch time in GPS
mode.
4.2 Heart Rate Monitor Chest strap
Battery
Sensor front
Sensor back Contact surface for
sensor
How to Put on the Heart Rate Monitor Chest Strap
To ensure good contact and transmission of heart rate, moisten the
sensors on the inside of the heart rate strap using a drop of water
or ECG gel.
Slip the plastic oval connector into the hole in the sensor, coming
up from the inside, and press to lay flat.
18Position the sensor under your pectoral (chest) muscles, adjusting
the strap for a snug but not tight fit. Be sure the battery
compartment is to your right when attaching the strap and the
words are not upside down.
.
In order to make an optimum transfer of the cardiac frequency
possible, wear the belt with the battery compartment on the right
side (from the wearer’s point of view).
The battery is already inserted in the chest strap, and is ready for
use.
4.3 Acquire GPS Signal Before Starting a Workout
The GPS watch is equipped with a global positioning system (GPS)
that measures distance, speed, elevation and navigation by means
of the USA satellite network. The USA operates this satellite system
and is responsible for its maintenance and accuracy.
Prior to starting a GPS Workout or GPS Navigation, it is best to
acquire the signal to be sure that the GPS data and speed tracking
is accurate. The first time the GPS is started, or when using the
watch at a distance (e.g., over 175 miles) from its last GPS position,
19requires a cold start. A cold start is one that may take a minute or
longer to connect to the full GPS signal.
On the other hand, a warm start that acquires the signal near the
last GPS position, may only take 10 seconds to acquire the full GPS
signal. In either case, when possible, it is recommended to start the
GPS out in an open area with an unobstructed view of a clear sky.
See SECTION 4.3 for instructions on how to start GPS
5 GPS Watch Modes
The watch has four function modes. Press the MODE button to
switch between modes.
Watch/Timer/Alarm- Displays date and time. Press View
button to display remaining battery life, timer, alarm clock, and
dual time that adds a second time zone.
GPS-Workout/Heart Rate - Use for workouts to see heart rate,
distance, speed, and more. Three customizable views
available in workout mode.
GPS-Navigation/Path/Waypoint – Use to follow previously
recorded paths, or to create a new path. Choose points
(waypoints) along the path then navigate back to them or back
to where you started. Follow the points on previously recorded
paths to follow the same route. This mode is helpful when
hiking.
Compass - Use when you need to know your bearings and
direction.
206 Basic Settings
Preparing your watch for use.
6.1 Navigating the Settings Menu
To enter the Settings Menu, PRESS and HOLD the Mode button
(bottom left) until the settings menu is displayed.
Press the bottom right (Lap/Reset) button to scroll down to the
menu item you want.
Press the center right (View) button to select an item and display
its sub-menu or to confirm (OK) a setting.
Press the bottom left (Mode) button to return to the previous
menu and again to exit settings return to watch mode.
6.1.1 Menu Structure
Menu structure
• Workout (Point 6.3)
o Profiles
Select Selection of training profile
Customize Selection of training data for the
display 1-3 of each training profile
Reset Setting of training data basis
o History Call of training history
21o Smart Lap
By Dist Automatic taking-up of lap times
„Lap-By-Distance“
LapWP Automatic generation of reference
points From laps „Lap-To-Waypoint“
Alert Alarm activation for „Lap-By-
Distance“
o View Scan Automatic switching among the 3
displays
o Track Log Setting of the interval for
measurements
o Delete
Del Last Deletion of data from last training
Del All Deletion of data from all trainings so
far
• Navigation (Point 6.4)
o Sel Path Path selection
o Del Path Path deletion
o Nav Mode Selection of navigation type
o WP Radius Adjustment of path-beam point
• GPS (Points 6.3 and 6.4)
o On/Off Activation/deactivation of GPS
reception
o Timeout Setting of GPS Timeout
o A-GPS A-GPS Expiry (Maturity date)
• HRM (Point 6.3)
o On/Off Activation of cardiac frequency
measurement
o Zone HR
Select Selection of training area
22 Customize Modification of upper and lower
limits
Alert Alarm activation for training area
Reset Reset of upper and lower limits to
default settings
o Max.HR Setting of maximum cardiac
frequency
o Pairing Junction of the chest belt with the GPS
watch
• Settings
o Timer (Point 6.2) Timer adjustment
o Alarm (Point 6.2) Alarm adjustment
o Time Date (Point 6.2)
Home Time
GPS Upd Setting of GPS updating time
Time Zone Time zone adjustment
Manual Manual adjustment of time
Dual Time Dual time adjustment
Format Adjustment of 12/24 hour format
o User (Point 6.1.1)
Gender Selection of gender
Birth Date Date of birth setting
Weight Weight setting
o System (Point 6.1.2 – excepting Compass point 6.5)
Sound
Key Tones Activation/deactivation of key tone
Chimes Activation/deactivation of fixed time
alarm
Contrast LCD contrast adjustment
Units
23 Dst/Spd Adjustment speed and distance unit
of measure
Position Adjustment of unit of measure for
altitude and longitude degree
Weight Adjustment of weight unit of body
weight
Compass (Point 6.5)
Declinate Entry of declinations
Calibrate Compass calibration
Language Language adjustment
Sys Reset Operation of system reset
• Memory (Point 6.1.3) Call of memory status.
6.2 General Settings
6.2.1 User Settings
For accurate calorie count, maximum heart rate, and heart rate
zones, be sure to make adjustments to the user settings before
working out. To enter User Settings:
PRESS and HOLD the Mode button to bring up the watch menu.
Press the LAP/Reset button to scroll down to SETTINGS
Press the VIEW button to select SETTINGS.
• Navigate to the various settings in the same way.
Selection of gender
Select SETTINGS from the menu USER GENDER
Then select "Male" or "Female.”
Date of birth
Select SETTINGS from the menu USER BIRTH DATE
Adjust the year, month and day using the ST/STOP button to
choose a higher number and the LAP/RESET button to go to a
24lower number. Press the view button to accept the adjustment
and move to the next setting. Press the Mode button when you
have completed the birth date is set correctly.
Weight
Select SETTINGS the menu USER WEIGHT
Then adjust weight
6.3 System settings
Once you make the desired adjustments to a setting, press the
Mode button to accept the changes and return to the previous
menu.
Turn on/off button sounds
Turning on the button sounds (Key Tones) lets you know that you
have pressed a button. There may be times when you want to
silence your watch and turn off the key tones.
Select SETTINGS from the menu SYSTEM SOUND KEY
TONES.
Select "On" and press Mode button to accept the change and
return to the previous menu.
Activation/deactivation of fixed time alarm
Select SETTINGS from the menu SYSTEM SOUND
CHIME
Select "On" to activate the fixed time alarm or "Off" to
deactivate it, then press the Mode button to accept the
change and return to the previous menu.
LCD contrast adjustment
If you have trouble seeing the watch display outdoors, change to a
darker contrast.
Select SETTINGS from the menu USER CONTRAST
Then set the desired LCD contrast from 3 (light) up to 16 (dark).
25Adjusting the unit of measure (KM or Miles) for speed and
distance
The watch can be set to measure speed and distance both on land
and on water.
Select SETTINGS from the menu SYSTEM UNITS
DST/SPD
Select METRIC for Kilometers - km/h, IMPERIAL for miles-mph,
or NAUTICAL for miles/ knots.
Adjustment of the unit of measure for longitude and latitude
degree
Select SETTINGS from the menu SYSTEM UNITS
POSITION
Then select 0’00’00.00 N to display GPS location in Degrees-
Minutes-Seconds or
0.000000 N to display GPS location in decimal degrees.
Adjustment of the unit of measure for body weight – kgs or lbs
Select SETTINGS from the menu SYSTEM UNITS
WEIGHT
Then select kg for kilograms or lb for pounds.
Language adjustment
Select SETTINGS from the menu SYSTEM LANGUAGE
Select the desired language (English, French, Spanish,
German, and Italian).
System reset
Select SETTINGS from the menu SYSTEM SYS RESET
Select "On" to perform a system reset. Performing a system
reset will return the watch to its default settings and ALL DATA
(paths, reference points, training histories, etc.) WILL BE
DELETED.
26 Select "Off" in order not to reset the system and press the
Mode button to return to the previous menu without resetting
the watch.
6.4 Check Memory Usage
The watch has a limited memory and does not delete data
automatically. You may want to track the memory usage to avoid
losing any of your workout stats.
To view how much memory has been used go MEMORY in the
menu.
The following display appears:
Memory usage level
The memory use level of the GPS watch will be indicated as a
percentage %. 1% of the memory corresponds to approximately 480
in memorized reference points for the GPS watch.
TIP:
Only a certain number of workouts can be stored on the watch. If
you want to save all of your workouts to track your progress over
time, you need to connect to Runtastic.com and upload your
workouts. To automatically delete workouts from the watch, check
the "delete workouts after upload" button in the Runtastic Connect
software. When the memory is nearing capacity, a notification
“Memory full!” will appear on the watch display.
277 Time mode- Watch/Timer/Alarm/Battery
Press the MODE button until the time mode is displayed.
The main time mode is the watch with time and date. That appears
as follows:
Day of the week
Time
Date Month
Cycle through the following time modes displays by pressing the
VIEW button:
Time and date
Battery level
Timer
Alarm
Dual Time
7.1 Time and date
In Time-mode press the VIEW button until the following display
appears on the display:
Day of the week
Time
Date Month
28SETTING THE TIME AND DATE
The time and date can be set in the Menu by going to SETTINGS >
TIME > HOME TIME and choosing how you want to set the time:
GPS update
Time Zone
Manual setting
Using GPS Update to set time:
GPS Update is turned “ON” as a default setting and will
automatically set the time when a GPS signal is acquired.
Select SETTINGS from the menu TIME DATE HOME TIME
GPS Upd
To turn off the GPS Update feature select “Off.”
NOTE: The GPS signal transmits Greenwich Mean Time (GMT);
therefore, it may be necessary to set a different time zone
Time zone adjustment
Select SETTINGS from the menu TIME DATE HOME DATE
TIME ZONE
To set the time by Then you will be able to set a time zone of -
12:00 up to +12:00 time zone difference based on GMT. Choose
to have the time zone chosen automatically by using the
option "By Longitude" that appears after “+12:00.” When
selecting "By longitude", the GPS watch will try to calculate the
time zone based on the established longitudinal degree. If this
does not work properly, set the time one in hours (e.g.: + 1:00).
Choosing 12 or 24-hour format
Select SETTINGS from the menu TIME DATE FORMAT
Select between the 12 or 24 hours (military time) formats.
29Manual time adjustment
If no GPS reception is possible, time format can also be manually
adjusted:
Select SETTINGS from the menu TIME DATE HOME DATE
MANUAL
Then adjust the seconds, minutes, hours, year, month and day.
Use the ST/Stop and Lap/RESET buttons to change the time up
or down. Press the VIEW button to switch between hour,
minutes, seconds and date. Press MODE button when you
have finished setting the time.
7.2 Battery level display
In Time-mode press the „VIEW“-button until the following
display appears on the display:
Remaining hours
The estimation for the remaining hours for the use of GPS function
will be displayed. When the battery is almost empty, the symbol
will appear, and the GPS functioning and cardiac frequency
measurement will be deactivated. To charge the battery, see point
9.1 "Charging the battery of the GPS watch".
307.3 Setting a Count-down Timer
In Time-mode press the VIEW button until the following display
appears :
Timer
Current time
Set Timer
Select SETTINGS from the menu TIMER
Use the ST/STP or Lap/RESET button to adjust the hours,
minutes and seconds for the timer. Press the VIEW button to
move between hours, minutes and seconds.
Press the MODE button to accept changes and return to the
previous menu.
To Use the Timer
Press the VIEW button until the Timer display appears.
Press the ST/STP button to start the timer. Press the ST/STP
button again to stop or pause the timer.
After stopping the timer, you can continue the countdown by
pressing the ST/STP button again.
There will be a beep counting down the final 10 seconds, and
an alarm will sound when the timer reaches “00:00.”
Press any watch button to stop the alarm.
To return to the full timer countdown, press the "LAP/RESET"
button, to reset the timer.
317.4 Alarm
You can set up to 5 different alarms to go off at a particular time.
Alarms can be set to repeat daily or on chosen days. To view the
time of each set alarm, go to Time-mode and press the VIEW button
until the following display appears:
Alarm 1-5
Alarm time
Alarm
ON
Days OFF
repeated
Press the ST/STP button, to view alarm 1-5.
Press the LAP/RESET button to set the alarm "ON" (enabled) or
turn it "OFF" (disabled).
Setting of alarm time and days repeated:
Select SETTINGS from the menu ALARMS
Use the ST/STP or Lap/RESET buttons to choose Alarm 1-5.
Use the VIEW button to move between adjustments (hour and
minutes).
Next, ON and OFF will blink. Choose “ON” to turn on the alarm
"ON" (activated) or "OFF" (deactivated).
Now choose when you would like the alarm to repeat. The
default is Daily.
32Daily Daily
Sun Sunday
Mon Monday
Tue Tuesday
Wed Wednesday
Thu Thursday
Fri Friday
Sat Saturday
Mon-Fri Monday-Friday
Press the MODE button to accept settings and return to the
previous menu.
Stopping the Alarm
When the alarm rings, stop it by pressing any key.
7.5 Dual Time – Display two time zones
Keep track of a different time zone by setting the Dual Time (e.g.,
always know what time it is in Paris when you are in New York). In
Time-mode, press the VIEW button until the following display
appears:
Dual
time
Current
time
Setting the Dual time:
Select SETTINGS from the menu TIME DATE DUAL TIME
33 Set the desired time difference from the current time (+12
hours to –12 hours in 30-minute increments).
Press the MODE button to accept settings and return to the
previous menu.
8 GPS-Workout mode
The GPS-Workout mode will display and record your stats once a
current exercise session has been started. Stats can be saved and
later uploaded to the Runtastic website using Runtastic Connect.
There are 3 customizable displays (see section ###) to view heart
rate, calories burned, time, pace, speed, distance, altitude, and laps.
This is an example of a GPS Workout Mode display:
Training data row 1
Training data row 2
Training data row 3
How to Start/stop workout monitoring and recording
Press the „ST./STP." button in GPS-Workout-mode in order to start or
stop the training.
This way, the search for GPS signal and cardiac frequency
measurement will be activated automatically (if this has not already
been performed manually).
YOU MUST SAVE YOUR TRAINING SESSIONS AFTER YOU HAVE
FINISHED YOUR WORKOUT. A quick press of the ST/STOP button
will pause the workout but will not stop the workout and save it.
34Setting of training data to zero
If training stops, hold down the "LAP/RESET" button, until "Hold to
Save" appears; all training data are set to 0 and you can start a new
training. Still, the data of this training will be kept in the memory of
the watch and will be able to be viewed later.
8.1 Heart Rate Monitoring
The watch starts displaying current workout statistics when a
workout session is started.
Be sure you are wearing the heart rate monitor chest strap.
To quickstart a workout, be sure the watch is displaying the GPS-
Workout Mode. Press the ST/STP button and your current heart rate
will be displayed.
Or
To display your heart rate without recording a workout:
Wear the strap according to the description from point 4.2 "Chest
strap."
Select SETTINGS from the menu HRM ON/OFF
Press the VIEW button to toggle On to turn on heart rate
monitor reception, and off to stop the reception.
Note that turning on the heart rate reception will not start a workout
session (see previous steps to quickstart a workout).
8.1.1 Heart Rate Training Zones
Heart rate measurements fall into zones based on a percentage of
your maximum heart rate. Zones can be set up to optimize different
35goals. The GPS watch has 3 training zone options (Health, Fat Burn,
Aerobics), or you can customize the zones (User).
The GPS watch automatically calculates your maximum heart rate
based on your age and gender (this is why it you must set up this
information in user settings see section ##). Heart rate zones are
also set automatically based on your maximum heart rate.
Each zone has an upper and lower limit based on the percentage
of your maximum heart rate:
% of the maximum
cardiac frequency
Above training zone
Upper limit
Within the training zone
Lower limit
Below training zone
Choosing a Training Zone
Select SETTINGS from the menu HRM HR ZONE
SELECT
Select Health, Fat Burn, or Aerobics to use the preset heart
rate zones for the respective goal.
How to Customize/Modify Training Zones
You can customize a training zone by modifying the upper and/or
lower limits of the zone.
36 Select SETTINGS from the menu HRM HR ZONE
CUSTOMIZE
Select the training zone you want to modify—Health, Fat Burn,
Aerobics, or User.
As you change the heart rate beats per minute (bpm) using the
ST/STP or Lap/RESET buttons, the percentage of your
maximum heart rate (indicated next to the heart rate bpm) will
also change.
Press the MODE button to accept the changes and return to
the previous menu.
To Reset Training Zone to Default Settings
To return the upper and lower limits of a heart rate zone to the
default setting:
Select SETTINGS from the menu HRM HR ZONE RESET
To Manually Set Your Maximum Heart Rate
As you become fit, your individual heart rate bpm maximum may
differ from the default maximum heart rate for your age and gender
that was automatically set. When your maximum heart rate is
changed, all of the upper and lower limits of the heart rate training
zones will also change based on the percentage of your maximum
heart rate.
If you have done a fitness test to determine your maximum
heart rate and want to manually change the maximum heart rate
setting:
Select SETTINGS from the menu HRM HR ZONE MAX
HR
Use the ST/STP or Lap/RESET buttons to change the maximum
heart rate bpm.
37 Press the MODE button to accept the changes and return to
the previous menu.
Activate/Deactivate Training Zone Alarms
When you aren't looking at your watch, you can be alerted when
you are above or below your set heart rate zone.
To hear an audible alert when your heart rate is outside the training
zone:
Select SETTINGS from the menu HRM HR ZONE ALERT
Use the ST/STP or Lap/RESET buttons to choose "On"
(activated) or "Off" (deactivated)
Press the MODE button to accept the changes and return to
the previous menu.
Note: The alarm for the training zone only works in training mode.
Pairing a chest strap with the GPS watch
Each chest strap has its own ID and was paired at the factory with
the GPS watch. If you replace the GPS watch or the chest strap,
they must be paired again.
Select SETTINGS from the menu HRM PAIRING
Touch the watch to the contact surface of the sensors and
hold it there for a few seconds.
"Pairing Chest Strap" will be displayed on the watch.
If pairing was successfully performed, the notification "DONE!"
appears on the watch.
If the notification "FAIL" appears, then the pairing did not work.
Try again, repeating the steps above
After pairing, switch “HRM” back to “On” see section ###
388.1.2 Sports Profiles and training data
Choose a sports profile to show stats that pertain to a particular
sport or the workout views can be customized to display the
workout stats—heart rate, heart rate zones, distance, altitude, etc.--
that you want to see on each screen. Each profile has 3 displays
with 3 rows of stats.
The GPS watch has 5 different training profiles:
Running, Cycling, Hiking, Sailing and User
The names of these profiles can be modified by connecting the
watch to your computer and using the Runtastic Connect software
(see section ###)
To Choose a Sports Profile
Select SETTINGS from the menu WORKOUT PROFILES
SELECT
Use the ST/STP or Lap/RESET buttons to choose a profile.
"Done!" will be displayed to indicate that the watch has
registered your selection.
Press the MODE button to exit and return to the previous
menu.
The default settings for the Running Profile Views are:
Display 1: Distance, average pace (time per mile), training time
Display 2: Number of laps, current cardiac frequency, lap time
Display 3: Height, time, calories
Switching between the 3 displays:
In GPS-Workout-mode press the VIEW button to display the next
view screen.
Automatically switch among the 3 displays during a workout:
39When the “Scanning” function is activated, the GPS watch
automatically switches between the 3 displays. To turn on automatic
switching between views:
Select SETTINGS from the menu WORKOUT VIEWSCAN
ON
Customize the Displayed Training Data
Training data can be displayed on any row or screen in the workout.
Choose the stats that you want to easily view based on your
priorities. For example, you can view current heart rate, heart rate
zone, and workout time on one screen, then distance, pace and
speed on another.
The screens can be customized in the watch settings or by
connecting the watch to your computer and making changes in the
Runtastic Connect software. Using the Runtastic Connect software
is the faster and easier method (see section ### for instructions)
Customizing Training Displays in the Watch Settings
Select SETTINGS from the menu WORKOUT PROFILES
CUSTOMIZE
Select a profile that you wish to customize and press the VIEW
button.
"View 1" is displayed with the current training stat choice for
each row.
Use the ST/STP or Lap/RESET buttons to toggle through the list
of stats that can be displayed in that row (see below).
Press the VIEW button when you reach the stat you want for
that row.
The next row will blink. Repeat the steps to toggle through the
list and choose the stat for the second and third rows.
40 To keep the current setting, press the VIEW button.
Pressing the VIEW button again will display "View 2" and "View
3" Repeat the steps to customize each view.
Press the MODE button when you are done to accept the
changes and return to the previous menu.
A list of available stats and an illustration of how it appears on the
watch display is as follows:
Possible training data rows 1 and 3
Altitude Altitude
Calories Calories
Distance Distance
Heading Heading (degree indication)
HR-Avg Average heart rate % of max HR
HR-Max Maximum heart rate % of max HR
HR-Min Minimum heart rate % of max HR
HR Current heart rate % of max HR
HRZ-Abv Time above training area
HRZ-Blw Time below training area
HRZ-In Time in training area
LapDist Lap distance
LapNo Number of laps
LapTime Time of laps
Pace Avg Medium Pace (time/km)
Pace Max Maximum Pace (the fastest time/km)
Pace Current Pace (time/km)
Speed Avg Average speed
Speed Max Maximum speed
Speed Current speed
TimeOfDay Time
Wkout Time Training time
41Possible training data row 2
Distance Distance
HR Current cardiac frequency
LapDist Lap distance
LatLong Longitudinal and latitude degree
PaceAvg Average pace (time/ mile)
SpeedAvg Average speed
Speed Current speed
TimeOfDay Time
Wkout Time Training time
Reset the Training Views to defaults
In the setting mode select „Workout“ point from the menu
„Profiles“ „Reset“.
8.1.3 Using GPS during workout sessions
Turning on GPS Tracking
See Section ### for information about "warm starts" and "cold
starts."
Acquiring GPS signal:
It is best to acquire the signal prior to starting a workout or GPS
Navigation session.
While standing in one place:
Option 1:
1. Change to GPS Workout or GPS Navigation mode.
422. Press and hold down the „VIEW“-button from GPS-
Workout-mode.
3. The GPS icon will blink indicating that it is searching for
satellites.
When the GPS signal is acquired (fixed), the icon will change as
follows:
Search for GPS
signal acquired
Satellites
Option 2:
1. Press and hold the MODE button to enter the watch menu.
2. Select GPS from the menu ON/OFF
3. Press the VIEW button and the message "GPS On!" will be
displayed.
8.1.4 GPS Status Display:
Antenna symbol flashes - GPS signal not acquired.
If "GPS fixed!" is displayed, the watch has found 2-
Dimensional positioning but is missing Altitude data.
43This symbol indicates that the GPS has acquired full 3-D
positioning, including Altitude data.
Accurate and uninterrupted reception of the satellite signal can only
be guaranteed under calm weather conditions (clear sky) and an
adequate reception area – open area with clear view to the sky.
Satellite signals react sensitively to external influences. GPS
reception may be weak or unavailable in bad weather (e.g. heavy
snowfall), as well as when clothes or other objects cover the GPS
watch, when you are surrounded by high buildings, or in narrow
valleys. This will impede the GPS watch's ability to obtain a stead
signal thereby significantly affecting its efficiency and accuracy of
speed, distance and other measurements.
Inside buildings, GPS reception may be available near windows or
in areas with a clear view of the sky. Therefore it is recommended
that you go outdoors or near a window to obtain the GPS signal. It
is near impossible to get GPS reception in interior spaces and
basements.
If the GPS signal from the satellites is lost and no position can be
determined, "GPS Lost!" appears on the screen, until a button is
pressed.
Stopping the GPS
The GPS feature will shorten battery life. At times, you may want to
turn off the GPS (e.g., when working out indoors).
To stop the GPS:
Option 1:
1. While viewing the GPS Workout or GPS Navigation mode.
442. Press and hold down the VIEW button until "GPS Off!" is
displayed.
Option 2:
1. Press and hold the MODE button to enter the watch menu.
2. Select GPS from the menu ON/OFF
3. Press the VIEW button and the message "GPS Off!" will be
displayed.
GPS Timeout setting
When the GPS is turned on, it will search to reacquire a signal that
has been lost. The default setting is for the watch to search for a
GPS signal for 5 minutes. If it is not successful, the GPS will
automatically turn off. This saves battery life, as the GPS does not
constantly search for signal.
The "GPS Timeout" setting can be changed. If you know that you
may run into dead areas where the signal will be lost, (e.g., part of
the path has trees, going through a tunnel, tall buildings) you don't
want to need to stop and turn on the GPS during your workout.
Instead, change the GPS Timeout to 30 minutes. With a 30-minute
timeout setting, the GPS will continue to track your distance,
location, speed, and pace as soon as the GPS signal can be
required.
To change the GPS TimeOut Setting:
Press and hold the MODE button to enter the watch's menu.
Select GPS from the menu TIMEOUT
Use the ST/STOP or Lap/RESET buttons to change between 5 min
and 30 mins. Press the MODE button to accept the change and
return to the previous menu.
45When You Can't Get a GPS Signal
There are times when the GPS may not be able to obtain a signal
(e.g., during bad weather, downtown among tall buildings). Yet, the
watch can still track your workout and add the GPS information later
using a feature called the "Assisted Global Positioning System" (A-
GPS).
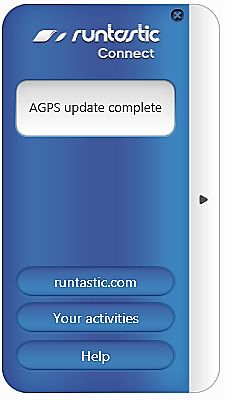
8.1.5 A-GPS
A-GPS fastens the search for a good
GPS-reception and saves the data on
a server for 7 days.
Download the A-GPS data to the
watch
Connect the watch to your computer
using the USB charger/data cable. As
soon as the watch is linked to the
computer, the A-GPS data will be
transferred to the watch. Note that
AGPS requires that the computer be
connected to the Internet. The information will not be available
after 7 days.
8.1.6 LAPS
Recording of lap times
During a workout session, press the "LAP/RESET” button to record
the time of a lap. For each workout, the maximum number of lap
times is 99.
46Automatic recording of lap times LAP BY DISTANCE
The Smart Lap feature will automatically generate a lap at any set
distance (e.g., every ½ mile, mile). Lap times will then automatically
be recorded when the distance has been reached.
To set up Smart Lap by distance:
(1) Press and hold the MODE button to enter the watch's
menu.
(2) Select WORKOUT from the menu SmartLAP BY DIST
(3) Use the ST/STOP or Lap/RESET buttons to set the desired
lap distance.
(4) Press the VIEW button to accept the setting.
(5) Use the ST/STOP or Lap/RESET buttons to highlight "ON"
(6) Press the VIEW button to choose "On," or "Off" to turn off
the SmartLap by distance setting.
(7) Press the MODE button to accept the settings and return
to the previous menu.
With the SmartLap on, you can still record lap intervals manually by
pressing the LAP/RESET button.
Audible Alert activation for LAP BY DISTANCE
To set the watch to sound a beep notification each time it records a
new lap:
Press and hold the MODE button to enter the watch's menu.
Select WORKOUT from the menu SmartLAP ALERT
Then select "On" to activate the alarm for "Lap-By-Distance"
function or "Off" to deactivate it.
Press the MODE button to accept the settings and return to the
previous menu.
478.2 After training-RECALLING WORKOUT History
After a workout session has been completed and saved (see
section###), you can review the data that was recorded during your
workouts.
To view your Workout history:
Press and hold the MODE button to enter the watch's menu.
Select WORKOUT from the menu WORKOUT HISTORY
Press the VIEW button to recall your most recent workout stats.
Use the ST/STOP or Lap/RESET buttons to scroll through the
saved workouts.
Press the VIEW button to display the workout details.
The history consists of 3 screens. The watch will automatically scroll
through the screens every 5 seconds:
(1st Screen)
First row: Workout history sequence number (Workout Number)
Second row: Workout Date
Third row: Workout start Time
Fourth row: Number of laps recorded.
(2nd Screen)
Length of Workout (Training time)
Distance
Average pace (time per mile)
(3rd Screen)
Calories burned
Average Heart Rate
Average speed
48To view the lap data:
Press the VIEW button
On the upper left is the Workout Number and on the upper right is
the lap number.
Press the ST/STOP or the LAP/RESET buttons, to switch between the
individual laps.
The history of the laps consists of 2 displays that automatically
alternate:
Display 1. Shows Average lap time, lap distance and lap pace
(time per mile)
2nd Display
Lap time, average heart rate for lap, and the speed of this lap.
Press the VIEW button, to return to the workout history screen
Deletion of workout data
If you wish to delete the data of the last workout:
Press and hold the MODE button to enter the watch's menu.
Select WORKOUT from the menu WORKOUT
DELETEDel Last
If you want to delete the data of all of the workout data on the
watch:
Select WORKOUT from the menu WORKOUT
DELETEDel All.
Workout data is NOT automatically deleted. See section### on how
to automatically delete workout data that has been uploaded to
your Runtastic.com dashboard.
8.3 GPS-Navigation-mode
The GPS Navigation mode can create routes (paths) or points along
a route to follow (waypoints). This mode works together with the
GPS-Workout mode. When you start a workout session or mark a
49lap in one mode, it begins a session and registers the lap in the
other mode as well.
Before you begin GPS Navigation, you need to choose a path.
Previous paths can be followed, or a new path can be created.
Press the MODE button repeatedly until the “GPS Navigation-mode
is displayed:
Current Speed
Directional arrow Distance to the
activated
checkpoint
Navigation Data
8.4 Waypoints- Creating a Path on the Watch,
Finding Your Way
A waypoint is a point along a route ("path"). It helps with navigation
to create waypoints when you make a turn along your path-- like a
fork in a hiking path, a landmark. Without waypoints, when using the
navigation to find the beginning or end of your path, the GPS could
point you off the road or trail, in a direction that could not be
followed because there are buildings or other obstacles in the way.
This type of waypoint function is unique to a GPS watch and usually
is found on trail GPS devices. When joined together, waypoints
create a path (route) in the watch's memory that can be followed
again. To use waypoints in this way, choose either the waypoint
50navigation and pick the waypoint, or the forward navigation (see
below for instructions).
Another way to use marked waypoints is to return to a point along
the path and find your way back to where you started, or simple
choose your starting point and follow the way back. This is
particularly helpful to be guided back to a point on a trail when
hiking. (Be sure to always have a map and magnetic compass as a
backup) To use waypoints in this way, choose either the waypoint
navigation and pick a previous waypoint, or the backward-
navigation (see below for instructions. _
You can save up to 10 paths on this GPS-watch, but you can only
work with one path a time. A path can consist of up to 99 waypoints.
Within a path, waypoints within a path can be linked with each other
and form their own sub-path,or they can be individual waypoints.
The GPS-Navigation mode has display screens that can be
accessed by pressing the VIEW button:,
Navigation-display
Go-to-display
Choosing Paths
Press and hold the MODE button to enter the watch's menu.
Select NAVIGATION from the menu SelPath
Use the ST/STOP or Lap/RESET buttons to scroll through the
saved paths. The path number and number of waypoints will
be listed for each path. Look for a path that reads "0" to the
right of the path number.
Press the VIEW button to choose the path. "Done!" will appear
on the display.
51 Press the MODE button to accept the changes and return to
the previous menu.
Delete path
Press and hold the MODE button to enter the watch's menu.
Select NAVIGATION from the menu DelPath
Use the ST/STOP or Lap/RESET buttons to scroll through the
saved paths.
Creating a path
Setting of measurement interval
When you start the GPS Navigation, the watch will create a path
(and save it to the path number you chose in the previous step. If
you do not create any waypoints, the path will show 1 waypoint.
The GPS watch records the path continuously. You can manually set
how often the measurements are performed, from 1 second up to 10
minutes. The basic setting is 4 seconds:
In the setting mode select „Workout” point Tracklog.
Then adjust the interval desired for measurements
Waypoints can be created each time a lap is recorded. This must
be set in the watch's workout settings:
Press and hold the MODE button to enter the watch's menu.
Select WORKOUT from the menu SmartLap Lap-Waypoint
Use the ST/STOP or Lap/RESET buttons to Highlight "On"
Press the VIEW button to turn on the Lap to Waypoint Feature
Use the ST/STOP or Lap/RESET buttons to scroll through and
display a path (from 1 to 10) to record. Previously recorded
paths will have a number to the right of the path number that
indicates the number of waypoints for that path.
52 Choose a path with "0" waypoints to create a new path.
Choosing a previously recorded path will overwrite the
previous path information.
Press VIEW to choose the displayed path number.
Press MODE to accept the settings and return to the previous
menu.
To create a waypoint, quickly press the LAP/RESET button to mark
the location.
8.5 Navigation-display
In the “GPS Navigation-mode” press the VIEW button repeatedly
until you see the following display:
Current Speed
Directional arrow Distance to the
activated waypoint
Navigation Data
The current speed and the distance to the activated waypoint are
displayed. Alternating navigation data is shown on the bottom row
that scrolls through:
Time of day
Workout time
Distance to finish
Estimated time to finish
Current heart rate (if available)
53You can also read