Cisco IP Phone Models 7960 and 7940 User Guide
←
→
Page content transcription
If your browser does not render page correctly, please read the page content below
Cisco IP Phone Models
7960 and 7940 User Guide

Corporate Headquarters
Cisco Systems, Inc.
170 West Tasman Drive
San Jose, CA 95134-1706
USA
http://www.cisco.com
Tel: 408 526-4000
       800 553-NETS (6387)
Fax: 408 526-4100

Customer Order Number: DOC-7810182=
Text Part Number: 78-10182-05
THE SPECIFICATIONS AND INFORMATION REGARDING THE PRODUCTS IN THIS MANUAL ARE SUBJECT TO CHANGE WITHOUT
NOTICE. ALL STATEMENTS, INFORMATION, AND RECOMMENDATIONS IN THIS MANUAL ARE BELIEVED TO BE ACCURATE BUT
ARE PRESENTED WITHOUT WARRANTY OF ANY KIND, EXPRESS OR IMPLIED. USERS MUST TAKE FULL RESPONSIBILITY FOR
THEIR APPLICATION OF ANY PRODUCTS.

THE SOFTWARE LICENSE AND LIMITED WARRANTY FOR THE ACCOMPANYING PRODUCT ARE SET FORTH IN THE INFORMATION
PACKET THAT SHIPPED WITH THE PRODUCT AND ARE INCORPORATED HEREIN BY THIS REFERENCE. IF YOU ARE UNABLE TO
LOCATE THE SOFTWARE LICENSE OR LIMITED WARRANTY, CONTACT YOUR CISCO REPRESENTATIVE FOR A COPY.

The following information is for FCC compliance of Class B devices: The equipment described in this manual generates and may radiate
radio-frequency energy. If it is not installed in accordance with Cisco’s installation instructions, it may cause interference with radio and television
reception. This equipment has been tested and found to comply with the limits for a Class B digital device in accordance with the specifications in
part 15 of the FCC rules. These specifications are designed to provide reasonable protection against such interference in a residential installation.
However, there is no guarantee that interference will not occur in a particular installation.

Modifying the equipment without Cisco’s written authorization may result in the equipment no longer complying with FCC requirements for Class
B digital devices. In that event, your right to use the equipment may be limited by FCC regulations, and you may be required to correct any
interference to radio or television communications at your own expense.

You can determine whether your equipment is causing interference by turning it off. If the interference stops, it was probably caused by the Cisco
equipment or one of its peripheral devices. If the equipment causes interference to radio or television reception, try to correct the interference by
using one or more of the following measures:

• Turn the television or radio antenna until the interference stops.

• Move the equipment to one side or the other of the television or radio.

• Move the equipment farther away from the television or radio.

• Plug the equipment into an outlet that is on a different circuit from the television or radio. (That is, make certain the equipment and the television
or radio are on circuits controlled by different circuit breakers or fuses.)

Modifications to this product not authorized by Cisco Systems, Inc. could void the FCC approval and negate your authority to operate the product.

The Cisco implementation of TCP header compression is an adaptation of a program developed by the University of California, Berkeley (UCB) as
part of UCB’s public domain version of the UNIX operating system. All rights reserved. Copyright © 1981, Regents of the University of California.

NOTWITHSTANDING ANY OTHER WARRANTY HEREIN, ALL DOCUMENT FILES AND SOFTWARE OF THESE SUPPLIERS ARE
PROVIDED “AS IS” WITH ALL FAULTS. CISCO AND THE ABOVE-NAMED SUPPLIERS DISCLAIM ALL WARRANTIES, EXPRESSED
OR IMPLIED, INCLUDING, WITHOUT LIMITATION, THOSE OF MERCHANTABILITY, FITNESS FOR A PARTICULAR PURPOSE AND
NONINFRINGEMENT OR ARISING FROM A COURSE OF DEALING, USAGE, OR TRADE PRACTICE.

IN NO EVENT SHALL CISCO OR ITS SUPPLIERS BE LIABLE FOR ANY INDIRECT, SPECIAL, CONSEQUENTIAL, OR INCIDENTAL
DAMAGES, INCLUDING, WITHOUT LIMITATION, LOST PROFITS OR LOSS OR DAMAGE TO DATA ARISING OUT OF THE USE OR
INABILITY TO USE THIS MANUAL, EVEN IF CISCO OR ITS SUPPLIERS HAVE BEEN ADVISED OF THE POSSIBILITY OF SUCH
DAMAGES.

AccessPath, AtmDirector, Browse with Me, CCIP, CCSI, CD-PAC, CiscoLink, the Cisco Powered Network logo, Cisco Systems Networking
Academy, the Cisco Systems Networking Academy logo, Fast Step, Follow Me Browsing, FormShare, FrameShare, GigaStack, IGX, Internet
Quotient, IP/VC, iQ Breakthrough, iQ Expertise, iQ FastTrack, the iQ Logo, iQ Net Readiness Scorecard, MGX, the Networkers logo, Packet,
RateMUX, ScriptBuilder, ScriptShare, SlideCast, SMARTnet, TransPath, Unity, Voice LAN, Wavelength Router, and WebViewer are trademarks of
Cisco Systems, Inc.; Changing the Way We Work, Live, Play, and Learn, Discover All That’s Possible, and Empowering the Internet Generation, are
service marks of Cisco Systems, Inc.; and Aironet, ASIST, BPX, Catalyst, CCDA, CCDP, CCIE, CCNA, CCNP, Cisco, the Cisco Certified
Internetwork Expert logo, Cisco IOS, the Cisco IOS logo, Cisco Systems, Cisco Systems Capital, the Cisco Systems logo, Enterprise/Solver,
EtherChannel, EtherSwitch, FastHub, FastSwitch, IOS, IP/TV, LightStream, MICA, Network Registrar, PIX, Post-Routing, Pre-Routing, Registrar,
StrataView Plus, Stratm, SwitchProbe, TeleRouter, and VCO are registered trademarks of Cisco Systems, Inc. and/or its affiliates in the U.S. and
certain other countries.

All other trademarks mentioned in this document or Web site are the property of their respective owners. The use of the word partner does not imply
a partnership relationship between Cisco and any other company. (0106R)
Cisco IP Phone Models 7960 and 7940 User Guide
Copyright © 2000-2001, Cisco Systems, Inc.
All rights reserved.
C O N T E N T S

               Preface ix
                  About this Guide ix
                  Related Documentation ix
                  Obtaining Documentation ix
                      World Wide Web x
                      Documentation CD-ROM x
                      Ordering Documentation x
                      Documentation Feedback x
                  Obtaining Technical Assistance xi
                      Cisco.com xi
                      Technical Assistance Center xi
                           Contacting TAC by Using the Cisco TAC Website xi
                           Contacting TAC by Telephone xii
                  Document Conventions xii

CHAPTER    1   Introducing Your Cisco IP Phone 1-1
                  A Road Map to Your Cisco IP Phone 1-1

CHAPTER    2   How to Use the Handset, Speakerphone, and Headset 2-1
                  Using the Handset 2-1
                  Using the Speakerphone 2-2
                  Using the Headset 2-2
                      Plugging in the Headset 2-2
                      Headset Safety Considerations 2-4

                                          Cisco IP Phone Models 7960 and 7940 User Guide
 78-10182-05                                                                               v
Contents
Adjusting the Handset, Speakerphone, and Headset Volume 2-4
CHAPTER 3 Placing a Call and Other Basic Phone Tasks 3-1
Making Telephone Calls 3-1
Placing a Call 3-2
Answering a Call 3-3
Ending a Call 3-3
Muting a Call 3-3
Putting a Call on Hold 3-3
Transferring a Call 3-4
Redialing a Number 3-5
Parking a Call 3-5
Using Call Pickup 3-6
How to Pick Up Calls Within Your Group 3-6
How to Pick Up Calls Outside of Your Group 3-7
Using Call Forwarding 3-8
Setting Up Call Forwarding on Your Phone 3-8
How Call Forwarding Works with Your Voice Mail System 3-9
Making Conference Calls 3-9
Placing a Conference Call 3-9
Conference Call Tips 3-10
Meet-Me Conference Calls 3-11
Establishing a Meet-Me Conference 3-11
Joining a Meet-Me Conference 3-11
Adjusting the Ringer Volume 3-12
CHAPTER 4 Getting Started with Feature Buttons 4-1
Tips for Using the LCD Screen 4-2
Using the Services Button 4-2
Cisco IP Phone Models 7960 and 7940 User Guide
vi 78-10182-05Contents
Using the Extension Mobility Service 4-3
How to Log in to Extension Mobility 4-4
How to Log Out of Extension Mobility 4-5
How to Change Your Extension Mobility PIN 4-5
Establishing Cisco IP Phone Services 4-6
How to Log On to the Main Menu Page 4-7
How to Set Up Speed Dial Buttons 4-7
How to Set Up Call Forwarding When Not at Your Phone 4-9
How to Cancel Call Forwarding 4-10
How to Subscribe to Services 4-11
How to Change or End Subscriptions 4-12
How to Manage Your Personal Address Book 4-13
Using the Messages Button 4-15
Setting Up Voice Mail 4-15
Accessing Voice Mail 4-15
Using the Settings Button 4-16
Changing the LCD Contrast 4-16
Changing the Ringer Sound 4-17
Accessing Network Configuration Data 4-17
Accessing Status Data 4-18
Using the Directories Button 4-18
Viewing or Dialing from a Directory 4-19
Using the i Button for Instant Help 4-20
CHAPTER 5 Using the Cisco IP Phone 7914 Expansion Module 5-1
Understanding Expansion Module Features 5-2
How to Get More Information 5-3
Cisco IP Phone Models 7960 and 7940 User Guide
78-10182-05 viiContents
APPENDIX A Safety and Compliance Information A-1
Safety Notices A-1
Regulatory Compliance A-3
INDEX
Cisco IP Phone Models 7960 and 7940 User Guide
viii 78-10182-05Preface
This preface covers these topics:
• About this Guide, page ix
• Related Documentation, page ix
• Obtaining Documentation, page ix
• Obtaining Technical Assistance, page xi
• Document Conventions, page xii
About this Guide
This guide is designed to help you perform basic and advanced phone tasks using your Cisco IP Phone
Models 7960 and 7940. This guide assumes that your Cisco IP Phone is already connected and ready for
you to use. For connection instructions, see the guide that shipped with your phone in the box: At a
Glance Cisco IP Phone Models 7960 and 7940. Contact your system administrator for additional help.
If you use a Cisco IP Phone 7914 Expansion Module, refer to Chapter 5, “Using the
Cisco IP Phone 7914 Expansion Module” for an overview.
Related Documentation
For more information, refer to these documents:
• At a Glance Cisco IP Phone 7960 and 7940—This booklet includes basic installation instructions
and ships in the box with each phone
• Quick Reference Cisco IP Phone 7960/7940—This wallet card contains basic instructions and can
be ordered separately
Obtaining Documentation
The following sections provide sources for obtaining documentation from Cisco Systems.
Cisco IP Phone Models 7960 and 7940 User Guide
78-10182-05 ixPreface
Obtaining Documentation
World Wide Web
You can access the most current Cisco documentation on the World Wide Web at the following sites:
• http://www.cisco.com
• http://www-china.cisco.com
• http://www-europe.cisco.com
Documentation CD-ROM
Cisco documentation and additional literature are available in a CD-ROM package. The Documentation
CD-ROM is updated monthly and may be more current than printed documentation. The CD-ROM
package is available as a single unit or as an annual subscription.
Ordering Documentation
Cisco documentation is available in the following ways:
• Registered Cisco Direct Customers can order Cisco Product documentation from the Networking
Products MarketPlace:
http://www.cisco.com/cgi-bin/order/order_root.pl
• Registered Cisco.com users can order the Documentation CD-ROM through the online Subscription
Store:
http://www.cisco.com/go/subscription
• Nonregistered Cisco.com users can order documentation through a local account representative by
calling Cisco corporate headquarters (California, USA) at 408 526-7208 or, in North America, by
calling 800 553-NETS(6387).
Documentation Feedback
If you are reading Cisco product documentation on the World Wide Web, you can submit technical
comments electronically. Click Feedback in the toolbar and select Documentation. After you complete
the form, click Submit to send it to Cisco.
You can e-mail your comments to bug-doc@cisco.com.
To submit your comments by mail, use the response card behind the front cover of your document, or
write to the following address:
Attn Document Resource Connection
Cisco Systems, Inc.
170 West Tasman Drive
San Jose, CA 95134-9883
We appreciate your comments.
Cisco IP Phone Models 7960 and 7940 User Guide
x 78-10182-05Preface
Obtaining Technical Assistance
Obtaining Technical Assistance
Cisco provides Cisco.com as a starting point for all technical assistance. Customers and partners can
obtain documentation, troubleshooting tips, and sample configurations from online tools. For Cisco.com
registered users, additional troubleshooting tools are available from the TAC website.
Cisco.com
Cisco.com is the foundation of a suite of interactive, networked services that provides immediate, open
access to Cisco information and resources at anytime, from anywhere in the world. This highly
integrated Internet application is a powerful, easy-to-use tool for doing business with Cisco.
Cisco.com provides a broad range of features and services to help customers and partners streamline
business processes and improve productivity. Through Cisco.com, you can find information about Cisco
and our networking solutions, services, and programs. In addition, you can resolve technical issues with
online technical support, download and test software packages, and order Cisco learning materials and
merchandise. Valuable online skill assessment, training, and certification programs are also available.
Customers and partners can self-register on Cisco.com to obtain additional personalized information and
services. Registered users can order products, check on the status of an order, access technical support,
and view benefits specific to their relationships with Cisco.
To access Cisco.com, go to the following website:
http://www.cisco.com
Technical Assistance Center
The Cisco TAC website is available to all customers who need technical assistance with a Cisco product
or technology that is under warranty or covered by a maintenance contract.
Contacting TAC by Using the Cisco TAC Website
If you have a priority level 3 (P3) or priority level 4 (P4) problem, contact TAC by going to the TAC
website:
http://www.cisco.com/tac
P3 and P4 level problems are defined as follows:
• P3—Your network performance is degraded. Network functionality is noticeably impaired, but most
business operations continue.
• P4—You need information or assistance on Cisco product capabilities, product installation, or basic
product configuration.
In each of the above cases, use the Cisco TAC website to quickly find answers to your questions.
To register for Cisco.com, go to the following website:
http://www.cisco.com/register/
If you cannot resolve your technical issue by using the TAC online resources, Cisco.com registered users
can open a case online by using the TAC Case Open tool at the following website:
http://www.cisco.com/tac/caseopen
Cisco IP Phone Models 7960 and 7940 User Guide
78-10182-05 xiPreface
Document Conventions
Contacting TAC by Telephone
If you have a priority level 1 (P1) or priority level 2 (P2) problem, contact TAC by telephone and
immediately open a case. To obtain a directory of toll-free numbers for your country, go to the following
website:
http://www.cisco.com/warp/public/687/Directory/DirTAC.shtml
P1 and P2 level problems are defined as follows:
• P1—Your production network is down, causing a critical impact to business operations if service is
not restored quickly. No workaround is available.
• P2—Your production network is severely degraded, affecting significant aspects of your business
operations. No workaround is available.
Document Conventions
This document uses the following conventions:
Convention Description
boldface font Commands and keywords are in boldface.
italic font Arguments for which you supply values are in italics.
[ ] Elements in square brackets are optional.
{x|y|z} Alternative keywords are grouped in braces and separated by vertical bars.
[x|y|z] Optional alternative keywords are grouped in brackets and separated by
vertical bars.
string A nonquoted set of characters. Do not use quotation marks around the string
or the string will include the quotation marks.
screen font Terminal sessions and information the system displays are in screen font.
boldface screen font Information you must enter is in boldface screen font.
italic screen font Arguments for which you supply values are in italic screen font.
^ The symbol ^ represents the key labeled Control—for example, the key
combination ^D in a screen display means hold down the Control key while
you press the D key.
< > Nonprinting characters, such as passwords are in angle brackets.
Note Means reader take note. Notes contain helpful suggestions or references to material not covered in
the publication.
Caution Means reader be careful. In this situation, you might do something that could result in equipment
damage or loss of data.
Cisco IP Phone Models 7960 and 7940 User Guide
xii 78-10182-05Preface
Document Conventions
Warnings use the following conventions:
Warning This warning symbol means danger. You are in a situation that could cause
bodily injury. Before you work on any equipment, be aware of the hazards
involved with electrical circuitry and be familiar with standard practices
for preventing accidents. (To see translations of the warnings that appear
in this publication, refer to the appendix, “Translated Safety Warnings.”)
Waarschuwing Dit waarschuwingssymbool betekent gevaar. U verkeert in een
situatie die lichamelijk letsel kan veroorzaken. Voordat u aan
enige apparatuur gaat werken, dient u zich bewust te zijn van de
bij elektrische schakelingen betrokken risico’s en dient u op de
hoogte te zijn van standaard maatregelen om ongelukken te
voorkomen. (Voor vertalingen van de waarschuwingen die in
deze publicatie verschijnen, kunt u het aanhangsel “Translated
Safety Warnings” (Vertalingen van veiligheidsvoorschriften)
raadplegen.)
Varoitus Tämä varoitusmerkki merkitsee vaaraa. Olet tilanteessa, joka voi
johtaa ruumiinvammaan. Ennen kuin työskentelet minkään
laitteiston parissa, ota selvää sähkökytkentöihin liittyvistä
vaaroista ja tavanomaisista onnettomuuksien ehkäisykeinoista.
(Tässä julkaisussa esiintyvien varoitusten käännökset löydät
liitteestä "Translated Safety Warnings" (käännetyt turvallisuutta
koskevat varoitukset).)
Attention Ce symbole d’avertissement indique un danger. Vous vous trouvez
dans une situation pouvant entraîner des blessures. Avant
d’accéder à cet équipement, soyez conscient des dangers posés
par les circuits électriques et familiarisez-vous avec les
procédures courantes de prévention des accidents. Pour obtenir
les traductions des mises en garde figurant dans cette
publication, veuillez consulter l’annexe intitulée « Translated
Safety Warnings » (Traduction des avis de sécurité).
Warnung Dieses Warnsymbol bedeutet Gefahr. Sie befinden sich in einer
Situation, die zu einer Körperverletzung führen könnte. Bevor Sie
mit der Arbeit an irgendeinem Gerät beginnen, seien Sie sich der
mit elektrischen Stromkreisen verbundenen Gefahren und der
Standardpraktiken zur Vermeidung von Unfällen bewußt.
(Übersetzungen der in dieser Veröffentlichung enthaltenen
Warnhinweise finden Sie im Anhang mit dem Titel “Translated
Safety Warnings” (Übersetzung der Warnhinweise).)
Avvertenza Questo simbolo di avvertenza indica un pericolo. Si è in una
situazione che può causare infortuni. Prima di lavorare su
qualsiasi apparecchiatura, occorre conoscere i pericoli relativi
ai circuiti elettrici ed essere al corrente delle pratiche standard
per la prevenzione di incidenti. La traduzione delle avvertenze
riportate in questa pubblicazione si trova nell’appendice,
“Translated Safety Warnings” (Traduzione delle avvertenze di
sicurezza).
Cisco IP Phone Models 7960 and 7940 User Guide
78-10182-05 xiiiPreface
Document Conventions
Advarsel Dette varselsymbolet betyr fare. Du befinner deg i en situasjon
som kan føre til personskade. Før du utfører arbeid på utstyr, må
du være oppmerksom på de faremomentene som elektriske
kretser innebærer, samt gjøre deg kjent med vanlig praksis når
det gjelder å unngå ulykker. (Hvis du vil se oversettelser av de
advarslene som finnes i denne publikasjonen, kan du se i
vedlegget "Translated Safety Warnings" [Oversatte
sikkerhetsadvarsler].)
Aviso Este símbolo de aviso indica perigo. Encontra-se numa situação
que lhe poderá causar danos fisicos. Antes de começar a
trabalhar com qualquer equipamento, familiarize-se com os
perigos relacionados com circuitos eléctricos, e com quaisquer
práticas comuns que possam prevenir possíveis acidentes. (Para
ver as traduções dos avisos que constam desta publicação,
consulte o apêndice “Translated Safety Warnings” - “Traduções
dos Avisos de Segurança”).
Advertencia Este símbolo de aviso significa peligro. Existe riesgo para su
integridad física. Antes de manipular cualquier equipo,
considerar los riesgos que entraña la corriente eléctrica y
familiarizarse con los procedimientos estándar de prevención de
accidentes. (Para ver traducciones de las advertencias que
aparecen en esta publicación, consultar el apéndice titulado
“Translated Safety Warnings.”)
Varning! Denna varningssymbol signalerar fara. Du befinner dig i en
situation som kan leda till personskada. Innan du utför arbete på
någon utrustning måste du vara medveten om farorna med
elkretsar och känna till vanligt förfarande för att förebygga
skador. (Se förklaringar av de varningar som förekommer i denna
publikation i appendix "Translated Safety Warnings" [Översatta
säkerhetsvarningar].)
Cisco IP Phone Models 7960 and 7940 User Guide
xiv 78-10182-05C H A P T E R 1
Introducing Your Cisco IP Phone
The Cisco IP Phone 7960 and Cisco IP Phone 7940 are full-feature telephones that
provide voice communication over an IP (Internet Protocol) network. These
phones function much like traditional analog phones, allowing you to place and
receive telephone calls. They also support features that you have come to expect
from a telephone—such as speed dialing, redial, call transfer, conference calling,
and voice mail access.
Your Cisco IP Phone offers features that might surprise you. Because it is part of
an IP network, your Cisco IP Phone can provide not only telephony services, but
data services, too—including up-to-the-minute information from the Internet
through an Extensible Markup Language (XML)-based application. In a nutshell,
your Cisco IP Phone provides a whole range of communication features that you
could not expect from a traditional telephone.
A Road Map to Your Cisco IP Phone
Refer to the following illustrations and table to identify the buttons and parts on
your Cisco IP Phone and to find a description of related features.
Note The only difference between the Cisco IP Phone models 7960 and 7940 is the
number of available line or speed dial buttons. The Cisco IP Phone 7940 has
two and the 7960 has six.
Cisco IP Phone Models 7960 and 7940 User Guide
78-10182-05 1-1Chapter 1 Introducing Your Cisco IP Phone
A Road Map to Your Cisco IP Phone
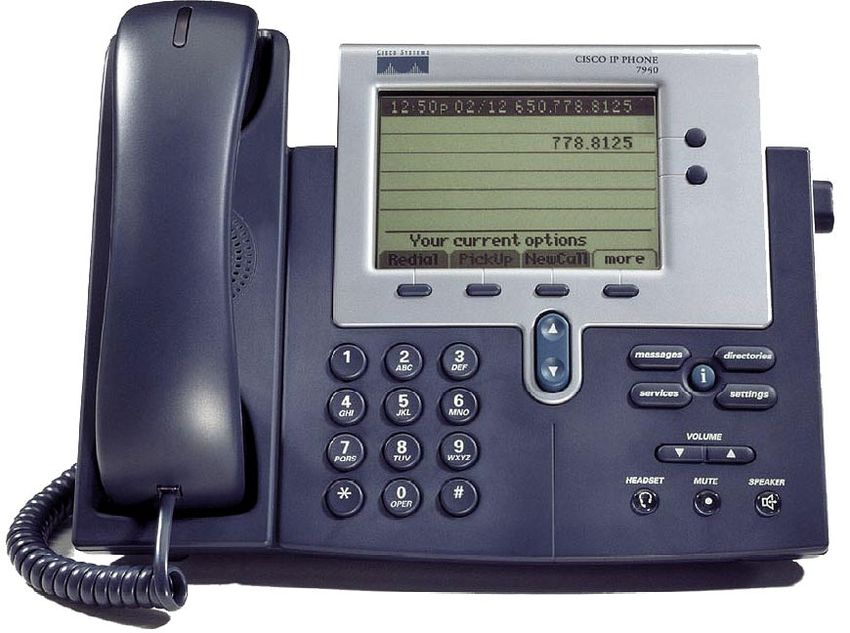
Figure 1-1 Cisco IP Phone 7960
2 3 4
1
5
6
7
8
9
58728
17 16 15 14 13 12 11 10
Figure 1-2 Cisco IP Phone 7940
2 3 4
1
5
6
7
8
9
58669
17 16 15 14 13 12 11 10
Cisco IP Phone Models 7960 and 7940 User Guide
1-2 78-10182-05Chapter 1 Introducing Your Cisco IP Phone
A Road Map to Your Cisco IP Phone
1 Handset with Functions like a traditional handset. The light strip at the
indicator light top of the handset blinks when the phone rings and
remains lit to indicate a new voice mail message.
2 LCD screen Displays features such as the time, date, your phone
number, caller ID, line/call status and soft key tabs.
3 Cisco IP Phone Indicates your Cisco IP Phone model.
model type
4 Line or speed Opens a new line, speed dials the number on the LCD
dial button screen, or ends a call. The Cisco IP Phone 7960 has six
line or speed dial buttons and the 7940 has two.
5 Footstand Allows you to adjust the angle of the phone base.
adjustment
6 Directories Provides access to call histories and directories.
button
directory
7 i button Displays help on your LCD screen for a phone button or
function.
i
8 Settings button Provides access to phone settings such as contrast and ring
settings
sound, network configuration, and status information.
9 Speaker button Toggles the speaker on or off.
10 Mute button Toggles the mute on or off.
11 Headset button Toggles the headset on or off.
12 Volume button Increases or decreases volume for the handset, headset, or
speakerphone (depending upon which is currently active).
Also controls the ringer volume (if on-hook), and the LCD
contrast.
Cisco IP Phone Models 7960 and 7940 User Guide
78-10182-05 1-3Chapter 1 Introducing Your Cisco IP Phone
A Road Map to Your Cisco IP Phone
13 Services button Provides access to phone services (if available).
services
14 Messages Provides access to a message system (if available).
button
messages
15 Navigation Enables you to scroll through text and select features
button displayed on the LCD screen.
16 Dial pad Works exactly like the dial pad on a traditional telephone.
17 Soft keys Enable you to engage any of the functions displayed on the
corresponding LCD tabs. Soft keys point to feature
options displayed along the bottom of your LCD screen.
Soft keys change depending on the status of your phone.
For example, you can see one set of soft key options when
you pick up the handset, and another set when the phone
is not in use.
Tip The features available on a Cisco IP Phone depend upon the call processing
environment (or “protocol”) that the IP Phone uses. Your Cisco IP Phone uses
the Cisco CallManager call processing environment. The information in this
guide is specific to Cisco CallManager.
Cisco IP Phone Models 7960 and 7940 User Guide
1-4 78-10182-05C H A P T E R 2
How to Use the Handset,
Speakerphone, and Headset
There are three tools you can use to place and answer calls—the handset, the
speakerphone, and a headset. These sections describe their use and how to adjust
the volume for each:
• Using the Handset, page 2-1
• Using the Speakerphone, page 2-2
• Using the Headset, page 2-2
• Adjusting the Handset, Speakerphone, and Headset Volume, page 2-4
Using the Handset
The handset on your Cisco IP Phone functions in the same way as a handset on a
traditional phone. To place and answer calls with the handset, simply lift the
handset. To hang up, place the handset back in its cradle.
To switch from the handset to the speakerphone, press the Speaker button on the
front of your phone during a call, then hang up the handset.
Tip The light strip at the top of your handset blinks when your phone rings and
remains lit to indicate that you have received a new voice mail message.
Cisco IP Phone Models 7960 and 7940 User Guide
78-10182-05 2-1Chapter 2 How to Use the Handset, Speakerphone, and Headset
Using the Speakerphone
Using the Speakerphone
To place and answer calls using the speakerphone, press the Speaker button. You
can use the speakerphone in conjunction with all of the features on your
Cisco IP Phone.
To switch from speakerphone to handset during a call, simply lift the handset.
Using the Headset
To place and answer calls using a headset, plug an approved headset into the back
of the phone base and press the Headset button on the front of your phone.
You can use the headset in conjunction with all of the features on your
Cisco IP Phone, including the Volume and Mute buttons. Use these buttons to
adjust the volume to the ear piece and to mute the speech path from the headset
microphone.
The Cisco IP Phone models 7960 and 7940 support four- or six-wire headset
jacks. For information on the purchasing headsets, see the following URLs:
• http://cisco.getheadsets.com
• http://vxicorp.com/cisco
This section covers the following topics:
• Plugging in the Headset, page 2-2
• Headset Safety Considerations, page 2-4
Plugging in the Headset
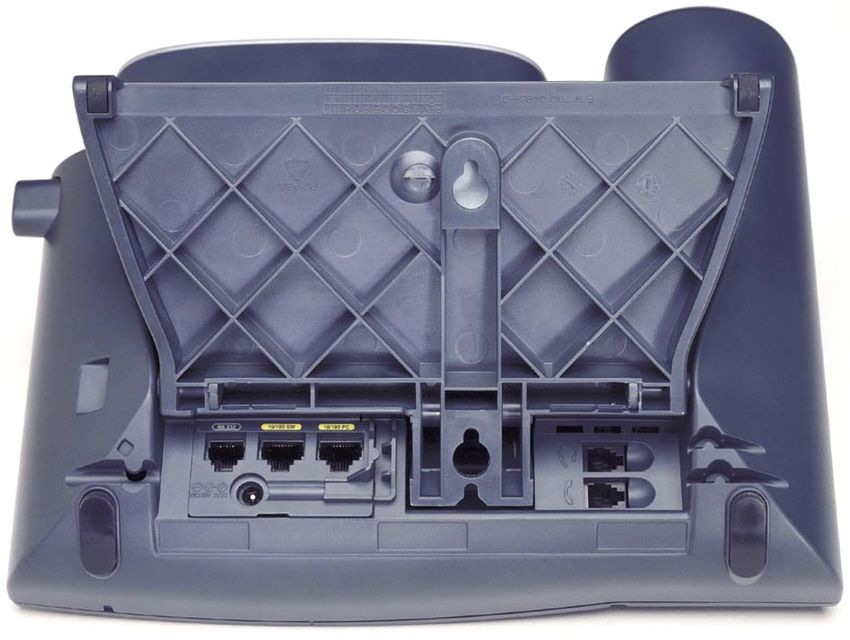
Figure 2-1 illustrates the headset port and other cable connection ports on the
Cisco IP Phone models 7960 and 7940.
Note If you need help connecting your phone to the network, a computer, or a power
source, contact your system administrator.
Cisco IP Phone Models 7960 and 7940 User Guide
2-2 78-10182-05Chapter 2 How to Use the Handset, Speakerphone, and Headset
Using the Headset
Figure 2-1 Cisco IP Phone cable connections
1
RS232 10/100 SW 10/100 PC
+
DC48V
7
2
6
3
5
58670
4
1 AC adapter port (DC48V)
2 Power supply with AC adapter port plug
3 Power cable with wall socket plug
Cisco IP Phone Models 7960 and 7940 User Guide
78-10182-05 2-3Chapter 2 How to Use the Handset, Speakerphone, and Headset
Adjusting the Handset, Speakerphone, and Headset Volume
4 Network port (10/100 SW)
5 Access port (10/100 PC)
6 Handset port
7 Headset port
Headset Safety Considerations
Read these notices before using a headset with your Cisco IP Phone.
Warning Read the installation instructions before you connect the system to its power
source.
Warning This product relies on the building’s installation for short-circuit
(overcurrent) protection. Ensure that a fuse or circuit breaker no larger than
120 VAC, 15A U.S. (240 VAC, 10A international) is used on the phase
conductors (all current-carrying conductors).
Adjusting the Handset, Speakerphone, and Headset
Volume
Follow these steps to adjust the volume on the handset, speakerphone, or headset.
Procedure
Step 1 Press the up or down Volume button when the handset, speakerphone, or headset
is in use.
Note If you press the Volume button when none of these are in use, you are adjusting
the ringer volume. For details, see the “Adjusting the Ringer Volume” section
on page 3-12.
Cisco IP Phone Models 7960 and 7940 User Guide
2-4 78-10182-05Chapter 2 How to Use the Handset, Speakerphone, and Headset
Adjusting the Handset, Speakerphone, and Headset Volume
Step 2 To save the volume setting for future calls, press the Save soft key.
Note that you must adjust the volume for the handset, speakerphone, and headset
individually.
Cisco IP Phone Models 7960 and 7940 User Guide
78-10182-05 2-5Chapter 2 How to Use the Handset, Speakerphone, and Headset
Adjusting the Handset, Speakerphone, and Headset Volume
Cisco IP Phone Models 7960 and 7940 User Guide
2-6 78-10182-05C H A P T E R 3
Placing a Call and Other Basic Phone
Tasks
Basic phone tasks include placing, receiving and forwarding calls. The following
sections describe how to perform these basic tasks on your Cisco IP Phone model
7960 or 7940:
• Making Telephone Calls, page 3-1
• Using Call Forwarding, page 3-8
• Making Conference Calls, page 3-9
• Adjusting the Ringer Volume, page 3-12
Making Telephone Calls
These sections describe how you can place, answer, or otherwise manage a
telephone call:
• Placing a Call, page 3-2
• Answering a Call, page 3-3
• Ending a Call, page 3-3
• Muting a Call, page 3-3
• Putting a Call on Hold, page 3-3
• Transferring a Call, page 3-4
• Redialing a Number, page 3-5
Cisco IP Phone Models 7960 and 7940 User Guide
78-10182-05 3-1Chapter 3 Placing a Call and Other Basic Phone Tasks
Making Telephone Calls
• Parking a Call, page 3-5
• Using Call Pickup, page 3-6
Placing a Call
You can place a call with your Cisco IP Phone in any of the following ways:
• Lift the handset and dial the number.
• Press the line button that corresponds with your extension and dial the
number that you want to reach.
• Press the NewCall soft key and dial the number.
• If you are using a headset, press the Headset button and dial the number.
• If you are using the speakerphone, press the Speaker button and dial the
number.
• If you have established speed dial numbers, press a Speed dial button to place
a call to the corresponding number. See the “How to Set Up Speed Dial
Buttons” section on page 4-7 for details.
• Press the Dial soft key after selecting a number from one of several available
directories. See the “Using the Directories Button” section on page 4-18 for
details.
• Press the Redial soft key to automatically place a call to the most recently
dialed number.
Tip To locate buttons, keys, and other parts on your phone, refer to the “A Road
Map to Your Cisco IP Phone” section on page 1-1.
Cisco IP Phone Models 7960 and 7940 User Guide
3-2 78-10182-05Chapter 3 Placing a Call and Other Basic Phone Tasks
Making Telephone Calls
Answering a Call
To answer an incoming call:
• Lift the handset.
• If you are using a headset, press the Headset button, then press the line button
of the incoming call.
• To use the speakerphone, press the Answer soft key or the Speaker button.
Ending a Call
To end a call:
• Hang up the handset.
• If you are using a headset, press the Headset button or the EndCall soft key.
• If you are using the speakerphone, press the Speaker button or the EndCall
soft key.
Muting a Call
You can mute the handset, headset, or speakerphone during a call. The mute
feature temporarily disables your phone’s microphone. Mute prevents the party or
parties on the other end of the line from hearing you, but does not interfere with
your ability to hear them.
To mute a call, press the Mute button. To disengage mute, press Mute again.
Putting a Call on Hold
When you put a call on hold, the call remains active even though you and the other
party cannot hear one another. You can answer other calls while a call is on hold.
Cisco IP Phone Models 7960 and 7940 User Guide
78-10182-05 3-3Chapter 3 Placing a Call and Other Basic Phone Tasks
Making Telephone Calls
Note Keep in mind that when you put a call on hold, a beeping tone
generates or music plays. If you put a conference call on hold, you
subject the other conference participants to the beeping tone or music.
For conference calls, consider using the Mute feature, instead.
• To put a call on hold, press the Hold soft key.
• To return to the call, press the Resume soft key.
• If multiple calls are on hold, use the Navigation button to select the desired
call before you press Resume.
• If multiple calls on multiple lines are on hold, press the line button for the line
to which you want to switch and use the Navigation button to select the
desired call. Press Resume.
If you cannot use the Navigation button because only one line displays on
your phone’s LCD screen, press the line button next to the call that you want
to resume. If your phone opens a new line at this point, press the EndCall soft
key to return to the desired call.
Tip If you are talking on one line when a second call rings on another line, you can
press the answer soft key to automatically put the first call on hold.
Transferring a Call
Follow these steps to transfer a call to another phone.
Procedure
Step 1 During a call, press the Trnsfer soft key. This puts the call on hold.
Step 2 Dial the number or office extension to which you want to transfer the call.
Step 3 When it rings on the other end, press Trnsfer again. Or, when the party answers,
announce the call and then press Trnsfer.
Cisco IP Phone Models 7960 and 7940 User Guide
3-4 78-10182-05Chapter 3 Placing a Call and Other Basic Phone Tasks
Making Telephone Calls
Step 4 If you are using a handset, hang up.
If the party refuses the call, press the Resume soft key to return to the original
call.
Redialing a Number
To redial the most recently dialed number, press the Redial soft key. Doing so
without lifting the handset activates the speakerphone or headset.
To redial a number from a line other than your primary line, select the desired line
button and then press Redial.
Parking a Call
Park a call when you want to store the call and then retrieve the call from another
phone in the Cisco CallManager system (for example, a phone in someone else’s
office or in a conference room). Call park numbers are pre-configured for this
purpose by your system administrator.
Follow these steps to park a call.
Procedure
Step 1 During an active call, press the more soft key until you see the Park tab.
Step 2 Press Park. The LCD screen displays the special call park number at which the
call is stored. If the screen does not display a call park number, the call park
feature is not available to you.
Step 3 Make a note of the call park number, then hang up. The call is parked at that
number, allowing you to retrieve it from another phone.
Step 4 To retrieve the parked call from any phone in the Cisco CallManager system, dial
the call park number at which the call is parked.
Cisco IP Phone Models 7960 and 7940 User Guide
78-10182-05 3-5Chapter 3 Placing a Call and Other Basic Phone Tasks
Making Telephone Calls
Note You have a limited amount of time to retrieve the parked call before it
reverts to ringing at its original destination. See your system
administrator for this time limit.
Using Call Pickup
You can answer an incoming call that is ringing on a telephone extension other
than your own by using the call pickup feature.
There are two types of call pickup available on the Cisco IP Phone, as described
in these topics:
• How to Pick Up Calls Within Your Group, page 3-6
• How to Pick Up Calls Outside of Your Group, page 3-7
Note Call pickup and group call pickup are optional features configured by your
system administrator; your phone does not support these features by default.
How to Pick Up Calls Within Your Group
Call pickup allows you to pick up incoming calls within your own group. A
“group” in this sense is any consolidation of Cisco IP Phone extensions, as
defined by your system administrator. For example, your group might contain
co-workers in neighboring offices or cubes.
Activate call pickup so that an incoming call delivered to another extension in
your group rings on your extension.
Cisco IP Phone Models 7960 and 7940 User Guide
3-6 78-10182-05Chapter 3 Placing a Call and Other Basic Phone Tasks
Making Telephone Calls
Procedure
Step 1 Press any available line button on your Cisco IP Phone.
Step 2 Press the PickUp soft key. The call now rings on your phone.
Step 3 Answer the incoming call.
Tip If there is more than one incoming call involved when you activate call pickup,
the first unanswered call will ring at your phone.
How to Pick Up Calls Outside of Your Group
Group call pickup allows you to pick up incoming calls within your own group or
in other groups. A “group” might contain co-workers in neighboring offices or
cubes.
You must dial the appropriate call pickup group number when using this feature.
A call pickup group number is provided to you by your system administrator.
Procedure
Step 1 Press any available line button.
Step 2 Press the GPickUp soft key.
Step 3 Dial the required call pickup group number.
Step 4 Answer the incoming call that is redirected to your phone.
Step 5 To pick up a call using a different call pickup group number, hang up and begin
again at Step 1.
Tip If there is more than one incoming call involved when you activate group call
pickup, you receive the first unanswered call. If there is no unanswered call in
the group, or if you dial an invalid group number, you receive a fast busy tone.
Cisco IP Phone Models 7960 and 7940 User Guide
78-10182-05 3-7Chapter 3 Placing a Call and Other Basic Phone Tasks
Using Call Forwarding
Using Call Forwarding
Call forwarding allows you to redirect all incoming calls from your
Cisco IP Phone to another number.
Call forwarding should be set up when you want all calls to be redirected to a
different number where you can answer the calls. For example, if you are going
to be working in another office. You can forward calls to an IP Phone or to a
traditional analog phone.
This section covers these topics:
• Setting Up Call Forwarding on Your Phone, page 3-8
• How Call Forwarding Works with Your Voice Mail System, page 3-9
Setting Up Call Forwarding on Your Phone
Follow these steps to set up call forwarding on your phone.
Procedure
Step 1 Press the CFwdAll soft key. You should hear two beeps.
Step 2 Enter the number to which you want to forward all of your calls.
Note Be sure to enter the number exactly as you would if you were placing
a call to that number. For example, enter an access code such as 9 or
the area code, if necessary. Your system administrator might restrict
the call forwarding feature to numbers within your company.
After you enter the number, an animated phone icon with a flashing right arrow
appears in the upper-right corner of the LCD screen. The LCD also displays a
message confirming the number or extension to which your calls are being
forwarded.
Step 3 To cancel call forwarding, press the CFwdAll soft key.
Cisco IP Phone Models 7960 and 7940 User Guide
3-8 78-10182-05Chapter 3 Placing a Call and Other Basic Phone Tasks
Making Conference Calls
Tip You can forward all calls from your phone to another phone even if you are not
at the location of your Cisco IP Phone. To do this, you need access to a web
page. For instructions, see the “How to Set Up Call Forwarding When Not at
Your Phone” section on page 4-9.
How Call Forwarding Works with Your Voice Mail System
Call forwarding sends all incoming calls intended for your Cisco IP Phone to
another number. However, your Cisco IP Phone does not relinquish the forwarded
call at the new number unless the call is answered (in other words, picked up by
a person or a mechanical answering machine). Your Cisco IP Phone considers a
forwarded call “unanswered” after a certain number of rings. Unanswered,
forwarded calls are redirected to your voice mail system (if one is available for
your Cisco IP Phone).
Making Conference Calls
Your Cisco IP Phone supports conference calls, enabling you to talk with multiple
parties at the same time.
This section covers the following topics:
• Placing a Conference Call, page 3-9
• Conference Call Tips, page 3-10
• Meet-Me Conference Calls, page 3-11
Placing a Conference Call
Follow these steps to turn a call into a conference call.
Procedure
Step 1 During a call, press the more soft key and then the Confrn soft key. Doing so
automatically activates a new line and puts the first party on hold.
Cisco IP Phone Models 7960 and 7940 User Guide
78-10182-05 3-9Chapter 3 Placing a Call and Other Basic Phone Tasks
Making Conference Calls
Step 2 Place a call to another number or extension.
Step 3 When the call connects, press Confrn again to add the new party to the conference
call.
Repeat these steps to add parties to the conference call.
Conference Call Tips
• To end a conference call, all but one party must hang up.
• Once the conference call initiator disconnects, no additional parties can be
added.
• To mute a conference call, press Mute.
• To put a conference call on hold, press the Hold soft key.
Note Keep in mind when you put a call on hold, a beeping tone generates or
music plays. If you put a conference call on hold in order to place or
answer another call, you subject the other conference participants to
the beeping tone or music that automatically generates when the call
is on hold. To avoid disrupting the other callers, consider muting the
call instead.
• To place a conference call on the speakerphone, press the Speaker button.
Press the Mute button to mute the speakerphone. The conference parties
cannot hear you but you can hear them.
• Press the Trnsfer soft key to transfer a conference call to another person. Dial
the number to which you want to transfer the call and then press Trnsfer
again. All parties will be transferred.
Cisco IP Phone Models 7960 and 7940 User Guide
3-10 78-10182-05Chapter 3 Placing a Call and Other Basic Phone Tasks
Making Conference Calls
Meet-Me Conference Calls
Your Cisco IP Phone supports Meet-Me conferences. A Meet-Me conference
allows other callers to dial into the conference call. A Meet-Me conference
requires a special conference number which is pre-configured for this purpose by
your system administrator.
This section covers these topics:
• Establishing a Meet-Me Conference, page 3-11
• Joining a Meet-Me Conference, page 3-11
Establishing a Meet-Me Conference
Follow these steps to establish a Meet-Me conference call.
Before You Begin
Contact your system administrator for the necessary Meet-Me conference number
or numbers.
Procedure
Step 1 Press the more soft key twice to display the Meet-Me tab.
Step 2 Press the Meet-Me soft key.
Step 3 Dial the Meet-Me conference number.
Step 4 Follow the voice instructions to establish the Meet-Me conference.
Joining a Meet-Me Conference
To join a Meet-Me conference, simply dial the Meet-Me conference number
provided by the Meet-Me conference initiator. You are connected to the
conference once the conference initiator has dialed in and established the
conference. You do not need to press the Meet-Me soft key on your
Cisco IP Phone.
Cisco IP Phone Models 7960 and 7940 User Guide
78-10182-05 3-11Chapter 3 Placing a Call and Other Basic Phone Tasks
Adjusting the Ringer Volume
Adjusting the Ringer Volume
To change the volume used by the ringer, press the up or down Volume button
while the handset is in its cradle. Continue to press the Volume button to hear
sample rings and to adjust the volume to the desired level.
Note In addition to changing the ringer volume, you can also change the ringer
sound. For instructions, see the “Changing the Ringer Sound” section on
page 4-17.
Cisco IP Phone Models 7960 and 7940 User Guide
3-12 78-10182-05C H A P T E R 4
Getting Started with Feature Buttons
Your Cisco IP Phone has five feature buttons:
• Services button—Displays services on your phone’s LCD screen. These are
services to which you have already subscribed using the Cisco IP Phone User
Options web page.
• Messages button—Provides access to your voice mail message system.
• Settings button—Displays network settings on your phone’s LCD screen,
plus options for adjusting your phone’s ringer sound and LCD contrast.
• Directories button—Displays various directories on your phone’s LCD
screen, including missed, received, and placed calls.
• The i button—Displays helpful information about other buttons and features.
Note To locate the feature buttons on your phone, see the “A Road Map to Your
Cisco IP Phone” section on page 1-1.
These sections provide instructions for using feature buttons:
• Tips for Using the LCD Screen, page 4-2
• Using the Services Button, page 4-2
• Using the Messages Button, page 4-15
• Using the Settings Button, page 4-16
• Using the Directories Button, page 4-18
• Using the i Button for Instant Help, page 4-20
Cisco IP Phone Models 7960 and 7940 User Guide
78-10182-05 4-1Chapter 4 Getting Started with Feature Buttons
Tips for Using the LCD Screen
Tips for Using the LCD Screen
Here are some tips for using the LCD screen on your Cisco IP Phone. These tips
can help you navigate menus and soft key options that display on your phone’s
LCD screen when you press a feature button.
• There are two ways to scroll through menu items:
– Using the Navigation button—Press the Navigation button (this is the
button with the up and down arrows) to select (or highlight) a menu item.
Then press the Select soft key.
– Using an Item Number—You can press the number key on your phone’s
key pad that corresponds to the item number displayed on the LCD
screen. For example, from the Settings menu, press 1 to reach the
Contrast menu, press 3 to reach the Network Configuration menu, and so
on. Use this method to select any menu item that has an item number to
the left of it.
• Press the Exit soft key to return to the previous menu.
• Soft keys correspond to the option tabs displayed along the bottom of your
LCD screen. Soft keys change depending on the status of your phone. For
example, you can see one set of soft key options when you pick up the
handset, and another set when the phone is not in use.
• The >> soft key allows you to re-position your cursor. TheChapter 4 Getting Started with Feature Buttons
Using the Services Button
Tip What are services? Services can consist of special phone features (such as
speed dialing and call forwarding) as well as information retrieved from the
Web through an Extensible Markup Language (XML)-based application (such
as movie listings, news headlines, or services specific to your company.)
This section covers the following topics:
• Using the Extension Mobility Service, page 4-3
• Establishing Cisco IP Phone Services, page 4-6
Using the Extension Mobility Service
Your system administrator might have provided you with a service called
Cisco CallManager Extension Mobility. This service allows you to associate your
phone number and user profile with any Cisco IP Phone. When you use your
extension mobility personal identification number (PIN) to log in to a
Cisco IP Phone, your assigned telephone number and all of its characteristics
(ring type, speed dial, etc.), are associated with that phone.
Extension mobility can be useful in sales offices or other environments in which
employees do not routinely conduct business in the same office space every day.
Extension mobility also allows you to conduct business from hotels that provide
Cisco IP Phones. Your system administrator will inform you if this service is
available to you.
This section covers the following topics:
• How to Log in to Extension Mobility, page 4-4
• How to Log Out of Extension Mobility, page 4-5
• How to Change Your Extension Mobility PIN, page 4-5
Cisco IP Phone Models 7960 and 7940 User Guide
78-10182-05 4-3Chapter 4 Getting Started with Feature Buttons
Using the Services Button
How to Log in to Extension Mobility
To log in to Cisco CallManager Extension Mobility, perform these steps.
Procedure
Step 1 Press the Services button on your Cisco IP Phone model 7960 or 7940.
Step 2 From the Services menu, use the Navigation button to select the login option for
extension mobility. as it is displayed on your phone’s LCD screen. Press the
Select soft key.
The LCD screen prompts you to enter your user ID and PIN. Your user ID and a
default PIN are provided to you by your system administrator.
Note Your system administrator chooses the name of the login and logout
options for your extension mobility service. These options might
display on the Settings menu of your phone’s LCD screen as “login
service” and “logout service,” for example.
Step 3 Enter your user ID.
Enter the letters of the alphabet using your key pad. Press the phone key
associated with a letter. To scroll through the letters associated with each key,
press the key rapidly. For example, press 2 to display the letter “a.” To enter the
letter “b,” press 2 again without pausing. Press theChapter 4 Getting Started with Feature Buttons
Using the Services Button
Tips
• If you are logged out of a Cisco IP Phone that has Cisco Extension Mobility
Service configured for it, you will not be able to make calls or check voice
mail messages from that phone until you log in. If you can hear a busy signal
after pressing the Messages button or any key on the touch tone key pad, then
you must log in before using the phone.
• You cannot log in to a phone that is off the hook.
• Extension mobility might automatically log you out after a certain amount of
time. This time limit is established by your system administrator.
How to Log Out of Extension Mobility
When you are ready to log out of extension mobility, press the Services button on
your phone, then use the Navigation button to select the logout option for
extension mobility. Press the Select soft key. Press the Exit soft key to return to
the previous screen.
How to Change Your Extension Mobility PIN
To change your Extension Mobility PIN, use the Cisco IP Phone User Options
web page. This web-based application allows you to change your PIN and to
subscribe to other services. Your system administrator provides you with the URL
you need to access the User Options web page.
Follow these steps to change your Extension Mobility PIN.
Procedure
Step 1 Use your Web browser to access the URL provided by your system administrator.
The Cisco IP Phone User Options Log On page appears.
Step 2 Enter your user ID and your password and click Log On. These are provided by
your system administrator.
The User Options Menu page appears.
Step 3 From the User Options Menu page, click Change your PIN.
The Update your PIN page appears.
Cisco IP Phone Models 7960 and 7940 User Guide
78-10182-05 4-5Chapter 4 Getting Started with Feature Buttons
Using the Services Button
Step 4 Enter your password, your current PIN, and your new PIN in the required fields
and click Update.
Step 5 When you are finished, click Return to the menu or Log off at the bottom of the
Update Succeeded page.
See the “Establishing Cisco IP Phone Services” section on page 4-6 for more
instructions on using the Services button.
Establishing Cisco IP Phone Services
In order to establish services so that they are displayed on your phone’s LCD
screen, you need to use the Cisco IP Phone User Options web page. The User
Options web page allows you to subscribe to services, assign speed dial buttons,
manage a personal address book, and set up call forwarding when you are away
from your phone.
The following topics describe how to establish services with the User Options
web page:
• How to Log On to the Main Menu Page, page 4-7
• How to Set Up Speed Dial Buttons, page 4-7
• How to Set Up Call Forwarding When Not at Your Phone, page 4-9
• How to Cancel Call Forwarding, page 4-10
• How to Subscribe to Services, page 4-11
• How to Change or End Subscriptions, page 4-12
• How to Manage Your Personal Address Book, page 4-13
Cisco IP Phone Models 7960 and 7940 User Guide
4-6 78-10182-05Chapter 4 Getting Started with Feature Buttons
Using the Services Button
How to Log On to the Main Menu Page
Your system administrator will provide you with the URL needed to access the
User Options page with your Web browser.
Follow these instructions to log on and to access the main menu.
Procedure
Step 1 Use your Web browser to access the URL provided by your system administrator.
The Cisco IP Phone User Options Log On page appears.
Step 2 Enter your user ID and your password and click Log On. These are provided by
your system administrator.
The User Options Menu page appears.
Step 3 Select your phone from the “Select a device to configure” drop-down list.
Once you select your phone, a complete list of menu options appears.
Tips
• Your password allows you to access the Cisco IP Phone User Options web
page. Your PIN allows you to log in to a phone if you use Extension Mobility
services.
• Promptly replace your default password or PIN to maintain privacy. From the
User Options Menu page, click Change your Password. To establish a
personal identification number (PIN), click Change your PIN from the Menu
page.
How to Set Up Speed Dial Buttons
The buttons to the right of the LCD screen on your Cisco IP Phone can be used as
phone lines or as speed dial buttons, as determined by your system administrator.
You can assign phone numbers and text labels to speed dial buttons using the
Cisco IP Phone User Options web page.
Cisco IP Phone Models 7960 and 7940 User Guide
78-10182-05 4-7Chapter 4 Getting Started with Feature Buttons
Using the Services Button
Note If you are using one or more Cisco IP Phone 7914 Expansion Modules, you
have access to extra speed dial or line buttons. See Chapter 5, “Using the
Cisco IP Phone 7914 Expansion Module,” for details.
Follow these instructions to set up your speed dial buttons.
Procedure
Step 1 From the User Options Menu page, click Update your Speed Dial buttons. (If
you need help accessing the Menu page, see the “How to Log On to the Main
Menu Page” section on page 4-7.)
The Speed Dial Configuration page appears.
Step 2 Enter the phone numbers or extensions that you want to associate with your speed
dial buttons.
Note Be sure to enter the numbers exactly as you would if you were to call
that number. For example, include an access code such as 9 or the area
code, if necessary.
Step 3 Enter the corresponding text label that you want displayed on your phone’s LCD
screen.
Step 4 Click Update to activate new speed dial buttons and to display the corresponding
text.
Step 5 When you are finished, click Return to the menu or Log off at the bottom of the
Configure Speed Dials page.
Note If Extension Mobility is configured for your phone, you must log out
and back in for the new speed dial settings to take effect.
Cisco IP Phone Models 7960 and 7940 User Guide
4-8 78-10182-05You can also read