Xerox Device Agent User Guide
←
→
Page content transcription
If your browser does not render page correctly, please read the page content below
Version 6.4
May 2021

Xerox® Device Agent
User Guide
©2021 Xerox Corporation. All rights reserved. Xerox® and Phaser® are trademarks of Xerox Corporation in
the United States and/or other countries. BR17444
Microsoft®, Windows®, Windows Vista®, SQL Server®, Microsoft®.NET, Windows Server®, Internet Explorer®,
Windows Media® Center, and Windows NT® are either registered trademarks or trademarks of Microsoft
Corporation in the United States and/or other countries.
Linux® is a registered trademark of Linus Torvalds.
Apple®, Macintosh®, and Mac OS® are registered trademarks of Apple Inc.
VMware® is a registered trademark of VMware, Inc. in the United States and/or other jurisdictions.
Cisco® is a registered trademark of Cisco and/or its affiliates
Parallels Desktop is a registered trademark of Parallels IP Holdings GmbH.
Changes are periodically made to this document. Changes, technical inaccuracies, and typographic errors
will be corrected in subsequent editions.
Document Version: 6.4 (May 2021)

Revision History
  Version     Date             Description

  6.4         May 2021         By default, the software is set to automatically upgrade after each
                               installation or upgrade. Xerox Device Agent may be disabled or
                               terminated if communication thresholds set in Xerox Services
                               Manager are exceeded.
  6.3         October 2020     Now supports SQL Server 2019. Added support for multiple card
                               readers.
  6.2         May 2020         Updated support software section. Changed CloudDM to
                               CloudFM.
  6.1         October 2019     Added CloudDM Setting. (This does not apply to Xerox® Device
                               Agent Lite installs and upgrades.)
  6.0         May 2019         Removed references to Xerox Print Agent; it is no longer supported.
                               Added support for Windows Server 2019.
                               Changed the default auto-upgrade settings to Automatic.
                               Noted ability to re-register an account in Xerox® Services Manager.
                               Send card reader data to Xerox® Services Manager
  5.6         October 2018     SQL Server 2017 Support, SNMP Access Denied Status email, and
                               installation failure warning for unsupported .NET versions
  5.5         May 2018         Updated Branding, fixed bookmarks, updated supported
                               hardware, added the recovery services feature, added remote
                               snmp v3 discovery, add Appliance Deployment Appendix
  5.4         October 2016     Added registration option for PE upgrades that mimic Xerox®
                               Device Agent
  5.3         February         Updated supported hardware and software requirements, added
              2016             support for Macintosh environments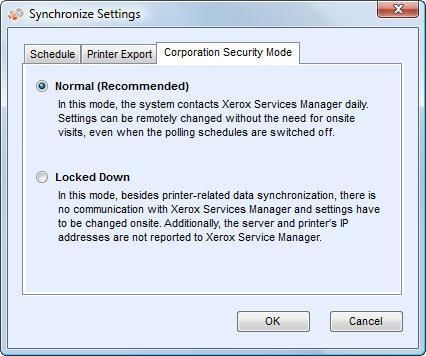
Introduction

   Version     Date         Description

   5.2         June 2015    Added features from the 5.1 and 5.2 releases. Updated the
                            hardware and software requirements.
   5.0         July 2014    Rewritten for clarity; proxy consolidation updates
   1.1         April 2013   Operating System: Added Windows® 7 Home Edition
                            Removed Windows® 7 2008 r2 Domain Controller support
                            Memory: Removed Windows® 2012 Domain Controller support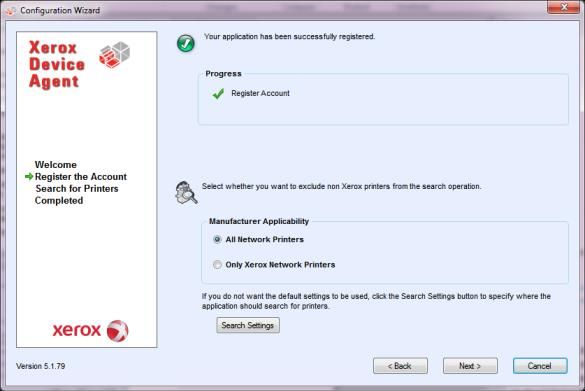
Contents

1.   Introduction ................................................................................................................................................................................................ 1
     Product Overview ...................................................................................................................................................................................... 1
          Data Security......................................................................................................................................................................................... 1
     Using this Guide ........................................................................................................................................................................................ 1

2.   Getting Started .......................................................................................................................................................................................... 2
     Checking the Requirements ................................................................................................................................................................. 2
          Hardware and Software ................................................................................................................................................................... 2
          Requirements to Run on a Macintosh Operating System .................................................................................................. 3
          Unsupported Configurations.......................................................................................................................................................... 4
          Database Configurations................................................................................................................................................................. 4
     Installing the Software ........................................................................................................................................................................... 4
          Uninstalling the Application ........................................................................................................................................................... 8
          Automatic Updates ............................................................................................................................................................................ 8
          Disablement and Termination Thresholds ............................................................................................................................... 9

3.   Configuring the System ...................................................................................................................................................................... 10
     Overview .................................................................................................................................................................................................... 10
     Using the Configuration Wizard ...................................................................................................................................................... 10
          Registering the Account ................................................................................................................................................................ 10
          Starting the Wizard.......................................................................................................................................................................... 10
          Searching for Printers ..................................................................................................................................................................... 20
     Opening the Application ..................................................................................................................................................................... 21

4.   Using the Interface ............................................................................................................................................................................... 22
     Overview .................................................................................................................................................................................................... 22
     Understanding the Screens ............................................................................................................................................................... 23
          Viewing the Printers Screen.......................................................................................................................................................... 23
          Viewing the Synchronize Screen ................................................................................................................................................ 30
          Viewing the Settings Screen ........................................................................................................................................................ 30
     Using the System Tray......................................................................................................................................................................... 31
     Resizing the Application ...................................................................................................................................................................... 32

5.   Working with Printers ........................................................................................................................................................................... 33
     Overview .................................................................................................................................................................................................... 33
     Adding a Printer ...................................................................................................................................................................................... 33

     Xerox® Device Agent User Guide                                                                                                                                                                                 i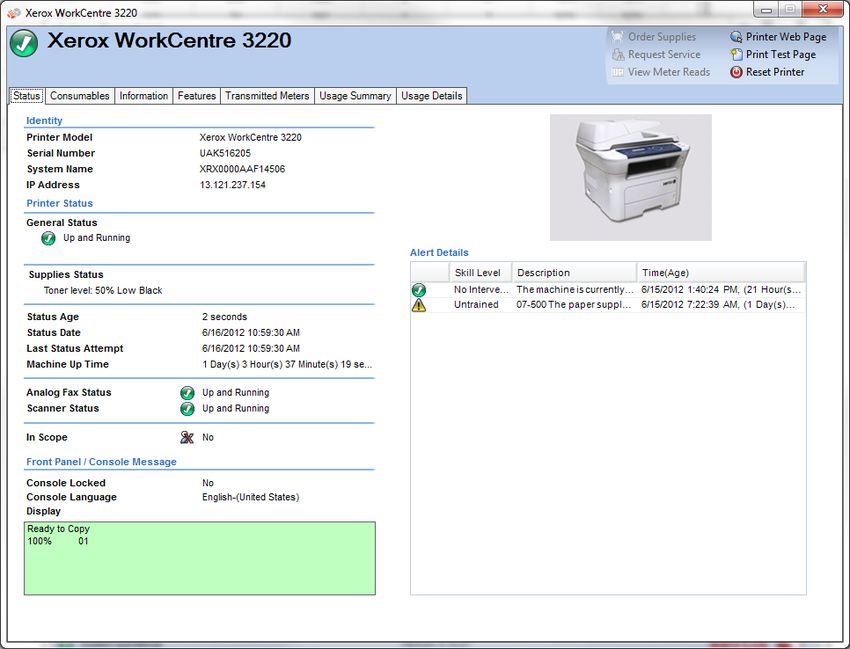
Contents
Adding Printers by IP Address or DNS Name ........................................................................................................................ 33
Adding Multiple Printers ................................................................................................................................................................ 34
Adding a Direct Printer ........................................................................................................................................................................ 35
Deleting a Printer ................................................................................................................................................................................... 36
Exporting the Printer List..................................................................................................................................................................... 36
Viewing Printer Properties .................................................................................................................................................................. 37
Checking the Status......................................................................................................................................................................... 37
Checking Consumables .................................................................................................................................................................. 39
Viewing Printer Information ........................................................................................................................................................ 41
Understanding Printer Features ................................................................................................................................................. 43
Viewing Transmitted Meters Usage ......................................................................................................................................... 45
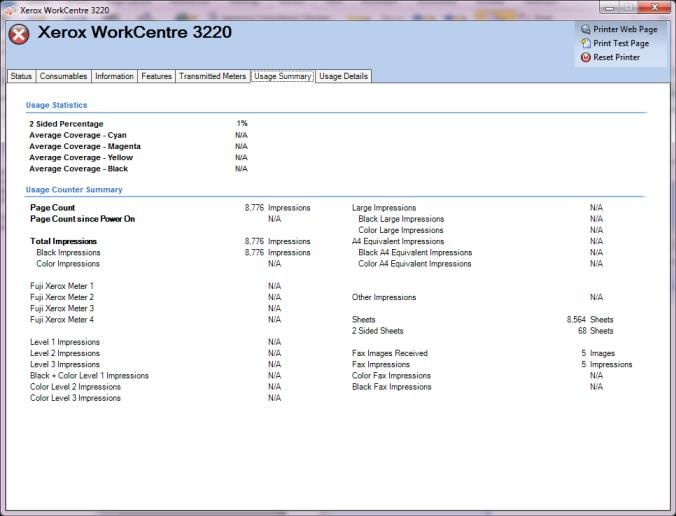
Checking the Usage Summary ................................................................................................................................................... 46
Viewing the Usage Counter Details .......................................................................................................................................... 47
6. Synchronizing the Data ....................................................................................................................................................................... 49
Overview .................................................................................................................................................................................................... 49
Using the Details View......................................................................................................................................................................... 49
Using the Data View............................................................................................................................................................................. 50
7. Configuring the Settings..................................................................................................................................................................... 52
Overview .................................................................................................................................................................................................... 52
Working with the Views ....................................................................................................................................................................... 52
Using the Search View.................................................................................................................................................................... 53
Viewing the Status Read ............................................................................................................................................................... 57
Viewing the Local Alerts ................................................................................................................................................................ 59
Viewing the Remote Alerts ........................................................................................................................................................... 60
Working with Administrator Settings ....................................................................................................................................... 61
Changing the Language ................................................................................................................................................................ 62
Working with Automatic Updates ............................................................................................................................................. 63
Viewing the Log ................................................................................................................................................................................ 65
Using Diagnostics............................................................................................................................................................................. 65
Using CloudFM .................................................................................................................................................................................. 66
8. Troubleshooting ..................................................................................................................................................................................... 67
Recovery Services ................................................................................................................................................................................... 67
Monitoring Recovery Services ..................................................................................................................................................... 67
Running Recovery Services ........................................................................................................................................................... 67
Disabling Recovery Services Automatic Upload .................................................................................................................. 68
Xerox® Device Agent User Guide ii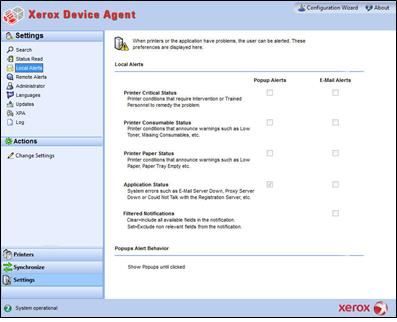
Contents

     Issues and Responses........................................................................................................................................................................... 68

9.   Appliance Deployment Appendix ................................................................................................................................................... 71
     Hardware ................................................................................................................................................................................................... 71
     Windows Convenience Modifications ........................................................................................................................................... 71

     Xerox® Device Agent User Guide                                                                                                                                                                              iii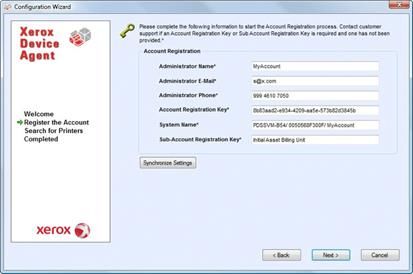
1.   Introduction

     Product Overview
     The Xerox® Device Agent enables the service provider to monitor and assess output devices on your
     network, and provides continuing asset management information. Xerox® Device Agent is a Microsoft
     Windows® device management client that uses Microsoft® SQL Server® to provide automated device meter,
     supplies, and status retrieval and submission to Xerox® Services Manager, and proactive alert monitoring for
     automatic incident creation and problem resolution. Xerox® Services Manager is a web-based application
     that provides a single point of management for your enterprise’s output devices, supplies, and service-
     related incidents to help you manage costs and increase device and user productivity. Xerox® Device Agent
     features a built-in alert detection system that can warn you when certain conditions exist in monitored
     devices. It can:
     • Discover network-connected printers
     • Monitor for status and alert conditions and notify via e-mail when they occur

     DATA SECURITY

     Xerox® Device Agent communicates periodically with Xerox® Services Manager. To ensure maximum
     security for your data, Xerox® Services Manager is hosted in an ISO 27001-compliant facility. Data sent to
     your partner is primarily printer-specific billing counters, supply levels and printer alerts. Data is compressed,
     encrypted and protected by several mechanisms:
     • Xerox® Device Agent initiates all contact with Xerox® Services Manager and standard firewall
       configurations on the site are required to enable communication.
     • Xerox® Device Agent requires a valid proxy, if one is required for Internet communication.
     • Xerox® Services Manager data server sits behind a secure firewall and is not accessible from the Internet.
     • Xerox® Services Manager user interface access requires authentication. Xerox® Device Agent information
       is stored in an account specific to the customer site and the access to that account data in Xerox®
       Services Manager is restricted to the Xerox® Services Manager account managers.
     • All Xerox® Services Manager communication is logged and available for viewing.
     • Data sent to your networked devices consists primarily of remote commands that allow an account
       support administrator to request Xerox® Device Agent command execution.
     • Requests principally involve firmware updates, printer reboots, test page printing and current device
       status refreshes.
     • Xerox® Device Agent periodically polls its Xerox® Services Manager account for command requests.
     • Operations results from command requests are sent to the Xerox® Services Manager server, where they
       are reviewed.

     Using this Guide
     This guide is intended for users installing Xerox® Device Agent.

     Xerox® Device Agent User Guide                                                                                   1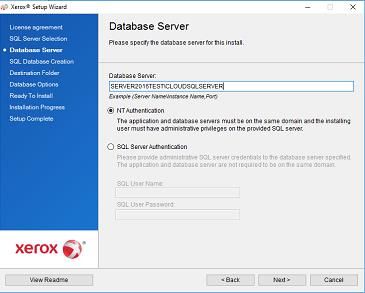
2.   Getting Started

     Checking the Requirements
     Before you can start using the client software, you must ensure that the requirements described
     in the following sections are in place.

     HARDWARE AND SOFTWARE

     This section describes the hardware and software requirements necessary for running the client
     software.

       Item                           Requirement
       Operating System: (32- and     • Windows Server® 2012 and 2012 R2
       64-bit)                        • Windows Server® 2016
                                      • Windows Server® 2019
                                      • Windows® 8.1
                                      • Windows® 10 Professional, Enterprise, Home
                                      • Apple® OS 10.9.4 or later when run with the Parallels®
                                        Desktop hardware emulation software. Go to the
                                        Requirements to Run on a Macintosh Operating System
                                        section for requirement details.
                                      • Microsoft®.NET framework 4.5.2 Extended (Full Version)
                                        installed

       DB Server                      • Note: Xerox® Device Agent can use a customer’s pre-
                                        existing full SQL Server. During installation, you can
                                        choose a database running on a standalone server.
                                      • SQL Server® Compact Edition
                                      • SQL Server® 2012 SP4
                                      • SQL Server® 2014 SP3
                                      • SQL Server® 2016 SP2
                                      • SQL Server® 2017
                                      • SQL Server® 2019
                                      • The software includes Microsoft SQL Server® Compact
                                        Edition.

       Memory                         • Windows® 8.1, Windows® 10, Windows Server® 2012
                                        and higher: 2 GB of RAM (2.5 GB or higher
                                        recommended)

       Processor                      • 1.7 GHz processor or better

       Hard Disk                      • Minimum free space is 450 MB

       Minimum Resolution             • 1024 x 768

     Xerox® Device Agent User Guide                                                                    2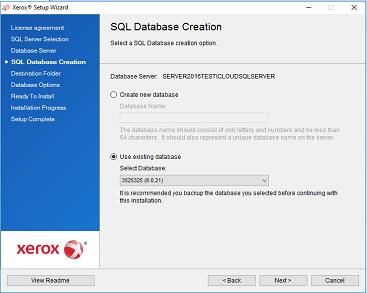
Getting Started

  Permissions                      • You must install the application software on the client
                                     computer using the administrative account or an
                                     account with administrative privileges.

  Internet Connection              • Required
Notes
• We strongly recommend that you update your host computers with the latest critical patches
  and service releases from Microsoft Corporation.
• The Network Transmission Control Protocol/Internet Protocol (TCP/IP) must be loaded and
  operational.
• Requires SNMP-enabled devices and the ability to route SNMP over the network. It is not
  required to enable the SNMP service on the computer where Xerox® Device Agent will be
  installed or any other network computers.
• You must install Microsoft.NET framework 4.5.2 Extended (Full Version) before you install the
  application.
The application should not be installed on a PC where other SNMP-based applications or other
Xerox printer management tools are installed, since they may interfere with each other’s
operation.

REQUIREMENTS TO RUN ON A MACINTOSH OPERATING SYSTEM

This table lists the system requirements that you must meet to run Xerox® Device Agent in a
Macintosh environment. You can only run Xerox® Device Agent in a Macintosh environment by
using hardware emulation software. You cannot run Xerox® Device Agent in a native Macintosh
environment.

  Item                           Requirement

  Apple Mac Hardware             • Intel Core 2 Duo, Core i3, Core i5, Core i7, or Xeon processor

  Host Operating System for      • Apple OS 10.9.4 or Later
  Apple Mac Platforms
  Hardware Emulation             • Parallels Desktop v10.2.1 or later required for Apple OS X 10.9
  Software                         “Mavericks” – 10.10.x “Yosemite” host systems
                                 • Parallels Desktop v11.0.1 or later required for Apple OS X
                                   10.11 “El Capitan” host system

  Supported Guest Windows • Windows® 8.1, and 8.1 update 1 (64-bit only for update 1)
  Operating Systems Running • Windows® 10
  a Parallels Desktop (32 and
  64 bit)
  Additional Software            • Microsoft®.NET framework 4.5.2 installed

  Memory                         • 2 GB for all Windows Applications

  Hard Disk                      • Minimum free space is 600 MB (100 MB for Xerox® Device
                                   Agent and up to 500 MB for the Microsoft®.NET framework,
                                   if not previously installed.)
                                 • An additional 850 MB of disk space on the boot volume
                                   (Macintosh HD) for Parallels Desktop installation

Xerox® Device Agent User Guide                                                                       3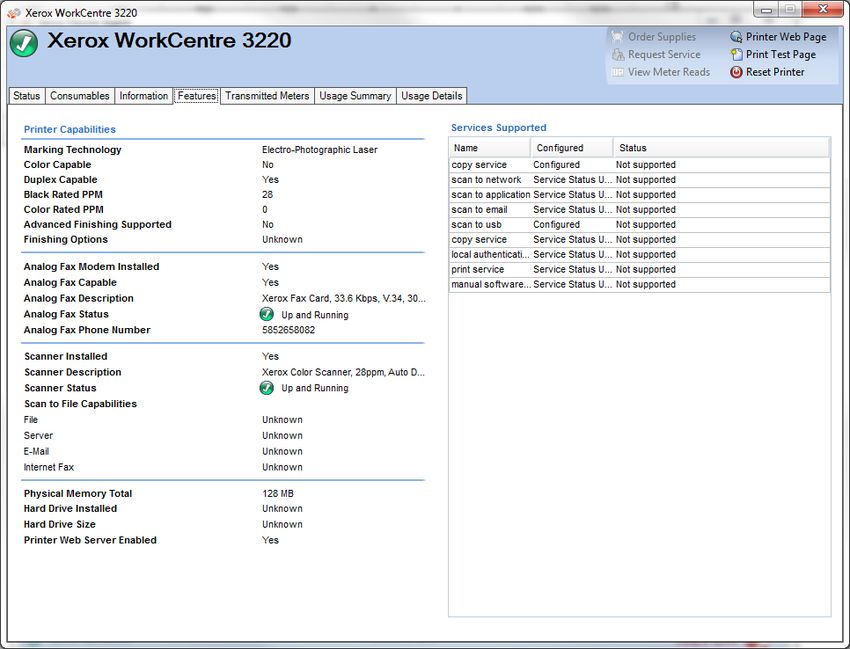
Getting Started

UNSUPPORTED CONFIGURATIONS

This section describes the configurations that are not supported.
• Installation of the application on a computer with another Xerox device management
  application, such as Xerox® Device Manager.
• Native Mac OS® operating system software (i.e., Xerox® Device Agent can only run on the
  Apple Mac Platform when the Parallels Emulation Software is installed.)
• Any version of UNIX® operating systems, Linux® operating systems, Windows® systems
  running the Novell client, Windows® 7, Windows® XP, Windows® Vista, Windows NT® 4.0,
  Windows Media® Center, Windows® 2000, Windows® Server 2008 and 2008 R2, Windows®
  Server 2003, Windows® 8 RT, Operating systems running Terminal Services for applications
  and Installation on Windows systems running domain controllers.
• Since this application has only been tested on VMware® Lab Manager/workstation
  environment, other virtual environments are not supported.

DATABASE CONFIGURATIONS

The application installs SQL Server Compact Edition 4.0 (SQL CE) database engine and database
files that store printer data and application settings within the installation directory. No database
licensing is necessary for the application. Xerox® Device Agent also supports existing instances of
SQL Server, as described above.

Installing the Software
In this section, you will learn how to:
• Install the software
• Change the destination folder location of the application
Note
• Before installation, disable the Sleep and Hibernation modes to allow the application to collect
  and transmit meter information.
To install the software:
1. Log in as an administrator.
2.   Double-click the installation file. The Select Language screen displays.

Xerox® Device Agent User Guide                                                                      4
Getting Started

Note
If you do not have Microsoft.NET framework 4.5.2 Extended (Full Version), the installer displays
an error message prompting you to install .NET framework 4.5.2 Extended (Full Version) before
you continue with installation. You can download the .NET framework Extended (Full Version)
from the Microsoft Web site.
3.   Verify that the correct language is highlighted.
4.   Click Install. The License Agreement displays.
5.   Click View Readme. The ReadMe file displays.
6.   Select I accept the terms of the license agreement radio button.

     Note
     If you are performing a manual update of the application and you have the current version
     of the application open, you are prompted to accept the End-User License Agreement
     (EULA).

7.   Click Next.
8.   In the SQL Server Selection screen choose one of the following:
     -    Use built-in database server (SQL CE): Select this option to run the application on a SQL
          CE database server then select this option. The SQL CE is automatically installed on the
          customer machine. Go to step 12.
     - Use an existing MS SQL database server: Select this option to use the SQL server that is
          already available. Go to the next step.
9.   Click Next. The Database Server screen displays. Provide the authentication type. Click Next.

10. Click Next. In the SQL Database Creation screen, select one of the following:
     -    Create New Database: if you want to create a new database. With this option, the
          application backs up your current database, but you still need to configure the
          application and search for printers again to populate your new database. Use this
          setting if the account used for the previous installation is unknown, different than the
          new account or configuration, or if you want to start with a clean installation with
          default settings

Xerox® Device Agent User Guide                                                                       5
Getting Started
- Use Existing Database: if you want to upgrade using the information from your current
database, and if the last installation was for the same account and was properly
configured for the new installation.
11. Click Next. A warning message prompts the user to back up the database before upgrading,
Click Yes.
12. The Destination folder screen displays. Do one of the following:
– To accept the default location for the Destination folder, click Next (recommended).
– To change the default location, click Change. The Browse for Folder dialog box displays.
Note : If you are installing the application on an operating system in a language other than
English where the "Program Files" directory name is localized, the default installation path is
displayed in English. The application, however, installs at the correct localized directory for
your selected language.
Xerox® Device Agent User Guide 6Getting Started
- Navigate to and select the desired folder or create a new one.
- Click OK. The dialog box closes.
Note
You cannot install your application in the root directory.
13. The Database Options screen opens if a previous version of the database is detected. Make
a selection and click Next.
- Create New Database if you want to create a new database. With this option, the
application backs up your current database, but you still need to configure the
application and search for printers again to populate your new database. Use this
setting if the account used for the previous installation is unknown, different than the
new account or configuration, or if you want to start with a clean installation with
default settings
- Use Existing Database if you want to upgrade using the information from your current
database, and if the last installation was for the same account and was properly
configured for the new installation.
14. Click Install. The Installing Xerox® Device Agent screen displays, indicating the progress of
the installation, after which the Install Completed screen displays.
15. To launch the application immediately, leave the check box saying “Launch Xerox® Device
Agent now” selected, and click Finish (Recommended). The Configuration Wizard displays.
Note
If other applications are running on your computer, you might experience a delay from the
time installation concludes and the Configuration Wizard begins. See the Registering the
Account section for more information.
To launch the application later, de-select the check box and click Finish. See the Registering
the Account section for more information.
Notes:
You must complete the Configuration Wizard after installation. See Configuring the System
for further information.
Xerox® Device Agent User Guide 7Getting Started
You can click Cancel on any screen during the installation. A dialog box displays asking you
to confirm the cancellation. If you click Yes, the Install Failed! screen displays, indicating that
the application remains uninstalled. Click Finish. To install the application, you need to run
the installer again.
If an automatic or manual installation fails (i.e., because the correct version of .NET is not
installed), a pop-up message alerts the user and an error event is added to the application
log and an e-mail is sent to the configured administrator account. The pop-up error
communications continue until you opt out of the alert or the error is resolved.
UNINSTALLING THE APPLICATION
Note:
This is an optional feature that allows you to uninstall the database when you uninstall the
application.
If you decide to uninstall the application, the Uninstall Options screen displays.
1. Select one of the following:
- Do not remove the database if you want to preserve your current database.
- Remove the database if you do not need to preserve your current settings for a future
installation. This removes the active database and any future installation creates a new
database at the time of installation. If there are any databases backed up during the
installation as part of the Database Options, they are not removed.
2. Click Continue.
AUTOMATIC UPDATES
The application supports automatic update. When a newer version of the application is released,
it is loaded on the Auto Update server, which the application can connect to.
The application contacts the Auto Update server at:
• Scheduled intervals that you specify in the Updates section of the Settings area
• Application startup, if the schedule is in the past
• Your request, from the Updates section of the Settings area
The server identifies if there is a newer version available for download.
If you set the application to prompt you when updates are available, or if you clicked to check for
updates, the application asks you to confirm whether you want to update the application.
• If you select No, the Next scheduled upgrade dialog opens. Select the day of the week and
time of the day when you would like to receive your next reminder to upgrade.
• If you select Yes, the application proceeds automatically to:
- Download the new installer
- Run the new installer (which closes the application if it is open)
- Uninstall the older version and install the newer version
- Run the new version of the application that was just installed
Notes:
• If you are updating the application, but you decide to cancel the installation process, you must
run the installation setup file again to complete the installation.
• Depending on where you cancelled the update in the installation process, you could end up
with an unusable application.
Xerox® Device Agent User Guide 8Getting Started DISABLEMENT AND TERMINATION THRESHOLDS When disablement thresholds are enabled in Xerox Services Manager, if Xerox Services Manager has not communicated with Xerox Device Agent within the specified period of time, or the customer or account has been disabled in Xerox Services Manager, then the Xerox Device Agent may be disabled or terminated. These thresholds cannot be edited in Xerox Device Agent. To re-enable a Xerox Device Agent that has been disabled for exceeding the communication threshold, you need to resolve the issue that caused the disablement. It is impossible to re-enable a Xerox Device Agent that has been terminated; in this instance, you must reinstall the Xerox® Device Agent. When a Xerox Device Agent is pending disablement or termination due to communication failure, warning emails are be sent if email alerts are configured in Xerox Device Agent. See Viewing the Local Alerts section in this document to configure emails. Xerox® Device Agent User Guide 9
3.   Configuring the System

     Overview
     You must complete a minimum set of requirements in the Configuration Wizard after installation,
     according to your site requirements, to use the application.
     The Configuration Wizard is divided into two sections:
     • Register the Account: Enables communication between the application and Xerox® Services Manager.
     • Search for Printers: Allows you to find a printer or printers for the application to manage and monitor.

     Using the Configuration Wizard
     This section describes the features you can configure with the Configuration Wizard.

     REGISTERING THE ACCOUNT

     In the Register the Account section, you can:
     • Enter the administrator name, phone number, and e-mail address
     • Enter the application registration information
     • Modify the system name, if applicable
     • For partner edition installations and upgrades, if enabled, elect to mimic a Xerox® Device Agent install,
       which means you are not required to enter chargeback codes. This does not apply to Xerox® Device
       Agent Lite installs and upgrades.
     • Configure proxy server and security settings for Internet connectivity
     • Modify synchronization settings, if applicable
     An Operations Center Administrator can remotely change the registration of a Xerox® Device Agent to
     another account and or chargeback code in Xerox® Services Manager. Xerox® Device Agent registrations
     can be moved between partners within the same Operations Center and even to another Partner Account /
     CBC in another Operations Center. This function is documented in the Xerox® Services Manager
     Administration Guide.

     STARTING THE WIZARD

     If you launch the application immediately after installation, the Install Completed screen closes, and the
     Configuration Wizard automatically starts. If you did not launch the application immediately after
     installation, you can access the Configuration Wizard in one of the following ways:
     • Double-click the application icon on the desktop:
     • Navigate to the program from the Start menu
     • Right-click the tray icon in the System Tray and select Open.

     Xerox® Device Agent User Guide                                                                               10
Configuring the System
To configure the system:
1. Launch the application. The current availability of computer resources might cause a delay, so allow
enough time for it to launch successfully. When the Configuration Wizard starts, the Welcome screen
displays.
2. Click Next. If the application cannot connect to the Internet or communicate with the registration
server, the Proxy Server screen displays.
Note
You can use this screen to verify your network communication and proxy server settings by clicking
Test. The Communications Test dialog box displays, indicating a green checkmark for successful
communication validation with Internet Connection, the Registration Server, and the Update Server.
3. In the Proxy Server section, select one of the following options to verify that your proxy server settings
allow you to connect to the Internet:
– Use Browser Settings (Internet Explorer): By default, this option is selected, allowing you to use the
browser settings of the computer where the application is installed to access the Internet.
– No Proxy Server: Select this option if you connect to the Internet directly.
– Specified: Select this option to configure your proxy server settings manually to access the
Internet. The application enables the Security button and the Exceptions section.
Note
If you need to use bypass addresses, you must select Specified.
4. If you selected Specified:
a. Enter the HTTP or HTTPS (Secure) proxy server address or DNS name and ports. Or, enter
information in the HTTP fields, and ensure that the Use the same proxy server for both HTTP and
HTTPS check box is selected, so that the application populates the HTTPS fields with the same
information.
Note
If the addresses, DNS names, or ports are incorrect, the application displays a red exclamation
point in the corresponding field. You must correct the information before you can continue to the
next step.
Xerox® Device Agent User Guide 11Configuring the System
b. To identify any addresses that you want the proxy server to bypass, or to ensure that the
application bypasses the Xerox® Services Manager registration server when it is inside the firewall,
enter the addresses in the Exceptions section, separating each entry with a semicolon.
5. If your network uses an authenticated proxy server:
a. Click Security. The Advanced Communication Properties dialog box displays.
b. Select one of the following from the Authentication Type drop-down menu:
– Auto Detect
– NTLM
– Digest
– Kerberos
– Negotiate
– Basic
c. Complete the User Name, Domain, Password, and Verify Password text fields, and click OK. The
Advanced Communications Properties dialog box closes and returns you to the third screen in the
Register the Account section.
6. Click Test. A dialog box displays, showing the communication status with the following:
- Internet Connection: Verifies if the proxy settings are valid for basic Internet connectivity.
- Registration Server: Verifies that the application can communicate with the server required for
registering the application. The application must pass this test to proceed to the next step.
- Update Server: Verifies that the application can communicate with the server that provides
software updates, so that the application can automatically upgrade to the latest version. If this
test fails, you can continue with the registration, but you need to fix the issue in the future.
7. Click OK. The dialog box closes.
8. Continue to test each of the proxy server options until the Registration Server communication status
passes.
Note
If the connection test continues to fail and you have verified that the proxy server settings and the
Internet is functioning on the computer, contact your Xerox Support Representative.
9. When the Registration Server test passes, click OK. The dialog box closes, and you are returned to the
third screen in the Register the Account section.
10. Click Next. The next screen in the Register the Account section displays.
Xerox® Device Agent User Guide 12Configuring the System
11. Enter information in all the fields.
12. For Partner Edition only, if there is an XDA checkbox and it is checked, you will not be required to enter
a chargeback code for billing purposes. In addition, the appropriate product codes will be associated
with the new Xerox® Device Agent.
13. If you want to change the default synchronization settings, click Synchronize Settings. The Synchronize
Settings dialog box displays.
a. Schedule Tab: The application communicates with Xerox® Services Manager according to the
schedule. During the communication, the application obtains updates or changes to remote alert
profiles, submits meter reads, and updates In Scope status of printers.
Note
If you choose to synchronize with Xerox® Services Manager at a specific time each day, the
synchronization frequency cannot be set greater or less than 24 hours.
– Select one of the following:
– Every, and enter the frequency you wish to synchronize (cannot be fewer than 6 hours), or
– Daily at, and click the drop-down arrows to set a specific time of day.
Note
If you power down your computer at the end of the day, do not set your schedule outside of
business hours.
Xerox® Device Agent User Guide 13Configuring the System
b. Printer Export: By default, the application exports the printers and printer data that it finds to
Xerox® Services Manager. From this export, Xerox® Services Manager obtains the printer model
name and other data from the printer.
Note
Enable Printer Export is the recommended setting, and is selected by default.
If you select the Skip Printer Export radio button, a warning message displays, reminding you to
enable the printer export after you have completed configuration.
c. Corporation Security Mode: By default, the application contacts Xerox® Services Manager daily
and allows administrators to remotely change settings, avoiding the need for on-site visits. If your
corporation requires a higher level of security, you can lock down the communication, so that there
is no communication to Xerox® Services Manager except for printer data synchronization. In this
mode, any setting changes require an on-site visit and the application does not report any
computer or printer IP addresses or site settings to Xerox® Services Manager. It is not
recommended that you change this setting; however, if necessary, do the following.
Note
If your version of Xerox® Device Agent does not contain the Corporation Security Mode tab, it
operates in Normal mode.
Select the Locked Down radio button.
Xerox® Device Agent User Guide 14Configuring the System
d. Click OK to close the Synchronize Settings dialog box.
Note
If you enter incorrect information or leave a required field blank at any time during the Configuration
Wizard, the application flags the incorrect field with an exclamation point. When you hover over the
exclamation point, the application displays a brief message indicating the type of error, such as Invalid
Entry. This field must be filled in. You must fix the information before the application allows you to
continue to the next screen.
A message displays, indicating that the registration is in progress.
As the application attempts to complete registration, one of the three following statuses displays:
a. Pending Registration: The screen displays a warning, indicating that Xerox® Services Manager
needs to approve your registration.
- Click Try Again to re-attempt registration.
- If registration still remains pending, contact your Xerox Support Representative.
b. Failed Registration: The screen displays an error icon and corresponding message, asking you to
verify that the information you entered matches the provided correct registration information.
- Click Try Again to re-attempt registration.
- If the second registration attempt fails, verify that you have the correct registration
information.
- If the key and URL are correct, but your registration still fails, contact your Xerox Support
Representative.
c. Successful Registration: If the registration is successful, the screen displays a green checkmark icon.
14. In the Manufacturer Applicability area, select whether you want Xerox® Device Agent to search for all
printers or only for Xerox® printers.
15. If you accept the default selection All Network Printers, click Next.
Or, to configure printer search settings other than the default network settings:
a. Click Advanced. The Search Settings screen displays.
Xerox® Device Agent User Guide 15Configuring the System
Note
If you do not click Advanced, the default search is conducted using your local subnet.
b. Select one of the following:
- Default Search to start an automatic search for printers on the local subnet.
- No Search to skip setting up your search settings at this time.
- Specified Search to search for other printers or addresses outside of the local subnet.
The New Search and Current Searches sections now display. This also enables the SNMP V3
search option.
Note
If you are performing a specified search, the application exercises rule RFC 1918 and allows
you to use a subnet mask using internal addresses from x.x.x.0 to x.x.x.255. The first zero and
last 255 of the subnet range, however, are reserved.
Xerox® Device Agent User Guide 16Configuring the System
If you use a subnet mask that is not standard for your subnet class, a message similar to the
following displays:
The range specified includes [X] addresses. The subnet mask entered is not the default Class
[X] mask. Are you sure you want to use the range as specified?
- Verify that the range you specified is what you want.
- Click Yes to allow the entry of the range. Click No to return to the screen, without adding the
range, so the application can update the values.
- Make a selection from the Search Type drop-down menu.
- If you selected IPv4 Address or IPv6 Address, enter the Address in the Specified field.
- For IPv6, enter the value in the Prefix Length field.
- If you selected DNS Name, enter the name in the DNS Name field.
- If you selected IPv4 Address Range, enter the address ranges in the Start Address and End
Address fields; and enter the Subnet Mask in the specified field.
- If you selected IPv4 Subnet, in the Address in Subnet field, enter an IP address within the
subnet.
Then, enter the subnet mask in the Subnet Mask field.
- If you selected Import, click Export Template. Complete the CSV file. Click Instructions for
details on how to complete the CSV file. When you are ready, click Select File to import the list
of printer addresses.
- Once you have selected one of the Specified Search options and entered the information into
the appropriate fields, click to add your search information to the Current Searches list.
- If you chose SNMP V3 search, the only search type available is Import. The steps are the same
as when using the Import option in the Specified Search.
Note
If the IP addresses in your new search overlap any existing IP addresses in the Current Searches
list, the application displays the red exclamation point icon, indicating that you cannot add the
new IP address. To fix this error, go to the Current Searches lists, click Delete or Delete All and
search again for the new addresses.
c. If you want to modify any of the Advanced Communication Properties which include
Communications, Search settings, and printers to exclude from searches:
- Click Advanced. The Advanced Communication Properties dialog box opens.
Xerox® Device Agent User Guide 17Configuring the System
- Modify any of the following settings as needed.
- Enter "GET" community names to retrieve information from networked printers. To ensure a
proper printer search, efficient status retrieval, and data collection, you must set the correct
"GET" values in this dialog box. The default setting for the SNMP "GET" community name is
"public".
- Click New and enter a new name.
- Enter "SET" community names to configure parameters on networked printers. To reset the
printers, you must configure the correct "SET" names. The default settings for the SNMP "SET"
community name are "internal", "private", and "public".
Xerox® Device Agent User Guide 18Configuring the System
- Click New and enter a new name.
- Modify other settings in this dialog box, as necessary.
- Set the number of timeouts and retries in the Communications Settings section.
- From the Timeout drop-down list, select a number to identify the number of seconds.
- From the Retries drop-down list, select a number.
Note
If you want to return to the default settings in this dialog box, click Restore Defaults.
- On the Search tab, modify how often the application performs a printer search from the
Schedule.
- Click Never radio button to disable scheduling.
- Modify the Manufacturer, if necessary:
- Select All Network or Only Xerox® Network Printers.
- Select the check box to retrieve advanced printer information such as tray levels, bin levels,
and supply information when the printer is initially discovered.
- On the Exclusions tab, enter the IP addresses, subnets, or ranges that you wish to exclude. The
process is the same as when you are adding addresses to the discovery list. Follow the same
steps you would use to specify a search for printers.
Xerox® Device Agent User Guide 19Configuring the System
• Click OK to close the Advanced Communication Properties dialog box.
d. Click OK to close the Search Settings dialog box.
16. Click Next to continue to the Search for Printers section of the Configuration Wizard.
SEARCHING FOR PRINTERS
After you have completed registration successfully, the first screen of the Search for Printers section
displays, indicating the progress of your printer search.
Note
The Printer Search may take several minutes, depending on the search type, configuration, and number of
potential networked devices.
As the application attempts to complete the printer search, one of two statuses display in the Search for
Printers section of the screen: failed or successful.
1. If you receive a Failed Printer Search message, use one or more of the following methods to investigate
the failed printer search:
- Verify that all your printers are online, and click Search Again.
- Verify that SNMP is enabled on the printers.
- Verify that SNMP community names configured on the application match those on the printers.
- Verify that SNMP traffic is not being blocked on your network.
- Skip the printer search, and select Actions > Add Printer Wizard to do a one-off printer search.
- Click Single Address to add the IP address of a known printer.
- Ping the IP address of the printer from the computer on which the application is running.
- If the application still is unable to find any printers, click Back to return to the first screen of the
Search for Printers section, verify and/or adjust your search criteria, and start another search.
Xerox® Device Agent User Guide 20Configuring the System
- If you exhaust these options and cannot find any printers, contact your Xerox Support
Representative.
If you receive a Successful Printer Search message, the Search Results screen displays a check mark
and the number of discovered printers.
2. Click Next. The Progress screen displays the communication settings status, followed by the Completed
screen.
3. Click Finish to close the Configuration Wizard and open the application user interface.
Opening the Application
To access the application after installation and configuration, use one of the following methods:
• Double-click the application icon on the desktop.
• Double-click the tray icon in the System Tray, which is where the minimized application runs after
installation.
• Navigate to the Start menu programs folder and select the application.
• Right-click the tray icon in the System Tray and select Open.
Xerox® Device Agent User Guide 214. Using the Interface
Overview
The Xerox® Device Agent user interface is a powerful and easy-to-use printer management
interface that is divided into three key sections:
• Printers: View printer information, add and delete printers, and go to the customer-facing
pages to order supplies, request service, and view meter reads.
For details about printer operations, see Working with Printers.
• Synchronize: View communication logs and status, as well as update the schedule settings.
• For details about synchronization, see Synchronizing the Data.
• Settings: Modify application settings, such as printer search settings, alert preferences, and
language options.
For details about settings, see Configuring the Settings.
To access the desired option:
• Click Printers, Synchronize, or Settings in the left navigation pane. The specified view displays.
Note
Not all features in the screenshot are available in all versions of the application.
In addition to the three main sections, the application contains:
• Header: Displays the application name and icon, as well as links to the Configuration Wizard
and the About dialog box.
• Status bar: Check the status of communication between the application and Xerox® Services
Manager, as well as determine if the application is searching for printers or collecting printer
status.
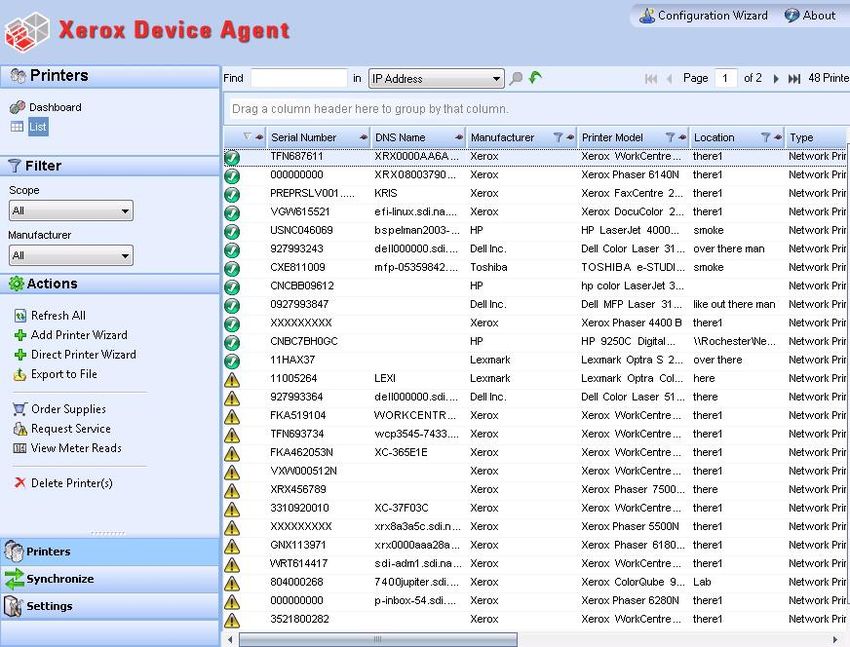
Xerox® Device Agent User Guide 22Using the Interface Understanding the Screens This section provides further details about the three main screens that you can access from the Xerox® Device Agent interface. VIEWING THE PRINTERS SCREEN The Printers screen is the default view when the application first opens. To access the Printers screen from another location: • Click Printers in the left navigation pane. Notes • Not all features in the screenshot are available in all versions of the application. • The application supports managing a limited number of printers. If you receive an error message stating that the printer limit was reached, it means that you have reached the limit and cannot add any more printers to the application. To add new printers, first delete one or more previously found printers. Next, modify the search settings to ensure that the deleted printers are not included within any existing IP address, subnet address, or range of IP addresses; and then use the Add Printer Wizard to add new printers. • The Printers area contains the following views: Dashboard and List. You can toggle between the two views by clicking the view name. Using the Dashboard View The first time that you open the application after installation, the Dashboard view displays, indicating the most commonly used data in graphical format. Xerox® Device Agent User Guide 23
Using the Interface

Note
Not all features in the screenshot are available in all versions of the application.
Working with Tiles
In the Dashboard view, each printer is represented in a tile format.

Each tile contains:
•   Printer icon: Displays a thumbnail representing the printer type.
•   Printer model: Name of the printer.
•   Status icons displayed over a printer icon: Describes the printer type.
•   DNS name: Translates the domain name into an IP address.
•   Printer IP Address: Network address of the printer.
•   Serial Number: Serial number found on the physical printer.
•   Printer Status: Status of the printer.
•    and : For In Scope printers, they take you to the Xerox® Services Manager customer-
  facing pages, so you can order supplies or request service respectively.
• In Scope/ Out of Scope: Whether or not the printer is included in the Xerox service contract.
    Notes
     If your version of the application does not distinguish between In Scope and Out of Scope
     printers, you do not have access to this feature.

Xerox® Device Agent User Guide                                                                    24
You can also read