Emerson Field Tools 3.8 Quick Start Guide - Emerson Field Tools Quick Start Guide
←
→
Page content transcription
If your browser does not render page correctly, please read the page content below

Emerson Field Tools Quick Start Guide
                                                       D301703X412
                                                           July 2021

Emerson Field Tools 3.8 Quick Start Guide

Remote Automation Solutions
Emerson Field Tools Quick Start Guide
D301703X412
July 2021

     Application Safety Considerations
       Protecting Operating Processes
       A failure of this application – for whatever reason -- may leave an operating process without appropriate
       protection and could result in possible damage to property or injury to persons. To protect against this, you
       should review the need for additional backup equipment or provide alternate means of protection (such as
       alarm devices, output limiting, fail-safe valves, relief valves, emergency shutoffs, emergency switches, etc.).

System Training
       A well-trained workforce is critical to the success of your operation. Knowing how to correctly install, configure,
       program, calibrate, and trouble-shoot your Emerson equipment provides your engineers and technicians with
       the skills and confidence to optimize your investment. Remote Automation Solutions offers a variety of ways for
       your personnel to acquire essential system expertise. Our full-time professional instructors can conduct
       classroom training at several of our corporate offices, at your site, or even at your regional Emerson office. You
       can also receive the same quality training via our live, interactive Emerson Virtual Classroom and save on travel
       costs. For our complete schedule and further information, contact the Remote Automation Solutions Training
       Department at 800-338-8158 or email us at education@emerson.com.

ii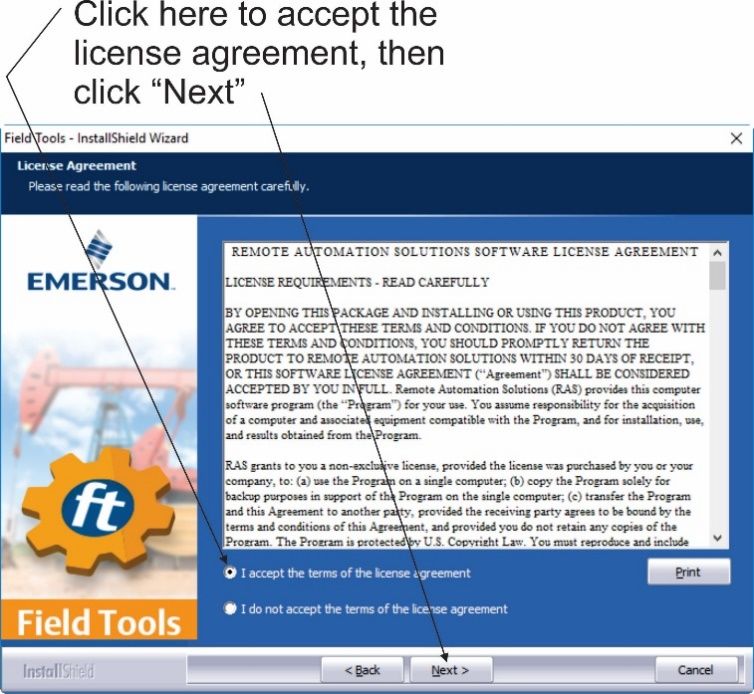
Emerson Field Tools Quick Start Guide
                                                                                                                                               D301703X412
                                                                                                                                                   July 2021

Contents

Chapter 1.             Introduction                                                                                                               1
       1.1    What is Emerson Field Tools? ................................................................................................ 1

Chapter 2.             Installation                                                                                                               3
       2.1    Minimum System Requirements........................................................................................... 3
              2.1.1 Notes on USB to Serial Converters ............................................................................ 3
       2.2    Before You Begin .................................................................................................................. 3
              2.2.1 Disabling User Account Control (UAC) in Windows ................................................... 4
              2.2.2 Special Notes for BSI_Config/TechView Users ........................................................... 5
              2.2.3 Special Notes for OpenBSI users ............................................................................... 5
              2.2.4 Special Notes for ROCLINK Users .............................................................................. 5
       2.3    Installing Field Tools ............................................................................................................. 6

Chapter 3.             Communication Setup                                                                                                      13
       3.1    Using Field Tools to Establish a Connection ......................................................................... 13
       3.2    Before You Begin ................................................................................................................ 13
       3.3    Starting Field Tools and Logging In ..................................................................................... 14
       3.4    Changing the Password ...................................................................................................... 15
       3.5    Defining Users .................................................................................................................... 15
              3.5.1 Adding a User ......................................................................................................... 16
              3.5.2 Setting a Minimum Password Length ...................................................................... 16
              3.5.3 Deleting a User ....................................................................................................... 17
              3.5.4 Assigning RTU Login Credentials............................................................................. 17
       3.6    Connections List ................................................................................................................. 17
       3.7    Starting an Existing Connection .......................................................................................... 19
       3.8    Creating a New Connection to a Device (Controller/Flow Computer) .................................. 19
       3.9    Making a Direct Connection ............................................................................................... 28
       3.10          Active Connection pane ........................................................................................... 28
       3.11          Saving Connections / Importing Connections ........................................................... 29
              3.11.1 Exporting Connections ......................................................................................... 29
              3.11.2 Importing Connections ........................................................................................ 29
              3.11.3 Importing ROCLINK Connections .......................................................................... 29
       3.12          Settings ................................................................................................................... 30
       3.13          Offline Configurations/Solutions Menu .................................................................... 31
              3.13.1 Creating a New Solution File for a Flow Computer (FB1000/FB2000 Series) ........... 31
              3.13.2 Creating a New Solution File for an RTU ................................................................ 33
              3.13.3 Opening an existing Solution File .......................................................................... 35
              3.13.4 Converting a Flow Computer Configuration (*.xml) to a Solution File ................... 35

Contents                                                                                                                                                  iii
Emerson Field Tools Quick Start Guide
D301703X412
July 2021
Chapter 4. FBxNet™ 37
4.1 What is FBxNet? ................................................................................................................. 37
4.2 Licensing FBxNet ................................................................................................................ 37
4.3 How do I configure FBxNet? ................................................................................................ 42
4.4 Starting FBxNet .................................................................................................................. 43
4.5 Switching Between Monitor and Configuration Mode ......................................................... 45
4.6 Creating a Site .................................................................................................................... 45
4.6.1 Editing a Site .......................................................................................................... 47
4.6.2 Deleting a Site ........................................................................................................ 47
4.7 Creating a Subscriber Directly in FBxNet ............................................................................. 48
4.7.1 Editing a Subscriber ................................................................................................ 49
4.7.2 Deleting a Subscriber ............................................................................................. 49
4.8 Adding a Publisher.............................................................................................................. 49
4.8.1 Editing a Publisher .................................................................................................. 49
4.8.2 Deleting a Publisher ............................................................................................... 50
4.9 Adding a New Parameter .................................................................................................... 50
4.9.1 Editing Existing Publisher Parameters ..................................................................... 51
4.9.2 Deleting a Parameter.............................................................................................. 52
4.10 Synchronizing CSV Files............................................................................................ 52
4.11 Manually Creating the Subscriber CSV File ................................................................ 53
4.11.1 Subscriber File Format .......................................................................................... 53
4.11.2 Subscriber File Example – Created in Excel ............................................................ 55
4.11.3 Subscriber File Example – Created in a Text Editor ................................................ 56
4.12 CSV File Validation ................................................................................................... 57
4.13 FBxNet Authentication ............................................................................................. 57
4.14 Downloading CSV Files ............................................................................................. 58
4.14.1 Downloading CSV Files for a Single Site ................................................................ 59
4.15 Making Changes to Your CSV Files ............................................................................ 59
4.16 Restoring the Backup of Previous CSV Files at the PC ................................................ 60
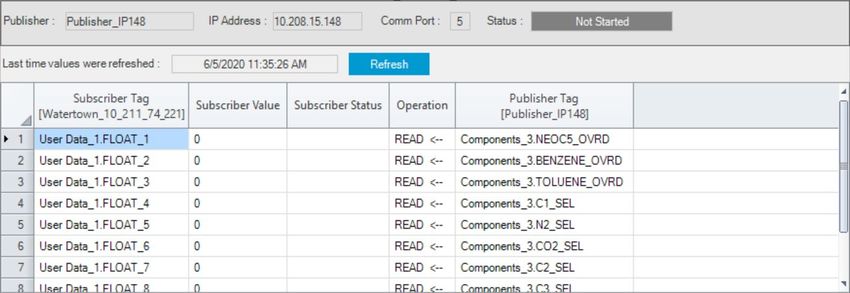
4.17 Viewing Status of the Subscriber Device ................................................................... 60
4.18 Viewing Status of the Publisher Devices ................................................................... 61
4.19 Viewing Details on a Single Publisher........................................................................ 63
4.20 Modifying FBxNet Configuration Parameters ............................................................ 64
4.21 Enabling/Disabling Fault Processing ......................................................................... 65
4.22 Troubleshooting Tips ............................................................................................... 66
4.23 FBxNet Settings........................................................................................................ 66
4.24 Working with the Tag Browser. ................................................................................ 67
Appendix A. Troubleshooting Tips 71
Appendix B. Field Tools Uninstallation Procedure 79
iv Contents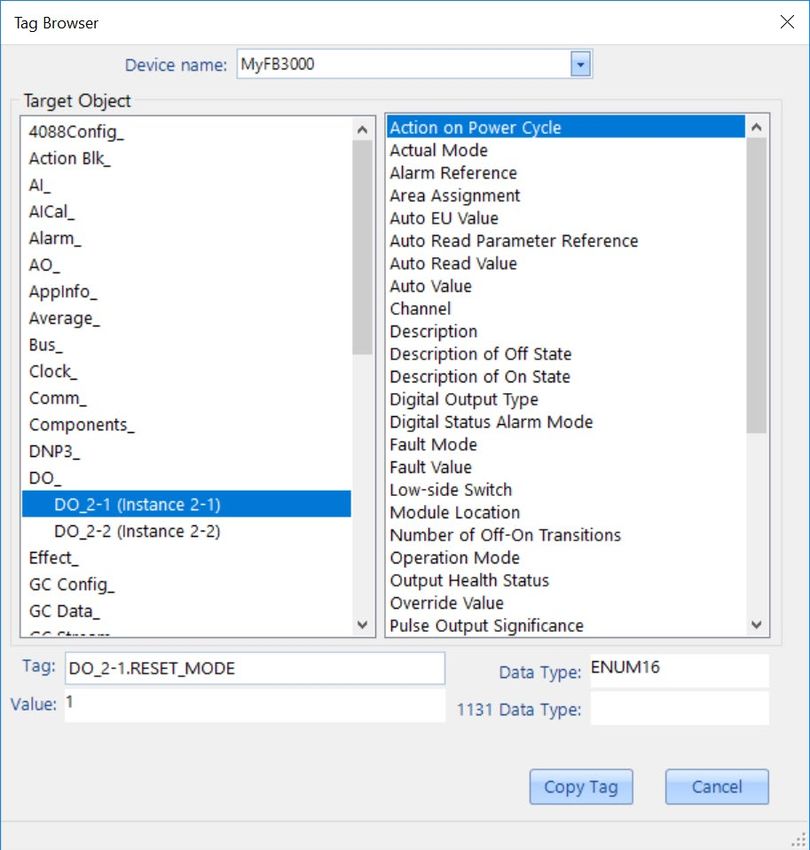
Emerson Field Tools Quick Start Guide
                                                                                                  D301703X412
                                                                                                      July 2021

Chapter 1. Introduction
1.1            What is Emerson Field Tools?
               Emerson Field Tools provides a single integrated package for connecting to and configuring ROC,
               FloBoss™, ControlWave™ flow computers and RTUs, FB1000/FB2000 Series Flow Computers, and
               FB3000 RTUs.

               Field Tools supports either a direct serial connection or an IP connection to a controller or flow
               computer. You can also connect wirelessly with FB1000/FB2000 Series Flow Computers. In all these
               cases, you establish communications with the controller using Field Tools’ Connection wizard.

               In addition, if you install configuration tools for the controller (ROCLINK, TechView, and/or
               FBxConnect) Field Tools automatically launches the appropriate tool when you open a connection
               to a ROC, FloBoss, ControlWave device, an FB1000/FB2000 Series Flow Computer, or an FB3000
               RTU.

Introduction                                                                                                     1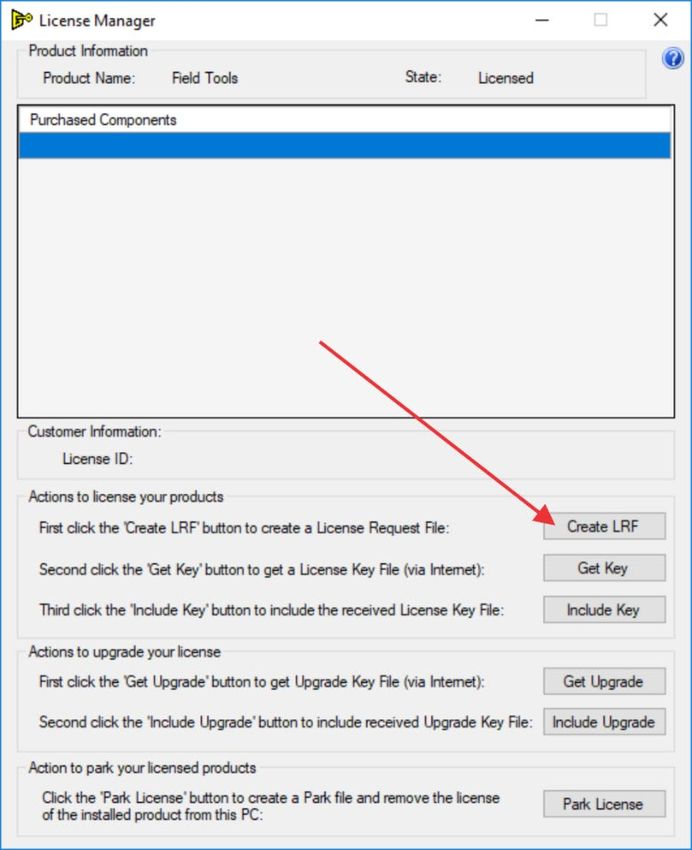
Emerson Field Tools Quick Start Guide
D301703X412
July 2021

2                                       Introduction
Emerson Field Tools Quick Start Guide
D301703X412
July 2021
Chapter 2. Installation
This chapter covers installation of Field Tools software.
2.1 Minimum System Requirements
For optimal performance, we recommend that your laptop PC meet the following minimum
requirements:
Intel® Core™2 Duo T7100 or similar specification Intel CPU (minimum)
2.5 GB available hard disk space to install the full software package
8 GB RAM
1366 x 768 or better resolution display (OS compatible)
Windows 7 Professional for either 32-bit or 64-bit (Service Pack 1) or Windows 10 Professional
Network port can be either:
o RS-232 Serial port or USB to RS-232 converter (See Section 2.1.1)
o Ethernet port
Important
Not all components of Field Tools run on all three operating systems.
For details on compatibility of Field Tools with particular hardware, software, and firmware, please
refer to the Field Tools Product Data Sheet (D301735X012).
2.1.1 Notes on USB to Serial Converters
USB to RS-232 serial converters vary widely in quality and performance. Users report good results
with the following converters:
BlackBox IC199A
IOGear® GUC232A
CHIPI-X10
If you experience problems with your converter, see Appendix A – Troubleshooting Tips.
2.2 Before You Begin
Before you install Field Tools, there are several things you need to know:
Important
Field Tools cannot reside on a computer running any components of OpenEnterprise 2.x,
OpenEnterprise 3.x, OpenEnterprise Client/Server software, or ObjectServer.
Field Tools 3.8 includes components of BSI_Config (such as TechView) which are from
OpenBSI version 5.9 Service Pack 3.
Installation 3
Emerson Field Tools Quick Start Guide
D301703X412
July 2021
Field Tools can co-exist on a computer running OpenBSI Network Edition 5.9 Service Pack 2
(or newer). It cannot be installed on a computer running OpenBSI versions older than 5.9
Service Pack 2.
You must have administrative privileges to install Field Tools.
If installing TechView, close all other programs down before you begin installation. In
particular Office 365 components must be closed because they can interfere with the Field
Tools installer.
If you are using an Enterprise version of the Windows operating system and your
administrative privileges do not include read/write access to \ProgramData\Emerson and its
sub-folders, these privileges must be set manually by your system administrator.
You must disable User Account Control (UAC) prior to the installation (you can re-enable it
after a successful installation). See Section 2.2.1.
If you are using an Enterprise version of a Windows operating system with an application
blocker, set any EXE files in \Program Files\Emerson to “trusted source.”
Field Tools cannot reside on a computer running any components of OpenEnterprise 2.x,
OpenEnterprise 3.x, OpenEnterprise Client/Server software, or ObjectServer.
As part of the installation, Eltima device software is installed automatically. Depending upon
your permissions, Windows may require you to confirm this installation before the installation
can proceed.
For best results on a PC or laptop, set your Windows Control Panel display settings for smaller
fonts (100% default). Larger fonts may cause some screen items to overlap or be cut off.
For best results on a tablet, set your Windows Control Panel display settings for either smaller
fonts (100%) or medium fonts (125% default). DPI should be 100.
2.2.1 Disabling User Account Control (UAC) in Windows
You must disable UAC prior to installing Field Tools. You can re-enable it after successful
installation.
1. Click Start > Control Panel to open the Windows Control Panel.
2. Click Action Center.
3. Click Change User Account Control settings.
4. Drag the sliding control down to Never notify and click OK.
4 Installation
Emerson Field Tools Quick Start Guide
                                                                                                      D301703X412
                                                                                                          July 2021

                   Figure 2-1. Changing User Account Control

2.2.2          Special Notes for BSI_Config/TechView Users
               If you have BSI_Config 5.9 (which includes TechView) installed prior to installing Field Tools 3.8 and
               it is a version older than 5.9 Patch A, the Field Tools installer automatically updates BSI_Config
               components on your PC to version 5.9 Service Pack 3 (which includes Patch A). If you subsequently
               reinstall BSI_Config 5.9, you’ll need to manually copy the Field Tools installer version of
               TechView.exe to the proper installation path on your PC. If you used the default installation paths,
               you can use the following examples, assuming your PC hard disk is the C drive:
               For 64-bit OpenBSI Users:
               Copy C:\program files (x86)\emerson\openenterprise\bin\TechView.exe to C:\program files
               (x86)\bristol\openbsi\
               For 32-bit OpenBSI Users:
               Copy C:\program files\emerson\openenterprise\bin\TechView.exe to C:\program files\bristol\openbsi\

2.2.3          Special Notes for OpenBSI users
               Field Tools 3.8 includes components of OpenBSI’s BSI_Config Version 5.9 Service Pack 3. OpenBSI
               Network edition version 5.9 Service Pack 2 (or newer) can co-exist with Field Tools 3.8. The Field
               Tools installer does not affect OpenBSI Network Edition. The two programs, however, are not
               linked together; you cannot for example, launch NetView from Field Tools.

2.2.4          Special Notes for ROCLINK Users
               If you have a version of ROCLINK already installed that is older
               than the version included in the Field Tools installer, Field Tools
               prompts you to confirm the upgrade to the newer version. If you
               answer Yes the upgrade proceeds; if you answer No the installer
               leaves the existing version as is.

Installation                                                                                                        5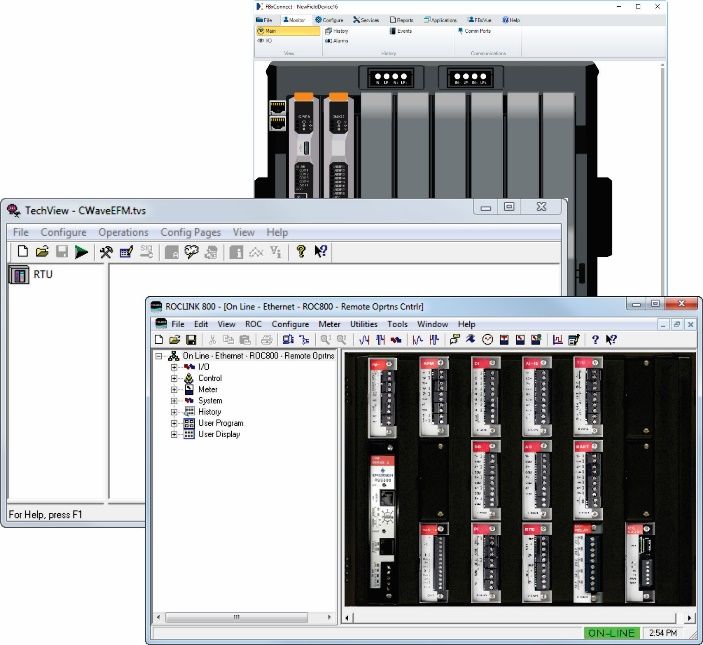
Emerson Field Tools Quick Start Guide
D301703X412
July 2021
               To preserve your existing files, always backup the device directory (which includes the
               ROC_USER.MDB file) before you install ROCLINK, and then copy it back after the installation
               completes. The device directory is the folder \Program Files\ROCLINK800.
               You can only have three simultaneous ROCLINK connections to devices through Field Tools.

2.3            Installing Field Tools
               Field Tools is available as a free download for registered SupportNet users. The installer file follows
               the format FieldToolsbuildnum.exe where buildnum is the software version build number.

               Important
               If you are not a registered SupportNet user, activating a new SupportNet account to obtain Field
               Tools software may take up to 24 hours to process.
               If you are installing the Field Tools executable from a network drive, there may be a long delay while
               the installer extracts and uncompresses files onto the local PC.

               1. Right-click on the Field Tools (.EXE) installation file and choose Run as administrator from the
                  pop-up menu.
               2. The installation process starts and checks whether certain necessary software components
                  exist on the laptop, and if they are not present, the installation process prompts you to install
                  them. Click Install. This process may take several minutes, and the installer may require you to
                  reboot your PC.

                   Figure 2-2. InstallShield Wizard

                   Once installation of the required components finishes, the Field Tools installation wizard starts:

6                                                                                                            Installation
Emerson Field Tools Quick Start Guide
D301703X412
July 2021
Figure 2-3. InstallShield Wizard
3. Click Next.
Figure 2-4. Installer Welcome Screen
4. To proceed with the installation, click I accept the terms of the license agreement and then
click Next.
Installation 7Emerson Field Tools Quick Start Guide
D301703X412
July 2021
Figure 2-5. License Agreement
5. Select the optional configuration packages you want to install then click Next.
Figure 2-6. Optional Package Selection
Note
You must purchase a license to use FBxDesigner; see the FBxDesigner Quick Start Guide
(D301860X012) for instructions on licensing that product.
FB3000 users can purchase various features and applications. You can license these from
within FBxConnect, or through the Emerson Customer Portal. See the FBxConnect online
help and the Emerson Customer Portal Quick Start Guide (D301878X012) for details.
8 InstallationEmerson Field Tools Quick Start Guide
D301703X412
July 2021
You can access licensing tools through the Help > Licensing menu item in Field Tools
If you are installing over an existing version of Field Tools, you have the option to preserve
any saved connections by checking Retain Previous Connections, and to preserve the
password for Field Tools software by checking Retain Administrator Password.
6. The installation proceeds. The installer program periodically reports which components are
being installed. This may take several minutes:
Figure 2-7. Setup Status Screen
7. The software prompts you whether you want the installer to create a Field Tools desktop icon;
click Yes if you want to start Field Tools from the desktop.
Installation 9Emerson Field Tools Quick Start Guide
D301703X412
July 2021
8. Click Finish to exit the installer.
Figure 2-8. InstallShield Wizard Finish Screen
Custom Install without User Prompts
Some companies require software installations to be handled by their Information Technology (IT)
departments without user intervention.
To do this with Field Tools, you must create a custom setup file in a temporary folder that specifies
which packages the installer should load.
The setup file must be named setup.iss, and you must store it in your c:\temp folder:
The setup file follows the format below:
[{A336A33B-40A8-4032-BAD6-58A04D514F12}-Options-0]
Designer=installFBxDesigner
ROCLink=installROCLINK
TechTools=installTechView
FBx=installFBxConnect
Connections=preserveConnections
Password=preservePassword
[{A336A33B-40A8-4032-BAD6-58A04D514F12}-AskYesNo-icon]
Result=disableprompts
Where:
Element Set To:
installFBxDesigner 0 = Do not install FBxDesigner
1 = Install FBxDesigner
installROCLINK 0 = Do not install ROCLINK
1 = Install ROCLINK
installTechView 0 = Do not install TechView
1 = Install TechView
10 InstallationEmerson Field Tools Quick Start Guide
D301703X412
July 2021
Element Set To:
installFBxConnect 0 = Do not install FBxConnect
1 = Install FBxConnect
preserveConnections 0 = Delete any existing connections
1 = Preserve existing connections from
previous installation
preservePassword 0 = Delete any existing Field Tools password
1 = Preserve existing password for Field Tools
icon 0 = Do not create Field Tools desktop icon
1 = Create Field Tools desktop icon
disableprompts 0 = Prompt during installation
1 = Install silently without prompts
Here is a sample setup.ISS file that will silently install ROCLINK, TechView, and FBxConnect, and
preserve connections and the Field Tools password, and will create a desktop icon for Field Tools.
[{A336A33B-40A8-4032-BAD6-58A04D514F12}-Options-0]
Designer=0
ROCLink=1
TechTools=1
FBx=1
Connections=1
Password=1
[{A336A33B-40A8-4032-BAD6-58A04D514F12}-AskYesNo-1]
Result=1
Once you create the file, store it in a temporary folder, and launch the installer from the command
line as follows:
fieldtoolsxxxx /s /f1c:\temp\setup.iss
where xxxx is the installer number.
Installation 11Emerson Field Tools Quick Start Guide D301703X412 July 2021 12 Installation
Emerson Field Tools Quick Start Guide
D301703X412
July 2021
Chapter 3. Communication Setup
This chapter covers initial communication setup with Field Tools.
3.1 Using Field Tools to Establish a Connection
Field Tools can communicate with a controller or flow computer using either a direct serial
connection or through an IP network. FB1000/FB2000 Series Flow Computers also support wireless
connections through FBxConnect.
CAUTION
When making multiple FBxConnect connections to the same device (as with a remote and a local
connection), be aware that the changes one connection makes to the device may not be
immediately visible to other connections, and may even require the other connections to restart
FBxConnect before changes become visible. For example, simple changes (such as changes to
setpoints) may be immediately visible to all connections, but changing the number of meters,
configuring I/O, adding/deleting menu items, or other major configuration changes may require
re-establishing the connection using FBxConnect.
3.2 Before You Begin
For serial connections, you would typically connect a serial cable between the laptop computer
and a serial port on the controller or flow computer. Other options for serial connections could
include a radio or modem.
For IP connections, connect the laptop to the same IP network which includes the controller or
flow computer.
If you have an FBx-series device with the FBxWifi option, you can use a wireless IP connection.
This option requires you know the connection key for the wireless network.
For details on cabling/wiring, consult the hardware manual for your controller or flow
computer.
Important
When using Field Tools for serial communication, you must plug into the Local Port. For
ControlWave-series units, this is a port for which you’ve set the _Pn_LOCAL_PORT system
variable TRUE in the ControlWave project running in the unit. Local ports answer to requests
sent to a BSAP local address of 1 which is what Field Tools requests. For Network 3000, this is a
BSAP slave or pseudo-slave port. For a ROC or FloBoss, the Local Port is a specific port (the LOI
port) which answers to the address of 240 and a group number of 240.
For ControlWave/Network 3000 devices only, you need to know which TechView
session(*.TVS) file is appropriate for your device so you can specify it when you establish your
connection. If you installed TechView, a set of default TVS files resides on your hard disk in your
\openbsi installation path. The Connection wizard opens that folder first when you specify your
TVS file. For example, there is a CWaveEFM.TVS file to support the ControlWave EFM, a
Communication Setup 13Emerson Field Tools Quick Start Guide
D301703X412
July 2021
CWaveGFC.TVS file to support the ControlWave GFC, and so on. If you have a customized
application with a customized TVS file, you should place it in that folder.
3.3 Starting Field Tools and Logging In
1. Start Field Tools either from the desktop icon or click: Start > Programs > Emerson Field
Tools > Field Tools.
2. In the Log In dialog box, enter your User name and Password and click Log in.
Figure 3-1. Log in Dialog Box
Important
The very first time you log in, use admin for the User name and leave the Password field blank.
Once you’ve logged in with these defaults, Field Tools prompts you to change your password.
3. The Field Tools main screen opens. Use it to establish a connection with the controller / flow
computer.
Figure 3-2. Field Tools Main Screen
14 Communication SetupEmerson Field Tools Quick Start Guide
D301703X412
July 2021
3.4 Changing the Password
You can change the password for the currently logged on user at any time.
1. Click Security > Change password from the menu bar. The Change Password dialog box opens.
Note
The very first time you start Field Tools, the default password for the ADMIN account is blank,
and Field Tools forces you to define a new password; click OK to open the Change Password
dialog box. Passwords are case sensitive.
Figure 3-3. Change Password Dialog Box
2. In the Change Password dialog box, enter the current password in the Old password field, then
enter the new password in both the New password and Confirmation fields, then click OK. Your
password is now changed.
3.5 Defining Users
The User Management dialog box lets you define Field Tools users, and also configure RTU login
credentials for them.
To define the Field Tools users on this PC click Security > User management from the menu bar.
This opens the User Management dialog box.
Figure 3-4. User management Dialog Box
Communication Setup 15Emerson Field Tools Quick Start Guide
D301703X412
July 2021
3.5.1 Adding a User
1. If the User Management dialog box is not already open, click Security > User management to
open it.
2. Click Add User. Optionally choose a Role for the user. (Particular roles can have particular
privileges associated with them.)
3. Enter a User name for the user.
Notes
Usernames are case-insensitive and are stored in the database as lowercase.
Do not create a user named Operator. This word is reserved for use internally by Field Tools.
4. Enter a password in the Password and Confirm Password fields.
5. Click OK.
Figure 3-5. Add new user Dialog Box
3.5.2 Setting a Minimum Password Length
You can enforce a minimum password length to increase the level of protection of your Field Tools
passwords. Passwords can range from 1 to 32 characters. The longer the password length, the
harder it is for an intruder to gain access to your system.
1. Click Security > Security configuration to open the Security configuration dialog box.
Figure 3-6. Security configuration Dialog Box
2. Enter the minimum number of characters required for a valid password and click OK.
16 Communication SetupEmerson Field Tools Quick Start Guide
D301703X412
July 2021
From this point on, all users you define must have a password of this length or longer. Existing
users created previously with passwords shorter than this number are unaffected.
3.5.3 Deleting a User
1. If the User Management dialog box is not already open, click Security > User management to
open it.
2. Click the name of the user you want to delete.
3. Click Delete User.
4. Click Yes when prompted to confirm the deletion.
3.5.4 Assigning RTU Login Credentials
1. If the User Management dialog box is not already open, click Security > User management to
open it.
2. Click the name of the user for which you want to define RTU login credentials then click
Credentials mapping. The Credentials mapping dialog box opens.
Figure 3-7. Device credentials Dialog Box
3. Enter a Username and Password for accessing the particular RTU type(s).
Note
For the ROC/FloBoss, usernames for RTU access cannot exceed 3 characters.
4. Click OK.
3.6 Connections List
The left pane of the Field Tools main screen displays the Connections list tree. This shows
connections you’ve previously saved or used, and also lets you create new connections.
Communication Setup 17Emerson Field Tools Quick Start Guide
D301703X412
July 2021
Figure 3-8. Connections List
Table 3-1. Connections List Pane and Context Menus Icons
Icon Description
Identifies a previously configured connection to an FB1100 Flow Computer. The name of the device
appears next to the icon. Double-click the icon to re-start the connection.
Identifies a previously configured connection to an FB1200 Flow Computer. The name of the device
appears next to the icon. Double-click the icon to re-start the connection.
Identifies a previously configured connection to an FB2100 Flow Computer. The name of the device
appears next to the icon. Double-click the icon to re-start the connection.
Identifies a previously configured connection to an FB2200 Flow Computer. The name of the device
appears next to the icon. Double-click the icon to re-start the connection.
Identifies a previously configured connection to an FB3000 RTU. The name of the device appears
next to the icon. Double-click the icon to re-start the connection.
Identifies a previously configured connection to a ROC, DL8000, or FloBoss. The name of the device
appears next to the icon. Double-click the icon to re-start the connection.
Identifies a previously configured connection to a ControlWave or Network 3000 (33xx) controller.
The name of the device appears next to the icon. Double-click the icon to re-start the connection.
Shows on top of a controller/flow computer icon when its connection is active. Beginning with Field
Tools 2.0, you can have multiple simultaneous active connections.
Site - A site is just a name underneath which you can group one or more connections. It could
represent a geographical area, a department, or any other logical grouping you need. The
Connections list comes with a default site name called “All Connections” which you can rename
and/or add additional sites underneath. Although you can rename it, you cannot delete the “All
Connections” site; you can delete other sites if they have no devices underneath.
Add Connection. Click to launch the Connection wizard. You can find this icon in the Connections
list toolbar and in the context menu when you right click on a site.
Edit Connection. Click to change the connection parameters for the selected connection. You
cannot edit an active connection.
18 Communication SetupEmerson Field Tools Quick Start Guide
D301703X412
July 2021
Icon Description
Note: If you change the connection name, when you save, Field Tools prompts you to decide
whether you want to save the connection as a new connection under the new name (Add new
connection), or to just rename the existing connection (Replace connection).
Connect. Click to activate the selected connection.
Delete. Click to delete the selected connection or site.
Add Site. Click this context menu item to add a site underneath the currently selected site.
Rename Site. Click this context menu item to call up the Modify Site dialog box and rename the
currently selected site.
Expand branch. Click to expand this branch of the Connections tree.
Hide branch. Click to hide the portion of the Connections tree underneath.
Apply Pin. Click to display only the portion of the tree below the current position of the cursor. This
is useful if you have a large Connections list tree with many items and you only want to see a portion
of it.
Remove Pin. Click to turn off the Apply Pin option and display the entire Connections list tree.
3.7 Starting an Existing Connection
1. If you have previously established connections from this laptop, Field Tools displays them in
the Connections list pane (see Figure 3-8).
2. To activate a connection, double-click on its icon and Field Tools activates that connection and
automatically launches the appropriate configuration tool (ROCLINK, TechView, or
FBxConnect).
3.8 Creating a New Connection to a Device
(Controller/Flow Computer)
1. If the connection for the controller/flow computer you want to communicate with already
exists in the Connections list just double-click on it – you’re done. If no previous connection
exists to this device, go to the next step.
2. If you want to associate the device with a particular site, first click the site name in the
Connections list. (If you don’t want to choose a site at this time, you can skip that – the
connection will automatically belong to the All Connections site.)
Communication Setup 19Emerson Field Tools Quick Start Guide
D301703X412
July 2021
3. Click the Add connection icon in the Connections pane toolbar. If the icon is not visible
(because no site is selected) click Connections > Add connection from the menu bar. Either
way, the Connection wizard opens.
Figure 3-9. Connection Wizard
4. Select the type of device to which you want to connect in the Device platform field. The
choices are: FloBoss/ROC/DL8000, ControlWave/33xx, or FBx (for the FB1000/FB2000 Series
Flow Computers or FB3000 RTU).
Note
“33xx” refers to Network 3000 devices.
5. Enter the name of the field device in the Specify name field. For FBx devices, click the Get name
from device button and Field Tools obtains the device name from the device (if it exists). If no
name exists in the device, Field Tools uses the name “Default.”
Note
Make connection names alpha-numeric; you can also include dashes, underscores, or spaces.
Connection names cannot include special characters such as single or double quotation marks,
20 Communication SetupEmerson Field Tools Quick Start Guide
D301703X412
July 2021
commas, slashes, periods, colons, or asterisks. There is no pre-set maximum length for
connection names.
6. For a ROC/FloBoss or ControlWave, if you want to define a default username/password
combination for this device click Device credentials in the Connection page to open the Device
credentials dialog box, enter a valid Username and Password combination for access to this
controller/flow computer, and re-enter the password in the Verify Password field; this
username/password combination will be used for this controller/flow computer throughout
this Field Tools session. If you want to use this username/password combination as the default
for this RTU for all subsequent connection sessions check the Save as default box. Click OK to
finish and close the dialog box.
Figure 3-10. Device credentials Dialog Box
Note
For FB1000/FB2000 Series Flow Computers or the FB3000 RTU, Field Tools uses the Field Tools
Username and Password by default. If that username/password combination is not correct for
the device, you can enter the correct ones, when prompted, and Field Tools then stores them
with the connection details for that device. For that reason, there is no Device Credentials
option for these devices.
7. Choose a Connection type. Choices include either Serial, IP, or WiFi (if you have an
FB1000/FB2000 Flow Computer). Proceed to Step 8 for serial communication; skip to Step 9
for IP communication; skip to Step 10 for Wi-Fi communication.
8. For serial communication:
Figure 3-11. Serial Connection Settings – FB1000/FB2000 Series Flow Computers & FB3000
RTU
Communication Setup 21Emerson Field Tools Quick Start Guide
D301703X412
July 2021
Figure 3-12. Serial Connection Settings – ROC/FloBoss
Figure 3-13. Serial Connection Settings – ControlWave/33xx
Select the PC communication port in the Comm port drop down menu, otherwise leave it
at the Auto default which causes the Connection wizard to cycle through the various ports
until it finds the correct one. You can refresh the port selections by clicking the refresh ( )
button.
The Wizard hides certain parameters to simplify configuration using default values; while
this is useful in some situations, we recommend you enter the Baud rate and Address if you
know them, rather than letting Field Tools attempt to auto-discover them. Most other
parameters may be left at default values. Click Show more parameters to specify
additional parameters as follows.
If you know the baud rate for communicating with the field device, you can specify it in the
Baud rate drop-down field. Otherwise use the Auto default which causes the Connection
Wizard to cycle through the supported baud rates (9600, 19200, 38400, 57600, and
115200) until it finds the correct one.
Optionally specify the Link Timeout for this connection. That value defines the period of
time (in milliseconds) Field Tools waits for a response from the RTU or flow computer
before declaring a communication failure. If you enter 0, Field Tools uses a default of 200
milliseconds. Optionally, you can change the Retries parameter, which sets the total
number of attempts to send a communication message before declaring an error.
Specify the Address and the Group according to the following table:
Table 3-2. Specifying Address and Group for a Serial Connection
Device Type Address Group Description
FB1000/FB2000 Default: 1 Not applicable If you don’t know the address, check the
Series Flow Range: 0-254 Discover address of device box.
Computers,
FB3000 RTU
ROC/FloBoss Default: 240 Default: 240 Normally you should leave both of these at
Range: 0-255 Range: 0-255 the default of 240 for local connections on
the LOI port.
22 Communication SetupEmerson Field Tools Quick Start Guide
D301703X412
July 2021
Device Type Address Group Description
ControlWave Default: Auto- Not applicable If you are not connected to the local port or
detect BSAP slave port (as specified in the
Range: 1-127 ControlWave project or ACCOL load,
respectively) but you know the BSAP local
address for the field device, you can specify it
in the Address drop-down field. Otherwise
leave it at the Auto default which causes the
Connection wizard to try each address in the
range (1 to 127) until it finds the correct one.
For ROC/FloBoss only: Under Extra Parameters use the […] button to specify the
ROC/FloBoss .800 Configuration file to associate it with this connection when ROCLINK
launches. The .800 file must reside on this laptop PC.
Figure 3-14. Specifying the ROC Configuration File
For ControlWave/Network 3000 units only: Under Extra Parameters use the […] button to
specify the TechView session file you want to use with this connection when TechView
launches. The TechView session file must reside on this laptop PC.
Figure 3-15. Specifying the TechView Session File
Tips
The Auto options are useful if you do not know the communication port, baud rate, or (for
ControlWave/33xx only) the local address. If you leave all of these fields at Auto, however, it
could take considerable time to establish the connection since the system must
successively try each port, each of the five supported baud rates, and for ControlWave/33xx
each of 127 possible local addresses.
The maximum number of connection attempts if all fields are left at Auto for a ROC/FloBoss
is (# of serial ports) * 5.
The maximum number of connection attempts if all fields are left at Auto for a
ControlWave/33xx is (# of serial ports) * 635.
When you’ve completed this step, go to Step11.
Communication Setup 23Emerson Field Tools Quick Start Guide
D301703X412
July 2021
9. For IP communication:
Figure 3-16. IP Connection Settings – FB1000/FB2000 Series Flow Computers & FB3000 RTUs
Figure 3-17. IP Connection Settings – ROC/FloBoss
Figure 3-18. IP Connection Settings – ControlWave/33xx
Notes
If you make an invalid entry in one of the Connection Wizard fields, a warning icon
blinks, and you must correct the invalid entry.
To view/modify hidden parameters, click Show more parameters.
Specify the IP address of the RTU or flow computer. Position your cursor in the left-most
digit position of the IP address field, enter the value for that position and use the tab key
to move to the next position and so on until you enter the complete IP address. If you
want to highlight the entire address to type over it, click the icon.
Specify the port (IP socket number) used by this connection. The following table shows
the default ports:
Table 3-3. Default Port (IP socket number) for Connection
Device Type Default Port (socket)
ROC/FloBoss 4000
FBx 20000
ControlWave 1234
24 Communication SetupEmerson Field Tools Quick Start Guide
D301703X412
July 2021
Note
Field Tools only supports a single active IP connection to one ControlWave device at a
time on a given default port. If more than one ControlWave device shares the same
default port, only one of those ControlWave devices can have an active IP connection at
any one time. If you attempt to start a second connection, Field Tools posts the message
“An IP connection to a Bristol device already exists. Only one such connection is allowed.”
To make the new connection you must manually close down the existing active
connection and then you can start the new connection.
Optionally specify the Link Timeout for this connection. That is the period of time (in
milliseconds) Field Tools waits for a response from the RTU or flow computer before
declaring a communication failure. If you enter 0 Field Tools uses a default of 5000
milliseconds.
Specify the Address and Group according to the following table:
Table 3-4. Specifying Address and Group for an IP Connection
Device Type Address Group Description
FBx Default: 1 Default: 0 If you don’t know the address, select the
Range: 0-254 Range: 0 to 254 Discover address of device option.
ROC/FloBoss Default: 240 Default: 240 Normally you should leave both of these at
Range: 0-255 Range: 0-255 the default of 240 for local connections on
the LOI port.
ControlWave Not applicable Not applicable
If the connection is through a terminal server, select the Terminal Server checkbox and set
the IP address and Port (socket) to be the IP address and port of the terminal server.
For ROC/FloBoss only: Under Extra parameters use the […] button to specify the
ROC/FloBoss .800 Configuration file in order to associate it with this connection when
ROCLINK launches. The .800 file must reside on this laptop PC.
Figure 3-19. Specifying the ROC Configuration File
For ControlWave/Network 3000 units only: Under Extra parameters use the […] button to
specify the TechView session file you want to use with this connection. The TechView
session file must reside on this laptop PC.
Figure 3-20. Specifying the TechView Session File
When finished, skip to Step 11.
10. For Wi-Fi communication (FB1000/FB2000 Flow Computers only):
Communication Setup 25Emerson Field Tools Quick Start Guide
D301703X412
July 2021
Figure 3-21. WiFi Connection Parameters
Wi-Fi networks that your laptop detects are shown onscreen. For this type of connection to
work, the laptop must first detect the WiFi Network to which the device belongs. The
default WiFi Network follows the format FBxxxx_serialnumber.
Specify the IP address of the RTU or flow computer. Position your cursor in the left-most
digit position of the IP address field, enter the value for that position and use the tab key to
move to the next position and so on until you enter the complete IP address. If you want to
highlight the entire address to type over it, click the icon. The default IP address for
FB1000/FB2000 Flow Computers when they ship from the factory is 192.168.1.10.
Specify the Port (IP socket number) of the RTU or flow computer. The default port is
20000.
Enter the Security Key for the wireless network. To see it as you type it, click the eyeball
icon. The default security key for FB1000/FB2000 Flow Computers when they ship from
the factory is EmersonFBXX00. Be sure to change it to something only your organization
knows when you place the device in service.
If the connection is through a terminal server, select the Terminal Server checkbox and set
the IP address and Port (socket) to be the IP address and port of the terminal server.
Specify the Address as described in Table 3-4. If you don’t know the address, check the
Discover address of device box.
11. If you don’t want to activate the connection right now, but just want to save your configuration
entries, you can click Save; this saves your entries in the Connection list, and exits the wizard. If
you want to connect right now, click Connect and the wizard attempts to establish the
connection.
12. Field Tools reports details of the connection progress in the Connection progress pane.
Figure 3-22. Connection in Progress
26 Communication SetupEmerson Field Tools Quick Start Guide
D301703X412
July 2021
13. If the connection is successful, the Active connection pane of the Field Tools main screen
shows an icon for the newly connected device and its toolbar populates with icons appropriate
to the device type.
14. In addition, Field Tools automatically launches the configuration tool (ROCLINK, TechView, or
FBxConnect) appropriate for the device platform.
Figure 3-23. RTU Configuration Tools – FBxConnect, TechView, ROCLINK
Communication Setup 27Emerson Field Tools Quick Start Guide
D301703X412
July 2021
3.9 Making a Direct Connection
The term direct connection refers to a direct serial connection to a device.
Click Connections > Direct Connect and select the type of device from the options presented. Field
Tools attempts to establish a local serial connection by sequentially trying each serial port using the
default settings for that device type.
Figure 3-24. Direct Connection
3.10 Active Connection pane
The Active Connection pane shows details for the currently active connection and allows you to
launch certain other tools for use with the device(s).
Figure 3-25. Active Connection Pane
The Active Connection pane includes a separate tab for each active connection. Click on the tab to
see details about a particular connection.
To see information about a device (RTU, flow computer), move the cursor over that device and a
small status box opens that shows details based on the type of device. This could include its
address, or certain status information.
To disconnect an active connection, right click on the icon for the device and choose Disconnect.
To disconnect all connections, click Connections > Close all connections.
Table 3-5. Icons Used in Active Connection Pane
Icon Description
Identifies a previously configured connection to an FB1100 Flow Computer. The name of the device
appears next to the icon. Double-click the icon to re-start the connection.
Identifies a previously configured connection to an FB1200 Flow Computer. The name of the device
appears next to the icon. Double-click the icon to re-start the connection.
28 Communication SetupEmerson Field Tools Quick Start Guide
D301703X412
July 2021
Icon Description
Identifies a previously configured connection to an FB2100 Flow Computer. The name of the device
appears next to the icon. Double-click the icon to re-start the connection.
Identifies a previously configured connection to an FB2200 Flow Computer. The name of the device
appears next to the icon. Double-click the icon to re-start the connection.
Identifies a previously configured connection to an FB3000 RTU. The name of the device appears
next to the icon. Double-click the icon to re-start the connection.
ROC or FloBoss controller connection.
ControlWave or Network 3000 controller connection.
Device icon(s).
Note: The devices’ device descriptor (DD) files provide the device icons. Consequently, depending
upon the type of HART or WirelessHART device, you may see different device icons.
Expand branch. Click this to expand the branch of the tree.
Hide branch. Click this to hide the portion of the tree underneath.
Apply Pin. Click to display only the portion of the tree below the cursor’s current position. This is
useful if you have a large tree with many items and you want to see only a portion of the tree.
Remove Pin. Click to turn off the Apply Pin option and display the entire tree.
Failure. Indicates some sort of failure associated with this device.
Terminate Connection. Click to shut down the active connection in this device tab. Field Tools
prompts you to confirm this action.
3.11 Saving Connections / Importing Connections
If you have configured a group of connections, you can save the connection configuration details in
an XML file. You can then transfer that XML file to another PC/laptop running Field Tools, so that
you don’t need to re-create the connections on that PC, you can just click on them to start the
connection.
3.11.1 Exporting Connections
1. Click Connections > Export > Export to file.
2. Specify a filename for the XML file.
3.11.2 Importing Connections
1. Click Connections > Import > Import from file.
2. Navigate to the XML file that contains the connection information and click Open. If a duplicate
connection exists, Field Tools prompts you to confirm the update.
3.11.3 Importing ROCLINK Connections
If you had previously created connections within ROCLINK without Field Tools, you can import
those connections into Field Tools.
1. Click Connections > Import > Connections from ROCLINK. The Import ROCLINK connections
dialog box opens.
Communication Setup 29Emerson Field Tools Quick Start Guide
D301703X412
July 2021
Figure 3-26. Import ROCLINK connections Dialog Box
2. In the Import ROCLINK Connections dialog box, choose the site name which contains the
ROCLINK connections you want to import.
3. If you want to overwrite existing ROCLINK connections, select the Overwrite Existing
Connections Data option.
4. Click Start to import the connections.
3.12 Settings
Click Settings in the menu bar to open the Settings dialog box. The Settings dialog box lets you pre-
configure certain items for FBxConnect.
Figure 3-27. Settings Dialog Box
If you want to see firmware revision warnings when you connect to an FB1000/FB2000 Flow
computer or FB3000 RTU, ensure the Show “Device has older firmware” and “Show Ðevice has
newer firmware” check boxes are selected.
If you want the system to prompt operators whether to override the time zone of an FBx device
when a time synchronization message comes in, select the Show “Override device time zone”
dialog box before synchronizing time of an FBx device.
Select Zero pad decimal places on floating point values if you want floating point values shown on
FBxConnect displays to be padded with zeros to fill the specified field size. For example, in a field
specified to show 5 decimal places, a floating point value of 6.25 will be padded to show 6.25000.
30 Communication SetupEmerson Field Tools Quick Start Guide
D301703X412
July 2021
This does not show greater precision for the value, it only shows zeros to allow numbers to line up
properly on the display.
Click OK to save your changes to the settings.
3.13 Offline Configurations/Solutions Menu
The Configurations/Solutions menu bar item lets you view/create solution files for an
FB1000/FB2000 Series Flow Computer or FB3000 Series RTU offline– without an active connection
to the device. You can also create/view a configuration file for a ROC/DL8000 or FloBoss device.
For a ROC or FloBoss device, see the ROCLINK online help for more information.
Figure 3-28. Offline Configurations
3.13.1 Creating a New Solution File for a Flow Computer
(FB1000/FB2000 Series)
1. Click Configurations/Solutions > New > FBx > Flow Computer.
2. Specify a name for the solution file (*.zsl) and click Save.
Figure 3-29. Specifying the name of the solution file
3. Select the correct Device type for your flow computer, and then select the correct
configuration characteristics for sensor types, ranges, and so on. Finally, click Open.
Communication Setup 31Emerson Field Tools Quick Start Guide
D301703X412
July 2021
Figure 3-30. Specifying characteristics of the solution
4. You can now optionally configure various features through the FBxConnect toolbar. (See
D301850X012 - FBxConnect Configuration Software User Manual for the FB1000-FB2000
Series for details on configuring features in FBxConnect.) You can specify an associated Site
for the flow computer. If you created a custom FBxVue display for the flow computer
which you would like to appear when starting an FBxConnect connection instead of the
default, specify it in the Home screen field. Optionally you can go back to change the
characteristics by clicking Edit Model Spec.
When you are finished with all entries, click Save to save your offline solution file. At a later
time, you can download the solution file to the flow computer.
32 Communication SetupEmerson Field Tools Quick Start Guide
D301703X412
July 2021
Figure 3-31. Saving the Offline Solution File
3.13.2 Creating a New Solution File for an RTU
1. Click Configurations/Solutions > New > FBx > RTU.
2. Specify a name for the solution file (*.zsl) and click Save.
Figure 3-32.– Specifying the name of the solution file
Communication Setup 33Emerson Field Tools Quick Start Guide
D301703X412
July 2021
3. First, select the Device type. If this is an FB3000 RTU with the 3CPU16 CPU installed,
choose FB3000. If this is an FBxRemote I/O rack with the 3IOCPU installed, choose FBRIO.
4. Depending upon whether or not your FB3000 includes one or more extension chassis,
choose the appropriate number of chassis in the Select IO rack size field. You can then
select the type of I/O module in each slot using the Module Type selection box. Finally,
click Open.
Figure 3-33. Specifying I/O for the FB3000
5. You can now optionally configure various features through the FBxConnect toolbar. (See
D301882X012 - FBxConnect Configuration Software User Manual for the FB3000 for details on
configuring features in FBxConnect.) You can specify an associated Site for the RTU. If you
created a custom FBxVue display for the RTU which you would like to appear when starting
an FBxConnect connection instead of the default, specify it in the Home screen field.
When you are finished with any entries, click Save to save your offline solution file. At a
later time, you can download the solution file to the FB3000.
34 Communication SetupEmerson Field Tools Quick Start Guide
D301703X412
July 2021
Figure 3-34. Saving the Offline Solution File
3.13.3 Opening an existing Solution File
1. Click Configurations/Solutions > Open > FBx > Solution.
2. Select the solution file (*.zsl) and click Open. You can now edit the solution as desired.
3.13.4 Converting a Flow Computer Configuration (*.xml) to a
Solution File
Going forward, Field Tools requires FB1000/FB2000 Series flow computers use solution files similar
to those used in the FB3000. You can convert an existing flow computer configuration file to a
solution file. The advantage of using solution files is they allow you to download an FBxVue display
to the flow computer and they also allow easier reuse of user data descriptions and the DNP3 map
file, etc. instead of only the configuration details.
1. Click Configurations/Solutions > Open > FBx > Flow Computer Configuration.
Communication Setup 35You can also read