SONICWALL GLOBAL MANAGEMENT SYSTEM USERS - ADMINISTRATION GUIDE
←
→
Page content transcription
If your browser does not render page correctly, please read the page content below
®
SonicWall Global
Management System Users
Administration Guide
Contents

   Configuring Users Status . . . . . . . . . . . . . . . . . . . . . . . . . . . . . . . . . . . . . . . . . . . . . . . . . . . . . . . . . . . . . . 5
   Logging Out a Single User . . . . . . . . . . . . . . . . . . . . . . . . . . . . . . . . . . . . . . . . . . . . . . . . . . . . . . . . . . . . . . . 5
   Logging Out Multiple Users . . . . . . . . . . . . . . . . . . . . . . . . . . . . . . . . . . . . . . . . . . . . . . . . . . . . . . . . . . . . . 5
   Searching for Active User Sessions . . . . . . . . . . . . . . . . . . . . . . . . . . . . . . . . . . . . . . . . . . . . . . . . . . . . . . . . 6

   Configuring User Settings . . . . . . . . . . . . . . . . . . . . . . . . . . . . . . . . . . . . . . . . . . . . . . . . . . . . . . . . . . . . . 7
   User Login Settings . . . . . . . . . . . . . . . . . . . . . . . . . . . . . . . . . . . . . . . . . . . . . . . . . . . . . . . . . . . . . . . . . . . . 7
       Setting the Authentication Method for Login . . . . . . . . . . . . . . . . . . . . . . . . . . . . . . . . . . . . . . . . . . . 8
       Setting the Single-Sign-On Methods . . . . . . . . . . . . . . . . . . . . . . . . . . . . . . . . . . . . . . . . . . . . . . . . . . 9
       Requiring User Names be Treated as Case-sensitive . . . . . . . . . . . . . . . . . . . . . . . . . . . . . . . . . . . . . 9
       Preventing Users From Logging in from More than One Location . . . . . . . . . . . . . . . . . . . . . . . . . . 10
       Forcing Users to Log In Immediately After Changing Their Passwords . . . . . . . . . . . . . . . . . . . . . . 10
       Displaying User Login Information Since the Last Login . . . . . . . . . . . . . . . . . . . . . . . . . . . . . . . . . . 10
   One-Time Password Settings . . . . . . . . . . . . . . . . . . . . . . . . . . . . . . . . . . . . . . . . . . . . . . . . . . . . . . . . . . . 10
   Configuring the User Web Login Settings . . . . . . . . . . . . . . . . . . . . . . . . . . . . . . . . . . . . . . . . . . . . . . . . . 11
       Setting the Timeout for the Authentication Page . . . . . . . . . . . . . . . . . . . . . . . . . . . . . . . . . . . . . . . 11
       Setting How the Browser is Redirected . . . . . . . . . . . . . . . . . . . . . . . . . . . . . . . . . . . . . . . . . . . . . . . 12
       Managing Redirections to the Login Page . . . . . . . . . . . . . . . . . . . . . . . . . . . . . . . . . . . . . . . . . . . . . 13
       Using a CHAP challenge to Authenticate Users . . . . . . . . . . . . . . . . . . . . . . . . . . . . . . . . . . . . . . . . . 13
       Redirecting Unauthenticated Users . . . . . . . . . . . . . . . . . . . . . . . . . . . . . . . . . . . . . . . . . . . . . . . . . . 14
       Authentication Bypass Settings . . . . . . . . . . . . . . . . . . . . . . . . . . . . . . . . . . . . . . . . . . . . . . . . . . . . . . 14
   User Session Settings . . . . . . . . . . . . . . . . . . . . . . . . . . . . . . . . . . . . . . . . . . . . . . . . . . . . . . . . . . . . . . . . . 15
   User Session Settings for SSO-Authenticated Users . . . . . . . . . . . . . . . . . . . . . . . . . . . . . . . . . . . . . . . . . 17
   User Session Settings for Web Login . . . . . . . . . . . . . . . . . . . . . . . . . . . . . . . . . . . . . . . . . . . . . . . . . . . . . 18
   Accounting . . . . . . . . . . . . . . . . . . . . . . . . . . . . . . . . . . . . . . . . . . . . . . . . . . . . . . . . . . . . . . . . . . . . . . . . . . 19
       Configuring RADIUS Accounting . . . . . . . . . . . . . . . . . . . . . . . . . . . . . . . . . . . . . . . . . . . . . . . . . . . . . 20
       User Accounting . . . . . . . . . . . . . . . . . . . . . . . . . . . . . . . . . . . . . . . . . . . . . . . . . . . . . . . . . . . . . . . . . . 22
       Configuring TACACS+ Accounting . . . . . . . . . . . . . . . . . . . . . . . . . . . . . . . . . . . . . . . . . . . . . . . . . . . . 25
   Customization . . . . . . . . . . . . . . . . . . . . . . . . . . . . . . . . . . . . . . . . . . . . . . . . . . . . . . . . . . . . . . . . . . . . . . . 26
       Pre-Login Policy Banner . . . . . . . . . . . . . . . . . . . . . . . . . . . . . . . . . . . . . . . . . . . . . . . . . . . . . . . . . . . . 26
   Customize Login Pages . . . . . . . . . . . . . . . . . . . . . . . . . . . . . . . . . . . . . . . . . . . . . . . . . . . . . . . . . . . . . . . . 29

   Configuring and Managing Partitions . . . . . . . . . . . . . . . . . . . . . . . . . . . . . . . . . . . . . . . . . . . . . . . . . . 32
   Users > Partitions Page . . . . . . . . . . . . . . . . . . . . . . . . . . . . . . . . . . . . . . . . . . . . . . . . . . . . . . . . . . . . . . . . 33
       Authentication Partitioning Settings . . . . . . . . . . . . . . . . . . . . . . . . . . . . . . . . . . . . . . . . . . . . . . . . . 33
       Authentication Partitions . . . . . . . . . . . . . . . . . . . . . . . . . . . . . . . . . . . . . . . . . . . . . . . . . . . . . . . . . . 34
       Deleting Partitions and Subpartitions . . . . . . . . . . . . . . . . . . . . . . . . . . . . . . . . . . . . . . . . . . . . . . . . 36
       Partition Selection Policies . . . . . . . . . . . . . . . . . . . . . . . . . . . . . . . . . . . . . . . . . . . . . . . . . . . . . . . . . 37
   Assigning Servers, Agents, and Clients . . . . . . . . . . . . . . . . . . . . . . . . . . . . . . . . . . . . . . . . . . . . . . . . . . . . 38
       Assigning Manually . . . . . . . . . . . . . . . . . . . . . . . . . . . . . . . . . . . . . . . . . . . . . . . . . . . . . . . . . . . . . . . 38
       Auto Assigning . . . . . . . . . . . . . . . . . . . . . . . . . . . . . . . . . . . . . . . . . . . . . . . . . . . . . . . . . . . . . . . . . . . 39
   Editing Partitions . . . . . . . . . . . . . . . . . . . . . . . . . . . . . . . . . . . . . . . . . . . . . . . . . . . . . . . . . . . . . . . . . . . . . 40

                                                                                                      GMS 9.3 Users Administration Guide                      2
                                                                                                                                          Contents
Configuring Multi-RADIUS . . . . . . . . . . . . . . . . . . . . . . . . . . . . . . . . . . . . . . . . . . . . . . . . . . . . . . . . . . . 42
Multi-RADIUS General Settings . . . . . . . . . . . . . . . . . . . . . . . . . . . . . . . . . . . . . . . . . . . . . . . . . . . . . . . . . 43
Configuring Multi-RADIUS User Settings . . . . . . . . . . . . . . . . . . . . . . . . . . . . . . . . . . . . . . . . . . . . . . . . . . 43
Configuring Multi-RADIUS Client Test . . . . . . . . . . . . . . . . . . . . . . . . . . . . . . . . . . . . . . . . . . . . . . . . . . . . 44

Configuring RADIUS . . . . . . . . . . . . . . . . . . . . . . . . . . . . . . . . . . . . . . . . . . . . . . . . . . . . . . . . . . . . . . . . 46
Configuring RADIUS . . . . . . . . . . . . . . . . . . . . . . . . . . . . . . . . . . . . . . . . . . . . . . . . . . . . . . . . . . . . . . . . . . . 47
RADIUS Servers . . . . . . . . . . . . . . . . . . . . . . . . . . . . . . . . . . . . . . . . . . . . . . . . . . . . . . . . . . . . . . . . . . . . . . 48
RADIUS Users . . . . . . . . . . . . . . . . . . . . . . . . . . . . . . . . . . . . . . . . . . . . . . . . . . . . . . . . . . . . . . . . . . . . . . . . 48
RADIUS Client Test . . . . . . . . . . . . . . . . . . . . . . . . . . . . . . . . . . . . . . . . . . . . . . . . . . . . . . . . . . . . . . . . . . . . 49

Configuring LDAP . . . . . . . . . . . . . . . . . . . . . . . . . . . . . . . . . . . . . . . . . . . . . . . . . . . . . . . . . . . . . . . . . . . 50
LDAP Terms . . . . . . . . . . . . . . . . . . . . . . . . . . . . . . . . . . . . . . . . . . . . . . . . . . . . . . . . . . . . . . . . . . . . . . . . . 50
Prerequisites for an Active Directory Configuration . . . . . . . . . . . . . . . . . . . . . . . . . . . . . . . . . . . . . . . . . 51
Configuring LDAP . . . . . . . . . . . . . . . . . . . . . . . . . . . . . . . . . . . . . . . . . . . . . . . . . . . . . . . . . . . . . . . . . . . . . 52
    Configuring LDAP Authentication . . . . . . . . . . . . . . . . . . . . . . . . . . . . . . . . . . . . . . . . . . . . . . . . . . . . 53
    Configuring the Schema . . . . . . . . . . . . . . . . . . . . . . . . . . . . . . . . . . . . . . . . . . . . . . . . . . . . . . . . . . . 55
    Configuring the Directory . . . . . . . . . . . . . . . . . . . . . . . . . . . . . . . . . . . . . . . . . . . . . . . . . . . . . . . . . . 58
    Configuring Referrals . . . . . . . . . . . . . . . . . . . . . . . . . . . . . . . . . . . . . . . . . . . . . . . . . . . . . . . . . . . . . . 59
    Configuring LDAP Users & Groups . . . . . . . . . . . . . . . . . . . . . . . . . . . . . . . . . . . . . . . . . . . . . . . . . . . 60
    Configuring LDAP Relay . . . . . . . . . . . . . . . . . . . . . . . . . . . . . . . . . . . . . . . . . . . . . . . . . . . . . . . . . . . . 61
    Configuring Test Settings . . . . . . . . . . . . . . . . . . . . . . . . . . . . . . . . . . . . . . . . . . . . . . . . . . . . . . . . . . . 62
More Information on LDAP Schemas . . . . . . . . . . . . . . . . . . . . . . . . . . . . . . . . . . . . . . . . . . . . . . . . . . . . . 63

Configuring Multi-LDAP . . . . . . . . . . . . . . . . . . . . . . . . . . . . . . . . . . . . . . . . . . . . . . . . . . . . . . . . . . . . . 64
Managing Multi-LDAP Integration . . . . . . . . . . . . . . . . . . . . . . . . . . . . . . . . . . . . . . . . . . . . . . . . . . . . . . . 64
   Configuring the Schema . . . . . . . . . . . . . . . . . . . . . . . . . . . . . . . . . . . . . . . . . . . . . . . . . . . . . . . . . . . 65
   Configuring the Directory . . . . . . . . . . . . . . . . . . . . . . . . . . . . . . . . . . . . . . . . . . . . . . . . . . . . . . . . . . 68
Configuring Login/Bind . . . . . . . . . . . . . . . . . . . . . . . . . . . . . . . . . . . . . . . . . . . . . . . . . . . . . . . . . . . . . . . . 69
Configuring the General Settings . . . . . . . . . . . . . . . . . . . . . . . . . . . . . . . . . . . . . . . . . . . . . . . . . . . . . . . . 69
    Configuring Referrals . . . . . . . . . . . . . . . . . . . . . . . . . . . . . . . . . . . . . . . . . . . . . . . . . . . . . . . . . . . . . . 71
    Configuring Multi-LDAP Users & Groups . . . . . . . . . . . . . . . . . . . . . . . . . . . . . . . . . . . . . . . . . . . . . . 72
    Configuring LDAP Relay . . . . . . . . . . . . . . . . . . . . . . . . . . . . . . . . . . . . . . . . . . . . . . . . . . . . . . . . . . . . 73
    Configuring Test Settings . . . . . . . . . . . . . . . . . . . . . . . . . . . . . . . . . . . . . . . . . . . . . . . . . . . . . . . . . . . 74

Configuring TACACS+ . . . . . . . . . . . . . . . . . . . . . . . . . . . . . . . . . . . . . . . . . . . . . . . . . . . . . . . . . . . . . . . . 76
Configuring TACACS+ Servers . . . . . . . . . . . . . . . . . . . . . . . . . . . . . . . . . . . . . . . . . . . . . . . . . . . . . . . . . . . 76
Configuring TACACS+ General Settings . . . . . . . . . . . . . . . . . . . . . . . . . . . . . . . . . . . . . . . . . . . . . . . . . . . 77
TACACS+ Users . . . . . . . . . . . . . . . . . . . . . . . . . . . . . . . . . . . . . . . . . . . . . . . . . . . . . . . . . . . . . . . . . . . . . . . 78
TACACS+ Test . . . . . . . . . . . . . . . . . . . . . . . . . . . . . . . . . . . . . . . . . . . . . . . . . . . . . . . . . . . . . . . . . . . . . . . . 79

Configuring Local Users . . . . . . . . . . . . . . . . . . . . . . . . . . . . . . . . . . . . . . . . . . . . . . . . . . . . . . . . . . . . . . 80
Groups . . . . . . . . . . . . . . . . . . . . . . . . . . . . . . . . . . . . . . . . . . . . . . . . . . . . . . . . . . . . . . . . . . . . . . . . . . . . . 82
VPN Access . . . . . . . . . . . . . . . . . . . . . . . . . . . . . . . . . . . . . . . . . . . . . . . . . . . . . . . . . . . . . . . . . . . . . . . . . . 83

                                                                                                    GMS 9.3 Users Administration Guide                       3
                                                                                                                                         Contents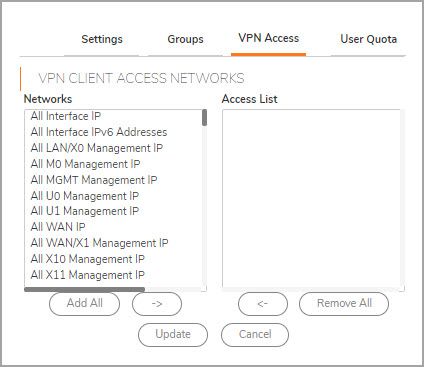
User Quota . . . . . . . . . . . . . . . . . . . . . . . . . . . . . . . . . . . . . . . . . . . . . . . . . . . . . . . . . . . . . . . . . . . . . . . . . . 83

Configuring Local Groups . . . . . . . . . . . . . . . . . . . . . . . . . . . . . . . . . . . . . . . . . . . . . . . . . . . . . . . . . . . . 85
Members . . . . . . . . . . . . . . . . . . . . . . . . . . . . . . . . . . . . . . . . . . . . . . . . . . . . . . . . . . . . . . . . . . . . . . . . . . . 88
VPN Access . . . . . . . . . . . . . . . . . . . . . . . . . . . . . . . . . . . . . . . . . . . . . . . . . . . . . . . . . . . . . . . . . . . . . . . . . . 88
CFS Policy . . . . . . . . . . . . . . . . . . . . . . . . . . . . . . . . . . . . . . . . . . . . . . . . . . . . . . . . . . . . . . . . . . . . . . . . . . . 89
Administration . . . . . . . . . . . . . . . . . . . . . . . . . . . . . . . . . . . . . . . . . . . . . . . . . . . . . . . . . . . . . . . . . . . . . . . 89
Editing Local Groups . . . . . . . . . . . . . . . . . . . . . . . . . . . . . . . . . . . . . . . . . . . . . . . . . . . . . . . . . . . . . . . . . . 90

Configuring Guest Services . . . . . . . . . . . . . . . . . . . . . . . . . . . . . . . . . . . . . . . . . . . . . . . . . . . . . . . . . . . 91
Configuring Guest Services . . . . . . . . . . . . . . . . . . . . . . . . . . . . . . . . . . . . . . . . . . . . . . . . . . . . . . . . . . . . . 91
Editing Guest Profiles . . . . . . . . . . . . . . . . . . . . . . . . . . . . . . . . . . . . . . . . . . . . . . . . . . . . . . . . . . . . . . . . . 94
Deleting Guest Profiles . . . . . . . . . . . . . . . . . . . . . . . . . . . . . . . . . . . . . . . . . . . . . . . . . . . . . . . . . . . . . . . . 94

Configuring Guest Accounts . . . . . . . . . . . . . . . . . . . . . . . . . . . . . . . . . . . . . . . . . . . . . . . . . . . . . . . . . . 95
Editing Guest Accounts . . . . . . . . . . . . . . . . . . . . . . . . . . . . . . . . . . . . . . . . . . . . . . . . . . . . . . . . . . . . . . . . 97
Deleting Guest Accounts . . . . . . . . . . . . . . . . . . . . . . . . . . . . . . . . . . . . . . . . . . . . . . . . . . . . . . . . . . . . . . . 97

SonicWall Support . . . . . . . . . . . . . . . . . . . . . . . . . . . . . . . . . . . . . . . . . . . . . . . . . . . . . . . . . . . . . . . . . . 99
About This Document . . . . . . . . . . . . . . . . . . . . . . . . . . . . . . . . . . . . . . . . . . . . . . . . . . . . . . . . . . . . . . . . 100

                                                                                                    GMS 9.3 Users Administration Guide                       4
                                                                                                                                         Contents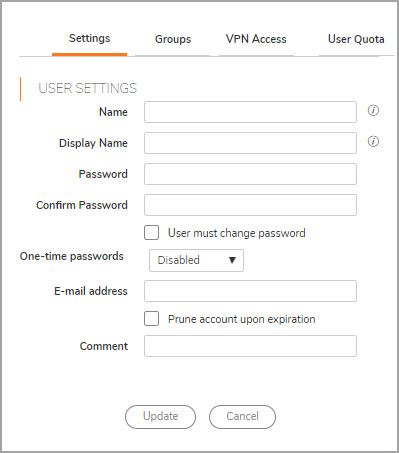
1
                                 Configuring Users Status
The Users > Status page displays the Active User Sessions on the firewall. IPv4 and IPv6 IP addresses are
accepted/displayed in the Active User Sessions table.

The Active User Sessions table lists the User Name, IP Address, Session Time, Time Remaining, Inactivity
Remaining, Type/Mode, Settings, and Logout.

Topics:
   • Logging Out a Single User
   • Logging Out Multiple Users
   • Searching for Active User Sessions

Logging Out a Single User
To log out a user:
   1 Navigate to the Users > Status page.
   2 Select the user you would like to logout and click Logout User(s) to log them out.

Logging Out Multiple Users
To log out multiple users:
   1 Navigate to the Users > Status page.
   2 Select the users you would like to logout and click Logout User(s) to log them out.

                                                                        GMS 9.3 Users Administration Guide
                                                                                                             5
                                                                                  Configuring Users Status
Searching for Active User Sessions
To search for active user sessions:
   1 Navigate to the Users > Status page.
   2 Specify search options in the Active User Sessions Search section.
   3 Clicking Search. The Active User Sessions table displays only those users matching the search criteria. To
     restore the table, click Clear.

                                                                        GMS 9.3 Users Administration Guide
                                                                                                             6
                                                                                  Configuring Users Status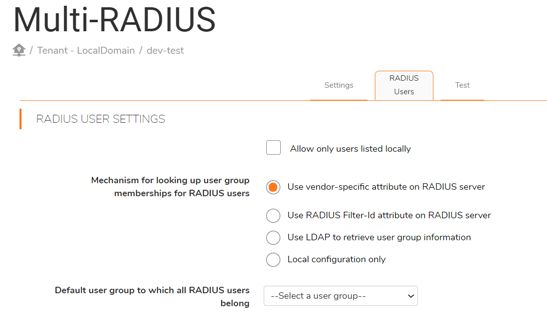
2
                              Configuring User Settings
In addition to the regular authentication methods, the GMS allows you to use Lightweight Directory Access
Protocol (LDAP) to authenticate users. LDAP is compatible with Microsoft’s Active Directory.
For SonicWall appliances running SonicOS 5.0 and higher, you can select the SonicWall Single Sign-On Agent to
provide Single Sign-On functionality. Single Sign-On (SSO) is a transparent user authentication mechanism that
provides privileged access to multiple network resources with a single workstation login. SonicWall PRO and TZ
series security appliances running SonicOS 5.0 and higher provide SSO functionality using the SonicWall Single
Sign-On Agent (SSO Agent) to identify user activity based on workstation IP address when Active Directory is
being used for authentication. The SonicWall SSO Agent must be installed on a computer in the same domain as
Active Directory.

Topics:
   • User Login Settings
   • One-Time Password Settings
   • Configuring the User Web Login Settings
   • User Session Settings
   • User Session Settings for SSO-Authenticated Users
   • User Session Settings for Web Login
   • Accounting
   • Customization
   • Customize Login Pages

User Login Settings
Topics:
   • Setting the Authentication Method for Login
   • Setting the Single-Sign-On Methods
   • Requiring User Names be Treated as Case-sensitive
   • Preventing Users From Logging in from More than One Location
   • Forcing Users to Log In Immediately After Changing Their Passwords
   • Displaying User Login Information Since the Last Login
   • Setting How the Browser is Redirected
   • Setting How the Browser is Redirected
   • Managing Redirections to the Login Page
   • Using a CHAP challenge to Authenticate Users

                                                                        GMS 9.3 Users Administration Guide
                                                                                                              7
                                                                                  Configuring User Settings
Setting the Authentication Method for Login
To set the authentication method for login:
1 Navigate to the Users > Settings page.
2 Select one of the following authentication methods from Authentication method for login:
• Local Users—To configure users in the local database using the Users > Local Users and Users >
Local Groups pages. For information on configuring local users and groups, refer to Configuring
Local Users and Configuring Local Groups.
• RADIUS—If you have more than 1,000 users or want to add an extra layer of security for
authenticating the user to the SonicWall. If you select Use RADIUS for user authentication, users
must log into the SonicWall using HTTPS in order to encrypt the password sent to the SonicWall. If
a user attempts to log into the SonicWall using HTTP, the browser is automatically redirected to
HTTPS. For information on configuring RADIUS, refer to Configuring RADIUS.
• RADIUS + Local Users—If you want to use both RADIUS and the SonicWall local user database for
authentication. For information on configuring RADIUS, refer to Configuring RADIUS.
• LDAP—If you use a Lightweight Directory Access Protocol (LDAP) server or Microsoft Active
Directory (AD) server to maintain all your user account data. For information about configuring
LDAP, refer to Configuring LDAP.
• LDAP + Local Users—If you want to use both LDAP and the SonicWall local user database for
authentication. For information about configuring LDAP, refer to Configuring LDAP.
GMS 9.3 Users Administration Guide
8
Configuring User Settings• TACACS+—If you use Terminal Access Controller Access-Control System Plus (TACAS+) protocol for
authentication.
• TACACS++Local Users—If you use Terminal Access Controller Access-Control System Plus
(TACAS+) protocol and the SonicWall local user database for authentication
3 Click Update.
Setting the Single-Sign-On Methods
The Single-sign-on method(s) displays the status of the available method(s). You can enable/disable methods,
or click Configure to configure a single-sign-on method. The following methods are available:
To set the single-sign-on methods:
1 Navigate to the Users > Settings page.
2 Enable or disable the methods, or click Configure to configure a single-sign-on method. These methods
are available:
• SSO Agent — Configure the SSO Agent if you are using Active Directory for authentication and the
SonicWall SSO Agent is installed on a computer in the same domain.
• Terminal Services Agent — Configure the SSO Agent if you are using Terminal Services and the
SonicWall Terminal Services Agent (TSA) is installed on a terminal server in the same domain.
• Browser NTLM Authentication — Configure Browser NTLM Authentication if you want to
authenticate Web users without using the SonicWall SSO Agent or TSA. Users are identified as
soon as they send HTTP traffic. NTLM requires RADIUS to be configured (in addition to LDAP, if
using LDAP), for access to MSCHAP authentication.
• RADIUS Accounting — Configure RADIUS Accounting if you want a network access server (NAS) to
send user login session accounting messages to an accounting server.
• 3rd Party API — Configure the XML-/JSON-based REST API for third-party devices or scripts to
pass user login/logout notifications to the firewall.
3 Click Update.
Requiring User Names be Treated as
Case-sensitive
To require that user names are treated as case-sensitive:
1 Navigate to the Users > Settings page.
2 Select Case-sensitive user names. (This option is selected by default.)
3 Click Update.
GMS 9.3 Users Administration Guide
9
Configuring User SettingsPreventing Users From Logging in from More
than One Location
To prevent users from logging in from more than one location at a time:
1 Navigate to the Users > Settings page.
2 Select Enforce login uniqueness. (This option is not selected by default.)
3 Click Update.
Forcing Users to Log In Immediately After
Changing Their Passwords
To force the user to login immediately after changing the password:
1 Navigate to the Users > Settings page.
2 Select Force relogin after password change. (This option is not selected by default.)
3 Click Update.
Displaying User Login Information Since the
Last Login
To display user login information since the last login:
1 Navigate to the Users > Settings page.
2 Select Display user login info since last login. (This option is not selected by default.)
3 Click Update.
One-Time Password Settings
To configure the one-time password settings:
1 Navigate to the Users > Settings page.
GMS 9.3 Users Administration Guide
10
Configuring User Settings2 Choose an email format for One-time password Email format:
• Plain Text
• HTML
3 From One-time password format, select the password format:
• Characters
• Characters + Numbers
• Numbers
4 In the One-time password length beginning and ending fields, enter the minimum and maximum length
of the password. The length must be between 4-14 characters. The default for both fields is 10
characters.
5 Click Update.
Configuring the User Web Login
Settings
Setting the Timeout for the Authentication
Page
While the login authentication page is displayed, it uses system resources. By setting a limit on how long a login
can take before the login page is closed, you free up those resources.
To set the timeout for the Authentication Page:
1 Navigate to the Users > Settings > Web Login page.
GMS 9.3 Users Administration Guide
11
Configuring User Settings2 In the Show user authentication page for (minutes) field, enter the number of minutes that users have
to log in with their username and password before the login page times out. If it times out, a message
displays informing them what they must do before attempting to log in again. The default time is 1
minute.
3 Click Update.
Setting How the Browser is Redirected
To set how the browser is redirected:
1 Navigate to the Users > Settings | Web Login page.
2 From Redirect the browser to this appliance via, choose one of the following options to determine how
a user’s browser is initially redirected to the SonicWall appliance’s Web server:
• The interface IP address – Select this to redirect the browser to the IP address of the appliance
Web server interface. This option is selected by default.
• Its domain name from a reverse DNS lookup of the interface IP address – When clicked, displays
the appliance Web server’s Interface, IP Address, DNS Name, and TTL (in seconds). This option is
not selected by default.
• Its configured domain name – Select to enable redirecting to a domain name configured on the
System > Administration page.
NOTE: This option is available only if a domain name has been specified on the System >
Administrator page. Otherwise, this option is dimmed. To enable redirection to a configured
domain name, set the firewall’s domain name on the System > Administrator page.
Redirection is allowed when an imported certificate has been selected for HTTPS web
management of that page.
• The name from the administration certificate – Select to enable redirecting to a configured
domain name with a properly signed certificate. Redirecting to the name from this administration
certificate is allowed when an imported certificate has been selected for HTTPS web management
on that page.
NOTE: This option is available only if a certificate has been imported for HTTPS management
in the Web Management Settings section of the System > Administration page. Otherwise,
this option is dimmed.
TIP: If you are using imported administration certificates, use this option. If you are not
going to use an administration certificate, select the Its configured domain name option.
To do HTTPS management without the browser displaying invalid-certificate warnings, you need
to import a certificate properly signed by a certification authority (administration certificate)
rather than use the internally generated self-signed one. This certificate must be generated for
the appliance and its host domain name. A properly signed certificate is the best way to obtain an
appliance’s domain name.
If you use an administration certificate, then to avoid certificate warnings, the browser needs to
redirect to that domain name rather than to the IP address. For example, if you browse the
internet and are redirected to log in at https://gateway.SonicWall.com/auth.html,
the administration certificate on the appliance says that the appliance really is
gateway.sonicall.com, so the browser displays the login page. If you are redirected to
https://10.0.02/auth.html, however, even though the certificate says it is
gateway.sonicall.com, the browser has no way to tell if that is correct, so it displays a
certificate warning instead.
GMS 9.3 Users Administration Guide
12
Configuring User Settings3 Click Update.
Managing Redirections to the Login Page
Limiting redirections prevents possibly overloading the SonicWall appliances’ web server by limiting redirections
to the login page should HTTP/HTTPS connections that would otherwise get redirected there be repeatedly
opened at a high rate from some unauthorized users.
To manage redirections to the login page:
1 Navigate to the Users > Settings | Web Login page.
2 In the Limit redirecting users to field, enter the number of times in the Limit redirecting users to times
per minute per user field. The default value is 10 times.
3 To further limit redirects of the same page, select the Don’t redirect repeated gets of the same page
option. This option is selected by default.
4 Select Redirect users from HTTPS to HTTP on completion of login if the session does not need to be
encrypted.
5 Click Update.
Using a CHAP challenge to Authenticate Users
If using RADIUS authentication (and if the RADIUS server supports it), a CHAP challenge can be used to
authenticate users during web login. Such a login through HTTP is secure, so it is not necessary to enforce HTTPS
for login.
Administrators who use this mechanism to log into the SonicWall appliance are restricted in the management
operations they can perform. For some management operations, the appliance needs to know the user’s
password, which is not available with CHAP authentication by a remote authentication server. Consequently, if
this option is enabled, users who are members of administrative user groups might have to log in manually
through HTTPS when logging in for administration. This restriction does not apply to the built-in admin account.
TIP: When using LDAP, this mechanism can be used normally by:
1 Setting the Authentication method for login to RADIUS.
2 Selecting LDAP as the mechanism for setting user group memberships in the RADIUS configuration.
To use a CHAP challenge to authenticate users:
1 Navigate to the Users > Settings | Web Login page.
2 Select Allow HTTP login with RADIUS CHAP mode to enable type of login.
NOTE: This option is only available when the Authentication method for login is RADIUS or
RADIUS+Local Users. This option is not selected by default.
3 Select the option Authenticate user’s other IP (v4/v6) addresses if possible, if required.
4 Select the option Use HTTP to initiate combined logins, if required.
5 Click Update.
GMS 9.3 Users Administration Guide
13
Configuring User SettingsRedirecting Unauthenticated Users
To redirect HTTP/HTTPS traffic from unauthenticated users to a specified URL instead of the
SonicWall’s own login page:
1 Select On redirecting unauthenticated users, redirect to an external login page URL. This option allows
users to be authenticated by an external authentication system. This option is not selected by default.
TIP: To allow only unauthenticated users to be redirected, you need to create one or more access rules for
this situation.
NOTE: The external system can subsequently use the SSO third-party API or RADIUS Accounting to pass
the user’s name and credentials to the firewall so they are identified for such activities as access control
and logging.
2 When you select this option, the URL field displays. Enter the URL for redirection in the field.
3 To configure options related to the captive portal configured in a zone’s guest settings, scroll to Web
Login Settings for Guest Captive Portal.
4 For captive portal guest authentication, to allow the authentication page to show in a portal host page as
a frame, select Allow authentication page in frame. This option is not selected by default.
10 Click Update.
Authentication Bypass Settings
GMS Guest Services allows guest users to have access through your network directly to the Internet without
access to your protected network. To do this, GMS uses the IP address of the user’s computer.
Using the IP address as the identifier is useful when guest user traffic passes through a network router, as this
changes the source MAC address to that of the router. However, the user’s IP address passes through
unchanged.
If only the MAC address is used for identification, two clients behind the same router have the same MAC
address upon reaching the Security Appliance. When one client gets authenticated, the traffic from the other
client is also treated as authenticated and bypasses the guest service authentication.
By using the client IP address for identification, all guest clients behind the routed device are required to
authenticate independently.
Topics:
• Adding URLs to Authentication Bypass
GMS 9.3 Users Administration Guide
14
Configuring User SettingsAdding URLs to Authentication Bypass
To add HTTP URLs user authentication bypass in Access Rules:
1 Navigate to Users > Settings | Authentication Bypass.
2 Click Add. The Add URL pop-up displays.
3 Enter the URL in the URL field.
4 Click Update. A change order pop-up confirmation displays.
5 Click Accept.
User Session Settings
The settings that follow apply to all users when authenticated through the SonicWall.
GMS 9.3 Users Administration Guide
15
Configuring User SettingsTo configure user session settings:
1 Navigate to Users > Settings | User Sessions.
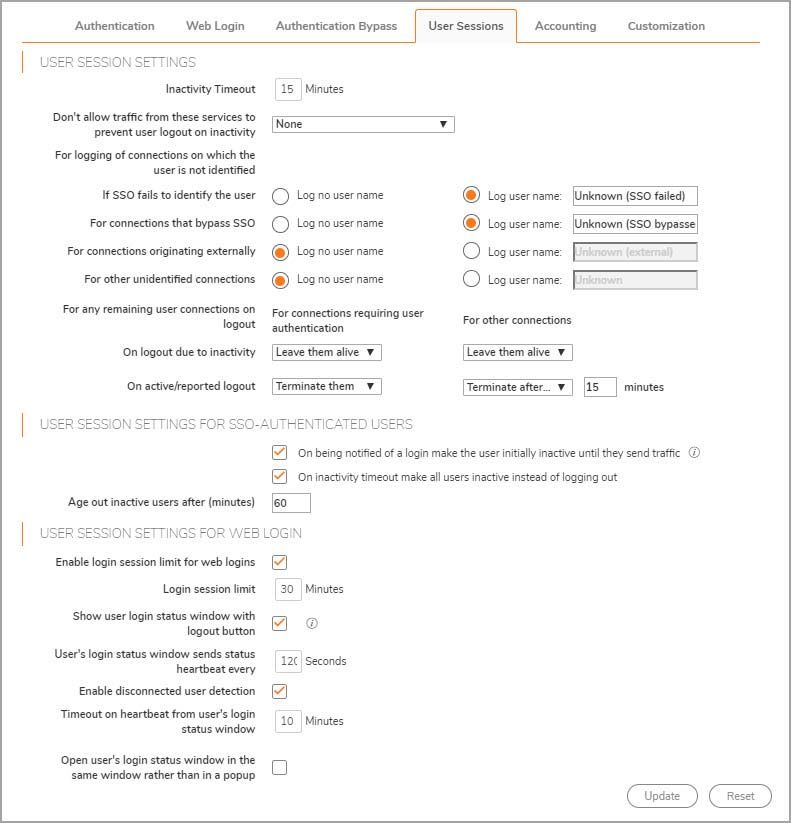
To configure settings that apply to all users who are authenticated through the firewall:
1 Navigate to the Users > Settings | User Sessions page.
2 Specify the length of time for inactivity after which users are logged out of the firewall in the Inactivity
timeout (minutes) field. The default is 15 minutes.
3 From Don’t allow traffic from these services to prevent user logout on inactivity, select the service or
service group option to be prevented from logging out inactive users. This option saves system overhead
and possible delays re-identifying aged-out authenticated users by making them inactive instead of
logging them out. Inactive users do not use up system resources and can be displayed on the Users >
Status page. The default is None.
4 For the following For logging of connections on which the user is not identified options, choose the type
of logging, Log no user name or Log user name, to be done, and optionally, the log user name:
• If SSO fails to identify the user: Log user name Unknown SSO failed (default)
GMS 9.3 Users Administration Guide
16
Configuring User Settings• For connections that bypass SSO: Log user name SSO Bypass (default)
NOTE: This option also can be set in SSO Bypass section of the Enforcement of the SSO
Authentication Configuration dialog.
• For connections originating externally: Log no user name (default); if Log user name is selected,
the default user name is Unknown (external)
• For other unidentified connects: Log no user name (default); if Log user name is selected, the
default user name is Unknown
5 Specify how to handle a user’s connections that remain after the user logs out from the SonicWall
appliance with the Actions for remaining user connections on logout options.
Action
Type of logout For connections requiring user
For other connections 2
authentication 1
On logout due to inactivity Leave them alive (default) Leave them alive (default)
Terminate them Terminate them
Terminate after… minutes Terminate after… minutes
On active/reported logout Leave them alive Leave them alive
Terminate them (default) Terminate them
Terminate after… minutes Terminate after… 15 minutes (default)
1. Applies for connections through access rules that allow only specific users.
2. Applies for other connections that do not have a specific user authentication requirement.
You can set different actions for:
• Inactivity logout, where the user might or might not still be logged into the domain/computer.
• Users actively logging themselves out or being reported to the SonicWall appliance as being
logged out (the latter normally means that the user has logged out from the domain/user).
6 Click Update.
User Session Settings for
SSO-Authenticated Users
To specify how inactive SSO-authenticated users are handled:
1 Navigate to the Users > Settings | User Sessions page.
To put a user identified to the SonicWall appliance through an SSO mechanism, but no traffic has yet
been received from the user, into an inactive state so they do not use resources, select On being notified
of a login make the user initially inactive until they send traffic. The users remain in an inactive state
until traffic is received. This option is selected by default.
GMS 9.3 Users Administration Guide
17
Configuring User SettingsSome SSO mechanisms do not give any way for the SonicWall appliance to actively re-identify a user, and
if users identified by such a mechanism do not send traffic, they remain in the inactive state until the
appliance eventually receives a logout notification for the user. For other users who can be re-identified,
if they stay inactive and do not send traffic, they are aged-out and removed after a period (see the
paragraphs that follow).
2 If an SSO-identified user who has been actively logged in is timed out because of inactivity, then users
who cannot be re-identified are returned to an inactive state. To have users who would otherwise be
logged out on inactivity to be returned to an inactive state, select On inactivity timeout make all user
inactive instead of logged out. Doing this avoids overhead and possible delays re-identifying the users
when they become active again. This setting is selected by default.
3 For inactive users who are subject to getting aged out, you can set the time, in minutes, after which they
are aged-out and removed if they stay inactive and do not send traffic by selecting Age out inactive users
after (minutes) and specifying the timeout in the field. This setting is selected by default, and the
minimum timeout value is 10 minutes, the maximum is 10000 minutes, and the default is 60 minutes.
NOTE: As the reason for keeping inactive user separate from active users is to minimize the
resources used to manage them, the age-out timer runs once every 10 minutes. It might, therefore,
take up to 10 minutes longer to remove inactive users from active status.
4 Click Update.
User Session Settings for Web Login
To configure user session settings for web login:
1 Navigate to the Users > Settings | User Sessions page.
2 Enable login session limit for web logins: Limit the time a user is logged into the firewall through web
login before the login page times out by selecting this option and typing the amount of time, in minutes,
in the Login session limit … Minutes field. This setting is selected by default The default value is 30
minutes.
If the session times out, a message displays that reads you must log out before attempting to log in again.
3 Select Show user login status window with logout button to display a status window with a Log Out
button during the user’s session. The user must click Log Out to log out of the session. This option is not
selected by default.
NOTE: The window must be kept open throughout the user’s session as closing it logs the user out.
GMS 9.3 Users Administration Guide
18
Configuring User SettingsIMPORTANT: If this option is not enabled, the status window is not displayed and users might not
be able to log out. In this case, a login session limit must be set to ensure that they do eventually
get logged out.
The User Login Status window refreshes every (minutes) displays the number of minutes the user has
left in the login session. The user can set the remaining time to a smaller number of minutes by entering
the number and clicking Update.
When this option is enabled, a mechanism that monitors heartbeats sent from that window also can be
enabled to detect and log out users who disconnect without logging out.
IMPORTANT: If this option is not enabled, users might be unable to log out. Set a login session limit
to ensure users are logged out eventually.
4 In the User's login status window sends status heartbeat every … Seconds field, specify how often a
heartbeat is sent back to the SonicWall. This heartbeat notifies the SonicWall of your connection status
and continues to be sent as long at the status window is open. The default is 120 seconds.
5 Select Enable disconnected user detection to have the SonicWall to detect when the user’s connection is
no longer valid and then end the session. This option is already selected by default.
6 In the Timeout on heartbeat from user's login status window … Minutes field, specify the time needed
without a reply from the heartbeat before ending the user session. The minimum delay before ending
the user session is 1 minute, the maximum is 65535 minutes, and the default is 10 minutes.
7 Select Allow unauthenticated VPN users to access DNS to allow that access.
8 Select Open user’s login status window in the same window rather than in a popup if you do not want
the login status window to open as a separate pop-up window. This option is not selected by default.
9 LDAP read from server options are available when the LDAP option is active. The options are:
• Automatically update the schema configuration
• Export details of the schema
10 Click Update.
Accounting
GMS supports both RADIUS accounting and TACACS+ accounting. If both a RADIUS server and a TACACS+ server
are configured, a user’s accounting messages are sent to both servers.
Topics:
• Configuring RADIUS Accounting
• Configuring TACACS+ Accounting
Configuring RADIUS Accounting
Topics:
• Sending RADIUS Accounting Information to Servers
• Editing Servers
• Deleting Servers
GMS 9.3 Users Administration Guide
19
Configuring User SettingsSending RADIUS Accounting Information to Servers
To send RADIUS accounting information to servers:
1 Navigate to the Users > Settings page.
2 Scroll to the RADIUS Accounting section.
3 Select Send RADIUS Accounting Information. The section expands.
GMS 9.3 Users Administration Guide
20
Configuring User Settings4 To add a RADIUS server:
a Click Add. The Add/Edit Radius Accounting Server dialog displays.
b Enter the host or IP address in the IP Address/Host field.
c Enter the port in the Port field.
d Enter the shared secret in the Shared secret and Confirm shared secret fields.
e Select the username format from Username Format:
• User-Name
• User-Name@Domain
• Domain\User-Name
• User-Name.Domain
f To enable the server, select Enabled. This option is not selected by default.
g Select the authentication partition from Authentication partition.
h Click OK. The RADIUS Accounting table is updated.
i For each server to add, repeat Step a through Step h.
5 Enter a maximum time out, in seconds, in the RADIUS Accounting Server Timeout (seconds) field. The
default is 5 seconds.
6 Enter the maximum number of retries in the Retries field. The default is 3 retries.
7 To send accounting data to all servers listed in the RADIUS Accounting table, select Send accounting data
to all servers.
8 Click Update.
GMS 9.3 Users Administration Guide
21
Configuring User SettingsUser Accounting
1 From Send accounting data for, select one or more types of users. Include SSO users identified via
RADIUS Accounting? is not available by default. To make it selectable, first select the SSO-authenticated
users field.
2 Choose whether to track domain and/or local users from Include. Domain users is selected by default.
3 To receive watchdog messages, select Send Watchdog Messages. This option is not selected by default.
4 After selecting this option, the Every:....minutes option appears. Indicate how often you would like to
receive Watchdog Messages.
5 Click Test.
6 From Select server to test, select the IP address of the TACACS+ server.
7 Choose the type of test from Test. Connectivity is selected by default.
8 Click Test. The results of the test display in Returned User Attributes.
9 Click Apply.
10 Repeat these previous steps for each server.
11 Click OK.
GMS 9.3 Users Administration Guide
22
Configuring User SettingsEditing Servers
To edit a server:
1 Navigate to the Users > Settings page.
2 Scroll to the RADIUS Accounting section.
3 Click the Edit icon for the server to edit. The Add/Edit Radius Accounting Server dialog for that server
displays. The IP Address/Host and Port fields are dimmed and cannot be changed.
4 Make the changes.
5 Click OK. The servers entry in the RADIUS Accounting table is updated.
Deleting Servers
To delete a single server:
1 Navigate to the Users > Settings | Accounting page.
GMS 9.3 Users Administration Guide
23
Configuring User Settings2 Scroll to the RADIUS Accounting section.
3 Click the Delete icon in the Configure column for the server to be deleted. A confirmation message
displays.
4 Click OK.
5 Click Update.
To delete one or more servers:
1 Navigate to the Users > Settings page.
2 Scroll to the RADIUS Accounting section.
3 Select the servers in the RADIUS Accounting table to be deleted.
4 Click Delete. A confirmation message displays.
5 Click OK.
6 Click Update.
GMS 9.3 Users Administration Guide
24
Configuring User SettingsConfiguring TACACS+ Accounting
GMS supports TACACS+ accounting Start, Watchdog and Stop messages, but not the TACACS+ accounting proxy,
that is, GMS does not forward the accounting request to the accounting server.
To configure TACACS+ accounting:
1 Navigate to Users > Settings | Accounting.
2 Click the TACACS+ Accounting option. The TACACS+ Accounting Configuration dialog displays.
3 To add a TACACS+ server, click Add New TACACS+ Server. The Add TACACS+ Accounting Server dialog
displays.
4 Enter the host name or IP address of the TACACS+ server in the Host Name or IP Address field.
5 Enter the port number of the server in the Port field. The default is 49.
6 Enter the shared secret in the Shared Secret and Confirm Shared Secret fields.
7 Click Enabled when you are ready to put this TACACS+ server into use.
8 Click OK.
GMS 9.3 Users Administration Guide
25
Configuring User SettingsCustomization
Topics:
• Pre-Login Policy Banner
• Acceptable Use Policy
• Customize Login Pages
Pre-Login Policy Banner
Create a policy statement that is presented to all users as a banner in the window before web login. The policy
banner can include HTML formatting.
To display a banner containing a policy when the user logs in and that the user must accept to log
in:
1 Navigate to Users > Settings | Customization.
2 Select Start With Policy Banner Before Login Window. This option is not selected by default.
a To see a sample banner, click Example Template. The Policy banner content field is populated.
b Make changes to the sample banner or enter new coding. The page that is displayed to the user
includes I Accept and Cancel for user confirmation.
c Click Update.
Topics:
• Example Template
• Preview Message
GMS 9.3 Users Administration Guide
26
Configuring User SettingsExample Template
Click Example Template to populate the content with the default Acceptable Use Policy (AUP) template, which
you can modify:
Welcome
Enter your usage policy terms here.
Click "I Accept" only if you wish to accept these terms and continue,
or otherwise click "Cancel".
Preview Message
Click Preview to display your AUP message as it appears to the user.
Acceptable Use Policy
An acceptable use policy (AUP) is a policy that users must agree to follow to access a network or the Internet. It
is common practice for many businesses and educational facilities to require that employees or students agree
to an acceptable use policy before accessing the network or Internet through their Security Appliance.
The Post-Login Acceptable Use Policy section allows you to create the AUP message window for users. You can
use HTML formatting in the body of your message. Clicking Example Template creates a preformatted HTML
template for your AUP window; see Example Template.
To create a post-login AUP message window:
1 Navigate to Users > Settings | Customization.
2 Scroll to the Acceptable Use Policy section.
3 Specify these settings:
GMS 9.3 Users Administration Guide
27
Configuring User Settings• Display on login from - Select the network interface(s) you want to display the Acceptable Use
Policy page when users login. You can choose Trusted Zones (default), WAN Zone, Public Zones
(default), Wireless Zones, and VPN Zone in any combination.
• Window size (pixels) - Allows you to specify the size of the AUP window, in pixels:
• Width: Minimum size is 400 pixels, maximum size is 1280 pixels, and the default is 460
pixels.
• Height: Minimum size is 200 pixels, maximum size is 1024 pixels, and the default is 310
pixels.
• Enable scroll bars on window - Turns on the scroll bars when your content exceeds the display
size of the window. This option is selected by default.
• Acceptable use policy text for user login - Enter your Acceptable Use Policy text in this field. You
can include HTML formatting. The page that is displayed to the user includes I Accept and Cancel
for user confirmation.
4 Click Update.
Topics:
• Example Template
• Preview Meassage
Example Template
Click Example Template to populate the content with the default AUP template, which you can modify:
Welcome to the SonicWall
Enter your usage policy terms here.
Click "I Accept" only if you wish to accept these terms and continue, or otherwise select
"Cancel."
Preview Message
Click Preview to display your AUP message as it appears to the user.
Customize Login Pages
The GMS provides the ability to customize the text of the login authentication pages that are presented to users.
Administrators can translate the login-related pages with their own wording and apply the changes so that they
take effect without rebooting.
Although the entire the GMS interface is available in different languages, sometimes the administrator does not
want to change the entire UI language to a specific local language.
However, if the firewall requires authentication before users can access other networks, or enables external
access services (for example, VPN, SSL-VPN), those login related pages usually should be localized to make them
more usable for typical users.
GMS 9.3 Users Administration Guide
28
Configuring User SettingsThe Customizable Login Page feature provides the following functionality:
The Customize Login Page feature provides the following functionality:
• Keeps the style of original login by default
• Customizes login related pages
• Uses the default login related pages as templates
• Saves customized pages into system preferences
• Allows a preview of changes before saving to preferences
• Presents customized login-related pages to typical users
The following login-related pages can be customized:
• Admin Preempt
• Login Authentication
• Logged Out
• Login Full
• Login Disallowed
• Login Lockout
• Login Status
• Guest Login Status
• Policy Access Barred
• Policy Access Down
• Policy Access Unavailable
• Policy Login Redirect
• Policy SSO Probe Failure
• User Password Update
• User Login Message
GMS 9.3 Users Administration Guide
29
Configuring User SettingsTo customize one of these pages:
1 Navigate to Users > Settings | Customization.
2 Scroll to the Customize Login Pages section.
3 Select the page to be customized from the Select Login Page drop-down menu.
4 Select the page to be customized from Select Login Page:
Admin Preempt Login Lockout Policy Access Unavailable
Login Authentication (default) Login Status Policy Login Redirect
Logged Out Guest Login Status Policy SSO Probe Failure
Login Full Policy Access Barred User Password Update
Login Disallowed Policy Access Down User Login Message
5 Click Default to load the default content for the page into the Login page content field.
6 Edit the content of the page.
NOTE: The var strXXX = lines in the template pages are customized JavaScript Strings. You
can change them into your preferring wording. Modifications should follow the JavaScript syntax.
You can also edit the wording in the HTML section.
CAUTION: Be careful to verify the HTML of your custom login page before deploying it, because HTML
errors might cause the login page to not function properly. An alternative login page is always available
for the administrator, in case a customized login page has any issues. To access the alternate login page,
manually input the URL https://(device_ip)/defauth.html directly into the address line of
browser (case sensitive). The default login page without any customization is then displayed, allowing
you to login as normal and reset your customized login related pages.
TIP: Leave the Login Page Contents field blank and apply the change to revert to the default page.
7 Click Update.
GMS 9.3 Users Administration Guide
30
Configuring User SettingsGMS 9.3 Users Administration Guide
31
Configuring User Settings3
Configuring and Managing
Partitions
Topics:
• Users > Partitions Page
• Authentication Partitioning Settings
• Authentication Partitions
• Partition Selection Policies
• Assigning Servers, Agents, and Clients
• Editing Partitions
NOTE: Users > Partitions displays only if partitioning has been configured on the SonicWall appliance.
GMS 9.3 Users Administration Guide
32
Configuring and Managing PartitionsUsers > Partitions Page
The Users > Partitions page includes two Search features and three sections:
• Authentication Partitioning Settings
• Authentication Partitions
• Partition Selection Policies
Authentication Partitioning Settings
This section enables/disables authentication partitioning. When authentication partitioning is disabled, the
other sections do not display.
When authentication partitioning is enabled, the two Search features and two additional sections;
Authentication Partitions and Authentication Selection Policies, also display.
GMS 9.3 Users Administration Guide
33
Configuring and Managing PartitionsAuthentication Partitions
NOTE: This section displays only when authentication partitioning is enabled.
This section displays a table of authentication partitions and allows you to create, edit, delete, and manage the
partitions. The partitions you configure here control which authentication servers are used for which users.
You can expand a partition’s tree to show the servers, agents, and clients assigned to it.
Selection checkbox Allows you to select one or more partitions and/or subpartitions in the table. Selecting
the checkbox in the table heading selects all entries except the Default partition.
Name Specifies the name of the authentication partition. Subpartitions are indicated by a Link
icon in front of the name.
Parent Partition Specifies the parent authentication partition for subpartitions. This column is blank for
parent partitions.
Domain(s) Specifies the domain(s) to which the partition or subpartition belongs. This column is
blank for the Default partition.
Comment Displays the comment included when the partition was added. The comment for the
Default partition is Auto-created default partition.
Configure Displays the Edit, Selection, and Delete icons for the partition.
NOTE: The Delete icons are dimmed for the Default partition.
Add Partition Displays the Add an authentication partition pop-up dialog for adding an
authentication partition or subpartition.
GMS 9.3 Users Administration Guide
34
Configuring and Managing PartitionsAuto Assign Assigns any unassigned LDAP servers, RADIUS servers, SSO agents, TSAs, and RADIUS
accounting clients to the relevant partitions automatically, based on their IP addresses
or host names.
Delete Partition(s) Deletes the selected authentication partition(s) or subpartition(s).
NOTE: You cannot delete the Default partition.
There is always one authentication partition in this table, the auto-created Default partition. You cannot delete
this partition. You can, however, edit it and select servers, agents, and clients for it as well as subpartitions. If
you disable authentication partitioning, all LDAP servers, SSO agents, TSAs, and RADIUS accounting clients are
reassigned to the Default partition; when you re-enable authentication partitioning, you must reassign them.
RADIUS servers are not affected and remain with their assigned partitions.
Adding Partitions and Subpartitions
To add a partition:
1 Navigate to the Users > Partitions page.
2 In the Authentication Partitions section, click Add Partition. The Add Authentication Partition pop-up
dialog displays.
3 Enter a friendly, meaningful name in the Partition Name field. The name can be from 1 to 32
alphanumeric characters.
4 For Partition type, choose whether the authentication partition is:
• A top-level partition; go to Step 6.
• A sub-partition; the Parent partition drop-down menu displays.
5 Select a parent partition from the drop-down menu. The default partition is Default.
TIP: If your installation does not have multiple partitions, then create subpartitions as subpartitions
of the Default partition.
6 Under the Domain(s) list, click Add. The Add Domain pop-up dialog displays.
GMS 9.3 Users Administration Guide
35
Configuring and Managing Partitions7 Enter a Domain Name.
8 Click OK.
9 Repeat Step 6 through Step 8 for each domain you want to add.
10 Optionally, enter a comment in the Comment field.
11 Click Save. The partitions and/or subpartitions are added to the Authentication Partitions table.
Subpartitions are positioned immediately after their parent partitions, with a Link icon indicating they
are subpartitions.
Deleting Partitions and Subpartitions
NOTE: In this section, partition refers to both partitions and subpartitions.
You can delete a single partition, multiple partitions, or all partitions. If you delete a single partition, the servers,
agents, and clients are reassigned to the Default partition.
NOTE: You cannot delete the Default partition.
Topics:
• Deleting a Single Partition
• Deleting Multiple Partitions
• Deleting All Partitions (Except Default)
Deleting a Single Partition
To delete a single partition:
1 Navigate to Users > Partitions.
2 Under the Authentication Partitions table, click the Delete icon in the Configure column for the partition
to be deleted. A verification message displays.
3 Click OK.
Deleting Multiple Partitions
To delete multiple partitions:
1 Navigate to Users > Partitions.
2 In the Authentication Partitions table, click the checkbox(es) of the authentication partition(s) you want
to delete. You can select multiple partitions.
GMS 9.3 Users Administration Guide
36
Configuring and Managing Partitions3 Click Delete Partition(s). A verification message displays.
4 Click OK.
Deleting All Partitions (Except Default)
To delete all partitions (except Default):
1 Navigate to Users > Partitions.
2 In the Authentication Partitions table, click the checkbox at the top of the table’s left column. All
partitions should be selected.
3 Deselect the Default partition.
4 Click Delete Partition(s). A verification message displays.
5 Click OK. All servers/agents/clients are reassigned to the Default partition.
Expanding Trees
Expanding an authentication partition's tree shows the servers, clients, and agents assigned to the partition:
You can expand the tree of:
• All table entries by clicking the triangle next to the checkbox in the heading.
• One or more table entries by clicking the Expand icon of each.
Partition Selection Policies
NOTE: This section displays only when authentication partitioning is enabled.
This section displays a table of policies affecting the selection of authentication partitions and allows you to
create, delete, and edit the policies you create. These policies select the partitions in the Authentication
Partitions table based on the physical locations of the users being authenticated. When authenticating users
whose domain names are not available for matching against those in the selected partitions, the users’
partitions are selected base on their physical locations set by these policies. These selection policies are also
used for auto-assigning authentication devices to partitions based on the physical locations of those devices.
The Default selection policy for the Default partition cannot be deleted.
GMS 9.3 Users Administration Guide
37
Configuring and Managing PartitionsSelection checkbox Allows you to select one or more entries in the table. Selecting the checkbox in the table
heading selects all entries except that of the Default selection policy.
Zone Displays the zone assigned to the partition selection policy.
Interface Displays the interface assigned to the authentication partition selection policy.
Network Displays the network assigned to the authentication partition selection policy.
Partition Displays the authentication partition to which the selection policy applies.
Comment Displays any comment you entered when creating or editing the selection policy. The
selection policy for the Default partition has the comment Auto-created default policy.
Configure Displays the Edit and Delete icons, which are dimmed for the default policy.
Add Policy Displays the Add Authentication Partition Policy pop-up dialog for adding a selection
policy for an authentication partition or subpartition.
Delete Policy(s) Deletes the selected policy or policies.
NOTE: You cannot delete the policy for the Default partition. Delete is dimmed unless at
least one policy has been selected.
There is always one selection policy in this table, the auto-created default policy for the Default partition. You
cannot select this policy, delete it, change its priority, or edit it, except for choosing the partition to which it
applies.
Assigning Servers, Agents, and Clients
After you have added the authentication partitions, you can assign servers, agents, and/or clients to the
partitions. You can also assign them to the authentication partitions at any time by following the same
procedures.
You can have unassigned servers, agents, and clients auto-assigned to the partition.
Topics:
• Assigning Manually
• Auto Assigning
Assigning Manually
To assign servers, agents, and clients:
1 Navigate to Users > Partitions.
GMS 9.3 Users Administration Guide
38
Configuring and Managing Partitions2 In the Authentication Partition table, click the partition's Selection icon in the Configure column. The
Select what? popup dialog displays.
3 Select the type of server, agent, or client to assign. The appropriate Select the server/agent/client for
partition partitionName pop-up menu displays with a list of available servers, agents, or clients.
4 Do one of the following:
• Select a server/agent/client from the Available list and click the Right-arrow.
• Select multiple items from the Available list by pressing the Ctrl key while selecting each item and
then click the Right-arrow.
• Select all items by clicking Add All.
5 Click Save.
Auto Assigning
There is an Auto Assign button for assigning any unassigned servers, agents, and clients, based on their IP
addresses or host names, to the relevant partitions automatically.
To auto assign servers, agents, and clients:
1 Navigate to Users > Partitions.
2 In the Authentication Partitions table, click the checkbox(es) of the authentication partition(s) to which
you want to assign unassigned servers, agents, and/or clients. You can select more than one partition.
Auto assign becomes active.
3 Click Auto Assign. The auto-assign message appears.
GMS 9.3 Users Administration Guide
39
Configuring and Managing PartitionsYou can also read