User Account and Authentication Service - 2020 General Electric Company
←
→
Page content transcription
If your browser does not render page correctly, please read the page content below

User Account and Authentication
Service

                      © 2020 General Electric Company
Contents
     UAA Service Overview                                                                                   1
          About the User Account and Authentication Security Service                                        1
          UAA Deployment Architecture                                                                       1
     Understanding UAA and OAuth2 Access Token Flows                                                        4
          Obtaining Tokens Using Authorization Code Grant                                                   4
          Obtaining Tokens Using Implicit Grant                                                             5
          Obtaining Tokens Using Resource Owner Password Credentials Grant                                  7
          Obtaining Tokens Using Client Credentials Grant                                                   7
     Understanding UAA and ID Tokens                                                                        9
          Using UAA to Obtain ID Tokens                                                                     9
     Get Started With the UAA Service                                                                     10
          UAA Security Service Setup                                                                      10
          Creating a UAA Service Instance                                                                 10
          Binding an Application to the UAA Instance                                                      13
          Unbinding the UAA Instance From Your Application                                                15
          Deleting a UAA Instance                                                                         15
     Configuring the UAA Service Instance                                                                 16
          About UAA Dashboard                                                                             16
          Managing Clients                                                                                17
          Managing Users                                                                                  24
          Creating Password Policies                                                                      27
          Managing Identity Providers                                                                     28
          OIDC Federated Authentication                                                                   37
          Managing Tokens                                                                                 68
          Multifactor Authentication                                                                      71
     Using UAA for Application Login or Logout Window                                                     76
          Using UAA to Set Up Application Login or Logout                                                 76
          Customizing the UAA Login Window for Your Application                                           76
     Troubleshooting UAA Service                                                                          78
          Troubleshooting UAA Service                                                                     78
     UAA Release Notes                                                                                    81

ii                                                                     User Account and Authentication Service
UAA Release Notes   81

                    iii
Copyright GE Digital
     © 2020 General Electric Company.

     GE, the GE Monogram, and Predix are either registered trademarks or trademarks of General Electric
     Company. All other trademarks are the property of their respective owners.
     This document may contain Confidential/Proprietary information of General Electric Company and/or its
     suppliers or vendors. Distribution or reproduction is prohibited without permission.
     THIS DOCUMENT AND ITS CONTENTS ARE PROVIDED "AS IS," WITH NO REPRESENTATION OR
     WARRANTIES OF ANY KIND, WHETHER EXPRESS OR IMPLIED, INCLUDING BUT NOT LIMITED TO
     WARRANTIES OF DESIGN, MERCHANTABILITY, OR FITNESS FOR A PARTICULAR PURPOSE. ALL OTHER
     LIABILITY ARISING FROM RELIANCE UPON ANY INFORMATION CONTAINED HEREIN IS EXPRESSLY
     DISCLAIMED.
     Access to and use of the software described in this document is conditioned on acceptance of the End
     User License Agreement and compliance with its terms.

iv                                                                                © 2020 General Electric Company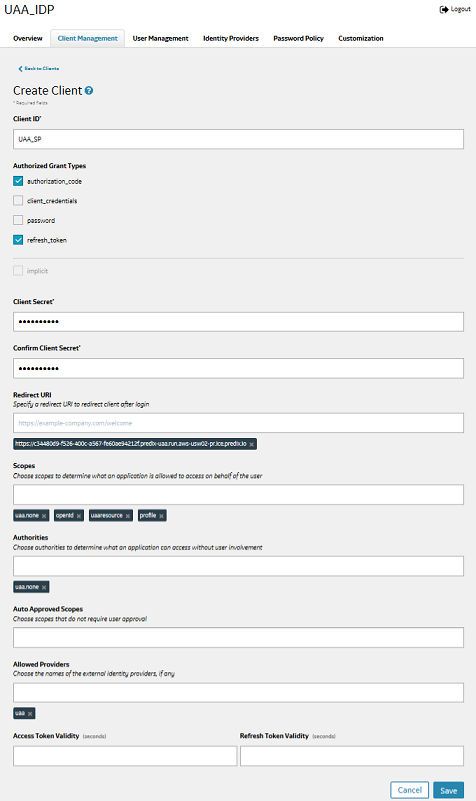
UAA Service Overview

About the User Account and Authentication Security Service
       User Account and Authentication is a security service available in the Predix marketplace.
       The User Account and Authentication (UAA) service is the primary authentication service on the Predix
       platform. It enables developers to add user authentication and authorization capabilities to their
       application. Application developers can obtain a UAA instance from the Predix marketplace and configure
       the instance to authenticate trusted users and clients for their application. UAA service offers a virtual
       OAuth2 server to customers to issue and validate tokens for client applications.
       UAA Application or Predix UAA allows Predix customers and developers to create virtual UAA instances
       with the available controls and configurations. Each UAA instance acts as a separate OAuth server. Predix
       UAA also offers a UAA Dashboard to manage the UAA instance administrative activities, RESTful
       endpoints, and a command line (UAAC) tool.
       Note: All Predix platform services require a UAA instance to ensure secure access to the service.
       UAA includes the following features:
       •   Identity management through SCIM APIs.
       •   A complete OAuth 2.0 authorization server.
       •   Login and logout services for UAA authentication.
       •   SAML federation capabilities to meet third-party SAML identity provider requirements.
       The UAA Server supports the APIs described in the open source UAA documentation .

       Additional Information
       Exploring Security Services Guides

UAA Deployment Architecture
       The following topologies are supported for using the UAA service:
       •   Local identity management in the User Account and Authentication (UAA) server.
       •   Federated identity management.
       •   Federated identity management with additional identity management using UAA. In this topology the
           users are white-listed based on setup in federated identity store and UAA.
       The following diagram shows how authentication in local identity management in the User Account and
       Authentication (UAA) server.

© 2020 General Electric Company                                                                                 1
In this flow:
    1. An administrator provisions the users through SCIM APIs in UAA.
    2. An application user requests data using a browser.
    3. The web application sends the authentication request to UAA. If the user is set up in UAA, the
       authentication request is approved, the user is authenticated, and the token is issued to the web
       application. If the data request already contains a valid token, this step is not required.
    4. The web application passes the data request and JWT token to the web services.
    5. Once the user is authorized, the data is returned to the web application.
    The following diagram shows how UAA integrated with federated identity management.

2                                                                                  © 2020 General Electric Company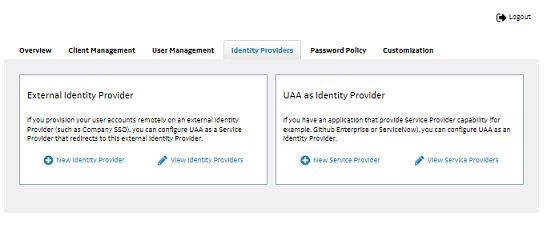
In this flow, instead of performing local authentication using UAA, the users are authenticated using the
       federated identity store.
       The following diagram shows UAA integrated with federated identity management in conjunction with
       local identity management.

       This flow demonstrates authentication using both the UAA service and the federated identity service. The
       UAA uses the SAML request to communicate with the federated identity services. When an
       authentication request is generated for UAA, UAA checks the users against the UAA and the federated
       identity store. This setup is useful for whitelisting the users that can be authenticated. For example, if an
       organization has a large set of users set up in their federated identity store, but they want only a subset of
       users to be able to access the services, then they can use this setup to identify the user subset.

© 2020 General Electric Company                                                                                     3
Understanding UAA and OAuth2 Access Token
Flows

Obtaining Tokens Using Authorization Code Grant
    When you use the authorization code grant type, the client directs the resource owner to UAA, which in
    turn directs the resource owner back to the client with the authorization code. The OAuth2 endpoint in
    UAA accepts authorization code to provide an Access Token.
    When you use the Authorization Code grant type, the token is stored and managed on the server’s side.
    Therefore any technical information present in the token (such as scope names), is not leaked to the user
    and the token is less prone to be misused. Additionally, with Authorization Code grant type, it is easier to
    terminate a user’s session without waiting for the token to expire its lifetime. Authorization Code security
    relies on a robust session management scheme that includes best practices such as HTTP protocol
    hardening using HTTP security headers, HTTP Cookie security flags, adequate session lifetime, and secure
    session termination (sign-out mechanism).
    For more details on the Authorization Grant type, see RFC 6749.
    The following diagram shows the high-level flow for obtaining access tokens using authorization grant.

    1. The client requests access to a resource. The request includes client identifier, requested scope, local
       state, and a redirection URI.
    2. UAA authenticates the resource owner (via the user-agent) and establishes whether the resource
       owner grants or denies the client's access request.

4                                                                                    © 2020 General Electric Company
3. If the resource owner grants access, UAA sends the authorization code back to the client using the
          redirection URI provided in previous step.
       4. The client requests an access token from the UAA token endpoint by including the authorization code
          received in the previous step.
       5. UAA authenticates the client, validates the authorization code, and ensures that the redirection URI
          received matches the URI used to redirect the client. If the client is authenticated, UAA sends an
          access token back.
       For detailed information on UAA endpoints used to generate authorization code and Access Tokens, see
       open-source UAA documentation.

Obtaining Tokens Using Implicit Grant
       When you use the implicit grant type, UAA directly issues an Access Token to the client without
       authenticating the client. This reduces the number of round trips required to obtain an access token.
       However with this grant type, the access token is transmitted in the URI fragment, which can expose it to
       unauthorized parties. Additionally if the public clients use implicit flows, UAA cannot determine what
       client an access token was issued to.
       The benefit of using implicit grants is that it improve the responsiveness and efficiency of some clients (for
       example, a client implemented as an in-browser application). However, you must weigh this benefit
       against the security implications of using implicit grants.
       For more details on the Implicit Grant type, see RFC 6749.
       The following diagram shows the high-level flow for obtaining access tokens using implicit grant type.

© 2020 General Electric Company                                                                                     5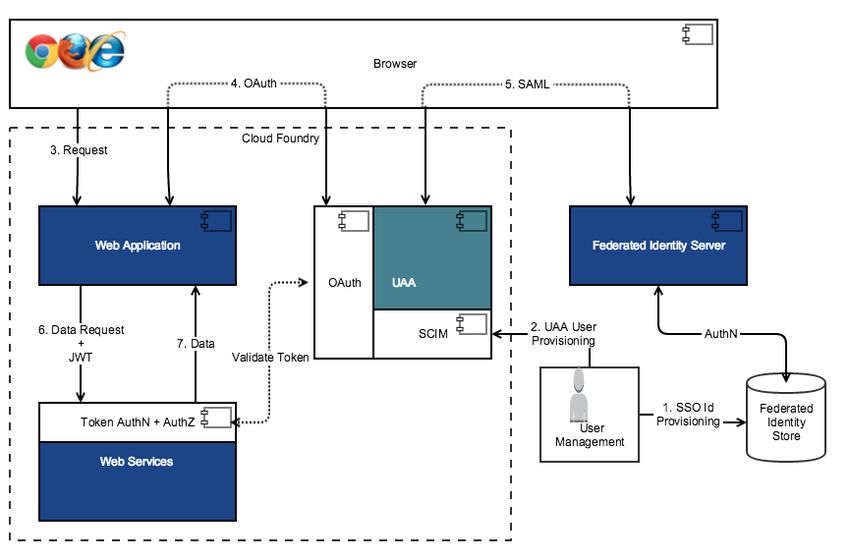
1. The client sends a request to the authorization endpoint in UAA. The request includes client identifier,
       requested scope, local state, and a redirection URI. Redirection URI is required for UAA to send the
       Access Token.
    2. UAA authenticates the resource owner and establishes whether the resource owner grants or denies
       the client's access request.
    3. If the resource owner grants access, UAA redirects the user-agent back to the client using the
       redirection URI specified in step 1. The redirection URI includes the access token in the URI fragment.
    4. The user-agent makes a request to the web-hosted client resource. The user-agent does not pass the
       URI fragment information to the client resource.
    5. The web-hosted client resource returns a web page that can access the full redirection URI including
       the URI fragment retained by the user-agent, and can extract the access token contained in the URI
       fragment.
    6. The user-agent extracts the access token. Often extraction includes executing the script provided by
       the web-hosted client resource locally.
    7. The user-agent passes the access token to the client.
    For detailed information on UAA endpoints used to generate Access Tokens with implicit grant type, see
    open-source UAA documentation.

6                                                                                   © 2020 General Electric Company
Obtaining Tokens Using Resource Owner Password Credentials
Grant
When you use the resource owner password credentials grant type, the OAuth2 endpoint in UAA accepts
the username and password and provides Access Tokens.
You must use this grant type only when there is a high degree of trust between the resource owner and
the client (for example, the client is part of the device operating system or a highly privileged application),
and when other authorization grant types such as an authorization code are not available.
When you use this grant type, the client does not need to store the resource owner credentials for future
use. The client simply exchanges the credentials with a long-lived access token or refresh token.
For more details on resource owner password credentials grant type, see RFC 6749.
The following diagram shows the high-level flow for obtaining access tokens using resource owner
password credentials grant.
1. The resource owner provides its username and password to the client.
2. The client includes the credentials in the requests for an access token from UAA token endpoint.
3. UAA authenticates the client and validates the resource owner credentials, and if valid, issues an
access token.
For detailed information on UAA endpoints used to generate Access Tokens, see open-source UAA
documentation.
Obtaining Tokens Using Client Credentials Grant
When you use the client credentials grant type, the OAuth2 endpoint in UAA accepts the client id and
client secret and provides Access Tokens.
The client credentials can be used when the authorization scope is limited to the protected resources
under the control of the client, or to protected resources previously authorized with UAA. Client
credentials authorization grant is typically used when the client is acting on its own behalf (the client is
also the resource owner) or is requesting access to protected resources based on previous authorization
with UAA.
For more details on the Authorization Grant type, see RFC 6749.
© 2020 General Electric Company 7The following diagram shows the high-level flow for obtaining access tokens using client credentials grant.
1. The client requests an access token from the token endpoint.
2. UAA authenticates the client, and if valid, issues an access token.
For detailed information on UAA endpoints used to generate Access Tokens with client credentials grant,
see open-source UAA documentation.
8 © 2020 General Electric CompanyUnderstanding UAA and ID Tokens
Using UAA to Obtain ID Tokens
The ID Token contains claims about the authentication of an end-user by the authorization server, and can
optionally contain other requested claims. For more information on ID tokens, see the OpenID Connect
Core 1.0 specification.
You can obtain ID tokens for the following authorization grant types:
• Authorization Code (response_type=code)
• Implicit (response_type=id_token token or response_type=id_token)
• Hybrid (using other response type values defined in OAuth 2.0 Multiple Response Type Encoding
Practices [OAuth.Responses])
© 2020 General Electric Company 9Get Started With the UAA Service
UAA Security Service Setup
To begin using any secure Predix platform service, you must set up a UAA service instance as the trusted
issuer.
Task Roadmap
# Task Description
1 (Optional) Configure your proxy settings if necessary. Depending on your location and network configuration, you may
need to configure your proxy settings to access remote resources.
See Defining Proxy Connections to Remote Resources.
2 (Optional) Deploy a Predix Hello World Web application. Creating and Deploying a Simple Web App to Cloud Foundry.
3 Create the UAA service instance. See Creating a UAA Service Instance on page 10.
4 Create OAuth2 clients to setup access to your service When you create a UAA instance, an admin client is automatically
authenticated using UAA. created for you to access UAA for additional configuration. You
can create a new client for your service instance with specific
scopes. If an Oauth2 client already exists, you can update the
client to add your service instance.
See Creating an OAuth2 Client on page 17.
5 Create Groups to set up the required permissions for A group represents the privileges of a user.
the users.
See Creating Groups in a UAA Instance on page 27.
6 Create Users in the UAA instance. For UAA to authenticate the users, the users must first be created
in UAA. You can either create users locally within UAA or federate
to an external identity provider.
For creating users locally, see Creating Users in a UAA Instance on
page 24.
To set up federated identity with UAA, see Managing Identity
Providers.
7 Bind your application to the service instance. See Binding an Application to the UAA Instance on page 13.
Creating a UAA Service Instance
You can create multiple instances of the UAA service in your space.
About This Task
As a best practice, first delete any older unused instances before creating a new one.
Procedure
1. Sign into your Predix account at https://www.predix.io.
2. Navigate to Catalog > Services, then click the User Account and Authentication tile.
10 © 2020 General Electric Company3. Click Subscribe on the required plan.
4. Complete the fields on the New Service Instance page.
Field Description
Org Select your organization.
Space Select the space for your application.
Service instance name Enter a unique name for this UAA service instance.
Service plan Select a plan.
Admin client secret Enter a client secret (this is the admin password for this UAA instance). The client secret can
be any alphanumeric string.
Note: Record the client secret in a secure place for later use.
Subdomain (Optional) Enter a subdomain you might need to use in addition to the domain created for
UAA. You must not add special characters in the name of the subdomain. The value of sub-
domain is case-insensitive.
5. Click Create Service.
Results
Your UAA instance is created with the following specifications:
• A client identifier (admin).
Note: An admin client is required for bootstrap purposes. You can create additional clients to use
with your application.
• A client secret (that you specified while creating the service).
To retrieve additional details of your instance, you can bind an application to your instance.
Using the Command Line to Create a UAA Service Instance
Optional procedure for using the command line instead of the graphical user interface to create a UAA
service instance.
About This Task
You can create up to 10 instances of UAA service in your space. If you need additional instances, you must
delete an older unused instance and create a new one.
Procedure
1. Use the Cloud Foundry CLI to log into Cloud Foundry.
cf login -a
Note: If you are a GE employee, you must use the cf login --sso command to log into Cloud
Foundry. After you enter your SSO, you will receive a one-time passcode URL. Copy this URL and paste
it in a browser to retrieve your one-time passcode. Use this code with the cf command to complete
the CF login process.
Depending on your Predix.io registration, the value of is one of the following:
• Predix US-West
https://api.system.aws-usw02-pr.ice.predix.io
• Predix US-East
© 2020 General Electric Company 11https://api.system.asv-pr.ice.predix.io
• Predix Europe
https://api.system.aws-eu-central-1-pr.ice.predix.io
For example,
cf login -a https://api.system.aws-usw02-pr.ice.predix.io
2. List the services in the Cloud Foundry marketplace by entering the following command.
cf marketplace
The UAA service, predix-uaa, is listed as one of the available services.
3. Create a UAA instance by entering the following command.
cf create-service predix-uaa -c
'{"adminClientSecret":"","subdomain":""}'
where:
• cf stands for the CLI command, cloud foundry
• cs stands for the CLI command create-service
• is the plan associated with a service. For example, you can use the tiered plan for the
predix-uaa service.
• -c option is used to specify following additional parameters.
◦ adminClientSecret specifies the client secret.
◦ subdomain specifies a sub-domain you might need to use in addition to the domain created
for UAA. This is an optional parameter. You must not add special characters in the name of the
sub-domain. The value of sub-domain is case insensitive.
Note: Cloud Foundry CLI syntax can differ between Windows and Linux operating systems. See the
Cloud Foundry help for the appropriate syntax for your operating system. For example, to see help for
the create service command, run cf cs.
Results
Your UAA instance is created with the following specification:
• A client identifier (admin).
Note: An admin client is created for bootstrap purposes. You can create additional clients to use with
your application.
• A client secret (that you specified while creating the service).
To retrieve additional details of your instance, you can bind an application to your instance.
Example
Create a predix-uaa service instance with client secret as admin and sub-domain as
ge-digital:
cf cs predix-uaa tiered test-1 -c
'{"adminClientSecret":"admin","subdomain":"ge-digital"}'
12 © 2020 General Electric CompanyThis is how it appears in VCAP SERVICES when using the cf env
command:
"VCAP_SERVICES": {
"predix-uaa": [
{
"credentials": {
"dashboardUrl": "https://uaa-dashboard.run.asv-
pr.ice.predix.io/#/login/04187eb1-
e0cf-4874-8218-9fb77a8b4ed9",
"issuerId": "https://04187eb1-
e0cf-4874-8218-9fb77a8b4ed9.predix-uaa.run.asv-
pr.ice.predix.io/oauth/token",
"subdomain": "04187eb1-e0cf-4874-8218-9fb77a8b4ed9",
"uri": "https://04187eb1-
e0cf-4874-8218-9fb77a8b4ed9.predix-uaa.run.asv-
pr.ice.predix.io",
"zone": {
"http-header-name": "X-Identity-Zone-Id",
"http-header-value": "04187eb1-
e0cf-4874-8218-9fb77a8b4ed9"
}
},
"label": "predix-uaa",
"name": "testuaa",
"plan": "Tiered",
"provider": null,
"syslog_drain_url": null,
"tags": [],
"volume_mounts": []
}
],
Binding an Application to the UAA Instance
About This Task
You must bind your application to your UAA instance to provision its connection details in the
VCAP_SERVICES environment variable. The Cloud Foundry runtime uses the VCAP_SERVICES environment
variable to communicate with a deployed application about its environment.
You can retrieve the following UAA instance details from the VCAP_SERVICES environment variable:
• A dashboard_url for your instance. You can use this URL to access the dashboard for managing
this instance of UAA.
• A subdomain that specifies a sub-domain you can use in addition to the domain created for UAA.
• A uaa_instance_uri for your instance.
• A uaa_instance_issuerId for your instance. The issuerID is required when you create an
instance of another service that uses your UAA instance for authentication.
• A uaa_instance_GUID is the zoneID for your instance.
© 2020 General Electric Company 13Procedure
1. Use the Cloud Foundry CLI to log into Cloud Foundry.
cf login -a
Depending on your Predix.io registration, the value of is one of the following:
• Predix US-West
https://api.system.aws-usw02-pr.ice.predix.io
• Predix US-East
https://api.system.asv-pr.ice.predix.io
• Predix Europe
https://api.system.aws-eu-central-1-pr.ice.predix.io
For example,
cf login -a https://api.system.aws-usw02-pr.ice.predix.io
2. Bind the application to the service instance by entering the following command:
cf bind-service
The instance is bound to your application, and the following message is
returned:
Binding service to app in org
predix-platform / space predix as userx@ge.com...
OK
TIP: Use 'cf restage' to ensure your env variable changes take effect
3. Verify the binding by entering the following command:
cf env
Messages that are similar to the following messages are returned:
Getting env variables for app myApp in org predix-platform / space
security as userx@ge.com...
OK
...
],
"predix-uaa": [
{
"credentials":
{
"dashboardUrl": "https://uaa-dashboard.run.asv-
pr.ice.predix.io/#/login/ff27c315-d027-4d1d-a30c-64f49b369ed9",
"issuerId":
"https://ff27c315-d027-4d1d-a30c-64f49b369ed9.predix-
uaa.run.aws-usw02-pr.ice.predix.io/oauth/token",
"subdomain": "ff27c315-d027-4d1d-a30c-64f49b369ed9",
"uri":
"https://ff27c315-d027-4d1d-a30c-64f49b369ed9.predix-
uaa.run.aws-usw02-pr.ice.predix.io",
"zone": {
"http-header-name": "X-Identity-Zone-Id",
"http-header-value": "ff27c315-d027-4d1d-
a30c-64f49b369ed9"
14 © 2020 General Electric Company}
},
"label":
"predix-uaa",
"name":
"my_uaa_instance",
"plan":
"free",
"tags":
[]
}
],
In this sample, the following values are displayed:
• dashboard_url = https://uaa-dashboard.run.asv-pr.ice.predix.io/#/
login/ff27c315-d027-4d1d-a30c-64f49b369ed9
• uaa_instance_issuerId = https://ff27c315-d027-4d1d-
a30c-64f49b369ed9.predix-uaa.run.aws-usw02-pr.ice.predix.io/oauth/
token
• subdomain = 04187eb1-e0cf-4874-8218-9fb77a8b4ed9
• uaa_instance_uri = https://ff27c315-d027-4d1d-
a30c-64f49b369ed9.predix-uaa.run.aws-usw02-pr.ice.predix.io
• uaa_instance_GUID = ff27c315-d027-4d1d-a30c-64f49b369ed9
Unbinding the UAA Instance From Your Application
Procedure
Unbind a service instance:
cf unbind-service
The service instance is unbound from the application, and the following message is returned:
Unbinding app predix-service from service userX in org predix-
platform / space predix as userx@ge.com...
OK
Deleting a UAA Instance
Procedure
Delete a service instance:
cf delete-service predix-uaa
© 2020 General Electric Company 15Configuring the UAA Service Instance
About UAA Dashboard
The UAA Dashboard is a graphical user interface available on predix.io to configure and manage your UAA
security service instance.
Some of the tasks that you can accomplish using UAA Dashboard are:
• View the clients, users and identity providers related to your UAA instance.
• View clients associated with your service instances.
• Create and manage clients.
• Create and manage users and groups.
• Manage SSO configuration with SAML or OpenID Connect (OIDC) identity providers.
• Manage password policies for user passwords.
View, Create, and Manage Clients
You can create additional clients for different applications that authenticate with the same UAA server
instance. You can assign different access permissions to each client depending on your application's
requirement. Use the Client Management tab in UAA Dashboard to view, create and manage your OAuth
clients.
View, Create, and Manage Users and Groups
The authentication flow for authorization grant type such as Authorization Code, Implicit, and Resource
Owner Password involves users that provide their username and password credentials to an application.
You can either create users locally within UAA or federate to an external identity provider. Use the User
Management tab in the UAA Dashboard to create users locally in UAA and manage them for your
application. Additionally you can create groups that represent the privileges a user can potentially have.
Manage SSO configuration with SAML or OpenID Connect (OIDC) identity providers
Use the Identity Providers tab in the UAA Dashboard to manage your identity providers and service
providers in UAA. For more information on integrating with identity providers, see Managing Identity
Providers.
Add and Manage Password Policies
Use the Password Policy tab in the UAA Dashboard to configure the user accounts in UAA with password
policy such as length, accepted or required character types, expiration times, and reset policy.
16 © 2020 General Electric CompanyManaging Clients
Creating an OAuth2 Client
You can create OAuth2 clients with specific permissions for your application to work with Predix Platform
services. Often this is the first step after creating an instance of a service.
About This Task
When you create an instance of UAA, the UAA Dashboard is available for configuring that instance of UAA.
You can use the Client Management tab in the UAA Dashboard to create the OAuth2 clients.
If you are prefer using the UAA command-line interface (UAAC) instead of UAA Dashboard to create an
OAuth2 client, see Using UAAC to Create an OAuth2 Client on page 20
Procedure
1. In the Predix.io Console view, select the Space where your services are located.
2. In the Services Instances page, select the UAA instance to configure.
3. Select the Configure Service Instance option.
4. In the UAA Dashboard login page, specify your admin client secret and click Login.
5. In UAA Dashboard, select the Client Management tab.
The Client Management tab has two views, Clients and Services . The Services view displays the
service instances that you have created for your services.
Note: The service instances displayed in the Services view were created while using the UAA that you
are trying to configure. Service instances that you created using other UAA instances are not displayed
on this page.
6. Click Create Client to open the Create Client form.
7. Complete the Create Client form.
© 2020 General Electric Company 17Field Description
Client ID Specify a name for the OAuth2 client you are creating.
Authorized Grant Types Choose one or more of the following grant types:
• authorization_code
When you use the authorization code grant type, the client directs the resource owner
to UAA, which in turn directs the resource owner back to the client with the
authorization code.
• client_credentials
When you use the client credentials grant type, the OAuth2 endpoint in UAA accepts
the client ID and client secret and provides Access Tokens.
• password
When you use the resource owner password credentials grant type, the OAuth2
endpoint in UAA accepts the username and password and provides Access Tokens.
• refresh_token
The refresh tokens are credentials used to obtain access tokens. You can choose this
option to obtain refresh token from UAA. You can then use the refresh token to obtain
a new access token from UAA when the current access token becomes invalid or
expires, or to obtain additional access tokens with identical or narrower scope.
• implicit
When you use the implicit grant type, UAA directly issues an Access Token to the
client without authenticating the client. This reduces the number of round trips
required to obtain an access token.
For more information on grant types, see RFC 6749.
Client Secret Specify the password. It is important that you keep a note of this password. If lost, this
password cannot be retrieved.
Confirm Client Secret Reenter the client secret.
18 © 2020 General Electric CompanyField Description
Redirect URI Specify a redirect URI to redirect the client after login or logout (for example, http://
example-app.com/callback). Use this URI when you start using UAA as the
service provider for your external Identity provider. UAA uses the value of Redirect URI
for /oauth/authorize and /logout endpoints.
You must specify a Redirect URI value if you use the Authorization Code or Implicit
authorization grant type. When you use the Authorization Code grant type, the Redirect
URI is your application's endpoint or callback that expects user authorization code. When
you use the Implicit grant type, the Redirect URI is the end point where UAA sends the
bearer token.
Unique Resource Identifier consists of:
• Access Protocol, http or https
• Domain or IP address
• Access Port such as 80 or 443
• Path
If you have a specific URL for your application callback, you can use that to set the Redirect
URI value for the related client. For example, https://your-app-
domain.run.aws-usw02-pr.ice.predix.io/path1/path2/
callback.
You can specify multiple values for Redirect URI as a list of allowed destinations that UAA
server can redirect the users. For example, https://
yourappdomain1.run.aws-usw02-pr.ice.predix.io/
path1/path2/callback, https://
yourappdomain2.run.aws-usw02-pr.ice.predix.io/
path1/path2/callback.
If the subdomain of your application is dynamic, you can set the value of Redirect URI using
wilcards. For example, https://*.your-app-domain.run.aws-
usw02-pr.ice.predix.io/path1/path2/callback.
Note: You must only use ‘*’ for a domain that is exclusive to your application (Such as
your-app-domain in example above). This prevents the redirect to be routed to
an application that you do not own. You cannot use * in the top domain and sub domain
(such as predix.io in the example above).
Scopes Scopes are permissions associated with an OAuth Client to determine user access to a
resource through an application. The user permissions are for authorization grant types
authorization_code, password and implicit.
By default, the admin client is assigned all required scopes. For a new client, an
administrator can select the scopes to be added based on client requirements.
For a list of available scopes, see Scopes Authorized by the UAA.
To use an OAuth2 client for your Predix Platform service instance, you must update your
OAuth2 client to add scopes that are specific to each service after adding the client to the
service instance.
© 2020 General Electric Company 19Field Description
Authorities Authorities are permissions associated with the OAuth Client when an application or API is
acting on its own behalf to access a resource with its own credentials, without user
involvement. The permissions are for the client_credentials authorization
grant type.
By default, the admin client is assigned all required authorities. For a new client, an
administrator can select the authorities to be added based on client requirements.
The list of authorities matches the list of scopes. For a list of available UAA scopes, see
Scopes Authorized by the UAA.
To use an OAuth2 client for your Predix Platform service instance, you must update your
OAuth2 client to add authorities that are specific to each service after adding the client to
the service instance.
Note: An admin client is not assigned the default authority to change the user password.
To change the user password, you must add the uaa.admin authority to your admin
client.
Auto Approved Scopes Specify scopes that can be approved automatically for the client without explicit approval
from a resource owner.
Allowed Providers Specifies the names of the external identity providers, if any. This field is required if you are
using external identity providers with UAA as a service provider.
Access Token Validity Specifies the access-token expiration time in ms.
Refresh Token Validity Specifies the refresh-token expiration time in ms.
Next Steps
Updating the OAuth2 Client for Services on page 21 for your service specific information.
Using UAAC to Create an OAuth2 Client
You can use the UAA command-line interface (UAAC) instead of UAA Dashboard to create an OAuth2
client.
About This Task
You can use the UAAC, to manage your UAA instance. For more information on installing the command-
line interface, see https://github.com/cloudfoundry/cf-uaac.
Procedure
1. Specify your UAA instance as the intended target.
uaac target
is the URL to your trusted issuer, for example, https://
11fa0273-9e2a-37e2-9d06-2c95a1f4f5ea.predix-uaa.run.aws-usw02-
pr.ice.predix.io. You can retrieve this URL from the VCAP_SERVICES environment variable after
binding your UAA instance to an application.
2. Log in using the administrative client.
uaac token client get admin
3. Specify the administrative client secret at the prompt.
20 © 2020 General Electric Company4. Use the following command to create the OAuth2 client:
uaac client add [client_name]
--authorities "uaa.resource"
--scope "openid"
--autoapprove "openid"
--authorized_grant_types [authorization_code|implicit|password|
client_credentials|refresh_token]
--redirect_uri [redirect_uri_1, redirect_uri_2, ...]
For more information on UAA options such as scopes and authorized_grant_types, see the
UAA documentation at https://github.com/GESoftware-CF/uaa/blob/master/docs/UAA-APIs.rst.
Next Steps
Updating the OAuth2 Client for Services on page 21 for your service specific information.
Updating the OAuth2 Client for Services
To use an OAuth2 client for secure access to your Predix Platform service instance from your application,
you must update your OAuth2 client to add additional authorities or scopes that are specific to each
service.
About This Task
To enable your application to access a platform service, your JSON Web Token (JWT) must contain the
scopes required for a platform service. For example, some of the scope required for Access Control service
are acs.policies.read acs.policies.write.
The OAuth2 client uses an authorization grant to request an access token. Based on the type of
authorization grant that you have used, you must update your OAuth2 client to generate the required
JWT. For more information on how the OAuth2 client is created, see Creating OAuth2 client.
If you use the UAA Dashboard to create additional clients, the client is created for the default
client_credentials grant type. Some required authorities and scopes are automatically added to
the client. You must add additional authorities or scopes that are specific to each service.
In addition, the admin client is not assigned the default authority to change the user password. To change
the user password, you must add the uaa.admin authority to your admin client.
Use the following procedure to update the OAuth2 client.
Procedure
1. In the Console view, select the Space where your services are located.
2. In the Services Instances page, select the UAA instance to configure.
3. Select the Configure Service Instance option.
4. In the UAA Dashboard login page, specify your admin client secret and click Login.
5. In UAA Dashboard, select the Client Management tab.
The Client Management tab has two views, Clients and Services. The Services view displays the
service instances that you have created for your services.
Note: The service instances displayed in the Services view are the instances that you created using
the UAA that you are trying to configure. The service instances that you created using some other UAA
instance are not displayed on this page.
6. Select the Switch to Services View option.
© 2020 General Electric Company 217. In the Services view, select the service that you need to update.
8. Choose an existing client or choose the Create a new client option. If you chose to create a new
client, follow the steps in Creating an OAuth2 Client on page 17.
9. Click Submit.
10. Click on the Switch to Clients View option.
11. In the Clients view, click the edit icon corresponding to the client added in the previous step.
12. Complete the Edit Client form.
Field Description
Authorized Grant Types Choose one or more of the following grant types:
• authorization_code
When you use the authorization code grant type, the client directs the resource owner
to UAA, which in turn directs the resource owner back to the client with the
authorization code.
• client_credentials
When you use the client credentials grant type, the OAuth2 endpoint in UAA accepts
the client ID and client secret and provides Access Tokens.
• password
When you use the resource owner password credentials grant type, the OAuth2
endpoint in UAA accepts the username and password and provides Access Tokens.
• refresh_token
The refresh tokens are credentials used to obtain access tokens. You can choose this
option to obtain refresh token from UAA. You can then use the refresh token to obtain
a new access token from UAA when the current access token becomes invalid or
expires, or to obtain additional access tokens with identical or narrower scope.
• implicit
When you use the implicit grant type, UAA directly issues an Access Token to the
client without authenticating the client. This reduces the number of round trips
required to obtain an access token.
For more information on grant types, see RFC 6749.
Redirect URI Specify a redirect URI to redirect the client after login (for example, http://
example-app.com/welcome).
This URI is used when you start using UAA as service provider for your external Identify
provider.
Scopes By default, the client is assigned a few required scopes. For a new client, an administrator
can select the scopes to be added based on the selected grant type.
If you select the authorization_code, password and implicit grant
type, you must update the scopes with service specific scopes.
For a complete list of required scopes, see Authorities or Scopes Required for Platform
Services on page 23.
For a list of available UAA scopes, see Scopes Authorized by the UAA.
Authorities By default, the client is assigned a few required authorities. For a new client, an
administrator can select the authorities to be added based on the selected grant type.
If you select the client_credentials grant type, you must update the
authorities with service specific authorities.
For a complete list of scopes to be added for each service, see Authorities or Scopes
Required for Platform Services on page 23.
For a list of available UAA authorities, see Scopes Authorized by the UAA.
Auto Approved Scopes Specify scopes that can be approved automatically for the client without explicit approval
from the resource owner.
Allowed Providers Specify the names of the external identity providers, if any. This field is required if you are
using external identity providers with UAA as a service provider.
22 © 2020 General Electric CompanyField Description
Access Token Validity Specifies the access token expiration time in ms.
Refresh Token Validity Specifies the refresh token expiration time in ms.
Next Steps
You can complete the following additional tasks in UAA Dashboard:
• If you are using authorization grant type as Authorization Code, Implicit, or Resource Owner Password,
you can manage users in UAA.
• You can create password policies for user passwords.
• You can set up external identity provider or use UAA as an identity provider. See Managing Identity
Providers.
If you have completed your OAuth2 client setup, you can bind your application to your service instance.
Authorities or Scopes Required for Platform Services
When you create a new OAuth2 client, the client is assigned default scopes and authorities. You must add
additional authorities or scopes that are specific to each service.
The following table lists the scopes and authorities specific to each platform service that you must add to
your OAuth2 client.
Service Name Authorities/Scopes
Access Control • acs.policies.read
• acs.policies.write
• acs.attributes.read
• acs.attributes.write
• predix-acs.zones..user
This value is added by default if you use the UAA Dashboard. It is also generated in the
VCAP_SERVICES environment variable as oauth-scope when you bind your
application to your ACS service instance.
Analytics Catalog analytics.zones..user (added by default)
Analytics Runtime analytics.zones..user (added by default)
Asset predix-asset.zones..user (added by default)
Blockchain as a Service predix-blockchainapi.zones..user (added by default)
Event Hub • Publish
◦ predix-event-hub.zones..user
◦ predix-event-hub.zones..wss.publish
◦ predix-event-hub.zones..grpc.publish
• Subscribe
◦ predix-event-hub.zones..user
◦ predix-event-hub.zones..grpc.subscribe
Tenant Management • tms.tenant.read
• tms.tenant.write
• predix-tms.zones..user (added by default)
© 2020 General Electric Company 23Service Name Authorities/Scopes
Time Series • Data ingestion
◦ timeseries.zones..user (added by default)
◦ timeseries.zones..ingest
• Data queries
◦ timeseries.zones..user (added by default)
◦ timeseries.zones..query
View • views.zones..user (added by default)
• views.admin.user
• views.power.user
Changing the Administrative Client Secret
Procedure
1. Specify your UAA instance as the intended target.
uaac target
is the URL to your trusted issuer, for example, https://
11fa0273-9e2a-37e2-9d06-2c95a1f4f5ea.predix-uaa.run.aws-usw02-
pr.ice.predix.io. You can retrieve this URL from the VCAP_SERVICES environment variable after
binding your UAA instance to an application.
2. Log in using the administrative client.
uaac token client get admin
3. Specify the administrative client secret at the prompt.
4. Use the following command to change the client secret.
uaac secret change
5. Enter the current administrative client secret at the prompt.
6. Enter the new administrative client secret at the prompt.
7. Reenter the new administrative client secret at the prompt.
Note:
Do not specify the administrative client secret using the -s option. Your terminal history retains a
copy of those credentials.
Managing Users
Creating Users in a UAA Instance
You can create users locally in UAA for authentication and assign them to the required groups from the
UAA dashboard.
Before You begin
• Log in to Predix.io.
24 © 2020 General Electric CompanyAbout This Task
When you create a UAA instance, an admin client is automatically created for you so that you can
configure your UAA instance. The admin client is assigned all the required authorities and scopes by
default.
Note: The admin client is not assigned the authority to be able to change the user password by default. If
you need the ability to update or change the user password, you must add the uaa.admin authority to
your admin client. You can use the UAA command-line interface (UAAC) to add the uaa.adminauthority
to your admin client. For more information on installing the command-line interface, see https://
github.com/cloudfoundry/cf-uaac.
If you prefer using the UAAC to create the users, see Using UAAC to Create Users in a UAA Instance on
page 26.
Use the following procedure to create users locally through the UAA dashboard.
Procedure
1. In the Console view, select the Space where your services are located.
2. In the Services Instances page, select the UAA instance that you need to configure.
3. Select the Configure Service Instance option.
4. In the UAA Dashboard login page, specify your admin client secret and click Login.
5. In the UAA Dashboard, select the User Management tab.
The User Management tab has two sections, Users and Groups. The Groups section displays the
groups that you created in your UAA instance.
6. Click on the Create User button to open the New User form.
7. Specify the following values in the New User form:
Field Description
Regular User Choose this option to set up local users in your UAA. The Regular User is not configured through any
external Identity Provider (IdP).
Shadow User Choose this option to create a local user in UAA corresponding to the user defined in your external IdP.
The Shadow User option is useful if you need to white list users to authenticate only a subset of users
setup in your identity provider. To setup individual shadow users, ensure that the option to create
shadow users is not selected while configuring a new IdP.
User Name Specify the user name. If you are setting up a shadow user, this value must match the user name
defined in your IdP.
Email Specify the email address. If you are setting up a shadow user, this value must match the user name
defined in your IdP.
Password Specify the password. An administrator can set password policies to define the permitted structure of
the password. For more information, see Creating Password Policies on page 27.
This option is not required if you are setting up a shadow user.
Given Name Specify the first name of the user.
Family Name Specify the last name of the user.
Origin Specify the name of the IdP that this user is configured in. The Origin option is available only if you are
setting up a Shadow user.
Groups Select the groups to associate the user with. For more information on groups, see Creating Groups in a
UAA Instance on page 27.
© 2020 General Electric Company 25Field Description
Active Select this option to allow your Regular or Shadow user to login.
Verified Select this option to indicate that this Regular or Shadow user is a verified user.
Verified users are the users who are verified using an autogenerated email invite sent from UAA at the
time of account creation.
Using UAAC to Create Users in a UAA Instance
Optional procedure to create users in a UAA instance using the UAAC instead of UAA dashboard. .
About This Task
For applications accessing your UAA instance, you can create additional clients and users with required
scopes.
Note: The admin client is not assigned the authority to be able to change the user password by default. If
you need the ability to update or change the user password, you must add the uaa.admin authority to
your admin client. You can use the UAA command-line interface (UAAC) to add the uaa.adminauthority
to your admin client. For more information on installing the command-line interface, see https://
github.com/cloudfoundry/cf-uaac.
Procedure
1. Create a new user.
uaac user add --emails -user@ge.com --password
2. Create the groups in your UAA instance.
For more information on available groups, see https://github.com/cloudfoundry/uaa/blob/master/
docs/UAA-APIs.rst#scopes-authorized-by-the-uaa.
For example:
uaac group add scim.read
uaac group add scim.write
3. Add the new user to the required groups.
For example:
uaac member add zones..admin
uaac member add scim.read
uaac member add scim.write
uaac member add clients.write
uaac member add clients.read
uaac member add clients.admin
uaac member add clients.secret
4. Verify that the user is created with the correct scope.
uaac token owner get
uaac token decode
26 © 2020 General Electric CompanyCreating Groups in a UAA Instance
If you design your application to authorize using specific scopes, you can create groups corresponding to
those scopes in UAA and assign users to those groups. When the users log into your web application, the
application redirects them to UAA. If a user is in the specified group and you chose to authorize the web
application with that scope, the web application gets a signed token that contains that scope.
About This Task
Predix platform services have scopes specific to each service. When you create users for these services,
you can create groups corresponding to these scopes to provide permissions specific to a service. After
creating groups, you can assign users to the required groups.
For example, if you use the Time Series service, you must create the
timeseries.zones..user and
timeseries.zones..ingest groups for users with data ingestion permission.
For a list of scopes for all platform services, see Authorities or Scopes Required for Platform Services on
page 23.
Use the following procedure to create groups in UAA:
Procedure
1. In the Console view, select the Space where your services are located.
2. In the Services Instances page, select the UAA instance that you need to configure.
3. Select the Configure Service Instance option.
4. In the UAA Dashboard login page, specify your admin client secret and click Login.
5. In UAA Dashboard, select the User Management tab.
The User Management tab has two sections, Users and Groups. The Groups section displays the
groups that you have created in your UAA instance.
6. Click on the Create Group option to open the New Group form.
7. Specify the following values in the New Group form:
Field Description
Display Name Specify the name of the group.
Description Specify the description of the group.
Creating Password Policies
You can configure the password policy for passwords and client secrets in UAA for parameters such as
length, accepted or required character types, expiration times, and reset policy.
About This Task
When you create an instance of UAA, an internal Identity Provider of type uaa is automatically created
with the default password policy. You can create new password policies for clients in your instance of
UAA. You can create policies for both user passwords and for client secrets.
You can change the password policies at any time. Change in the password policy affects all users,
including any existing users in your UAA instance.
© 2020 General Electric Company 27Procedure
1. In the Console view, select the Space where your services are located.
2. In the Services Instances page, select the UAA instance that you need to configure.
3. Select the Configure Service Instance option.
4. In the UAA Dashboard login page, specify your admin client secret and click Login.
5. In UAA Dashboard, select the Password Policy tab.
6. Specify the following values in the Password Policy form:
Field Description
Set Password Length Specifies the minimum to maximum number of characters
required for a valid password.
Requirements Specifies the type of characters required for a valid password.
Expiration Specifies the number of months after which current password
expires.
Lockout Policy Specifies the amount of time (in seconds) for which the
account is locked when the number of failed attempts has
exceeded the set limit within the specified time.
Managing Identity Providers
Managing Identity Providers
An Identity Provider (IdP) manages accounts for users who may need secure access to the applications or
services. A Service Provider (SP) is the server receiving request from a user for access to a service or
application. In a typical SAML flow, when a user requests a service from the SP, the SP first requests and
obtains an identity assertion from the IdP. The IdP receives the request from SP and generates an identity
assertion based on the user account information. SP then decides whether to perform the service based
on assertion provided by IdP. UAA supports SAML protocol for communicating with IdPs or SPs.
You can configure your UAA instance to act as an IdP or use an external IdP. The following scenarios
determine the type of configuration you need for your UAA:
• If you administer users accounts locally in UAA using UAA SCIM APIs or UAA dashboard, then UAA is
your default identity provider. You do not need any additional configuration for identity provider in
UAA.
• If you provision your user accounts remotely on an external IdP such as Company SSO, you can
configure UAA as SP that redirects to external IdP. For more information, see Configuring UAA as
Service Provider for External Identity Provider.
• If you have applications that provide SP capability (For example, GitHub Enterprise or ServiceNow),
you can configure UAA as IdP. For more information, see Configuring UAA as an Identity Provider.
• It is possible to configure UAA as both SP and IdP. However such a configuration is useful only as a test
environment. To set up UAA as SP and IdP, you can complete steps for configuring UAA as both SP and
IdP.
28 © 2020 General Electric CompanyConfiguring UAA as Service Provider for External Identity Provider
If you provision your user accounts remotely on an Identity Provider (IdP) such as Company SSO, you can
configure UAA as Service Provider (SP) that redirects to external IdP.
Before You begin
• Obtain your Identity Provider (IdP) metadata from your IdP administrator.
• Log In to Predix.io and go to Console view.
About This Task
Complete the following procedure to configure UAA as SP for external IdP:
Procedure
1. In the Services Instances page on Predix.io, select the UAA instance that you need to configure.
2. Select the Configure Service Instance option.
3. In the UAA Dashboard login page, specify your admin client secret and click Login.
4. In UAA Dashboard, click on the Identity Providers tab.
5. In the External Identity Provider section, select New Identity Provider.
6. In the New Identity Provider form, specify the following information and press Submit:
Name of the Field Description
Name Specify the name of your IdP.
Description Specify a short description for your IdP.
Type Select the type of IdP- SAML or OIDC.
Email Domain Specify the email domain that UAA can use to identify the
identity provider if you have configured more than one
identity provider. To support this feature, UAA provides a
configuration of IdP discovery. By default, this configuration is
set to False.
UAA can be configured to set IDP Discovery to
true if you have configured more than one
identity provider. For more information, see
Identifying IdP Using Email Domain on page 34
Active Select this option to set the IdP as active. If you have multiple
IdPs defined for a single UAA instance, UAA interacts with
only active IdPs. If you have multiple active IdPs for a single
UAA instance, you must ensure that the clients related to the
IdPs are updated with the corresponding information.
Although it is possible to update a single client to interact
with multiple IdPs, as a best practice, you can define a new
client for each of your application to interact with UAA.
If you are setting up an OpenID Connect (OIDC) IdP, the following field are available:
Name of the Field Description
Username Mapping Specify the username attribute defined in your IdP.
Authorization Endpoint Url Specify the authorization endpoint for OIDC token.
Token Endpoint Url Specify the token URL for OIDC authorization code.
© 2020 General Electric Company 29Name of the Field Description
Token Key Endpoint Url Specify the token key endpoint for token verification.
Token Issuer Specify the URL of your OIDC provider.
Relying Party Client ID Specify the OIDC provider client id.
Relying Party Client Secret Specify the OIDC provider client secret.
Automatically create a shadow user on login Select this option to create a local user in UAA corresponding
to each user defined in the identity provider that you are
configuring. The local user is created when the user logs-in for
the first time. This feature enables a user to be authenticated
by UAA without requiring you to create it in UAA also.
By default this option is turned off. You must
create each user in UAA even if the user exists in
IdP for authentication from UAA.
This option is useful if you need to white list
users to authenticate only a subset of users
setup in your identity provider. To white list users,
you can turn this option off while configuring a
new IdP, and individually create users in UAA
corresponding to users that are defined in your
IdP that you need authenticated.
If you are setting up a SAML IdP, the following fields are available:
Name of the Field Description
Name ID Format Specify the IdP ID format that UAA SP must use. This is useful
if the IdP metadata contains multiple ID formats and you
need to specify the format that SP must use. You can copy the
ID format string from the metadata that you specify.
Metadata Specify the IdP metadata and download the UAA SP metadata
in this field. You must obtain the IdP metadata from your IdP
administrator. You must supply the UAA SP metadata to your
IdP administrator.
Email (Optional) Specify the attribute defined in your IdP that
corresponds to the email attribute in UAA.
Given Name (Optional) Specify the attribute defined in your IdP that
corresponds to the Given Name attribute in UAA.
Family Name (Optional) Specify the attribute defined in your IdP that
corresponds to the Family Name attribute in UAA.
Automatically create a shadow user on login Creates a local user in UAA corresponding to each user
defined in the identity provider that you are configuring. The
local user is created when the user logs-in for the first time.
This feature enables a user to be authenticated by UAA
without requiring you to create it in UAA also.
If this option is turned off, you must create each
user in UAA even if the user exists in IdP for
authentication from UAA.
This option is useful if you need to white list
users to authenticate only a subset of users
setup in your identity provider. To white list users,
you can turn this option off while configuring a
30 © 2020 General Electric CompanyYou can also read