AAA & Captive Portal Cloud Service TM and Virtual Appliance - Administrator Manual - Cloudessa
←
→
Page content transcription
If your browser does not render page correctly, please read the page content below
AAA & Captive Portal Cloud ServiceTM
and Virtual Appliance
Administrator Manual

Revision 28
August, 2013
Copyright, Cloudessa, Inc.
All rights reserved
To receive technical assistance with your Cloudessa deployment, please visit the support
section of our website cloudessa.com, or contact us via email at
support@cloudessa.com.
 2     WWW.CLOUDESSA.COM
Table of Contents
Cloudessa Quick Intro ............................................................................................................. 6
       Why choose Cloudessa?...............................................................................................................................7
       Key Features.....................................................................................................................................................8
       Authentication Options............................................................................................................................. 11
       WPA 2 / 802.1X or Captive Portal ........................................................................................................ 11
       The Role of RADIUS and AAA ................................................................................................................. 12
       User Credential Stores .............................................................................................................................. 14
       RADIUS and 802.1X Authentication .................................................................................................... 14
       Protocols ......................................................................................................................................................... 14
       RADIUS attributes ....................................................................................................................................... 16
       Captive Portal Authentication................................................................................................................ 16
Configuring Cloudessa Server ........................................................................................... 18
Creating and managing your Virtual RADIUS Server ................................................ 18
       Create Server - Wizard .............................................................................................................................. 19
       Create Server - GUI ..................................................................................................................................... 19
       RADIUS Server: General Info Tab ......................................................................................................... 20
       RADIUS Server: Debug Tab ..................................................................................................................... 21
       RADIUS Server: User Groups Tab ......................................................................................................... 21
       RADIUS Server: Device Groups Tab..................................................................................................... 21
       RADIUS Server: Ext User Groups Tab ................................................................................................. 22
       RADIUS Server: Source IPs Tab ............................................................................................................. 22
       RADIUS Server: Guest Users Tab .......................................................................................................... 23
       RADIUS Server: Access Card Sheets .................................................................................................... 23
       RADIUS Server: Attributes Tab ............................................................................................................. 23
CREATING AND MANAGING USERS AND GROUPS ....................................................... 24
       Creating and Managing Local Non-Admin Users ........................................................................... 24
       Uploading Bulk User Information ........................................................................................................ 25
       User: Manage User Tab ............................................................................................................................. 25
       User: Google Auth Tab............................................................................................................................... 25
       User: Groups Tab ......................................................................................................................................... 26
       User: Attributes Tab................................................................................................................................... 26
       User: Advanced Tab ................................................................................................................................... 26
User Groups Overview ......................................................................................................... 27
Creating and Managing Local User Groups ................................................................... 28
       User Group: Manage Group Tab ............................................................................................................ 28
       User Group: VLAN Tab ............................................................................................................................. 28
       User Group: Users Tab ............................................................................................................................. 28
       User Group: IP Pool Tab .......................................................................................................................... 29
       User Group: Attributes Tab .................................................................................................................... 29

                                                                                                               WWW.CLOUDESSA.COM 3
Creating and Managing External User Groups ............................................................ 29
       Ext User Group: Manage Group Tab .................................................................................................... 30
       Ext User Group: VLAN Tab ..................................................................................................................... 30
       Ext User Group: Users Tab ..................................................................................................................... 30
       Ext User Group: IP Pool Tab .................................................................................................................. 30
       Ext User Group: Attributes Tab ............................................................................................................ 31
Viewing External Users........................................................................................................ 31
Creating and Managing Devices and Device Groups ................................................. 31
       Creating and Managing Devices ............................................................................................................ 31
       Creating and Managing Device Groups .............................................................................................. 32
Creating and Managing External Device Groups ........................................................ 32
Using IP Address Pools ........................................................................................................ 33
Adding Vendor-Specific Attributes .................................................................................. 34
Logging and Accounting ...................................................................................................... 35
       Authentication Logs ................................................................................................................................... 35
       Active Sessions ............................................................................................................................................. 36
       Accounting Logs........................................................................................................................................... 36
       RADIUS Trace Logs ..................................................................................................................................... 36
Guest User Access .................................................................................................................. 36
       Guest User Access Card Sheets .............................................................................................................. 36
Cloudessa Administrator Options.................................................................................... 37
       Creating Admins and User Managers.................................................................................................. 37
       Admin Logs .................................................................................................................................................... 37
Upgrading Cloudessa Subscription ................................................................................. 37
The Cloudessa Virtual Appliance ..................................................................................... 38
GOOGLE APPS AUTHENTICATION .................................................................................... 40
       EAP-TTLS Option......................................................................................................................................... 40
       EAP-TLS Option ........................................................................................................................................... 40
       Captive Portal Option ................................................................................................................................ 41
Two-Factor Authentication ................................................................................................ 42
       Using Google Authenticator .................................................................................................................... 42
       Downloading Google Authenticator for Smartphones................................................................. 43
       About Quick Response (QR) Codes ...................................................................................................... 43
Cloudessa Web Services API .............................................................................................. 44
Creating and Managing Captive Portals ......................................................................... 44
       Creating a Captive Portal ......................................................................................................................... 45
       Captive Portal: General Info Tab........................................................................................................... 45
       Captive Portal: Splash Page Tab............................................................................................................ 46
       Captive Portal: Success Page Tab ......................................................................................................... 46
       Captive Portal: Authentication Providers ......................................................................................... 47
       Google+ \ Google Apps Configuration ................................................................................................ 48
       Google+ \ Google Apps - Advanced Configuration ........................................................................ 50

 4          WWW.CLOUDESSA.COM
Facebook Configuration: .......................................................................................................................... 51
     Twitter Configuration................................................................................................................................ 51
     Twitter - Advanced Configuration ....................................................................................................... 52
     LinkedIn Configuration............................................................................................................................. 53
     LinkedIn - Advanced Configuration..................................................................................................... 54
     Login with PayPal Configuration .......................................................................................................... 55
     Login with Paypal - Advanced Configuration .................................................................................. 56
     PayPal Express Checkout ......................................................................................................................... 58
     Email Self Registration.............................................................................................................................. 60
     Captive Portal: Placeholders................................................................................................................... 62
     Displaying video ads on Captive Portal: ............................................................................................ 63
Configuring your Devices for Cloud Captive Portal services. ................................. 65
     Configuring Meraki. .................................................................................................................................... 65
     Ruckus Configuration ................................................................................................................................ 68

                                                                                                      WWW.CLOUDESSA.COM 5
Cloudessa "AAA & Captive Portal Cloud Service" Quick Intro
Welcome to the Cloudessa© cloud based Authentication, Authorization, and
Accounting (AAA) and Captive Portal solution platform.
Cloudessa supports building complex WiFi Captive Portals for hotspots such as
retail, hospitality and guest access, as well authenticating enterprise users using
802.1X and RADIUS based protocols. It supports a variety of backend authentication
sources, such as Google Apps, Active Directory, SAML providers, and social network
sign-ins, including Facebook and Twitter, and Payment Processors such as PayPal.
Cloudessa is a 100% cloud service compatible with enterprise WiFi AP's and
Controllers from leading network hardware vendors.
Cloudessa is available either as a public cloud Service, or as a Virtual Appliance for
installation in an enterprise or private data center, so you can deploy Cloudessa in
the way that is appropriate for your business..
Use the hosted Cloudessa Service in the public cloud, where you can take
advantage of a shared multi-tenant infrastructure.
Deploy Cloudessa as a Virtual Appliance, running in a private cloud or
enterprise data center if you need to maintain service completely on-site and
control service availability. Cloudessa VA runs on major private cloud
platforms such as VMWare and Xen.
Note: The first release of the Captive Portal functionality will only be available as a
Cloud Service. If you have other requirements, please contact sales@cloudessa.com.
This guide covers:
Overview and Key Features
Using Cloudessa AAA & Captive Portal Cloud Service
Installation and use of the Cloudessa Virtual Appliance in your private data
center.
The hosted Service and the Virtual Appliance include identical features,
functionality, and administrative interfaces. The only difference is, one is a licensed
cloud service, the other must be executed as a Virtual Machine in your data center.
6 WWW.CLOUDESSA.COM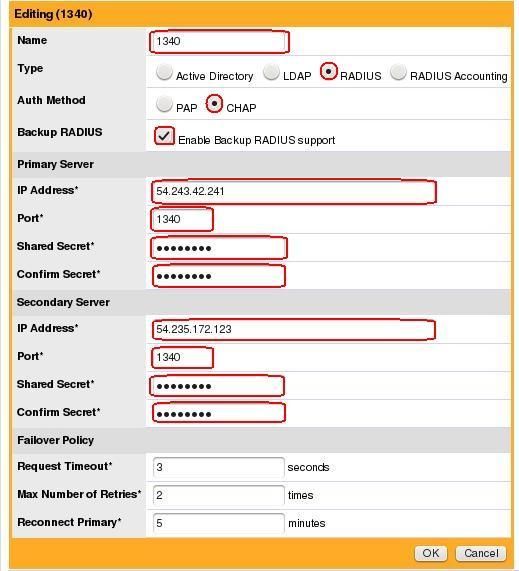
Why choose Cloudessa?
Driven by mobile workers and BYOD, the scale, complexity, and importance of
enterprise WiFi and VPN networks is increasing dramatically.
A well-architected, multifaceted access security infrastructure is an essential
element of every enterprise WiFi, VPN, and other remote access gateway
deployment. This infrastructure typically must support the following functions:
Authentication, to ensure that only authorized users gain access to the
network
Authorization, to configure the appropriate level of network resource access
for a particular user or device for a particular session.
Accounting, to document who access the network, when.
Security, to prevent attacks on user credentials and data
In addition, these new WiFi requirements should ideally reuse existing user stores
and integrate into the network’s existing access management systems and
architecture for securing VPN’s and other access gateways to ensure a consistent
level of security regardless of how users are accessing your network.
WiFi hotspots provide unique set of business growth opportunities to engage
consumers and guests of your business. A strong Captive Portal solution integrated
into your business logic provides an opportunity to win new customers and keep
new customers happy.
Cloudessa is the first cloud solution that enables you to both:
Provide strong network access security for the employees and contractors of
your business
Grow your business by engaging your customers with advanced hotspot and
captive portal solutions integrated with your business logic
WWW.CLOUDESSA.COM 7
Cloudessa enables you to achieve these goals while keeping the security of your
network intact. Cloudessa supports the industry standard means of using separate
WiFi SSIDs or network VLANs to separate your internal business network from
customer engagement and hotspot network.
Key Features
The following are key features of Cloudessa discussed throughout this manual
Multiple Virtual RADIUS/802.1X servers, each running on a separate
authentication and accounting port. You can create a Virtual RADIUS server
with a single click of a mouse.
Multiple Captive Portals, each running on a separate URLs. You can create a
Virtual RADIUS server with a single click of a mouse.
Captive Portal support based on industry standard UAM as well as Meraki
EXCAP protocol and are compatible with major enterprise WiFi hardware
such as Cisco, Meraki, Ruckus, Aruba, Motorola and others.
For RADIUS/802.1X, a comprehensive variety of protocols are supported
including PAP, CHAP, MS-CHAP, SIP, PEAP, EAP-TTLS, EAP-TLS and MAC-
based authentication
For Captive Portals, SAML authentication is supported, including such
vendors as Ping Identity, Okta, OneLogin and Microsoft ADFS
For Captive Portals, social network OAuth logins are supported, including
Facebook, Twitter, and LinkedIn, as well as PayPal login for payment
integration
Accounting and Billing. Cloudessa includes build-in integration with PayPal,
as well as a capability to add custom modules to integrate with other
Payment Processors.
Accounting Logs of user and admin actions
Two-factor authentication using Google Authenticator
Authentication against External user stores, including Active Directory,
LDAP, SQL Databases, Google Apps, as well as customer-provided Web
Service APIs
JSON-based Web Services API
Powerful Captive Portal building tools and widgets
Three methods to use Google Apps for authentication: Captive Portal,
PAP/EAP-TTLS and EAP-TLS with digital certificates.
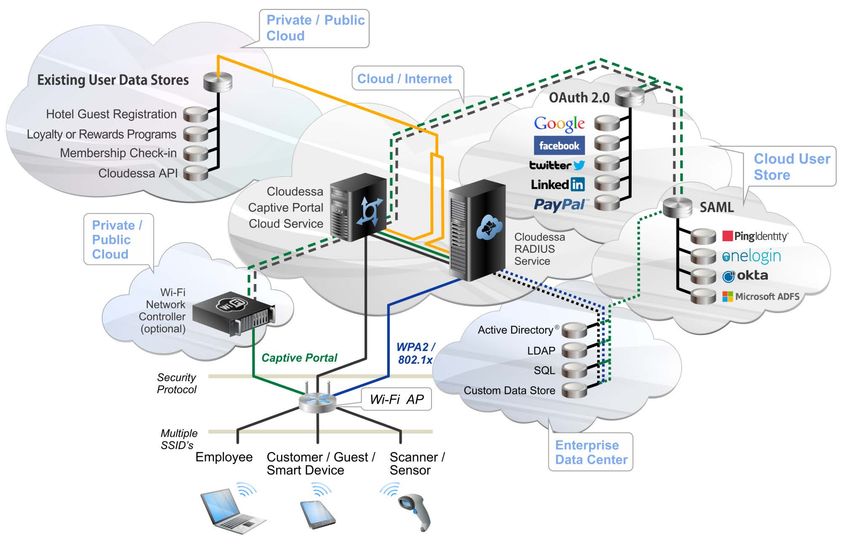
The following figure illustrates how a multi-location enterprise can leverage
the Cloudessa RADIUS functionality service in the public cloud to
authenticate and authorize WiFi users and devices.
8 WWW.CLOUDESSA.COM
Figure 1: Example Deployment - Cloudessa RADIUS / AAA Cloud Service

                                                                WWW.CLOUDESSA.COM 9
Figure 2: Example Deployment - Cloudessa AAA & Captive Portal Cloud Service

 10     WWW.CLOUDESSA.COM
Authentication Options
When assessing your WiFi and VPN network security requirements, it is important
to examine what is the right level of security for your deployment, and how do you
want to enforce the access security.

Cloudessa RADIUS provides the flexibility to deploy both WPA2 / 802.1X compliant
or Captive Portal browser based access security.

Best practice for WiFi and VPN access to enterprise LAN applications mandates the
use of WiFi Protected Access 2 Enterprise (WPA2) and 802.1X-based security; in
addition, WPA2 and 802.1X are considered essential for securing WiFi access in
healthcare (HIPAA), financial services (SOX), and other regulated environments.

If the primary use of the WiFi network is to access cloud or external resources, (for
instance in a hotspot or for student / customer / guest internet access) or if a users
session will be protected via a VPN tunnel, and there is little risk of sensitive data
being compromised, then a browser based login via a Captive Portal is a viable
option.

WPA 2 / 802.1X or Captive Portal

With WPA 2 / 802.1X, authentication happens before a user is granted an IP
address and allowed on the network, this protects against attacks at upper layers
by denying access before a rogue user ever gets on the network. WiFi networks
requiring a high level of access security and most VPN networks use WPA 2 / 802.1X
based access security.

WPA 2 /802.1X works at Layer 2, the data link layer. In this case, the wireless
client is authenticated, the encryption key is derived and the Layer 2 wireless
connection between the client and the access point is encrypted. WPA2 supports
Extensible Authentication Protocol (EAP) based authentication to prevent access
until user authentication is completed

The 802.1X protocol applies to wired and wireless networks. In a wireless network,
the 802.1X authentication occurs after the client (end user) has associated to an
access point using an 802.11 association method. Wired networks use 802.1X by
connecting to a port on an 802.1X enabled switch.

Captive Portal provides a browser-based mechanism for user to login to the
network. With Captive Portal, unauthenticated users attempting to access the

                                                        WWW.CLOUDESSA.COM 11
network are redirected to a Captive Portal web page. Users access to network
resources is restricted until they are authenticated via a browser-based login.
Captive Portal is an application-level authentication used primarily with WiFi for
hotspot and visitor / guest access networks. With Captive Portal, the user does
obtain an IP address on the network prior to authentication; however, their network
usage is restricted until they are authenticated via a browser based login.
Captive Portal authenticates users at Layer 3, the network layer. In this case
the encryption is typically done at the level of the browser using the HTTPS
protocol. Captive Portal authentication is often used in conjunction with a layer 3
VPN, such as an IPSec or SSL VPN, that is used to encrypt the entire layer 3 traffic.
The decision to use WPA 2 / 802.1X or Captive Portal based access security depends
on your access network infrastructure and security risk profile. Organizations
who's employees will be using the WLAN or VPN to access corporate applications
and resources and cannot risk their network or data being compromised should
consider the more secure WPA 2 / 802.1X Layer 2 security approach.
If the primary use of the WiFi network is to access cloud or external resources, for
instance in a hotspot or for customer / guest access, then Captive Portal Layer 3
security is an appropriate option.
The Role of RADIUS and AAA
Regardless of which method you choose for enforcing access security on your WiFi
AP’s, VPN’s, or other access gateways, authenticating users to a network through
client based WPA2 / 802.1X or browser based Captive Portal, Cloudessa RADIUS
server provides advanced capabilities for both.
The RADIUS server orchestrates and manages the interaction between a
number of different network elements that need to work collaboratively to
manage and secure WiFi Access Point’s and Controllers (AP’s), VPN’s, and
other access gateways.
A centralized RADIUS server receives authentication requests from the WiFi
AP’s, controllers, VPN servers, or other access gateway.
User credentials are then processed against a designated user store, typically
Active Directory (AD), or an LDAP or SQL database.
If a cloud user store such as Google AppsTM, SAML or social network is used,
Cloudessa RADIUS will create and delete the corresponding RADIUS
credentials on the fly
Authentication is accepted or rejected based on the validity of the provided
12 WWW.CLOUDESSA.COMuser account credentials.
When returning the access accept / reject message to the gateway, the
RADIUS server also returns the parameters for the user authorization to
network resources. The Authorizations are returned via standard and
vendor specific RADIUS attributes, for each user and session, based on which
group or groups the user is an authenticated member of (based on the users
group assignments in AD, Google Apps or other user store)
The role of the RADIUS server is essential. Not only does it authenticates the
user, but it also communicates back to the gateway WiFi AP or VPN (via
RADIUS attributes), the parameters for how that gateway should be
configured for that particular user, for that particular session, based on what
network group (as defined in AD or Google Apps or other user store) that the
user is a member of. Such parameters can include assigning users to
particular VLAN's, setting bandwidth allocation, and dynamically configuring
any other configurable policy element of your access gateway.
RADIUS accounting logs are generated and stored to detail describing the
user and the device accessing the network. RADIUS accounting logs can be
important for documenting who was on the network, when; and for proving
accountability and security compliance within regulated environments such
as healthcare, financial services and public access networks.
WiFi access security is dependent on the interoperability between a number of
different network components:
User Device, typically a laptop or smart device running "client" or
"supplicant" software or a browser;
WiFi AP, WiFi Controller, VPN, Firewall or other Access Gateway - The Access
Gateway is the access security enforcement point and is the "Authenticator"
or "RADIUS Client" that initiates and sends the RADIUS authentication
request to the RADIUS server;
RADIUS Server – IETF Standards based server that handles the
authentication, authorization, and accounting for user access;
User Store – Active Directory, LDAP or SQL database, Google Apps, or other
user store where user credentials and user group assignments are stored.
All of these network components must be configured and interoperable to enforce
access security.
WWW.CLOUDESSA.COM 13User Credential Stores
The following user stores and authentication sources are supported:
Active Directory, LDAP, SQL databases,
Google Apps
SAML authentication, for instance Ping Identity, OneLogin, Okta and ADFS
Social network OAuth-based logins, such as Facebook, Twitter LinkedIn,
PayPal.
Cloudessa internal native user store
Customer-owned webservices APIs. Examples include hospitality, re-
creation, health-care and co-working spaces. In this case Cloudessa will call
the external webservices API during authentication
RADIUS and 802.1X Authentication Protocols
Cloudessa supports a comprehensive set of RADIUS and 802.1X authentication
protocols. All of these protocols include a shared secret between the RADIUS client
and the RADIUS server. Typically RADIUS clients are WiFi Access Points or
Controllers, VPN's or firewall devices.
Older, non-802.1X compliant protocols include:
Password Authentication Protocol (PAP) - The user enters a username
and a password. The password is encrypted using the RADIUS shared secret
and then the username and the encrypted password are sent to the RADIUS
server, the server verifies them against a user store. The password may be
stored in the user store in plaintext or as a hashed value. If the verification is
successful, Accept message is sent back to the RADIUS client. PAP is one of
the oldest and mostly widely used protocols in wired networking. It is also
used in wireless networks for Captive Portal authentication using web forms,
and for the EAP-TTLS/PAP protocol suite.
Challenge Handshake Authentication Protocol (CHAP) - is more secure
than PAP. With CHAP, the server sends a random “challenge” string to the
client, along with the hostname. The client uses the hostname to determine
the appropriate secret, combines it with the challenge and returns the
information to the server. The server acknowledges the client, and permits
access if the correct result is received. In such a way the password is never
communicated over the network, improving security over PAP.
MS-CHAP v1 and v2 – is a Microsoft version of CHAP. MS-CHAP is an option
in the Microsoft implementation of Point to Point Tunneling Protocol (PPTP).
14 WWW.CLOUDESSA.COMMAC Authentication Bypass – important protocol which uses the MAC
address of a device as the username and the password. Although this
protocol is not particularly secure it is widely used for low security
environments, such as guest access. Typically this protocol is emplemented
by wired Layer 2 switches and Layer 2/3 gateways.
Digest is a widely used username/password protocol for Voice-over-IP
systems.
MSISDN is a RADIUS protocol variation where Mobile Subscriber Integrated
Services Digital Network-Number (MSISDN) is used as the authentication
credential. This protocol is used by telecom RADIUS servers.
Newer, 802.1X compliant protocols are described below. For 802.1X the user client
(supplicant), typically installed on a laptop or wireless device, authenticates to the
RADIUS server through the Authenticator, such as Access Point or wired Ethernet
switch. The Authenticator plays the role of the relaying party helping the Supplicant
and the RADIUS server exchange messages. Once the authentication is complete, the
RADIUS server sends Accept message to the Authenticator, and the user is permitted
to use the network.
802.1X protocols typically include a combination of a secure tunnel, and then the
inner authentication protocol which is used over the secure tunnel once the secure
connection is established. The secure tunnels include Microsoft PEAP, TTLS and
TLS. PAP, CHAP or MS-CHAP are typically used as inner authentication protocols.
PEAPv0 / MS-CHAPv2 – this protocol is the most widely supported Wi-Fi
authentication protocol, it used Microsoft PEAP as secure tunnel and MS-CHAPv2 as
the inner authentication protocol. It is supported by Microsoft, Apple, Android and
Blackberry devices. The limitation of this protocol is that the password needs to be
stored on the server side in plaintext and cannot be hashed. Another limitation is
that this protocol does not work with external web services, such as Google Apps,
which typically can verify the password, but will not give out the password.
EAP-TTLS/ PAP– this protocol is uses Microsoft TTLS as secure tunnel and PAP as
the inner authentication protocol. The password can be stored in hashed form, one
can also use this protocol to authenticate against external web services. This
protocol is supported natively on Android, Linux and Windows 8. On Apple devices,
it is switched off by default and needs to be enabled. On older versions of Windows
third party software such as SecureW2 needs to be installed to enable the protocol.
A typical price of this third party software is $20-$50 per laptop.
EAP-TTLS/ MSCHAPv2– not frequently used combination of TTLS and MSCHAPv2
Cisco LEAP– Cisco proprietary protocol. Used in older Cisco hardware.
WWW.CLOUDESSA.COM 15EAP-MD5– Older protocol, not frequently used. RADIUS attributes One of the main reasons for the ubiquitous use of RADIUS in access networks is the flexibility of the RADIUS attributes to enable the application of a consistent set of access security policies across different types of access gateways, from different vendors. Standard RADIUS Attributes define how an access gateway is configured for a particular users session. RADIUS attributes carry specific authentication and authorization details. For example, to initiate a user session, the access gateway sends Access-Request packets to a RADIUS server. The initial packet contains several attributes that identify the user, such as username, password and other identifiers. If the authentication is successful, the server responds with the Access-Accept packet that contains attributes that define the user session, such as VLAN and bandwidth limits. RADIUS is extensible. In addition to the standard RADIUS attributes, networking vendors incorporate specific RADIUS attributes to add new capabilities for communication with the RADIUS server. These attributes are contained in a RADIUS dictionary file. Vendor-specific dictionary files contain a definition of RADIUS attributes that are used by each vendor. With Cloudessa RADIUS, you can select the level where access is authorized: you can define attributes at the individual user level, at the group level, or at the Virtual RADIUS server level. Cloudessa frequently updates the vendor-specific RADIUS dictionary options to ensure that the latest files are available. Captive Portal Authentication Cloudessa includes a powerful set of tools to build Captive Portals. These Captive Portals are web-based and hosted by Cloudessa. Cloudessa utilizes the UAM (Unified Access Method) standard and the Meraki EXCAP protocol to integrate with a wide 16 WWW.CLOUDESSA.COM
variety of WiFi hardware, including Cisco, Meraki, Ruckus, Motorola, Aruba and
others.
Cloudessa Captive Portal can include a number of authentication options, in
particular:
Social network login using Facebook, Twitter, and LinkedIn.
Google Apps authentication
Self-registration
Login with PayPal and the corresponding billing/payment capabilities
SAML-based authentication utilizing Secure Assertion Markup Language.
Examples of supported SAML providers are Ping Identity, Okta, Microsoft
ADFS, and OneLogin.
WWW.CLOUDESSA.COM 17Configuring the Cloudessa Server As the administrator, starting with the Dashboard, you will need to step through the various configurable elements of Cloudessa. . DASHBOARD - This is your starting point. A wizard will help you create a RADIUS server instance. USERS & GROUPS – Define internal users, groups, as well as external users and external user groups, based on external user stores such as Active Directory and Google Apps. GUESTS – Define guest users and create printable sheets of access cards. RADIUS – Configure your virtual RADIUS severs. CLOUD CAPTIVE PORTALS – Create WiFi Captive Portals. DEVICES & GROUPS – Create devices and groups of devices that will be allowed to access the network. LOGS – View various logs, such as authentication, active sessions, accounting and RADIUS trace logs. ACCOUNT – Create account administrators and user managers, view admin logs and set your account information and modify your service subscription options. Creating and managing your Virtual RADIUS Server As administrator, the first thing you need to do is create a virtual RADIUS server, which will be your domain specific RADIUS instance on the Cloudessa Cloud Platform. Within each Cloudessa RADIUS instance, administrators can create multiple virtual RADIUS servers. Each virtual RADIUS server can be configured to meet the needs of a specific functional or organizational unit. 18 WWW.CLOUDESSA.COM
After you create a server, you need to configure the server.
Create Server - Wizard
After you reach the Cloudessa Getting Started page, launch the Wizard to begin
setting up your RADIUS Server, or select RADIUS > Virtual RADIUS Servers.
The Wizard allows you to configure a basic RADIUS server instance for testing
purposes, and to familiarize yourself with the layout and flow of Cloudessa RADIUS
configuration options.
To use the Wizard, click “Launch Wizard” and follow the steps to set up your domain
specific RADIUS sever on the Cloudessa Cloud Platform.
Enter your RADIUS server name and Shared Secret, and select an
authentication protocol.
Enter the Shared Secret - this is required for communication with your NAS.
The Shared Secret on the RADIUS server must be added in your Network
Access Server (NAS) or network Layer 2 switch configuration to allow the
devices to communicate.
Select the authentication protocols that you want to use.
Create Server - GUI
To create your Virtual RADIUS server through the GUI:
Go to “RADIUS > Virtual RADIUS Servers” in the Cloudessa Admin UI
Click Create RADIUS Server.
Select a Name for your RADIUS server.
Click Generate Secret to generate a new shared secret, or you can choose to
use the default. The Shared Secret serves as a password between the RADIUS
server and RADIUS clients. (for example, your Layer 2 802.1X switch or NAS).
WWW.CLOUDESSA.COM 19 Select a RADIUS server authentication protocol.
An authentication protocol defines how devices connect to the virtual RADIUS
server.
PAP (Password Authentication Protocol)
CHAP (Challenge Handshake Authentication Protocol)
MS-CHAP (Microsoft Challenge Handshake Authentication Protocol)
PEAPv0 / MS-CHAPv2 (Protected Extensible Authentication Protocol)
EAP-TTLS / PAP (Extensible Authentication Protocol - Tunneled
Transport Layer Protocol)
Under Advanced config, you can select additional authentication protocols:
MSISDN
Digest
MAC Authentication Bypass
Cisco LEAP
EAP-MD5
Note: To use Cloudessa RADIUS with an Active Directory server or LDAP, you must
select PAP or EAP-TTLS under Advanced Config. With EAP-TTLS, choose PAP as the
TTLS inner protocol. To use Google Authenticator, you must use EAP-TTLS and PAP.
In addition to the shared secret that you created, your RADIUS-enabled device or
NAS must be configured with the RADIUS authentication port and the RADIUS
accounting port.
Note: As a service, Cloudessa RADIUS uses non-standard RADIUS port numbers. To see
the port numbers for your RADIUS server, access the server under the main Virtual
RADIUS Servers tab. The RADIUS server IP address is also displayed on this page.
You must configure your WiFi AP or other Access Gateway with the IP address for the
Cloudessa Server, and the assigned port number for the Cloudessa RADIUS Service for
RADIUS Authentication and RADIUS Accounting.
RADIUS Server: General Info Tab
Use General Info tab to:
View IP addresses of the primary and secondary RADIUS servers, as well as
RADIUS authentication and accounting port numbers
20 WWW.CLOUDESSA.COM Modify server name
Disable IP filtering for this server – this will allow NAS servers with any IP
address to connect. Good for debugging and initial configuration, should not
be used in production for security concerns.
Disable MAC filtering – this disables filtering based on the MAC address of
the user device. If MAC filtering is enabled, you will need to specify MAC
addresses for all user devices.
Block Google Authenticator – this will block two-factor authentication for
this server, even if it is enabled for user. Typically, two-factor authentication
is used for VPN access, and not used for WiFi.
RADIUS Server: Debug Tab
Use Debug tab to
Enable detailed debug log for this server
If you are having RADIUS or network issues, you can enable RADIUS debug for a
specified period of time. Debug will allow support personnel to quickly track down
the cause of the issue.
Note: You have the option to display passwords in the debug file. This option displays
passwords in clear text. Anyone with access to the debug file will have access to user
passwords.
RADIUS Server: User Groups Tab
Use User Groups tab to
Attach internal user groups that can authenticate against the server.
Note: by default, when the server is create, “All Users” group is attached to it. This
can be modified later to allow for more fine-grained access.
RADIUS Server: Device Groups Tab
Use Device Groups tab to
Attach device groups that can authenticate against the server. This is used
only for MAC-based authentication and MSISDN authentication.
WWW.CLOUDESSA.COM 21RADIUS Server: Ext User Groups Tab
Use Ext User Groups tab to
Attach external user groups that can authenticate against the server, such as
Active Directory or LDAP based groups.
RADIUS Server: Source IPs Tab
Use Source IPs tab to
Specify which IP addresses from the Internet can connect to the server. For
security reasons, the server will filter out packets from all other IP addresses.
You need to specify the IP address of your internet gateway or firewall. For
debugging purposes, IP filtering can be disabled in the General Info tab.
Source IP is used to ensure that only authorized users or devices have access to the
RADIUS server. With source IP enforcement, access is permitted only to users who
have an IP address that you have approved.
Typically a gateway is used to separate an enterprise network from the public
Internet. Users connect from within that gateway. When Cloudessa RADIUS
receives a RADIUS request from a user authenticating to a NAS, the source IP
address is the source IP address from the gateway, not the individual user.
By default, the network mask 255.255.255.255 is used with the source IP that you
specify. This ensures that only one host can be associated with that IP address. For
example, your AP or NAS IP address should be used to permit these devices to
communicate with the RADIUS server.
To use source IP, create a new source IP address entry. Then, add the source IP (or
multiple source IPs) to a virtual RADIUS server instance.
1. In the Web UI, go to RADIUS > Source IPs and create source IP
address(es) based on the IP address of the gateway.
2. Go to RADIUS > Virtual RADIUS Servers, and click on a server to
display options.
3. Select the tab for Source IPs.
4. Select the check box for the applicable Source IP for the RADIUS
instance.
22 WWW.CLOUDESSA.COMRADIUS Server: Guest Users Tab
Use Guest Users tab to:
View and delete temporary guest user accounts that have access to this
server
RADIUS Server: Access Card Sheets
Use Access Card Sheets tab to:
View and delete temporary printable access card sheets that have access to
this server
RADIUS Server: Attributes Tab
Use Attributes tab to:
Set RADIUS attributes that are returned in all RADIUS Access-Accept
messages by this server.
WWW.CLOUDESSA.COM 23CREATING AND MANAGING USERS AND GROUPS
Cloudessa supports local users and groups, as well as authentication against
external user stores, where a group on each external store such as LDAP is mapped
to an external group on Cloudessa service.
You can add individual local users either through the Web UI, or by importing a
batch of established users with a CSV file.
Note: Admin email address is used when authenticating to the Web Admin interface.
The RADIUS login is used to identify the user to RADIUS service.
Cloudessa RADIUS service supports several user roles:
Primary Admin (root) manages all Cloudessa features. The primary Admin
cannot be deleted.
Admins manage all Cloudessa features, authenticate against RADIUS servers
and access the full web interface. An Admin can create another Admin. An
Admin can be deleted by the Primary Admin.
Users can optionally manage their password through the Web UI, if
permitted by the administrator.
User Managers can use the Cloudessa RADIUS server for authentication, and
create, remove and manage RADIUS users.
Guest Users are granted temporary guest access to the RADIUS service
Creating and Managing Local Non-Admin Users
You can add a local user either directly from the Admin UI or you can import lists of
users via a CSV file.
To create a local user directly:
In the Web UI, select Users and Groups > Users.
Click Create User.
Enter the following information for each user:
Email Address (required) – used for notifications and password reset
Login (required) – RADIUS login name
First Name – user first name
Last Name – user last name
24 WWW.CLOUDESSA.COM Password – set password (or select Generate password to randomly
generate a password).
User can manage his password. If you leave this check box selected,
the user can us the Web interface to change and reset the password.
The same password is used for the Web interface and the RADIUS
server.
Show Password. If this is not checked, the password is hidden when
typed in.
Click Create New User.
Uploading Bulk User Information
To avoid manually adding individual users and data, you can import a comma
separated value (.csv) file.
Create a new .csv file, and then enter users in the following format:
o FIRSTNAME, LASTNAME, EMAIL, USERNAME, PASSWORD, GROUP.
From the Users main Web UI page, select Bulk Upload.
Select the .csv file from your local machine.
The user table is populated from the entries in the .csv file.
User: Manage User Tab
Use this tab to:
Change user info you entered when creating the user
View user role (Regular User, Admin, or User Manager)
Disable the user – if the user is disabled, she cannot use RADIUS
authentication
User: Google Auth Tab
Use this tab to
Enable two-factor authentication Google Authenticator
If the two-factor authentication is enabled,
WWW.CLOUDESSA.COM 25 A QR code is automatically generated and emailed to the user
The user needs to scan the QR code into the Google Authenticator
smartphone app
The user needs then to authenticate using the following credential:
permanent password + comma sign + Google Authenticator PIN
For example:
mypassword,123456
Show Google Auth Key option can be used to display the corresponding
Google Auth key, for smartphones that do not have camera to scan QR codes
Regenerate Code option can be used to regenerate the QR code
Verify Code button can be used to verify QR code. This is used to make sure
your smartphone app works correctly. If your smartphone has clock set
incorrectly the app will fail.
Note: for Windows Mobile, you need to download the opensource Authenticator+
app, which is maintained by Cloudessa in the Microsoft App Store.
User: Groups Tab
Use this tab to
Attach and remove this user from user groups
User: Attributes Tab
Use this tab to
Specify RADIUS attributes returned for this particular user
User: Advanced Tab
Use this tab to
Limit the number of devices this user can use on the network. This is counted
on a daily basis. For example if you set the value to 3, the user can at
26 WWW.CLOUDESSA.COMmaximum use 3 different devices within 24 hours. The devices are identified
by their MAC addresses
User Groups Overview
After you have created a new RADIUS server, you must specify the user groups that
can authenticate against the server.
Note: when the server is created the “All Users” group is attached to the server,
meaning that all users can authenticate against the server. To enable more fine-
grained access, you need to detach this group from the server, and then attach the
user groups that should have access to the server. For instance, if you only want
engineering employees to have access, you need to create Engineering group and
attach it to the server.
User groups can be internal (local) or external. All users in user groups who
attempt to authenticate against the RADIUS server must belong to either a local or
an external user group.
Local user groups consist of users that have been added to the local RADIUS
database, native to your instance of Cloudessa RADIUS. You add users in the Admin
UI under Users and Groups > Users.
External users consist of individuals in a data store from an external authentication
server database. External users are defined in an external user group.
If multiple external user groups are added to a virtual server, and a user attempts to
authenticate, all internal and external groups are attempted in sequence. If at least
one group includes the user, and authentication against this group succeeds, the
user is allowed to authenticate against the virtual server.
For an external user authentication attempt to succeed, at least one external group
must return success for authentication of the user.
You add external users from the Users and Groups > External User Groups page.
If a successful connection is made with your external authentication store, the
External Users table is populated with users. You can filter users by Login, Display
Name, Email or External Group Name.
WWW.CLOUDESSA.COM 27Creating and Managing Local User Groups
To create a local user group:
In the Web UI, select Users and Groups > User Groups.
Click Create User Group.
Enter the following information for each grouo:
Name (required) – group name
Description – group description
Service Type (required) – WiFi, VPN, SSH, Local Login, or Other
Click Create User Group.
User Group: Manage Group Tab
Use this tab to
Edit group description and service type
User Group: VLAN Tab
Use this tab to
Place all users on in this group on a particular VLAN. Click Enable VLAN
Tag and set the VLAN ID attribute. This RADIUS attribute will be returned by
the RADIUS server for this group. The wireless access point or the Ethernet
switch will then place the user device on the VLAN specified by the attribute.
In this way you can place different user groups on different VLANs.
Note: Permissible VLAN numbers are 0 – 4095.
User Group: Users Tab
Use this tab to
Add and remove users from this group
28 WWW.CLOUDESSA.COMUser Group: IP Pool Tab
This advanced feature can be used to assign IP addresses to the user device from the
pool of available addresses by allocating an IP address and returning the IP address
in the RADIUS attribute. When the NAS server sends Accounting-Stop message, the
IP address is released back to the pool.
Use this tab to
Manage pools of IP addresses that are assigned to this user group. Each IP
address pool is specified by the Range Start and Range End IP addresses.
Click on “Add IP Pool” to add an IP Address Pool
User Group: Attributes Tab
Use this tab to
Specify RADIUS attributes returned for all users in this group
Creating and Managing External User Groups
External user groups are those that you have created based on an external
authentication data store. Supported external user stores include:
Active Directory
Google Apps (ensure that users are registered with Google Apps)
LDAP
Databases: Oracle, MS SQL Server, DB2, MAXDB, Sybase, MySQL, PostgreSQL
Web Services: Cobot API
To create an external user group:
In the Web UI, select Users and Groups > External User Groups.
Click Create Ext User Group.
Define a Name for the external user group.
Select a Database server type and provide the required information
to make a connection with the external data store
WWW.CLOUDESSA.COM 29 Click Test Connection – this will allow you to make sure that the
connection is enabled and works
Click Create Group
Ext User Group: Manage Group Tab
Use this tab to
Edit group description and service type
Ext User Group: VLAN Tab
Use this tab to
Place all users on in this group on a particular VLAN. Click Enable VLAN
Tag and set the VLAN ID attribute. This RADIUS attribute will be returned by
the RADIUS server for this group. The wireless access point or the Ethernet
switch will then place the user device on the VLAN specified by the attribute.
In this way you can place different user groups on different VLANs.
Note: Permissible VLAN numbers are 0 – 4095.
Ext User Group: Users Tab
Use this tab to
Add and remove users from this group
Ext User Group: IP Pool Tab
This advanced feature can be used to assign IP addresses to the user device from the
pool of available addresses by allocating an IP address and returning the IP address
in the RADIUS attribute. When the NAS server sends Accounting-Stop message, the
IP address is released back to the pool.
Use this tab to
30 WWW.CLOUDESSA.COM Manage pools of IP addresses that are assigned to this user group. Each IP
address pool is specified by the Range Start and Range End IP addresses.
Click on “Add IP Pool” to add an IP Address Pool
Ext User Group: Attributes Tab
Use this tab to
Specify RADIUS attributes returned for all users in this group
Viewing External Users
Cloudessa pulls user info from the external user stores and makes external users
visible in the Cloudessa UI. To view external users, click Users&Groups->External
Users.
You can also use this tab to set a Google Authenticator Two-Factor QR code for the
external user. To do this, select the user, and then enable Google Authenticator in
the Google Authenticator tab.
Creating and Managing Devices and Device Groups
Devices and device groups are used to provide authentication using MAC-based
authentication protocol (MAB). Each device is specified by its MAC address.
Creating and Managing Devices
To create a device:
In the Web UI, select Devices and Groups > Devices.
Click Create Device.
Enter the following information for each device:
Name (required) – device name
Description – device description
MAC address (required) – MAC address as XX:XX:XX:XX:XX
WWW.CLOUDESSA.COM 31 Click Create Device.
Once the device is created, you can use Groups tab to add it to Device Groups, as
well as Attributes tab to specify RADIUS attributes returned for this device.
Creating and Managing Device Groups
To create a group of devices:
In the Web UI, select Devices and Groups > Device Groups.
Click Create Device Group.
Enter the following information for each device:
Name (required) – group name
Description – group description
Click Create Device Group.
Once the device is created, you can use Devices tab to add devices to this group, as
well as Attributes tab to specify RADIUS attributes returned for this device group.
Creating and Managing External Device Groups
Devices and device groups are used to provide authentication using MSISDN
protocol. The device information is stored in an external SQL database and
Cloudessa establishes a connection to this database.
Before you create an external device group, ensure that your database is installed
and operating.
Cloudessa supports the following databases:
Oracle DB
MS SQL Server
DB2
MAXDB
Sybase
MySQL
PostgreSQL
32 WWW.CLOUDESSA.COMTo create an external device group on Cloudessa RADIUS:
1. In the Web UI, select Devices and Groups > External Device Groups.
2. Click Create Device Group.
3. Select the type of database that currently exists in your network.
4. Enter the Group Name and the required information (*) to enable the
database to communicate with the RADIUS server.
5. Click Test Connection. If the RADIUS server and the database can
communicate, click Next > and configure Device config mapping details.
6. In Device config mapping, provide the following data:
Table Name
Field Name for Calling Station ID (ID, username or password)
Field Name for Framed IP Address (ID, username or password)
Framed Network Mask
7. Click Finish.
8. Select a virtual RADIUS server that you have created.
9. Click Device Groups.
10. Click Add Group, and select the device group that you configured.
You can add RADIUS attributes, or change the connection password by using
the tabs when you select the device group.
Using IP Address Pools
IP address pools are used to assign IP addresses to devices that authenticate against
the RADIUS server.
When you define an IP address pool, the RADIUS server allocates addresses from the
range you specify.
IP address allocation is part of the authorization process, and is done after
authentication has succeeded.
WWW.CLOUDESSA.COM 33You can also read