Edge Security Pack (ESP) - Feature Description UPDATED: 04 December 2020 - Kemp Technologies
←
→
Page content transcription
If your browser does not render page correctly, please read the page content below
Edge Security Pack (ESP)
Feature Description

UPDATED: 04 December 2020
Edge Security Pack (ESP)

     Copyright Notices

     Copyright © 2002-2020 Kemp Technologies, Inc. All rights reserved. Kemp Technologies and the
     Kemp Technologies logo are registered trademarks of Kemp Technologies, Inc.

     Kemp Technologies, Inc. reserves all ownership rights for the LoadMaster and Kemp 360 product line
     including software and documentation.

     Used, under license, U.S. Patent Nos. 6,473,802, 6,374,300, 8,392,563, 8,103,770, 7,831,712, 7,606,912,
     7,346,695, 7,287,084 and 6,970,933

     kemp.ax                                2                Copyright 2002-2020, Kemp Technologies, All Rights Reserved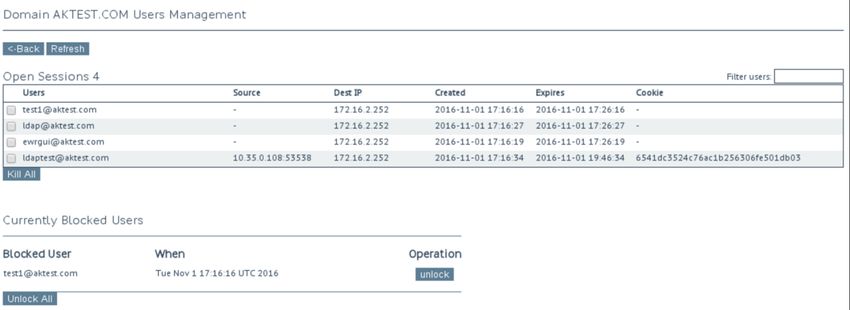
Edge Security Pack (ESP)

     Table of Contents
        1 Introduction                                                                                                  5

           1.1 Related Firmware Version                                                                                     5

        2 The LoadMaster Edge Security Pack (ESP)                                                                       6

           2.1 End Point Authentication for Pre-Auth                                                                        7

               2.1.1 Persistent Logging and Reporting for User Logging                                                      7

               2.1.2 Single Sign-On Across Virtual Services                                                                 7

               2.1.3 LDAP Authentication from the LoadMaster to the Active Directory                                        8

               2.1.4 Basic Authentication Communication from a Client to the LoadMaster                                     8

               2.1.5 Dual-factor Authentication                                                                             8

        3 ESP Web User Interface (WUI) Options                                                                          9

           3.1 ESP Options                                                                                                  9

               3.1.1 SMTP Virtual Services and ESP                                                                     28

           3.2 LDAP Configuration                                                                                      28

           3.3 Manage SSO Options                                                                                      31

               3.3.1 Single Sign On Domains                                                                            31

                 3.3.1.1 Client Side (Inbound) SSO Domains                                                             32

                   3.3.1.1.1 Client Side (Inbound) SAML SSO Domains                                                    39

                   3.3.1.1.2 Sessions                                                                                  41

                 3.3.1.2 Server Side (Outbound) SSO Domains                                                            43

           3.4 Backup/Restore                                                                                          45

           3.5 Debug Options                                                                                           48

     kemp.ax                                  3               Copyright 2002-2020, Kemp Technologies, All Rights Reserved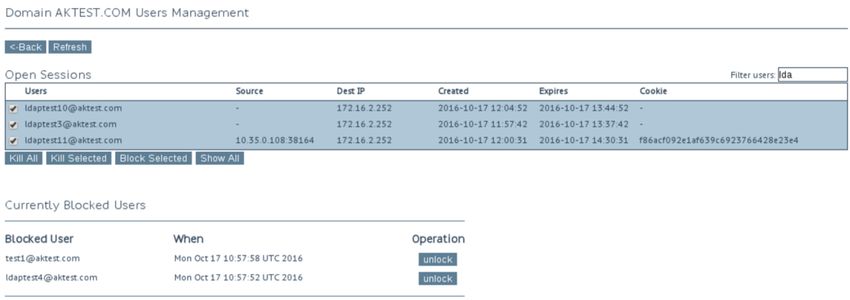
Edge Security Pack (ESP)

               3.5.1 Enable SSOMGR Debug Traces                                                                     48

               3.5.2 Flush SSO Authentication Cache                                                                 48

               3.5.3 SSO LDAP Server Timeout                                                                        48

               3.5.4 Linear SSO Log Files                                                                           49

           3.6 Miscellaneous Options                                                                                49

               3.6.1 L7 Configuration                                                                               49

               3.6.2 Network Options                                                                                50

           3.7 Logging Options                                                                                      50

        4 Setting up a Virtual Service with ESP                                                                     54

           4.1 Create a Single Sign-On (SSO) Domain                                                                 54

           4.2 Create a Virtual Service                                                                             57

           4.3 Configure a Simple Mail Transfer Protocol (SMTP) ESP Service                                         63

        5 Troubleshooting                                                                                           65

        6 Support for Additional Security Headers Added                                                             66

        References                                                                                                  67

        Last Updated Date                                                                                           68

     kemp.ax                                4              Copyright 2002-2020, Kemp Technologies, All Rights Reserved
Edge Security Pack (ESP)
1 Introduction

       1 Introduction
       Kemp has built a large and loyal install base across a range of market segments, applications and
       geographies. These include a large number of customers who have deployed Kemp’s LoadMaster
       load balancers in conjunction with Microsoft workloads. As a part of the solution for Microsoft
       workloads, a key component has historically been Microsoft’s Forefront Threat Management
       Gateway (TMG). One key feature of TMG was that it offered customers a way to publish and protect
       workload servers such as Exchange Client Access Servers, especially in Internet-facing deployments
       where a clean separation between critical infrastructure and the public internet is essential.

       Since the TMG product is no longer supported, Kemp has extended the LoadMaster platform with
       the Edge Security Pack (ESP), to replace and enhance the functionality that was available in TMG.
       This separately available feature pack builds on the existing core technologies that have enabled
       successful joint deployments of TMG and LoadMaster in internet-facing Microsoft workloads.

                      ESP functionality is only available on certain subscriptions.
                      Please contact a Kemp representative if needed.

       1.1 Related Firmware Version
       Published with LMOS version 7.2.48.3 LTS. This document has not required changes since 7.2.48.3
       LTS. However, the content is in sync with the latest LoadMaster LTS firmware.

       kemp.ax                              5                Copyright 2002-2020, Kemp Technologies, All Rights Reserved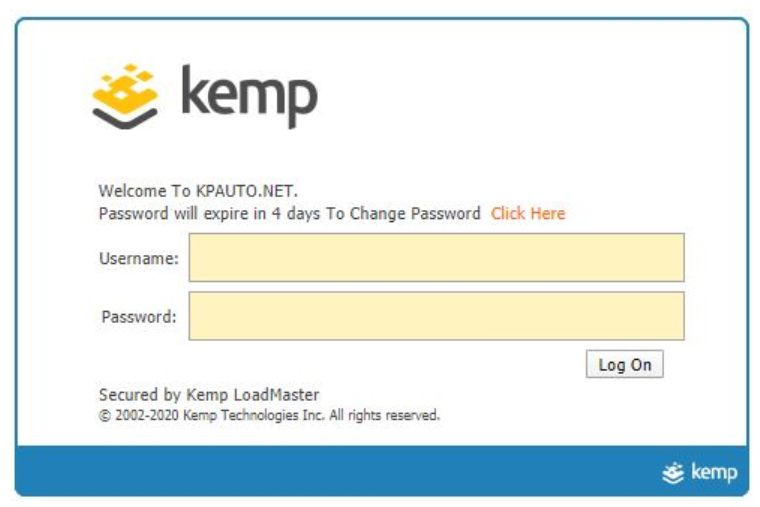
Edge Security Pack (ESP)
2 The LoadMaster Edge Security Pack (ESP)

       2 The LoadMaster Edge
       Security Pack (ESP)
       The Kemp LoadMaster along with the Edge Security Pack (ESP) delivers a solution to customers who
       would have previously deployed TMG to publish their Microsoft applications.

       The basic flow for ESP authentication is shown in the diagram above:

           l    Traffic from the client goes to the LoadMaster.

           l    The LoadMaster may present an authentication form asking the user to enter credentials.

      kemp.ax                                   6                 Copyright 2002-2020, Kemp Technologies, All Rights Reserved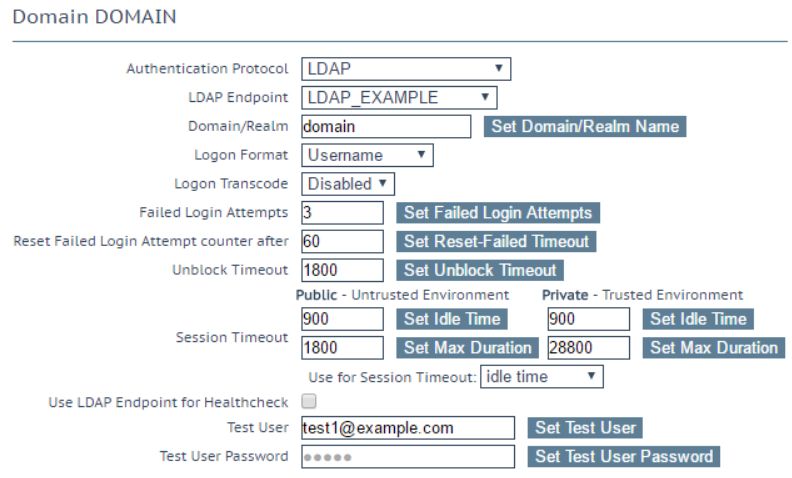
Edge Security Pack (ESP)
2 The LoadMaster Edge Security Pack (ESP)

           l    The Authentication Provider server then allows or rejects the request.

           l    If successful, the traffic is passed to the Real Servers.

       The Kemp ESP offers the following key features:

           l    End point authentication for pre-authentication

           l    Persistent logging and reporting for user logging

           l    Single Sign-On (SSO) across Virtual Services

           l    LDAP Authentication from the LoadMaster to the Active Directory

           l    Basic authentication communication from a client to the LoadMaster

           l    Dual-factor authentication

                         A reboot is required after upgrading older versions of the
                         LoadMaster to an ESP license.

       2.1 End Point Authentication for Pre-Auth
       Clients who are trying to access Virtual Services on the LoadMaster will have to provide
       Authentication information which is used by the ESP to validate the clients’ right to access the
       service. In the event of success, the client is permitted to access the service, and in the event of
       failure the client is blocked until valid credentials are provided.

       2.1.1 Persistent Logging and Reporting for User Logging
       When clients try to access a service, an appropriate message is logged to allow monitoring by the
       administrator.

       2.1.2 Single Sign-On Across Virtual Services
       The LoadMaster is designed to handle multiple Virtual Services supporting unique workloads.
       Access to these services can be authenticated through a single point of contact, by associating them
       with the same Single Sign-On (SSO) Domain.

                         The Virtual Services need to be on the same domain for this to
                         work, for example ecp.example.com and www.example.com.

       SSO in ESP will enable clients to only enter the authentication information when accessing the first
       Virtual Service and then this same information is used to access other services associated with the

      kemp.ax                                     7                 Copyright 2002-2020, Kemp Technologies, All Rights Reserved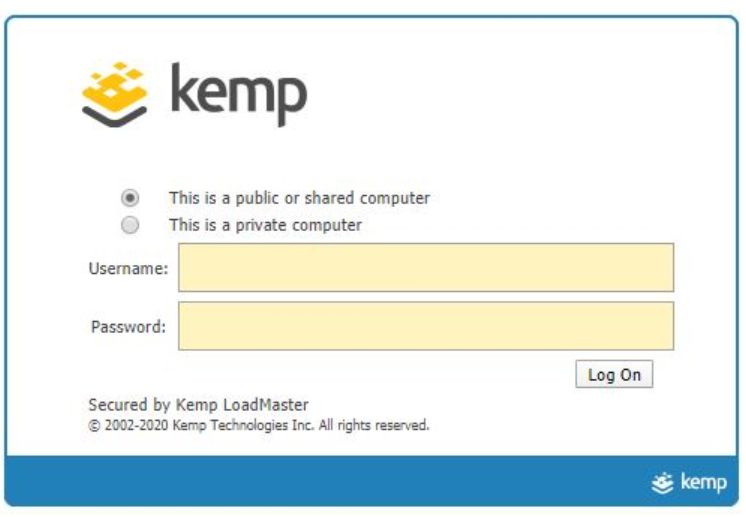
Edge Security Pack (ESP)
2 The LoadMaster Edge Security Pack (ESP)

       Single Sign-On Domain. Therefore, a client accessing Exchange will also be able to access
       SharePoint and other workloads if they are associated with the same Single Sign-On Domain.

       2.1.3 LDAP Authentication from the LoadMaster to the Active Directory
       Active Directory is the standard Authentication Provider for Microsoft workloads. LoadMaster will
       support the key connection types between the LoadMaster and the Active Directory.

                      For instructions on how to set up the server-side configuration,
                      please refer to the relevant vendor’s documentation.

       2.1.4 Basic Authentication Communication from a Client to the LoadMaster
       LoadMaster with ESP currently supports basic and form-based authentication between the client
       and the LoadMaster, providing clients with an optimum authentication experience.

       Large and small businesses are deploying large numbers of internet-facing applications to support
       ever expanding business requirements. This rapidly growing number of servers needs to be scalable
       and highly reliable. Above all, the access to these servers and services needs to be secure. With the
       addition of ESP, the Kemp LoadMaster will continue to deliver on customer security requirements
       for internet facing applications in a world without Microsoft Forefront TMG, while continuing to
       address requirements for feature-rich and cost-effective scalability and high reliability.

                      For instructions on how to set up the server-side configuration,
                      please refer to the relevant vendor’s documentation.

       2.1.5 Dual-factor Authentication
       Some authentication mechanisms assume a dual-factor approach where both the Active Directory
       and a secondary mechanism are used in sequence. For these, the form includes the username,
       password and also a passcode which is checked after the username and password.

      kemp.ax                                8                Copyright 2002-2020, Kemp Technologies, All Rights Reserved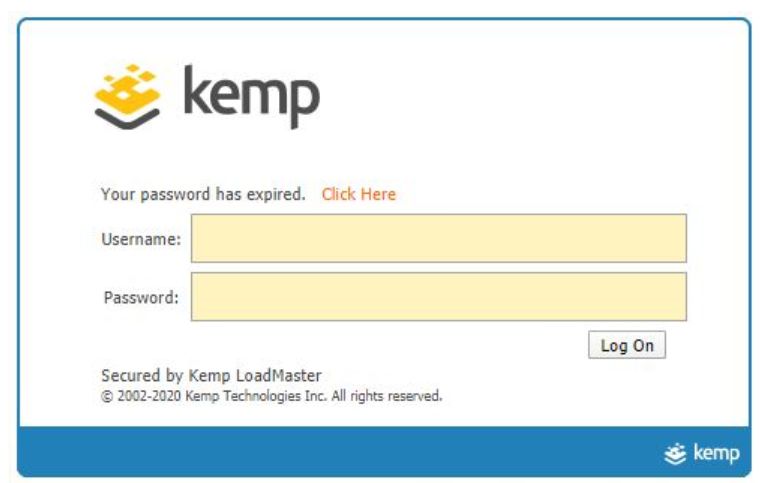
Edge Security Pack (ESP)
3 ESP Web User Interface (WUI) Options

       3 ESP Web User Interface
       (WUI) Options
       The sections below describe the ESP WUI Options. These sections refer to various different sections
       of the LoadMaster WUI. To log in to the LoadMaster WUI, navigate to https:// in a
       web browser and enter credentials.

       3.1 ESP Options
       This section refers to the ESP Options section of the Virtual Service modify screen. To get to this
       section – in the LoadMaster WUI go to Virtual Services > View/Modify Services, click Modify on
       the relevant Virtual Service and then expand the ESP Options section. The ESP Options are also
       available for SubVSes.

       The ESP feature must be enabled before the options can be configured. To enable the ESP function,
       please select the Enable ESP checkbox.

       The full ESP Options will appear.

                      The ESP feature can only be enabled if the Virtual Service is an
                      HTTP, HTTPS, or SMTP Virtual Service.

      kemp.ax                                9                Copyright 2002-2020, Kemp Technologies, All Rights Reserved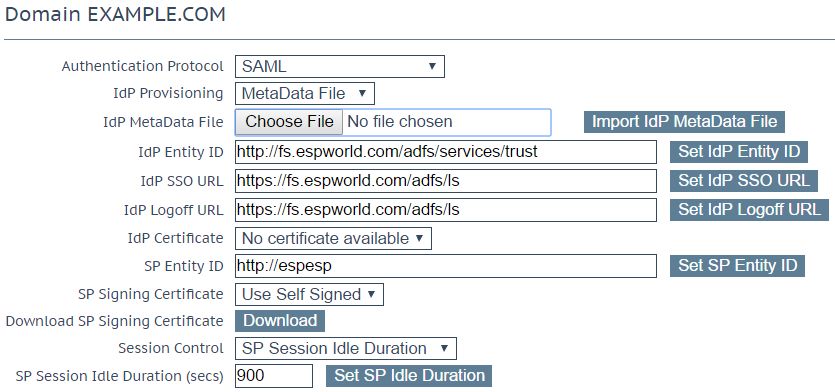
Edge Security Pack (ESP)
3 ESP Web User Interface (WUI) Options

       Enable ESP

       Enable or disable the ESP feature set by selecting or deselecting the Enable ESP checkbox.

       ESP Logging

       There are three types of logs stored in relation to the ESP feature. Each of these logs can be enabled
       or disabled by selecting or deselecting the relevant checkbox. The types of log include:

           User Access: logs recording all user logins. These logs include the full URL the client IP has
           requested, along with the Uniform Resource Identifier (URI).

           Security: logs recording all security alerts

           Connection: logs recording each connection

       Logs are persistent and can be accessed after a reboot of the LoadMaster. The ESP logs can be found
       by navigating to System Configuration > Logging Options > Extended Log Files in the main menu
       of the LoadMaster WUI.

      kemp.ax                                 10               Copyright 2002-2020, Kemp Technologies, All Rights Reserved
Edge Security Pack (ESP)
3 ESP Web User Interface (WUI) Options
When using SNMP monitoring of ESP-enabled Virtual Services
that were created using a template, ensure to monitor each
SubVS directly rather than relying on the master service. This is
because the Authentication Proxy sub-service will always be
marked as up and, as a consequence, so will the master
service.
Client Authentication Mode
Specifies how clients attempting to connect to the LoadMaster are authenticated. The following are
the types of methods available:
Delegate to Server: the authentication is delegated to the server
Basic Authentication: standard Basic Authentication is used
Form Based: clients must enter their user details within a form to be authenticated on the
LoadMaster
Please keep in mind - if UTF-8 encoding is utilized, the
maximum number of characters for the username or password
which is used to access an ESP-enabled Virtual Service is (in
theory) 30 characters each. However, if a combination of 1 and
2 byte characters are used, this limit could be increased. The
maximum limit is 63 characters each if the characters are all 1
byte encoded.
Client Certificate: clients must present the certificate which is verified against the issuing
authority
NTLM: NTLM credentials are based on data obtained during the interactive logon process and
consist of a domain name, a user name and a one-way hash of the user’s password
NTLM does not forward credentials to the LoadMaster when
Windows 10 Credential Guard is enabled.
SAML: The LoadMaster supports SAML, playing the role of a SAML service provider. The service
provider provides secure, gated access to a resource.
kemp.ax 11 Copyright 2002-2020, Kemp Technologies, All Rights ReservedEdge Security Pack (ESP)
3 ESP Web User Interface (WUI) Options
The remaining fields in the ESP Options section will change
based on what is selected as the Client Authentication Mode.
SSO Domain
Select the Single Sign-On (SSO) Domain within which the Virtual Service is included.
Please refer to the Create a Single Sign-On (SSO) Domain section for further information on
configuring SSO Domains. An SSO Domain must be configured to correctly configure the ESP
feature.
Only SSO domains with the Configuration type of Inbound
Configuration are shown as options in this SSO Domain field.
Alternative SSO Domains
Many organizations use extranets to share information with customers and partners. It is likely that
extranet portals will have users from two or more Active Directory domains. Rather than
authenticating users from individual domains one at a time, assigning Alternative SSO Domains
gives the ability to simultaneously authenticate users from two or more domains using one Virtual
Service.
This option appears only when more than one domain has
been configured and when the Authentication Protocol for the
SSO domains are set to LDAP.
Please refer to the Create a Single Sign-On (SSO) Domain section for further information on
configuring SSO Domains.
Before configuring the ESP Options to use Alternative SSO Domains ensure that, in the SSL
Properties section, the Enabled and Reencrypt tick boxes are selected.
kemp.ax 12 Copyright 2002-2020, Kemp Technologies, All Rights ReservedEdge Security Pack (ESP)
3 ESP Web User Interface (WUI) Options
The domain name which appears in the SSO Domain drop-down list is the default domain. This is
also the domain which is used if only one is configured.
Previously configured alternative domains appear in the Available Domain(s) list.
To assign alternative SSO Domains:
1. Highlight each of the domains you wish to assign and click the > button. An assigned
domain is a domain which can be authenticated using a particular Virtual Service. All
domains which appear as available may be assigned to a Virtual Service.
2. Click the Set Alternative SSO Domains button to confirm the updated list of Assigned
Domain(s).
3. Choose Basic Authentication from the Server Authentication Mode drop-down list.
When logging in to a domain using the ESP form, users should
enter the name of the SSO Domain if an alternative domain
needs to be accessed. If no domain name is entered in the
username, users are, by default, logged on the domain entered
in the default SSO Domain drop-down list.
To view the status of the Virtual Services, click Virtual Services and View/Modify Services.
A list of the Virtual Services displays showing the current status of each service.
kemp.ax 13 Copyright 2002-2020, Kemp Technologies, All Rights ReservedEdge Security Pack (ESP)
3 ESP Web User Interface (WUI) Options
If alternative domains are assigned and there is an issue with a particular domain, the affected
domain name is indicated in the Status column.
Allowed Virtual Hosts
The Virtual Service will only be allowed access to specified virtual hosts. Any virtual hosts that are
not specified are blocked.
Enter the virtual host name(s) in the Allowed Virtual Hosts field and click the Set Allowed Virtual
Hosts button to specify the allowed virtual hosts. Multiple, space-separated host names can be
entered here.
Multiple domains may be specified within the text box allowing many domains to be associated
with the SSO Domain.
The use of regular expressions is allowed within this text box. The LoadMaster supports Shell
regular expressions in this field, where * is a wild card and ? is a single character. An example is
*.example.com which indicates all sub-domains under example.com.
If this text box is left blank, the Virtual Service is blocked.
If the Virtual Service IP address is entered in the Allowed
Virtual Hosts field, the login process will fail. For testing
purposes, please modify your Hosts file if a proper DNS entry
cannot be made.
When using the Permitted Groups field in ESP Options, you
need to ensure that the SSO domain set here is the directory
for the permitted groups. For example, if the SSO Domain is
set to webmail.example and webmail is not the directory for
the permitted groups within example.com, it will not work.
Instead, the SSO Domain needs to be set to .example.com.
Allowed Virtual Directories
The Virtual Service will only be allowed access to the specified virtual directories, within the
allowed virtual hosts. Any virtual directories that are not specified are blocked.
Enter the virtual directory name(s) in the Allowed Virtual Directories text box and click the Set
Allowed Virtual Directories button to specify the allowed virtual directories. Multiple space-
separated names can be entered here.
The use of Shell regular expressions is allowed within this text box.
kemp.ax 14 Copyright 2002-2020, Kemp Technologies, All Rights ReservedEdge Security Pack (ESP)
3 ESP Web User Interface (WUI) Options
Pre-Authorization Excluded Directories
Any virtual directories specified within this field will not be pre-authorized on this Virtual Service
and are passed directly to the relevant Real Servers. Multiple space-separated directories can be
entered here.
The use of Shell regular expressions is allowed within this text box.
Permitted Groups
Specify the groups that are allowed to access this Virtual Service. When set, if a user logs in to a
service published by this Virtual Service, the user must be a member of at least one of the groups
specified.
If a user attempts to log in and they are not a member of a permitted group, a message will appear
in the logs, similar to the example below:
Blocked access, user exampleuser primary group qa not in approved groups for
VS172.21.42.11
Multiple groups are supported per Virtual Service up to a maximum of 2048 characters in length.
Performance may be impacted if a large number of groups are entered. Groups entered in this field
are validated using a Lightweight Directory Access Protocol (LDAP) query.
Some guidelines about this field are as follows:
l All groups specified must be valid on the Active Directory behind the SSO domain associated
with the Virtual Service
l Multiple groups must be separated by a semi-colon
A space-separated list does not work because most groups
contain a space in the name, for example IT Users.
l Do not use the Domain Users group because it is a default primary group for new users.
l The authentication protocol of the SSO domain must be LDAP
l The groups should be specified by Common Name, not by fully distinguished name, for
example Test Group
l When using permitted groups in SubVSs, if you have groups called OWAGroup and
ECPGroup, for example, users in each group have access to each other's SubVS. This is due
to the single sign on nature of ESP.
kemp.ax 15 Copyright 2002-2020, Kemp Technologies, All Rights ReservedEdge Security Pack (ESP)
3 ESP Web User Interface (WUI) Options
l Permitted groups only work when the LDAP Endpoint has a username in the format
username@domain.com or just administrator/Admin (as long as it is an administrator
account), or if there is no username configured.
l Do not enter the same group name in both the Permitted Groups and Steering Groups
fields. This causes a conflict. When you specify a steering group, it is assumed to behave like
a permitted group, so you do not need to enter the same group in both the Permitted
Groups and Steering Groups fields.
Permitted Groups SID(s)
This field is the equivalent of the Permitted Groups field. If specifying permitted groups, you can
complete either the Permitted Groups field or the Permitted Groups SID(s) field (security
identifiers).
In the Permitted Group SID(s) field you can specify the Group SIDs that are allowed to access this
Virtual Service. After you type the groups, click Set Permitted Group SIDs.
This field allows a list of group SIDs of up to 64 bytes in length (192 characters in the format NN NN
NN).
Each group is separated by a semi-colon. Spaces are used to separate bytes in certain group SIDs.
Here is an example:
S-1-5-21-3763804817-1170992687-1336323834-1151
SIDs can be found by using the get-adgroup-Identity GroupName command.
Include Nested Groups
This field relates to the Permitted Groups setting. Enable this option to include nested groups in
the authentication attempt. If this option is disabled, only users in the top-level group are granted
access. If this option is enabled, users in both the top-level and first sub-level group are granted
access. There is a theoretical limit of approximately six nested groups.
Multi Domain Permitted Groups
In LoadMaster firmware version 7.2.52, a new check box was added to the ESP Options section of
the Virtual Service modify screen called Multi Domain Permitted Groups. For further details, refer
to the following article: Multi Domain Permitted Groups Option.
Steering Groups
Steering groups can be used to steer client traffic to individual Real Servers in a Virtual Service
based on the Active Directory (AD) group membership of users initiating client traffic. An example
kemp.ax 16 Copyright 2002-2020, Kemp Technologies, All Rights ReservedEdge Security Pack (ESP)
3 ESP Web User Interface (WUI) Options
scenario would be a Virtual Service which has four Real Servers. Two Real Servers could be
configured to have a primary association with Active Directory Group 1 and two Real Servers could
be configured to have a primary association with AD Group 2. When a user attempts to access the
Virtual Service, their group membership will be verified and the information used to steer their
request to the appropriate Real Servers. If the Real Servers selected based on group membership are
not available, the default behavior is to fall back to the assigned scheduling method for the Virtual
Service.
For further information, refer to the ESP Steering Groups Technical Note on the Kemp
Documentation Page.
Steering groups are not available if using Basic Authentication
or SAML authentication.
Enter the Active Directory group names that will be used for steering traffic in the Steering Groups
field and click Set Steering Groups.
Use a semi-colon to separate multiple group names. Multiple groups are supported per Virtual
Service up to a maximum of 2048 characters in length.
The steering group index number will correspond to the location of the group in this list.
Do not enter the same group name in both the Permitted Groups and Steering Groups fields. This
causes a conflict. When you specify a steering group, it is assumed to behave like a permitted group,
so you do not need to enter the same group in both the Permitted Groups and Steering Groups
fields.
SSO Image Set
This option is only available if Form Based is selected as the Client Authentication Mode. There is
an option for which form to use to gather the user’s Username and Password. There are three
default form options; Exchange, Blank and Dual Factor Authentication. English is the default
language for the image sets. There are also options to display the form and error messages in other
languages – Brazilian Portuguese and French Canadian.
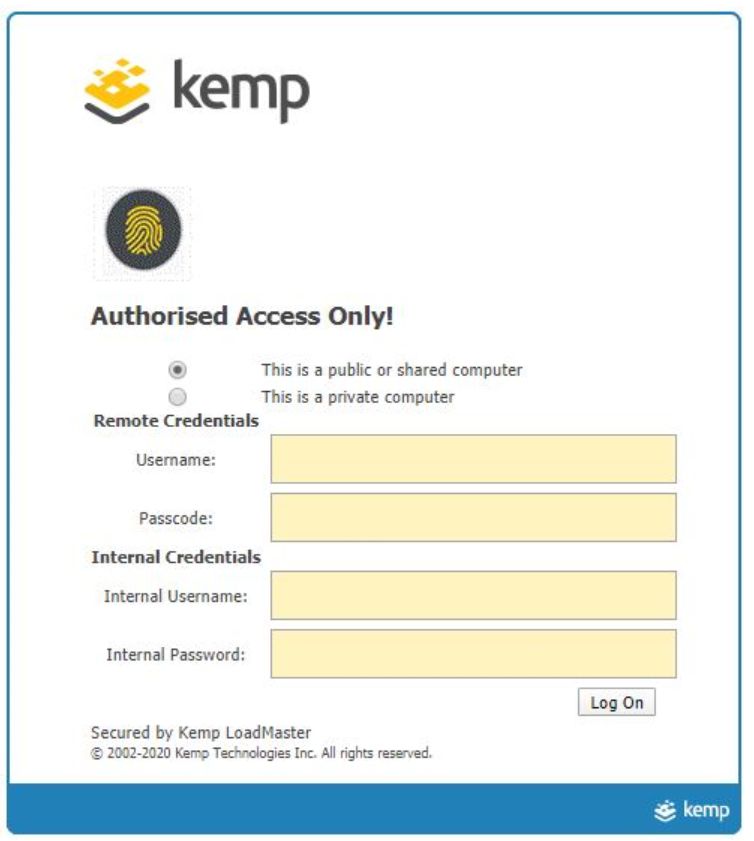
l Exchange Form
kemp.ax 17 Copyright 2002-2020, Kemp Technologies, All Rights ReservedEdge Security Pack (ESP)
3 ESP Web User Interface (WUI) Options
The Exchange Form contains the Kemp Logo.
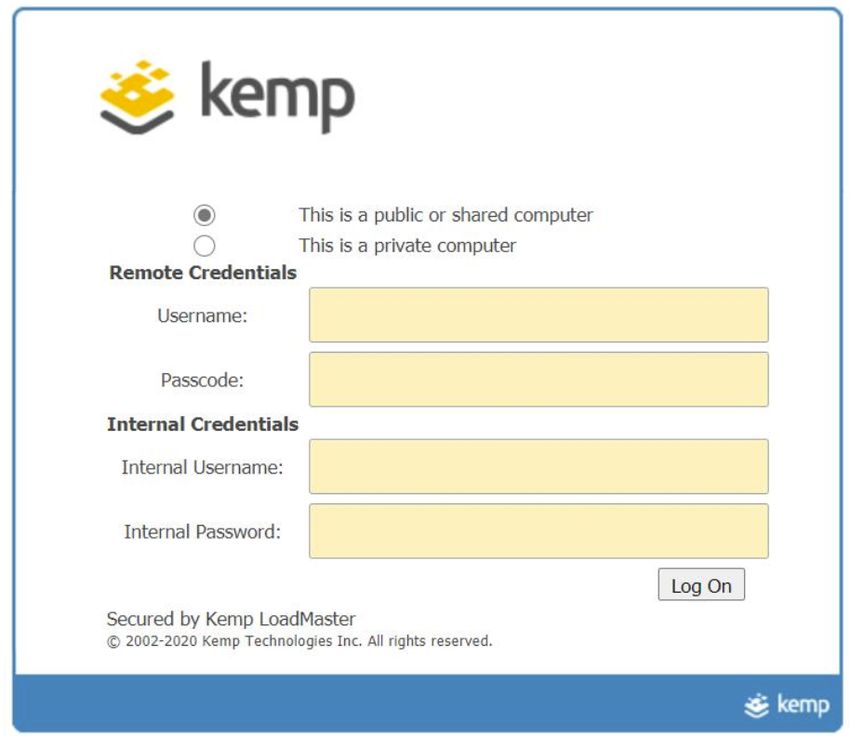
l Blank Form
The Blank Form does not contain the Kemp logo.
l Dual Factor Authentication
kemp.ax 18 Copyright 2002-2020, Kemp Technologies, All Rights ReservedEdge Security Pack (ESP)
3 ESP Web User Interface (WUI) Options
The Dual Factor Authentication form contains four fields - two for the remote credentials and two
for the internal credentials.
The Dual Factor Authentication image set should only be used
with the RADIUS and LDAP authentication protocol.
It is possible to upload a custom SSO image set. For more information, refer to the Custom
Authentication Form, Technical Note.
SSO Greeting Message
kemp.ax 19 Copyright 2002-2020, Kemp Technologies, All Rights ReservedEdge Security Pack (ESP)
3 ESP Web User Interface (WUI) Options
The login forms can be further customized by adding text (for example the Authorized Access Only!
text in the following screenshot). Enter the text to appear on the form within the SSO Greeting
Message text box and click the Set SSO Greeting Message button.
The SSO Greeting Message text box accepts HTML code, so you can type a reference to an external
image if you want. The message can have up to 255 characters. The message can contain almost any
character – it is inserted into a HTML form so the message can have any font that is available on the
page.
kemp.ax 20 Copyright 2002-2020, Kemp Technologies, All Rights ReservedEdge Security Pack (ESP)
3 ESP Web User Interface (WUI) Options
There are several characters that are not supported. These are
the grave accent character ( ` ) and the single quote (’).
If a grave accent character is used in the SSO Greeting
Message, the character will not display in the output, for
example a`b`c becomes abc. If a single quote is used, users
will not be able to log in.
Logoff String
This option is only available if Form Based or SAML is selected as the Client Authentication Mode.
Specify the string that the LoadMaster should use to detect a logout event. Normally this field
should be left blank. For OWA Virtual Services, the Logoff String should be set to /owa/logoff.owa;
or, in customized environments, a modified Logoff String needs to be specified in this text box.
Multiple logoff strings can be specified by using a space-separated list. You can enter up to 255
characters in this field.
If the URL to be matched contains sub-directories before the
specified string, the logoff string will not be matched.
Therefore, the LoadMaster will not log the user off.
Additional Authentication Header
This option is only available if SAML is selected as the Client Authentication Mode. Specify the
name of the HTTP header. This header is added to the HTTP request from the LoadMaster to the
Real Server and its value is set to the user ID for the authenticated session. You can enter up to 255
characters in this field.
Display Public/Private Option
kemp.ax 21 Copyright 2002-2020, Kemp Technologies, All Rights ReservedEdge Security Pack (ESP)
3 ESP Web User Interface (WUI) Options
Enabling this check box displays a public/private option on the login page. The session and idle
timeout depend on what option the user selects when logging in. If the user selects This is a
private computer, then their credentials are saved on the client computer. If the user is on a public
or shared computer, they should use the default option, which does not save their credentials
locally.
Disable Password Form
Enabling this option removes the password field from the login page. This may be needed when
password validation is not required, for example if using RSA SecurID authentication in a singular
fashion. By default, this option is disabled.
Use Session or Permanent Cookies
Three options are available to select for this field:
Session Cookies Only: This is the default and most secure option
Permanent Cookies only on Private Computers: Sends permanent cookies only on private
computers
Permanent Cookies Always: Sends permanent cookies in all situations
kemp.ax 22 Copyright 2002-2020, Kemp Technologies, All Rights ReservedEdge Security Pack (ESP)
3 ESP Web User Interface (WUI) Options
Permanent cookies only work with Internet Explorer (IE) and IE
must be set to accept Third Party Cookies and the site must be
added to the Trusted Sites.
The expiry time of a permanent cookie can be set by
configuring the Session Timeout fields in the modify
SSO screen. The maximum value is 7 days (604800 seconds).
Specify if the LoadMaster should send session or permanent cookies to the client browser when
logging in.
Permanent cookies should only be used when using single sign
on with services that have sessions spanning multiple
applications, such as SharePoint.
User Password Change URL
This is relevant when using client-side forms-based authentication and LDAP. Specify the URL that
users can use to change their password, for example
https://mail.kempqakcd.net/owa/auth/expiredpassword.aspx?url=/owa/auth.owa
If a user’s password has expired, or if they must reset their password, this URL and the User
Password Change Dialog Message is displayed on the login form.
This URL must be entered in the ESP Pre-Authorization Excluded Directories field - this is required
to bypass pre-authentication.
If using this expired password functionality in an Exchange 2010 environment:
The Pre-Authorization Excluded Directories must be set to /owa/auth.owa /owa/auth*
/owa/14.3.123.3**. 14.3.123.3 is the sub-path of the Exchange server that must be added to the
excluded directories.
When changing passwords, users cannot use a User Principal Name (UPN) (for example,
joebloggs@example.com) in the Domain\user name field in the Change Password window,
unless Exchange 2010 SP1 RU3 or later is deployed on the Client Access servers.
For further information, refer to the following Microsoft TechNet article:
https://technet.microsoft.com/en-us/library/bb684904(v=exchg.141).aspx
User Password Change Dialog Message
kemp.ax 23 Copyright 2002-2020, Kemp Technologies, All Rights ReservedEdge Security Pack (ESP)
3 ESP Web User Interface (WUI) Options
This text box is only visible if something is set for the User Password Change URL text box. Specify
the text to be displayed on the login form when the user must reset their password. Special
characters are not permitted in this field.
User Password Expiry Warning
By default, SSO users are notified about the number of days before they must change their
password. If you disable this option, the password expiry notification will not appear on the login
forms.
You can specify the number of days to show the warning before the password is expired. The default
value for this field is 15 days. The range is 1 to 30 days. This field is only visible if the Client
Authentication Mode is set to Form Based and the User Password Change URL is set.
kemp.ax 24 Copyright 2002-2020, Kemp Technologies, All Rights ReservedEdge Security Pack (ESP)
3 ESP Web User Interface (WUI) Options
The user is notified when the password has expired. The language of the warning text is based on
the SSO Image Set that is selected (English, French, or Portuguese).
Server Authentication Mode
Specifies how the LoadMaster is authenticated by the Real Servers. There are three types of methods
available:
None: no client authentication is required
Basic Authentication: standard Basic Authentication is used
KCD: Kerberos Constrained Delegation (KCD) is used. For further information, refer to the
Kerberos Constrained Delegation, Feature Description.
Server Token: On reception and verification of the SAML response, the LoadMaster requests a
long-lived token. The LoadMaster then builds a redirection URL with the token specified.
You can only select Server Token as the Server Authentication
Mode if SAML is selected as the Client Authentication Mode.
Form Based: can only be selected if the Client Authentication Mode is set to Form Based.
kemp.ax 25 Copyright 2002-2020, Kemp Technologies, All Rights ReservedEdge Security Pack (ESP)
3 ESP Web User Interface (WUI) Options
l When Form Based authentication is selected, the Form Authentication Path field appears.
l When the Form Authentication Path field is populated, the Form POST Format field
appears. The username and password from the client-side, form-based authentication is
injected into the form POST format to build the POST body.
This feature is predominantly used in Microsoft Exchange deployments and has only been tested
with Exchange 2013 and 2016. Therefore, the following strings do not need to be explicitly
configured for Exchange 2013/2016. They are used by default in the implementation:
- Form Authentication Path: /owa/auth.owa
- Form POST Format:
destination=%s#authRedirect=true&flags=4&forcedownlevel=0&use
rname=%s&password=%s&passwordText=&isUtf8=1
The Form POST Format field only becomes visible when the
Form Authentication Path is set.
If the deployment is not Exchange, Kemp recommends that the
settings are evaluated based on the required interaction with
the Real Server and subsequently set appropriately.
When choosing a specific Client Authentication Mode protocol, it is important to understand what
Server Authentication Mode protocols are compatible:
Client Authentication Mode Compatible Server Authentication Mode
Delegate to Server None
Basic Authentication Basic Authentication
Basic Authentication
KCD
Form Based
Form Based
None
KCD
NTLM
None
kemp.ax 26 Copyright 2002-2020, Kemp Technologies, All Rights ReservedEdge Security Pack (ESP)
3 ESP Web User Interface (WUI) Options
Client Authentication Mode Compatible Server Authentication Mode
Client Certificate KCD
SAML KCD
SAML None
SAML Server Token
Server Side configuration
This option is only visible when the Server Authentication
mode value is set to KCD. For further information, please refer
to the Kerberos Constrained Delegation, Feature Description.
Select the SSO domain for the server side configuration. Only SSO domains which have the
Configuration type set to Outbound Configuration are shown here.
Token Server FQDN
This option is only visible when the Server Authentication
mode value is set to Server Token.
Set the FQDN for the token server. When set, LoadMaster contacts the token server at the given
FQDN during sign-on and obtains a permanent access token from that token server. If this parameter
is unset, then LoadMaster obtains the token from the Real Server (as in previous releases).
Virtual Service Status
When View/Modify Services is clicked in the main menu, the Virtual Service status is displayed.
When the health check status is OK, the Status on the Virtual Services screen is set to Up.
When ESP is enabled, a new status is available; Security Down.
kemp.ax 27 Copyright 2002-2020, Kemp Technologies, All Rights ReservedEdge Security Pack (ESP)
3 ESP Web User Interface (WUI) Options
The LoadMaster will check the health status of the authentication server every 20 seconds. If the
authentication server cannot be reached, then the Virtual Service goes into a Security Down state
where no new users are allowed to access the Virtual Service. Existing connections will not be
affected until their individual connection timeouts expire.
3.1.1 SMTP Virtual Services and ESP
If an SMTP Virtual Service (with 25 as the port) is created, the ESP feature is enabled for the Virtual
Service when the Enable ESP checkbox is selected, but with a reduced set of options.
Enable ESP
Enable or disable the ESP feature set by selecting or deselecting the Enable ESP check box.
Connection Logging
Logging of connections can be enabled or disabled by selecting or deselecting the Connection
Logging check box. The ESP logs can be viewed and downloaded by going to System
Configuration > Logging Options > Extended Log Files.
Permitted Domains
All the permitted domains that are allowed to be received by this Virtual Service must be specified
here. For example, if the Virtual Service should receive SMTP traffic from john@kemp.com, then the
kemp.com domain must be specified in this field. When entering more than one domain, separate
them with a space.
The use of Shell regular expressions is allowed within this text box.
If this text box is blank, no domains are allowed and all mail is
stopped.
3.2 LDAP Configuration
To get to the LDAP Configuration screen, expand Certificates & Security and click LDAP
Configuration. This screen provides a management interface for LDAP endpoints. These LDAP
endpoints may be used in three different areas:
Health checks
kemp.ax 28 Copyright 2002-2020, Kemp Technologies, All Rights ReservedEdge Security Pack (ESP)
3 ESP Web User Interface (WUI) Options
SSO domains
WUI authentication
Any existing LDAP Endpoints are listed here, with an option to Modify and Delete. If an LDAP
endpoint is in use it cannot be deleted.
There is also an option to add a new LDAP endpoint. Enter a name for the endpoint and click Add.
Spaces and special characters are not permitted in the LDAP endpoint name.
LDAP Server(s)
Specify a space-separated list of LDAP servers to be used. Port numbers can also be specified if
required. If you have multiple domains and are using Permitted Groups, sometimes it is necessary
to include the Global Catalog port number, otherwise the Permitted Groups will fail. The default
port is 3628. For example, 10.110.20.23:3268.
LDAP Protocol
Select the transport protocol to use when communicating with the LDAP server.
kemp.ax 29 Copyright 2002-2020, Kemp Technologies, All Rights ReservedEdge Security Pack (ESP)
3 ESP Web User Interface (WUI) Options
If you create an SSO domain with the Authentication Protocol
set to Certificates, ensure to set the LDAP Protocol to LDAPS
in the LDAP endpoint.
Validation Interval
Specify how often the user should be revalidated with the LDAP server. Valid values range from 10
to 86400 seconds.
Referral Count
The LoadMaster offers beta functionality to support LDAP referral replies from Active Directory
Domain Controllers. If this is set to 0, referral support is not enabled. Set this field to a value
between 1 and 10 to enable referral chasing. The number specified will limit the number of hops
(referrals chased).
Multiple hops may increase authentication latency. There is a
performance impact that depends on the number and depth of
referrals required in your configuration.
You must have intimate knowledge of your Active Directory
structure to set the referral limit appropriately. The same
credentials are used for all lookups, and so on.
The use of Active Directory Global Catalog (GC) is the preferred
configuration as the primary means of resolution instead of
enabling LDAP referral chasing. A GC query can be used to
query the GC cache instead of relying on LDAP and the referral
process. Using Active Directory GC has little or no performance
drag on the LoadMaster. For steps on how to add/remove the
GC, refer to the following TechNet article:
https://technet.microsoft.com/en-us/library/cc755257
(v=ws.11).aspx
Server Timeout
Specify the LDAP server timeout in seconds. The default value is 5. Valid values range from 5 to 60.
Admin User
Enter the username of an administrator user in the format admin@domain.com or domain\user.
kemp.ax 30 Copyright 2002-2020, Kemp Technologies, All Rights ReservedEdge Security Pack (ESP)
3 ESP Web User Interface (WUI) Options
This account must be in the Domain Admins group.
Admin User Password
Enter the password for the specified administrator user.
3.3 Manage SSO Options
Before using the Edge Security Pack (ESP) the user must first set up a Single Sign-On (SSO) Domain
on the LoadMaster. The SSO Domain is a logical grouping of Virtual Services which are
authenticated by an LDAP server.
To get to the Manage SSO screen – in the main menu of the LoadMaster WUI, go to Virtual
Services > Manage SSO.
The maximum number of SSO domains that are allowed is 128.
Click the Manage SSO Domains menu option to open the Manage Single Sign On Options screen.
3.3.1 Single Sign On Domains
Two types of SSO domains can be created – client side and server side.
kemp.ax 31 Copyright 2002-2020, Kemp Technologies, All Rights ReservedEdge Security Pack (ESP)
3 ESP Web User Interface (WUI) Options
Client Side configurations allow you to set the Authentication Protocol to LDAP, RADIUS, RSA-
SecurID, Certificates, RADIUS and LDAP or RSA-SecurID and LDAP.
As of LoadMaster firmware version 7.2.52, RADIUS two-factor
and LDAP authentication is supported. For further details, refer
to the following article: RADIUS Two-Factor and LDAP
Authentication.
Server Side configurations allow you to set the Authentication Protocol exclusively to Kerberos
Constrained Delegation (KCD).
To add a new SSO Domain enter the name of the domain in the Name field and click the Add
button. The name entered here does not need to relate to the allowed hosts within the Single Sign
On Domain.
If the Domain/Realm field is not set, the domain Name set
when initially adding an SSO domain is used as the
Domain/Realm name.
3.3.1.1 Client Side (Inbound) SSO Domains
Authentication Protocol
kemp.ax 32 Copyright 2002-2020, Kemp Technologies, All Rights ReservedEdge Security Pack (ESP)
3 ESP Web User Interface (WUI) Options
This dropdown allows you to select the transport protocol used to communicate with the
authentication server. The options are:
l LDAP
l RADIUS
l RSA-SecurID
l Certificates
If you create an SSO domain with the Authentication Protocol
set to Certificates, ensure to set the LDAP Protocol to LDAPS
in the LDAP endpoint.
l RADIUS and LDAP
l RSA-SecurID and LDAP
The fields displayed on this screen will change depending on
the Authentication protocol selected.
LDAP Endpoint
Select the LDAP endpoint to use. For further information on LDAP endpoints, refer to the LDAP
Configuration section.
This option is only available if the Authentication Protocol is
set to LDAP, RADIUS and LDAP or RSA-SecurID and LDAP.
RADIUS/RSA-SecurID Server(s)
Type the IP address(es) of the server(s) which are used to authenticate the domain.
Multiple server addresses can be entered within this text box. Each entry must be separated by a
space.
Radius Shared Secret
The shared secret to be used between the RADIUS server and the LoadMaster (48 character limit).
This field is only available if the Authentication Protocol is set
to RADIUS or RADIUS and LDAP.
Send NAS Identifier
kemp.ax 33 Copyright 2002-2020, Kemp Technologies, All Rights ReservedEdge Security Pack (ESP)
3 ESP Web User Interface (WUI) Options
If this check box is disabled (default), a NAS identifier is not sent to the RADIUS server. If it is
enabled, a Network Access Server (NAS) identifier string is sent to the RADIUS server. By default, this
is the hostname. Alternatively, if a value is specified in the RADIUS NAS Identifier text box, this
value is used as the NAS identifier. If the NAS identifier cannot be added, the RADIUS access request
is still processed.
This field is only available if the Authentication Protocol is set
to RADIUS or RADIUS and LDAP.
Sending the NAS identifier serves two purposes:
l It helps to classify the device type that is sending the request as opposed to simply sending
the host IP address which makes troubleshooting and consuming logs easier.
l It enables customized authentication responses to be sent back from the server based on the
identifier.
RADIUS NAS Identifier
If the Send NAS Identifier check box is selected, the RADIUS NAS Identifier field is shown. When
specified, this value is used as the NAS identifier. Otherwise, the hostname is used as the NAS
identifier. If the NAS identifier cannot be added, the RADIUS access request is still processed.
This field is only available if the Authentication Protocol is set
to RADIUS or RADIUS and LDAP and the Send NAS Identifier
check box is enabled.
Check Certificate to User Mapping
This option is only available when the Authentication Protocol is set to Certificates. When this
option is enabled - in addition to checking the validity of the client certificate - the client certificate
will also be checked against the altSecurityIdentities (ASI) attribute of the user on the Active
Directory.
If this option is enabled and the check fails, the login attempt will fail. If this option is not enabled,
only a valid client certificate (with the username in the SubjectAltName (SAN)) is required to log in,
even if the altSecurityIdentities attribute for the user is not present or not matching.
For more information, refer to the Kerberos Constrained Delegation, Feature Description.
Allow fallback to check Common Name
Enabling this option allows a fallback to check the Common Name (CN) in the certificate when the
SAN is not available.
kemp.ax 34 Copyright 2002-2020, Kemp Technologies, All Rights ReservedEdge Security Pack (ESP)
3 ESP Web User Interface (WUI) Options
This field only appears when the Authentication Protocol is set
to Certificates.
Domain/Realm
The login domain to be used. This is also used with the logon format to construct the normalized
username, for example;
l Principalname: @
l Username: \
If the Domain/Realm field is not set, the Domain name set
when initially adding an SSO domain is used as the
Domain/Realm name.
RSA Authentication Manager Config File
This option is only available when the Authentication Protocol
is set to RSA-SecurID.
This file needs to be exported from the RSA Authentication Manager.
For more information on the RSA authentication method,
including how to configure it, refer to the RSA Two Factor
Authentication, Feature Description.
RSA Node Secret File
This option is only available when the Authentication Protocol
is set to RSA-SecurID.
A node secret must be generated and exported in the RSA Authentication Manager.
It is not possible to upload the RSA node secret file until the
RSA Authentication Manager configuration file is uploaded. The
node secret file is dependent on the configuration file.
Logon Format
kemp.ax 35 Copyright 2002-2020, Kemp Technologies, All Rights ReservedEdge Security Pack (ESP)
3 ESP Web User Interface (WUI) Options
This drop-down list allows you to specify the format of the login information that the client has to
enter.
The options available vary depending upon which
Authentication Protocol is selected.
Not Specified: The username will have no normalization applied to it - it is taken as it is typed.
Principalname: Selecting this as the Logon format means that the client does not need to enter
the domain when logging in, for example username@domain. The SSO domain added in the
corresponding text box is used as the domain in this case.
When using RADIUS as the Authentication protocol the value
in this SSO domain field must exactly match for the login to
work. It is case sensitive.
Username: Selecting this as the Logon format means that the client needs to enter the domain
and username, for example domain\username.
Username Only: Selecting this as the Logon Format means that the text entered is normalized to
the username only (the domain is removed).
The Username Only option is only available for the RADIUS
and RSA-SecurID protocols.
Logon Format (Phase 2 Real Server)
Specify the logon string format used to authenticate to the Real Server.
The Logon Format (Phase 2 Real Server) field only appears if the Authentication Protocol is set
to one of the following options:
l RADIUS
l RSA-SecurID
Logon Format (Phase 2 LDAP)
Specify the logon string format used to authenticate to LDAP.
The Logon Format (Phase 2 LDAP) field only appears if the Authentication Protocol is set to one
of the following options:
kemp.ax 36 Copyright 2002-2020, Kemp Technologies, All Rights ReservedEdge Security Pack (ESP)
3 ESP Web User Interface (WUI) Options
l RADIUS and LDAP
l RSA-SecurID and LDAP
The table below shows the expected normalization results (for LDAP only) from example
configurations:
Used for
Login Format Setting Realm Input Username Normalized User Used for BIND Result Result
BIND on Fail
Not Specified example test01 test01@EXAMPLE.COM test01@EXAMPLE.COM Success
Not Specified example test01@example.com test01@example.com test01@example.com Success
Not Specified example test01@example test01@example test01@example Success
Not Specified example example\test01 example\test01 example\test01 Success
Not Specified example example.com\test01 example.com\test01 example.com\test01 Fail test01@example Success
Principal Name example test01 test01@example test01@example Success
Principal Name example test01@example.com test01@example.com test01@example.com Success
Principal Name example test01@example test01@example test01@example Success
Principal Name example example\test01 example\test01 test01@example Success
Principal Name example example.com\test01 test01@example.com test01@example Success
Username example test01 example\test01 example\test01 Success
Username example test01@example.com example\test01 example\test02 Success
Username example test01@example example\test01 example\test01 Success
Username example example\test01 example\test01 example\test01 Success
Username example example.com\test01 example\test01 example\test01 Success
Not Specified None test01 test01@EXAMPLE.COM test01@EXAMPLE.COM Success
Not Specified None test01@example.com test01@example.com test01@example.com Success
Not Specified None test01@example test01@example test01@example Success
Not Specified None example\test01 example\test01 example\test01 Success
Not Specified None example.com\test01 example.com\test01 example.com\test01 Fail test01@EXAMPLE.COM Success
Principal Name None test01 test01@EXAMPLE.COM test01@EXAMPLE.COM Success
Principal Name None test01@example.com test01@example.com test01@example.com Success
Principal Name None test01@example test01@example test01@example Success
Principal Name None example\test01 example\test01 example\test01 Success
Principal Name None example.com\test01 test01@EXAMPLE.COM test01@EXAMPLE.COM Success
Username None test01 EXAMPLE.COM\test01 EXAMPLE.COM\test01 Fail test01@EXAMPLE.COM Success
Username None test01@example.com EXAMPLE.COM\test01 EXAMPLE.COM\test01 Fail test01@EXAMPLE.COM Success
kemp.ax 37 Copyright 2002-2020, Kemp Technologies, All Rights ReservedEdge Security Pack (ESP)
3 ESP Web User Interface (WUI) Options
Used for
Login Format Setting Realm Input Username Normalized User Used for BIND Result Result
BIND on Fail
Username None test01@example test01@example test01@example Success
Username None example\test01 example\test01 example\test01 Success
Username None example.com\test01 EXAMPLE.COM\test01 EXAMPLE.COM\test01 Fail test01@EXAMPLE.COM Success
Username Only None test01 test01 N/A Pass N/A N/A
Username Only None test01@example.com test01 N/A Pass N/A N/A
Username Only None test01@example test01 N/A Pass N/A N/A
Username Only None example\test01 test01 N/A Pass N/A N/A
Username Only None example.com\test01 test01 N/A Pass N/A N/A
Logon Transcode
Enable or disable the transcode of logon credentials, from ISO-8859-1 to UTF-8, when required.
If this option is disabled, log in using the format that the client dictates. If this option is enabled,
check if the client uses UTF-8. If the client does not use UTF-8, use ISO-8859-1.
Failed Login Attempts
The maximum number of consecutive failed login attempts before the user is locked out. Valid
values range from 0 to 99. Setting this to 0 means that users will never be locked out.
When a user is locked out, all existing logins for that user are
terminated, along with future logins.
Reset Failed Login Attempt Counter after
When this time (in seconds) has elapsed after a failed authentication attempt (without any new
attempts) the failed login attempts counter is reset to 0. Valid values for this text box range from 60
to 86400. This value must be less than the Unblock timeout value.
Unblock timeout
The time (in seconds) before a blocked account is automatically unblocked, that is, unblocked
without administrator intervention. Valid values for this text box range from 60 to 86400. This
value must be greater than the Reset Failed Login Attempt Counter after value.
Session timeout
kemp.ax 38 Copyright 2002-2020, Kemp Technologies, All Rights ReservedEdge Security Pack (ESP)
3 ESP Web User Interface (WUI) Options
The idle time and max duration values can be set here for trusted (private) and untrusted (public)
environments. The value that is used is dependent on whether the user selects public or private on
their login form. Also, either max duration or idle time can be specified as the value to use.
Idle time: The maximum idle time of the session in seconds, that is, idle timeout.
Max duration: The max duration of the session in seconds, that is, session timeout.
Valid values for these fields range from 60 to 604800 (seconds).
Use for Session Timeout: A switch to select the session timeout behaviour (max duration or idle
time).
The underlying network traffic may render the session active,
even if there is no obvious user interaction.
Use LDAP Endpoint for Healthcheck
Select this check box to use the LDAP endpoint administrator username and password for health
checking. If this is enabled, the Test User and Test User Password textboxes will not be available.
For more information on LDAP endpoints, refer to the LDAP Configuration section.
This option is only available for the following protocols; LDAP,
Certificates, RADIUS and LDAP and RSA-SecurID and LDAP.
Test User and Test User Password
In these two fields, enter credentials of a user account for your SSO Domain. The LoadMaster will
use this information in a health check of the Authentication Server. This health check is performed
every 20 seconds.
3.3.1.1.1 Client Side (Inbound) SAML SSO Domains
The fields vary when the Authentication Protocol is set to SAML. The SAML-specific fields are
described below.
kemp.ax 39 Copyright 2002-2020, Kemp Technologies, All Rights ReservedEdge Security Pack (ESP)
3 ESP Web User Interface (WUI) Options
Idp Provisioning
The Manual option allows you to manually input details into the IdP fields.
The MetaData File option allows you to upload an IdP MetaData File. This simplifies the
configuration of the IdP attributes, including the IdP Entity ID, IdP SSO URL and IdP Logoff URL.
The metadata file can be downloaded from the IdP.
IdP Metadata File
This field is only visible if the IdP Provisioning field is set to MetaData File. To upload the file -
click Browse, navigate to and select the relevant file and click Import IdP MetaData File.
IdP Entity ID
Specify the IdP entity identifier.
IdP SSO URL
Specify the IdP SSO URL.
IdP Logoff URL
Specify the IdP logoff URL.
IdP Certificate
The IdP Certificate is very important in terms of verification of the assertions that must be
contained in the SAML response that is received from the IdP. Without the certificate, verification
cannot proceed.
kemp.ax 40 Copyright 2002-2020, Kemp Technologies, All Rights ReservedEdge Security Pack (ESP)
3 ESP Web User Interface (WUI) Options
SP Entity ID
This is an identifier that is shared to enable the IdP to understand, accept and have knowledge of
the entity when request messages are sent from the LoadMaster. This must correlate to the identifier
of the relying party on the AD FS server.
SP Signing Certificate
It is optional to sign requests that are sent in the context of logon. Currently, the LoadMaster does
not sign those requests.
In the context of log off requests – it is mandatory and these requests must be signed. This is to
avoid any spoofing and to provide extra security in relation to log off functionality. This ensures
that users are not being hacked and not being logged off unnecessarily.
In the SP Signing Certificate drop-down list, you can choose to use a self-signed certificate or
third party certificate to perform the signing.
Download SP Signing Certificate
If using a self-signed certificate, click Download to download the certificate. This certificate must be
installed on the IdP server (for example AD FS) to be added to the relying party signature.
The AD FS server requires this certificate for use of the public key to verify the signatures that the
LoadMaster generates.
Session Control
The IdP Session Max Duration option does not appear to be usable when the IdP is AD FS. SAML
and the LoadMaster supports it if present in the Authentication Response.
SP Session Idle Duration
Specify the session idle duration (in seconds).
3.3.1.1.2 Sessions
kemp.ax 41 Copyright 2002-2020, Kemp Technologies, All Rights ReservedEdge Security Pack (ESP)
3 ESP Web User Interface (WUI) Options
Clicking the Sessions button, for a client-side SSO domain, opens a screen listing the current open
sessions on that domain.
You can filter the list by entering a search term in the Filter users text box.
The following information is provided about each session:
l Users: The username/domain of the client.
l Source: The client (host) IP address and source port.
l Dest IP: The destination IP address of the connection.
l Created: The date and time that the connection was created.
l Expires: The date and time that the connection expires.
l Cookie: The cookie used in the connection.
Clicking the Kill All button kills all open sessions (flushes the SSO cache).
kemp.ax 42 Copyright 2002-2020, Kemp Technologies, All Rights ReservedEdge Security Pack (ESP)
3 ESP Web User Interface (WUI) Options
Selecting one or more sessions provides some further options:
l Kill Selected
l Block Selected
l Show All
Logs are added to the audit log for every kill session operation. For example:
l Kill 'non-cookie' session log:
Nov 9 16:47:31 LM ssomgr: Deleted a session tester@aktest.com:- for domain AKTEST.COM
l Kill 'cookie' session log:
Nov 9 16:47:31 LM ssomgr: Deleted a session
ldaptest@aktest.com:420cf78373643b3c0171d95c757e7bf3 for domain AKTEST.COM
l Kill all domain sessions log:
Nov 9 16:48:46 LM ssomgr: Deleted all domain AKTEST.COM user sessions
Currently Blocked Users
This section displays a list of users who are currently blocked and it also shows the date and time
that the block occurred. It is possible to remove the block by clicking the unlock button in the
Operation drop-down list.
Different formats of the same username are treated as the
same username, for example administrator@kemptech.net,
kemptech\administrator and kemptech.net\administrator are
all treated as one username.
3.3.1.2 Server Side (Outbound) SSO Domains
kemp.ax 43 Copyright 2002-2020, Kemp Technologies, All Rights ReservedYou can also read