Acronis Cyber Cloud Version 20.08 - PARTNER'S GUIDE
←
→
Page content transcription
If your browser does not render page correctly, please read the page content below
Acronis Cyber Cloud
Version 20.08

PARTNER'S GUIDE       Revision: 8/28/2020
Table of contents
1 About this document .......................................................................................................4
2 About Acronis Cyber Cloud ...............................................................................................4
2.1 Offering items and quota management ....................................................................................4
2.1.1 Services, offerings, and offering items .......................................................................................................... 4
2.1.2 Managing Cyber Protection service editions for partners ........................................................................... 7
2.1.3 Switching Cyber Protection service editions for customers ........................................................................ 8
2.1.4 Enabling or disabling offering items .............................................................................................................. 9
2.1.5 Soft and hard quotas..................................................................................................................................... 10
2.1.6 Agent installer dependency on offering items............................................................................................ 15
2.2 User accounts and tenants ......................................................................................................16
2.3 Supported web browsers.........................................................................................................18
3 Using the management portal ........................................................................................ 18
3.1 Activating the administrator account ......................................................................................18
3.2 Accessing the management portal ..........................................................................................18
3.3 Navigation in the management portal ....................................................................................19
3.4 Accessing the services .............................................................................................................19
3.5 Creating a tenant .....................................................................................................................21
3.6 Disabling and enabling a tenant ..............................................................................................23
3.7 Deleting a tenant .....................................................................................................................23
3.8 Creating a user account ...........................................................................................................24
3.9 User roles available for each service .......................................................................................25
3.10 Changing the notification settings for a user...........................................................................27
3.11 Disabling and enabling a user account ....................................................................................27
3.12 Deleting a user account ...........................................................................................................28
3.13 Transferring ownership of a user account ...............................................................................28
3.14 Setting up two-factor authentication ......................................................................................29
3.14.1 Two-factor setup propagation across tenant levels ................................................................................... 30
3.14.2 Setting up two-factor authentication for your tenant ............................................................................... 31
3.14.3 Managing two-factor configuration for users ............................................................................................. 32
3.14.4 Resetting two-factor authentication in case of lost second-factor device ............................................... 33
3.14.5 Brute-force protection .................................................................................................................................. 33
3.15 Configuring upsell scenarios for your customers ....................................................................33
3.16 Managing locations and storage..............................................................................................35
3.16.1 Managing storage ......................................................................................................................................... 36
3.17 Configuring branding ...............................................................................................................36
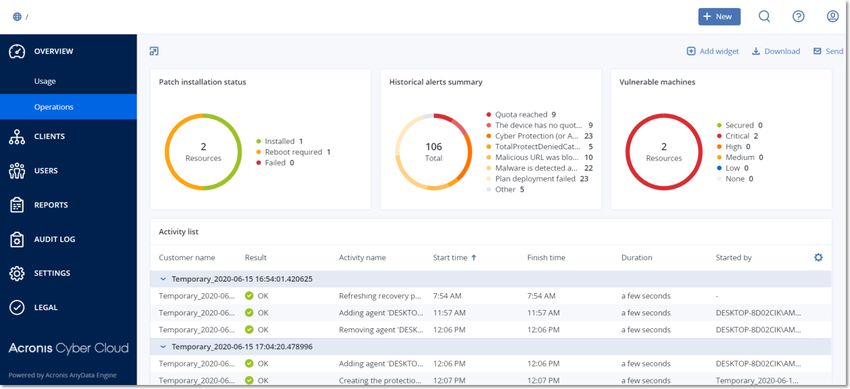
3.18 Monitoring ...............................................................................................................................38
3.18.1 Usage .............................................................................................................................................................. 39
3.18.2 Operations ..................................................................................................................................................... 39
3.19 Reporting .................................................................................................................................52
3.19.1 Usage .............................................................................................................................................................. 52
3.19.2 Operations ..................................................................................................................................................... 54
3.19.3 Time zones in reports.................................................................................................................................... 57
2 Copyright © Acronis International GmbH, 2003-2020
3.20 Audit log ...................................................................................................................................58
       4     Advanced scenarios ....................................................................................................... 60
    4.1      Moving a tenant to another tenant .........................................................................................60
    4.2      Converting a partner tenant to a folder tenant and vice versa ...............................................60
    4.3      Limiting access to the web interface .......................................................................................61
    4.4      Limiting access to your tenant .................................................................................................61
    4.5      Integration with third-party systems .......................................................................................62
       4.5.1       Setting up an Acronis Cyber Cloud extension ............................................................................................. 62
       4.5.2       Managing API clients ..................................................................................................................................... 62

3                                                                                           Copyright © Acronis International GmbH, 2003-2020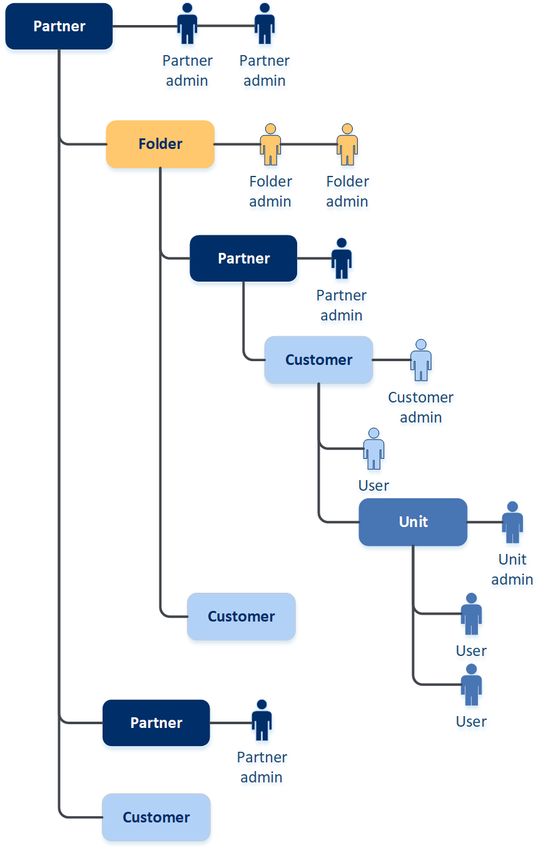
1 About this document This document is intended for partner administrators who want to use Acronis Cyber Cloud to provide services to their clients. This document describes how to set up and manage the services available in Acronis Cyber Cloud. 2 About Acronis Cyber Cloud Acronis Cyber Cloud is a cloud platform that enables service providers, resellers, and distributors to deliver data protection services to their partners and customers. The services are provided at the partner level, down to the customer company level and the end-user level. The services management is available through web applications called the service consoles. The tenant and user account management is available through a web application called the management portal. The management portal enables administrators to: Monitor the service usage and access the service consoles Manage tenants Manage user accounts Configure services and quotas for tenants Manage storage Manage branding Generate reports about the service usage 2.1 Offering items and quota management This section describes the following: What are services, offerings, and offering items? How are offering items enabled or disabled? What are the soft and hard quotas? When can the hard quota be exceeded? What is backup quota transformation? How does the offering item availability affect the installer availability in the service console? 2.1.1 Services, offerings, and offering items Services The following services are available in Acronis Cyber Cloud: Cyber Protection File Sync & Share Cyber Infrastructure SPLA 4 Copyright © Acronis International GmbH, 2003-2020
Notary
Physical Data Shipping
You can define which of these services will be available to your partners and customers by enabling
or disabling them.
Offerings and offering items
Acronis Cyber Cloud enables you to customize the offering (the set of services and service features,
called offering items) that you deliver to your customers and partners.
The offering defines which services and functionality will be available in the management portal and
the service consoles to the partners, customers, and their end users. All functionality that is excluded
from the offering will be hidden from them.
To further refine their offerings, you can define quotas for the specific offering items.
Cyber Protection service editions
The Cyber Protection service has different editions which determine the functionality that is provided
to customers.
Edition Description
Cyber Backup – Standard Provides:
Backup and recovery functionality that covers small environment needs
Vulnerability assessment, basic remote installation, basic ransomware,
and cryptomining protection functionality
Basic remote installation functionality
5 Copyright © Acronis International GmbH, 2003-2020
Cyber Protect – Essentials Provides:
Basic file-level backup capabilities
Vulnerability assessment
Basic auto-discovery and remote agent installation
Patch management
Antivirus and antimalware protection
URL filtering
Remote desktop
Remote device wipe
Windows Defender Antivirus and Microsoft Security Essentials
management
Cyber Protect – Standard Provides:
Backup and recovery functionality that covers small environment needs
Basic remote installation functionality
Vulnerability assessment and patch management functionality
Advanced antimalware protection and web protection functionality
Remote desktop functionality
Security controls functionality such as Windows Defender management
Alarms based on data from Cyber Protection Operations Center
Data discovery functionality
Cyber Protect – Advanced Provides:
Backup and recovery functionality dedicated to protect advanced
workloads such as Microsoft Exchange and Microsoft SQL clusters
designed for big environments
Group management and plan management
Advanced remote installation functionality
Vulnerability assessment and patch management functionality
Advanced antimalware protection and web protection functionality
Remote desktop functionality
Security controls functionality, such as Windows Defender management
Alarms based on data from Cyber Protection Operations Center
Data discovery functionality
Disaster Recovery add-on
The Disaster Recovery add-on provides disaster recovery functionality designed for companies that
have high requirements for the Recovery Time Objective. The add-on can be used with the following
editions:
Cyber Backup Standard
6 Copyright © Acronis International GmbH, 2003-2020
Cyber Protect Standard
Cyber Protect Advanced
The edition allows you to differentiate the data protection offerings for your partners and customers,
and provide the data protection functionality that meets their needs and budgets.
You can decide which of the editions will be available for your partner by enabling or disabling them
while creating a partner. Each edition can be adjusted by configuring its offering items.
You can assign one edition per customer. Afterward, you can switch customers between the editions,
on demand.
2.1.2 Managing Cyber Protection service editions for partners
Turning off editions for your partner tenants
To turn off the edition for a partner tenant, go to Clients > > Configure tab and
deselect the edition. Enter your login to confirm the edition disablement.
Turning off the Cyber Backup - Disaster Recovery edition
The following changes will affect the selected tenant and its child tenants that had Cyber Backup -
Disaster Recovery edition:
The Cyber Backup - Disaster Recovery edition will become unavailable.
All protection plans will be revoked, all devices will be unregistered, and their backups will be
deleted.
The disaster recovery functionality will become unavailable: all recovery servers, primary servers,
disaster recovery network configurations will be deleted; VPN appliances will be unregistered;
public IP addresses will be revoked from the cloud servers; the servers will not be reachable from
the Internet.
Turning off the Cyber Backup - Standard edition
The following changes will affect the selected tenant and its child tenants that had Cyber Backup -
Advanced/Standard edition:
The Cyber Backup - Advanced/Standard edition will become unavailable.
All protection plans will be revoked, all devices will be unregistered, and their backups will be
deleted.
Turning off the Cyber Protect - Disaster Recovery add-on
The following changes will affect the selected tenant and its child tenants that had Cyber Protect -
Disaster Recovery add-on:
The Cyber Protect - Disaster Recovery add-on will become unavailable.
All protection plans will be revoked, all devices will be unregistered, and their backups will be
deleted.
All the Cyber Protect functionality will be disabled.
The disaster recovery functionality will become unavailable: all recovery servers, primary servers,
disaster recovery network configurations will be deleted; VPN appliances will be unregistered;
public IP addresses will be revoked from the cloud servers; the servers will not be reachable from
the Internet.
7 Copyright © Acronis International GmbH, 2003-2020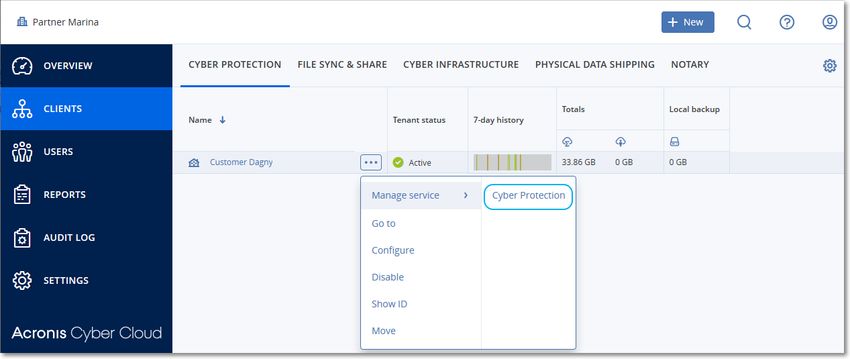
Turning off the Cyber Protect - Advanced/Standard edition
The following changes will affect the selected tenant and its child tenants that had Cyber Protect -
Advanced/Standard edition:
The Cyber Protect - Advanced/Standard edition will become unavailable.
All protection plans will be revoked, all devices will be unregistered, and their backups will be
deleted.
All the Cyber Protect functionality will be disabled.
Turning off the Cyber Protect - Essentials edition
The following changes will affect the selected tenant and its child tenants that had Cyber Protect -
Essentials edition:
The Cyber Protect - Essentials edition will become unavailable.
All protection plans will be revoked, all devices will be unregistered, and their backups will be
deleted.
All the Cyber Protect functionality will be disabled.
2.1.3 Switching Cyber Protection service editions for customers
Upgrading editions for your customer tenants
To upgrade the edition for a customer tenant, go to Clients > > Configure tab
and switch the edition. The edition upgrade may take up to 10 minutes to complete.
edition > edition
The following changes will be applied to the selected tenant and its child tenants:
The edition features will become available.
All protection plans that use edition features will remain working.
All registered devices and their backups will be preserved.
Usage statistics and quotas will be migrated to the related offering items of edition in
the management portal and usage report. Historical usage statistics will be preserved.
Downgrading editions for your customer tenants
The edition downgrade may take up to 10 minutes to complete. Enter your login to confirm the
edition downgrade.
Cyber Backup Standard/Advanced edition > Cyber Backup Standard edition
Formerly Cyber Backup had two editions - Standard and Advanced. Currently Cyber Backup Standard is the only
edition of Cyber Backup.
The following changes will be applied to the selected tenant and its child tenants:
The Cyber Backup - Advanced edition features will become unavailable.
All protection plans that use Cyber Backup - Advanced edition features will stop working.
All registered devices and their backups will be preserved.
Usage statistics and quotas will be migrated to the related offering items of Cyber Backup -
Standard edition in the management portal and usage report. Historical usage statistics will be
preserved.
8 Copyright © Acronis International GmbH, 2003-2020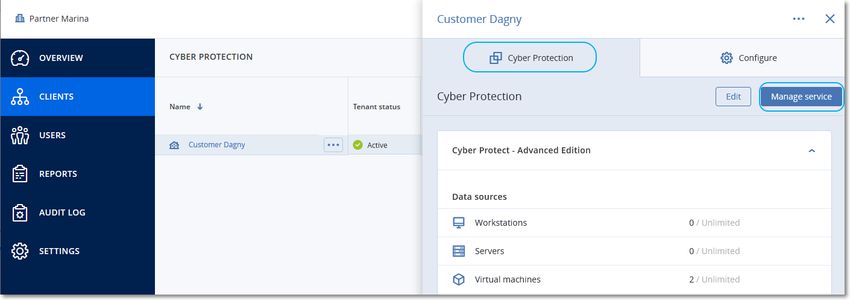
Cyber Protect Advanced/Standard edition > Cyber Protect Essentials edition
The following changes will be applied to the selected tenant and its child tenants:
The Cyber Protect Advanced/Standard edition features will become unavailable.
All protection plans that use Cyber Protect Advanced/Standard edition features will stop
working.
All registered devices and their backups will be preserved.
All recovery servers, primary servers, and their backups will be preserved.
All disaster recovery network configurations will be preserved.
VPN appliances will remain registered.
Usage statistics and quotas will be migrated to the related offering items of Cyber Backup -
Essentials edition in the management portal and usage report. Historical usage statistics will be
preserved.
Note that the Disaster Recovery add-on cannot be applied to Cyber Backup - Essentials edition.
Deactivating Disaster Recovery add-on
The following changes will be applied to the selected tenant and its child tenants:
The Disaster Recovery add-on features will become unavailable.
All protection plans that use Disaster Recovery add-on features will stop working.
All registered devices and their backups will be preserved.
All recovery servers, primary servers, and their backups will be preserved.
All disaster recovery network configurations will be preserved.
VPN appliances will remain registered.
Usage statistics and quotas will be migrated to the related offering items of the target edition in
the management portal and usage report. Historical usage statistics will be preserved.
2.1.4 Enabling or disabling offering items
To learn how to enable or disable the offering items for a tenant, refer to "Creating a tenant (p. 21)".
The capability to disable the offering items and the result of these actions are listed in the table
below.
Offering item Disabling Result
Backup storage Can be disabled when the The cloud storage will become
usage is equal to zero. unavailable as a destination for
backups within a customer
tenant.
Local backup Can be disabled when the The local storage will become
usage is equal to zero. unavailable as a destination for
backups within a customer
tenant.
9 Copyright © Acronis International GmbH, 2003-2020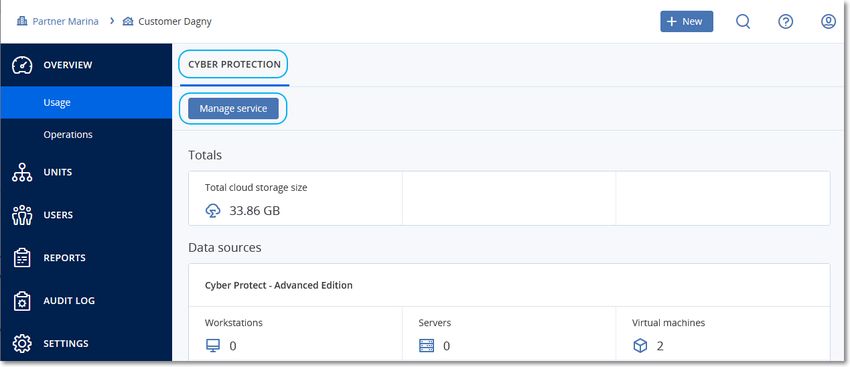
Data sources (including Office     Can be disabled when the          The backup and recovery of
365 and G Suite)                   usage is equal to zero.           data sources (including Office
                                                                     365 and G Suite) will become
                                                                     unavailable within a customer
                                                                     tenant.
All Disaster Recovery offering     Can be disabled when the          See the details in "Soft and
items                              usage is more than zero.          hard quotas (p. 10)".
All Notary offering items          Can be disabled when the          The Notary service will be
                                   usage is equal to zero.           unavailable within a customer
                                                                     tenant.
All File Sync & Share offering     Offering items cannot be        The File Sync & Share service
items                              enabled or disabled separately. will be unavailable within a
                                                                   customer tenant.
All Physical Data Shipping         Can be disabled when the          The Physical Data Shipping
offering items                     usage is equal to zero.           service will be unavailable
                                                                     within a customer tenant.

For an offering item that cannot be disabled when its usage is more than zero, you can manually
remove usage, and then disable the corresponding offering item.

2.1.5       Soft and hard quotas
Quotas enable you to limit a tenant's ability to use the service. To set the quotas, select the client on
the Clients tab, select the service tab, and then click Edit.

When a quota is exceeded, a notification is sent to the user's email address. If you do not set a quota
overage, the quota is considered "soft." This means that restrictions on using the Cyber Protection
service are not applied.

When you specify the quota overage, then the quota is considered "hard." An overage allows the
user to exceed the quota by the specified value. When the overage is exceeded, restrictions on using
the service are applied.

Example

Soft quota: You have set the quota for workstations equal to 20. When the number of the customer's
protected workstations reaches 20, the customer will get a notification by email, but the Cyber
Protection service will be still available.

Hard quota: If you have set the quota for workstations equal to 20 and the overage is 5, then your
customer will get the notification by email when the number of protected workstations reaches 20,
and the Cyber Protection service will be disabled when the number reaches 25.

Levels on which quotas can be defined
The quotas can be set on the levels listed in the table below.
     Tenant/User             Soft quota (only    Hard quota (quota
                                  quota)           and overage)
Partner                  yes                    no
Folder                   yes                    no
Customer                 yes                    yes

10                                                          Copyright © Acronis International GmbH, 2003-2020
Unit no no
User yes yes
The soft quotas can be set on the partner and folder levels. On the unit level no quotas can be set.
The hard quotas can be set on the customer and user levels.
The total amount of hard quotas that are set on the user level cannot exceed the related customer
hard quota.
2.1.5.1 Backup quotas
You can specify the cloud storage quota, the quota for local backup, and the maximum number of
machines/devices/websites a user is allowed to protect. The following quotas are available.
Quotas for devices
Workstations
Servers
Virtual machines
Mobile devices
Web hosting servers
Websites
A machine/device/website is considered protected as long as at least one protection plan is applied
to it. A mobile device becomes protected after the first backup.
When the overage for a number of devices is exceeded, the user cannot apply a protection plan to
more devices.
Quotas for cloud data sources
Office 365 seats
This quota is applied by the service provider to the entire company. The company can be allowed
to protect Mailboxes, OneDrive files, or both. Company administrators can view the quota and
the usage in the management portal.
Note Public folders consume licenses from your backup quota for Office 365 seats.
Office 365 Teams
This quota is applied by the service provider to the entire company. This quota enables or
disables the ability to protect Office 365 Teams and sets the maximum number of teams that can
be protected. Company administrators can view the quota and the usage in the management
portal.
Office 365 SharePoint Online
This quota is applied by the service provider to the entire company. This quota enables or
disables the ability to protect SharePoint Online sites. If the quota is enabled, any number of
SharePoint Online sites can be protected. Company administrators cannot view the quota in the
management portal, but can view the amount of storage occupied by SharePoint Online backups
in the usage reports.
Backing up SharePoint Online sites is only available to customers who have at least one Office
365 seats quota in addition. This quota is only verified and will not be taken up.
G Suite seats
11 Copyright © Acronis International GmbH, 2003-2020This quota is applied by the service provider to the entire company. The company can be allowed
to protect Gmail mailboxes (including calendar and contacts), Google Drive files, or both.
Company administrators can view the quota and the usage in the management portal.
G Suite Shared drive
This quota is applied by the service provider to the entire company. This quota enables or
disables the ability to protect G Suite Shared drives. If the quota is enabled, any number of
Shared drives can be protected. Company administrators cannot view the quota in the
management portal, but can view the amount of storage occupied by Shared drive backups in
the usage reports.
Backing up G Suite Shared drives is only available to customers who have at least one G Suite
seats quota in addition. This quota is only verified and will not be taken up.
An Office 365 seat is considered protected as long as at least one protection plan is applied to the
user's mailbox or OneDrive. A G Suite seat is considered protected as long as at least one protection
plan is applied to the user's mailbox or Google Drive.
When the overage for a number of seats is exceeded, a company administrator cannot apply a
protection plan to more seats.
Quotas for storage
Local backup
The Local backup quota limits the total size of local backups that are created by using the cloud
infrastructure. An overage cannot be set for this quota.
Cloud resources
The Cloud resources quota combines the quota for backup storage and quotas for disaster recovery.
The backup storage quota limits the total size of backups located in the cloud storage. When the
backup storage quota overage is exceeded, backups fail.
Exceeding the hard quota for backup storage
Regarding the backup storage, its hard quota can be exceeded to two times the defined hard quota.
The protection agent certificate has the 2x technical quota that allows an agent to overcome the
tenant's hard quota when it is not yet reached during a running backup. The next backup will not be
possible if the tenant quota is exceeded. If the 2x multiplied value of the quota (in the certificate) is
reached during backup creation, then the backup will fail.
12 Copyright © Acronis International GmbH, 2003-2020Example: You have defined the cloud storage hard quota of 100 TB for a customer tenant which means that the total sum of hard quotas allocated to the tenant's users cannot exceed 100 TB. You decided to split the hard quota for the two users equally. This means that technically each user's agent has a 100 TB technical quota. But it does not mean that the agent can back up machines until all 100 TB are reached. It means only that if the hard quota is almost reached when the backup creation started, then the backup will be completed unless its size is too big that even the 2x hard quota is not enough. On the scheme below, a user has 1 TB of free space, but the backup size is larger, for example, 3 TB. In this case, the backup will be successfully completed even though the hard quota limit of the cloud storage space is exceeded by 2 TB. If the backup size was 53 TB, then the backup creation would start but fail when the cloud storage limit (100 TB) is reached. Backup quota transformation In general, this is how acquiring a backup quota and offering item mapping to resource type works: the system compares the available offering items with the resource type, and then acquires the quota for the matched offering item. There is also a capability to assign another offering item quota, even if it does not exactly match the resource type. This is called the backup quota transformation. If there is no matching offering item, the system tries to find a more expensive appropriate quota for the resource type (automatic backup quota transformation). If nothing appropriate is found, then you can manually assign the service quota to the resource type in the service console. Example You want to back up a virtual machine (workstation, agent-based). 13 Copyright © Acronis International GmbH, 2003-2020
First, the system will check if there is an allocated Virtual machines quota. If it is not found, then the
system automatically tries to acquire the Workstations quota. If that is also not found, the other
quota will not be automatically acquired. If you have enough quota that is more expensive than the
Virtual machines quota and it is applicable to a virtual machine, then you can log in to the service
console and assign the Servers quota manually.
2.1.5.2 Disaster Recovery quotas
Note The Disaster Recovery offering items are available only with the Disaster Recovery add-on.
These quotas are applied by the service provider to the entire company. Company administrators can
view the quotas and the usage in the management portal, but cannot set quotas for a user.
Disaster recovery storage
This storage is used by primary and recovery servers. If the overage for this quota is reached, it is
not possible to create primary and recovery servers, or add/extend disks of the existing primary
servers. If the overage for this quota is exceeded, it is not possible to initiate a failover or just
start a stopped server. Running servers continue to run.
Compute points
This quota limits the CPU and RAM resources that are consumed by primary and recovery servers
during a billing period. If the overage for this quota is reached, all primary and recovery servers
are shut down. It is not possible to use these servers until the beginning of the next billing period.
The default billing period is a full calendar month.
When the quota is disabled, the servers cannot be used regardless of the billing period.
Public IP addresses
This quota limits the number of public IP addresses that can be assigned to the primary and
recovery servers. If the overage for this quota is reached, it is not possible to enable public IP
addresses for more servers. You can disallow a server to use a public IP address, by clearing the
Public IP address check box in the server settings. After that, you can allow another server to use
a public IP address, which usually will not be the same one.
When the quota is disabled, all of the servers stop using public IP addresses, and thus become
not reachable from the Internet.
Cloud servers
This quota limits the total number of primary and recovery servers. If the overage for this quota
is reached, it is not possible to create primary or recovery servers.
When the quota is disabled, the servers are visible in the service console, but the only available
operation is Delete.
Internet access
This quota enables or disables the Internet access from the primary and recovery servers.
When the quota is disabled, the primary and recovery servers will not be able to establish
connections to the Internet.
2.1.5.3 File Sync & Share quotas
You can define the following File Sync & Share quotas for a tenant:
Users
The quota defines a number of users that can access this service.
Cloud storage
14 Copyright © Acronis International GmbH, 2003-2020This is a cloud storage for storing users' files. The quota defines the allocated space for a tenant
in the cloud storage.
2.1.5.4 Physical Data Shipping quotas
The Physical Data Shipping service quotas are consumed on a per-drive basis. You can save initial
backups of multiple machines on one hard drive.
You can define the following Physical Data Shipping quotas for a tenant:
To the cloud
Allows sending an initial backup to the cloud data-center by using a hard disk drive. This quota
defines the maximum number of drives to be transferred to the cloud data-center.
2.1.5.5 Notary quotas
You can define the following Notary quotas for a tenant:
Notary storage
The notary storage is the cloud storage where the notarized files, signed files, and files whose
notarization or signing is in progress are stored. This quota defines the maximum space that can
be occupied by these files.
To decrease this quota usage, you can delete the already notarized or signed files from the
notary storage.
Notarizations
This quota defines the maximum number of files that can be notarized by using the notary
service. A file is considered notarized as soon as it is uploaded to the notary storage and its
notarization status changes to In progress.
If the same file is notarized multiple times, each notarization counts as a new one.
eSignatures
This quota defines the maximum number of files that can be signed by using the notary service. A
file is considered signed as soon as it is sent for signature.
2.1.6 Agent installer dependency on offering items
Depending on the allowed offering items, the corresponding agent installer will be available in the
Add devices section in the service console. In the table below, you can see the agent installers and
their availability in the service console depending on the enabled offering items.
Enabled offering Servers Workstations Virtual Office G Suite Mobile Web Websites
item machines 365 seats devices hosting
seats servers
Agent installer
Workstations – + + +
Agent for
Windows
Workstations – + + +
Agent for Mac
OS
15 Copyright © Acronis International GmbH, 2003-2020Servers – Agent + + + +
for Windows
Servers – Agent + + + +
for Linux
Agent for +
Hyper-V
Agent for +
VMware
Agent for +
Virtuozzo
Agent for SQL + +
Agent for + +
Exchange
Agent for Active + +
Directory
Agent for Office +
365
Agent for G +
Suite
Full installer for + + + + +
Windows
Mobile (iOS and +
Android)
2.2 User accounts and tenants
There are two user account types: administrator accounts and user accounts.
Administrators have access to the management portal. They have the administrator role in all
services.
Users do not have access to the management portal. Their access to the services and their roles
in the services are defined by an administrator.
Each account belongs to a tenant. A tenant is a part of the management portal resources (such as
user accounts and child tenants) and service offerings (enabled services and offering items within
them) dedicated to partner or a customer. The tenant hierarchy is supposed to match the
client/vendor relationships between the service users and providers.
A tenant type of Partner typically corresponds to service providers that resell the services.
A tenant type of Folder is a supplementary tenant that is typically used by partner administrators
to group partners and customers to configure separate offerings and/or different branding.
A tenant type of Customer typically corresponds to organizations that use the services.
A tenant type of Unit typically corresponds to units or departments within the organization.
An administrator can create and manage tenants, administrator accounts, and user accounts on or
below their level in the hierarchy.
Administrators at the customer level and higher can limit access to their tenant for higher-level
administrators (p. 61).
16 Copyright © Acronis International GmbH, 2003-2020The following diagram illustrates an example hierarchy of the partner, folder, customer, and unit
tenants.
The following table summarizes operations that can be performed by the administrators and users.
Operation Users Customer and unit Partner and folder
administrators administrators
Create tenants No Yes Yes
Create accounts No Yes Yes
Download and install the Yes Yes No*
software
Manage services Yes Yes Yes
17 Copyright © Acronis International GmbH, 2003-2020Operation Users Customer and unit Partner and folder
administrators administrators
Create reports about the No Yes Yes
service usage
Configure branding No No Yes
*A partner administrator who needs to perform these operations can create a customer administrator or user
account for themselves.
2.3 Supported web browsers
The web interface supports the following web browsers:
Google Chrome 29 or later
Mozilla Firefox 23 or later
Opera 16 or later
Windows Internet Explorer 11 or later
Microsoft Edge 25 or later
Safari 8 or later running in the macOS and iOS operating systems
In other web browsers (including Safari browsers running in other operating systems), the user
interface might be displayed incorrectly or some functions may be unavailable.
3 Using the management portal
The following steps will guide you through the basic use of the management portal.
3.1 Activating the administrator account
After signing the partnership agreement, you will receive an email message containing the following
information:
An account activation link. Click the link and set the password for the administrator account.
Ensure that your password is at least eight characters long. Remember the login that is shown on
the account activation page.
A link to the login page. The login and password are the same as in the previous step.
3.2 Accessing the management portal
1. Go to the service login page. The login page address was included in the activation email
message.
2. Type the login, and then click Next.
3. Type the password, and then click Next.
4. Click Management Portal.
The timeout period for the management portal is 24 hours for active sessions and 1 hour for idle
sessions.
Some services include the capability to switch to the management portal from the service console.
18 Copyright © Acronis International GmbH, 2003-20203.3 Navigation in the management portal
When using the management portal, at any given time you are operating within a tenant. This is
indicated in the top-left corner.
By default, the top-most hierarchy level available to you is selected. Click the tenant name to drill
down the hierarchy. To navigate back to an upper level, click its name in the top-left corner.
All parts of the user interface display and affect only the tenant in which you are currently operating.
For example:
The Clients tab displays only the tenants that are direct children of the tenant in which you are
currently operating.
The Users tab displays only the user accounts that exist in the tenant in which you are currently
operating.
By using the New button, you can create a tenant or a new user account only in the tenant in
which you are currently operating.
3.4 Accessing the services
Overview tab
The Overview > Usage section provides an overview of the service usage and enables you to access
the services within the tenant in which you are operating.
To manage a service for a tenant by using the Overview tab
1. Navigate to the tenant (p. 19) for which you want to manage a service, and then click Overview >
Usage.
Note that some services can be managed at the partner tenant and at the customer tenant levels,
while other services can be managed only at the customer tenant level.
2. Click the name of the service that you want to manage, and then click Manage service or
Configure service.
19 Copyright © Acronis International GmbH, 2003-2020For information about using the services, refer to the user guides that are available in the service
consoles.
Clients tab
The Clients tab displays the child tenants of the tenant in which you are operating and enables you to
access the services within them.
To manage a service for a tenant by using the Clients tab
1. Do one of the following:
Click Clients, select the tenant for which you want to manage a service, click the name or
icon of the service that you want to manage, and then click Manage service or Configure
service.
20 Copyright © Acronis International GmbH, 2003-2020 Click Clients, click the ellipsis icon next to the name of the tenant for which you want to
manage a service, click Manage service, and then select the service that you want to
manage.
Note that some services can be managed at the partner tenant and at the customer tenant levels,
while other services can be managed only at the customer tenant level.
For information about using the services, refer to the user guides that are available in the service
consoles.
3.5 Creating a tenant
A Partner tenant is normally created for each partner that signs the partnership agreement.
A Folder tenant is normally created to group partners and customers to configure separate offerings
and/or different branding.
A Customer tenant is normally created for each organization that signs up for a service.
You may want to create a new Unit tenant within a customer tenant when expanding the service to a
new organizational unit.
To create a tenant
1. Log in to the management portal.
2. Navigate to the tenant (p. 19) in which you want to create a tenant.
3. In the top-right corner, click New, and then click one of the following, depending on the type of
the tenant that you want to create:
Customer
Partner
Folder
User
The available types depend on the parent tenant type.
4. In Name, specify a name for the new tenant.
5. [Only when creating a customer tenant] In Mode, select whether the tenant is using services in
the trial mode or in the production mode. Monthly service usage reports do not include usage
data for trial-mode tenants.
21 Copyright © Acronis International GmbH, 2003-2020Important If you switch the mode from trial to production in the middle of a month, the entire month will
be included in the monthly service usage report. For this reason, we recommend that you switch the mode
on the first day of a month. The mode is automatically switched to production when a tenant remains in the
trial mode for one full month.
6. [Optional] In Language, change the default language of notifications, reports, and the software
that will be used within this tenant.
7. In Management mode, select one of the following modes for managing access to the tenant:
Self-service – this mode limits access to this tenant for administrators of the parent tenant:
they can only modify the tenant properties, but cannot access or manage anything inside (e.g.
tenants, users, services, backups, and other resources).
Managed by service provider – this mode grants full access to the tenant for administrators
of the parent tenant: modify properties, manage tenants, users, services; access backups and
other resources.
Only the administrator of the tenant created by you will be able to change the Management
mode if it is Self-service. For this, the administrator of the created tenant can go to Settings >
Security and set up the Support access switch (p. 61).
To view the selected Management mode for your child tenants, go to Clients.
8. In Security, enable or disable two-factor authentication for the tenant. If enabled, all users of this
tenant will be required to set up two-factor authentication for their accounts for more secure
access. Users must install the authentication application on their second-factor devices and use
the one-time generated TOTP code along with the traditional login and password to log in to the
console. For more details, refer to "Setting up two-factor authentication (p. 29)". To view the
two-factor authentication status for your customers, go to Clients.
9. Do one of the following:
To finish the tenant creation, click Save and close. In this case, all services will be enabled for
the tenant. The tenant will not have an administrator until you create one.
To configure services for the tenant and to create a tenant administrator, click Next.
10. [Optional, not applicable to a unit tenant] Disable the switches for the services that you want to
disable for the tenant. Disabled services will be hidden from the users within the tenant and its
child tenants.
[If you create a partner] For the Cyber Protection service, select which editions will be available.
[If you create a customer] For the Cyber Protection service, select one of the editions that will be
available.
When ready, click Next.
11. [Optional, not applicable to a unit tenant] Configure the offering items for the tenant:
a. Within each service, clear the check boxes for the offering items that you want to disable.
The functionality that corresponds to the disabled offering items will be unavailable for the
users within the tenant and its child tenants.
b. Some services enable you to select storages that will be available to the new tenant. Storages
are grouped by locations. You can select from the list of locations and storages that are
available to your tenant.
When creating a parent/folder tenant, you can select multiple locations and storages for
each service.
When creating a customer tenant, you must select one location, and then select one
storage per service within this location. The storages assigned to the customer can be
changed later, but only if their usage is 0 GB – that is, either before the customer starts
using the storage or after the customer removes all the backups from this storage. The
22 Copyright © Acronis International GmbH, 2003-2020information about the storage space usage is not updated in real time. Please allow up to
24 hours for the information to be updated.
For additional details about storages, refer to "Managing locations and storage" (p. 35).
c. To specify the quota for an item, click on the Unlimited link next to the offering item. These
quotas are "soft". If any of these values are exceeded, an email notification is sent to the
tenant administrators and the administrators of the parent tenant. Restrictions on using the
services are not applied. For a partner tenant it is expected that the offering item usage can
exceed the quota because the overage cannot be set when creating a partner tenant.
d. [Only when creating a customer tenant] Specify the quota overages. An overage allows a
customer tenant to exceed the quota by the specified value. When the overage is exceeded,
restrictions on using the corresponding service are applied.
12. Do one of the following:
To create a tenant administrator, click Next, and then follow the steps described in "Creating
a user account" (p. 24), starting from step 4. If you change your mind, you can click Skip and
close to cancel creating an administrator.
To create a tenant without an administrator, click Save and close. You can add
administrators to the tenant later.
Note Creation of an administrator is mandatory for a customer tenant and for a partner tenant with
Management mode set to Self-service.
The newly created tenant appears on the Clients tab.
If you want to edit the tenant settings or specify the contact information, select the tenant on the
Clients tab, and then click the pencil icon in the section that you want to edit.
3.6 Disabling and enabling a tenant
You may need to disable a tenant temporarily. For example, in case your tenant has debts for using
services.
To disable a tenant
1. In the management portal, go to Clients.
2. Select the tenant that you want to disable, then click the ellipsis icon > Disable.
3. Confirm your action by clicking Disable.
As the result:
The tenant and all its sub-tenants will be disabled, their services will be stopped.
Billing of the tenant and its sub-tenants will be continued as their data will be preserved and
stored in Acronis Cyber Cloud.
All API clients within the tenant and its sub-tenants will be disabled and all integrations using
these clients will stop working.
To enable a tenant, select it in the client list, then click the ellipsis icon > Enable.
3.7 Deleting a tenant
You may want to delete a tenant in order to free up the resources that it uses. The usage statistics
will be updated within a day after deletion. For large tenants it might take longer.
23 Copyright © Acronis International GmbH, 2003-2020Before deleting a tenant, you have to disable it. For more information on how to do this, refer to
Disabling and enabling a tenant (p. 23).
Important Deleting a tenant is irreversible!
To delete a tenant
1. In the management portal, go to Clients.
2. Select the disabled tenant that you want to delete, and then click the ellipsis icon >
Delete.
3. To confirm your action, enter your login, and then click Delete.
As a result:
The tenant and its sub-tenants will be deleted.
All services that were enabled within the tenant and its sub-tenants will be stopped.
All users within the tenant and its sub-tenants will be deleted.
All machines in the tenant and its sub-tenants will be unregistered.
All service-related data, for example backups and synced files, in the tenant and its sub-tenants
will be deleted.
All API clients within the tenant and its sub-tenants will be deleted and all integrations using
these clients will stop working.
3.8 Creating a user account
You may want to create additional accounts in the following cases:
Partner/folder administrator accounts — to share the services management duties with other
people.
Customer/unit administrator accounts — to delegate the service management to other people
whose access permissions will be strictly limited to the corresponding customer/unit.
User accounts within the customer or a unit tenant — to enable the users to access only a subset
of the services.
Please be aware that existing accounts cannot be moved between tenants. First, you need to create
a tenant, and then populate it with accounts.
To create a user account
1. Log in to the management portal.
2. Navigate to the tenant (p. 19) in which you want to create a user account.
3. In the top-right corner, click New > User.
4. Specify the following contact information for the account:
Login
Important Each account must have a unique login.
Email
[Optional] First name
[Optional] Last name
In Language, change the default language of notifications, reports, and the software that will
be used for this account.
24 Copyright © Acronis International GmbH, 2003-20205. [Not available when creating an account in a partner/folder tenant] Select the services to which
the user will have access and the roles in each service.
Available services depend on the services that are enabled for the tenant in which the user
account is created.
If you select the Company administrator check box, the user will have access to the
management portal and the administrator role in all services that are currently enabled for
the tenant. The user will also have the administrator role in all services that will be enabled
for the tenant in the future.
If you select the Unit administrator check box, the user will have access to the management
portal, but may or not have the service administrator role, depending on the service.
Otherwise, the user will have the roles that you select in the services that you select (p. 25).
6. Click Create.
The newly created user account appears on the Users tab.
If you want to edit the user settings, or specify notification settings and quotas (not available for
partner/folder administrators) for the user, select the user on the Users tab, and then click the pencil
icon in the section that you want to edit.
To reset a user’s password
1. In the management portal, go to Users.
2. Select the user whose password you want to reset, and then click the ellipsis icon > Reset
password.
3. Confirm your action by clicking Reset.
The user can now complete the resetting process by following the instructions in the email received.
3.9 User roles available for each service
One user can have several roles but only one role per service.
For each service, you can define which role will be assigned to a user.
25 Copyright © Acronis International GmbH, 2003-2020Service Role Description
n/a Company This role grants administrator rights for all services. If
Administrator the Disaster Recovery add-on of the Cyber Protection
service is enabled for the company, this role also enables
access to the disaster recovery functionality.
Management Administrator This role enables access to the management portal
Portal where the administrator can manage users within the
entire organization.
Read-only This role is not available for the Standard editions. The
administrator role provides read-only access to all objects in the
management portal. Such users can access data of other
users of the organization in the read-only mode.
Cyber Protection Administrator This role enables configuring and managing Cyber
Protection for your customers. The administrator can
configure and manage the Disaster Recovery service.
Read-only This role is not available for the Standard editions. The
administrator role provides read-only access to all objects of the Cyber
Protection service. Such users can access data of other
users of the organization in the read-only mode.The
read-only administrator cannot configure and manage
the Disaster Recovery service.
File Sync & Share Administrator This role enables configuring and managing File Sync &
Share for your users.
Cyber Administrator This role enables configuring and managing Cyber
Infrastructure Infrastructure for your users.
Read-only administrator role
A user account with the read-only administrator role has the following permissions and limitations:
Deny file-level backup browsing
Deny mailbox-level browsing
Deny access to the file system (to browse files and folders on the source/target machines)
Deny any create/update/delete operations for all other objects
Allow read access for all other objects
For a read-only administrator, all not allowed UI objects will be hidden except the protection plan
default settings that will be shown but the Save button will not be active.
Any changes related to accounts/roles are shown as activities in the Activities list containing the
following information:
A list of changes
Who did the changes
Date and time of changes
26 Copyright © Acronis International GmbH, 2003-20203.10 Changing the notification settings for a user
To change the notifications settings for a user, select the user on the Users tab, and then click the
pencil icon in the Settings section. The following notifications settings are available:
Quota overuse notifications (enabled by default)
The notifications about exceeded quotas.
Scheduled usage reports
The usage reports described below that are sent on the first day of each month.
Failure notifications, Warning notifications, and Success notifications (disabled by default)
The notifications about the execution results of protection plans and the results of disaster
recovery operations for each device.
Daily recap about active alerts (enabled by default)
The daily recap is generated based on the list of active alerts that are present in the service
console at the moment when the recap is generated. The recap is generated and sent once a day,
between 10:00 and 23:59 UTC. The time when the report is generated and sent depends on the
workload in the data center. If there are no active alerts at that time, the recap is not sent. The
recap does not include information for past alerts that are no longer active. For example, if a user
finds a failed backup and clears the alert, or the backup is retried and succeeds before the recap
is generated, the alert will no longer be present and the recap will not include it.
All notifications are sent to the user's email address.
Notifications received by user role
The notifications that Cyber Protection sends depend on the user role.
Notification type\User role User Customer and unit Partner and folder
administrators administrator
Notifications for own devices Yes Yes n/a*
Notifications for all devices of the n/a Yes Yes
child tenants
Notifications for Office 365, G-Suite, n/a Yes Yes
and other cloud-based backups
* Partner administrators cannot register own devices, but can create their own customer
administrator accounts and use those accounts to add own devices. See User accounts and tenants
(p. 16).
3.11 Disabling and enabling a user account
You may need to disable a user account in order to temporarily restrict its access to the cloud
platform.
To disable a user account
1. In the management portal, go to Users.
2. Select the user account that you want to disable, and then click the ellipsis icon > Disable.
3. Confirm your action by clicking Disable.
As a result, this user will not be able to use the cloud platform or to receive any notifications.
27 Copyright © Acronis International GmbH, 2003-2020To enable a disabled user account, select it in the users list, and then click the ellipsis icon
> Enable.
3.12 Deleting a user account
You may need to delete a user account permanently in order to free up the resources it uses — such
as storage space or license. The usage statistics will be updated within a day after deletion. For
accounts with a lot of data, it might take longer.
Before deleting a user account, you have to disable it. For more information on how to do this, refer
to Disabling and enabling a user account (p. 27).
Important Deleting a user account is irreversible!
To delete a user account
1. In the management portal, go to Users.
2. Select the disabled user account, and then click the ellipsis icon > Delete.
3. To confirm your action, enter your login, and then click Delete.
As a result:
This user account will be deleted.
All data that belongs to this user account will be deleted.
All machines associated with this user account will be unregistered.
3.13 Transferring ownership of a user account
You may need to transfer the ownership of a user account if you want to keep the access to a
restricted user’s data.
Important You cannot reassign the content of a deleted account.
To transfer the ownership of a user account:
1. In the management portal, go to Users.
2. Select the user account whose ownership you want to transfer, and then click the pencil icon in
the General information section.
3. Replace the existing email with the email of the future account owner, and then click Done.
4. Confirm your action by clicking Yes.
5. Let the future account owner verify their email address by following the instructions sent there.
6. Select the user account whose ownership you are transferring, and then click the ellipsis icon
> Reset password.
7. Confirm your action by clicking Reset.
8. Let the future account owner reset the password by following the instructions sent to their email
address.
The new owner can now access this account.
28 Copyright © Acronis International GmbH, 2003-2020You can also read