AriaMx Real-Time PCR System - G8830A Setup and User Guide
←
→
Page content transcription
If your browser does not render page correctly, please read the page content below
AriaMx Real-Time PCR
System
G8830A

Setup and User Guide
Version B0, January 2015

        Agilent Technologies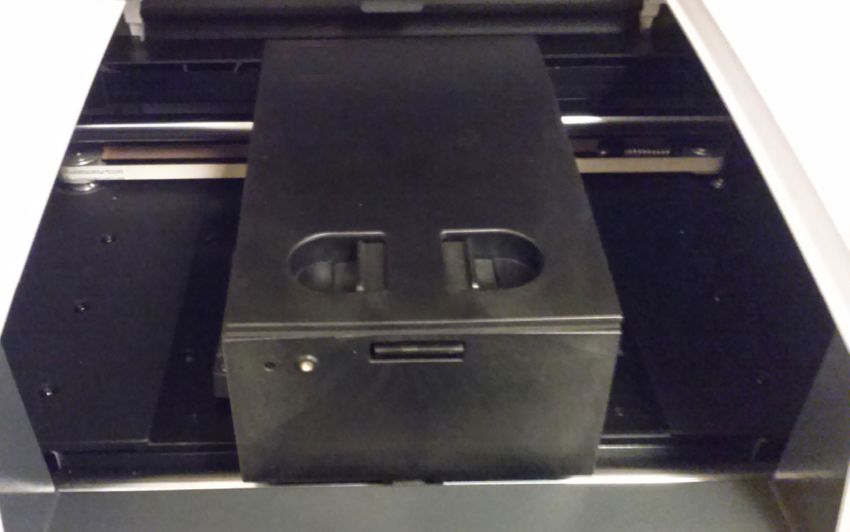
Notices
© Agilent Technologies, Inc. 2015               Warranty                                       Safety Notices
No part of this manual may be reproduced in
                                                The material contained in this
any form or by any means (including elec-
                                                document is provided “as is,” and
tronic storage and retrieval or translation
                                                is subject to being changed, with-                CAUTION
into a foreign language) without prior agree-
                                                out notice, in future editions. Fur-
ment and written consent from Agilent                                                          A CAUTION notice denotes a haz-
                                                ther, to the maximum extent
Technologies, Inc. as governed by United
                                                permitted by applicable law, Agi-              ard. It calls attention to an operat-
States and international copyright laws.
                                                lent disclaims all warranties,                 ing procedure, practice, or the like
                                                either express or implied, with
Manual Part Number                              regard to this manual and any                  that, if not correctly performed or
G8830-90001                                     information contained herein,                  adhered to, could result in damage
                                                including but not limited to the               to the product or loss of important
Edition                                         implied warranties of merchant-                data. Do not proceed beyond a
                                                ability and fitness for a particular
Version B0, January 2015                        purpose. Agilent shall not be lia-             CAUTION notice until the indicated
Agilent Technologies, Inc.                      ble for errors or for incidental or            conditions are fully understood and
5301 Stevens Creek Blvd                         consequential damages in con-                  met.
Santa Clara, CA 95051 USA                       nection with the furnishing, use,
                                                or performance of this document
                                                or of any information contained
PowerPoint ® and Excel® are trademarks or       herein. Should Agilent and the                   WAR NING
registered trademarks of Microsoft Corpora-     user have a separate written
tion in the United States and/or other coun-    agreement with warranty terms                  A WARNING notice denotes a
tries.                                          covering the material in this doc-
                                                ument that conflict with these                 hazard. It calls attention to an
SYBR® is a registered trademark of Molecu-                                                     operating procedure, practice, or
lar Probes, Inc.
                                                terms, the warranty terms in the
                                                separate agreement shall control.              the like that, if not correctly per-
Technical Support                                                                              formed or adhered to, could result
                                                Technology Licenses
For technical support, contact Agilent at
                                                                                               in personal injury or death. Do not
                                                The hardware and/or software described in      proceed beyond a WARNING
techservices@agilent.com. Complete con-
                                                this document are furnished under a license
tact information for Technical Support is
                                                and may be used or copied only in accor-
                                                                                               notice until the indicated condi-
listed on page 18.                                                                             tions are fully understood and
                                                dance with the terms of such license.
                                                                                               met.
                                                Restricted Rights Legend
                                                U.S. Government Restricted Rights. Soft-
                                                ware and technical data rights granted to
                                                the federal government include only those
                                                rights customarily provided to end user cus-
                                                tomers. Agilent provides this customary
                                                commercial license in Software and techni-
                                                cal data pursuant to FAR 12.211 (Technical
                                                Data) and 12.212 (Computer Software) and,
                                                for the Department of Defense, DFARS
                                                252.227-7015 (Technical Data - Commercial
                                                Items) and DFARS 227.7202-3 (Rights in
                                                Commercial Computer Software or Com-
                                                puter Software Documentation).

2                                                                               AriaMx Real-Time PCR System Setup and User
In this Guide...
                                 This document describes how to program and use the
                                 Agilent AriaMx Real-Time PCR System.

                             1   Before You Begin
                                 This chapter contains information for you to read and
                                 understand before you start setting up the instrument.

                             2   Installing and Setting Up the Instrument
                                 This chapter contains instructions for installing and setting
                                 up the AriaMx instrument.

                             3   Getting Started with AriaMx System
                                 This chapter contains instructions to load samples, get
                                 started with the software, set up user accounts and access
                                 instruments remotely via a network.

                             5   Troubleshooting, Maintenance, and Updates
                                 This chapter contains instructions for maintaining the
                                 instrument and uploading software updates.

AriaMx Real-Time PCR System Setup and User Guide                                                 3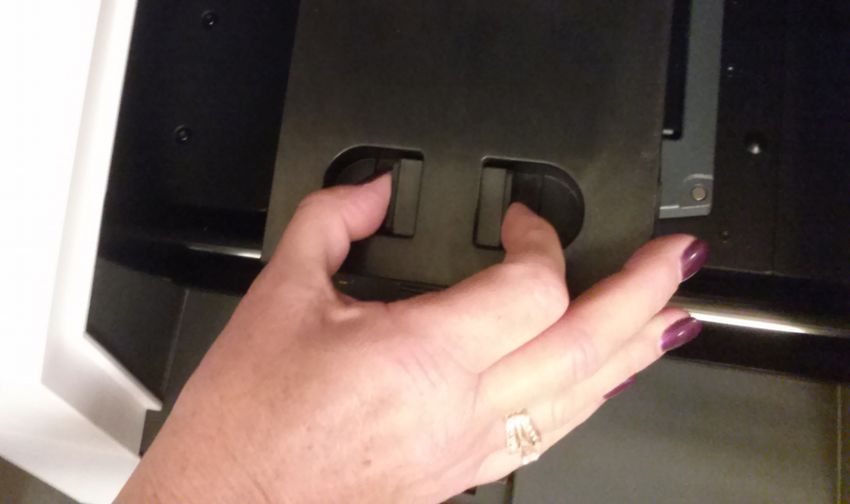
4 AriaMx Real-Time PCR System Setup and User

Contents
               1   Before You Begin     9
                      Overview of the AriaMx Real-Time PCR System 10
                      Materials provided with the AriaMx Real-Time PCR System       10
                      Hardware specifications 11
                      Recommended plasticware 12
                      Safety precautions 12
                      Consignes de sécurité 15
                      Indicator LED light 17
                      Agilent Technical Support 18

               2   Installing and Setting Up the Instrument    19
                   Installing the AriaMx Instrument 20
                      Step 1. Select a location for the instrument 20
                      Step 2. Unpack the shipping containers      20
                      Step 3. Install the optical modules 23
                      Step 4. Clean the thermal block 28
                      Step 5. Connect the instrument to a power supply 28
                      Step 6. Connect a keyboard or mouse to the instrument (optional) 28
                      Step 7. Connect the instrument to a network or directly to a PC 29
                   Setting Up the AriaMx Instrument 32
                      Step 1. Turn on the instrument and calibrate the background for the optical
                          modules 32
                      Step 2. Set the instrument date and time 33
                      Step 3. Run a diagnostic check 34
                   Logging In and Creating User Accounts 35
                      Step 1. Log in to the instrument using an Administrator account    35
                      Step 2. Add user accounts 36

AriaMx Real-Time PCR System Setup and User Guide                                                    5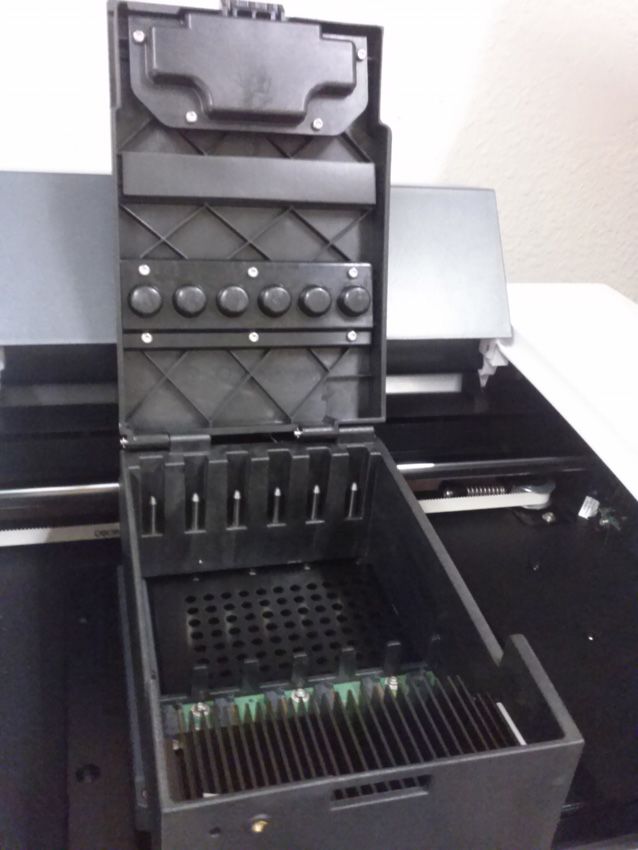
Contents

                  Step 3. Log in to your personal user account        37
               Customizing Instrument Settings    38

           3   Installation of the AriaMx Software     39
               Minimum requirements for running the AriaMx software        40
               Installing the Standard AriaMx Software      41
                  Install the AriaMx software 41
                  Launch the AriaMx software 47
               Installing the AriaMx ET (Electronic Tracking) Software 48
                  Install Microsoft SQL Server 2012 48
                  Install the AriaMx ET software 54
                  Configure and start Microsoft Distributed Transaction Coordinator (MSDTC)
                       service 62
                  Launch the AriaMx ET software 66
               Installing Microsoft .NET Framework 4.0      67
                  Install Microsoft .NET Framework 4.0      67

           4   Running Experiments      71
               Preparing and Loading PCR Samples       72
                  Prepare samples 72
                  Load samples 72
               Setting Up and Running Experiments 73
                  Use the touchscreen to set up and run an experiment      73
                  Use the PC software to set up and run an experiment      74
               Managing Saved Experiments 76
                 Locate saved experiment files 76
                 Create a subfolder 77
                 Copy and paste experiments 77
                 Transfer experiments to a USB drive        77

           5   Troubleshooting, Maintenance, and Updates          79
               Troubleshooting Instrument Error Messages         80

6                                              AriaMx Real-Time PCR System Setup and User Guide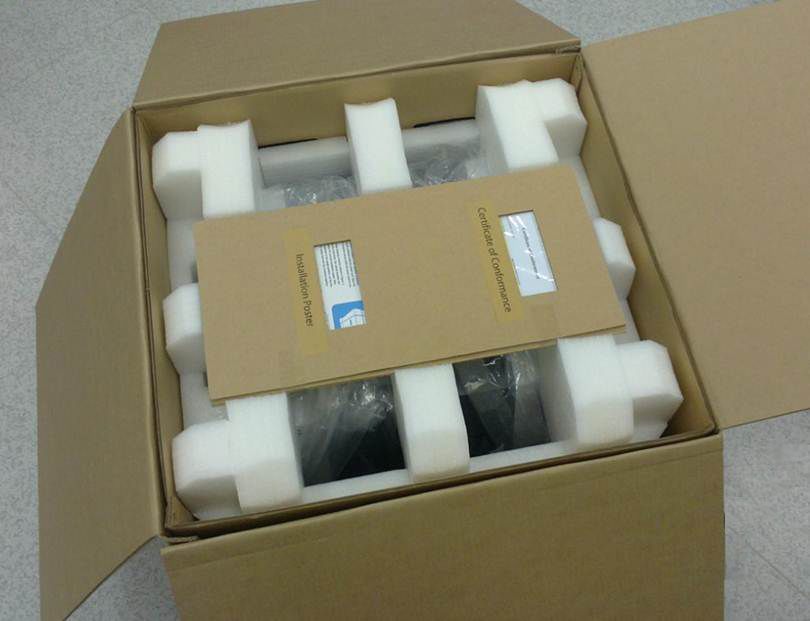
Contents

                      View error messages 80
                      Open the diagnostic report   80
                   Maintaining the Instrument 82
                     Service the instrument 82
                     Clean the instrument 82
                     Clean the optical modules 83
                   Updating the Instrument Software     84

AriaMx Real-Time PCR System Setup and User Guide                   7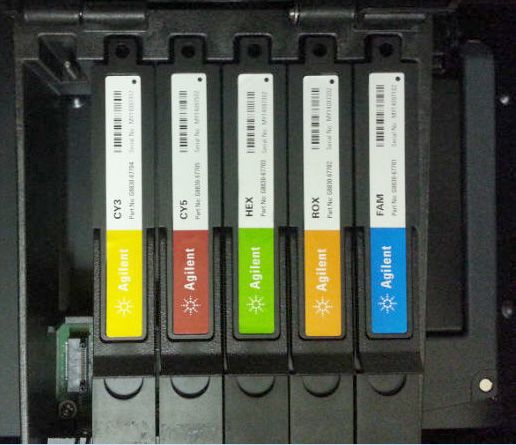
Contents

8          AriaMx Real-Time PCR System Setup and User Guide
AriaMx Real-Time PCR System
             Setup and User Guide

             1
             Before You Begin
             Overview of the AriaMx Real-Time PCR System 10
             Materials provided with the AriaMx Real-Time PCR System 10
             Hardware specifications 11
             Recommended plasticware 12
             Safety precautions 12
             Indicator LED light 17
             Agilent Technical Support 18

This chapter contains information for you to read and understand before
you start setting up the instrument.

                                 Agilent Technologies                     9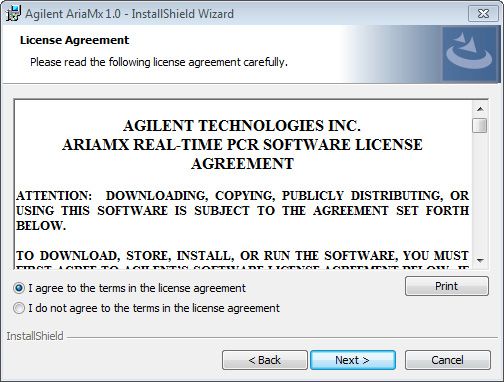
1    Before You Begin
     Overview of the AriaMx Real-Time PCR System

        Overview of the AriaMx Real-Time PCR System
                   The AriaMx Real-Time PCR System is a fully integrated quantitative PCR
                   amplification, detection, and data analysis system. The system design
                   combines a state-of-the-art thermal cycler, an advanced optical system
                   with an LED excitation source, and complete data analysis software. The
                   instrument can hold up to six optics modules, and the scanning optics
                   design delivers optimal separation between the dyes and between samples.
                   The instrument provides a closed-tube PCR detection format that can be
                   used with a variety of fluorescence detection chemistries including SYBR®
                   Green and EvaGreen dyes as well as fluorogenic probe systems including
                   TaqMan probes.

        Materials provided with the AriaMx Real-Time PCR System
                   Table 1      Materials provided

                   Materials provided                    Quantity

                   AriaMx instrument                     1

                   Certificate of Conformance            1

                   AriaMx installation poster            1

                   Power cord                            1

                   Optical modules                       Up to 6 optical modules, as selected by the user

                   AriaMx software CD                    1

                   The AriaMx instrument, the Certificate of Conformance, and the AriaMx
                   installation poster are all shipped together in the same shipping container.
                   The power cord, optical modules, and software CD are each shipped in
                   their own packaging.

                   Table 2      Materials offered as options at time of purchase

                   Options                               Quantity

                   Electronic tracking software          1 seat

                   Notebook PC                           1

10                                                      AriaMx Real-Time PCR System Setup and User Guide
Before You Begin 1
Hardware specifications
Hardware specifications
Table 3 Hardware specifications for the AriaMx Real-Time PCR System
Feature Specification
Excitation source Eight dye-specific LEDs per optical module
Detection Eight photodiodes per optical module
Dyes ROX, FAM, HEX, CY5, CY3
Six slots, swappable cartridges, no reference channel needed
Electrical power (input) 100–240 VAC, 50/60 Hz, 1100VA
Thermal system Peltier-based, 96-well block
Thermal system temperature 25.0–99.9°C
range Max Heating: >6°C/sec
Max Cooling: >2.5°C/sec
Accuracy: ±0.2°C or better at typical annealing, amplification,
and denaturation temperatures
Cycling speeds 40 cycle protocol in 43 minutes
Operating environment 20–30°C (65–95°F); 20–80% non-condensing humidity;
maximum altitude of 2000 m
Weight 50 lbs (23 kg)
Dimensions 19.7" W × 18.1" D × 16.5" H (50 cm × 46cm × 42cm)
On board quality checks Instrument QC checks:
All checks: 30 minutes
Selected checks: 10–30 minutes
Calibration:
1-minute background calibration
Data loss prevention:
Data captured from all channels on each scan
Ability to store up to 5 GB on the instrument
Warranty Two-year warranty
Plastic consumables Low-profile 0.2-ml tubes, strip tubes, and 96-well plates
See “Recommended plasticware” on page 12 for part numbers
AriaMx Real-Time PCR System Setup and User Guide 111 Before You Begin
Recommended plasticware
Recommended plasticware
Table Table 4 lists the part numbers of Agilent plates, tubes, and other
plastic consumables for use in the AriaMx instrument.
Table 4 QPCR plasticware for use in the AriaMx instrument
Agilent Part Number Description
401490 96-well plate, fully skirted, low profile
401491 96-well plate, rigid, fully skirted, low profile
401494 96-well plate, non-skirted, low profile
401493 8x strip tubes, without caps, low profile, 120 strips (10 packs of 12 strips)
401425 8x strip tube optical caps, 120 strips (10 packs of 12 strips)
401427 8x strip tube optical caps, 60 strips (5 packs of 12 strips)
401492 Adhesive seal for 96-well plates, 50-pack
Safety precautions
Electrical
Standard electrical safety precautions should be applied, including the
following:
• Always put the instrument in a location where, if needed, the power
supply can be immediately disconnected.
• Proper voltage must be supplied before you turn on the instrument for
the first time.
• The device must be connected to a grounded socket. Do not operate the
instrument from a power outlet that has no ground connection.
• Do not touch any switches or outlets with wet hands.
• Turn off the instrument before you disconnect the power cord.
• Unplug the instrument before you clean any major liquid spills and
before you service any of the electrical or internal components.
12 AriaMx Real-Time PCR System Setup and User GuideBefore You Begin 1
Safety precautions
• Do not connect the instrument to the same power strip as other high
power-draw appliances (e.g. refrigerators and centrifuges).
• Do not service the electrical components unless you are qualified to
do so.
Fluids and Reagents
• Fill reaction vessels outside the instrument so that no fluids penetrate
the instrument.
• Never cycle or incubate explosive, flammable and reactive substances in
the instrument.
• You must observe the relevant safety regulations when handling
pathogenic material, radioactive substances or other substances
hazardous to health.
• Do not submerge the instrument in any liquid.
Danger of Burns
• Do not touch the thermal block, inner side of heated lid and reaction
vessels. These areas quickly attain temperatures of greater than 50°C.
Keep the heated lid closed until temperatures of 30°C or lower are
reached.
• Do not use any materials (plates, sealings, foils, mats) which are not
sufficiently temperature-stable (up to 120°C).
Operating Environment
• The ventilation slots of the device must remain free to vent at all times.
Leave at least 10 cm of space around the instrument.
• Keep the ambient temperature between 20°C and 30°C with humidity
levels between 20% and 80% non-condensing.
• Do not operate the instrument in a hazardous or potentially explosive
environment.
AriaMx Real-Time PCR System Setup and User Guide 131 Before You Begin
Safety precautions
Equipment Ratings
• Pollution degree 2
• Installation category II
• Altitude 2000 m
• Humidity 20 to 80%, non-condensing
• Electrical supply 100-240 VAC, 50/60 Hz, 1100VA
• Temperature 20°C to 30°C
• For Indoor Use Only
Electrostatic Discharge
The instrument is static sensitive. Electrostatic discharges greater than
8000 volts may interfere with the normal operation of the USB ports on
the instrument. Handling precautions are required when working in high
static environments. Wear a grounded wrist strap and take other antistatic
precautions prior to making contact with the device in high static
environments. ESD STM5.1-1998 Class 3B.
Safety Symbols
The electrical/safety symbols described below may be displayed on the
instrument.
Power on
Power off
Caution
Caution, hot surfaces
14 AriaMx Real-Time PCR System Setup and User GuideBefore You Begin 1
Consignes de sécurité
Consignes de sécurité
Électrique
Les consignes relatives à la sécurité des installations électriques standard
doivent être respectées, notamment :
• Placez toujours l'appareil dans un emplacement où, si besoin est,
l'alimentation peut être débranchée immédiatement.
• Une tension appropriée doit être appliquée avant la première mise sous
tension de l'instrument.
• L'appareil doit être branché à une prise de courant mise à la terre.
N'utilisez jamais l'appareil à partir d'une prise de courant sans mise à
la terre.
• Ne touchez pas les commutateurs ou les prises avec les mains
mouillées.
• Éteignez l'appareil avant de débrancher le câble d'alimentation.
• Débranchez l'appareil avant de nettoyer tout déversement de liquide
important et avant de réparer l'un des composants électrique ou
interne.
• Ne branchez pas l'instrument à la même multiprise que d'autres
appareils à haute consommation électrique (p. ex., réfrigérateurs et
centrifugeuses).
• Ne tenter pas de réparer un composant électrique, sauf si vous êtes
qualifié pour le faire.
Fluides et réactifs
• Remplissez les récipients de réaction en dehors de l'instrument afin
qu'aucun fluide n'y pénètre.
• Ne soumettez aucune substance explosive, inflammable ou réactive à un
cycle ou à une incubation dans l'instrument.
• Vous devez observer les règles de sécurité en vigueur lorsque vous
manipulez des matières pathogènes, des substances radioactives ou
toute autre substance dangereuse pour la santé.
• Ne pas immerger l'instrument dans du liquide.
AriaMx Real-Time PCR System Setup and User Guide 151 Before You Begin
Consignes de sécurité
Danger de brûlures
• Ne touchez pas le bloc thermique, la partie interne du capot chauffé
ou les récipients de réaction. Ces zones atteignent rapidement des
températures supérieures à 50 °C. Maintenez le capot chauffé fermé
jusqu'à ce que la température soit inférieure ou égale à 30 °C.
• N'utilisez aucun matériel (plaques, joints, feuilles, feuillets)
insuffisamment stables en température (jusqu'à 120 °C).
Environnement d'exploitation
• Les fentes de ventilation de l'appareil ne doivent être obstruées à aucun
moment. Laissez un espace d'au moins 10 cm autour de l'instrument.
• Maintenez la température ambiante entre 20 °C et 30 °C, avec un taux
d'humidité compris entre 20 % et 80 % sans condensation.
• N'utilisez pas l'instrument dans un environnement dangereux ou
potentiellement explosif.
Cote attribuée à l'appareil
• Degré de pollution 2
• Catégorie d'installation 2
• Altitude 2 000 m
• Humidité comprise entre 20 % et 80 % sans condensation
• Alimentation électrique 100-240 V c.a., 50/60 Hz, 1100 VA
• Température comprise entre 20 °C et 30 °C
• Pour utilisation en intérieur uniquement
Décharges électrostatiques
L’appareil est sensible à l'électricité statique. Les décharges
électrostatiques supérieures à 8 000 volts peuvent interférer avec le
fonctionnement normal des ports USB de l'appareil. Des précautions de
manipulation doivent être observées pour toute utilisation dans des
environnements soumis à de fortes charges statiques. Portez un bracelet
de mise à la terre et prenez toutes les précautions antistatiques
nécessaires avant d'entrer en contact avec l'appareil dans des
environnements soumis à de fortes charges statiques. ESD STM5.1-1998
Classe 3B.
16 AriaMx Real-Time PCR System Setup and User GuideBefore You Begin 1
Indicator LED light
Symboles de sécurité
Il se peut que les symboles électriques/de sécurité décrits ci-dessous
s'affichent sur l'instrument.
Sous tension
Hors tension
Attention
Attention, surfaces chaudes
Indicator LED light
On the front of the instrument (top right corner) is a status indicator
LED. Table 5 summarizes the status codes for this LED light.
Table 5 Appearance of the status indicator LED
Appearance Instrument Status
Off The instrument is idle.
Blinking green The instrument is running.
Solid green The instrument is paused.
Blinking red The instrument has detected an error. Check the display for
an error message containing further details.
AriaMx Real-Time PCR System Setup and User Guide 171 Before You Begin
Agilent Technical Support
Agilent Technical Support
E-mail Telephone (Local toll-free)
Americas
US and Canada qpcr@agilent.com 800-227-9770 (select options 3-4-3)
Brazil chem_vendas@agilent.com 0800 7281405
Asia and Pacific
Australia agilent_assist@agilent.com 1800 802 402
Japan email_japan@agilent.com 0120-477-111
Malaysia ccc-smt@agilent.com 1-800-88-0805
New Zealand agilent_assist@agilent.com 0508 555 344
Singapore ccc-smt@agilent.com 1800 276 2622
South Korea Korea-inquiry_lsca@agilent.com 080-004-5090
Europe
Austria customercare_Austria@agilent.com 01 25125 6800
Belgium customercare_Belgium@agilent.com 02 404 92 22
Denmark customercare_Denmark@agilent.com 45 70 13 00 30
Finland customercare_Finland@agilent.com 010 802 220
France customercare_France@agilent.com 0810 446 446
Germany customercare_Germany@agilent.com 0800 603 1000
Italy customercare_Italy@agilent.com 800 012575
Netherlands customercare_Netherlands@agilent.com 020 547 2600
Spain customercare_Spain@agilent.com 901 11 68 90
Sweden customercare_Sweden@agilent.com 08 506 4 8960
Switzerland customercare_Switzerland@agilent.com 0848 8035 60
UK/Ireland customercare_UK@agilent.com 0845 712 5292
All other countries
Find local contact information at http://www.agilent.com/genomics/contactus
18 AriaMx Real-Time PCR System Setup and User GuideAriaMx Real-Time PCR System
Setup and User Guide
2
Installing and Setting Up the Instrument
Installing the AriaMx Instrument 20
Step 1. Select a location for the instrument 20
Step 2. Unpack the shipping containers 20
Step 3. Install the optical modules 23
Step 4. Clean the thermal block 28
Step 5. Connect the instrument to a power supply 28
Step 6. Connect a keyboard or mouse to the instrument (optional) 28
Step 7. Connect the instrument to a network or directly to a PC 29
Setting Up the AriaMx Instrument 32
Step 1. Turn on the instrument and calibrate the background for the
optical modules 32
Step 2. Set the instrument date and time 33
Step 3. Run a diagnostic check 34
Logging In and Creating User Accounts 35
Step 1. Log in to the instrument using an Administrator account 35
Step 2. Add user accounts 36
Step 3. Log in to your personal user account 37
Customizing Instrument Settings 38
This chapter contains instructions for installing and setting up the AriaMx
instrument.
Agilent Technologies 192 Installing and Setting Up the Instrument
Installing the AriaMx Instrument
Installing the AriaMx Instrument
Step 1. Select a location for the instrument
• Locate a solid, flat clean surface for the instrument. Make sure that:
• The instrument can stand completely stable.
• The rear air slots will not be covered.
• The unit always has at least 10 cm (approximately 4 inches) to the
next wall or neighboring instrument.
• The temperature (normal ambient) is between 20°C and 30°C with
humidity levels between 20% and 80% non-condensing.
• The atmosphere is not explosive.
Step 2. Unpack the shipping containers
The AriaMx instrument is shipped in two separate containers. The small container holds
NOTE the power cord. The large container holds the instrument and accessory tray.
Any optical modules that you ordered with the instrument are each packed and shipped
separately in their own box.
The software CD is also packed and shipped separately.
1 Open the small shipping container that holds the power cord. Remove
the power cord and set it aside for now.
2 Make sure that the large shipping container is in the upright position
(Figure 1), then cut the four plastic straps that hold the container
together.
Retain the large shipping container and all packaging materials inside. In the event that
CA U T I O N
you need to return the instrument for service, you must ship it in the original container
to maintain warranty protection.
20 AriaMx Real-Time PCR System Setup and User GuideInstalling and Setting Up the Instrument 2
Step 2. Unpack the shipping containers
Figure 1 AriaMx instrument shipping container
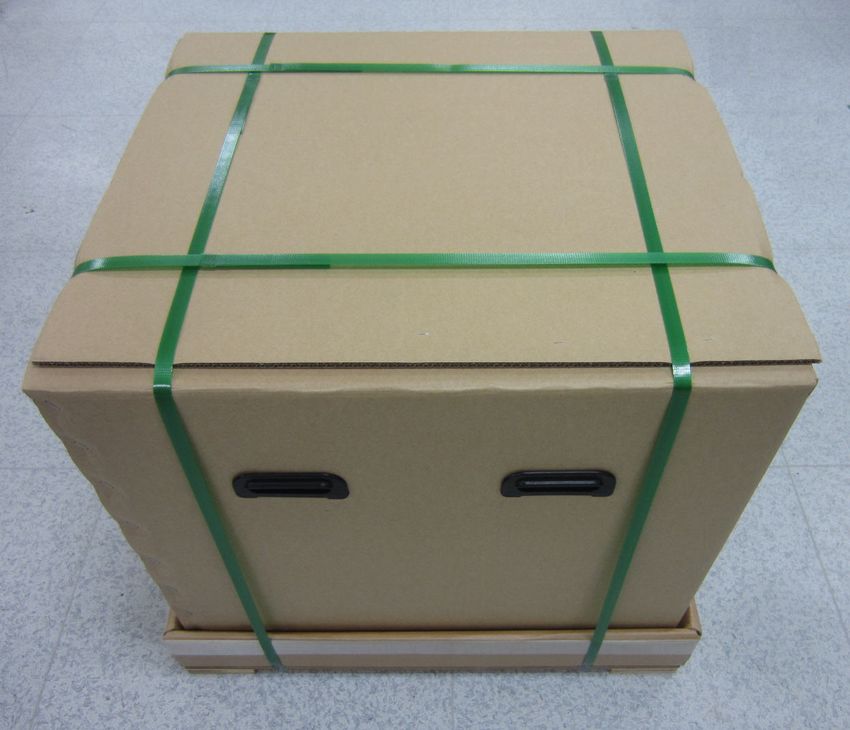
3 Open the top flaps of the large container.
Inside the container is an accessory tray (see Figure 2), which contains
the Certificate of Conformance and the installation poster.
AriaMx Real-Time PCR System Setup and User Guide 212 Installing and Setting Up the Instrument
Step 2. Unpack the shipping containers
Figure 2 Opened shipping container with accessory tray sitting on top
4 Remove the accessory tray. Unpack the installation poster from the
accessory tray and use it to guide you through the remainder of the
unpacking process.
5 Remove the foam support that sits on top of the instrument in the
shipping container.
6 Grip a handle on each side of the shipping container and lift up to
remove the box sleeve that surrounds the instrument.
The instrument sits on the base of the shipping container, as shown in
Figure 3.
22 AriaMx Real-Time PCR System Setup and User GuideInstalling and Setting Up the Instrument 2
Step 3. Install the optical modules
Figure 3 Instrument on shipping container base, with box sleeve removed
7 Remove the plastic wrapping from the instrument.
8 Lift the instrument off of the shipping container base and set it down
on its selected location (see “Step 1. Select a location for the
instrument”).
Agilent recommends that two people lift the instrument together.
Step 3. Install the optical modules
1 Open the instrument door by lifting up on the handle on the top of the
instrument. Lift the door all the way up and back.
2 Remove the piece of foam and then remove the strip of cardboard from
around the thermal block assembly (see Figure 4). Remember to retain
these pieces, along with all other packaging materials, in the event
that you need to ship the instrument for service.
The optical module housing carrier is positioned to the left of the
thermal block assembly.
AriaMx Real-Time PCR System Setup and User Guide 232 Installing and Setting Up the Instrument
Step 3. Install the optical modules
Figure 4 Foam insert (left) and underlying cardboard strip (right).
3 Slide the optical module housing carrier to the right until it is centered
in the opening of the instrument door (as shown in Figure 5). Use the
indentation on the top of the carrier to help slide it.
Figure 5 Optical module housing carrier, centered in the instrument door opening
4 Open the lid on the optical module housing carrier.
a With your thumb and index finger, pinch together the two pieces of
plastic in the indentation on the top of the carrier (see Figure 6).
b Lift the lid all the way back to reveal the six slots for the optical
modules (see Figure 7).
24 AriaMx Real-Time PCR System Setup and User GuideInstalling and Setting Up the Instrument 2
Step 3. Install the optical modules
Figure 6 Opening of the optical module housing
Figure 7 Slots for the optical modules
5 Open the boxes containing the optical modules. Remove the top piece of
foam from each box (Figure 8) then remove the plastic bag containing
the optical module.
AriaMx Real-Time PCR System Setup and User Guide 252 Installing and Setting Up the Instrument
Step 3. Install the optical modules
Figure 8 Optical module shipping box – top piece of foam removed
6 Install the optical modules into the slots in the recommended
configuration, as specified in Table 6. For any optical modules that you
do not have, leave that slot empty.
Table 6 Recommended configuration for optical modules
Slot position Optical modules
Slot 1 (right-most slot) FAM
Slot 2 ROX
Slot 3 HEX
Slot 4 CY5
Slot 5 CY3
Slot 6 (left-most slot) empty
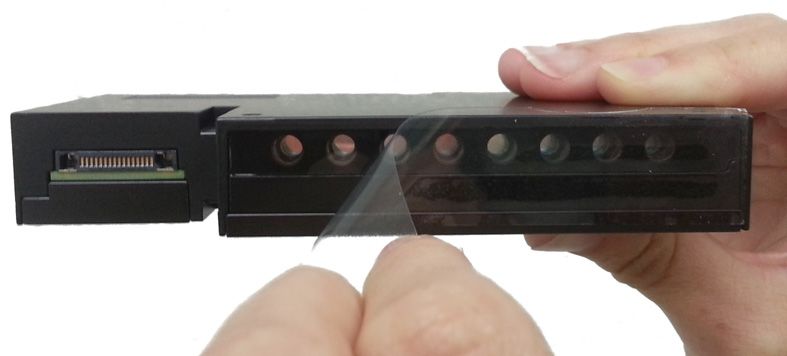
To install each optical module:
a Open the plastic bag and remove the optical module.
b Peel off the plastic film from the edge of the optical module (see
Figure 9). Once the film is removed, do not to touch the exposed
edge.
c Put the optical module in the appropriate slot in the optical module
housing. The correct orientation for the optical module is label side
up with the Agilent spark closer to the front of the instrument (see
Figure 10).
26 AriaMx Real-Time PCR System Setup and User GuideInstalling and Setting Up the Instrument 2
Step 3. Install the optical modules
Figure 9 Removal of plastic film from optical module
Figure 10 Installed optical modules
7 Lower the lid on the optical module housing until it clicks shut.
When you turn on the instrument for the first time, it will prompt you
to calibrate the background for the optical modules. Calibration is
described in “Step 1. Turn on the instrument and calibrate the
background for the optical modules” on page 32.
AriaMx Real-Time PCR System Setup and User Guide 272 Installing and Setting Up the Instrument
Step 4. Clean the thermal block
Step 4. Clean the thermal block
With the instrument door still open, clean the outside and inside surfaces
of the thermal block.
1 Lift the lid of the thermal block by pulling forward on the handle of
the lid and then lifting the lid up and away from the thermal block.
2 Using an aerosol can of compressed air, clean out the wells of the
thermal block. Hold the can 3–4 inches away from the thermal block as
you press the trigger.
3 Moisten a lint-free cleansing tissue with dH20, and gently wipe down
the thermal block and the underside of the lid. Then, close the lid of
the thermal block and wipe down the top of the lid.
4 Close the instrument door.
Step 5. Connect the instrument to a power supply
You must connect the instrument to a grounded AC outlet.
1 Plug the power cord into the power connector at the rear of the
instrument.
2 Connect the cable plug to the outlet.
Step 6. Connect a keyboard or mouse to the instrument (optional)
If desired, you can connect a keyboard or mouse to the instrument via the
USB ports on the front and back of the instrument.
• Plug the USB cable of the device into a USB port on the instrument.
Multimedia keyboards are not supported.
28 AriaMx Real-Time PCR System Setup and User GuideInstalling and Setting Up the Instrument 2
Step 7. Connect the instrument to a network or directly to a PC
Step 7. Connect the instrument to a network or directly to a PC
Connecting your instrument to a PC, either directly or though a network,
allows you to remotely retrieve data from the instrument to your PC
through the AriaMx PC software. If you do not connect your instrument to
a PC, you must transfer post-run experiment data by copying it from the
instrument to a USB drive (FAT format), and then from the USB drive to
your PC.
To connect the instrument to a network
1 Plug one end of an ethernet cable into the ethernet port on the back of
the instrument. Use a standard Cat 6 straight/crossover ethernet cable.
2 Plug the other end of the cable into a network port.
To connect the instrument directly to a PC
1 Plug one end of an ethernet cable into the ethernet port on the back of
the instrument. Use a standard Cat 6 straight/crossover ethernet cable.
2 Plug the other end of the cable into the PC.
3 After you turn on the AriaMx instrument, set a static IP address,
subnet mask, and default gateway on the instrument using the
instructions below. Note that you will need to wait to complete these
steps until after you complete “Step 1. Turn on the instrument and
calibrate the background for the optical modules” on page 32.
a On the Home screen of the AriaMx touchscreen, press Settings.
b Press Connection Settings. If you see an error message that no
network connection is detected, press OK to close the error message.
c On the Connection Settings screen, select Use Manual Configuration.
d In the IP Address, Subnet Mask, and Default Gateway fields, enter
the values shown in Figure 11. Press OK.
AriaMx Real-Time PCR System Setup and User Guide 292 Installing and Setting Up the Instrument
Step 7. Connect the instrument to a network or directly to a PC
Figure 11 Connection Settings
4 On the PC, set a static IP address, subnet mask, and default gateway
using the instructions below.
a Open the Control Panel to the Network and Sharing Center.
b Under View your active networks, click Local Area Connection
(Figure 12). Note that the appearance of the Network and Sharing
Center screen may differ slightly from that shown in Figure 12
depending on your current network setup.
Figure 12 Network and Sharing Center – View your active networks
The Local Area Connection Status dialog box opens.
c In the Local Area Connection Status dialog box, click Properties.
The Local Area Connection Properties dialog box opens
d In the list of items under This connection uses the following items,
double-click Internet Protocol Version 4 (TCP/IPv4) (Figure 13).
30 AriaMx Real-Time PCR System Setup and User GuideInstalling and Setting Up the Instrument 2
Step 7. Connect the instrument to a network or directly to a PC
Figure 13 Local Area Connection Properties dialog box – Internet Protocol Version 4
The Internet Protocol Version 4 (TCP/IPv4) Properties dialog box
opens.
e On the General tab of the dialog box, select Use the following IP
address and set the IP address, subnet mask, and default gateway to
the values shown in Figure 14. Click OK to close the dialog box.
Figure 14 Internet Protocol Version 4 dialog box – Use the following IP address
AriaMx Real-Time PCR System Setup and User Guide 312 Installing and Setting Up the Instrument
Setting Up the AriaMx Instrument
Setting Up the AriaMx Instrument
Step 1. Turn on the instrument and calibrate the background for the
optical modules
1 Press the power button located near the bottom left corner on the front
of the instrument.
The instrument performs a series of health checks to ensure basic
hardware functionality. If the health checks reveal an instrument error,
record the error and then perform a more detailed diagnostic check
(see “Step 3. Run a diagnostic check” on page 34). The instrument
performs the health checks each time it is powered on. When the tests
are complete, the instrument touchscreen opens to the Home screen.
Anytime you install new optical modules, a message box opens
prompting you to calibrate the background for the optical modules.
2 Press OK in the message box.
The Background Calibration screen opens.
3 Press Calibrate.
A message box opens instructing you to load a 96-well QPCR plate
containing 20 l of dH20 or TE buffer in each well onto the thermal
block.
4 Prepare the plate and load it into the thermal block. Close the
instrument door and press OK in the message box.
See “Load samples” on page 72 for instructions on plate loading. See
“Recommended plasticware” on page 12 for ordering information on
96-well plates.
The instrument runs the calibration. At the end of calibration, a
message box opens on the touchscreen notifying you that the calibration
was successful.
5 Click OK in the message box to close it.
The touchscreen returns to the Home screen. You are logged in to the
Guest account.
32 AriaMx Real-Time PCR System Setup and User GuideInstalling and Setting Up the Instrument 2
Step 2. Set the instrument date and time
Figure 15 Touchscreen display – Home screen
The color touchscreen on the AriaMx instrument allows you to operate the
instrument by touching the buttons on the screen. If a mouse has been
connected to the instrument, you may select buttons by clicking. When
software functions require data input from a keyboard, the touchscreen
automatically displays a virtual keyboard. You can also type in data input
using a USB-connected keyboard.
Step 2. Set the instrument date and time
1 In the bottom right corner of the touchscreen, press the time and date
this is currently displayed.
2 In the menu that opens, press Change Date & Time.
The Date & Time Settings screen opens.
3 Use the fields to set the date and time to the correct values. Press the
help icon for detailed instructions on setting the date and time on this
screen.
AriaMx Real-Time PCR System Setup and User Guide 332 Installing and Setting Up the Instrument
Step 3. Run a diagnostic check
Step 3. Run a diagnostic check
1 On the Home screen of the touchscreen, press Settings.
2 Press Instrument Diagnostic.
3 Press Run Diagnostics.
4 Mark the check box at the top of the screen labeled All Test.
5 Press Run.
A message box opens prompting you to make sure that no plate is
loaded on the thermal block.
6 Press OK to continue.
A dialog box opens displaying a schematic of the optical modules
installed in the housing.
7 Mark the check boxes for all slots in the housing that contain an optical
module. For empty slots, leave the check box clear. Press OK.
The instrument begins running the diagnostic check. The first set of
tests is the user interaction tests.
8 During the user interaction tests, perform all actions and answer
questions as prompted on the touchscreen.
After the user interaction tests, the instrument runs the diagnostic
tests. No user input is required during this set of tests.
At the end of the diagnostic check, the touchscreen opens to the
Diagnostic Report screen.
Figure 16 Diagnostic report banner, with the test results circled in red
9 Check the diagnostic report. The banner at the top of the report lists
the number of tests that passed out of the total number of test
performed (see Figure 16).
• If all tests passed, you can close the diagnostic report.
• If any of the tests failed, contact Agilent Technical Support. See
page 18 for contact information.
34 AriaMx Real-Time PCR System Setup and User GuideInstalling and Setting Up the Instrument 2
Logging In and Creating User Accounts
Logging In and Creating User Accounts
The AriaMx instrument offers individualized user accounts, allowing each
AriaMx user to log in to the instrument with their own account and save
experiments to their own user folder. Three different access levels are
available for user accounts: Administrator, User, and Guest. Each level has
specific user rights as described in Table 7.
Table 7 Access levels
Access Level Functions allowed
Guest • Access rights to the Guest folder
User • Access rights to the Guest and personal user folder
Administrator • Access rights to the Guest folder and all user folders
• Creation and management of user accounts
• Installation of instrument software updates
• Access rights to the instrument diagnostic reports
Each time you turn on the instrument, you are automatically logged in to
the Guest account.
Step 1. Log in to the instrument using an Administrator account
1 From the Home screen of the touchscreen, press User Login.
Alternatively, from any screen of the touchscreen, press Current User
at the bottom of the screen, then press Open Login Page.
The User Login screen opens.
2 In the User Name drop-down, select the user name for an account that
has Administrator access level.
The instrument comes preloaded with a default Administrator account
that you can select here.
3 In the Password field, type the password for the account.
The default password for the Administrator user name is ADMIN.
4 Press Login.
AriaMx Real-Time PCR System Setup and User Guide 352 Installing and Setting Up the Instrument
Step 2. Add user accounts
A message box opens confirming that you logged in to the instrument.
Press OK to close the message box.
5 (Optional) Change the default password for the Administrator account.
a From the Home screen, press Settings.
b Press User Management.
c On the User Management screen, select the Administrator account
and press Edit.
d In the Password and Confirm Password fields, type a new password
for the account.
e Press OK to save the new password.
Step 2. Add user accounts
1 From the Home screen, press Settings.
2 Press User Management.
The User Management screen opens listing the available user names and
corresponding access levels.
3 Press Add.
The Add User screen opens.
Figure 17 Add User screen
4 In the User Name field, type a user name.
5 In the Access Level drop-down list, select an access level for the
account. The options are Administrator and User.
See Table 7 on page 35 for a description of access levels.
36 AriaMx Real-Time PCR System Setup and User GuideInstalling and Setting Up the Instrument 2
Step 3. Log in to your personal user account
6 In the Password and Confirm Password fields, type a password for the
account.
7 Press OK to save the account.
A message box opens confirming the creation of the new account. Click
OK to close the message box. You are returned to the User Management
screen.
8 Repeat step 3 through step 7 for any additional user accounts that you
want to create.
Step 3. Log in to your personal user account
Logging in to your personal account allows you to access your user folder.
If you are logged in as Guest, you must save the experiment to the Guest
folder.
1 From the Home screen of the touchscreen, press User Login.
Alternatively, from any screen of the touchscreen, press Current User
at the bottom of the screen, then press Open Login Page.
The User Login screen opens.
2 In the User Name drop-down, select your user name. In the Password
field, type the password for the account.
3 Press Login.
A message box opens confirming that you logged in to the instrument.
Press OK to close the message box.
To log out, press Current User at the bottom of any screen, then press
Log Out.
AriaMx Real-Time PCR System Setup and User Guide 372 Installing and Setting Up the Instrument
Customizing Instrument Settings
Customizing Instrument Settings
You can access a variety of instrument settings using the buttons on the
Settings screen of the touchscreen. Each button takes you to a different
screen in the touchscreen software. From each screen, press the Help icon
for more information on the settings available.
Table 8 Buttons on the Settings screen
Button Description
User Management – Opens the User Management screen, which has tools for
creating and managing user accounts. This screen can only be accessed when
an Administrator user is logged in to the instrument.
System Settings – Opens the System Settings screen, which has tools for
accessing and managing instrument settings including date/time, optical
module information, PC connections, experiment resumption, instrument
name and calibration processes.
Software Updates – Displays software version information for the instrument.
An Administrator user can use this screen to update the AriaMx instrument
software.
Hot Top Settings – Use this button to enable or disable the instrument hot top.
Connection Settings – Displays the IP address and other network information
for the instrument.
Instrument Diagnostic – Opens the Diagnostic Test screen, which contains
buttons for running instrument troubleshooting tests and viewing and
reporting the results. See “Open the diagnostic report” on page 80.
Calibrate Touch – Use this button to calibrate the touchscreen. The calibration
screen instructs you to touch a marker (+) appearing on the screen in order to
calibrate the touchscreen response functions.
38 AriaMx Real-Time PCR System Setup and User GuideAriaMx Real-Time PCR System
Setup and User Guide
3
Installation of the AriaMx Software
Minimum requirements for running the AriaMx software 40
Installing the Standard AriaMx Software 41
Install the AriaMx software 41
Launch the AriaMx software 47
Installing the AriaMx ET (Electronic Tracking) Software 48
Install Microsoft SQL Server 2012 48
Install the AriaMx ET software 54
Configure and start Microsoft Distributed Transaction Coordinator
(MSDTC) service 62
Launch the AriaMx ET software 66
Installing Microsoft .NET Framework 4.0 67
This chapter contains installation instructions for installing the AriaMx
software on your PC.
Visit www.agilent.com/genomics/AriaMx to download the latest version
of the AriaMx software.
Agilent Technologies 393 Installation of the AriaMx Software
Minimum requirements for running the AriaMx software
Minimum requirements for running the AriaMx software
Before installing the AriaMx software, see Table 9 for the minimum PC
requirements needed to run the software.
Table 9 Minimum requirements for running the AriaMx software
Operating system Windows 7 (Professional and Ultimate editions)
Supported architectures ×86 (32 bit)
×64 (64 bit)
Programs* Microsoft .NET Framework 4.0
Runtime components of Microsoft Visual C++ 2010 Libraries
Processor 2 GHz Dual Core Processor
Working memory (RAM) 2 GB (more is recommended)
Hard disk space 40 GB
Display resolution 1024 × 768 (1280 × 1024 is recommended)
* If you do not have Microsoft .NET Framework 4.0 installed on your PC, you can install it
using the installer provided on the AriaMx software CD (see “Installing Microsoft .NET
Framework 4.0” on page 67). If you do not have the needed Microsoft Visual C++ 2010
components, then the AriaMx installer will automatically install them to your PC when you
initiate installation of the AriaMx software.
40 AriaMx Real-Time PCR System Setup and User GuideInstallation of the AriaMx Software 3
Installing the Standard AriaMx Software
Installing the Standard AriaMx Software
The instructions in this chapter are for the installation of the standard AriaMx software. If
NOTE you purchased the optional 21 CFR Part 11-compatible features – which include user
authentication, database data storage, and audit trail support – use the instructions in
“Installing the AriaMx ET (Electronic Tracking) Software” on page 48.
The AriaMx Real-Time PCR System comes with a CD for installing the
AriaMx software on a desktop or laptop PC. However, because Agilent is
always improving the software, a newer version may already be available.
Before you install the software using the provided CD, check
www.agilent.com/genomics/AriaMx to see if a newer version is available
for download.
If you connected your instrument directly to a PC, install the software on
that PC. If you connected your instrument to a network, install the
software on a network PC. You can install the standard AriaMx software
on an unlimited number of PCs.
Before starting the installation, make sure your PC meets the minimum
requirements needed to run the AriaMx software. See Table 9 on page 40
for a list of the minimum requirements.
Install the AriaMx software
To install the AriaMx software:
1 Insert the provided CD into the CD drive of your PC.
2 In Windows Explorer, open the contents of the CD.
3 Open the AriaMx PC Software 1.0 Installer subfolder. In this subfolder,
double-click the file called Agilent AriaMx Software Setup 1.0.exe.
The AriaMx software installation wizard starts. Following the file
extraction process, the wizard opens to the Welcome window.
AriaMx Real-Time PCR System Setup and User Guide 413 Installation of the AriaMx Software
Install the AriaMx software
If you receive an error message stating that Microsoft .NET Framework 4.0 needs to be
NOTE installed, you must cancel the installation and install Microsoft .NET Framework 4.0 first. To
cancel the AriaMx installation, click OK in the error message box, then click Finish in the
installation wizard.
See “Installing Microsoft .NET Framework 4.0” on page 67 for instructions on installing
Microsoft .NET Framework 4.0.
Figure 18 Agilent AriaMx installation wizard – Welcome window
1 Click Next to continue with the installation.
The License Agreement window opens.
42 AriaMx Real-Time PCR System Setup and User GuideInstallation of the AriaMx Software 3
Install the AriaMx software
Figure 19 Agilent AriaMx installation wizard – License Agreement window
2 If you accept the terms of this agreement, select I agree to the terms
in the license agreement and click Next. (If desired, click Print before
clicking Next to print a copy of the license agreement.)
The Setup Type window opens.
AriaMx Real-Time PCR System Setup and User Guide 433 Installation of the AriaMx Software
Install the AriaMx software
Figure 20 Agilent AriaMx installation wizard – Setup Type window
3 In the Setup Type window, Standard is selected by default. Leave this
default selection in place and click Next.
The Destination Folder window opens.
44 AriaMx Real-Time PCR System Setup and User GuideInstallation of the AriaMx Software 3
Install the AriaMx software
.
Figure 21 Agilent AriaMx installation wizard – Destination Folder window
4 Designate a folder for the software files. The default folder is
C:\Program Files (x86)\Agilent\Agilent AriaMx.
• If you want to install the software to the default folder, click Next to
continue.
• If you want to designate a different folder, click Change in the
Destination Folder window. In the dialog box that opens, browse to
the desired folder, select the folder, and click Open. Then, in the
Destination Folder window, click Next to continue.
The Ready to Install window opens.
AriaMx Real-Time PCR System Setup and User Guide 453 Installation of the AriaMx Software
Install the AriaMx software
Figure 22 Agilent AriaMx installation wizard – Ready to Install window
5 Click Install.
The wizard installs the AriaMx software to the folder designated in
step 4. When installation is complete, the InstallShield Wizard
Completed window opens.
46 AriaMx Real-Time PCR System Setup and User GuideInstallation of the AriaMx Software 3
Launch the AriaMx software
Figure 23 Agilent AriaMx installation wizard – InstallShield Wizard Completed window
6 Click Finish to close the wizard.
Launch the AriaMx software
After installation is complete, the software is ready to launch.
To launch the AriaMx software:
• From the Start menu, click All Programs > Agilent > Agilent AriaMx
> Agilent AriaMx 1.0.
The software opens to the Getting Started screen.
During installation, a set of sample experiments and sample templates were saved to the
NOTE following folders.
C:\Users\Public\Documents\Agilent AriaMx\Sample Experiments
C:\Users\Public\Documents\Agilent AriaMx\Experiment Templates
You can now open these files in the AriaMx software.
AriaMx Real-Time PCR System Setup and User Guide 473 Installation of the AriaMx Software
Installing the AriaMx ET (Electronic Tracking) Software
Installing the AriaMx ET (Electronic Tracking) Software
The instructions in this chapter are only suitable if you purchased the AriaMx ET (electronic
NOTE tracking) software, which includes the optional 21 CFR Part 11-compatible features. If you
did not purchase the ET version of the software, see the installation instructions in
“Installing the Standard AriaMx Software” on page 41.
The AriaMx Real-Time PCR System comes with a CD for installing the
AriaMx ET software on a desktop or laptop PC. Before you install the
software using the provided CD, check www.agilent.com/genomics/AriaMx
to see if a newer version is available for download.
Make sure your PC meets the minimum requirements needed to run the
AriaMx software. See Table 9 on page 40 for a list of the minimum
requirements.
Note for MxPro users The database system used by AriaMx ET (Microsoft
SQL Server 2012) and the database system used by MxPro ET (Microsoft
Server Desktop Engine) are known to have incompatibility issues. For this
reason, AriaMx ET users need to make sure to install SQL Server on a PC
that is not already running Microsoft Server Desktop Engine.
Install Microsoft SQL Server 2012
The AriaMx ET software uses SQL Server for storage of the databases.
Install SQL Server prior to installing the AriaMx ET software.
You can install SQL Server on a different PC than the AriaMx ET software provided that the
NOTE two PCs are on the same network domain. Importantly, the AriaMx ET PC and the SQL
Server PC need to be joined to the same domain prior to installation of the AriaMx ET
software. Your network administrator can help you join the PCs to the same domain.
To install SQL Server:
1 Insert the provided CD into the CD drive of your PC.
2 In Windows Explorer, open the contents of the CD.
48 AriaMx Real-Time PCR System Setup and User GuideInstallation of the AriaMx Software 3
Install Microsoft SQL Server 2012
3 Open the AriaMx SQL Server 1.0 Installer subfolder. In this subfolder,
double-click the file called Agilent.AriaMx.SQLServer2012Setup.exe.
The AriaMx SQL Server installation wizard opens.
Figure 24 AriaMx Microsoft SQL Server 2012 installation wizard
4 Click Next to continue.
The License Agreement window opens.
AriaMx Real-Time PCR System Setup and User Guide 493 Installation of the AriaMx Software
Install Microsoft SQL Server 2012
Figure 25 AriaMx Microsoft SQL Server 2012 installation wizard – License Agreement
window
5 If you accept the terms of this agreement, select I accept the terms in
the license agreement and click Next. (If desired, click Print before
clicking Next to print a copy of the license agreement.)
The Instance Configuration window opens.
50 AriaMx Real-Time PCR System Setup and User GuideInstallation of the AriaMx Software 3
Install Microsoft SQL Server 2012
Figure 26 AriaMx Microsoft SQL Server 2012 installation wizard – Instance
Configuration window
6 In the Instance Name field of the Instance Configuration window, type a
name for the server instance you want to install. Hover your cursor
over the Information icon next to the field to see guidelines on selecting
a valid instance name.
7 In the Enter Password field, type a password for the server instance.
Hover your cursor over the Information icon next to the field to see
guidelines on selecting a valid password. Type the password again in
the Confirm Password field.
8 Click Next in the Instance Configuration window.
The Ready to Install window opens.
AriaMx Real-Time PCR System Setup and User Guide 513 Installation of the AriaMx Software
Install Microsoft SQL Server 2012
Figure 27 AriaMx Microsoft SQL Server 2012 installation wizard – Ready to Install
window
9 Click Install.
The Installing window opens and remains open until installation is
complete.
52 AriaMx Real-Time PCR System Setup and User GuideInstallation of the AriaMx Software 3
Install Microsoft SQL Server 2012
Figure 28 AriaMx Microsoft SQL Server 2012 installation wizard – Installing window
When installation is complete, the SQL Server 2012 Installation
Completed window opens.
AriaMx Real-Time PCR System Setup and User Guide 533 Installation of the AriaMx Software
Install the AriaMx ET software
Figure 29 AriaMx Microsoft SQL Server 2012 installation wizard – SQL Server 2012
Installation Completed window
10 Click Finish to close the wizard.
Install the AriaMx ET software
To install the AriaMx ET software:
1 Insert the provided CD into the CD drive of your PC.
2 In Windows Explorer, open the contents of the CD.
3 Open the AriaMx PC Software 1.0 Installer subfolder. In this subfolder,
double-click the file called Agilent AriaMx Software Setup 1.0.exe.
The AriaMx software installation wizard starts. Following the file
extraction process, the wizard opens to the Welcome window.
54 AriaMx Real-Time PCR System Setup and User GuideInstallation of the AriaMx Software 3
Install the AriaMx ET software
If you receive an error message stating that Microsoft .NET Framework 4.0 needs to be
NOTE installed, cancel the installation of the AriaMx software and install Microsoft .NET
Framework 4.0 first. See “Installing Microsoft .NET Framework 4.0” on page 67.
Figure 30 Agilent AriaMx installation wizard – Welcome window
1 Click Next to continue with the installation.
The License Agreement window opens.
AriaMx Real-Time PCR System Setup and User Guide 553 Installation of the AriaMx Software
Install the AriaMx ET software
Figure 31 Agilent AriaMx installation wizard – License Agreement window
2 If you accept the terms of this agreement, select I agree to the terms
in the license agreement and click Next. (If desired, click Print before
clicking Next to print a copy of the license agreement.)
The Setup Type window opens.
56 AriaMx Real-Time PCR System Setup and User GuideInstallation of the AriaMx Software 3
Install the AriaMx ET software
Figure 32 Agilent AriaMx installation wizard – Setup Type window
3 In the Setup Type window, select Electronic Tracking and click Next.
The Software Activation window opens.
AriaMx Real-Time PCR System Setup and User Guide 573 Installation of the AriaMx Software
Install the AriaMx ET software
Figure 33 Agilent AriaMx installation wizard – Software Activation window
4 The Software Activation window displays the Licensing Host ID. Follow
the instructions provided on your Software Entitlement Certificate to
use this Licensing Host ID to redeem your software license and save the
file to your PC. Then, in the Software Activation window, click Browse
to open a dialog box where you can browse to the folder containing the
license file. Select the file and click Open.
The dialog box closes and you are returned to the Software Activation
window.
5 Click Next.
The Database Server window opens.
58 AriaMx Real-Time PCR System Setup and User GuideInstallation of the AriaMx Software 3
Install the AriaMx ET software
Figure 34 Agilent AriaMx installation wizard – Database Server window
6 In the drop-down list at the top of the Database Server window, select
the database server instance that you set up while installing SQL Server
(see step 6 on page 51).
7 In the Password field, type the password for the database server instance
that you entered while installing SQL Server (see step 7 on page 51).
8 Select a database to use as the primary database when you log in to
the AriaMx ET software.
• To create a new database, select Create new database. Type a name
for the database into the adjacent field or use the default database
name.
• To select an existing database, select Select existing database. Click
Browse, and in the dialog box that opens, select the database that
you want to use and click OK. The dialog box closes.
After you make your selection, click Next in the Database Server
window.
The Destination Folder window opens.
AriaMx Real-Time PCR System Setup and User Guide 59You can also read