TUTORIAL: UBUNTU ON THE ZYNQ-7000 SOC FEATURING THE AVNET ZEDBOARD - APRIL 2013 VERSION 01
←
→
Page content transcription
If your browser does not render page correctly, please read the page content below
Tutorial:
                      Ubuntu on the
                    Zynq™-7000 SoC
             Featuring the Avnet ZedBoard

April 2013
Version 01

                 Copyright © 2013 Avnet Inc. All rights reserved
Table of Contents
Table of Contents ................................................................................................................ 2
Lab Setup for Xilinx 14.4 Tools ............................................................................................ 3
  Software .......................................................................................................................... 3
  Hardware ........................................................................................................................ 3
Technical Support ............................................................................................................... 4
Tutorial Notes ..................................................................................................................... 5
Tutorial Prerequisites.......................................................................................................... 5
Tutorial Overview................................................................................................................ 6
Lab 1 - FPGA Hardware Platform ........................................................................................ 7
  Experiment 1: Obtain and Build the Hardware Platform ............................................... 7
Lab 2 - Create the Second Stage Boot Loader (U-boot).................................................... 14
  Experiment 1: Clone the Xilinx U-Boot Git Repository ................................................. 15
  Experiment 2: Configuring U-Boot for the ZedBoard Target ........................................ 19
  Experiment 3: Building U-Boot from the Configured Source ....................................... 23
Lab 3 – Partition the SD Card for Booting ......................................................................... 28
  Experiment 1: Format the SD Card for Ubuntu Booting ............................................... 28
Lab 4 - Create the First Stage Boot Loader ....................................................................... 41
  Experiment 1: Create the Boot Image .......................................................................... 41
  Experiment 2: Boot ZedBoard Using New Boot Image ................................................. 48
Lab 5 – Configure and Build the Linux Kernel ................................................................... 54
  Experiment 1: Clone the ADI Linux Kernel Git Repository ............................................ 54
  Experiment 2: Configure and Build the Linux Kernel .................................................... 58
Lab 6 – Install the Device Tree .......................................................................................... 62
  Experiment 1: Compile the Device Tree Source File .................................................... 63
Lab 7 – Obtain and Load the Root File System ................................................................. 66
  Experiment 1: Download and Install the Root File System .......................................... 67
Lab 8 – Boot Ubuntu ......................................................................................................... 70
  Experiment 1: Boot the ZedBoard to the Ubuntu Desktop .......................................... 71
Lab 9 – Ubuntu Demo ....................................................................................................... 76
  Experiment 1: The Basic Desktop ................................................................................. 76
  Experiment 2: Sound .................................................................................................... 85
Appendix I - Installing RHEL EPEL Repo on Centos 6.x...................................................... 90
Revision History ................................................................................................................ 92
Resources .......................................................................................................................... 92

                                                 ZedBoard Ubuntu Tutorial : 2
Lab Setup for Xilinx 14.4 Tools
To complete the Tutorial labs, the following setups are recommended.

Software
    •    Xilinx ISE WebPACK 14.4 (Free license and download from Xilinx website)
    •    Cypress CY7C64225 USB-to-UART Bridge Driver
    •    Tera Term (Exact version used for this Tutorial is v4.75)
    •    VMware Player V5.0.0 (Exact version used is VMware-player-5.0.0-812388.exe)
    •    Virtual Machine Linux environment. For instructions on how to build this from
         scratch, see the Avnet Speedway – Implementing Linux on the Zynq-7000 SoC
         located at:
          http://www.zedboard.org/course/implementing-linux-zynq-7000-soc
    •    Adobe Reader for viewing PDF content (Exact version used is Adobe Reader X
         10.1.4)
    •    7-zip file archive utility
Hardware
   •    PC workstation with at least 5 GB RAM, 30GB free hard disk space, Windows 7
        64-bit operating system, and Internet access to download updates from the
        source code repository and software mirror sites.
   •    Available SD card slot on PC or external USB-based SD card reader
   •    Avnet ZedBoard (AES-Z7EV-7Z020-G) – included in kit
   •    2 USB cables (Type A to Micro-USB Type B) – 1 included in kit
   •    4GB SD card – included in kit
   •    CAT-5 Ethernet cable
   •    4-port USB Hub
   •    USB Keyboard
   •    USB Mouse
   •    HDMI Cable
   •    HDMI Monitor with speakers
           o or DVI Monitor with an HDMI-DVI adapter and external speakers or
             headphones connected to Line Out on the ZedBoard

                                      ZedBoard Ubuntu Tutorial : 3
Technical Support
For technical support with any of the labs, please contact your local Avnet/Silica FAE or
visit the ZedBoard.org support forum:

       http://www.zedboard.org/forum

Additional technical support resources are listed below.

ZedBoard Kit support page with Documentation and Reference Designs

       http://www.zedboard.org/content/support

For Xilinx technical support, you may contact your local Avnet/Silica FAE or Xilinx Online
Technical Support at www.support.xilinx.com . On this site you will also find the
following resources for assistance:

   •   Software, IP, and Documentation Updates
   •   Access to Technical Support Web Tools
   •   Searchable Answer Database with Over 4,000 Solutions
   •   User Forums
   •   Training - Select instructor-led classes and recorded e-learning options

Contact your Avnet/Silica FAE or Avnet Support for any additional questions regarding
the ZedBoard reference designs, kit hardware, or if you are interested in designing any
of the kit devices into your next design.

       http://www.em.avnet.com/techsupport

                                 ZedBoard Ubuntu Tutorial : 4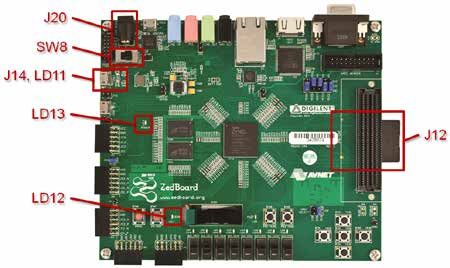
Tutorial Notes
Each lab in the tutorial begins with a brief description of the objective and a set of
general instructions. If these are sufficient you may proceed on your own. For those
with less experience, detailed instructions for all steps are provided.

Lab instructions using the SD card assume that the card is connected to the host system
via a USB adapter.

Tutorial Prerequisites
The labs in this document assume that you are using a Windows 7 Host system and a
VMWare player running the Linux environment from the Implementing Linux on the
Zynq-7000 SoC course.

The labs assume that you have a USB adapter to read/write the SD card that will be used
for booting Ubuntu on the ZedBoard. If you have an SD card slot the operations will be
much the same, but you won’t have to worry about USB devices being registered
between the Windows host machine and the Virtual Machine.

It would be an advantage to have some knowledge of the Xilinx Tools and the general
architecture and operation of the Zynq device. A good overview can be found in the
Avnet Speedway Introduction to Zynq.

                               ZedBoard Ubuntu Tutorial : 5
Tutorial Overview
This tutorial provides a means to integrate several different technologies on a single
platform. Using the Avnet ZedBoard, we have the power of a 64-bit 800 MHz dual core
Arm-9 Cortex processor chip, combined with the unrivalled flexibility of a Xilinx FPGA to
implement custom hardware systems.         We use a Linux kernel as the foundation
operating system running on the processor cores, but also add on a fully featured
desktop from Ubuntu, contained in the root file system. The desktop allows the
ZedBoard to function as a personal computer using a USB Keyboard and mouse, along
with an HDMI monitor.

With Linux and Ubuntu in place, a vast array of applications can be installed and used,
just as if a standard desktop PC were available. This includes the potential to develop in
a native application development environment on the ARM system.

Why do we want a desktop computer in an embedded system? Because this is the
future of mobile computing. By the end of 2013, the first smartphones will be
commercially available that implement an Ubuntu desktop and an Android environment
running side by side on top of a Linux kernel. This is possible because the Ubuntu
desktop and the Java VM use a common Linux kernel.

                                ZedBoard Ubuntu Tutorial : 6
Lab 1 - FPGA Hardware Platform
Lab Overview
The hardware platform used for Ubuntu was created with the Xilinx Design Tools,
version 14.4. For the sake of convenience we will begin with the source files for a Xilinx
Platform Studio project, but if you would like additional information on creating a Zynq
processor system completely from scratch, please refer to the Avnet Speedway
Introduction to Zynq.

When you have completed Lab 1, you will know how to do the following:

   •   Build a project with Xilinx Platform Studio to encapsulate the hardware design in
       a system.bit file.

Experiment 1: Obtain and Build the Hardware Platform
This experiment shows how to download the hardware source files for the Ubuntu
system from ADI, and how to generate the system.bit file.

Experiment 1 General Instruction:

Download a hardware platform from the ADI website that provides the components
necessary to run a desktop platform.

       http://wiki.analog.com/resources/fpga/xilinx/kc705/adv7511

Generate a bitstream using Xilinx Platform Studio.

Experiment 1 Step-by-Step Instructions:

   1. Using the web browser of your choice, browse to the website URL:

               http://wiki.analog.com/resources/fpga/xilinx/kc705/adv7511

       Download and save the Zed HDL Reference Design from the link:

                        cf_adv7511_zed_edk_14_4_2013_02_05.tar.gz

                                ZedBoard Ubuntu Tutorial : 7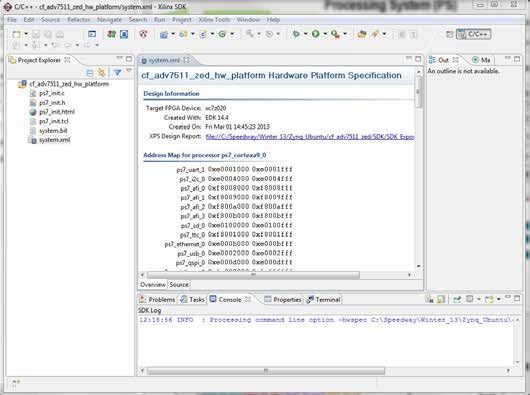
2. Use a decompression utility such as 7-zip to extract the two folders into:

                              C:\ZedBoard\Zynq_Ubuntu

                      Figure 1 – Hardware Source Folders

   You will extract two folders:
              §   cf_adv7511_zed
              §   cf_lib

3. Browse into the cf_adv7511_zed folder and double-click on the system.xmp file.
   This will launch Xilinx Platform Studio.

                            ZedBoard Ubuntu Tutorial : 8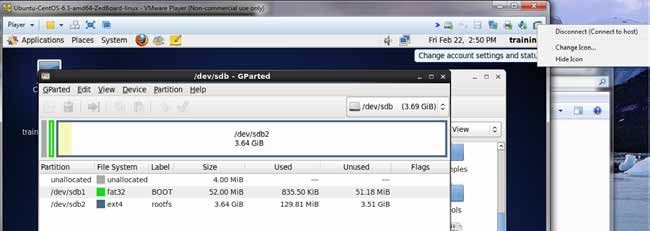
4. In the Navigator panel on the left side of XPS, click on the Generate BitStream
   icon. The build process to create a system.bit file may take 20-40 minutes
   depending on the capabilities of your host system

            Figure 2 – Generate Bitstream in Xilinx Platform Studio

5. Once the bitstream has been generated successfully, we will make preparations
   to create software in later labs by initializing the Software Development Kit
   environment. We will also save the system.bit file created for later use in a boot
   image that will be used to start the software running in the ZedBoard at power
   up. The system.bit file is created at:

   C:\ZedBoard\Zynq_Ubuntu\cf_adv7511_zed\implementation\system.bit

   Using Windows Explorer, copy the system.bit file and browse to:

                              C:\ZedBoard\Zynq_Ubuntu

   Create a new folder called bootfiles and paste the bitfile in at that location. We
   will be using it later when we create a boot image for the ZedBoard.

                            ZedBoard Ubuntu Tutorial : 9
6. In the Navigator panel click on the SDK Export Design icon.

                Figure 3 – Xilinx Software Development Kit Icon

7. Accept the default location for the hardware description files, ensure the
   checkbox for the bitstream and BMM files is ticked, and click on the Export and
   Launch SDK button.

                    Figure 4 – Export Hardware to the SDK

8. When the hardware export completes and the SDK launches, you will be asked
   to select a workspace. Make sure that the workspace path you select is within
   the directory of your hardware project – it is entirely possible that the last
   workspace used by the SDK will be shown in the Workspace path. If this is the
   case, browse to the correct folder, which will be the path of your hardware
   project appended with:

                        cf_adv7511_zed\SDK\SDK_Workspace

   When you are satisfied the workspace path is correct, click the OK button to
   proceed.

                           ZedBoard Ubuntu Tutorial : 10
Figure 5 – Select an SDK Workspace
9. When the SDK launch is complete, you should see the following SDK screen
representing the hardware platform.
Figure 6 – Xilinx Software Development Kit
ZedBoard Ubuntu Tutorial : 1110. In order to boot the ZedBoard, we are going to need a bootstrap loader to bring
up an environment that can be eventually used to load an operating system. To
do that we will create a new Application project for a 1st stage boot loader.
Select File -> New -> Application Project from the menu. Enter zynq_fsbl_0 for
the Project Name and click Next.
Figure 7 – First Stage Bootloader Project
ZedBoard Ubuntu Tutorial : 1211. Select Zynq FSBL from the Available Templates list and click Finish.
Figure 8 – First Stage Boot Loader Template
The SDK will create a zynq_fsbl_0 project and a zynq_fsbl_0_bsp (Board Support
Package) project, and will automatically build the software.
12. The elf file for the bootstrap loader is created at:
C:\ZedBoard\Zynq_Ubuntu\cf_adv7511_zed\SDK\SDK_Workspace\zynq_fsbl_
0\Debug\zynq_fsbl_0.elf
Using Windows Explorer, copy the zynq_fsbl_0.elf and browse to the folder
created earlier to hold the system.bit file:
C:\ZedBoard\Zynq_Ubuntu\bootfiles
Paste the elf file in at that location. We will be using it later when we create a
boot image for the ZedBoard.
13. You may close the SDK and XPS applications.
ZedBoard Ubuntu Tutorial : 13Lab 2 - Create the Second Stage Boot Loader (U-boot)
Lab Overview
Typically when booting up an embedded processing system, there are a series of low-
level device-specific operations that are executed to bring the system to a basic
operating state. Tasks to be performed may include processor register initialization,
memory initialization, peripheral detection and verification, and cache activation. At
this stage there are very few resources available, and hence the bootstrap or first-stage
loader and its associated software must be as compact as possible.
Once the processing system is fully operational, more complex operations, such as
loading and running an operating system can be performed. This is beyond the
capabilities of the bootstrap loader, so as its final task it loads and passes control to a
larger and more capable second stage loader. For the purposes of running Linux on our
embedded system, U-boot provides all the capabilities needed to act as our second
stage.
Why create the second stage image before we have the first stage loader in place? The
initial bootstrap loader image must contain the executable for the second stage loader
so that it may complete its final task. Therefore, before we can create the first stage
image, we must have the second stage boot loader built.
When you have completed this lab, you will know how to:
• Retrieve U-Boot source code from the Xilinx repository
• Configure U-Boot for the ZedBoard target
• Build U-Boot for the ZedBoard target
ZedBoard Ubuntu Tutorial : 14Experiment 1: Clone the Xilinx U-Boot Git Repository
This experiment shows how to clone the Xilinx U-Boot Git repository for Zynq. To
successfully complete this lab, you will need Internet access to retrieve the repository
information from the Xilinx website.
Experiment 1 General Instruction:
Make a local copy of the Xilinx U-Boot Git repository in your home directory, and check
out the branch compatible with the Linux kernel we intend to build.
On your Linux host, enter the following commands:
$ cd ~
$ git clone git://git.xilinx.com/u-boot-xlnx.git
$ cd u-boot-xlnx
$ git checkout -b xilinx-14.2-build1-trd \
xilinx-14.2-build1-trd
Experiment 1 Step-by-Step Instructions:
1. If the CentOS virtual machine is not already open, launch the VMware Player
application by selecting Start à All Programs à VMware à VMware Player. If
the CentOS virtual machine is already open, skip ahead to Step 4.
Figure 9 – The VMware Player Application Icon
2. Select the virtual machine named Ubuntu-CentOS-6.3-amd64-ZedBoard-linux
from the selections on the left and click on the Play virtual machine button to
the right.
If prompted for whether the virtual machine has been copied or moved, click on
the Moved button.
ZedBoard Ubuntu Tutorial : 15Figure 10 – The VMware Player Application
3. If prompted for a workstation login, click on the user entry training and enter the
password Avnet in order to log into the system.
Figure 11 – The CentOS Workstation Login
ZedBoard Ubuntu Tutorial : 164. If a terminal is not already open on the desktop of the CentOS guest operating
system, open a terminal window through the ApplicationsàSystem
ToolsàTerminal menu item.
Figure 12 – Launching the CentOS Terminal from the Desktop
5. The Xilinx U-Boot Git repository is located at the following URL:
git://git.xilinx.com/u-boot-xlnx.git
To get a working copy of the codebase, clone the remote repository to your local
machine. Cloning creates the repository and checks out the latest version, which
is referred to as HEAD.
Use the following Git command to clone the repository.
$ git clone git://git.xilinx.com/u-boot-xlnx.git
6. Wait until the clone operation completes, this could take 5-20 minutes
depending upon your connection speed.
The clone command sets up a few convenience items for you by:
• Keeping the address of the original repository
• Aliasing the address of the original repository as origin so that changes
can be easily sent back (if you have authorization) to the remote
repository
ZedBoard Ubuntu Tutorial : 17Figure 13 – Using the Git Clone Command
7. Change into the U-Boot source folder.
$ cd u-boot-xlnx
8. Checkout the code changes related to the 14.2 tools release, which are kept
under the xilinx-14.2-build1 tag. U-boot and Linux kernel versions are closely
related, so it is essential that that we match the correct U-boot release to the
version of the kernel we intend to use.
$ git checkout -b xilinx-14.2-build1-trd \
xilinx-14.2-build1-trd
ZedBoard Ubuntu Tutorial : 18Experiment 2: Configuring U-Boot for the ZedBoard Target
A working copy of the U-Boot repository is now available on the local development
machine and can be used to configure the source tree so that it can be built for a
ZedBoard target platform.
UBoot, like Linux, is maintained for many different processor systems and
must be configured for a designated target platform before being compiled. The make
files included in the U-boot source tree look for a target board name supplied on the
command line, and use that to locate the corresponding configuration file in the source
tree. This is done using the make config command format:
make _config
Where is the name of the configuration file (but without the .h) found
in the include/configs/ folder.
Experiment 2 General Instruction:
Configure the parameters for building U-Boot source so the executable created is
suitable for the Avnet ZedBoard. Edit the zynq_zed.h file to adjust the boot parameters
for our boot requirements. On your Linux host, enter the following commands:
$ cd ~/u-boot-xlnx/
$ make distclean
$ make zynq_zed_config
Experiment 2 Step-by-Step Instructions:
1. If the CentOS virtual machine is not already open, launch the VMware Player
application by selecting Start à All Programs à VMware à VMware Player. If
the CentOS virtual machine is already open, skip ahead to Step 4.
Figure 14 – The VMware Player Application Icon
2. Select the virtual machine named Ubuntu-CentOS-6.3-amd64-ZedBoard-linux
from the selections on the left and then click on the Play virtual machine button
to the right.
ZedBoard Ubuntu Tutorial : 19If prompted for whether the virtual machine has been copied or moved, click on
the Moved button.
Figure 15 – The VMware Player Application
3. If prompted for a workstation login, click on the user entry training and enter the
password Avnet in order to log into the system.
ZedBoard Ubuntu Tutorial : 20Figure 16 – The CentOS Workstation Login
4. If a terminal is not already open on the desktop of the CentOS guest operating
system, open a terminal window through the ApplicationsàSystem
ToolsàTerminal menu item.
Figure 17 – Launching the CentOS Terminal from the Desktop
ZedBoard Ubuntu Tutorial : 215. Change from the home directory into the U-Boot source directory.
$ cd u-boot-xlnx/
6. For good measure (sometimes a necessity) run a make distribution clean
command against the U-Boot source code. This command will remove all
intermediary files created by config as well as any intermediary files created by
make and it is a good way to clean up any stale configurations.
$ make distclean
7. A ZedBoard configuration is included for the ZedBoard target and the ZedBoard
specific header can be seen in the /include/configs/zynq_zed.h file. You will
need to open this file in the editor of your choice and remove the sdboot
configuration line that copies the root file system from the SD card to memory.
This is how Xilinx boots their kernel, but the ADI kernel uses the root file system
in place on the SD card, so it does not get copied. Delete the following line:
“fatload mmc 0 0x800000 ramdisk8M.image.gz;” \
Save the file and close your editor.
8. Configure U-Boot for the ZedBoard target by using our modified ZedBoard
default configuration.
$ make zynq_zed_config
ZedBoard Ubuntu Tutorial : 22Experiment 3: Building U-Boot from the Configured Source
Now that the source tree has been configured for the ZedBoard target platform, it can
be built using the cross toolchain. The resulting executable file will be created in your
working directory with the name u-boot. You will need this file for inclusion in the first-
stage loader image created in Lab 4 - Create the First Stage Boot Loader.
Experiment 3 General Instruction:
Build U-Boot for the ZedBoard target platform using the cross toolchain. The source
configuration was performed in the previous experiment, so the executable file can be
built with a single command. In your Linux system, enter:
$ cd ~/u-boot-xlnx
$ make
Experiment 3 Step-by-Step Instructions:
1. In the previous experiment, the U-Boot source tree was configured for a
ZedBoard target platform.
First, make sure the /home/training/u-boot-xlnx/ folder is the current working
directory by using the pwd command. If the working directory shown is not the
/home/training/u-boot-xlnx/ folder, change directories to that folder.
$ pwd
ZedBoard Ubuntu Tutorial : 232. Once the working directory is the /home/training/u-boot-xlnx/ folder, build the
U-Boot source with the make command.
The build process should take anywhere from 5 to 10 minutes to finish and
should complete successfully. If the build is successful and the console output
looks similar to that shown in Figure 13, proceed to Step 4.
$ make
Figure 18 – U-Boot Build Completed
ZedBoard Ubuntu Tutorial : 243. If you run into strange errors regarding problems locating your cross toolchain or
errors with segmentation faults during the build, perform this step to correct the
problem, otherwise skip to the next numbered step.
The terminal PATH environment variable may not be set correctly. One way to
resolve this is to pick up the updated user profile using the source command
from the /home/training/ folder.
Return to the U-Boot source folder, then clean the source tree with make
distclean and go back to Step 2 to rebuild. This should help resolve any
segmentation faults encountered with the toolchain.
$ cd ~
$ source .bash_profile
$ cd u-boot-xlnx/
$ make distclean
$ make zynq_zed_config
The terminal PATH environmental variable tells the terminal shell which
directories to search for executable files in response to commands issued by a
user. This environment variable increases both the convenience and the safety
of command line based operating systems and is widely considered to be the
single most important environmental variable. The PATH environment variable
can be checked by echoing it to the command line. Check it to be sure that it
contains a path to the Sourcery CodeBench installed /bin folder.
$ echo $PATH
ZedBoard Ubuntu Tutorial : 254. Once the build has completed successfully, open a file browser window through
the ApplicationsàSystem ToolsàFile Browser menu item.
Figure 19 – CentOS File Browser
5. Locate the file /home/training/u-boot-xlnx/u-boot which is the target
executable file in the Extended Linker Format (ELF) needed to execute on Zynq.
Right click on this file and select the Copy option which will place the selected
file in the Virtual Machine clipboard.
Figure 20 – Copying U-Boot Executable to Virtual Machine Clipboard
ZedBoard Ubuntu Tutorial : 266. Paste the U-Boot executable into the host operating system by using Windows
Explorer to navigate to the following folder:
C:\ZedBoard\Zynq_Ubuntu\bootFiles
Then paste the u-boot file into this folder. Rename the u-boot file to u-boot.elf
so that it has the appropriate ELF extension needed for the SDK tools to see it.
Figure 21 – U-Boot Executable Copied to the Host Machine and Renamed
ZedBoard Ubuntu Tutorial : 27Lab 3 – Partition the SD Card for Booting
Lab Overview
The ZedBoard will be booted from data contained on an SD card, and once the Linux
environment is operational the root file system will also reside on the SD card. In this
lab we will prepare the SD card with the required partition formats.
Experiment 1: Format the SD Card for Ubuntu Booting
In this experiment we will create two partitions on the SD card. The first partition will
be in FAT32 format, which can be accessed by either a Windows or Linux operating
system. This partition will contain the files used for initial bring-up of the ZedBoard.
The second partition will be in ext4 format, usable only by a Linux OS. On this partition
we will place the root file system, required by the Linux kernel to complete the OS boot
process.
Because the second partition is Linux specific, we will prepare the SD card from the
CentOS VM using a utility called the Gnome Partition Utility (GParted).
Experiment 1 General Instruction:
Use GParted to create 2 empty partitions on a 4 MB SD card. The first partition will be
52 MB FAT32 format, and the second partition will use the remaining space in ext4
format.
Note: All existing data on the SD card will be destroyed. Make sure you back up any
data you need to retain prior to the formatting operation.
ZedBoard Ubuntu Tutorial : 28Experiment 1 Step-by-Step Instruction:
1. Go to Appendix I and follow the instructions to install GParted. Then enter:
a. sudo yum install gparted
b. Respond ‘y’ to all queries
2. With the VM running, insert the SD card into a compatible read/write slot on
your computer. If the USB device is registered by Windows, close any pop-ups
that appear. From the VM, you may see a window to indicate that a new
removable device is available. Click OK to acknowledge and close the window.
Figure 22 – USB Detection by Virtual Machine
ZedBoard Ubuntu Tutorial : 293. In the VM, look at the upper right-hand corner and locate the icon that applies to
the USB device. Right-click on the icon and select “Connect” from the drop-
down menu.
Figure 23 – Connect USB Device to Virtual Machine
4. Click OK to acknowledge the device will be disconnected from the Windows host
and connected to the Virtual Machine.
Figure 24 – USB Transfer Warning from Virtual Machine
5. With the device connected to the VM, you may see browser windows activate to
view files on a non-blank SD card. Close any browser windows associated with
the SD card, as we will be repartitioning and formatting the entire card. Note
that any existing data on the card will be LOST.
ZedBoard Ubuntu Tutorial : 306. To run the GParted Partition Editor, in the VM menu select Applications |
System Tools | GParted Partition Editor.
Figure 25 – Launch GParted Partition Editor
ZedBoard Ubuntu Tutorial : 317. Enter the root password when prompted. For the CentOS VM created in Avnet
Speedways, the password is “Avnet”. Click OK.
Figure 26 – Enter Root Password
8. GParted will by default display the partitions on your CentOS system. You DO
NOT want to change anything here! In the upper right, open the drop-down
menu to display the available devices, and select the one corresponding to the
SD card. This will generally be labelled as /dev/sdb, with a size shown that is
slightly smaller than the full size of your SD card. Click on this device to select it.
Figure 27 – GParted SD Card Selection
ZedBoard Ubuntu Tutorial : 329. If your SD card has been used before, it may contain a file system already. Any
existing system not specifically used for the Ubuntu boot process should be
removed so we can start with a clean slate. In the example below we have a 4
MB SD card with a FAT32 file system that was created on a Windows 7 system.
If the card is empty, you may skip to step 15.
Figure 28 – Existing SD Card Partitions
10. Right-click on the file system to be removed and select Unmount.
Figure 29 – Unmount an Existing Partition
ZedBoard Ubuntu Tutorial : 3311. Right click on the unmounted file system and select Delete. You will see a
pending Delete action appear in a new window at the bottom of GParted.
Actions are queued and then executed serially with a single command.
Figure 30 – Delete Existing SD Card Partition
12. You will now see GParted as shown below, with the entire SD card unallocated
and one action pending. Click on the Edit menu and select Apply All Operations
from the dropdown list.
Figure 31 – GParted Perform Pending Operations
ZedBoard Ubuntu Tutorial : 3413. Click Apply to proceed with the operation. All data on the device will be
permanently lost.
Figure 32 – GParted Verify Partition Operations
NOTE: If you apply operations in GParted and you get back an error saying the
resource is busy, make sure you have no open browser windows for the /media
directory. Close them if you do, restart GParted, and the actions should work.
14. Once the operations have completed, you will see a message indicating that all
operations were successful. Click Close.
Figure 33 – GParted Operations Successful
15. Your SD card should now appear with the full space completely unallocated.
Right click on the unallocated space and select New.
Figure 34 – Create New SD Card Partition
ZedBoard Ubuntu Tutorial : 3516. In the Create New Partition window, enter the parameters shown below and
click the Add button. The operation will queue up in the lower window in
GParted.
Figure 35 – Create FAT32 Partition
17. Right-click on the unallocated space below your new FAT32 file system and
select New.
Figure 36 – Create New SD Card Partition
ZedBoard Ubuntu Tutorial : 3618. In the Create New Partition window, enter the parameters shown below and
click the Add button. The operation will queue up in the lower window in
GParted. The New size will automatically default to the remaining free space on
your SD card, which is what we want.
Figure 37 – Create New ext4 Partition
ZedBoard Ubuntu Tutorial : 3719. The GParted window should now look very similar to the one shown below. If
you are satisfied that you will be creating 2 partitions, the first a fat32 of about
52 MB called BOOT, and the second an ext4 partition of 3.6 GB or more called
rootfs, then select Edit from the menu and click on Apply All Operations.
Figure 38 – Partition SD Card with FAT32 and ext4
20. Click Apply to proceed with the operation. All data on the device will be
permanently lost. Depending on the size of your SD card, the operations may
take a few minutes or more to complete.
Figure 39 – Verify Partition Creation Operation
ZedBoard Ubuntu Tutorial : 3821. Once the operations have completed, you will see a message indicating that all
operations were successful. Click Close.
Figure 40 – Partition Creation Successful
22. Your SD card is now ready for the files that will be used to boot Ubuntu on the
ZedBoard. Your partition information should look similar to the information
shown below. Right-click on the drive icon at the upper right of the VM window
and select Disconnect.
Figure 41 – Disconnect USB Device
ZedBoard Ubuntu Tutorial : 3923. Close the GParted window.
24. Back in Windows you can open Windows Explorer to locate the removable drive,
which will now appear as a FAT32 drive named BOOT. Note that Windows does
not recognize the ext4 file system format, so it is not available from the
Windows host. Right-click on BOOT, select Eject and you can remove the SD
card. The card is now ready for use in subsequent steps.
Figure 42 – Remove SD Card from Host
ZedBoard Ubuntu Tutorial : 40Lab 4 - Create the First Stage Boot Loader
Lab Overview
At this point all the components necessary for initial bring-up of the ZedBoard have
been created. We have the hardware bitstream file and the First Stage Boot Loader
program, created in “Lab 1 - FPGA Hardware Platform”. In the second lab we
configured and built U-boot for the ZedBoard, to serve as the second stage loader that
will ultimately launch the operating system.
In this lab we will use the Xilinx SDK to combine the three components into a single boot
image, and test that image to verify we can complete a first stage boot and see a U-boot
prompt on the console.
When you have completed this lab, you will know how to do the following:
• Create a boot image for ZedBoard
• Boot ZedBoard to U-Boot prompt
Experiment 1: Create the Boot Image
This experiment shows how to export a boot image using SDK.
Boot Image Format
The Zynq BootROM is capable of booting the processor from several different non-
volatile memory types but it requires a data structure referred to as the Boot Image
Format (BIF) for instructions on how to parse the different boot components. For the
most part, simple Linux systems require only three components within the boot image:
1. FSBL (Stage 1 boot loader)
2. Programmable Logic (PL) Hardware Bitstream
3. U-Boot (Stage 2 boot loader)
Refer to Xilinx UG585 document, the Zynq Technical Reference Manual, for further
details.
Boot Medium
Although ZedBoard can boot from either Quad-SPI Flash or SD card, for the purposes of
this lab, we will use the SD card as the boot medium. This gives us the advantage of
being able to write directly to the FAT32 partition on the SD card from a PC.
ZedBoard Ubuntu Tutorial : 41Experiment 1 General Instruction:
Launch Xilinx Software Development Kit (SDK) and open the workspace from the project
in the Lab 1.1 directory. Use SDK Create Zynq Boot Image tool to create the Zynq boot
image file.
Experiment 1 Step-by-Step Instructions:
1. Launch Xilinx Software Development Kit (SDK). Start à All Programs à Xilinx
Design Tools à ISE Design Suite 14.4 à EDK à Xilinx Software Development
Kit.
Figure 43 – The SDK Application Icon
2. Set or switch the workspace to:
C:\ZedBoard\Zynq_Ubuntu\cf_adv7511_zed\SDK\SDK_Workspace
and click the OK button.
Figure 44 – Switching to the Appropriate SDK Workspace
ZedBoard Ubuntu Tutorial : 423. Once SDK is open, launch the Create Zynq Boot Image tool using the Xilinx
ToolsàCreate Boot Image menu item.
Figure 45 – Launching the Create Zynq Boot Image Tool
4. A new Boot Image Format (BIF) file must be created. In the Bif file drop down
menu, select the Create a new bif file… option.
Figure 46 – Creating a New BIF File
ZedBoard Ubuntu Tutorial : 435. Specify the FSBL elf file by browsing to the following file:
C:\ZedBoard\Zynq_Ubuntu\bootFiles\zynq_fsbl_0.elf
Keep in mind the importance of order for files placed into a boot image. Specify
the hardware bitstream by clicking the Add button and selecting the file below.
Click the Open button to add this file to the list of partitions in the boot image:
C:\ZedBoard\Zynq_Ubuntu\bootFiles\system.bit
Specify the application executable last (in our case it is the second stage boot
loader U-Boot) by clicking the Add button and selecting the following file. Then
click the Open button to add this file to the list of partitions in the boot image:
C:\ZedBoard\Zynq_Ubuntu\bootFiles\u-boot.elf
Browse to the following Output folder:
C:\ZedBoard\Zynq_Ubuntu\bootFiles
Click the Create Image button which will background launch Bootgen, a tool for
constructing boot images for Zynq-7000 AP SoC configuration.
Figure 47 – Selecting Appropriate Boot Image Partitions
ZedBoard Ubuntu Tutorial : 446. Bootgen merges the BIT and ELF files into a single boot image with the format
defined in the Boot Image Format (BIF) file to be loaded into Zynq devices at
boot time. Evaluate the output seen in the SDK console; notice how bootgen is
called against the bootimage.bif file, which contains the format which defines
which files are integrated and what order they are added to the binary output
file u-boot.bin.
It is important to note that the order of the images should always be the FSBL
first, followed by the Programmable Logic bitstream, and then finally the
software application file (in our case it is the second stage boot loader). The BIF
file is automatically created by the Zynq Boot Image Creation tool prior to the
Bootgen operation.
Figure 48 – Bootgen Running in the Background
At this point you may close the Xilinx SDK.
7. BootGen will create a u-boot.bin file in the specified output folder. The
BootROM on Zynq will only be able to locate a boot image file on the SD card if it
is named boot.bin. Rename the u-boot.bin file to the boot.bin filename.
Figure 49 – The Resulting Boot Image file Renamed to boot.bin
ZedBoard Ubuntu Tutorial : 458. Insert the SD card into the PC or SD card reader and wait for it to enumerate as a
Windows drive. If prompted by Windows when inserting the SD card, select the
Continue without scanning option.
Figure 50 – Windows Prompt for Scanning and Fixing an SD Card
9. Copy the boot.bin file from the bootfiles folder to the top level of the SD card.
Replace any existing versions of the boot.bin file that may be on the SD card.
Figure 51 – The Boot Image File Copied to the SD Card
Note: You may encounter problems writing to the SD card even when the write-
protect button is in the "off" position. With the SD card face up, the tiny white
plastic switch on the left side should be positioned towards the card edge
connector (the shortest side).
For some SD cards, on the opposite side from the switch, there is a tiny notch cut
out. This notch allows the SD cards to work in portable consumer electronics,
but may not work in USB card readers or computers. Some SD cards have this
extra built-in feature for copy protection, which makes it useless for custom
applications.
A strategically placed piece of electrical tape can work in overcoming this
feature. Be very precise in placing the tape over the notch, but not over the
ZedBoard Ubuntu Tutorial : 46adjacent brass electrical contact. Place the “modified” SD card in your reader,
and you should have no further problems with formatting, reading or writing.
Once you have bypassed the protection feature of the SD card, install your files
as needed. If you get the same error again after applying the tape, add a second
layer. Double check that you did not cover the connection edge and that the
plastic tab is “forward”; closest to the edge you insert. Sometimes it takes
several tries, but it will usually work with some added patience. If you have
existing files on the SD card, insert it, right click on the files you wish to remove
or overwrite, and select the Properties option. Then unselect the Read Only
check by the box. Try again to delete or add files; if you are prompted with a
message indicating that the disk is write protected, check the tape again.
ZedBoard Ubuntu Tutorial : 47Experiment 2: Boot ZedBoard Using New Boot Image
ZedBoard can now be booted using the Boot Image that was copied to the SD card in
the previous exercise.
Experiment 2 General Instruction:
Boot ZedBoard using the SD card with the Zynq boot image and observe the terminal
output on a console (Tera Term or similar) on your host system.
Experiment 2 Step-by-Step Instructions:
1. Connect 12 V power supply to ZedBoard barrel jack (J20).
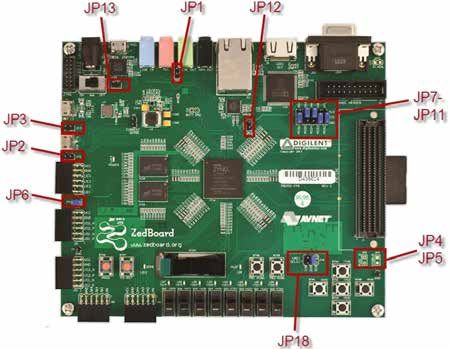
Figure 52 – ZedBoard Hardware Reference
2. Connect the USB-UART port of the ZedBoard (J14), labeled UART, to a PC using
the MicroUSB cable.
3. Insert the 4GB SD card included with ZedBoard into the SD card slot (J12) located
on the underside of ZedBoard PCB.
ZedBoard Ubuntu Tutorial : 484. Verify the ZedBoard boot mode (JP7-JP11) and MIO0 (JP6) jumpers are set to SD
card mode as described in the Hardware Users Guide:
http://www.zedboard.org/sites/default/files/ZedBoard_HW_UG_v1_6.pdf
Figure 53 – ZedBoard Jumper Settings
5. Turn power switch (SW8) to the ON position. ZedBoard will power on and the
Green Power Good LED (LD13) should illuminate.
ZedBoard Ubuntu Tutorial : 496. The PC may pop-up a dialog box asking for driver installation.
ZedBoard has a USB-UART bridge based on the Cypress CY7C64225 chipset. Use
of this feature requires that a USB driver be installed on your Host PC.
If Windows recognizes the USB-UART and loads the software driver, go ahead
and proceed to the next step. However, if the host PC did not recognize the
USB-UART and enumerate it as a COM port device refer to the USB-UART Setup
Guide document in the link below for instructions on installing this driver. When
driver installation is complete, continue to the next step.
http://www.zedboard.org/sites/default/files/CY7C64225_Setup_Guide_1_1.pdf
7. Wait approximately 15 seconds. The blue Done LED (LD12) should illuminate.
Use the Windows Device Manager to determine the COM Port.
Figure 54 – Device Manager Showing Enumerated USB-UART as COM13
Note: Each unique USB-UART device attached will enumerate under the next
available COM port. Here in this example, the Cypress CY7C64225 USB-UART
device is enumerated as COM13.
ZedBoard Ubuntu Tutorial : 508. On the PC, open a serial terminal program. For this demo, Windows 7 was used
which does not come with a built in terminal application such as HyperTerm.
Tera Term was used in this example which can be downloaded from the Tera
Term project on the SourceForge Japan page:
http://ttssh2.sourceforge.jp
9. Once Tera Term is installed, Tera Term can be accessed from the desktop or Start
menu shortcuts.
Figure 55 – Tera Term Icon
10. To configure baud rate settings, open the Serial Port Setup window from the
SetupàSerial port menu selection. Select the USB-UART COM port
enumeration that matches the listing found in Device Manager.
Also set the Baud rate option to 115200, the Data width option to 8-bit, the
Parity option to none, the Stop bit option to 1 bit, and the flow control to none.
Finally, assign the transmit delay parameters to 10 msec/char and 100
msec/line, and then click OK. This setting will help with later lab exercises were
many lines of text will be sent to the console in rapid succession.
Figure 56 – Tera Term Serial Port Setup Page
ZedBoard Ubuntu Tutorial : 5111. Optionally, the terminal settings can be saved for later use. To do this, use the
SetupàSave setup menu selection and overwrite the existing TERATERM.INI file.
12. Power cycle the ZedBoard and monitor the Tera Term window carefully.
When the terminal output from U-Boot and a countdown is observed, press any
of the keyboard keys to interrupt the boot process.
If you fail to interrupt the u-boot countdown, you will see that u-boot dutifully
tries to look for a Linux kernel image and its associated device file, and then
jumps to the location in memory where the Linux image should have been
loaded. We have not created these files as yet, so of course u-boot cannot find
them. If you get to this point, simply power cycle the board and be careful to
interrupt the countdown when it appears.
Figure 57 – U-Boot Terminal Output
If the amber USB-Link Status (LD11) does not flicker to indicate activity, and no
output is displayed on the terminal after 10 seconds, check the driver installation
to determine if the device driver is recognized and enumerated successfully and
that there are no errors reported by Windows.
ZedBoard Ubuntu Tutorial : 52Take a few minutes to explore the U-Boot environment and command line
options. Use the ? command entry to display a listing of the supported U-Boot
commands. Use any of the listed commands to explore U-Boot’s capabilities.
Figure 58 – ZedBoard U-Boot Prompt
ZedBoard Ubuntu Tutorial : 53Lab 5 – Configure and Build the Linux Kernel
Lab Overview
ADI provides a freely downloadable Linux kernel solution that has been tested on Xilinx
Zynq-7000 Programmable SoC development boards. The source files are hosted on an
open source repository site called GitHub.
In this lab, the process to rebuild the kernel from the source repository is explored.
When you have completed this lab, you will know how to do the following:
• Retrieve Linux kernel source code from ADI repository
• Configure the kernel for the ZedBoard target
• Build the kernel for the ZedBoard target
Experiment 1: Clone the ADI Linux Kernel Git Repository
This experiment shows how to make a local copy of the ADI Linux kernel Git repository
for Zynq. To successfully complete this lab, you will need Internet access to retrieve the
repository information from the GitHub website.
Experiment 1 General Instruction:
Make a local copy of the ADI Linux kernel Git repository in your home directory, and
check out the branch we intend to build.
On your Linux host, enter the following commands:
$ cd ~
$ git clone \
git://github.com/analogdevicesinc/linux.git ubuntu
$ cd ubuntu
$ git checkout xcomm_zynq
ZedBoard Ubuntu Tutorial : 54Experiment 1 Step-by-Step Instructions:
1. If the CentOS virtual machine is not already open, launch the VMware Player
application by selecting Start à All Programs à VMware à VMware Player. If
the CentOS virtual machine is already open, skip ahead to Step 4.
Figure 59 – The VMware Player Application Icon
2. Select the virtual machine named Ubuntu-CentOS-6.3-amd64-ZedBoard-linux
from the selections on the left and click on the Play virtual machine button to
the right.
If prompted for whether the virtual machine has been copied or moved, click on
the Moved button.
Figure 60 – The VMware Player Application
ZedBoard Ubuntu Tutorial : 553. If prompted for a workstation login, click on the user entry training and enter the
password Avnet in order to log into the system.
Figure 61 – The CentOS Workstation Login
4. If a terminal is not already open on the desktop of the CentOS guest operating
system, open a terminal window through the ApplicationsàSystem
ToolsàTerminal menu item.
Figure 62 – Launching the CentOS Terminal from the Desktop
ZedBoard Ubuntu Tutorial : 565. The Xilinx U-Boot Git repository is located at the following URL:
git://github.com/analogdevicesinc/linux.git
To get a working copy of the codebase, clone the remote repository to your local
machine. Cloning creates the repository and checks out the latest version, which
is referred to as HEAD.
Use the following Git command to clone the repository. .
$ cd ~
$ git clone \
git://github.com/analogdevicesinc/linux.git ubuntu
6. Wait until the clone operation completes, this could take 15-30 minutes
depending upon your connection speed.
The clone command sets up a few convenience items for you by:
• Keeping the address of the original repository
• Aliasing the address of the original repository as origin so that changes
can be easily sent back (if you have authorization) to the remote
repository
This copies the repository to a new directory at /home/training/ubuntu.
7. Change into the top level source folder.
$ cd ubuntu
8. Checkout the code branch compatible with the Xilinx 14.4 tools. This sets up the
xcomm_zynq branch for remote tracking.
$ git checkout xcomm_zynq
ZedBoard Ubuntu Tutorial : 57Experiment 2: Configure and Build the Linux Kernel
This experiment shows how to configure the source branch to target the Xilinx Zynq
SoC, and to build an executable file.
Experiment 2 General Instruction:
Clean, configure and build the Linux kernel source for the ARM architecture of the Zynq
SoC.
On your Linux host, enter the following commands:
$ make ARCH=arm distclean
$ make ARCH=arm zync_xcomm_adv7511_defconfig
$ make ARCH=arm
Experiment 2 Step-by-Step Instructions:
1. Change from the home directory into the ADI Linux kernel source directory.
$ cd ~/ubuntu/
2. For good measure (sometimes a necessity), run a make distribution clean
command against the kernel source code. This command will remove all
intermediary files created by config as well as any intermediary files created by
make and it is a good way to clean up any stale configurations.
$ make ARCH=arm distclean
3. A Zynq configuration file is included for Zynq targets using the ADI adv7511
HDMI video transmitter on the board. The file is located at:
/arch/arm/configs/zync_xcomm_adv7511_defconfig
This file defines a common configuration for a number of ADI reference designs
that may or may not include HDMI video and wireless communication. Our
design includes HDMI video, but no wireless comms. Configure the Linux Kernel
for the Zynq target by using this default configuration file. Take note that “zynq”
is misspelled in the filename as “zync”.
$ make ARCH=arm zync_xcomm_adv7511_defconfig
ZedBoard Ubuntu Tutorial : 584. Build the kernel source with the make command.
The build process should take about 10 to 20 minutes to complete. If the build is
successful and the console output looks similar to that shown in the Figure
below, proceed to the next step.
$ make ARCH=arm
Figure 63 – Linux Kernel Build Completed
ZedBoard Ubuntu Tutorial : 595. If a file browser window is not already open from a previous exercise, open a file
browser window through the ApplicationsàSystem ToolsàFile Browser menu
item.
Figure 64 – CentOS File Browser
6. Locate the file /home/training/ubuntu/arch/arm/boot/zImage, which is the
target executable image needed to execute on Zynq. Right click on this file and
select the Copy option which will place the selected file in the Virtual Machine
clipboard.
Figure 65 – Copying Kernel Image to Virtual Machine Clipboard
ZedBoard Ubuntu Tutorial : 607. Paste the kernel image into the boot folder under the host operating system by
using Windows Explorer to navigate to the following folder:
C:\ZedBoard\Zynq_Ubuntu\bootFiles
Figure 66 – Kernel Image Copied to the Host Machine
8. Insert the SD card into the PC or SD card reader and wait for it to enumerate as a
Windows drive. If prompted by Windows when inserting the SD card, select the
Continue without scanning option.
Figure 67 – Windows Prompt for Scanning and Fixing an SD Card
9. Copy the zImage file from the bootfiles folder to the top level of the SD card.
Replace any existing versions of the zImage file that may be on the SD card.
ZedBoard Ubuntu Tutorial : 61Lab 6 – Install the Device Tree
Lab Overview
The Device Tree is a file which contains a data structure describing the hardware
system. The information is used by Linux during the kernel boot process to map device
parameters such as device type, memory location and interrupt signals.
ADI provides a complete device tree source file for the Ubuntu system in the Git kernel
repository at:
~/ubuntu/arch/arm/boot/dts/zynq-zed-adv7511.dts
When you have completed this lab, you will know how to do the following:
• Compile the device tree source file for use by the Linux kernel at boot time
ZedBoard Ubuntu Tutorial : 62Experiment 1: Compile the Device Tree Source File
This experiment shows how to compile the device tree source file and copy it to your
host system for inclusion in the boot directory.
Experiment 1 General Instruction:
Use the makefile in the local Ubuntu repository to compile the device tree source file to
its binary equivalent.
On your Linux host, enter the following commands:
$ cd ~/ubuntu
$ make ARCH=arm zynq-zed-adv7511.dtb
Copy the devicetree.dtb file from the output directory to the boot file directory on the
host machine.
Experiment 1 Step-by-Step Instructions:
1. The location of the device tree source is hard-coded into the makefile in the root
directory of your local ubuntu repository. You can compile the device tree by
providing an output file name in the root directory that matches the name of the
source file (the only difference is the .dtb versus .dts endings).
$ cd ~/ubuntu
$ make ARCH=arm zynq-zed-adv7511.dtb
The output shows the location of the compiled binary file (.dtb) and the original
source file (.dts).
DTC arch/arm/boot/zynq-zed-adv7511.dtb
DTC: dts->dtb on file arch/arm/boot/dts/zynq-zed-adv7511.dts
ZedBoard Ubuntu Tutorial : 632. If a file browser window is not already open from a previous exercise, open a file
browser window through the ApplicationsàSystem ToolsàFile Browser menu
item.
Figure 68 – CentOS File Browser
3. Locate the compiled device tree file at:
~/ubuntu/arch/arm/boot/zynq-zed-adv7511.dtb
Right click on this file and select the Copy option which will place the selected
file in the Virtual Machine clipboard.
Figure 69 – Copying Kernel Image to Virtual Machine Clipboard
ZedBoard Ubuntu Tutorial : 644. Paste the compiled devicetree file into the boot folder under the host operating
system by using Windows Explorer to navigate to the following folder:
C:\ZedBoard\Zynq_Ubuntu\bootFiles
Figure 70 – Compiled Device Tree Copied to the Host Machine
5. Insert the SD card into the PC or SD card reader and wait for it to enumerate as a
Windows drive. If prompted by Windows when inserting the SD card, select the
Continue without scanning option.
Figure 71 – Windows Prompt for Scanning and Fixing an SD Card
6. Copy the zynq-zed-adv7511.dtb file from the bootfiles folder to the top level of
the SD card. Delete any existing versions of file devicetree.dtb, and rename the
file you just copied to devicetree.dtb.
7. Remove the SD card from your system.
ZedBoard Ubuntu Tutorial : 65Lab 7 – Obtain and Load the Root File System
Lab Overview
The Root File System is contained on the same partition as the root directory in the
Linux kernel, and it is the file system on which all other file systems are mounted. The
RFS is separate from the Linux kernel, but is required by the kernel to complete the boot
process. All file data used by Linux and any users is contained in the Root File System.
The separation of kernel and file system adds additional flexibility to Linux distributions.
Distributions largely use a common Linux kernel (with slight variations to support
specific elements important to the distribution), but the large part of what makes
distributions unique is determined by the makeup of the root file system. In the case of
Ubuntu and Android, for example, both use a common kernel but include feature
differences at the root file system level. For Ubuntu, RFS elements provide a desktop-
style graphical UI, while Android relies on a Java Virtual Machine to allow for ease of
application development. Both systems can co-exist on the same hardware platform
because they make use of a common Linux kernel.
The creation of a complete Root File System from scratch is a complex procedure, and
beyond the scope of this tutorial. However, if you wish to understand how an RFS is
constructed, refer to the Avnet Speedway Implementing Linux on the Zynq-7000 SoC,
Lab 2.2, Creating a Basic Root File System. The Speedway Lab provides step by step
instructions for creating a Root File System from scratch, including creating a complete
development environment. While the content of Ubuntu and Android may differ, the
process for importing the required features is the same.
In general, it is best to start with a Root File System that contains much of what you
already need for your implementation, and then customize it to your specific
requirements. Linaro provides a rich root file system that will coexist with our kernel to
provide a desktop experience, which serves the purposes of this tutorial.
When you have completed this lab, you will know how to do the following:
• Obtain the Root File System image from the Linaro website
• Install the Root File System to an SD card
You will need Internet access from your Linux host to retrieve the RFS.
ZedBoard Ubuntu Tutorial : 66You can also read