VMWARE AIRWATCH INSTALLATION GUIDE - INSTALLING AIRWATCH IN ON-PREMISES ENVIRONMENTS AIRWATCH V9.3 - VMWARE DOCS
←
→
Page content transcription
If your browser does not render page correctly, please read the page content below
VMware AirWatch Installation Guide
Installing AirWatch in on-premises environments
AirWatch v9.3

Have documentation feedback? Submit a Documentation Feedback support ticket using the Support Wizard on
support.air-watch.com.
Copyright © 2018 VMware, Inc. All rights reserved. This product is protected by copyright and intellectual property laws in the United States and other countries as well as by
international treaties. VMware products are covered by one or more patents listed at http://www.vmware.com/go/patents.
VMware is a registered trademark or trademark of VMware, Inc. in the United States and other jurisdictions. All other marks and names mentioned herein may be trademarks of their
respective companies.

                                                                                                                        VMware AirWatch Installation Guide | v.2018.03 | March 2018
                                                                                                                                    Copyright © 2018 VMware, Inc. All rights reserved.

                                                                                                                                                                                   1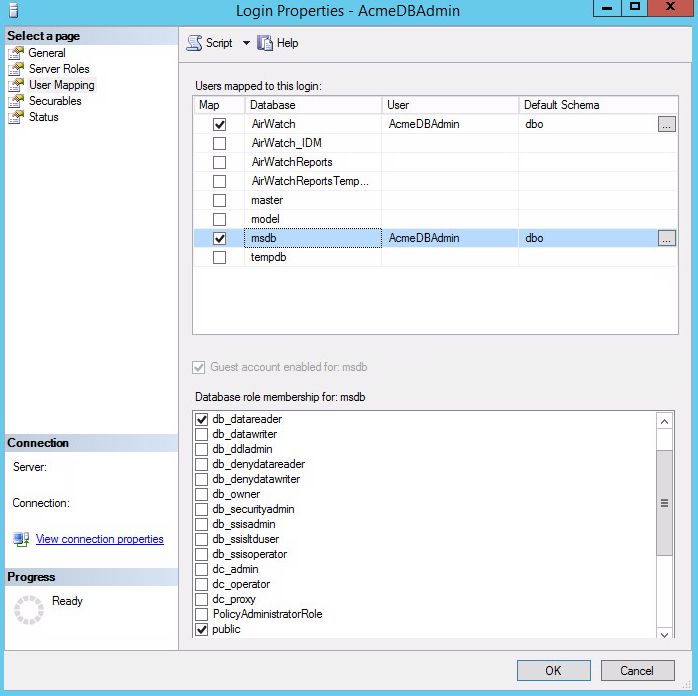
Revision Table
The following table displays revisions to this guide since the release of AirWatch v9.3.
 Date                                                       Reason
 March 2018                                                 Initial upload.

                                                                                 VMware AirWatch Installation Guide | v.2018.03 | March 2018
                                                                                           Copyright © 2018 VMware, Inc. All rights reserved.

                                                                                                                                          2
Table of Contents
 Chapter 1: Overview                                                                                                        5
             Introduction to AirWatch Installation                                                                          6
             Before you Begin Checklist                                                                                     6
             Installation Procedure Checklist                                                                               7

 Chapter 2: Installation Preparation                                                                                     10
             Database Server Prerequisites                                                                                11
             Application Server Prerequisites                                                                             12
             VMware Identity Manager Service Prerequisites                                                                14
             Perform Optional Installs                                                                                    15
             Reports Prerequisites                                                                                        15
             Create the AirWatch Database                                                                                 16
             Create the AirWatch SQL Service Account and Assign DB Owner Roles                                            17
             Create the VMware Identity Manager Service Database                                                          20
             Create the Identity Service SQL Service Account and Assign DB Owner Roles                                    21
             Configure your Application Servers                                                                           24
             Configure Your Internal DNS Record and Certificates                                                          25
             Configure Your External DNS Record and Certificates                                                          29
             Stage Install Files                                                                                          35
             Workspace ONE Validation Tool                                                                                35

 Chapter 3: Database Installation                                                                                        44
             Run the AirWatch Database Setup Utility                                                                      45
             Verify Proper Database Installation                                                                          46

 Chapter 4: Application Server Installation                                                                              47
             Run the AirWatch Installer on Each Application Server (Console and Device Services)                          48
             (Optional) Run the Installer on Additional Device Services Servers                                           61
             Run the AirWatch Installer on the VMware Identity Manager Service                                            62

 Chapter 5: Reports Installation                                                                                         68
             Reports Overview                                                                                             69

                                                                   VMware AirWatch Installation Guide | v.2018.03 | March 2018
                                                                             Copyright © 2018 VMware, Inc. All rights reserved.

                                                                                                                            3
Connect the Database to Reports Server                                                                    69
            Configure the Service Account for SSRS                                                                    70
            Configure the Web Service URL                                                                             72
            Set up the Reporting Database                                                                             73
            Verify the Report Manager URL and Web Service URL                                                         74
            Set up the AirWatch SSRS User                                                                             75
            Add the SSRS User to IIS_IUSRS                                                                            77
            Run the AirWatch Reporting Installer                                                                      78
            Integrate Reports with the AirWatch Console                                                               83
            Reports Storage Overview                                                                                  84

Chapter 6: Installation Verification                                                                                 87
            Verify Correct Site URL Population                                                                        88
            Verify Connectivity                                                                                       88
            Verify Services Are Started                                                                               88
            Validate GEM Functionality                                                                                89
            (Optional) Disable Services on Multiple Console Servers                                                   90
            VMware Identity Manager Troubleshooting Overview                                                          90

Chapter 7: Next Steps                                                                                                96
            Overview                                                                                                  97
            Create a Corporate Apple ID                                                                               97
            Run the Workspace ONE Wizard                                                                              97

Accessing Other Documents                                                                                            98

                                                               VMware AirWatch Installation Guide | v.2018.03 | March 2018
                                                                         Copyright © 2018 VMware, Inc. All rights reserved.

                                                                                                                        4
Chapter 1:
Overview
Introduction to AirWatch Installation   6
Before you Begin Checklist              6
Installation Procedure Checklist        7

                                            VMware AirWatch Installation Guide | v.2018.03 | March 2018
                                                      Copyright © 2018 VMware, Inc. All rights reserved.

                                                                                                     5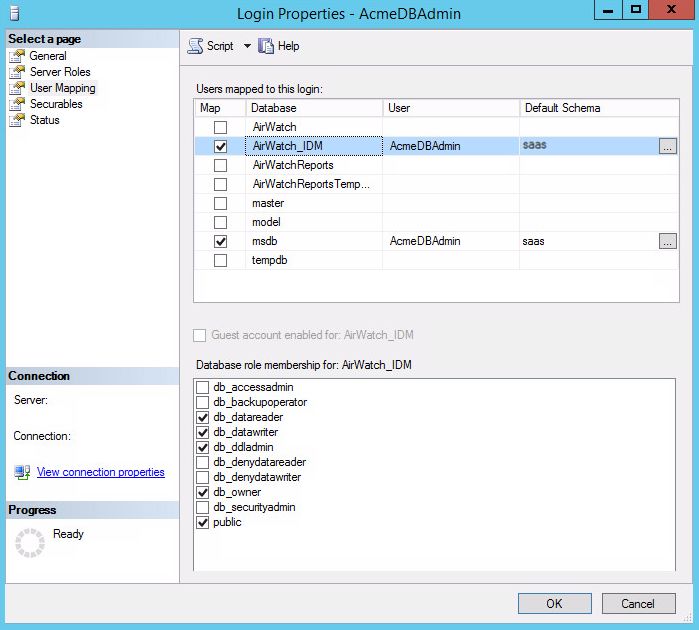
Chapter 1: Overview

Introduction to AirWatch Installation
The AirWatch Windows Installer allows you to install AirWatch components onto application servers as needed to meet
your AirWatch deployment needs. The installer handles the AirWatch Console server components, the Devices Services
server components, and the VMware Identity Manager service.
Installing AirWatch requires following specific prerequisites and procedures to successfully deploy your AirWatch on-
premises solution. Make sure to meet the prerequisites before proceeding with the installation instructions. Installing
AirWatch on premises involves configuring servers for your database, application, any auxiliary components, and
reports. AirWatch comprises several different components, which can be combined with application servers or installed
on their own dedicated servers.
To review recommended architectures based on your deployment size, refer to the VMware AirWatch Recommended
Architecture Guide, available on AirWatch Resources.

Before you Begin Checklist
Be aware of several notes and caveats before attempting to install AirWatch on premises. Read through the following
sections and ensure that you are fully prepared for following the steps in the remainder of this guide.

Obtain the Latest Version of this Document
Ensure that you are using the latest version of this guide by downloading the latest copy of the document from the
AirWatch Resources Portal (https://resources.air-watch.com). AirWatch frequently makes updates to documentation
and having the latest version ensures that you are following the best practices and procedures.

Obtain the Install Package Files
Ensure that you have downloaded the installation package files. The link to these files is provided to you by your
AirWatch consultant as part of the deployment process.

Meet the Requirements
Meet all the requirements needed for an AirWatch installation. Specific hardware and software requirements are outlined
in the VMware AirWatch Recommended Architecture Guide, available on AirWatch Resources. A list of other
requirements can be found in the Installation Preparation section.

 Note: As of AirWatch Version 9.1 we have changed our supported SQL versions. Please check the latest list of
 prerequisites in the Recommended Architecture Guide to ensure your current version is supported.

Verify your On-Call Resources
Ensure that you have the proper on-call resources available if you need them. These resources may include technical
resources such as the Database Analyst, Change Manager, Server Administrator, Network Engineer, and MDM System
Administrator.

                                                                               VMware AirWatch Installation Guide | v.2018.03 | March 2018
                                                                                         Copyright © 2018 VMware, Inc. All rights reserved.

                                                                                                                                        6
Chapter 1: Overview

Recommended Topologies
To streamline the AirWatch installation process, this document refers to both the AirWatch Console server and AirWatch
Device Services server. Before proceeding, it is important to understand each of these components and what they mean
to your specific topology model.
 l   The AirWatch Console Server refers to the component of AirWatch that renders and displays the AirWatch Console.
     It presents and sends data to the database directly from the AirWatch UI.

 l   The AirWatch Device Services Server refers to the component of AirWatch that communicates with all managed
     devices. This server runs all processes involved in receiving and transmitting information from devices to other
     components of the system.

 l   The VMware Identity Manager Server refers to the component of AirWatch that enables Workspace ONE
     functionality. This server provides services required for the Workspace ONE application and brand new functionality
     like mobile single sign-on and conditional access for third-party applications.

 l   The standard AirWatch deployment method involves installing multiple application servers for these components
     alongside a database. For each procedure in this guide that describes both the Console and Device Services
     components, complete the procedure on all AirWatch servers.

 l   This document assumes that you are using one of the recommended architectures as detailed in the VMware
     AirWatch Recommended Architecture Guide, available on AirWatch Resources. If you are not using one of these
     architectures, contact AirWatch for additional assistance.

A Note About Screenshots in this Document
Where applicable, this document uses screenshots from Windows Server 2012. If you are using Windows Server 2008 or
2016, then perform the same actions documented in this guide, with the knowledge that the exact steps may slightly
differ.

Installation Procedure Checklist
Use the following checklist to track your installation progress. Use the links provided to jump to a particular section, but
ensure that you complete all the required steps.
 Status
           Requirement                                         Notes
 Checklist
                                           Step 1: Prepare for Your Installation
             Verify Database Server Prerequisites Are Met      See Database Server Prerequisites on page 11.
             Verify Application Server Prerequisites Are Met See Application Server Prerequisites on page 12.
             Verify Identity Manager Service Server            See VMware Identity Manager Service Prerequisites on
             Prerequisites Are Met                             page 14.
             Perform Optional Installs                         See Perform Optional Installs on page 15.
             Verify Reports Server Prerequisites Are Met       See Reports Prerequisites on page 15.
             Create the AirWatch Database                      See Create the AirWatch Database on page 16.

                                                                                 VMware AirWatch Installation Guide | v.2018.03 | March 2018
                                                                                           Copyright © 2018 VMware, Inc. All rights reserved.

                                                                                                                                          7
Chapter 1: Overview

Status
          Requirement                                     Notes
Checklist
         Assign AirWatch Database Roles                  See Create the AirWatch SQL Service Account and Assign
                                                         DB Owner Roles on page 17.
         Create the Identity Manager Database            See Create the VMware Identity Manager Service Database
                                                         on page 20.
         Assign Identity Manager Database Roles          See Create the Identity Service SQL Service Account and
                                                         Assign DB Owner Roles on page 21.
         Configure Application Servers                   See Configure your Application Servers on page 24.
         Server Internal DNS and Certificate             See Configure Your Internal DNS Record and Certificates on
         Requirements                                    page 25
         Server External DNS and Certificate             See Configure Your External DNS Record and Certificates on
         Requirements                                    page 29.
         Stage Install Files                             See Stage Install Files on page 35
                                     Step 2: Perform the Database Installation
         Run the AirWatch Database Setup Utility         See Run the AirWatch Database Setup Utility on page 45.
         Verify Proper Database Installation             See Verify Proper Database Installation on page 46.
                                 Step 3: Perform Application Server Installation
         Start the AirWatch Installer on Each            See Run the AirWatch Installer on Each Application Server
         Application Server                              (Console and Device Services) on page 48.
         (OPTIONAL) Run the AirWatch Installer on Any See (Optional) Run the Installer on Additional Device
         Additional Device Services Servers           Services Servers on page 61.
         (OPTIONAL) Run the AirWatch Installer on        See Run the AirWatch Installer on the VMware Identity
         Identity Manager Server                         Manager Service on page 62.
                                       Step 4: Perform Reports Installation
         Connect Database to Reports Server              See Connect the Database to Reports Server on page 69.
         Configure Service Account for SSRS              See Configure the Service Account for SSRS on page 70.
         Configure Web Service URL                       See Configure the Web Service URL on page 72.
         Set up Reporting Database                       See Set up the Reporting Database on page 73.
         Verify Report URLs                              See Verify the Report Manager URL and Web Service URL
                                                         on page 74.
         Set up AirWatch SSRS User                       See Set up the AirWatch SSRS User on page 75.
         Add the SSRS User to IIS_IUSRS                  See Add the SSRS User to IIS_IUSRS on page 77.
         Run the Reports Installer                       See Verifying Reports Functionality on page 81.
         Integrate Reports with the Console and Enable See Integrate Reports with the AirWatch Console on page
         Reports Storage                               83 and Reports Storage Overview on page 84

                                                                           VMware AirWatch Installation Guide | v.2018.03 | March 2018
                                                                                     Copyright © 2018 VMware, Inc. All rights reserved.

                                                                                                                                    8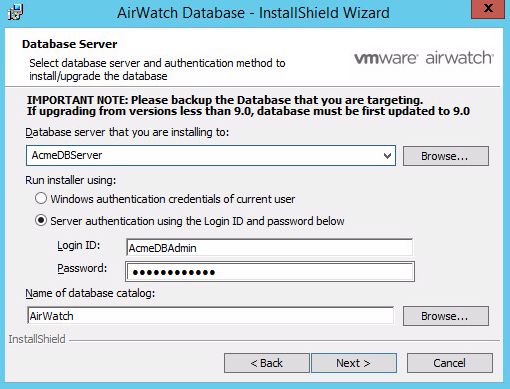
Chapter 1: Overview

This guide does not cover post-install configuration, but does include a Next Steps section, which covers some of the
essential procedures to get you started.

                                                                              VMware AirWatch Installation Guide | v.2018.03 | March 2018
                                                                                        Copyright © 2018 VMware, Inc. All rights reserved.

                                                                                                                                       9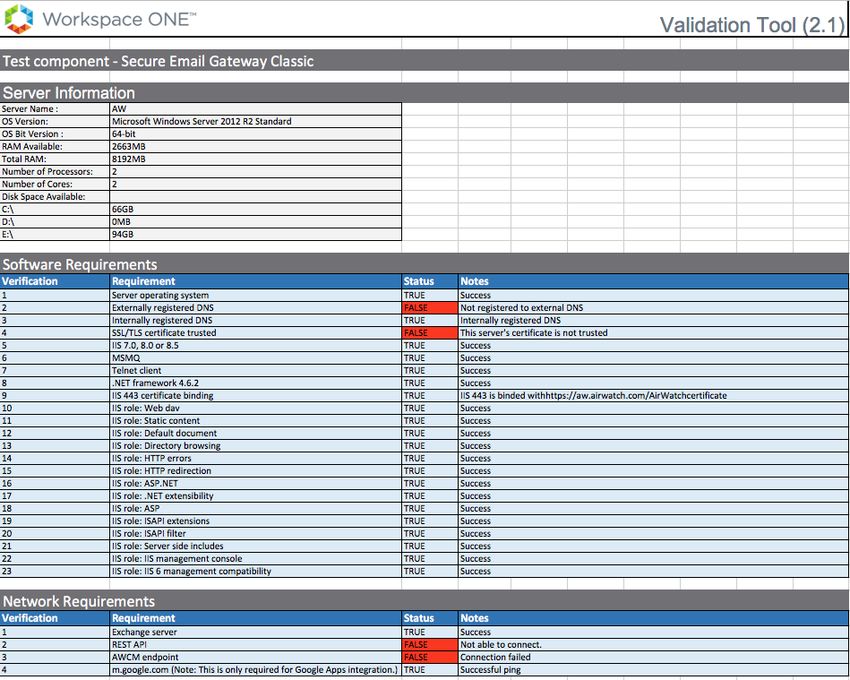
Chapter 2:
Installation Preparation
 Database Server Prerequisites                             11
 Application Server Prerequisites                          12
 VMware Identity Manager Service Prerequisites             14
 Perform Optional Installs                                 15
 Reports Prerequisites                                     15
 Create the AirWatch Database                              16
 Create the AirWatch SQL Service Account and Assign
 DB Owner Roles                                            17
 Create the VMware Identity Manager Service Database       20
 Create the Identity Service SQL Service Account and Assign
 DB Owner Roles                                             21
 Configure your Application Servers                        24
 Configure Your Internal DNS Record and Certificates       25
 Configure Your External DNS Record and Certificates       29
 Stage Install Files                                       35
 Workspace ONE Validation Tool                             35

                                                                 VMware AirWatch Installation Guide | v.2018.03 | March 2018
                                                                           Copyright © 2018 VMware, Inc. All rights reserved.

                                                                                                                        10
Chapter 2: Installation Preparation
Database Server Prerequisites
Meet the database server prerequisites before installing the database server. The prerequisites listed here apply to any
database you plan to install (for example, the AirWatch or AirWatch Identity Manager databases).
SQL Server Hardware Requirements
The exact specifications needed for your SQL server depend on the size and needs of your deployment. You may need to
gather this information before proceeding so you size your servers correctly. Read through the VMware AirWatch
Recommended Architecture Guide, available on AirWatch Resources, for hardware sizing information and other
technical details that ensure the smooth operation of your AirWatch database.
SQL Server Software Requirements
l SQL Server 2012, SQL Server 2014, or SQL Server 2016 with Client Tools (SQL Management Studio, Reporting Services,
Integration Services, SQL Server Agent, latest service packs). Ensure the SQL Servers are 64-bit (OS and SQL Server).
AirWatch does not support Express, Workgroup, or Web editions of SQL Server. These editions do not support all
the features used in the AirWatch application. Currently only Standard and Enterprise Editions are supported.
l Microsoft SQL Server 2012 Native Client 11.3.6538.0 is required to run the database installer. If you do not want to
install Microsoft SQL Server 2012 Native Client 11.3.6538.0 on to your database server, then run the database
installer from another AirWatch server or a jump server where Microsoft SQL Server 2012 Native Client 11.3.6538.0
can be installed.
l .NET 4.6.2 is required to run the database installer. If you do not want to install .NET on to your database server,
then run the database installer from another AirWatch server or a jump server where .NET can be installed.
l Ensure the SQL Server Agent Windows service is set to Automatic or Automatic (Delayed) as the Start type for the
service. If set to Manual, it has to be manually started before database installation.
l You must have the access and knowledge required to create, back up, and restore a database.
TCP/IP is Enabled
Use TCP/IP to connect to the database and disable Named Pipes. In SQL Server Configuration Manager, navigate to
SQL Server Network Configuration and select Protocols for MSSQLSERVER.
VMware AirWatch Installation Guide | v.2018.03 | March 2018
Copyright © 2018 VMware, Inc. All rights reserved.
11Chapter 2: Installation Preparation
Identity Manager Database
The Identity Manager database supports Named Instances or Windows authentication.
Application Server Prerequisites
Meet the application server prerequisites before installing the application server. The prerequisites listed here apply to
any application server you plan to install.
Hardware Requirements
An AirWatch installation can involve many servers, and the exact specifications depend on the size and needs of your
deployment. You may need to gather this information before proceeding so you size your servers correctly. Read
through the VMware AirWatch Recommended Architecture Guide, available on AirWatch Resources, for hardware
sizing information and other technical details that ensure the smooth operation of your AirWatch solution.
Network Requirements
Review all the network requirements as outlined in the VMware AirWatch Recommended Architecture Guide. These
requirements include the firewall ports that must be opened for AirWatch to function properly.
Software Requirements
Ensure that you meet the following software requirements for the application servers:
l Internet Explorer 9+ installed on all application servers
l Windows Server 2008 R2, Windows Server 2012, Windows Server 2012 R2, or Windows Server 2016
VMware AirWatch Installation Guide | v.2018.03 | March 2018
Copyright © 2018 VMware, Inc. All rights reserved.
12Chapter 2: Installation Preparation
l 64-bit Java (JRE 1.8) server needed for the server AWCM is installed on
l 64-bit Java (JRE 1.8) installed on all app servers
l .NET Framework 4.6.2 required; .NET 4.7 is supported. The installer is packaged with the .NET Framework 4.6.2
installer and will install it if 4.6.2 or 4.7 is not already present.
l PowerShell version 3.0+ is required if you are deploying the PowerShell MEM-direct model for email. To check your
version, open PowerShell and run the command $PSVersionTable. More details on this and other email
models can be found in the VMware AirWatch Mobile Email Management Guide, available on AirWatch Resources.
l Microsoft SQL Server 2012 Native Client 11.3.6538.0 is required to run the database installer. If you do not want to
install Microsoft SQL Server 2012 Native Client 11.3.6538.0 on to your database server, then run the database
installer from another AirWatch server or a jump server where Microsoft SQL Server 2012 Native Client 11.3.6538.0
can be installed.
Proxy Requirements
The AirWatch servers can be configured with a proxy / PAC file for outbound Internet access. Apple APNs traffic, however,
is not HTTP traffic, and cannot be authorized through traditional HTTP proxies. This traffic must go straight out to the
Internet or through an application/SOCKS proxy.
If you are performing outbound proxying of APNs messages, your proxy application must support SOCKS V5.
SOCKS V4 and SOCKS V4a are not supported.
Install Role from Server Manager
Ensure that you meet the following IIS requirements, depending on your Windows Server version:
l IIS 7.0 (Server 2008 R2)
l IIS 8.0 (Server 2012 or Server 2012 R2)
l IIS 8.5 (Server 2012 R2 only)
l IIS 10.0 (Server 2016)
See additional information on the required roles and features under Configure your Application Servers.
RDP and VM Access to Application Servers
You must have remote access to the servers that AirWatch is installed on. Verify this access before attempting to install
AirWatch servers.
Remote Desktop Connection Manager can be downloaded from the following link:
https://www.microsoft.com/en-us/download/details.aspx?id=44989
Verify you can connect using RDP to your application servers or appropriate VM hosts.
1. Open Remote Desktop Connection:
l Start > Run
l Type mstsc
VMware AirWatch Installation Guide | v.2018.03 | March 2018
Copyright © 2018 VMware, Inc. All rights reserved.
13Chapter 2: Installation Preparation
l Select OK
2. Enter the IP address of the server and select Connect.
3. Log in using credentials for the server. Verify a successful log-in.
Permissions of AirWatch Service Accounts
The service account you create for AirWatch needs the appropriate permissions to integrate with your back end systems.
This can be one service account that has all required access. Verify AD/LDAP connectivity between your AirWatch service
account and your backend systems.
VMware Identity Manager Service Prerequisites
The VMware Identity Manager service must be installed in a new standalone server or cluster. Meet the following
requirements before installation.
During installation, AirWatch installs the complete VMware Identity Manager service including the RabbitMQ Server and
Erland component. These components are necessary to use all the features and functionality of the VMware Identity
Manager service.
Identity Manager Service Software Requirements
l Windows Server 2008 R2, Windows Server 2012 R2, or Windows Server 2016
l PowerShell 4.0 or higher
o Active Directory module for PowerShell (RSAT-AD-PowerShell)
l JRE 1.8 installed (included in the application server installer)
If your JRE is an older version, the installer automatically updates it, but does not remove the existing JRE version,
which must be manually uninstalled.
l RabbitMQ Server (included in the application server installer)
l Erlang (included in the application server installer)
Networking Requirements
To configure certificate authentication in a VMware Identity Manager on-premises DMZ deployment:
l Enable SSL pass-through on port 443 at the load balancer in front of VMware Identity Manager.
l Open port 6443 (HTTPS) on the load balancer or firewall.
Review all the network requirements as outlined in the VMware AirWatch Recommended Architecture Guide. These
requirements include the firewall ports that must be opened for AirWatch to function properly.
VMware Enterprise Systems Connector
When you deploy the complete VMware Identity Manager service, you must deploy the VMware Enterprise Systems
Connector as well. For more information, see the VMware Enterprise Systems Connector Installation and
VMware AirWatch Installation Guide | v.2018.03 | March 2018
Copyright © 2018 VMware, Inc. All rights reserved.
14Chapter 2: Installation Preparation
Configuration Guide, available on AirWatch Resources here: https://resources.air-
watch.com/view/lmtqzhdn2v8vf2ft763j.
If you are only using the VMware Identity Manager for the unified application catalog, you must use the AirWatch Cloud
Connector of the VMware Enterprise Systems Connector to connect to Active Directory.
AlwaysOn
The SQL Server AlwaysOn capability is a combination of failover clustering and database mirroring/log shipping. It allows
for multiple read copies of your database and a single copy for read-write operations. For more information, see
https://msdn.microsoft.com/en-us/library/ff877884.aspx.
So long as you have the bandwidth to support the traffic generated, the Identity Manager database supports AlwaysOn.
Perform Optional Installs
Install optional software to ensure a smooth installation process and to make troubleshooting easier.
Supported Browsers
The AirWatch Console supports the latest stable builds of the following web browsers:
l Chrome
l Firefox
l Safari
l Internet Explorer 11
l Microsoft Edge
Note: If using IE to access the Console, navigate to Control Panel > Settings > Internet Options > Security and
ensure you have a security level or custom security level that includes the Font Download option being set to
Enabled.
If you are using a browser older than those listed above, AirWatch recommends upgrading your browser to guarantee
the performance of the AirWatch Console. Comprehensive platform testing has been performed to ensure functionality
using these web browsers. The AirWatch Console may experience minor issues if you choose to run it in a non-certified
browser.
Notepad++
Download and install Notepad++ (http://notepad-plus-plus.org/). This application is helpful because it allows you to view
many log files at once using the tabular format and allows for the auto-refresh of a log file if it is regenerated.
Reports Prerequisites
Meet the reports server prerequisites before installing the reports server.
VMware AirWatch Installation Guide | v.2018.03 | March 2018
Copyright © 2018 VMware, Inc. All rights reserved.
15Chapter 2: Installation Preparation
Hardware Requirements
The exact specifications needed for your reports server depend on the size and needs of your deployment. You may need
to gather this information before proceeding so you size your servers correctly. Read through the VMware AirWatch
Recommended Architecture Guide, available on AirWatch Resources, for hardware sizing information and other
technical details that ensure the smooth operation of your AirWatch reports server.
Software Requirements
l Windows Server 2008 R2/2012, or 2012 R2 (32-bit or 64-bit) with the latest service packs and recommended updates
from Microsoft (http://www.update.microsoft.com).
l Microsoft SQL Server 2012, SQL Server 2014, or SQL Server 2016 with Client Tools (SQL Management Studio,
Reporting Services, Integration Services, SQL Server Agent, latest server packs).
Network Requirements
Inbound communications to this server:
l AirWatch Console and Device Services using HTTP (80) or HTTPS (443) or other custom port numbers as needed.
Outbound communications from this server:
l The SMTP Mail Relay using SMTP on ports 25 or 465.
User Account Requirements
The Windows users running the Report installer must have access to both Report Manager and Report Database, as they
are required to deploy the report files on the Report Server.
Create the AirWatch Database
To create the database, you must perform the following steps with an administrator account that has the correct
read/write permissions.
1. On the SQL Server, open SQL Server Management Studio.
2. Log in using your user name and password.
3. Click Connect.
4. Right-click Databases and select New Database.
5. Enter AirWatch as the Database name.
6. Scroll to the right side of Database files, select the … next to Autogrowth for AirWatch, and change File Growth to
“In Megabytes” and the size to 128, then select OK.
VMware AirWatch Installation Guide | v.2018.03 | March 2018
Copyright © 2018 VMware, Inc. All rights reserved.
16Chapter 2: Installation Preparation
7. Select Options, and set the Collation to SQL_Latin1_General_CP1_Cl_AS.
8. Select OK to create the AirWatch database.
9. Expand Databases and verify the AirWatch database is created.
Create the AirWatch SQL Service Account and Assign DB Owner Roles
After you create the AirWatch database, you must configure the credentials of the SQL user that will run the AirWatch
database setup utility.
1. Open SQL Server Management Studio.
2. Log in to the DB server containing the AirWatch database.
VMware AirWatch Installation Guide | v.2018.03 | March 2018
Copyright © 2018 VMware, Inc. All rights reserved.
17Chapter 2: Installation Preparation
3. Navigate to Security > Login, right-click, and select New Login.
4. Select whether to use your Windows account or local SQL Server account for authentication. For SQL Server
authentication, enter your user credentials.
5. Select the AirWatch database as the Default database.
6. Navigate to the Server Roles tab. Select server role as Public.
7. Select User Mapping.
l Select the AirWatch Database. Then, select the db_owner role.
For a successful installation, you must ensure that the SQL User you are planning to run the AirWatch Database
Script with has the database db_owner role selected.
VMware AirWatch Installation Guide | v.2018.03 | March 2018
Copyright © 2018 VMware, Inc. All rights reserved.
18Chapter 2: Installation Preparation
l Select the msdb Database. Then, select the SQLAgentUserRole and db_datareader roles. SQLAgentUserRole is
not pictured below due to space constraints.
VMware AirWatch Installation Guide | v.2018.03 | March 2018
Copyright © 2018 VMware, Inc. All rights reserved.
19Chapter 2: Installation Preparation
8. Select OK.
Create the VMware Identity Manager Service Database
If you are installing the VMware Identity Manager service as part of a Workspace ONE installation, then you must create
a separate VMware Identity Manager services database.
1. On the SQL Server, open SQL Server Management Studio.
2. Log in using your user name and password.
3. Click Connect.
4. Right-click Databases and select New Database.
5. Enter AirWatch_IDM as the Database name.
You can customize the IDM database name. This guide uses AirWatch_IDM as the database name throughout.
6. Scroll to the right side of Database files, select the … next to Autogrowth, and change File Growth to “In Megabytes”
and the size to 128, then select OK.
VMware AirWatch Installation Guide | v.2018.03 | March 2018
Copyright © 2018 VMware, Inc. All rights reserved.
20Chapter 2: Installation Preparation
7. Select Options, and set the Collation to Latin1_General_CS_AS.
8. Under Options, set READ_COMMITTED_SNAPSHOT to ON.
9. Select OK to create the AirWatch_IDM database.
10. Expand Databases and verify the AirWatch_IDM database is created.
Create the Identity Service SQL Service Account and Assign DB Owner Roles
After you create the AirWatch Identity Service database, you must configure the credentials of the SQL user that will run
the AirWatch database setup utility.
1. Open SQL Server Management Studio.
2. Log in to the DB server containing the AirWatch Identity Service database.
VMware AirWatch Installation Guide | v.2018.03 | March 2018
Copyright © 2018 VMware, Inc. All rights reserved.
21Chapter 2: Installation Preparation
3. Navigate to Security > Login, right-click, and select New Login.
4. Enter your SQL Server account credentials for authentication.
5. Select the AirWatch_IDM database as the Default database. If User must change password is selected, then you
must change the password before running the application server installer. To avoid this step, uncheck this option.
6. Navigate to the Server Roles tab. Select server role as Public.
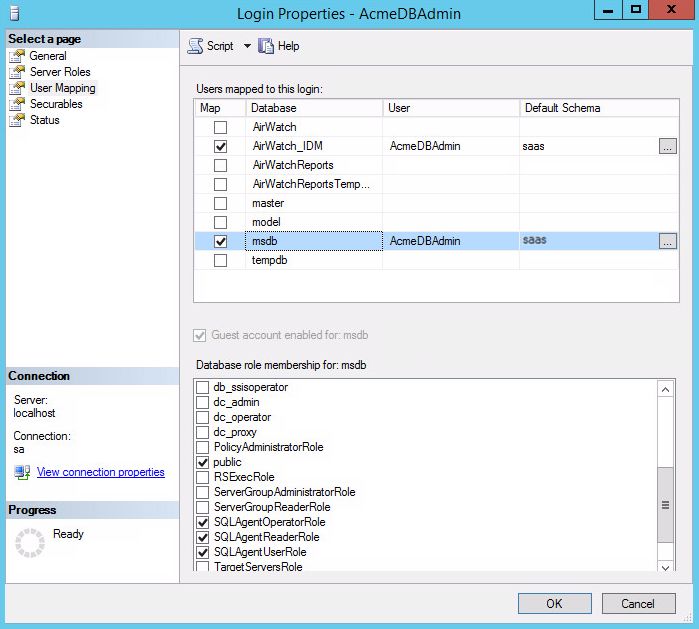
7. Select User Mapping.
l Select the AirWatch_IDM database. Then, select the db_owner, db_datareader, db_datawriter, db_ddladmin,
and public roles.
For a successful installation, you must ensure that the SQL User you are planning to run the AirWatch Database
Script with has the database db_owner role selected.
VMware AirWatch Installation Guide | v.2018.03 | March 2018
Copyright © 2018 VMware, Inc. All rights reserved.
22Chapter 2: Installation Preparation
Make sure that the AirWatch database default schema is set to saas. Only the saas schema can be used in the
Identity Manager database.
l Select the msdb Database. Then, select the public, SQLAgentUserRole, SQLAgentOperatorRole,
SQLAgentReaderRole and db_datareader roles. Note that db_datareader is not pictured below due to space
constraints.
VMware AirWatch Installation Guide | v.2018.03 | March 2018
Copyright © 2018 VMware, Inc. All rights reserved.
23Chapter 2: Installation Preparation
Make sure that the AirWatch database default schema is set to saas. Only the saas schema can be used in the
Identity Manager database.
8. Select OK.
Configure your Application Servers
The AirWatch installer configures the following roles and permissions as part of the installation. If you prefer to configure
these manually, or to verify them, you can use the procedure below.
1. On the AirWatch Console Server and AirWatch Device Services Server, from the Taskbar, open Server Manager and
select Manage > Add Roles and Features. Click Next to advance to the Server Roles tab.
2. Expand Web Server (IIS), and under it expand Web Server.
3. Verify that the following role services are enabled (most may already be enabled):
l Common HTTP Features: Static Content, Default Document, Directory Browsing, HTTP Errors, HTTP Redirection
l Application Development: ASP.NET, .NET Extensibility, ASP, ISAPI Extensions, ISAPI Filters, Server Side Includes
When ASP.NET is selected, select Add Required Features to associate features with the ASP framework. Ensure
that other required role services are enabled.
VMware AirWatch Installation Guide | v.2018.03 | March 2018
Copyright © 2018 VMware, Inc. All rights reserved.
24Chapter 2: Installation Preparation
l Health and Diagnostics: HTTP Logging, Logging Tools, Request Monitor, Tracing
l Security: Request Filtering, IP, and Domain Restrictions
l Performance: Static Content Compression, Dynamic Content Compression
l Management Tools: IIS Management Console and IIS 6 Metabase Compatibility
l Ensure WebDAV is not installed.
4. Click Next.
5. On the Features tab, verify the following required features are added:
l .NET Framework 4.6.2 Features: Entire module (.NET Framework and WCF Activation)
When .NET is selected, select Add Required Features, to associate features with the .NET framework. Expand to
verify every .NET/WCF feature is enabled. For a 2012 R2, .NET Framework 4.6.2 Features is required.
l Message Queuing: Message Queuing Server (expand Message Queuing > Message Queuing Services to select)
l Telnet Client
6. Click Next and verify that the features which must be enabled have been so enabled.
7. Select Install.
8. When the installation is finished, verify that the Installed succeeded messages are shown, then select Close.
Install URL Rewrite Module 2.0
The URL Rewrite Module 2.0 cannot be installed until the IIS role is installed.
1. Navigate to http://www.iis.net/downloads/microsoft/url-rewrite#additionalDownloads and download the
appropriate version for your install.
2. Run the installer and accept the defaults for installation.
Configure Your Internal DNS Record and Certificates
An internally registered DNS record is for devices connecting over your organization's internal Wi-Fi network, and it tells
them how to connect to AirWatch (specifically, the Device Services server). An internal DNS record must be registered on
the internal domain server.
In the standard, multi-server deployment, you must generate a self-signed certificate for your Console server (or you can
use an internally issued certificate).
The externally available URL of the AirWatch server must be set up with a trusted SSL certificate. A wildcard or individual
Web site certificate is required.
1. Open Server Manager and navigate to Roles > Web Server (IIS).
2. Click the Server Name.
3. Double-click Server Certificates.
VMware AirWatch Installation Guide | v.2018.03 | March 2018
Copyright © 2018 VMware, Inc. All rights reserved.
25Chapter 2: Installation Preparation
4. On the right, select Create Self-Signed Certificate.
5. Enter the friendly name (FQDN) and select OK.
VMware AirWatch Installation Guide | v.2018.03 | March 2018
Copyright © 2018 VMware, Inc. All rights reserved.
26Chapter 2: Installation Preparation
6. Next you can add a 443 binding to the Default Web site in IIS. The bindings for a completed server look like the
following. Your SSL certificate appears in the drop-down menu of available certificates.
VMware AirWatch Installation Guide | v.2018.03 | March 2018
Copyright © 2018 VMware, Inc. All rights reserved.
27Chapter 2: Installation Preparation
7. Also verify that you have a private key that corresponds to your certificate.
VMware AirWatch Installation Guide | v.2018.03 | March 2018
Copyright © 2018 VMware, Inc. All rights reserved.
28Chapter 2: Installation Preparation
Configure Your External DNS Record and Certificates
The two main components of AirWatch are the Device Services server and the Console server. In the standard
deployment model, these components are installed on separate servers, and only the Device Services component
requires an external DNS record, while the Console component can remain only internally available.
An externally registered DNS record is a friendly name that refers to the IP to tell external devices how to connect to
AirWatch (the Device Services server). This externally available URL must be set up with a trusted SSL certificate that is
trusted by all device types. For Apple, you can see a list of root certificates that are natively trusted by iOS On the Apple
Support webpage. For other OEMs, check with the OEM to see which third-party certificate authorities are natively
trusted. You can also typically retrieve this information from the device by looking for the Trusted Root CAs under
Settings.
A wildcard or individual Web site certificate is required.
Important: Ensure that these steps are performed on both the AirWatch Console and Device Services servers.
1. Obtain SSL certificates for each of your external DNS entries. A list of root certificates natively trusted by iOS can be
found here: http://support.apple.com/kb/HT5012
2. On the AirWatch Console and Device Services Servers, open mmc:
a. Start > Run
b. Type mmc
c. Select OK
3. In mmc, navigate to File > Add/Remove Snap-in …
4. Select Certificates from the list of add-ins and select Add.
5. Choose Computer account and select Next.
6. Keep Local computer selected and select Finish and OK.
VMware AirWatch Installation Guide | v.2018.03 | March 2018
Copyright © 2018 VMware, Inc. All rights reserved.
29Chapter 2: Installation Preparation
7. Expand the Certificates folder and right-click Personal.
8. Select All Tasks and choose Import.
9. In the Certificate Import Wizard, select Next and perform the following steps:
a. Click Browse and navigate to the Cert folder, which was staged earlier, and change the file type drop-down to All
Files.
If the drop-down is not changed to All Files, the certificate cannot be selected for import.
b. Select the appropriate certificate and select Open.
In a standard, multi-server installation, this certificate is the external third-party certificate for the DS server and
for the Console it can be a self-signed or internally issued certificate.
This certificate must be a PFX file.
c. Click Next, and complete the following settings:
l Password: Your certificate password
l Mark this key as Exportable: enable
This is optional and allows you to export the certificate from this server to use it on another server.
l Include all extended properties: enable
d. Click Next and select Finish.
e. Select OK to close the “The import was successful” pop-up.
10. Expand the Personal folder to show the Certificates folder
11. Drag the Root CA Certificate into the Trusted Root Certification Authorities folder. Navigate to Trusted Root
Certification Authorities > Certificates to verify that the move was successful.
VMware AirWatch Installation Guide | v.2018.03 | March 2018
Copyright © 2018 VMware, Inc. All rights reserved.
30Chapter 2: Installation Preparation
12. Navigate back to the Personal folder to show the Certificates folder, and drag the Intermediate CA Certificate into
the Intermediate Certification Authorities folder. Navigate to Intermediate Certification Authorities > Certificates
to verify that the move was successful.
13. Select File > Exit to close mmc. Select No to save changes.
14. Open Server Manager, select Roles and expand: Web Server (IIS) > Information Services (IIS) Manager.
15. In the right pane, under Connections, select the server.
16. Under the IIS section, double-click on Server Certificates and verify that the certificate is located in the certificate list.
An example is shown.
Once uploaded on your server you can use it to add a 443 binding to the Default Web site in IIS. Your SSL certificate
appears in the drop-down menu of available certificates.
17. Under Connections, expand Sites and select Default Web Site.
18. Under Actions, to the far right side, under Edit Site, select Bindings and select Add…
VMware AirWatch Installation Guide | v.2018.03 | March 2018
Copyright © 2018 VMware, Inc. All rights reserved.
31Chapter 2: Installation Preparation
19. Configure the following settings:
l Type: https
l SSL certificate: Your certificate
20. Click OK and select to Close.
The IP address and Port are not altered. Do not populate the Hostname with an IP or DNS entry, since it affects the
functionality of the SSL binding. A slight delay occurs when the certificate is bound to the Web site.
21. Click OK and select to Close.
22. Under Actions/Browse Web Site, verify Browse *.443 (https) is an available option.
23. Also verify that you have a private key that corresponds to your certificate.
VMware AirWatch Installation Guide | v.2018.03 | March 2018
Copyright © 2018 VMware, Inc. All rights reserved.
32Chapter 2: Installation Preparation
24. Verify that the certificate contains the common name in the subject.
25. Verify that your DNS name is listed in the Subject Alternative Name.
VMware AirWatch Installation Guide | v.2018.03 | March 2018
Copyright © 2018 VMware, Inc. All rights reserved.
33Chapter 2: Installation Preparation
26. Validate that you can connect to the server over HTTPS (https://yourAirWatchDomain.com). At this point, the IIS
splash page displays.
Important: If SSL is used for Admin Console access, ensure that FQDN is enabled or host file is configured.
VMware AirWatch Installation Guide | v.2018.03 | March 2018
Copyright © 2018 VMware, Inc. All rights reserved.
34Chapter 2: Installation Preparation
Stage Install Files
After meeting the database and application server prerequisites and configuring your internal and external DNS, you can
stage the install files on the appropriate Console, Device Services, and SQL servers.
To stage the install files:
1. Download the latest GA or Feature Pack Full Installer.zip file from the Resource Portal. Receive a direct link to the files
from your AirWatch consultant as part of the deployment process.
2. Unzip the files on to the appropriate server.
3. Extract the contents.
Workspace ONE Validation Tool
Use the Workspace ONE Validation Tool to verify that your system and components are properly configured.
The Workspace ONE Validation Tool collects and analyzes configuration data from the target AirWatch and Workspace
ONE environments to validate that your environment is ready for a successful SaaS or on-premises deployment.
The utility validates the Database, Console, Device Services, AirWatch Cloud Messaging, VMware Enterprise Systems
Connector, Secure Email Gateway, and Email Notification Service. Each of these components has different software and
networking requirements, such as OS, Database, CPU, RAM, JRE, network security, Server Manager, DNS, certificates,
and Email infrastructure.
The tol generates a customized report that validates that the environment is deployment-ready.
You can check your configuration to perform:
l A system health check.
l A validation before or after an install or upgrade to your AirWatch version.
l Troubleshooting on network changes.
l A validation before or after a server migration.
To begin the installation validation, download the Workspace ONE Validation Tool from https://resources.air-
watch.com/view/vldrj3p3fb8mvzmrpj84. Extract the ZIP file and open the InstallVerificationTool.exe file.
Next, select a component to validate:
l Validate the VMware AirWatch Console on page 35
l Validate the VMware Device Services on page 37
l Validate the Email Notification Server on page 40
l Validate the VMware Enterprise Systems Connector on page 38
l Validate the Secure Email Gateway on page 40
Validate the VMware AirWatch Console
Use the Workspace ONE Validation Tool to verify that your Windows machine is properly configured for a deployment of
the VMware AirWatch Console.
VMware AirWatch Installation Guide | v.2018.03 | March 2018
Copyright © 2018 VMware, Inc. All rights reserved.
35Chapter 2: Installation Preparation
1. Run the Workspace ONE Validation Tool. Select the Console option.
2. Enter the following Console information. Select Next at the end of each page.
a. Host URL
b. Database server
c. Database name
d. Authentication type: select SQL Server or Windows
e. Database user
f. Database password
g. Outbound connections by proxy: select Yes or No
o If you select Yes, enter the Proxy URL and Proxy port, and select the Authentication type.
o If your authentication type is Password, enter the User name, Password, and Bypass List information for
your authentication strategy.
h. System integration configurations: select Yes or No to connect your back-end resources to the Console
o If you select Yes, select the System Integration you want to configure, and enter the required integration
information for your selection.
VMware AirWatch Installation Guide | v.2018.03 | March 2018
Copyright © 2018 VMware, Inc. All rights reserved.
36Chapter 2: Installation Preparation
3. When you have entered all the required information, select Test to verify your Console configuration.
4. When the test results appear, you can Export the results or Retry the validation. For more information about using
the results, see Validation Tool Results on page 41.
If the validation returns errors, consult the Pre-Installation Requirements Worksheet, available at AirWatch Resources.
Validate the VMware Device Services
Use the Workspace ONE Validation Tool to verify that your instance of VMware Device Services is properly configured.
1. Run the Workspace ONE Validation Tool. Select the Device Services option.
2. Enter the following Device Services information. Select Next at the end of each page.
a. Host URL
b. Database server
c. Database name
d. Authentication type: select SQL Server or Windows
e. Database user
f. Database password
g. Outbound connections by proxy: select Yes or No
o If you select Yes, enter the Proxy URL and Proxy port, and select the Authentication type.
o If your authentication type is Password, enter the User name, Password, and Bypass List information for
your authentication strategy.
VMware AirWatch Installation Guide | v.2018.03 | March 2018
Copyright © 2018 VMware, Inc. All rights reserved.
37Chapter 2: Installation Preparation
h. System integration configurations: select Yes or No to connect your back-end resources to Device Services
o If you select Yes, select the System Integration that you want to configure and enter the required integration
information for your selection.
3. When you have entered all the required information, select Test to verify your Device Services configuration.
4. When the test results appear, you can Export the results or Retry the validation. For more information about using
the results, see Validation Tool Results on page 41.
If the validation returns errors, consult the Pre-Installation Requirements Worksheet, available at AirWatch Resources.
Validate the VMware Enterprise Systems Connector
Use the Workspace ONE Validation Tool to verify that your instance of VMware Enterprise Systems Connector is properly
configured.
1. Run the Workspace ONE Validation Tool. Select the Enterprise Systems Connector option.
2. Select the components to test: AirWatch Cloud Connector and VMware Identity Manager Connector. You can
select one or both components. Select Next.
3. Enter the following Certificate and DNS Validation information. The fields that appear depend on your selection in the
previous page.
a. AirWatch Cloud Connector:
l Enter the Console URL.
l Enter the AWCM URL.
l Enter the API URL.
VMware AirWatch Installation Guide | v.2018.03 | March 2018
Copyright © 2018 VMware, Inc. All rights reserved.
38Chapter 2: Installation Preparation
b. VMware Identity Manager Connector
l Enter the IDM URL.
l Enter the ESC URL (FQDN).
l Select Yes to integrate with RSA SecureID and enter the RSA Server URL.
l Select Yes to integrate with Horizon View and enter the Horizon View URL.
l Select Yes to integrate with Citrix-published resources and enter the Citrix URL.
4. Configure outbound connections by proxy.
o Select whether your outbound configurations operate using a proxy.
o If you select Yes, enter the Proxy URL and Proxy port, and select the Authentication type.
o If your authentication type is Password, enter the User name, Password, and Bypass List information for your
authentication strategy.
5. System integration configurations: select Yes or No to connect your back-end resources to Device Services
o If you select Yes, select the System Integration that you want to configure and enter the required integration
information for your selection.
6. When you have entered all the required information, select Test to verify your Enterprise Systems Connector
configuration.
7. When the test results appear, you can Export the results or Retry the validation. For more information about using
the results, see Validation Tool Results on page 41.
If the validation returns errors, consult the Pre-Installation Requirements Worksheet, available at AirWatch Resources.
VMware AirWatch Installation Guide | v.2018.03 | March 2018
Copyright © 2018 VMware, Inc. All rights reserved.
39Chapter 2: Installation Preparation
Validate the Secure Email Gateway
Use the Workspace ONE Validation Tool to verify that your instance of VMware Secure Email Gateway (SEG) is properly
configured.
1. Run the Workspace ONE Validation Tool. Select the Secure Email Gateway option.
2. Select the SEG version (Classic SEG or V2 SEG) to test. Select Next.
3. Enter the following Certificate and DNS Validation information.
a. Enter the Server URL.
b. Enter the AWCM URL.
c. Enter the API URL.
4. Configure the system integration settings to test.
o Select Microsoft Exchange and enter the required integration information.
5. When you have entered all the required information, select Test to verify your Secure Email Gateway configuration.
6. When the test results appear, you can Export the results or Retry the validation. For more information about using
the results, see Validation Tool Results on page 41.
If the validation returns errors, consult the Pre-Installation Requirements Worksheet, available at AirWatch Resources.
Validate the Email Notification Server
Use the Workspace ONE Validation Tool to verify that your instance of VMware Email Notification Server (ENS) is properly
configured.
VMware AirWatch Installation Guide | v.2018.03 | March 2018
Copyright © 2018 VMware, Inc. All rights reserved.
40Chapter 2: Installation Preparation
1. Run the Workspace ONE Validation Tool. Select the Email Notification Server option.
2. Configure the system integration settings to test.
o Select the System Integration you want to configure and enter the required integration information.
3. When you have entered all the required information, select Test to verify your Secure Email Gateway configuration.
4. When the test results appear, you can Export the results or Retry the validation. For more information about using
the results, see Validation Tool Results on page 41.
If the validation returns errors, consult the Pre-Installation Requirements Worksheet, available at AirWatch Resources.
Validation Tool Results
Use the results from the VMware Workspace ONE Validation Tool to make necessary changes to your configuration to
make sure that you are ready for a successful SaaS or on-premises deployment.
If the validation tool finds errors, your results include error details for your configuration. Additional information appears
when you hover over an error in this view.
VMware AirWatch Installation Guide | v.2018.03 | March 2018
Copyright © 2018 VMware, Inc. All rights reserved.
41Chapter 2: Installation Preparation
To view additional details for each error, select Export to download a Component Test Report. Use this report to
troubleshoot your configuration.
VMware AirWatch Installation Guide | v.2018.03 | March 2018
Copyright © 2018 VMware, Inc. All rights reserved.
42Chapter 2: Installation Preparation
For more information on how to resolve errors, consult the Pre-Installation Requirements Worksheet, available at
AirWatch Resources.
VMware AirWatch Installation Guide | v.2018.03 | March 2018
Copyright © 2018 VMware, Inc. All rights reserved.
43Chapter 3:
Database Installation
Run the AirWatch Database Setup Utility 45
Verify Proper Database Installation 46
VMware AirWatch Installation Guide | v.2018.03 | March 2018
Copyright © 2018 VMware, Inc. All rights reserved.
44Chapter 3: Database Installation
Run the AirWatch Database Setup Utility
Run the AirWatch database executable once all prerequisites are met, such as creating the database and the AirWatch
SQL account and assigning DB owner roles used for installation.
For the following procedure, if you are planning to use Windows authentication, then you must be logged in as the
account you want to use or you must shift+right-click when you run the AirWatch database executable and select Run as
different user. The installer can be run directly on the database server, or on an application server if you have security
concerns.
Important: If there is an open connection to the AirWatch database, the population of the tables during the Database
setup fails.
1. On either the AirWatch Console or Database Server, open the 9.2 DB folder, right-click the AirWatch Database
executable, and Run as an administrator.
2. The DB Installer automatically prompts you to install any essential missing components. When complete, select
Next.
3. Accept the AirWatch EULA, and then select Next.
4. Select a location to install the AirWatch Database files, and then select Next. The best practice is to install wherever
the AirWatch folder exists on your system. For example, C:\AirWatch.
The Database Server screen displays.
5. Click the Browse button next to the Database server text box and select your AirWatch database from the list of
options.
If a custom port was used, do not select Browse… Instead, use the following syntax:
DBHostName, and then select Browse… to select the database server.
VMware AirWatch Installation Guide | v.2018.03 | March 2018
Copyright © 2018 VMware, Inc. All rights reserved.
45Chapter 3: Database Installation
Select the Server authentication use the Login ID and password below radio button and enter the SQL Admin
credentials. Click the Browse button next to the database catalog text box and select the AirWatch database catalog.
Or, if you choose Windows Authentication, enter your Windows account. The Windows account must have access
to the database server.
Note: The Windows account mentioned is only used for creating the database.
The AirWatch database installation user (the account used to install the database only) has DB owner privileges on
the AirWatch Database and SQLAgentUserRole and db_datareader on the msdb database.
6. Click Next. A warning pop-up displays to ensure the account accessing the database has sufficient rights. Click OK
and Install.
7. Click Finish once the database upgrade process completes.
8. On the SQL Server, open SQL Server Management Studio, expand the AirWatch database and verify AirWatch
tables have been populated.
Verify Proper Database Installation
After running the database setup utility and completing installation, check to make sure that the installation was
successful.
To verify a successful installation:
1. From SQL Server Management Studio, select your AirWatch instance and enter:
SELECT * FROM dbo.DatabaseVersion
2. Click Execute.
3. Verify the correct version displays in the Results window. (If performing an 9.2 GA release, you see MajorVersion 9,
MinorVersion 2, and Description AirWatch 9.1 GA. Version 7.2 is shown as an example.)
VMware AirWatch Installation Guide | v.2018.03 | March 2018
Copyright © 2018 VMware, Inc. All rights reserved.
46Chapter 4:
Application Server Installation
Run the AirWatch Installer on Each Application Server
(Console and Device Services) 48
(Optional) Run the Installer on Additional Device Services
Servers 61
Run the AirWatch Installer on the VMware Identity
Manager Service 62
VMware AirWatch Installation Guide | v.2018.03 | March 2018
Copyright © 2018 VMware, Inc. All rights reserved.
47Chapter 4: Application Server Installation
Run the AirWatch Installer on Each Application Server (Console and Device
Services)
Run the AirWatch executable file on your application servers to install the AirWatch Console and Device Services features.
For the following procedure, if you are planning to use Windows authentication, then you must be logged in as the
account you want to use or you must shift+right-click when you run the installer EXE file and select Run as different user.
1. On the application server (which is either your Console or DS), open the 9.2 Application folder and run the AirWatch
Application 9.2.X Full Install.exe.
Execute the AirWatch installer from an account with administrator privileges. If you do not have administrative
privileges, right-click and choose Run as Administrator to run the installer.
The installer stops all the services on the App server automatically.
2. The installer installs pending server prerequisites, if any.
Certain software components you might be prompted to download, such as .NET and TLS, require a reboot. Proceed
with the installer until finished and reboot when you are done.
3. Click Next once the AirWatch installer begins. The End User License Agreement (EULA) appears.
4. Accept the EULA and select Next.
5. Next, specify if you are importing or exporting any AirWatch Setup Configurations from or to any other identically
configured AirWatch servers.
l Disregard this setting if you are deploying AirWatch without any load balanced High Availability (HA) or Disaster
Recovery (DR) servers.
l If you have multiple load-balanced Device Services servers, then you can export settings from the first Device
Services server to use on any of the additional Device Services servers and increase install speed or import
settings that you have previously exported. For more information, see (Optional) Run the Installer on Additional
Device Services Servers on page 61.
6. Select the AirWatch features that you want to install on the specific server.
l In a standard, multi-server environment, enable only the AirWatch Console features or the AirWatch Device
Services features for the respective server type.
VMware AirWatch Installation Guide | v.2018.03 | March 2018
Copyright © 2018 VMware, Inc. All rights reserved.
48You can also read