MYMATHLAB / MYSTATLAB - INTERMEDIATE INTERACTIVE TRAINING GUIDE - HELP.PEARSONCMG.COM
←
→
Page content transcription
If your browser does not render page correctly, please read the page content below

MyMathLab / MyStatLab – Intermediate
     Interactive Training Guide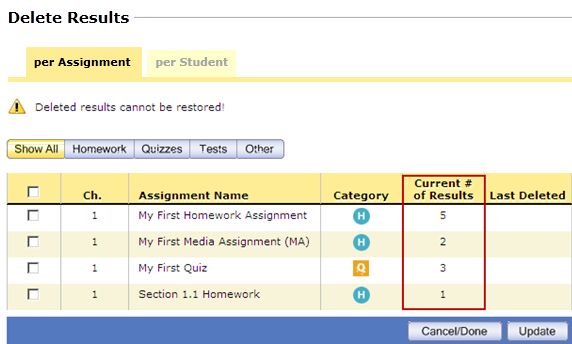
MYMATHLAB/MYSTATLAB – INTERMEDIATE

          Lesson   1 – Customize the Question Options for Assignments ....................... 68
          Lesson   2 – Customize the Settings for Homework Assignments .................... 76
          Lesson   3 – Customize the Settings for Quizzes and Tests ............................ 82
          Lesson   4 – Customize Your Gradebook ...................................................... 87
          Lesson   5 – Manage Course Grades ........................................................... 92
          Lesson   6 – Manage Student Results ......................................................... 100
          Lesson   7 – Change Assignment Settings .................................................. 107
          Lesson   8 – Manage Assignments ............................................................. 114
          Lesson   9 – Communicate Online with Students ......................................... 119
          Lesson   10 – Meet Online with Students .................................................... 122

Within your reading you will notice the following icons:

                              Click to watch a video showing you the steps for
                              completing the activity.

                              Click to start a practice module where you can
                              Work through the steps of an interactive simulation
                              to complete the activity.

                              Read best practices tips and strategies for
                              implementing a feature in your course.

                              Read important notes regarding a feature.

                              Click to open up the relevant Instructor Help page
                              for the topic.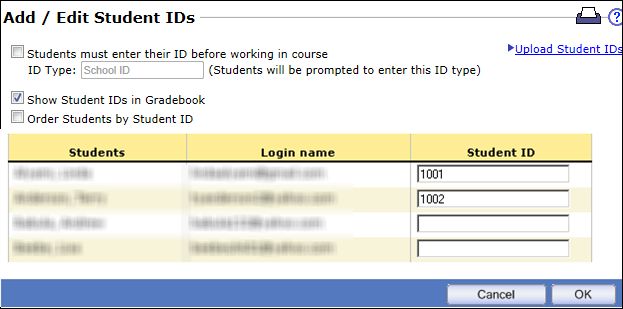
MyMathLab/MyStatLab – Intermediate

 LESSON 1 – CUSTOMIZE THE QUESTION OPTIONS FOR ASSIGNMENTS

In this lesson, you will learn how to:

     •   Customize the question options for an assignment
     •   Use question pools in a quiz or test

Customize the question options for an assignment

You have several options available for your homework, quiz, and test questions, such as
changing point values, including questions from other textbooks, adding instructor tips, and
others. In this lesson, you will learn about the various options and how to use them to
customize your questions.

1.   Edit the homework assignment.
     In the Homework/Test Manager, click the Actions dropdown list for one of your homework
     assignments and select Edit. Click Go to open up the homework editor. In Step 1 of the
     editor, click Next to go to the Select Media and Questions step.

            Note: The steps for customizing the question options for a quiz or test are
                  similar.

2.   Change the question point values.
     By default, each question is worth 1 point. Change the point value for the first question to
     2 points, and change the point value for the second question to 3 points. Notice that the
     total number of points for the assignment is automatically updated.

3.   Include questions from another textbook.
     In addition to the questions from the textbook you are teaching from, you can select
     questions from other textbooks in the Pearson library.

     Click Change to the right of your textbook title at the top of the page. In the Select book
     pop-up window, enter "Bittinger" in the Find Titles box, and click Find Titles. Select the
     Bittinger, Basic Mathematics, 11th edition textbook from the list and click Select
     Book.
Notice that the dropdown lists are updated to reflect the organization in the new textbook.
     Click the Chapter dropdown list and select Chapter 1. Then click the Section dropdown
     list and select Section 1.2. Check the box to the left of the first two questions in the
     Available Questions list, and click Add to include these questions in your homework
     assignment. The program identifies the questions from the different book with an asterisk
     and the thumbnail view lists the textbook from which the question was chosen.

           Note: You can include up to 20 questions from other books in any one
                 assignment. However, you must include at least one question in the
                 assignment from your course book.

4.   Include multiple-choice questions.
     The majority of the publisher questions are of the short-answer format, however, there are
     also multiple-choice questions available.

     Check the Show additional test bank questions box in the Question Source section at
     the top right of the page. Uncheck the Show publisher questions box.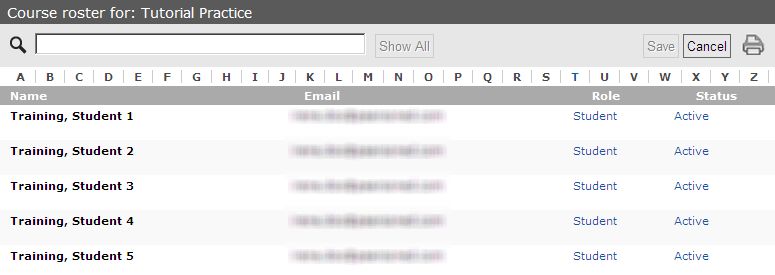
The Available Questions list is refreshed and shows only the questions from the test bank.
     These are identified with (tb) in the Question ID. Hover your mouse over the first question
     in the list for a thumbnail view of the question.

     Check the boxes for the first two questions in the Available Questions list and click Add to
     include these questions in your homework assignment.

5.   Add instructor tips.
     You can add your own notes to questions for clarification or to
     provide additional directions to students.

     Click the first question in your My Selections list to open the
     preview window. On the Preview window, click Add
     Instructor Tip. Enter "Be sure to check your answer." in
     the box. Click Save to add the tip to the question. The
     instructor tip will pop up automatically when the student first
     opens this question in your assignment.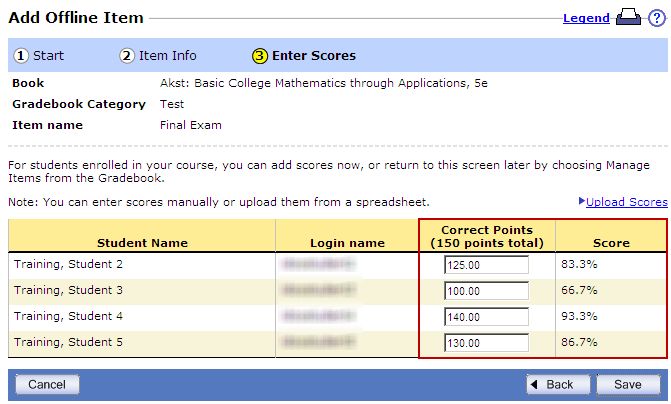
Note: You can only type text in the Instructor Tip box. Mathematical expressions
                 and images cannot be included in the Instructor Tip.

6.   Require students to show work.
     You can require students to show their work on individual questions in the assignment. On
     the question preview window, check the Student to show work box at the bottom of the
     window.

     The Show Work window will pop up automatically when the student first opens this
     question in your assignment. Students can select Help in the menu bar to learn how to use
     the Show Work window.

           Note: Students must turn off the pop-up blocker in their browsers to have the
                 Instructor Tip or Show Work window pop up automatically. Alternatively,
                 they can click the Instructor Tip or Show Work button in the Learning Aids
                 panel to pull up the window.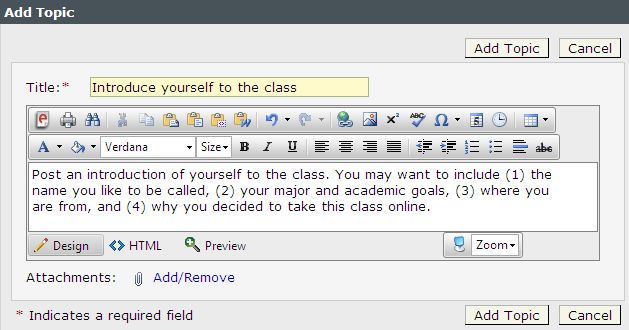
Tip:   You have to manually grade each student's work, so be judicious in the
                  number of questions that require students to show work. A best practice is
                  to limit the number of Show Work questions to 20% of the total number of
                  questions in the assignment.

7.   Set the question scoring options.
     You can adjust the numeric answer tolerance for a question, award partial credit for
     equivalent answers, and set the number of attempts students have on each part of the
     question.

     On the preview window, click Scoring Options at the bottom right of the window.

     In the Question Scoring Options window, select the Award partial credit option, and enter
     80% in the box. If a student enters an answer for this question that is equivalent to the
     correct answer but not in the specified form, the answer will be marked partially correct
     and the score will be 80% of the total points for that question.
Up To Speed
On Step 2, click View question details at the top of the My Selections list.
On the View Question Details window, you can specify the numeric answer
tolerance, credit for unsimplified answers, number of tries within each
question, and require students to show work for multiple questions.
8. Save your changes.
Return to the Add/Remove Content window and click Save & Assign to save your question
options and return to the Homework/Test Manager.Use question pools in a quiz or test
Within quizzes and tests, you can increase the variation of questions by using question pools. A
question pool is a group of questions that are associated with a single question on a quiz or
test. The question the student views on the quiz or test is a random selection of one of the
questions from the pool. In this lesson, you will use question pooling in a quiz.
Tip: Since the questions on your quiz or test are also algorithmically generated,
pooling greatly reduces the chances of two students seeing the same
question with the same values.
1. Edit the quiz.
In the Homework/Test Manager, click the Actions dropdown list for one of your quizzes or
tests, and select Edit. Click Go to open up the quiz editor. In Step 1 of the editor, click
Next to go to the Add/Remove Content step.
2. Enable question pooling.
Before you can create question pools, you have to enable question pooling. Click Pooling
options at the top of the My Selections list. On the Pooling Options window, select Enable
question pooling and click OK.
3. Create a question pool from existing questions in the quiz.
Check the boxes to the left of the first two questions in the My Selections list. Click Pool.
The two questions are pooled together.
Notice that the pooled questions in the My Selections list are separated by a different color
band, with each band representing one question pool. Your quiz now has two questions.4. Create a question pool by adding new questions.
If needed, filter the list of available questions to show questions from Section 1.2. Check
the boxes for questions 1.2.9, 1.2.11, and 1.2.15 and click Pool. These questions are
added to a quiz and are pooled as question 3 on your quiz.
Tip: Pool questions with the same objective and difficulty level to increase the
number of variations for your quiz.
5. Save your changes.
Click Save & Assign to save your quiz and return to the Homework/Test Manager.MyMathLab/MyStatLab – Intermediate
LESSON 2 – CUSTOMIZE THE SETTINGS FOR HOMEWORK
ASSIGNMENTS
In this lesson, you will learn how to:
• Customize the scoring options for a homework assignment
• Customize the access controls for a homework assignment
• Customize the presentation options for a homework assignment
Customize the scoring options for a homework assignment
In this lesson, you will learn how to specify the late submission policy (if any), partial credit
scoring, and Show Work grading options for all assignment types.
1. Edit the settings for the homework assignment.
In the Homework/Test Manager, click the Actions dropdown list for assignment you
customized in Lesson 1, and select Settings for Class. Click Go to choose the settings for
the assignment.
2. Specify the late submission policy.
If you set a due date for your assignment, you will be able to specify the late submission
policy in the Scoring Options section. For this lesson, make the following changes to the
late submission policy.
Check the box to Allow students to work and change score after due date. This will
allow students to submit the assignment after the due date. Next, you will impose
conditions for late submissions.
Check the Require password box, and enter "mypassword" in the password box. This
allows you to control which students can access the homework after the due date.
Up To Speed
You can also assign passwords for individual students. In the Homework/Test
Manager, select Settings per Student from the Actions dropdown list for
the assignment.
Check the Require final submission box and enter a date two weeks from the due date
for the assignment. This will allow students to access the assignment up to two weeks past
the original deadline.
Check the Deduct late submission penalty box and enter 10 in the Penalty box. Scores
for assignments submitted after the original due date will automatically be penalized by
10% of the earned score. For example, if a student earned 80% on the assignment the
final score will be 72%.Note: If this assignment is set as a prerequisite for another assignment, the pre-
penalty score will be used to meet the required minimum score of
prerequisites.
Check the Apply only to questions scored after the due date box. This will restrict the
late submission penalty to the questions that a student submits after the due date.
Questions submitted prior to the due date will retain their full earned value.
Tip: Setting a late submission penalty provides a motivation for students to
complete the assignment on time. You can also set a late submission
penalty per day as a further motivation for students to complete the
assignment as soon as possible.
3. Specify the partial credit policy for multi-part questions.
If any question in your assignment has more than one answer part, the program can award
partial credit for the parts that are answered correctly by a student. For example, if there
are four parts in a question and a student enters the correct answer for three parts, the
program can award the student 0.75 out of 1 point for the question score.
Tip: To avoid decimal partial credit, you can change the question point value to
equal to the total number of answer parts in the question. In the example
above, changing the point value to 4 would result in partial credit of 3 out
of 4 points.
By default, the partial credit scoring option is checked. Uncheck Partial Credit to disallow
partial credit on multi-part questions. When this option is unchecked, students get a 0
score on a multi-part question when they answer any part incorrectly.
4. Specify the Show Work scoring policy.
If any questions in your assignment require students to show work, students must answer
the question and enter their work in the Show Work window. You can choose how both
parts of the Show Work question are scored.
For this lesson, select Automatically score question and enter 50 in the percentage box.
Select Manually score Show Work. With these settings, entering the correct answer
earns 50% of the points for the question. You would award the remaining 50% manually
after you have reviewed the student's work.Tip: Here are several scoring scenarios for Show Work questions:
* 100% automatic scoring for question, 0% automatic score for Show
Work
Use this in conjunction with requiring work for every question in the
assignment. If a student does not answer a question correctly, you can
manually check the student's work and award partial credit. If a student
answers a question correctly, there is no need for you to review the
student's work.
* 0% automatic scoring for question, manual scoring for Show Work
Use this to manually score each question by reviewing the answer and the
student's work.
7. Save your changes.
Click Save & Assign to save your question options and return to the Homework/Test
Manager.
Customize the access controls for a homework assignment
Note: You need at least three assignments in your Homework/Test Manager to
complete this part of the lesson. If needed, return to the Homework/Test
Manager and create additional assignments.
1. Edit the settings for the homework assignment.
In the Homework/Test Manager, click the Actions dropdown list for the assignment you
customized earlier in this lesson, and select Settings for Class. Click Go to choose the
settings for the assignment.
2. Specify the prerequisite for the assignment.
In the Access Controls section, click Change to the right of Prerequisites. On the Add
Prerequisites window, click the Prerequisite Item dropdown list and select one of your
other assignments from the list. Enter 80 in the Minimum Score box. This setting
requires students to score at least 80% on the prerequisite assignment before they can
begin the current assignment. Click OK to return to the Choose Settings window.Tip: Use prerequisites to ensure mastery of prerequisite concepts. A best
practice is to specify 80% mastery on homework assignments and 70%
mastery on quizzes or tests.
Up To Speed
An assignment can have more than one prerequisite assignment that students
must complete before it can be accessed. Alternate prerequisite assignments
allow students more than one path for satisfying the prerequisite for an
assignment. On the Homework/Test Manager, click Set Prerequisites in the
toolbar. On the Set Prerequisites window, select Advanced Settings. Check
the Multiple Prereqs. box for the assignment. Once you select a prerequisite
item, another dropdown list will appear below the first to allow you to select a
second prerequisite item. Click Add alternate prerequisites to specify
alternate prerequisite assignments.
3. Specify the number of attempts allowed per question.
When students complete a homework question, a Similar Exercise button appears below
the question and allows them to generate the question again. If the Attempts per
question option is unchecked, students can generate a new version of the question an
unlimited number of times. You can use the Attempts per question option to limit the
number of times that a new version of a question will be generated.
Check the Attempts per question box and enter 2 in the text box. Students can work
each question twice and then the Similar Exercise button is no longer available.Note: When you limit the number of attempts, students see a warning about the
limit on the Homework Overview page before and after they work on the
assignment. They also see a warning before their last attempt at the
question.
Students use one of their attempts when they access the Help Me Solve
This learning aid.
Tip: Limit the number of attempts per question to discourage students from
"gaming" the system by generating multiple versions of a question in an
effort to get the correct answer without doing any mathematical work.
4. Save your changes.
Click Save & Assign to save your question options and return to the Homework/Test
Manager.
Customize the presentation options for a homework assignment
In this lesson, you will learn how to customize the student view of the homework window by
specifying which learning aids are available, how questions and answers are displayed, and
others.
1. Edit the settings for the homework assignment.
In the Homework/Test Manager, click the Actions dropdown list for the assignment you
customized earlier in this lesson, and select Edit. Click Go to enter the editor. At the top of
the page of Step 1, click Choose Settings to go to Step 3.
2. Specify how answers are scored in multi-part questions.
If a homework question has more than one answer part and a student answers at least one
part incorrectly, the program will indicate that the answer is incorrect but will not identify
which part was answered incorrectly.
In the Presentation Options section, check the Lock Correct Answers box to preserve
students' correct answers in a multi-part question. When you select this option, students
can click Check Answer to find out which answers are correct and then try again on the
incorrect answers without losing their correct answers. For example, suppose a question
has two answer boxes, as shown below.
Next, suppose the student enters the correct answer for the first box and the incorrect
answer for the second box and checks the answer. The program will indicate the correctanswer with blue shading and leave the incorrect answer available for editing, as shown
below.
3. Select the learning aids.
You can choose the learning aids available to students while working
on the homework assignment. The default Learning Aids are shown
on the right. In the Presentations Options section, click Change. On
the pop-up window, you can uncheck any learning aids that you
want to hide from students.
Note: The type and number of learning aids varies by question
and by textbook.
4. Save your changes.
Click Save & Assign to save your question options and return to the Homework/Test
Manager.MyMathLab/MyStatLab – Intermediate
LESSON 3 – CUSTOMIZE THE SETTINGS FOR QUIZZES AND TESTS
In this lesson, you will learn how to:
• Customize the access controls for a quiz
• Customize the presentation options for a quiz
• Customize the review options for a quiz
Customize the access controls for a quiz
In this lesson, you will learn how to customize the access students have to a quiz by requiring a
password to open the quiz or test, specifying the number of attempts allowed, as well as
options for incomplete quizzes or tests.
1. Edit the settings for the quiz.
In the Homework/Test Manager, click the Actions dropdown list for the quiz you
customized in Lesson 1, and select Settings for Class. Click Go to choose the settings for
the quiz.
2. Set a password for the quiz.
You can restrict access to the quiz by requiring a password to be entered to gain access to
the quiz. Check the Password box and enter "mypassword" in the text box. The student
will be prompted to enter this password before beginning the quiz.
Tip: Use a password when the quiz is taken in a proctored setting to ensure
that students cannot open the quiz outside of the proctored setting, or if
you want to control access to an un-proctored quiz.
3. Limit the number of quiz attempts.
You can limit the number of times a student can take the quiz before the due date. Check
the Number of Attempts box and enter 3 in the box. Students will be allowed up to three
attempts for this quiz.
Note: When a student begins the quiz, this counts as one attempt. Unlike
homework, students do not receive feedback while they are taking the
quiz, and the quiz is only graded when the student submits it.
4. Set a prerequisite for the quiz.
As with homework assignments, you can set prerequisites for the quiz. Click Change to the
right of Prerequisites. On the Add Prerequisites window, select your first homework
assignment from the Prerequisite Item dropdown list. Enter 80 for the minimum score.
Click OK to return to the Choose Settings step. Students will be required to earn at least
80% on the prerequisite assignment before they can open the quiz.Up To Speed
With quizzes and tests, you can specify prerequisites for each quiz or test
attempt. On the Add Prerequisites window, select Attempt 1 from the
Attempt dropdown list. Select your first media assignment from the next
Prerequisite Item dropdown list. Enter 100 for the minimum score, and
select Attempt 2 from the Attempt dropdown list.
Students will be required to earn at least 80% on the first homework
assignment to open the quiz the first time. After they complete the first quiz
attempt, they must earn 100% on the first media assignment to attempt the
quiz a second time.
Tip: Use prerequisites for quiz attempts to require students to review and
remediate in between attempts. In addition, limit the number of quiz
attempts to motivate students to prepare adequately before attempting the
quiz.
5. Set the option for resuming a quiz.
You can specify how students can resume an interrupted quiz. A quiz could be interrupted,
for example, by a technical difficulty with the student's computer or a mistaken exit. You
can allow students to resume the quiz without instructor permission, or you can require
students to get your permission to resume the quiz.
For this lesson, accept the default option for students to complete the quiz in one sitting,
and to allow students to re-access and complete an interrupted quiz on their own.Tip: Use Restricted Access or Blocked Access if you want to control student
access to an interrupted quiz.
Up To Speed
You can prevent students from opening applications or other browser windows
when taking the quiz by enabling the LockDown Browser. From the course
home page, click course settings in the top left of the page and select Edit
MML Settings. On the Course Settings Summary window, click Edit in the
Learning Aids and Test Options section. Check the Lockdown Option box
and click Save.
Return to the Homework/Test Manager and edit the settings for the quiz. In
the Access Controls section, the Lockdown Browser options are now available.
Check the Lockdown Browser box.
When students open the quiz, the Lockdown Browser will prompt them to
close all open applications and other browser windows, and the quiz will be
displayed in the Lockdown Browser. To further control access to the quiz,
select the Save for Later option for the Incomplete Attempt.
Students will see one question at a time in numerical order, and will not be
allowed to return to a previously accessed question. If the student saves the
quiz and returns later, he will be presented with the next unanswered
question on the quiz.6. Save your changes.
Click Save & Assign to save your quiz and return to the Homework/Test Manager.
Customize the presentation options for a quiz
In this lesson, you will learn how to customize which, if any, learning aids are available to
students in the quiz window, as discussed in Lesson 4 with homework assignments. Other
options with quizzes and tests include setting a time limit and scrambling the question order.
Tip: Change the Learning Aids display to show all learning aids and check the
Show in Review mode only box. When students are taking the quiz,
they will not have access to any of the learning aids. After they submit the
quiz, they can access the learning aids as they review the quiz in their
Gradebook.
1. Edit the settings for the quiz.
In the Homework/Test Manager, click the Actions dropdown list for the quiz you
customized earlier in this lesson, and select Edit. Click Go to enter the editor. At the top of
the page of Step 1, click Choose Settings to go to Step 3.
2. Set a time limit for the quiz.
Check the Quiz time allowed (minutes) box, and enter 60 in the text box. Check the
box to Show time remaining during quiz. With these settings, students will have 60
minutes from the time they start the quiz to submit the quiz for grading. A countdown
timer will be displayed on the quiz page. A warning box will pop up when the time limit is
approaching, and the quiz will be submitted automatically when the time limit is reached.
3. Scramble the question order.
Check the Question display box to randomly scramble question order each time a student
opens up the quiz.
6. Save your changes.
Click Save & Assign to save your quiz and return to the Homework/Test Manager.
Customize the review options for a quiz
In this lesson, you will learn how to specify the information displayed to students after they
submit the quiz for grading and choose when students can review their quiz results.
1. Edit the quiz.
In the Homework/Test Manager, click the Actions dropdown list for the quiz you
customized earlier in this lesson, and select Edit. Click Go to enter the editor. At the top of
the page of Step 1, click Choose Settings to go to Step 3.2. Set the results display option.
Click the Results Display dropdown list in the Review Options section. You can specify what
results, if any, are displayed after the student submits the quiz for grading. The following
options are available:
• Quiz Summary shows quiz score and question results
• Quiz Summary shows quiz score only
• Hide score and question results
For this lesson, select the Quiz Summary shows quiz score only option. With this
option, students will be shown their score on the quiz but they will not see how they scored
on each question.
Tip: Hide the question results for high-stakes assessments or assessments with
static questions so that students can see their score on the assessment but
are not able to view the questions or their answers.
3. Set the review options.
Click the Reviewing quiz dropdown list. You can choose when students can review their
quiz results. The available options are:
• Student can review quiz any time after submitting
• Student can review quiz only immediately after submitting
• Student can review submitted quiz any time after due date
• Student can never review submitted quiz
For this lesson, select Student can review submitted quiz any time after due date.
This option will allow students to review their quiz and results after the quiz due date.
6. Save your changes.
Click Save & Assign to save your quiz and return to the Homework/Test Manager.MyMathLab/MyStatLab – Intermediate
LESSON 4 – CUSTOMIZE YOUR GRADEBOOK
In this lesson, you will learn how to:
• Customize display options in your Gradebook
• Customize the course roster in your Gradebook
Customize display options in your Gradebook
In this lesson, you will customize your Gradebook spreadsheet view by selecting the
assignments for viewing and changing the score display.
1. Open the Show/Hide Assignments page.
In the Gradebook, select Show/Hide Assignments from the More Gradebook Tools
dropdown list. On the Show/Hide Assignments page, you will see the list of all assignments
in your course.
2. Select the assignments to hide.
For this lesson, check the box in the Hide column for the first two assignments. Click
Update to confirm your choices. Click OK in the pop-up alert box, then click Cancel/Done
to return to the Gradebook. Click All Assignments to open the spreadsheet view of the
Gradebook. The hidden assignments are no longer displayed in the instructor Gradebook,and a note is displayed above the spreadsheet to indicate that you have hidden
assignments.
Note: The hidden assignments will continue to show in your students’ Gradebook.
Tip: Hide assignments that you create for student practice only or that are used
as templates for other assignments to minimize the number of assignments
displayed in the Gradebook and to enable quicker access to relevant
student results.
3. Select the score display mode.
In the Gradebook, select Set Scoring Options from the More Gradebook Tools
dropdown list. In the Score Display section of the Set Scoring Options page, you can
choose to display overall scores and category scores in the Gradebook as Percentages or
Points. For this lesson, select Points.
Click Update to confirm your choices. Click OK in the pop-up alert box, then click
Cancel/Done to return to the Gradebook. Click All Assignments to open the spreadsheet
view of the Gradebook. The Overall Score is now displayed as points.
Note: Only the overall score is displayed as points. The assignment scores
continue to display as percentages.Customize the course roster in your Gradebook
When students self-enroll in your MyMathLab course, they are listed in the course roster, as
well as in your Gradebook. In this lesson, you will customize the course roster by adding
student IDs and changing a student's status in your course.
1. Add student IDs to the Gradebook.
In the Gradebook, click Add/Edit Student IDs in the toolbar.On the Add/Edit Student IDs
page, enter Student IDs for the first two students. Check the Show Student IDs in
Gradebook box to display the IDs in the spreadsheet view of your Gradebook.
Note: Click Upload Student IDs to upload Student IDs from a spreadsheet. You
can also check the first box if you want students to enter their ID before
working in the course.
Click OK to continue, and then click OK in the pop-up alert box. Click Gradebook at the
top of the page to return to the Gradebook. Click All Assignments to open the
spreadsheet view of the Gradebook. The Student IDs are displayed in a column to the right
of the students' names.Tip: If you teach more than one section of a course and each section has
identical assignments and settings, you can create one MyMathLab course
and have students from each section enroll in the same course. Enter the
section number (or any unique ID) as the Student ID for students in that
section. For example, you could enter "1" as the Student ID for students in
the first section, and enter "2" as the Student ID for students in the second
section. This allows you to quickly sort your Gradebook by section.
2. Change a student's status to inactive.
Click Course Tools in the course menu, and then click Course Roster. The course roster
lists all of the students currently enrolled in your course. Click Active for the first student
and select Inactive in the pop-up box. The student's access to the course will be disabled.Note: A student's status is automatically set to Inactive if the student selected
the Temporary Access option to access your course and did not pay for full
access before the Temporary Access expiration date. The student's
assignment results are saved in the Gradebook and will be restored once
the student enters an access code and returns to Active status
Close the box, then click Save in the Course Roster window. Notice that the inactive
student's name is highlighted in the course roster. Click Close on the confirmation page to
return to the course. Click Gradebook at the top of the page to return to the Gradebook.
The student's name appears in gray at the end of the list of active students.
Tip: Change a student's status to Inactive when the student withdraws from the
class.MyMathLab/MyStatLab – Intermediate
LESSON 5 – MANAGE COURSE GRADES
In this lesson, you will learn how to:
• Create an offline assignment to record non-MyMathLab grades
• Set up grade weighting by percentage
• Set up grade weighting by points
• Omit assignment results
• Customize the scoring options in your Gradebook
Create an offline assignment to record non-MyMathLab grades
You have the ability to include offline items in your Gradebook to record grades earned outside
of MyMathLab, such as written exams or participation grades. In this lesson, you will create an
offline assignment to record your Final Exam grades.
1. Create a new offline assignment.
In the Homework/Test Manager, click Create Assignment and select Add Offline Item
from the dropdown list. The Add Offline Item wizard has three steps to help you set up
your offline assignment.
Note: This option is also available through the Gradebook. Click Add Offline Item
from the Manage Gradebook Tools dropdown list.
2. Step 1: Start.
In Step 1, accept the default option to Add an offline item to any category in your
Gradebook. Click Next to go to Step 2.
Note: You can also upload a spreadsheet for multiple offline items and their
scores.
3. Step 2: Item Info.
Choose Test from the Gradebook Category dropdown list, and type "Final Exam" in the
Item name box. Select a date one week from today's date, and enter 150 as the total
number of points for the Final Exam. Click Next to go to Step 3.Note: By default, the offline item will be displayed with all chapters in the
Gradebook. Click Change Chapter… to change the chapter association, if
desired.
4. Step 3: Enter Scores.
Enter the exam scores in the Correct Points column. Note that the program automatically
converts your score to a percent in the Score column.
Note: Offline items can be added before your students have enrolled in the
course. You then have the option of entering scores directly or uploading
scores for your offline item.Click Save to save your assignment. You will see a summary of the settings for your offline
item. Click OK to close the Offline Item Summary page. Your Final Exam is now listed in
the Homework/Test Manager.
Note: The Final Exam is marked as “(Offline)” to indicate that this is an offline
item. This notation is only visible in the Homework/Test Manager, and
students will not see this notation.
4. View the offline assignment in the Gradebook.
In the Gradebook, click Tests to open the spreadsheet view for the Tests category. Your
Final Exam assignment along with the grades you entered will be displayed.
5. Edit the offline assignment.
In the Gradebook, select Manage Offline Items from the More Gradebook Tools
dropdown list. On the Manage Offline Items page, select Edit from the Actions dropdown
list for the Final Exam. You can edit all of the information for the assignment except for the
Gradebook Category. Click Next to go to Step 3. On the Enter Scores page, you can edit
the student scores or enter new scores as needed. Click Save to save your changes.
Set up grade weighting by percentage
If you are using the Gradebook to record all of your course grades from MyMathLab
assignments and offline assignments, you can set up the grade weighting to automatically
calculate each student's overall score.
Tip: If you are not recording all grades in the Gradebook, the overall score
displayed will not reflect the students' course average. You may wish to
hide the overall score from your students' results pages to avoid
misunderstandings about their course average. In the Gradebook, select
Set Scoring Options from the More Gradebook Tools dropdown list. On
the Set Scoring Options page, check the Hide Overall Score from
students box, and click Update.
You have two options for weighting grades:• Category and Assignment Weighting – categories are weighted relative to one
another and assignments are weighted within each category. This option is commonly
known as weighting by percentage.
• Assignment Weighting Only – assignments are weighted relative to other
assignments only. Category weights are not used in the calculations. This option is
commonly known as weighting by points.
In this lesson, you will learn how to set up grade weighting by percentage.
1. Select the weighting option.
In the Gradebook, click Change Weights in the toolbar. On the Change Weights page,
accept the default option for Category and Assignment Weighting.
2. Change the category weights.
We will use the following grade distribution in this lesson.
Homework 10%
Quizzes 20%
Tests 30%
Final Exam 30%
Participation 10%
Enter 10 for the Homework weight and 20 for the Quizzes weight. In this example, the
Final Exam is placed in the Tests category, and we enter 60 for the Tests weight. Finish by
entering 10 for the Other weight. Click Update to save your changes.Up To Speed
Since we are recording Participation grades in the Other category, we can
change the name of this category. Click Rename… and enter Participation
in the Rename Gradebook Category box. Click OK to confirm the change.
3. Change the assignment weights.
In the example above, there are four tests and a Final Exam in the course. The tests are
weighted equally and count for 30% of the overall course grade; therefore each test counts
for 7.5 % of the course grade.
The Assignment Weighting section within the category lists all of the assignments in your
course. The default assignment weight for each test is 10 points. Since the Final Exam is
worth 30% of the course grade, the exam counts four times as much as each test, enter
40 for the assignment weight for the Final Exam. Click Update to save your changes.
The Percent of Overall Score column shows the correct grade distribution for each test and
the Final Exam.
Note; The Percent of Overall Score column may show different percentages if
more than one Gradebook category is displayed in the Assignment
Weighting section.
Up To Speed
Suppose Tests count for 25% of the grade and the Final Exam counts for 30%
of the grade. Each test then counts for 6.25%, and the Final Exam counts 4.8
times as much as each test. Since you cannot enter a decimal number for the
assignment weight, you will have to find whole numbers that give you the
same ratio. For example, you could enter 48 as the Final Exam weight and 10
as the weight for each test.Set up grade weighting by points
You also have the option to set up your grade weights by points.
1. Select the weighting option.
In the Gradebook, click Change Weights in the toolbar. On the Change Weights page,
select the option for Assignment Weighting Only.
2. Change the assignment weights.
We will use the following grade distribution in this lesson.
Category Number of assignments Total points per category
Homework 20 100
Quizzes 10 200
Tests 4 300
Final Exam 1 300
Participation 14 100
Total 1000
Enter 5 for the weight for each homework assignment, 20 for the weight of each quiz, 75
for the weight of each test, and 300 for the Final Exam weight. For the Participation
assignments, you could enter 7 for the weight for 13 assignments, and 9 for the last
assignment, so that the total weight is 100 for the category. Click Update to save your
changes.
Note: If you add additional assignments to any category in the future, you need
to adjust the assignment weights so that the correct grade distribution is
maintained.
Omit assignment results
You can omit the results of an assignment so they are not included in the grade weights. For
example, you may assign a practice test for students to use as review, but not count the
practice test in the course average. In this lesson, you will learn how to omit the results for a
test.
1. Omit the results for a test.
In the Gradebook, select Omit Assignment Results from the More Gradebook Tools
dropdown list. For this lesson, you will omit the results for Test 1 from the example above.
Check the box in the Omit Results column for Test 1. Notice that the Percent of Overall
Score values for the remaining tests change. Click Update to save your changes.
2. Adjust the grade weights.
Since there are now only three tests counting for 30% of the overall course grade, each
test counts for 10% of the course grade. To ensure that the Final Exam counts three times
as much as each test, enter 30 for the assignment weight for the Final Exam. Click Updateto save your changes. The Percent of Overall Score now correct reflects the grade
distribution.
Customize the scoring options in your Gradebook
In this lesson, you will learn how to customize the scoring options by selecting which quiz or
test score to include in course averages, choosing the method for calculating student averages,
and deciding if the instructor's scores are included in class averages.
1. Select the quiz or test attempts to include.
In the Gradebook, select Set Scoring Options from the More Gradebook Tools
dropdown list. In the Attempts to Include section, you can choose to include the Best
score, Most recent score, Average score, or All scores for quizzes or tests. For
example, suppose you allowed 4 attempts on a test, and a student earned the following
scores in the order given: 80, 90, 60, 70. Here is the score that will be used to calculate
the test average for each option:
Best score = 90 Most recent score = 70 Average score = 75
If you selected All scores, then the program will include all 4 scores in the calculation of the
test average. For this lesson, select the option to include the Most recent score.
2. Select the method for calculating student averages.
In the Score Calculations section, you can select Current average to include only scored
assignments when calculating student averages. With this option enabled, the average will
reflect only those assignments that the student has opened.
If you select Cumulative performance, the averages will include scores from all
assignments in the course, and any assignments not yet opened will be scored as 0% when
the averages are calculated.
For example, suppose that your course has 10 homework assignments and a student has
opened 5 of them and earned 100% on each assignment. If you choose Current average,
the homework average will be calculated as 100%. If you choose Cumulative
performance, the student’s homework average will be calculated as 50%. For this lesson,
accept the default Current average option.Tip: Use Cumulative performance with Assignment Weighting Only to set
up a "points earned" model for course grades. Students start with 0 points
at the beginning of the course and accumulate points as they progress
through the course.
3. Decide whether to include instructor scores.
In the Instructor’s Scores section, you can choose to Omit or Include instructor’s scores
in the calculation of class averages. For this lesson, accept the default option to omit
instructor’s scores from class averages. Click Update to save your changes.MyMathLab/MyStatLab – Intermediate
LESSON 6 – MANAGE STUDENT RESULTS
In this lesson, you will learn how to:
• Allow students to resume an interrupted test
• Omit assignment results for a student
• Delete assignment results for a student
• Submit zero scores for an assignment
• Drop lowest scores for a category
Allow students to resume an interrupted test
In Lesson 3, you learned how to set the option for resuming an interrupted quiz or test. If you
chose the Restricted Access or Blocked Access option, you must take action to allow students to
resume the interrupted quiz or test. In this lesson, you will learn how to enable access to an
interrupted test.
1. Search for an interrupted test.
In the Gradebook, click Tests to open the spreadsheet view. Look for test attempts that
display the words "access needed."Note: You can also click All Assignments or Quizzes to search for an
interrupted quiz or test.
2. Enable access to the interrupted test.
Click access needed to go to student's Results page. Select Enable Access from the
Actions dropdown list for the interrupted test, and click Go. The test now displays the
words "retake allowed", and the student will be able to re-access the test.
Note: You have the option to disable access at any time before the student
retakes the test.
Up To Speed
If you have multiple students needing access to one or more interrupted
quizzes or test, use the Enable Access to Incomplete Tests page to enable
access to specific quiz or test attempts. In the Gradebook, select Enable
Access from the More Gradebook Tools dropdown list. On the Enable
Access to Incomplete Tests page, click a quiz or test name to see the list of
students needing access.
Check the box for an attempt, or check the box for the test and click Update
to enable access.
Omit assignment results for a student
In Lesson 5, you learned how to omit the results of an assignment from the calculation of the
course grade. You also have the option of omitting a particular student's results on an
assignment. In this lesson, you will learn how to omit an assignment result for a student.1. Omit an assignment result.
In the Gradebook, click the student's name to go to the Results page. On the Results page,
select Omit from the Actions dropdown list for the assignment, and click Go. The omitted
assignment result is grayed out and does not count towards the student's course average.
2. Include an assignment result.
Omitted results remain in the Gradebook and can be restored at a later time. In the
student's Results page, select Include from the Actions dropdown list for an omitted
assignment, and click Go. The assignment now counts towards the student's course
average.
Delete assignment results for a student
You can delete assignment results, permanently removing the student's attempt for the
assignment. Deleted results cannot be restored so be sure you no longer need to retrieve the
result later; otherwise omit the result. In this lesson, you will learn how to delete assignment
results for one or more students.
1. Delete an assignment result for one student.
In the Gradebook, click the student's name to go to the Results page. On the Results page,
select Delete from the Actions dropdown list for the assignment, and click Go. Click OK in
the pop-up alert box. The deleted assignment result is permanently removed and the
assignment reverts to an unopened state for that student.
Tip: To delete all assignments results for one student, return to the main
Gradebook page and select Delete Results from the More Gradebook Tools
dropdown list. On the Delete Results page, select the per Student tab.
2. Delete assignment results for all students.
You also have the option to delete results for one or more assignments for the whole class.
In the Gradebook, select Delete Results from the More Gradebook Tools dropdown list.
On the per Assignment tab, the Current # of Results column shows you the number of
scores recorded for each assignment.Check the box to the left of the first assignment and click Update. Click OK in the pop-up
warning box and click OK in the confirmation box. All results for the assignment are
deleted and today’s date is displayed in the Last Deleted column.
Tip: Delete results to revert an assignment to an unopened state so that you
can edit the assignment. This is useful prior to the beginning of the term
when you are designing your course. You can test the course as a student
and then delete results to allow further editing of the assignments.
Submit zero scores for an assignment
If a homework, quiz, or test is not started by a student, or if a quiz or test is interrupted, the
assignment is considered incomplete and the program will not record a grade for that
assignment. If you set your Score Calculations to Current average (refer to Lesson 5), the
incomplete assignment is not included in the calculation of the course average and could give
students an inaccurate view of their grade in the course. In this lesson, you will submit zero
scores for incomplete assignments.
1. Submit a zero score for a student.
In the Gradebook, click the student's name to go to the Results page. On the Results page,
select Submit Score from the Actions dropdown list for the incomplete assignment, and
click Go. On the Submit Score window, enter 0 in the Points Correct box and click OK.
Click OK in the pop-up alert box.The assignment now displays with a score of 0. Hover your mouse over the asterisk next to
the score to view the date of the submission.
2. Submit zero scores for all students.
You can submit zero scores for one or more assignments for one or more students. In the
Gradebook, click Manage Incompletes in the toolbar. On the Manage Incompletes page,
click an assignment name to see the list of students without results for that assignment.
Note: For students with in-progress quizzes or test, you can choose to submit
zero scores or submit current scores. The quiz or test will automatically be
terminated for the student.Check the box for one or more students, or check the box for the assignment to select all
students and click Submit to submit zero scores for these students.
Tip: Submit zero scores for all past due assignments to give students a more
realistic course average.
Drop lowest scores for a category
In this lesson, you will learn how to drop up to five of the lowest scores for assignments in any
Gradebook category for your class.
1. Update the Gradebook.
Lowest scores are based on student results at the time you drop the scores, so you should
make sure your Gradebook is up to date before you drop any scores. If necessary, you
should change scores, omit results, delete results, or submit zero scores as needed.
2. Drop lowest scores for a gradebook category.
In the Gradebook, select Drop Lowest Scores from the More Gradebook Tools
dropdown list. For this lesson, you will drop the two lowest homework scores. Select 2
from the dropdown list for the Homework category. Click Drop Lowest Scores, and click
OK in the confirmation window. The program records the date, and displays this above the
category list.
Note: Assignment weighting is not taken into account when dropping lowest
scores.Note: Lowest scores are based on student results at the time when you drop the
scores. Future scores are not considered until you drop lowest scores
again. If you drop lowest scores more than once in a term, any previously
dropped scores that are no longer the lowest will be restored.
Tip: You can reverse the process and include dropped scores back into the
Gradebook by dropping 0 lowest scores for the category.MyMathLab/MyStatLab – Intermediate
LESSON 7 – CHANGE ASSIGNMENT SETTINGS
In this lesson, you will learn how to:
• Change settings for multiple assignments
• Change assignment settings for individual students
Change settings for multiple assignments
In Lessons 2 and 3, you learned how to customize the settings for individual homework
assignments, quizzes, and tests. In this lesson, you will learn how to apply these settings to
multiple assignments at once.
1. Change assignment dates.
In the Homework/Test Manager, click Change Dates & Assign Status in the toolbar. On
the Change Due Dates & Assign Status page, you can change the Start and Due dates for
one or more assignments, as well as the final submission dates for late homework.
For this lesson, check the box for the first three homework assignments. At the top of the
Due column, select a date two weeks from today, and click Apply to Selected. The new
date is applied to all three assignments.
Next, check the box at the top of the HW/Media Assignment Access column to allow
students to work and change their score after the due date. Check the Final Submission
box and select a date four weeks from today.
Click Apply to Selected to apply the settings to the assignments. Click Update Changes
Only to save the new dates.Tip: When creating multiple assignments from scratch, save time by not
entering the available and due dates for the individual assignment. Finish
creating all of the assignments and then enter all of the assignment dates
on the Change Due Dates & Assign Status page.
Note: Clicking Update all settings applies your new settings plus any existing
settings to the course. If the course is a coordinator course, this will
override any settings individual member instructors have specified in their
courses. Refer to MyMathLab/MyStatLab – Advanced for more information
about coordinator and member courses.
2. Change scoring options, access controls, presentation options, and review
options.
In the Homework/Test Manager, select Change Settings for Multiple Assignments from
the More Assignment Tools dropdown list. On this page, you can change most of the
options that are on Step 3 of the Assignment wizard.
For this lesson, select Homework from the Assignment Type dropdown list. Accept the
default option to apply the changes to all assignments.
Check the box for Attempts per question in the Access Controls section, and then
check the box to limit the number of times a student can work each question. Enter 3 in
the text box, and click Apply Settings to change this option on all homework
assignments.
Tip: When creating multiple assignments from scratch, save time by not
customizing the settings on Step 3 for the individual assignments. Finish
creating all of the assignments and then customize all of the assignment
settings at once on the Change Settings for Multiple Assignments page.
3. Edit assignment names.
In the Homework/Test Manager, select Change Assignment Settings from the More
Assignment Tools dropdown list. On this page, you can edit you assignment names. Click
Update to save your changes.4. Change other settings.
To change the Gradebook category for quizzes and tests, select Change Categories from
the More Assignment Tools dropdown list. On this page, you can change an assignment
from the Test category to the Quiz category and vice versa.
To change the assignment status for multiple assignments, click Change Dates & Assign
Status in the toolbar. On this page, you can select one or more assignments and toggle
the assignment status.Tip: If you want to create your assignments ahead of time but not have the
assignments show up on your students' assignment list, save the
assignments but do not assign them. When you are ready to make the
assignments available to students, go to the Change Dates & Assign Status
page to quickly change the assignment status to Assigned.
Change assignment settings for individual students
You can change assignment settings for one or more individual students, without affecting the
setting for other students. In this lesson, you will learn how to change settings for one
assignment for several students and for several assignments for one student.
Tip: For example, if you have students who require test accommodations, you
could remove or change the time limit on their quizzes or tests, or you may
need to extend the deadline for several assignments for one student
1. Open the Individual Student Settings page.
In the Homework/Test Manager, select Individual Student Settings from the More
Assignment Tools dropdown list. This page has two views. The Per Student view lets you
select a student who needs individualized settings and then modify the settings for one or
more assignments. The Per Assignment view lets you select an assignment and then
modify the settings for one or more students.
2. Modify settings per assignment.
For this lesson, you will double the time limit for Test 1 for two students. Click the Per
Assignment tab to go to that view. Select Quizzes & Tests from the Assignment
Category dropdown list and click Go. Then select Test 1 from the Assignment dropdown
list and click Go.Note: Click Review Class Assignment Settings to view a summary of the class
assignment settings for the test.
Next, click Add/Remove Students from List. On the pop-up window, select the first two
students in the Students with Class Settings list and click Add to move these students
to the Students with Individual Settings list. Click OK to return to the Individual
Student Settings page.
On the Individual Student Settings page, check the box at the top of the leftmost column
to select both students. The time limit for the test is set at 60 minutes for the class.
Change the time limit to 120 minutes at the top of the Time Limit column. Click Apply to
Selected, then click Update to confirm the change in time limit for these two students.3. Modify settings per student.
For this lesson, you will change the due dates for all tests for one student. Click the per
Student tab to go to that view. On this page, the two students with personalized settings
on Test 1 show up in the Student dropdown list.
Click Change to add a third student to the list. On the pop-up window, select the first
student in the Students with Class Settings list and click Add to move this student to
the Students with Individual Settings list. Click OK to return to the Individual Student
Settings page.Select the third student from the Student dropdown list and click Go. Next, you will select
all tests in the course. Click Quizzes & Tests, and then click Add/Remove
Assignments. On the pop-up window, select the four tests in the Class Assignments list.
Click Add to move these assignments to the Assignments with Individual Settings list.
Click OK to return to the Individual Student Settings page.
On the Individual Student Settings page, check the box at the top of the leftmost column
to select all tests. Change the date at the top of the Due column to a date four weeks from
today. Click Apply to Selected to apply the new date to all four tests, and then click
Update to confirm the changes.
Tip: You can use the Individual Student Settings page to make an assignment
available to a subset of students in the class. Create your assignment and
save it but do not assign it to the class. On the Individual Student Settings
page, select the students and change the assignment status to Assigned
for these students.You can also read