TEST INFORMATION AND DISTRIBUTION ENGINE (TIDE) USER GUIDE - 2020-2021 UPDATED MARCH 31, 2021 - AZM2 PORTAL
←
→
Page content transcription
If your browser does not render page correctly, please read the page content below
Test Information and
   Distribution Engine (TIDE)
                   User Guide

                                                                    2020–2021
                                                                 Updated March 31, 2021

Descriptions of the operation of Cambium Assessment, Inc. (CAI) systems are property
of Cambium Assessment, Inc. and are used with the permission of CAI.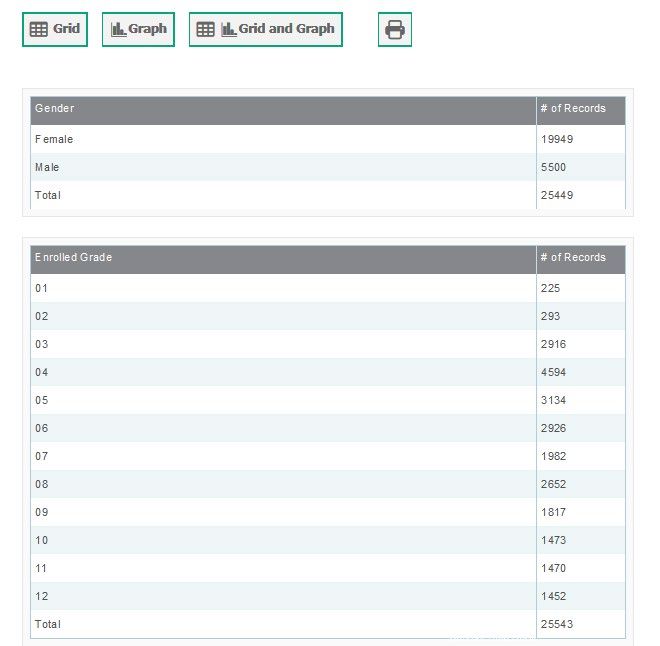
Test Information and Distribution Engine User Guide

Table of Contents
Introduction to TIDE ................................................................................................................... 1
   Things District and School Test Coordinators Need to Know How to Do ................................. 2
       How to add records one at a time ......................................................................................... 2
       How to modify existing records one at a time ....................................................................... 3
       How to add or modify multiple records at once ..................................................................... 4

How to Activate Your Account & Log in to & out of TIDE ....................................................... 6
   How to activate your account .................................................................................................... 6
   How to reactivate your account at the beginning of the school year ......................................... 7
   How to log in to TIDE ................................................................................................................ 9
   How to log out of TIDE ............................................................................................................ 10

How District-level Users Perform Tasks in TIDE ................................................................... 12
   How District-level Users Perform Tasks in TIDE Before Testing Begins ................................ 12
          How district-level users add new user accounts one at a time........................................ 12
          How district-level users modify existing user accounts one at a time ............................. 13
          How district-level users add or modify multiple user accounts all at once ...................... 13
      How District-level Users Register Students for Testing....................................................... 14
          How district-level users add new student accounts one at a time ................................... 14
          How district-level users modify existing student accounts one at a time......................... 15
          How district-level users add or modify multiple student accounts all at once.................. 16
          How district-level users transfer students between schools or districts .......................... 16
          How district-level users specify student accommodations and test tools ........................ 17
          How district-level users view a frequency distribution report........................................... 17
          How district-level users print PreID labels ....................................................................... 18
      How District-level Users Manage Rosters ........................................................................... 19
          How district-level users add new rosters one at a time ................................................... 20
          How district-level users modify existing rosters one at a time ......................................... 21
          How district-level users add or modify multiple rosters all at once .................................. 22
      How District-level Users Manage Orders for Paper Testing Materials ................................ 23
          How district-level users review orders before test administration ................................... 23
          How district-level users request additional paper testing materials during testing .......... 24
          How district-level users view order history reports .......................................................... 25
          How district-level users view order summary reports ...................................................... 25
   How District-level Users Use TIDE during Test Administration............................................... 26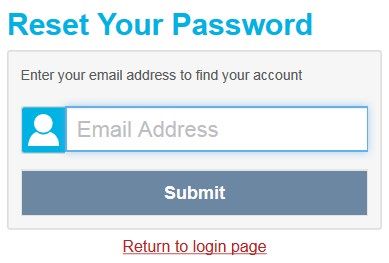
Test Information and Distribution Engine User Guide

       How District-level Users Print Test Tickets ......................................................................... 26
           How district-level users print test tickets from student lists ............................................. 26
           How district-level users print test tickets from roster lists ................................................ 27
       How District-level Users Manage Test Impropriety Requests ............................................. 28
           How district-level users add new test impropriety requests one at a time....................... 29
           How district-level users modify existing test impropriety requests one at a time ............ 30
           How district-level users add or modify multiple test impropriety requests all at once ..... 30
       How District-level Users Monitor Test Progress .................................................................. 31
           How district-level users view report of students’ current test status ................................ 31
           How district-level users view report of students’ current test status by student ID.......... 33
           How district-level users view report of test completion rates........................................... 34
          How district-level users view test session status reports ................................................ 34
          How district-level users view a test status report ............................................................ 35

How School Test Coordinators Perform Tasks in TIDE ........................................................ 37
   How School Test Coordinators Perform Tasks in TIDE Before Testing Begins...................... 37
       How School Test Coordinators Set up User Accounts in TIDE ........................................... 37
       How School Test Coordinators Register Students for Testing ............................................ 37
       How School Test Coordinators Manage Rosters ................................................................ 38
   How School Test Coordinators Use TIDE During Test Administration ................................... 38
       How School-level Users Print Test Tickets ......................................................................... 38
       How The School Test Coordinator Monitors Test Progress ................................................ 39

How Teachers and Test Administrators Perform Tasks in TIDE .......................................... 40
   How Teachers and Test Administrators Perform Tasks in TIDE Before Testing Begins ........ 40
       How Teachers and Test Administrators View User Accounts in TIDE ................................ 40
       How Teachers and Test Administrators Manage Student Information ................................ 40
       How Teachers and Test Administrators Print Test Tickets ................................................. 40

Appendix.................................................................................................................................... 42
   A.............................................................................................................................................. 42
       Account Information ............................................................................................................ 42
   C ............................................................................................................................................. 42
       Columns in the Additional Orders Page .............................................................................. 42
       Columns in the Detailed Session Report Page ................................................................... 43
       Columns in the Initial Orders Page ..................................................................................... 43
       Columns in the Order Details Form ..................................................................................... 43
       Columns in the Order History Page .................................................................................... 44
Test Information and Distribution Engine User Guide

     Columns in the Plan and Manage Testing Report .............................................................. 44
     Columns in the Roster Upload File ..................................................................................... 45
     Columns in the Student Upload File .................................................................................... 45
     Columns in the Summary Session Report Page ................................................................. 48
     Columns in the Test Completion Rate Report ..................................................................... 48
     Columns in the Test Impropriety Request Upload File ........................................................ 49
     Columns in the Test Status Report Page ............................................................................ 49
     Columns in the User Upload File ........................................................................................ 50
  F .............................................................................................................................................. 51
     Fields in the Add/View/Edit Students Page ......................................................................... 51
     Fields in the View/Edit Users [User’s Name] Page ............................................................. 53
  I ............................................................................................................................................... 53
     Inbox Files ........................................................................................................................... 53
  L .............................................................................................................................................. 55
     List of Test Impropriety Requests by Test Status................................................................ 55
     List of Test Impropriety Request Statuses .......................................................................... 55
     List of Test Impropriety Request Types .............................................................................. 56
  O ............................................................................................................................................. 57
     Ordering Materials ............................................................................................................... 57
         List of Order Statuses ..................................................................................................... 57
  P.............................................................................................................................................. 57
     Password Information ......................................................................................................... 57
     Printing Records in TIDE ..................................................................................................... 58
  S.............................................................................................................................................. 58
     Searching for Records in TIDE ........................................................................................... 58
     Searching for Students or Users by ID ................................................................................ 60
  T .............................................................................................................................................. 61
     Test Opportunity Status Descriptions .................................................................................. 61
  U ............................................................................................................................................. 62
     User Role Permissions ........................................................................................................ 62
     User Support ....................................................................................................................... 64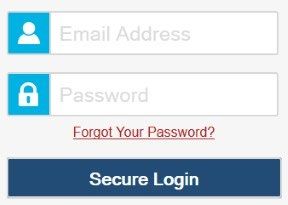
Test Information and Distribution Engine User Guide
Introduction to TIDE
Introduction to TIDE
This user guide provides instructions on how to use TIDE.
At its core, TIDE is a registration system for users who will access CAI systems and students who
will take AzM2 tests. Users of all CAI systems must be added to TIDE before they can access any
CAI system. Students must be added to TIDE before they can test in the online Test Delivery
System (TDS.) During testing, TIDE users can set student testing accommodations, print test
tickets, manage test impropriety requests, and monitor test progress.
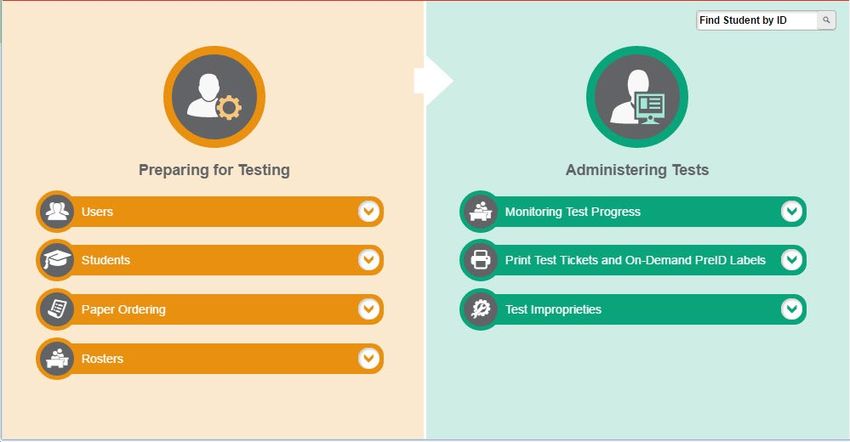
You can use TIDE to perform the following TIDE Dashboard
tasks:
Add new users or modify existing user
accounts in TIDE so district and school
users can access TIDE and other CAI
systems. Users must be registered in
TIDE to access other CAI systems.
Add new students or modify existing student accounts so students can take the correct tests with
the correct test settings. Students must be registered in TIDE to test in TDS.
Add new rosters or modify existing rosters. Rosters represent classes or other groups of students.
After testing, TIDE sends rosters to the Online Reporting System (ORS) so it can display scores at
the roster, school, district, and state levels.
Review contact and shipping information for paper testing materials.
Print test tickets that include a student’s username and SSID so the student can log in to a test.
Add new test impropriety requests or modify existing test impropriety requests if a test must be
reopened, reset, or invalidated.
View your district’s or school’s progress in starting and completing tests.
1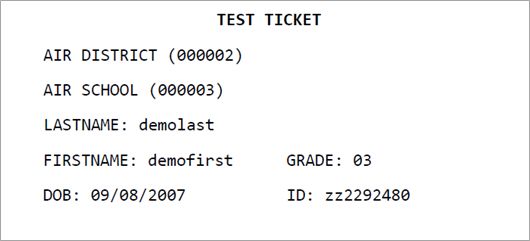
Test Information and Distribution Engine User Guide
Introduction to TIDE
TIDE divides tasks by user role. Users with higher roles will have access to more tasks in TIDE than users
with lower roles. District-level users have access to the most tasks, followed by school-level users,
teachers, and test administrators. The structure of this guide is based on user role. It includes the
following sections:
• How to Activate Your Account and Log in to TIDE
• How District-Level Users Perform Tasks in TIDE
• How School-Level Users Perform Tasks in TIDE
• How Teachers & Test Administrators Perform Tasks in TIDE
There is also an Appendix with additional information and instructions.
Things District and School Test Coordinators Need to Know How to Do
District and School Test Coordinators must be familiar with the following actions, as they are the same
for Users, Students, Rosters, and Test Impropriety Requests:
Adding new records or modifying existing records one at a time.
Adding multiple new records or modifying multiple existing records all at once through a file
upload.
How to add records one at a time
Start at the dashboard that appears when TIDE Dashboard
you first log in to TIDE, select the task (i.e.,
Users, Students, Rosters, or Test
Impropriety Requests) for which you want
to add a new record, and select Add.
On the page that appears, fill out the Add User
information, verify its accuracy, and select
Save.
2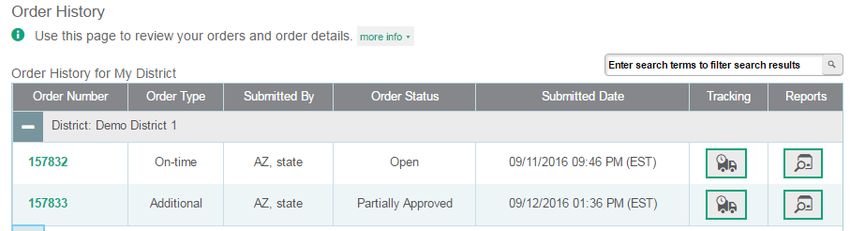
Test Information and Distribution Engine User Guide

                                                                                                             Introduction to TIDE
                  Add Student                                           Add Roster

 How to modify existing records one at a time
You can view and edit existing records one at a time or multiple existing records all at once through file
upload. If a record’s information changes after you’ve added the record to TIDE, you must edit the
record to match the most up to date information. You can also delete some types of records from TIDE.

    Begin by searching for the record you want to                  View/Edit/Export Student
    modify. Start at the dashboard that appears
    when you first log in to TIDE, select the task
    for which you want to search for records, and
    select View/Edit/Export. Fill out the form that
    appears and select Search.

    A pop-up window appears, allowing you to                           Search Results
    view or export search results or modify your
    search. To view and edit search results, select
    View Results. To export all search results to
    the inbox from the pop-up window, select
    Export to Inbox, and then select either Excel
    or CSV. The search results will be exported to
    your inbox, and you will return to the search
    form.

                                                 3
Test Information and Distribution Engine User Guide

                                                                                                              Introduction to TIDE
    If you select View Results, the search results        View/Edit/Export Student Search Results
    will appear in a table. To edit individual

    records, select       by the record you want.
    To delete individual records, mark the
    checkbox by that record, and select    . To
    export records, mark the checkbox by that
    record, and select      .

 How to add or modify multiple records at once
Rather than adding or modifying records one at a time, you may want to add or modify multiple records
all at once. A file upload allows you to upload users, students, and rosters. Records not previously set up
in TIDE will be added to TIDE through file upload. Records already set up in TIDE will be modified with
the updated content from the upload. To upload records, you must be familiar with spreadsheet
applications and/or comma-separated value (CSV) files.

    Start at the dashboard that appears when you                         Upload Roster
    first log in to TIDE, select the task for which
    you’d like to upload records, and select Upload.
    An upload screen will appear where you can
    download a template file.

    Once you’ve downloaded and filled out the
    template file, return to the upload screen,
    select Browse, locate the file on your computer,
    and upload it to TIDE. Select Next. The upload
    preview screen appears.

    Once you’ve verified the information on the                  Upload Roster Preview Page
    preview screen, select Next again. The
    validation screen appears.

                                                  4
Test Information and Distribution Engine User Guide
Introduction to TIDE
The validation screen shows errors or warnings Upload Roster Validation Page
associated with your uploaded file. To continue
with the upload despite these errors or
warnings, select Continue with Upload. The
confirmation screen appears. To revise the file
before uploading, select Upload Revised File.
To upload a new file from the confirmation
screen, select Upload New File.
Upload Roster Confirmation Page
5Test Information and Distribution Engine User Guide
How to Activate Your Account & Log in to & out of TIDE
How to Activate Your Account & Log in to & out of TIDE
Your TIDE administrator creates your account, and then TIDE sends you an activation email. This email
contains a link that takes you to the Reset Your Password page in TIDE where you can set up your
password for logging in to TIDE and other applicable CAI systems. This link expires 15 minutes after the
email was sent. If you do not set up your password within 15 minutes, you need to request for a new
link as described in the section “Password Information” in the appendix.
If you do not receive an activation email, check your spam folder. Emails are sent from
DoNotReply@cambiumast.com, so you may need to add this address to your contact list.
At the beginning of a new school year, your TIDE password and security details will be automatically
reset. You will receive an email from DoNotReply@cambiumast.com to notify you of this occurrence and
to alert you that you will not be able to log in to TIDE or any other system until you reactivate your
account for the new school year. Follow the instructions in the section “How to reactivate your account”
below to reactivate your account for the new school year.
How to activate your account
Select the link in the activation email. The Reset Reset Your Password Page
Your Password page appears.
In the New Password and Confirm New
Password fields, enter a new password. The
password must be at least eight characters long
and must include at least one lowercase
alphabetic character, one uppercase alphabetic
character, one number, and one special
character (e.g., %, #, or !).
Select Submit.
Account activation is complete. You can proceed to
TIDE by selecting the TIDE card in the portal page.
6Test Information and Distribution Engine User Guide
How to Activate Your Account & Log in to & out of TIDE
How to reactivate your account at the beginning of the school year
At the beginning of a new school year, your TIDE password and security details will be automatically
reset. You will receive an email from DoNotReply@cambiumast.com to notify you of this occurrence and
to alert you that you will not be able to log in to TIDE or any other system until you reactivate your
account for the new school year.
Navigate to the AzM2 portal User Cards on Portal
(https://azm2portal.org/).
Select your user role.
Select TIDE. The Login page appears. TIDE Card
Select Request a new one for this school year. Login Page
The Reset Your Password: Find Account page
appears.
7Test Information and Distribution Engine User Guide
How to Activate Your Account & Log in to & out of TIDE
Enter your TIDE email address and select Fields in the Reset Your Password: Find Account
Submit. TIDE sends you an email containing a Page
link to reset your password.
Select the link in the activation email. The Reset
Your Password page appears.
In the New Password and Confirm New
Password fields, enter a new password. The
password must be at least eight characters long
and must include at least one lowercase
alphabetic character, one uppercase alphabetic
character, one number, and one special
character (e.g., %, #, or !).
Select Submit.
During the reactivation process, you will be taken to Enter Code Page
the Enter Code page and asked to provide the
authentication code sent to your email.
In the Enter Emailed Code field, enter the
emailed code and select Submit.
You must enter the code within fifteen
minutes of the email being sent. If your code
expires, you can request for a new code by
selecting Resend Code on the Enter Code
page.
8Test Information and Distribution Engine User Guide
How to Activate Your Account & Log in to & out of TIDE
How to log in to TIDE
Do not share your login information with anyone. All AzM2 systems provide access to student
information, which must be protected in accordance with federal privacy laws.
Navigate to the AzM2 Portal User Cards on Portal
(https://azm2portal.org).
Select your user role.
Select TIDE. The Login page appears. TIDE Card
On the Login page, enter the email address and Login Page
password you use to access all CAI systems.
9Test Information and Distribution Engine User Guide
How to Activate Your Account & Log in to & out of TIDE
Select Secure Login. Enter Code Page
If you have not logged in using this browser
before, or if you have cleared your browser
cache, the Enter Code page appears, and an
email is sent to your address. This applies
every time you access TIDE with a new
browser. The email contains an
authentication code, which you must use
within fifteen minutes of the email being
sent.
In the Enter Emailed Code field, enter the
emailed code. If the code has expired,
Select Resend Code to request a new code.
Select Submit.
The Dashboard for your user role appears. Administration Details Page
Depending on your user role, TIDE may prompt you
to select a role, district, or school to complete the
login.
Working with TIDE in more than one browser tab or window may result in changes in one tab
overwriting changes made in another tab. Do not have more than one TIDE browser tab or window
open at one time.
How to log out of TIDE
1. In the TIDE banner select Log Out. Log Out
10Test Information and Distribution Engine User Guide
How to Activate Your Account & Log in to & out of TIDE
Logging out of TIDE logs you out of all AzM2 systems.
For example, if you log out of TIDE while administering a test using the TA Interface, your test
session will stop and all students in the session will be logged out of their tests. You cannot resume
the session. You will have to create a new session, and your students will have to log in to the new
session to resume testing.
11Test Information and Distribution Engine User Guide
How District-level Users Perform Tasks in TIDE
How District-level Users Perform Tasks in TIDE
District-level users can perform most of the tasks available in TIDE. Some of these tasks must be
performed before testing begins and some must be performed during testing.
How District-level Users Perform Tasks in TIDE Before Testing Begins
Before testing begins, district-level users must perform the following tasks in TIDE:
Set up user accounts for school-level users so they can log in to TIDE and other CAI systems.
Set up student accounts so students can take the correct tests with the correct test settings.
Set up rosters so teachers will be able to access results for their students in ORS.
Review contact and shipping information.
District-level users must set up user accounts for school-level users to sign in to TIDE and other CAI
systems.
How district-level users add new user accounts one at a time
You can add users to TIDE one at time. To learn more about adding records to TIDE one at a time, see
the section “How to add records one at a time” in the Introduction.
From the Users task menu, select Add Users. Add User
The Add Users page appears.
In the Email Address field, enter the new user’s Add User – Additional Fields
email address, and select +Add user or add
roles to use with this email. Additional fields
appear.
Enter the new user’s first and last names in the
required fields and other details in the optional
fields.
From the Role drop-down, select a role. From the drop-downs that appear, select a state, district,
and school, if applicable.
Optional: To add multiple roles, select +Add More Roles and repeat step 4.
Optional: To delete a role, select next to that role.
12Test Information and Distribution Engine User Guide
How District-level Users Perform Tasks in TIDE
Select Save. In the affirmation dialog box, select Continue to return to the Add Users page. TIDE
adds the account and sends the new user an activation email from DoNotReply@cambiumast.com.
How district-level users modify existing user accounts one at a time
You can view and modify existing user accounts one at a time or multiple existing user accounts all at
once through file export. If a user’s information changes after you’ve added the user to TIDE, you must
edit the user account to match the most up to date information. If the user’s account does not include
the most up to date information, the user may not be able to access other CAI systems or features
within those systems. You can also delete users from TIDE.
From the Users task menu, select View/Edit/Export Users. The View/Edit/Export Users page
appears.
Retrieve the individual user account you want to view, edit, export, or delete by following the
procedure in the section “How to modify existing records one at a time” in the Introduction.
In the list of retrieved user accounts, select for the user whose account you want to view or edit.
Modify the user’s details as required, using the table “Fields in the View/Edit Users [User’s Name]
Page” in the appendix as a reference.
Optional: To add more roles for this user, select +Add More Roles and then follow the steps as
described in the section on adding individual users.
Optional: To delete a role, select next to that role. You can also delete the user’s entire account
from the search results table.
Select Save.
In the affirmation dialog box, select Continue to return to the list of user accounts.
How district-level users add or modify multiple user accounts all at once
You can also add or modify multiple user accounts all at once through file upload as shown in the
section “How to add or modify multiple records at once” in the Introduction.
From the Users task menu, select Upload Users. The Upload Users page appears.
Following the instructions in the section “How to add or modify multiple records at once” in the
Introduction and using the table “Columns in the User Upload File” in the appendix as a reference,
fill out the template and upload it to TIDE. Users who have not previously been set up in TIDE will be
added in TIDE. Users who already have accounts set up in TIDE will have their accounts modified
with the updated content from the upload.
13Test Information and Distribution Engine User Guide
How District-level Users Perform Tasks in TIDE
How District-level Users Register Students for Testing
Students must be registered in TIDE to be eligible to test in TDS.
How district-level users add new student accounts one at a time
You can add students to TIDE one at time. To learn more about adding records to TIDE one at a time, see
the section “How to add records one at a time” in the Introduction.
When you add a student to a district and school, you must be associated with those entities. For
example, district-level users can add students to any school within their district.
From the Students task menu on the TIDE Fields in the Add Students Form (top portion)
dashboard, select Add Students. The Add
Students form appears.
In the Demographics panel, enter the
student’s demographic information, using
the table “Fields in the Add/View/Edit
Students Page” in the appendix as a
reference.
In the available student test settings and Sample Student Settings and Tools Panel
tools panels that appear below the
Demographics panel, enter the student’s
settings for each test, using the table
“Fields in the Add/View/Edit Students
Page” in the appendix as a reference. The
test settings are grouped into categories,
such as visual, auditory, language, and
presentation. Furthermore, the options
available for a test setting are also grouped
to indicate if an option is an
accommodation, designated support, or
universal tool. The panels display a column
for each of the student’s tests. You can
select different settings for each test, if
necessary.
14Test Information and Distribution Engine User Guide
How District-level Users Perform Tasks in TIDE
Select Save.
If TIDE reports that another student already has the SSID, contact ADE at AzM2@azed.gov.
To cancel the action, select Cancel. The pop-up window closes, and the Add Students page appears.
How district-level users modify existing student accounts one at a time
You can view and edit detailed information about a student’s record. You can also view a student’s test
participation report, if available.
From the Students task menu on the TIDE dashboard, select View/Edit/Export Students. The
View/Edit/Export Students page appears.
Retrieve the individual student account you want to view, edit, export, or delete by following the
procedure in the section “How to modify existing records one at a time” in the Introduction.
View/Edit/Export Students
In the list of retrieved students, select for
the student whose account you want to view.
The View/Edit/Export Students form appears.
Modify the student’s record as required.
In the Demographics panel, modify the student’s demographic information, using the table
“Fields in the Add/View/Edit Students Page” in the appendix as a reference.
In the available test settings and tools panels, modify the student’s test settings, using the “Fields
in the Add/View/Edit Students Page” in the appendix as a reference. The test settings are
grouped into categories, such as visual, auditory, language, and presentation. Furthermore, the
options available for a test setting are also grouped to indicate if an option is an accommodation,
designated support, or universal tool. The panels display a column for each of the student’s tests.
You can select different settings for each test, if necessary.
Changing a test setting in TIDE after the test starts does not update the student’s test setting if
the same test setting is available in the TA Interface. In this case, you must also change the test
setting in the TA Interface.
Select Save.
In the affirmation dialog box, select Continue to return to the list of student records.
15Test Information and Distribution Engine User Guide
How District-level Users Perform Tasks in TIDE
How district-level users add or modify multiple student accounts all at once
If you have many students to add, edit, or delete all at once, you can do so through file upload as shown
in the section “How to add or modify multiple records at once” in the Introduction.
From the Students task menu on the TIDE Upload Students Page
dashboard, select Upload Students. The Upload
Students page appears.
Following the instructions in the section “How to add or modify multiple records at once” in the
Introduction and using the table “Columns in the Student Upload File” in the appendix as a
reference, fill out the Student template and upload it to TIDE.
How district-level users transfer students between schools or districts
You can move students from one school to another within your district on the View/Edit/Export
Students page.
Retrieve the student account you want to view or edit by following the procedure in the section
“How to modify existing records one at a time.”
In the list of retrieved records, do one of the following: List of Retrieved Records page
Mark the checkboxes for the students you want to
move.
Mark the checkbox at the top of the table to move all
students listed on the page.
When moving students, you can only move students who are listed on the page that you are viewing.
Do one of the following:
Select Move to Other School above the search results.
Select in the floating Actions toolbar.
From the School drop-down list, select the school to which you want to move the student.
Select Yes. After TIDE moves the student, an affirmation message appears.
Select Continue to return to the student listing.
16Test Information and Distribution Engine User Guide
How District-level Users Perform Tasks in TIDE
How district-level users specify student accommodations and test tools
A student’s test settings include the available accommodations, such as text-to-speech or color choices.
Test tools specify the tools a student can use during a test. This section explains how to edit student test
settings and tools on the View/Edit/Export Students page.
Retrieve the student accounts whose settings and tools you want to view or edit by following the
procedure in the section “How to modify existing records one at a time.”
In the list of retrieved students, select for the student whose test settings and tools you want to
edit. The View/Edit/Export Students page appears.
Select the appropriate test settings and tools for each content area and select Save.
How district-level users view a frequency distribution report
A frequency-distribution report (FDR) shows the number of occurrences of a particular category, such as
the number of male and female students. You can generate FDRs for the students in your district or
school by a variety of demographics and accommodations.
From the Students task menu on the TIDE Fields in the Frequency Distribution Report Page
dashboard, select Frequency Distribution
Report. The Frequency Distribution Report
page appears.
In the Filters for Report panel, select the report Filters for Report Panel
filters:
From the School drop-down list, select a
school. District-level users can retain the
default for all schools within the district.
Optional: Select a specific grade or retain
the default for all grades.
Optional: In the Search FD sub-panel, mark
checkboxes to filter the report for
additional demographics and
accommodations.
17Test Information and Distribution Engine User Guide
How District-level Users Perform Tasks in TIDE
Select Generate Report. TIDE displays the Frequency Distribution Reports by Grade and
selected FDRs in grid format. Gender
Do one of the following:
To display the FDRs in tabular format, select
Grid.
To display the FDRs in graphical format,
select Graph.
To display the FDRs in both tabular and
graphical format, select Grid & Graph.
To download a PDF file of the FDRs, select
, and then select Print on the new
browser window that opens, displaying the
report. The generated PDF file displays the
report in your selected format of Grid,
Graph, or Grid & Graph.
How district-level users print PreID labels
A PreID label is a label that you affix to a Sample PreID Label
student’s test booklet.
Districts and schools can print labels for students
not included in the original PreID upload, such as
students who transferred to a school after the
PreID upload.
This task requires the 5" × 2" label stock
provided in your test materials shipment. Only
use the label sheets provided in the district’s test
material shipment. You can print on partially
used label sheets. TIDE generates the labels as a
PDF file that you download and print with your
browser.
1. From the Students task menu on the TIDE dashboard, select View/Edit/Export Students. The
View/Edit/Export Students page appears.
2. Retrieve the students for whom you want to print test tickets by filling out the search criteria and
selecting Search.
18Test Information and Distribution Engine User Guide
How District-level Users Perform Tasks in TIDE
3. Select the column headings to sort the retrieved students in the order you want the labels printed.
4. Specify the students for whom labels need to be printed:
To print labels for specific students, mark the checkboxes for the students you want to print.
To print labels for all students listed on the page, mark the checkbox at the top of the table.
5. Select , and then select My Selected PreID Labels.
6. In the new browser window that opens, verify Layout Model for PreID Labels
PreID Labels is selected in the Print Options
section, and a model appears for selecting the
start position for printing on the first page.
7. Select the start position you require.
The start position applies only to the first page
of labels. For all subsequent pages, the printing
starts in position 1, the upper-left corner.
8. Select Print. When printing PreID labels, make
sure Print to Fit is unchecked.
Your browser downloads the generated PDF.
How District-level Users Manage Rosters
Rosters are groups of students associated with a teacher in a particular school. Rosters typically
represent entire classrooms in lower grades or individual classroom periods in upper grades. Rosters can
also represent special courses offered to groups of students.
The rosters you create in TIDE are available in ORS. ORS can aggregate test scores at these roster levels.
You can also use rosters to print test tickets containing students’ login information to start taking a test.
When creating rosters, it is recommended to follow the guidelines below:
Rosters should ideally include about 25-30 students.
One or more rosters may need to be created depending on the subjects taught by a teacher. For
example, if a group of Grade 3 students have the same teacher for Reading and Mathematics,
then separate rosters do not need to be created for each subject. However, if different teachers
are responsible for teaching different subjects, then separate rosters need to be created for each
teacher and subject.
When naming rosters, a clear and consistent naming convention should be used that indicates
the grade, class name, teacher, and period as applicable. For example, an elementary school
19Test Information and Distribution Engine User Guide
How District-level Users Perform Tasks in TIDE
roster may be named ‘Gr3Jones19-20’ and a secondary school roster may be named
‘SmithPeriod3Eng19-20’.
You can only create rosters using students associated with your school or district.
How district-level users add new rosters one at a time
From the Rosters task menu on the TIDE Add Roster Form
dashboard, select Add Roster. The Add Roster
form appears.
In the Search for Students to Add to the Roster
panel, search for students by filling out the
search criteria and selecting Search.
In the Add/Remove Students to the Roster Add/Remove Students to Roster Panel
panel, do the following:
In the Roster Name field, enter the roster
name.
From the Teacher Name drop-down list,
select a teacher or school personnel
associated with the roster.
From the Students to display field, select
the students you wish to view in the
Available Students list.
20Test Information and Distribution Engine User Guide
How District-level Users Perform Tasks in TIDE
To add students to a roster, do one of the following in the list of available students:
- To move one student to the roster, select for that student.
- To move all the students in the Available Students list to the roster, select Add All.
- To move selected students to the roster, mark the checkboxes for the students you want to
add, then select Add Selected.
To remove students from a roster, do one of the following in the list of students in the roster:
- To remove one student from the roster, select for the student.
- To remove all the students from the roster, select Remove All.
- To remove selected students from the roster, mark the checkboxes for the students you
want to remove, then select Remove Selected.
4. Select Save, and in the affirmation dialog box, select Continue.
How district-level users modify existing rosters one at a time
From the Rosters task menu on the TIDE dashboard, select View/Edit/Export Roster. The
View/Edit/Export Roster page appears.
Retrieve the roster record you want to view or edit by following the procedure in the section “How
to modify existing records one at a time” in the Introduction.
View/Edit Roster Form
In the list of retrieved rosters, select for the
roster whose details you want to view. The
View/Edit Roster form appears.
In the Search for Students to Add to the Roster
panel, search for students by following the
procedure in the section “How to modify
existing records one at a time” in the
Introduction.
21Test Information and Distribution Engine User Guide
How District-level Users Perform Tasks in TIDE
In the Add/Remove Students to the Roster Add/Remove Students to Roster Panel
panel, do the following:
In the Roster Name field, enter the roster
name.
From the Teacher Name drop-down list,
select a teacher or school personnel
associated with the roster.
From the Students to display field, select
the students you wish to view in the
Available Students and Selected Students
lists.
To add students, do one of the following Modifying a Roster
from the list of available students:
- To move one student to the roster,
select for that student.
- To move all the students in the
Available Students list to the roster,
select Add All.
- To move selected students to the
roster, mark the checkboxes for the
students you want to add, then select
Add Selected.
To remove students, do one of the following in the list of students in the roster:
- To remove one student from the roster, select for the student.
- To remove all the students from the roster, select Remove All.
- To remove selected students from the roster, mark the checkboxes for the students you
want to remove, then select Remove Selected.
Select Save, and in the affirmation dialog box, select Continue.
How district-level users add or modify multiple rosters all at once
If you have many rosters to add or modify, you can do so through file upload as shown in the section
“How to add or modify multiple records at once” in the Introduction.
22Test Information and Distribution Engine User Guide
How District-level Users Perform Tasks in TIDE
From the Rosters task menu on the TIDE dashboard, select Upload Rosters. The Upload Rosters
page appears.
Following the instructions in the section “How to add or modify multiple records at once” in the
Introduction and using the table “Columns in the Roster Upload File” in the appendix as a reference,
fill out the Roster template, and upload it to TIDE.
How District-level Users Manage Orders for Paper Testing Materials
Your district or school may be approved to receive paper materials for testing. TIDE computes the
quantities of these materials based on the number of students registered for those tests. This section
describes how to review contact information and the shipping address to which all district-level or
school-level orders for testing materials are shipped, how to review the orders for those materials, and
how to order additional quantities as necessary. This section also describes how to track order
shipments.
Note: Initial order shipments for Spring 2021 will not include Special Paper Version (SPV) test kits.
Districts will be required to order SPV test kits during the additional order window. All requests for SPV
test kits must be approved by ADE.
How district-level users review orders before test administration
You can review initial orders at any time during the initial order window.
From the Paper Ordering Initial Orders Page
task menu on the TIDE
dashboard, select Initial
Orders. The Initial
Orders form appears.
In the Contact Info panel
(if available), do the
following:
Verify information in
the District
Assessment
Coordinator
Information panel.
23Test Information and Distribution Engine User Guide
How District-level Users Perform Tasks in TIDE
In the Search for Orders panel, do one of the following:
Mark District to view district overage quantities for initial orders.
Mark School, and then select a school, to view an order for an individual school.
Select Search. The Shipping Address and Comments panels appear, along with a list of materials.
In the list of initial List of Initial Orders
orders, review the
number in the Quantity
Approved column. This is
the amount of each item
you are scheduled to
receive. For information
on the columns that
appear, see the table
Columns in the Initial
Orders Page in the
appendix.
How district-level users request additional paper testing materials during testing
You can request additional materials beyond those specified in your initial order.
From the Paper Ordering task menu Fields in the Additional Orders Page
on the TIDE dashboard, select
Additional Orders. The Additional
Orders form appears.
Select Search. A list of materials List of Available Additional Orders
available for ordering appears. For
information on the columns that
appear, see the table Columns in the
Additional Orders Page in the
appendix.
Enter the number of materials needed for each product in the Additional Quantity column. Place
one additional order for the entire district. Any additional quantity you order will require approval
by ADE.
24Test Information and Distribution Engine User Guide
How District-level Users Perform Tasks in TIDE
Select Save Orders. A text box appears allowing you to enter additional comments. Select Submit to
submit your order. Select Cancel to return to the Additional Orders panel.
After the order has been reviewed, it will either be approved or rejected. Please check back within
24 hours after placing an additional order to check the status of the order. The Arizona Department
of Education will provide comments in the Comments panel. If your order has been rejected, the
Comments panel will provide information on why the order was rejected.
How district-level users view order history reports
You can review the order history of testing materials for your school or district.
From the Paper Ordering task menu on the Fields in the Order History Page
TIDE dashboard, select Order History. The
Order History page appears.
To view the order details, select the order
number in the Order Number column. The
Order Details form appears.
To view the order’s tracking report, select .
To view the order’s packing lists, manifests, and
security checklists, select .
How district-level users view order summary reports
You can review reports for your school’s or district’s open orders.
From the Paper Ordering task menu on the Fields in the Order Quantity Report Page
TIDE dashboard, select Order Quantity Reports.
The Order Quantity Report page appears.
Under Search Order For, do one of the following:
Mark District to review orders for an entire district.
Mark School, and then select a school, to review orders for an individual school.
From the Search Order By drop-down list, mark the checkboxes for On-time and Additional, as
available, to include those types of orders in the report.
Select Search. The order report appears.
25Test Information and Distribution Engine User Guide
How District-level Users Perform Tasks in TIDE
How District-level Users Use TIDE during Test Administration
During testing, district-level users can perform the following tasks in TIDE:
Print test tickets to help students log in to tests.
Add, modify, and upload test impropriety requests.
View reports of students’ current test statuses, test completion rates, and test status codes.
How District-level Users Print Test Tickets
A test ticket is a hard-copy form that includes a Sample Test Ticket
student’s username for logging in to a test.
TIDE generates the test tickets as PDF files that you
download with your browser.
How district-level users print test tickets from student lists
From the Print Test Tickets & On-Demand PreID Labels task menu on the TIDE dashboard, select
Print from Student List. The Print Test Tickets from Student List page appears.
Retrieve the students for whom you want to print test tickets by filling out the search criteria and
selecting Search.
Select the column headings to sort the retrieved students in the order you want the test tickets
printed.
26Test Information and Distribution Engine User Guide
How District-level Users Perform Tasks in TIDE
Specify the students for whom test tickets need Retrieved Students List
to be printed:
To print test tickets for specific students,
mark the checkboxes for the students you
want to print.
To print test tickets for all students listed on
the page, mark the checkbox at the top of
the table.
To print test tickets for all retrieved
students, no additional action is necessary.
The option to print all retrieved records is
available by default.
Select , and then select the appropriate action:
To print test tickets for selected students, select My Selected Test Tickets.
To print test tickets for all retrieved students, select All Test Tickets.
In the new browser window that opens Layout Model for Test Tickets
displaying a layout for selecting the printed
layout, verify Test Tickets is selected in the
Print Options section.
Select the layout you require, and then select
Print.
Your browser downloads the generated PDF.
How district-level users print test tickets from roster lists
From the Print Test Tickets task menu on the TIDE dashboard, select Print from Roster List. The
View/Edit Rosters page appears.
Retrieve the rosters for which you want to print test tickets by filling out the search criteria and
selecting Search.
Select the column headings to sort the retrieved rosters in the order you want the test tickets
printed.
27Test Information and Distribution Engine User Guide
How District-level Users Perform Tasks in TIDE
Do one of the following:
Mark the checkboxes for the rosters you want to print.
Mark the checkbox at the top of the table to print tickets for all retrieved rosters.
When printing multiple rosters, the total number of students included in the rosters should not
exceed 1000.
Layout Model for Test Tickets
Select , and then select Test
Tickets. A layout model appears for
selecting the printed layout.
Verify Test Tickets is selected in the
Print Options section.
Select the layout you require, and
then select Print.
Your browser downloads the generated
PDF.
How District-level Users Manage Test Impropriety Requests
During computer-based testing (CBT) a student may need their test re-opened or invalidated due to a
hardware malfunction or a testing impropriety. This section describes the types of improprieties, the
statuses of improprieties, and how you view, create, and monitor test impropriety requests.
All requests for test improprieties will be reviewed by ADE. ADE will view and provide feedback on a test
impropriety within one business day of the request.
If ADE approves the request, the test impropriety request will be processed. If ADE does not approve the
request, the test impropriety request will be rejected. When rejecting the request, ADE may ask that you
re-submit the request using a different type of impropriety. Any rejected requests will have a reason
why it was rejected.
For paper-based testing schools (PBT), a testing incident report will need to be submitted to ADE. The
Testing Incident Form can be obtained on the AzM2 DTC site at
https://www.azed.gov/assessment/achievement-dtcs.
For a full list of test impropriety request types, see the table “List of Test Impropriety Request Types” in
the appendix.
For a list of test impropriety request statuses, see the table “List of Test Impropriety Request Statuses”
in the appendix.
28Test Information and Distribution Engine User Guide
How District-level Users Perform Tasks in TIDE
For a list of available test impropriety requests by test status, see the table “List of Test Impropriety
Requests by Test Status” in the appendix.
How district-level users add new test impropriety requests one at a time
You can create an test impropriety request for a given test result.
Retrieve the result for which you want to create Selection Fields in the Create Test Impropriety
an test impropriety request by doing the Requests Page
following:
From the Test Improprieties task menu on
the TIDE dashboard, select Create
Requests. The Create Requests page
appears.
Select a request type.
From the drop-down lists and in the text
field, enter search criteria.
Select Search. TIDE displays the found Retrieved Test Results
results at the bottom of the Create
Requests page.
Mark the checkbox for each result for which
you want to create a test impropriety, and then
select Create.
From the Select a reason from the list drop-
down, select a reason for creating the test
impropriety request. The reasons may vary
based on the test impropriety request type.
In the Additional Comments field, enter comments.
Enter a reason for the request in the window that pops up.
Select Submit. TIDE displays a confirmation message.
29Test Information and Distribution Engine User Guide
How District-level Users Perform Tasks in TIDE
How district-level users modify existing test impropriety requests one at a time
District Test Coordinators can view, retract, and export existing test impropriety requests.
From the Test Improprieties task menu on Selection Fields in the View Requests Page
the TIDE dashboard, select View Requests.
The View Requests page appears.
Retrieve the test impropriety requests you Retrieved Test Impropriety Requests
want to view by filling out the search
criteria and selecting Search.
Optional: Review any comments left by ADE regarding the impropriety request by clicking the
icon in the Request Status column.
How district-level users add or modify multiple test impropriety requests all at once
If you have many test impropriety requests to create, it may be easier to perform those transactions
through file uploads. This task requires familiarity with composing comma-separated value (CSV) files or
working with Microsoft Excel.
From the Test Improprieties task menu on the TIDE dashboard, select Upload Requests. The Upload
Requests page appears.
Following the instructions in the section “How to add or modify multiple records at once” in the
Introduction, and using the table “Columns in the Test Impropriety Request Upload File” in the
appendix as a reference, fill out the Test Impropriety Request template and upload it to TIDE.
30Test Information and Distribution Engine User Guide
How District-level Users Perform Tasks in TIDE
How District-level Users Monitor Test Progress
The tasks available in the Monitoring Test Progress task menu allow you to generate various reports
that provide information about a test administration's progress.
The following reports are available in TIDE:
Plan and Manage Testing Report: Details a student’s test opportunities and the status of those
test opportunities. You can generate this report from the Plan and Manage Testing page.
Test Completion Rates Report: Summarizes the number and percentage of students who have
started or completed a test.
How district-level users view report of students’ current test status
TIDE includes a Plan and Manage Testing report that details all of a student’s test opportunities and the
status of those test opportunities.
Because the report lists testing opportunities, a student can appear more than once on the report.
From the Monitoring Test Progress Plan and Manage Testing Page
task menu on the TIDE dashboard,
select Plan and Manage Testing. The
Plan and Manage Testing page
appears.
In the Choose What panel, select the
parameters for which tests to include
in your report:
From the Test Name drop-down list, select the test for which you want to generate the report.
You may select one, multiple, or all from this list.
In the Search Students panel, select the parameters for the information to include in your report:
From the District drop-down list, select a district if applicable.
From the School drop-down list, select a school if applicable. You may select one or more
schools from this list. You may also select all schools if the selected district has 20 or less
schools. For districts that have more than 20 schools, the Select all option will not be available.
Furthermore, the checkboxes for the schools will be disabled once 20 schools have been
selected.
Optional: If a single school was selected, choose a teacher from the Teacher drop-down list.
31You can also read