BEST PRACTICES WITH MYMATHLAB/ FACULTY INSTRUCTION MANUAL
←
→
Page content transcription
If your browser does not render page correctly, please read the page content below
Best Practices with
      MyMathLab/
      Faculty Instruction
      Manual

Help when you need it:
MyMath Lab Professor Support 1-888-695-6577
Mon-Thu, 9am to 10pm Fri, 9am to 5pm Sun, 5pm to 10pm all times EST.

Your Tech specialist Matthew Stringer 817-881-1772 matthew.stringer@pearson.com

Your Representative DeeDee Martinson 281-796-3995 deedee.martinson@pearson.com

Live on-line training schedule at http://www.mymathlab.com/training.html
Table of Contents
BEST PRACTICES WITH MYMATHLAB ............................................................................................. 1
ABOUT THE MY COURSECOMPASS PAGE ........................................................................................ 2
USING THE COURSES AREA ......................................................................................................................... 3
USING THE COURSES SETTINGS PAGE ......................................................................................................... 3
Arranging course titles ......................................................................................................................... 3
Hiding and showing course titles .......................................................................................................... 3
USING THE ANNOUNCEMENTS AREA .......................................................................................................... 3
USING THE RESOURCES AREA ..................................................................................................................... 4
USING THE NEED HELP? AREA ................................................................................................................... 5
EDITING PERSONAL INFORMATION ............................................................................................................. 5
SETTING UP COURSES ............................................................................................................................ 6
CREATING AND UPGRADING COURSES ........................................................................................................ 6
SEARCHING OR BROWSING FOR PUBLISHER-PROVIDED COURSE MATERIALS ............................................... 6
COPYING YOUR OWN COURSE ..................................................................................................................... 7
COPYING ANOTHER INSTRUCTOR'S COURSE ................................................................................................ 9
SETTING UP MULTISEMESTER COURSES .....................................................................................................11
MANAGING COURSES ............................................................................................................................12
CHANGING A COURSE NAME AND DESCRIPTION .........................................................................................12
SETTING COURSE DATES ............................................................................................................................12
SETTING THE COURSE ENTRY POINT...........................................................................................................13
CHANGING COURSE APPEARANCE..............................................................................................................13
ALLOWING OTHER INSTRUCTORS TO COPY YOUR COURSE .........................................................................14
HOW STUDENTS ENROLL .....................................................................................................................15
REGISTERING AND ENROLLING IN A NEW SUBJECT ...................................................................................15
SENDING E-MAIL TO USERS ........................................................................................................................17
USING COURSE TOOLS ..........................................................................................................................18
ANNOUNCEMENTS .....................................................................................................................................18
Adding announcements ........................................................................................................................18
COLLABORATION TOOLS............................................................................................................................19
Creating collaboration sessions...........................................................................................................19
Modifying collaboration sessions ........................................................................................................20
Creating recordings .............................................................................................................................20
Virtual Classroom ................................................................................................................................20
Entering Virtual Classroom sessions ...................................................................................................21
Using the Virtual Classroom toolbar ...................................................................................................21
CHAT .........................................................................................................................................................22
DISCUSSION BOARD ..................................................................................................................................22
CALENDAR ................................................................................................................................................22
Adding events .......................................................................................................................................22
GLOSSARY .................................................................................................................................................22
Creating glossaries ..............................................................................................................................23
Uploading glossaries ...........................................................................................................................23M Y M A T H L A B B E S T P R A C T I C E S
USING THE HOMEWORK/TEST MANAGER .....................................................................................24
USING ASSIGNMENT MANAGEMENT TOOLS ................................................................................................24
SAMPLE HOMEWORK .................................................................................................................................24
SAMPLE TESTS ..........................................................................................................................................25
PRINTING ASSIGNMENTS ............................................................................................................................25
CREATING OR COPYING AN ASSIGNMENT ...................................................................................................25
IMPORTING ASSIGNMENTS .........................................................................................................................28
START........................................................................................................................................................28
SELECT IMPORT OPTIONS ..........................................................................................................................28
USING QUESTION POOLS IN TESTS ..............................................................................................................29
What is a question pool? ......................................................................................................................29
Creating question pools .......................................................................................................................29
CHOOSING ASSIGNMENT SETTINGS FOR HOMEWORK .................................................................................30
HOMEWORK ASSIGNMENT OPTIONS ...........................................................................................................30
Set options that determine when students can access the assignment: ................................................30
Prerequisite Control ............................................................................................................................31
Presentation Options ...........................................................................................................................31
CHOOSING ASSIGNMENT SETTINGS FOR TESTS AND QUIZZES .....................................................................31
TEST AND QUIZ ASSIGNMENT OPTIONS ......................................................................................................32
Availability Options .............................................................................................................................32
Access Controls ....................................................................................................................................32
Presentation Options ...........................................................................................................................32
Review Options ....................................................................................................................................33
Scoring Options ...................................................................................................................................33
SETTING PREREQUISITES FOR ASSIGNMENTS..............................................................................................33
TO SET PREREQUISITES: .................................................................................................................................34
ABOUT TESTGEN TESTS ............................................................................................................................34
UPLOADING TESTGEN TESTS .....................................................................................................................35
Step 1: Start .........................................................................................................................................35
Step 2: Upload TestGen Test ...............................................................................................................35
Step 3: Choose Settings ........................................................................................................................35
USING THE GRADEBOOK ......................................................................................................................36
ACCESSING GRADEBOOK FUNCTIONS ........................................................................................................36
CHANGING GRADEBOOK VIEWS ................................................................................................................37
VIEWING GRADEBOOK DATA IN THE CLASS ROSTER ..................................................................................37
REVIEWING STUDENT WORK ......................................................................................................................37
COMMENTING ON STUDENT WORK.............................................................................................................38
USING ITEM ANALYSIS ...............................................................................................................................38
Analyzing results by assignment ..........................................................................................................38
Analyzing results by student.................................................................................................................38
WEIGHTING RESULTS.................................................................................................................................39
DROPPING LOWEST SCORES .......................................................................................................................40
SUBMITTING ZEROS FOR INCOMPLETE WORK .............................................................................................41
IMPORTING PREVIOUS RESULTS FROM ANOTHER COURSE ..........................................................................41
WORKING WITH THE MATHXL EXERCISE BUILDER .................................................................42
GETTING HELP ON USING MYMATHLAB ........................................................................................43
ONLINE HELP .............................................................................................................................................43
ADDITIONAL HELP AND SUPPORT FOR MYMATHLAB ................................................................................43
COURSECOMPASS ONLINE HELP ...............................................................................................................43
SENDING CONTENT QUESTIONS TO THE PUBLISHER....................................................................................44
Pearson Education iiM Y M A T H L A B B E S T P R A C T I C E S
BEST PRACTICES WITH MYMATHLAB
With CourseCompass, you can get up and running with an online course in 15 minutes or less. After you
register, log in, and create your first course, you will see your course listed on the My CourseCompass
page. You have a range of options available for creating additional courses. Any course you create appears
in the Courses area on the My CourseCompass page.
You can view the publisher-provided content. You also have a wide range of choices as you customize your
course to fit your exact needs. For example, you can add Microsoft® Word documents, PowerPoint® slides,
Adobe® Photoshop® graphics, and HTML files to further enhance your course material.
In addition to course content, CourseCompass includes a full course-management system for tracking
student progress and reporting results. For example, you can:
• Create and manage student groups
• Enter, export, and report on student grades using the gradebook
• Generate reports on course usage and activity
• Exchange files with students by using the Digital Dropbox
You can also:
• Send e-mail to students
• Send messages to students
• Communicate in real-time, using the Virtual Classroom or Chat Collaboration tools
• Create topical forums in the Discussion Board
• Create a course glossary
Pearson Education 1M Y M A T H L A B B E S T P R A C T I C E S
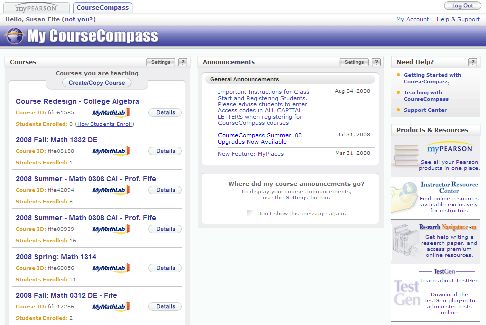
ABOUT THE MY COURSECOMPASS PAGE
Each time you log into CourseCompass, your personalized My CourseCompass page appears:
From the My CourseCompass page, you can manage your CourseCompass work. The page consists of
four areas:
• Courses, which lists the titles of all the courses you are teaching and taking.
• Announcements, which displays general announcements about CourseCompass as well as
specific announcements about each of your courses.
• Need Help?, which links to the many resources available to help you learn how to work in and
teach with CourseCompass.
• Resources, which gives you access to myPearsonStore.com, the Research Navigator, the
TestGen application and plug-in, and the Instructor Resource Center.
In the top-right corner of the My CourseCompass page, you can click the following links:
• My Account: enables you to manage your Pearson account by editing your personal information.
• Help & Support: takes you to Help information and the CourseCompass Support Center.
Pearson Education 2M Y M A T H L A B B E S T P R A C T I C E S
Using the Courses area
The Courses area on the My CourseCompass page lists all the courses you are teaching or taking. The
appearance of the course name indicates its status.
• To enter a course, click its name.
• To see details about a course—such as the number of students enrolled and beginning and ending
dates—click Details to the right of the course name. From the Details link, you can also change
the course's name, description, or dates.
• To upgrade your course to a new edition and/or version of your course materials, click New
Edition Available, New Version Available, or New Edition & Version Available, if it appears.
• The How Students Enroll link appears when no (0) students have enrolled in your course. The
link changes to display the number of students in your course as soon as one (1) student has
enrolled. To view information about how students enroll in your course, click How Students Enroll.
You can also distribute these instructions to your students.
• To create or upgrade a course, click Create/Copy Course and follow the on-screen instructions.
Using the Courses Settings page
The Courses Settings page provides control over the display of your Courses list.
Arranging course titles
To change the order of the courses in your Courses list, you simply drag and drop a course title to wherever
you want it to appear in the list.
To move a course title:
1. Click on the Move icon corresponding to the course title you want to move and hold down your
mouse button while you drag the course into position.
2. Verify that the course is in the correct location, and then release the mouse button.
3. Click the Save Changes button.
Hiding and showing course titles
The Courses Settings page Show checkboxes can be used to hide or show the course titles in your Courses
list.
To remove a course from the Courses list without deleting it:
1. In the Show column, deselect the Show checkbox corresponding to the course you want to hide.
2. Click the Save Changes button.
Using the Announcements area
The Announcements area on the My CourseCompass page includes general announcements from Pearson
Education. As an instructor, you can also display timely information about each of your courses. For
example, you might post assignment due dates, notifications of changes to the syllabus, dates for guest
speaker appearances, corrections to course material, or updates to an exam schedule.
Pearson Education 3M Y M A T H L A B B E S T P R A C T I C E S
• Click the Settings link in the message to open the Announcements Settings page. The
Announcement Settings page enables you to show or hide your course announcements in the
Announcements area.
Note: Students do not have the ability to hide course announcements; any course announcements you
publish will always appear in the students' Announcements area.
Displaying your course announcements
• To view or hide the announcements for a specific course, click the course title in the
Announcements area.
Using the Resources area
The Resources area on the My CourseCompass page displays links to:
• Research Navigator, where you and your students can search online databases to prepare
assignments or learn about a specific subject. Your students can also learn more about the
research process. To use Research Navigator:
1. Click Go to the website under Research Navigator.com in the Resources area on the My
CourseCompass page.
2. Select the database and type of source material that you want to search.
3. In the appropriate database area, select a discipline or subject.
4. Click Go.
• TestGen website, where you can download the TestGen application to use to create assessments.
You and your students can also download the TestGen plug-in needed to complete these
assessments in CourseCompass.
1. To install the TestGen application:
1. Click Go to the TestGen website under TestGen in the Resources area.
2. Enter your CourseCompass login name and password.
3. Click Log in.
4. Click Download new version or the link for your operating system.
5. Review the information under Before You Install.
6. Under Installation Instructions, click the link for your platform (Windows or Macintosh) to
download the appropriate setup file to your computer. You can download either a .zip
(compressed) file or the .exe (executable) file.
7. Follow the on-screen instructions to save and run the setup file.
2. To install the TestGen plug-in:
1. Click Get the TestGen plug-in under TestGen in the Resources area.
2. Click the link on the left of the web page to download the latest TestGen plug-in.
3. Review the information under Before You Install.
4. Under Installation Instructions, click the link for your platform (Windows or Macintosh) to
download the appropriate setup file to your computer. You can download either a .zip
(compressed) file or the .exe (executable) file.
5. Follow the on-screen instructions to save and run the setup file.
Pearson Education 4M Y M A T H L A B B E S T P R A C T I C E S
Using the Need Help? area
Click Getting Started with CourseCompass to:
• Watch How Do I? Tours that show you how to perform certain tasks in CourseCompass
• Install the appropriate plug-ins for your course, which may include:
o MyMathLab Installation Wizard
o Apple® QuickTime
o Java™ Plug-in
o Macromedia® Flash™
o Macromedia Shockwave® Player
o RealNetworks®RealOne™ Player
• View the CourseCompass system requirements
• View the Release Notes for the latest information about CourseCompass
Click Teaching with CourseCompass to:
• Review tasks to complete before the first day of your class
• Learn how students enroll in courses that span multiple semesters
• Find out how to install and use the TestGen application to create assessments
Click Support Center to:
• Open the complete online Instructor Help system
• Get information about contacting CourseCompass Customer Technical Support
• Get information about contacting MyMathLab Product Support
• Review frequently asked questions (FAQs) and their answers
Editing personal information
To edit your personal information:
1. Click Account Summary in the top-right corner of the My CourseCompass page.
2. Click Edit Personal Information.
3. Enter your password.
4. Click Log in to open the Account Summary page.
5. This page displays all the Pearson Education online products to which you have access, including
all the courses you are taking. Courses to which you no longer have access are shown as grayed
out.
6. Click Edit Account Information.
7. (Optional) Edit your contact, academic institution, or login information.
8. Click Save.
9. (Optional) E-mail your account information to yourself by clicking E-mail Account Summary in the
top-right corner of the Account Summary page.
10. Click Log out in the top-right corner.
Pearson Education 5M Y M A T H L A B B E S T P R A C T I C E S
SETTING UP COURSES
When you log in to CourseCompass for the first time, you create your first course. This course and any
others you create appear on the My CourseCompass page in the Courses area.
Creating and upgrading courses
You can create your courses in any of the following ways:
• Searching or browsing for publisher-provided course content from the list of publishers, disciplines,
and course materials
• Building a course from scratch without using any publisher-provided course material
• Copying another instructor's course
• Upgrading to a new edition or version of a course you have already been teaching
• Copying one of your own courses
If your course will span several terms, you need to set it up as a multisemester course.
Searching or browsing for publisher-provided course materials
CourseCompass provides a wealth of premium course material.
To create a course by browsing publisher-provided content:
1. Click Create/Copy Course in the Courses area on the My CourseCompass page. (If this is your first
course, click Create Your First Course instead.)
2. Do either of the following:
o Click Search Course Materials; type an author’s name, textbook title, or ISBN in the box;
then click Go. Course materials that match the criteria you typed appear.
o Click Browse by Discipline, select a discipline for your course in the first drop-down box,
select a publisher in the second drop-down box, then click Go. Course materials that
match the discipline and publisher(s) you selected appear.
3. Locate the textbook of interest and click Contents to see the types of accompanying materials
available in CourseCompass.
4. Click Select Course Materials next to the course materials you want to use.
5. Type a course name and, optionally, a course description.
6. Next to Enrollment Start Date, select the month, day, and year when you want students to start
enrolling in your course, or click the calendar icon and select a date. The default is the current
date.
7. Next to Enrollment End Date, select the month, day, and year when you want students to stop
enrolling in your course, or click the calendar icon and select a date. The default is the date nine
months from the current date.
8. Next to Course Start Date, select the month, day, and year when you plan to begin teaching the
course, or click the calendar icon and select a date. The default is the current date.
Pearson Education 6M Y M A T H L A B B E S T P R A C T I C E S
9. Next to Course End Date, select the month, day, and year when you want to close student access
to your course, or click the calendar icon and select a date. The default is the date nine months
from the current date.
10. Click Create Course Now.
11. On the Confirmation - Request Received page, note the course ID. You need to give this course ID
to students so they can enroll in the course. After the course is created, the course ID appears in
the Courses area on the My CourseCompass page.
Tip: Make a note of your course ID. You will need to give it to your students so they can enroll in
the course. CourseCompass automatically assigns a course ID number. This number is not related
to the course number assigned by your institution.
Note: Depending on the number of course creation requests in the CourseCompass queue and the
size of the course material you selected, creating the course may take as little as an hour or up to
one day. While you are waiting, you do not need to stay connected to the Internet.
12. Click Create or Copy Another Course to create another course, click Log Out to exit
CourseCompass, or click My CourseCompass to continue working in CourseCompass while you
wait for the just-created course to appear.
When CourseCompass finishes adding your course material, you will receive an e-mail message. When you
log in to CourseCompass, your course appears in the Courses area on the My CourseCompass page.
Note: You can review publisher-provided course materials in any course at any time.
Copying your own course
You can reuse a course that you created in CourseCompass. You can then modify the copied material as
needed for your new course. When you copy a course, the new course has a different course ID and an
empty gradebook.
To copy a course that you created:
1. Click Create/Copy Course in the Courses area on the My CourseCompass page. The Create or
Copy a Course page displays.
2. Select Copy a Course, and then select Copy One of Your Existing Courses.
3. Select the course you want to copy in the drop-down list, then click Go.
4. A list of course components for the original course appears, with all components selected.
5. Deselect any course component you do not want to copy, then click Continue. The Enter Course
Information page displays.
6. Type a course name and, optionally, a course description.
7. Select a course type: for most courses, select For Student enrollment. However, if you are creating
a course to use only as a template for other courses, select For Instructor use only. This type of
course can be modified and copied and is not intended for student enrollment.
Note: If you are creating a For Instructor use only course, the Course Enrollment Dates section is
grayed out. Proceed to step 9.
Pearson Education 7M Y M A T H L A B B E S T P R A C T I C E S
8. For Enrollment Start Date, open the calendar by clicking in the Date field or clicking the calendar
icon and select the month, day, and year when you want students to start enrolling in your course.
The default is the current date.
9. For Enrollment End Date, use the calendar to select the month, day, and year when you want
students to stop enrolling in your course. The default is the date nine months from the current date.
10. For Course Start Date, use the calendar to select the month, day, and year when you plan to begin
teaching the course. The default is the current date.
11. For Course End Date, use the calendar to select the month, day, and year when you want to close
student access to your course.
Note: When the course reaches its maximum end date of 15 months from the course creation
date, it will enter into a 12-month course retirement phase. At the end of this phase, the course is
flagged for deletion. Before any course is deleted, however, you will receive three email alerts
reminding you that your course has been flagged for deletion. These email reminders will contain
information on how to make a copy of your course for reuse after the original course is deleted.
Note: Students will be unable to access this course beyond the maximum course end date of 15
months. As an instructor, however, you will have access to the course until it is deleted.
12. Click Create Course Now.
13. On the Confirmation - Request Received page, note the course ID. You need to communicate the
course ID to students so they can enroll in your course. After the course is created, the course ID
appears in the Courses area on the My CourseCompass page.
Note: CourseCompass automatically assigns a course ID number. This number is not related to
the course number assigned by your institution
14. Click Create or Copy Another Course to create another course, click Log Out to exit
CourseCompass, or click Back to My CourseCompass to continue working in CourseCompass.
When CourseCompass finishes adding your course material, you receive an e-mail message. When you log
in to CourseCompass, your new course appears in the Courses area on the My CourseCompass page.
Notes:
• Assessments that you copy from another course retain the same availability setting as in the
original course.
• For information on integrating customized materials from the old course into the new one, see
Integrating customized materials into an upgraded course.
• If you created a course from scratch (a Personal Edition) before the course materials for your
textbook were published and now you want to add these materials to your course, you can upgrade
your Personal Edition by following this procedure.
If you copy another instructor's course or one of your own, the copy history appears on the Course Details
page:
Pearson Education 8M Y M A T H L A B B E S T P R A C T I C E S
Tip: When you copy an existing course that you created, the original course remains. You may want to
delete the original course after the copy to avoid confusion.
Copying another instructor's course
Note: Before you can copy another instructor's CourseCompass course, that instructor must first make the
course available for copying.
To create a course by copying another instructor's course:
1. Contact the other instructor to get the unique course ID for the course.
2. Click Create/Copy Course in the Courses area on the My CourseCompass page. (If this is your first
course, click Create Your First Course instead.)
3. Click Copy a Course, then click Copy Another Instructor’s Course.
4. Type the course ID for the course you want to copy, then click Go.
A list of course components for the original course appears, with all components selected.
5. Deselect any course component you do not want to copy, then click Continue.
6. Type a course name and, optionally, a course description.
7. Select a course type: for most courses, select For Student enrollment. However, if you are creating
a course to use as a template for other courses, select For Instructor use only. This type of course
can be modified and copied and is not intended for student enrollment.
Note: If you are creating a For Instructor use only course, the Course Enrollment Dates section is
grayed out. Proceed to step 10.
8. For Enrollment Start Date, open the calendar by clicking in the Date field or clicking the calendar
icon and select the month, day, and year when you want students to start enrolling in your course.
The default is the current date.
9. For Enrollment End Date, use the calendar to select the month, day, and year when you want
students to stop enrolling in your course. The default is the date nine months from the current date.
10. For Course Start Date, use the calendar to select the month, day, and year when you plan to begin
teaching the course. The default is the current date.
11. For Course End Date, use the calendar to select the month, day, and year when you want to close
student access to your course, or click the calendar icon and select a date.
Note: When the course reaches its maximum end date of 15 months from the course creation date,
it will enter into a 12-month course retirement phase. At the end of this phase, the course is flagged
for deletion. Before any course is deleted, however, you will receive three email alerts reminding
you that your course has been flagged for deletion. These email reminders will contain information
on how to make a copy of your course for reuse after the original course is deleted.
Note: Students will be unable to access this course beyond the maximum course end date of 15
months. As an instructor, however, you will have access to the course until it is deleted.
12. Click Create Course Now.
13. On the Confirmation - Request Received page, note the course ID. You need to communicate the
course ID to students so they can enroll in your course. After the course is created, the course ID
appears in the Courses area on the My CourseCompass page.
Pearson Education 9M Y M A T H L A B B E S T P R A C T I C E S
Notes:
If new course materials for the course you are copying are available or if the course materials for
this course have been retired, CourseCompass displays the Copy Existing Course Notice page.
CourseCompass automatically assigns a course ID number. This number is not related to the
course number assigned by your institution.
14. Click Create or Copy Another Course to create another course, click Log Out to exit
CourseCompass, or click My CourseCompass to continue working in CourseCompass.
When CourseCompass finishes adding your course material, you receive an e-mail message.
When you log in to CourseCompass, your new course appears in the Courses area on the My
CourseCompass page.
Pearson Education 10M Y M A T H L A B B E S T P R A C T I C E S
Setting up multisemester courses
Multisemester courses typically use the same textbook over two or more semesters. Students can sign up
for a subsequent semester of a multisemester course without getting another student access code or
making a payment.
Here is how the process works:
1. The instructor for the first semester creates a CourseCompass course and gives students the
course ID.
2. Students register for and complete the course.
3. The instructor for the subsequent semester creates a course using the same textbook course from
the CourseCompass course catalog and gives students the course ID.
4. The student signs up for the subsequent course from the Pearson Account Summary by following
these steps:
a. Go to https://register.pearsoncmg.com/userprofile and log in.
b. Under the list of CourseCompass products, click Enroll in a Course.
c. Enter the course ID for the new course and click Find Course.
d. Confirm the course information and click Next.
5. The student clicks Enter Course Now to start using the new course.
Pearson Education 11M Y M A T H L A B B E S T P R A C T I C E S
MANAGING COURSES
Changing a course name and description
Note: You must have Instructor status to change the course name and description. Users with Section
Instructor status are not allowed to make these changes.
To set or update the course name or description:
1. In the Courses area on the My CourseCompass page, click Details next to the name of the
course you want to modify.
2. Click Course Settings on the right.
3. Click Course Name and Description.
4. Modify the name of your course in the Course Name box.
5. (Optional) Type a description for your course in the Description box.
6. Click Save.
Setting course dates
The course dates can be used to control course availability for students. When you create a course, the
course start date is, by default, the creation date. You modify the ending date manually. You can later
modify the period during which the course is available to students (the course is always active for the
instructor). You can also modify the enrollment period, which by default matches the beginning and ending
dates for the course.
For all the course dates (enrollment start, enrollment end, course start, and course end) the default dates
that appear in the relevant fields can be changed.
Your course also has an expiration date, which is 15 months after the creation date. The end date you set
cannot be later than this expiration date. When the course reaches its expiration date, it will enter a 12-
month course retirement phase. At the end of this phase, the course is flagged for deletion. Before any
course is deleted, however, you will receive three email alerts reminding you that your course has been
flagged for deletion. These email reminders will contain information on how to make a copy of your course
for reuse after the original course is deleted.
Note: You must have Instructor status to modify the course dates. Users with Section Instructor status are
not allowed to make these changes.
For example, you might enable students to enroll in the course before the semester begins, but use the
course dates to keep the materials unavailable to students until you have finished setting up the course. You
can then change the course dates to make the course available to students.
To set course dates:
1. In the Courses area on the My CourseCompass page, click Details next to the name of the course
you want to modify.
2. Click Course Settings on the right.
3. Click Course Dates.
Pearson Education 12M Y M A T H L A B B E S T P R A C T I C E S
4. For Enrollment Start Date, open the calendar by clicking in the Date field or clicking the calendar
icon and select the month, day, and year when you want students to start enrolling in your course.
The default is the current date.
5. For Enrollment End Date, use the calendar to select the month, day, and year when you want
students to stop enrolling in your course. The default is the date nine months from the current date.
6. For Course Start Date, use the calendar to select the month, day, and year when you plan to begin
teaching the course. The default is the current date.
7. For Course End Date, use the calendar to select the month, day, and year when you want to close
student access to your course.
8. Note: Students will be unable to access this course beyond the maximum course end date of 15
months after creation. As an instructor, however, you will have access to the course until it is
deleted.
9. Click Save.
Setting the course entry point
When you click a course name on the My CourseCompass page, CourseCompass displays a page, such as
the Announcements or course home page, by default. You can change this setting so CourseCompass
displays one of the content areas or tool pages instead.
To set the course entry point:
1. In the Courses area on the My CourseCompass page, click Details next to the name of the course
you want to modify, and click Course Settings on the right
2. Click Set Course Entry Point.
3. In the Entry Point list, select the page you want CourseCompass to display when you click the
course name on the My CourseCompass page.
4. Click Submit, then click OK.
Note: Depending on your browser settings, you may need to clear your browser's cache before the change
takes effect. See your browser Help for instructions on how to clear the cache.
Changing course appearance
You can control what the navigation buttons (course menu) that appear on the left side of the pages in your
course look like. You can also change or remove the banner that appears at the top of the Announcements
page.
• To change the appearance of the buttons in the course menu:
1. In the Courses area on the My CourseCompass page, click Details next to the name of the
course you want to modify.
2. Click Course Settings on the right.
3. Click Course Design.
4. Click Course Design again. You should now see the Course Design page showing button
images.
5. Under Select Menu Style, select either Buttons or Text.
Pearson Education 13M Y M A T H L A B B E S T P R A C T I C E S
6. Under Select Style Properties, you can either select the button type, shape, and style for
button navigation, or the background and highlight colors for text navigation.
7. Tip: Click Gallery of Buttons to quickly preview the button options and select one in a separate
window. If you know the exact name of the button you want to preview, you can type its name
in the Button Name box.
8. When you are finished making your selections, click Submit, then click OK.
• To change the banner:
1. Click the course name on the My CourseCompass page.
2. Click Control Panel.
3. Click Settings under Course Options.
4. Click Course Design.
5. Click Course Banner. The current banner is shown at the top of the page.
6. Click Browse. Locate and select the image you want to use, then click Open.
7. Click Submit, then click OK. The new banner appears on the Announcements page.
Allowing other instructors to copy your course
You can allow other instructors to copy a course you have customized. You can enable and later disable
this option. You can also view a record of who has copied your course and when the copy was made.
Note: You must have Instructor status to change this setting. Users with Section Instructor status are not
allowed to set this option.
To allow other instructors to copy your course:
1. In the Courses area on the My CourseCompass page, click Details next to the name of the course
you want to modify, and click Course Settings on the right.
2. Click Allow another instructor to copy this course.
3. Select Make available for copy.
4. Click Submit, then click OK.
Pearson Education 14M Y M A T H L A B B E S T P R A C T I C E S
HOW STUDENTS ENROLL
To enroll in a typical course, a student needs to have a:
• Student access code, a valid credit card, or a PayPal account– Students get an access code with a
new book purchase or by buying the code separately in a student access kit/card at the campus
bookstore. Students can also buy access to a course online with a credit card or PayPal account
while they are enrolling.
• Important: The student access code is nontransferable and can be used only once.
• Course ID – This number, which identifies your particular course, consists of your last name followed
by five digits, for example, wong63229. You must give your students the course ID before they can
enroll.
• Email address – The student's registration and enrollment confirmation will be sent to this email
address. This address is also available to you, the instructor, for course-based communications.
A student who does not already have a Pearson account and is enrolling for the first time should follow the
registration instructions on the home page of the CourseCompass website.
To assist these students, print the instructions and distribute them, along with the course ID for your course.
A student who already has a Pearson account performs steps 1 through 6 in Registering and Enrolling in a
New Subject below to enroll in a new course.
To assist these students, copy the instructions to a document and distribute. You may want to enter your
course ID in the space provided in step 3.
Note: Students who need to enroll in another course based on the same textbook as a current or previous
course should go through their Pearson Account Summary to enroll. They do not need to use a new access
code or make a payment. Direct these students to:
1. Go to https://register.pearsoncmg.com/userprofile and log in.
2. Under the list of CourseCompass products, click Enroll in a Course.
3. Enter the course ID received from the instructor of the new course, confirm the course information,
and click Find Course.
4. If the student is prompted to provide an access code or purchase course access using a credit
card, the course materials do not match the previous course. The student should contact the
instructor.
5. Click Enter Course Now to start using the new course.
Registering and Enrolling in a New Subject
1. Go to http://www.coursecompass.com and click Register in the Students area.
2. Review the list of required items for enrolling in a course, and click Next.
3. Enter the course ID you received from your instructor for your new course, and click Find Course.
4. Course ID: _____________________________
5. Follow the instructions to either:
6. Use a student access code or
7. Purchase access online
Pearson Education 15M Y M A T H L A B B E S T P R A C T I C E S
8. Print the Confirmation page to keep a record of your registration and enrollment information, your
login name, and the email address used for your account.
9. Click Log In Now to access your new course.
To use a student access code:
1. Verify the course information and click Access Code.
2. Enter your student access code and click Next.
3. Review the license agreement and click I Accept.
4. Indicate whether you already have a Pearson account:
• If not, select No and follow the instructions to create your login name and password.
• If you do, select Yes and enter your login information.
• If you're not sure, select Not sure. Enter your email address and click Search. If you have
an account, you will receive your login information by email, and you can change your
selection to Yes. If you do not have an account, change your selection to No and create
your login information.
Click Next.
5. Enter or confirm the information requested on the Account information page:
• Your name and an email address that you check regularly
• School Location: Select your school country and, for schools in the U.S., enter the zip
code. From the resulting list, select your school name. If it is not listed, select Other and
enter school name, city, and state.
• Security question: Select a question from the drop-down list; then enter the answer.
Click Next.
To purchase course access online:
1. Click Buy Now.
2. Click the Buy button next to the course materials you want to buy. (You might see options with or
without an online ebook, for example.)
3. Accept the license agreement.
4. Indicate whether you already have a Pearson account:
• If not, select No and follow the instructions to create your login name and password.
• If you do, select Yes and enter your login information.
• If you're not sure, select Not sure. Enter your email address and click Search. If you have
an account, you will receive your login information by email, and you can change your
selection to Yes. If you do not have an account, change your selection to No and create
your login information.
Click Next.
5. Enter or confirm the information requested on the Account Information page:
• Your name and an email address that you check regularly
• School Location: Select your school country and, for schools in the U.S., enter the zip
code. From the resulting list, select your school name. If it is not listed, select Other and
enter school name, city, and state.
• Security question: Select a question from the drop-down list; then enter the answer.
Pearson Education 16M Y M A T H L A B B E S T P R A C T I C E S
Click Next.
6. Enter your payment information (credit card or PayPal account and billing information). Click
Continue.
7. Review your order and, when you are ready, click Place Order.
Note: For more help with registration, go to www.coursecompass.com and click Registration Help under
Students. For help during registration, click the Video Tutorial link at the top of the registration pages.
Sending e-mail to users
When you either list or search for students (users), CourseCompass displays a range of information about
those students, including e-mail addresses. Each e-mail address is a link that you can click to send a
message. When you click an e-mail address, CourseCompass displays an e-mail message with the To field
already filled in.
Students receive e-mail you send from CourseCompass in their regular e-mail program. Likewise, any
replies they send back appear in your regular e-mail program.
To find a student (user) to whom to send e-mail, you can:
• List all students (users) in your course
• List students (users) assigned to a specific group
• Search all students (users) in your course
• Search students (users) assigned to a specific group
You will also see e-mail addresses as you add students (users) to groups or remove them from groups.
Note: You can also send e-mail from the Course Tools area in the Control Panel or by clicking
Communication in the course menu.
Pearson Education 17M Y M A T H L A B B E S T P R A C T I C E S
USING COURSE TOOLS
CourseCompass includes a variety of tools that enable communication and collaboration in the online
environment. Students use these tools by clicking Communication or Tools in the course menu.
Announcements
You can use announcements to post timely information that is critical to your course's success, such as:
• Due dates for assignments
• Changes to the syllabus
• Corrections to course materials
• Addition of a quiz or test
• Exam schedules
Adding announcements
To add an announcement to a course:
1. Do one of the following:
o Click the course name on the My CourseCompass page, click Control Panel, then click
Announcements under Course Tools.
o In the Announcements area on the My CourseCompass page, click Manage to the right of any
existing announcement.
2. Click Add Announcement.
3. Under Announcement Information, type a message for the announcement.
4. Click one of the options for displaying the text:
o Smart Text displays the text as it is entered, but converts URLs and e-mail addresses into
links.
o Plain Text displays the text exactly as it is entered, with no links.
o HTML displays the text as you format it using HTML tags that you type in this box.
5. Under Options, click Yes if you want the announcement to appear permanently on the My
CourseCompass and course Announcements pages. If not, indicate the range of dates in which to
display the announcement to students:
o Click the Display After box and then select the desired entries from the date and time boxes.
o Click the Display Until box and then select the desired entries from the date and time boxes.
6. (Optional) Click Browse to link to course content, such as an assignment, item, or learning unit.
Click the location to which you want to link, then click Submit.
7. Click Submit, then clickOK.
Pearson Education 18M Y M A T H L A B B E S T P R A C T I C E S
Collaboration tools
CourseCompass provides two collaboration tools for instructors and students to communicate in real-time:
the Virtual Classroom and Chat. You can use these tools to set up real-time online classroom discussions,
extra-help sessions, and office hour question-and-answer forums. Your CourseCompass course contains
two default collaboration sessions: a Virtual Classroom Lecture Hall and a Chat Office Hours session. You
can filter or search for sessions, use these sessions "as is," modify these sessions, remove these sessions,
or create new sessions.
You can create a recording of everything except private messaging that occurs during a Virtual Classroom
or Chat session by recording it. Archives are saved by date; if two or more collaboration sessions occur on
the same day, they are included in the same archive. You can create recordings, browse recordings, and
remove recordings.
When working with either collaboration tool, consider the following:
• Virtual Classroom is a Java applet and therefore may take a few minutes to load into a browser
window.
• To participate in a Virtual Classroom session, all participants (instructors and students) must have the
Java plug-in. If the Java plug-in is not installed on your computer, it will automatically install from
within CourseCompass when you join a Virtual Classroom session.
• Unlike the Discussion Board, collaboration sessions are synchronous (occur in real time). Be sure to
notify students about a scheduled collaboration session to ensure attendance.
• Sometimes a collaboration session can be overwhelming if there are too many users. Consider
dividing students into groups to keep the conversation manageable.
• You cannot print from within the Virtual Classroom Java applet. However, you can print an archive for
a Virtual Classroom session by selecting File >Print from your browser's menu.
Creating collaboration sessions
To create a new collaboration session:
1. Click the course name for which you want to add a session on the My CourseCompass page.
2. Click Control Panel.
3. Click Collaboration under Course Tools.
4. Click Collaboration Session.
5. Accept or enter a new name in the Session Name box. The default name has this format:
.
6. (Optional) If you want to specify certain times and dates for the session to be available to students:
a. Select the Start After box and then select the desired entries from the date and time boxes.
b. Select the End After box and then select the desired entries from the date and time boxes.
7. Next to Available, select Yes to make the session available to students to view and participate in;
select No to make the session unavailable to students.
8. Under Collaboration Tool, select either Chat or Virtual Classroom.
9. Click Submit, then click OK.
Pearson Education 19M Y M A T H L A B B E S T P R A C T I C E S
Modifying collaboration sessions
You can change a collaboration session name, availability to students, and even the tool to use for the
session. For example, you may want to make the session unavailable to students as you become familiar
with the tools.
To modify an existing collaboration session:
1. Click the course name on the My CourseCompass page.
2. Click Control Panel.
3. Click Collaboration under Course Tools.
4. Click Manage next to the session you want to modify.
5. (Optional) Enter a new name in the Session Name box.
6. (Optional) If you want to specify certain times and dates for the session to be available to students:
o Select theStart After box and then select the desired entries from the date and time boxes.
o Select theEnd Afterbox and then select the desired entries from the date and time boxes.
7. Next to Available, select Yes to make the session available to students to view and participate in;
select No to make the session unavailable to students.
8. Under Collaboration Tool, select either Chat or Virtual Classroom.
9. Click Submit, then click OK.
Creating recordings
As an instructor, you can record and archive Virtual Classroom and Chat sessions. Students cannot record
these sessions, although you can allow students to review any archives you record.
To record a collaboration session:
1. Enter the Virtual Classroom or Chat session you want to archive.
2. Click the Start recording button at the top-right of the window:
3. Enter a name for the archive, then click OK.
4. Use the recording controls to pause, stop, and insert bookmarks, as necessary.
CourseCompass begins recording the session. You can later review the collaboration session recording.
Virtual Classroom
You can use the Virtual Classroom to set up real-time online classroom discussions, extra-help sessions,
and office hour question-and-answer forums. You can use the Virtual Classroom toolbar to control or clear
Pearson Education 20M Y M A T H L A B B E S T P R A C T I C E S
the display, select the features available to passive and active users, end the session, or create small group
discussions.
After you enter the Virtual Classroom, you can perform a variety of tasks, including:
• Managing a Virtual Classroom session, such as adding content, answering questions, and so on
• Using the whiteboard, such as by drawing or selecting objects
You can create a recording of everything except private messaging that occurs during a Virtual Classroom
session by recording it. Archives are saved by date; if two or more collaboration sessions occur on the same
day, they are included in the same archive. You can create recordings, browse recordings, and remove
recordings.
Entering Virtual Classroom sessions
You can enter a Virtual Classroom session for the entire course or for a group you set up.
Note: The Virtual Classroom is a Java applet and may take a few minutes to load. In addition, the Java plug-
in must be installed on your computer.
• To enter a Virtual Classroom for the entire class:
1. Click the course name on the My CourseCompass page.
2. Do one of the following:
o Click Control Panel, then click Collaboration under Course Tools.
o Click Communication in the course menu, then click Collaboration.
3. Click Join next to the session you want to enter.
A Virtual Classroom session opens in a separate browser window.
To leave the Virtual Classroom, click End in the toolbar at the top of the window.
Note: To end the session and remove all the participants, click Controls in the toolbar at the top of the
window, select End session and expel all users, then click OK three times.
Using the Virtual Classroom toolbar
The Virtual Classroom toolbar appears at the top of the Virtual Classroom window.
• Click View to specify whether private messages should appear in the same or a different window.
• Click Controls to specify which features to make available to active participants and to passive
participants. You can also end the session, removing all the users from it.
• Click Clear to clear your display only or the display of every user.
• Click End to close the current Virtual Classroom session.
• Click Breakout to select participants to include in a separate discussion within the session. Users in a
breakout discussion are still active in the main Virtual Classroom session.
Pearson Education 21You can also read