CLOUD VOICE BUSINESS PORTAL - Company Administrator Guide January 2021
←
→
Page content transcription
If your browser does not render page correctly, please read the page content below

CLOUD VOICE
BUSINESS
PORTAL
Company Administrator
Guide
January 2021
Contents
Contents .......................................................................................................................................... 2

Introduction...................................................................................................................................... 5

Overview .......................................................................................................................................... 5

Logging into the Portal...................................................................................................................... 7
        Password Ageing....................................................................................................................... 7
        Password Resets ....................................................................................................................... 7
               Company Administrator Reset ......................................................................................... 7
               Group/User Administrator Reset ...................................................................................... 7
        Locked Accounts ....................................................................................................................... 9
                Company Administrator Force Unlock............................................................................... 9
                Group/User Force Unlock ............................................................................................... 9

Portal Quick-Reference Guide...........................................................................................................10
        Tabs .......................................................................................................................................10
        Company Dashboard & Quick Statistic Tiles..................................................................................10
        Site Dashboard & Quick Statistic Tiles..........................................................................................11
        Employee Dashboard & Quick Statistic Tiles .................................................................................12
        Service Offerings ......................................................................................................................13
        Live Search Function.................................................................................................................15

General Portal Views and Information ...............................................................................................16

Saving the Business Portal as a Home Screen on iOS ........................................................................19

Dashboard Description – Company...................................................................................................20
        Quick Statistic Tiles ...................................................................................................................20
        Call Logs .................................................................................................................................20
                 Graphical View and Compare.........................................................................................22
                 List View .....................................................................................................................23
                 Type View ...................................................................................................................23
                 Top 10 View ................................................................................................................24
                 Export Tool..................................................................................................................24
        Recent Activity .........................................................................................................................24

Dashboard Description – Site ...........................................................................................................26
        Quick Statistic Tiles ...................................................................................................................26

2
Recorded Calls (if enabled) ........................................................................................................27
Call Logs .................................................................................................................................29
Managing Company’s ................................................................................................................29
Company Sidebar .....................................................................................................................29
Mapping Feature Settings ..............................................................................................40
Mapping Custom Audio to Users.....................................................................................44
Mapping Feature Settings ..............................................................................................44
Managing Sites................................................................................................................................45
Sites Sidebar............................................................................................................................45
Site Selection...............................................................................................................46
Features .....................................................................................................................46
Feature Assignment......................................................................................................47
Profile.........................................................................................................................48
Device Management.........................................................................................................................50
Device Types ...........................................................................................................................50
Device Types - Advanced Customisation .........................................................................54
Devices ...................................................................................................................................57
Devices – Advanced Customisation ................................................................................59
Device Profile ..............................................................................................................59
General Settings ..........................................................................................................60
Option Keys.................................................................................................................64
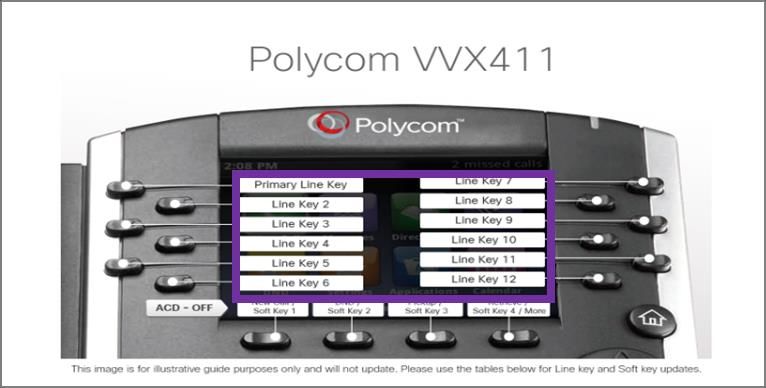
Line Keys ....................................................................................................................65
Soft Keys ....................................................................................................................69
Assign a Function Key...................................................................................................71
Assign a Speed Dial Key ...............................................................................................73
Power Save.................................................................................................................75
Reorder Lines ..............................................................................................................77
Adding & Managing Groups (Optional)..............................................................................................78
Employee Groups Sidebar .........................................................................................................79
Managing Employees.......................................................................................................................87
Employees Sidebar ...................................................................................................................87
Employee Selection ......................................................................................................88
Add Employee .............................................................................................................89
Profile.........................................................................................................................89
Service Settings ...........................................................................................................90
Remove Employee .......................................................................................................92
Service Settings – Service Passwords .............................................................................92
Features .....................................................................................................................93
Features Assignment ....................................................................................................94
Devices.......................................................................................................................95
3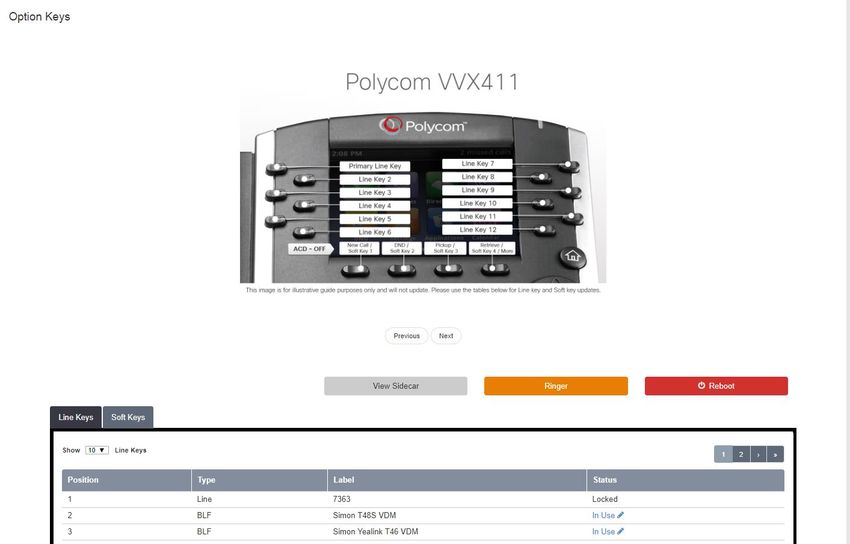
Applications .................................................................................................................96
    Group Memberships .....................................................................................................97
    Admin Privileges ..........................................................................................................98
    Import Employees ........................................................................................................98

4
Introduction
The following provides a comprehensive user guide on how to use the Virgin Media
Business Cloud Voice Business Portal. Where appropriate the guide will be backed up by
screenshots to support the recipient of this guide.
For all help and support please visit virginmediabusiness.co.uk where you will find all our
Cloud Voice guides or, alternatively, call us on 0800 052 0800.
Overview
The Business Portal allows users to configure their Cloud Voice service to suit their
business needs for example how calls are handled. Configurations can be made by
individual users to change their own service or Company administrators to make
Site/Company-wide changes in one go.
The portal is available to the following individuals:
Company administrator – the nominated individual who will govern and configure the
Cloud Voice service for the whole company.
Site (Group) administrator – the nominated individual who will govern and configure
the Cloud Voice service for all users at a particular site or within a defined group.
End user – the individuals using the Cloud Voice service who can configure their
service to suit their individual needs.
The Business Portal can be logged onto from the following devices:
Desktop (Windows/Mac) – Preferred
Tablet
Smartphone
The Business Portal supports the following browsers:
Internet Explorer 8.0 and higher
Firefox
Chrome
Safari
5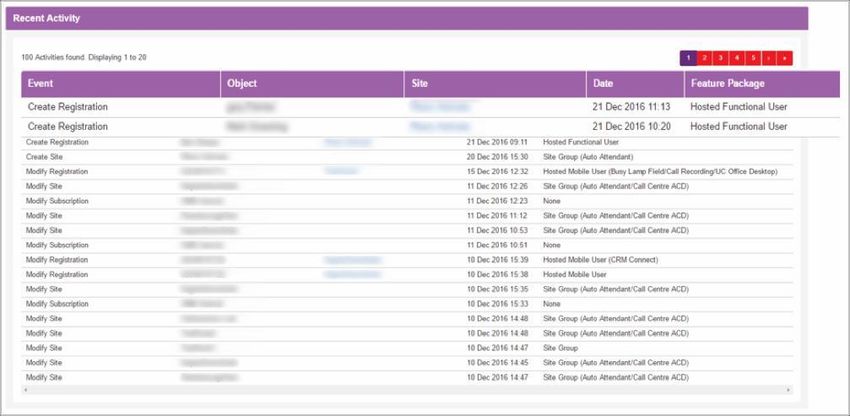
The Business Portal allows a Company Administrator to perform the following tasks:
Manage account details and passwords of Users, including password resets
View a dashboard for a Company and Site(s)
View Users’ devices and add/modify additional devices
Manage groups
Manage Site features
Manage User features including removal/restriction of features
Add new Users to an existing Site (where enabled)
Modify an existing Users licenses, including changing, adding or removing (where
enabled)
Cease an existing User or Users add-ons (where enabled)
Change a User’s phone number (where enabled)
The Business Portal allows a Group Administrator to perform any or all of the
following tasks, depending on what privileges they have been assigned by the
Company Administrator:
Manage account details and passwords of Users, including password resets
View a Company and Site dashboard
View Users’ devices and add/modify devices
Manage groups
Manage Site features
Manage User features including removal/restriction of features
Add new Users to an existing Site (where enabled)
Modify an existing Users licenses, including changing, adding or removing (where
enabled)
Cease an existing User or Users add-ons (where enabled)
Change a User’s phone number (where enabled)
Throughout this document the terms User and Employee will be interchanged, but both mean the
same thing- a person using the service and who has access to the Business Portal
6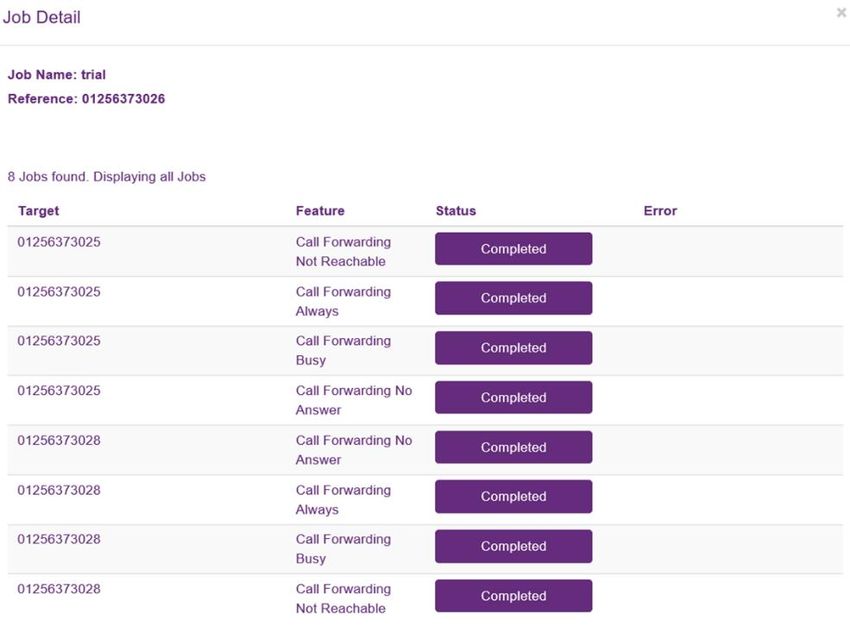
Logging into the Portal
https://www.vmbcloudvoice.virginmediabusiness.co.uk/businessportal/
The Username, Domain and Password details will be sent to the End User in the Welcome
Email once the user has been provisioned on the Cloud Voice service.
Password Ageing
Passwords will expire every 90 days and a User will be asked to enter a new password
once this period has expired. When changing this password, a User will not be able to use
the previous password. When entering a new password, the following rules must be
adhered to:
Password Length: 8 characters
Convention: 1 uppercase letter, 1 number and 1 special character
Password Resets
Company Administrator Reset
Password resets for Company Administrators can only be carried out by Virgin Media
Business. If you need to reset a password, please contact Virgin Media Business.
Group/User Administrator Reset
If a Group Administrator or User needs a password reset, this can be completed by a
Company Administrator. Simply log into the Business Portal using your Company
Administrator credentials, locate the Site, select Employees, locate the User and click on
Select.
7
Click on Profile from the left-hand administration bar.

Select Auto generate and email password to reset the password and send this directly to
the registered user.

Once selected this will display the following warning message. Please select OK to
proceed.

8
The user’s password will be reset and an email will be sent using the address specified in
the user’s profile. All unsaved changes will be lost. Click OK to continue.

Once selected this will display the following Success message, indicating the password has
been reset and sent.

Locked Accounts
If you enter the wrong credentials into the portal three times in a four-hour period, your
account will be locked. This account will then stay locked for four hours, after which you can
then enter the correct credentials.

Alternatively you can contact your administrator, who can use the Force Unlock option to
unlock this ahead of the four-hour period, and if needed reset the password.

Company Administrator Force Unlock

If you lock yourself out of your account you will need to contact Virgin Media Business, who
can unlock this for you.

Group/User Force Unlock

If a Group Administrator or User needs their account unlocked, this can be completed by a
Company Administrator. Simply follow the steps identified in the Password Reset section
above to locate the User, then select the Force Unlock option.

Once selected, this will display the following warning message. Please select OK to
proceed. The users account will be locked. All unsaved changes will be lost. Click OK to
continue.

Once selected this will display the following
Success message indicating the account has
been unlocked. Please note that no email is
sent when you unlock an account.

9
Portal Quick-Reference Guide
The following screenshots are used to provide a quick overview of the high-level
functionality of the portal at a Company/Group Administrator level.
Tabs
The Business Portal uses tabs to navigate to the different sections of the portal and by
default the landing page is the Company dashboard for Company Administrators. You can
use the top navigation tabs to manage Sites, Employees and Employee Groups. The s ide
navigation tabs (left-hand side) provide you with administration and management options
within the selected Company, Site, Employee or Employee Groups.
Company Dashboard & Quick Statistic Tiles
As Company Administrator, you’ll be presented with the following dashboard when you log
in. This view will provide you with a visual quick stats section, displaying the following key
information:
Number of Active Sites
Number of Active Employees
Number of Company Admins
Add Employee option (Note, though the link works, the functionality is disabled as
this will impact your Agreement. To add employees please speak to Virgin Media
Business)
Call Logs
Recent Activity
10Site Dashboard & Quick Statistic Tiles
If a Group Administrator is created then they will not see the Company dashboard, but may
see the Site Dashboard, Site Selection or Employees area. This is dependent on whether
the Group(s) that they are administering is also a Site. A Group Administrator can only
manage features within the group they have been assigned to.
Assuming the Group Administrator is allowed to administer the Site, the following will be
displayed:
Number of Active Employees
Number of Auto Attendants created
Number of Call Centers created
Number of Hunt Groups created
Recorded Calls (where enabled)
Call Logs
Feature Summary
11If you have Call Recording enabled then the dashboard display will look slightly different and
include a section called Recorded Calls directly below the tiles, as per the image below.
Employee Dashboard & Quick Statistic Tiles
An administrator is able to log into the Employee Dashboard which will show them the
following key information:
Voicemail Notifications – Unread and Read
Missed Calls – Number, Date and Time
Dialed Calls – Number, Date and Time
Received Calls – Number, Date and Time
Recorded Calls – Last 10 recorded calls, calls in progress (only if enabled)
Call Logs – user-level call data and analysis
Quick Feature Management – top features
12Service Offerings
The Service Offerings menu lists the Feature Packages that are available for Sites and
Employees. This can be found at the top-right of the page:
A Feature Package represents a specific collection of service features. You can use this
information to determine which Feature Package you have assigned to each Employee and
Company. Optional Add-On Features can also be viewed here.
The Service Offerings tab will offer up different information, depending on which tab has
been selected. This is summarised below:
Object Service Offerings Tab
Company Displays all available Site and Employee Feature Packages and Add-Ons
company-wide
13Site Displays the Site Feature Package and Add-Ons assigned to the Site and all
Employee Feature Packages and Add-Ons that are available for Employees under
the Site
Employee Displays the Feature Package and any Add-Ons assigned to the Employee
As a Company Administrator, you will be presented with the following view
To then view the features within a package you simply need to click the package, which will
then present the following views:
14Live Search Function
You can use the Search function at the top of the page to search on a number of objects
within the same company:
It offers a dynamic search facility across the following fields:
Username
Firstname
Surname
Phone Number
Site Name
Administrators simply need to type in the criteria (full or partial) and it will list all matches:
15General Portal Views and Information As a Company Administrator you can view features at a Site or Employee level. From the Site or Employees tab, select a site or employee and you will then be able to open the Featurestab on the left side. This will open up the Features view: You have the option of viewing these as either a List or Grid view: 16
For a Feature description and more information, hover over the Icon. A brief
            summary will appear:

Some screens have filter options that allow you to dynamically filter the options displayed on
the screen.

17
Additionally, the Site Selection, Employee Selection and Group Selection pages have search
options which allow you to search through the following data:
Site Selection
Site Name
Group Selection
Group Name
Employee Selection
Username
Firstname
Surname
Phone Number
Site Name
18Saving the Business Portal as a Home Screen on iOS Access the Business Portal on your iOS device and you can save it to the home screen. By doing so, it effectively behaves like an app: 19
Dashboard Description – Company
Quick Statistic Tiles
Select a Company and click on the Dashboard to be presented with a visual quick stats
section that will display the following:
Number of Active Sites
Number of Active Employees
Number of Company Admins
Add Employee option: Please note, to add employees, you will need to contact
Virgin Media Business. You will not be able to add an employee through the portal
as this will impact your contract with Virgin Media Business.
Call Logs
Call Logging provides company-wide call records, plus comparison and analytical tools for
tracking and improving the efficiency and effectiveness of business communications.
An intuitive, feature-rich interface allows you to visualise trends and patterns, zoom in on
detailed data or view key headline information at a glance. Call Logging is accessed via the
Dashboard in the Business Portal from anywhere and on any device via a Web Browser
and Internet connection.
The search bar may display different options depending on your account privileges. You
are able to build your search by first selecting your criteria from the options boxes and then
secondly by clicking the magnifying glass to submit the search and view the results. The
Graph and Compare Views, List View, Type View and Top 10 Views (detailed below) will
display the results based on your chosen search. There is a maximum delay of
approximately 15 minutes for new calls to be displayed.
20The search criteria available are:
Object – Company, Site, User (by Username), Business Number (by full or partial
telephone number), Calling Number (by full or partial telephone number)
Traffic – All Traffic, International, Premium Rate, Non-Geographic, Mobile, National,
Off-Net, On-Net
Direction – Outbound, Inbound, Any
Status – Answered, Unanswered, Any
Date Range
21Graphical View and Compare
When your results are returned, the Graphical View displays total calls or minutes for the
current month by hour, day, week or month. You can zoom into the graph for monthly down
to hourly views and pan across the graph to move to the previous or next period of time.
You can hover over each data point dot on the graph to display the values.
Zoom between Hourly, Daily, Weekly and Monthly data
Use the interactive graph to pan and hover for more data
A comparison feature overlays the previous month’s data results, allowing you to
analyse patterns and trends
You can switch between the views detailed below using the View Button
22List View The List View provides individual call information on the results of your search, including the Business Number, Time, Duration, Calling Number, Destination and Call Status. You can order the List View results by ascending or descending Time or Duration by clicking on the corresponding column title. Browse the data by selecting the number of entries to display and/or by navigating through the result pages Type View The Type View allows you to instantly compare different types of calls to provide key information including the amount of Off-Net calls versus On-Net calls, Inbound versus Outbound and Answered versus Unanswered. The Type View displays the percentage split of total minutes and total calls for each call type. This is a useful feature to instantly view how many of your calls are On-Net (often 23
within the Company or between Sites a free of charge) versus Off-Net calls to people
outside of your Company. It allows you to see how calls are being handled and monitor
performance by viewing the incoming and outgoing call split and percentage of answered
and unanswered calls.

Top 10 View

The Top 10 View provides the 10 highest results based on your search and top 10 category
selection. For example, this allows you to see the top 10 destinations or numbers involved
in calls across your whole Company, individual users or Groups. Click the Top 10 View
button and select your category from the list of Calling Number, Destinations, International
Calls, Mobile Calls and National Calls. For example, if your search was for all outbound,
answered or unanswered calls for a Site and you select the top 10 International Calls, then
the Top 10 View will display the top 10 most frequent international numbers being dialed by
that Site and all of its Employees.

This is a useful feature to instantly view what regions a marketing campaign is targeting,
which of your Customers are called or call you the most, the most popular international
destinations, which Customers call Customer Service the most and which Employees
answer the most calls to these numbers, etc.

The Top 10 view allows you to see what the most popular calls are being made and
received, increase business effectiveness and reduce costs.

Export Tool

The export tool allows you to export the current data in the chosen search and view as a
CSV file. Click the Export button – this will automatically download all of the data in the
current view in comma-separated values format.

Recent Activity
The Recent Activity section of the Company Dashboard shows the recent provisioning
activity for Sites, Employees and specific Site Features such as Call Centers that generate
provisioning events. These events include activating, modifying and deleting Employees,
and assigning/removing Feature Packages from Call Centers and Hunt Groups. The table
will show the last 100 events and after 2 years entries will be removed.

 The information on each event shows the Event Type (e.g. Create Registration), the Object
(e.g. its Username), the Site for which the event occurred, the Date the event occurred and
any Feature Package assigned to the Object.

24
Please note that this section will not display changes made within features, i.e. a User
changing their Simultaneous Ring setting.

25
Dashboard Description – Site
Quick Statistic Tiles
A Company Administrator clicking onto a Site dashboard or a Site Administrator logging in
will be presented with the following visual quick stats:
Number of Active Employees
The Limit of Employees
(Corresponding to the number of employee licenses purchased for the Site)
List of Auto Attendants, including a shortcut to create a new one
List of Call Centers, including a shortcut to create a new one
List of Hunt Groups, including a shortcut to create a new one
26Recorded Calls (if enabled)
The Site Dashboard contains a section on Call Recording when the Virgin Media Business
Administrator has enabled this, if the product has been purchased as part of your
Agreement. This is divided into four areas:
Recorded Calls
Total Calls Recorded
Total Subscribers
Details
Recorded Calls screenshot can be seen below and contains the following, which is
informational only:
27 Last 10 recorded calls, including In/Out, Number, From, Date, Time, Duration
A Total Calls Recorded screenshot can be seen below and displays a total count of how
may recorded calls there are on the Site:
A Total Subscribers screenshot can be seen below and displays a total count of Users
who are having their calls recorded:
If the Details button is selected, this will open up the Call Recording portal in another
window.
From here the Company and Group Administrator may see calls, play calls, delete calls and
manage their Call Recordings. Please review the Cloud Voice Business Portal – Voice
Recording Application User Guide for further details on how to use this.
28Call Logs
Call Logging provides a Site’s call records, comparison and analytical tools for tracking and
improving the efficiency and effectiveness of business communications. The function works
the same as described above in the Company section.
Managing Company’s
This allows the Company Administrator to manage the Company Profile, view the Company
Dashboard and use the Search Tool.
Company Sidebar
When you select the Company tab you will be presented with a left-hand side bar, which
provides administrative functions for that Company, as per the screenshot:
Features - Configure Company Features (NOT APPLICABLE FOR
CLOUD VOICE)
Profile – the Company Profile lists all the details associated to the
Company. This is informational only and not used.
Dashboard – The Dashboard allows you to access Call Logging and
review recent billable activity.
Search Tool – the Search Tool allows you to perform a search on a
number of parameters, including telephone number and username.
Features
This feature is not applicable for Cloud Voice.
29Profile
This section is not used so please do not make any changes in here.
Dashboard
This section is has already been explained in the dashboards section of this guide, above.
Search Tool
This section is used to perform a search across the Company by IP Phone MAC Address,
Telephone Number and Name.
Once logged into the Business Portal you will see the Search Tool icon in the left-hand
panel. Once you select Search Tool you will be taken to the next screen where you can
use the Search by dropdown to perform either of the searches shown below, and described
in the next sections.
Search by MAC Address
If you want to locate a specific IP phone device to see which Site or User it belongs to, you
can perform a Companywide MAC address search.
Select MAC Address from the Search By parameter.
30 Input the MAC address of the device into the MAC Address field, all in uppercase.
Select the Search button to perform the search
If the device is found it will return a table similar to the one below, listing the
Company and Site that it is allocated to. If the device is allocated to a User the
Users column will be populated with view which acts as a hyperlink. If it allocated to
a site but not a user then the Users column will say none.
Select the view hyperlink button to open up an informational pop-up window which
will then display further details on the user behind the device.
Selecting the hyperlink in the Username column will take you to the Employee
Service Settings page.
Please note, if you perform a search and a match is found, but it is within a
Company you do not have permission to view, you will get a message stating you do
not have permission. This occurs because the search is performed platform wide.
31Search by Telephone Number
If you want to locate a specific telephone number to see which Site, Enhanced Group
Function (EGF) (Hunt group etc) or User it belongs to, you can perform a companywide
telephone number search.
Select Phone Number from the Search By parameter.
Input the phone number into the Phone Number field, which will accept E164 format
(+44xx) or national format (0203xx).
Select the Search button to perform the search
If the telephone number is found it will return a table similar to the one below, listing
the Company and Site that it is allocated to as well as if it allocated to a user or EGF.
If the device is allocated to a user the Type column will be populated with the term
User. If it allocated to a Hunt Group or similar group function then the Type column
will be populated with the term EGF.
Selecting the hyperlink in the ID column will take you to the Employee Service
Settings page.
32 Please note, if you perform a search and a match is found, but the number is not
assigned to an EGF or User, you will get a message stating that.
Please note, if you perform a search and a match is found, but it is within a
Company you do not have permission to view, you will get a message stating you do
not have permission. This occurs because the search is performed platform wide.
Search by Name
If you want to locate a specific user by name to see which Site they belong to, or even
which telephone number they have, you can perform a companywide name s earch.
Select First and Last Name from the Search By parameter.
Input the First Name into the First Name field and Last Name into the Last Name
field, which will support wildcard searches. The Company field is optional and will
limit the search to the company specified.
Select the Search button to perform the search
33 If the user is found it will return a table similar to the one below, listing the Company
and Site that it is allocated to as well as the user’s phone number which will appear
as a hyperlink. The filter button is free text and will allow you to further refine your
search.
Selecting the hyperlink in the User column will take you to the Employee Service
Settings page.
Bulk Feature Management
Select this tab to duplicate feature settings from a reference Site or User to other
target Sites and Users.
Once logged into the Business Portal you will see the Bulk Feature Management icon in the
left-hand panel. Once you select Bulk Feature Management you will be taken to the next
screen where you can start a new job or view any historical jobs.
To start a new job click on the +Add button which will then enable you to create a bulk
mapping job for either Site or User (employee) features
34Bulk Feature Management is supported on the following Site Features:
- Auto Attendant
- Add After Hours Greeting media, duplicate to all target Sites and enable.
- Add Business Hours Greeting media, duplicate to all target Sites and enable.
Call Centre
Add Entrance Message media, duplicate to all target Sites and enable.
Add Comfort Message media, duplicate to all target Sites and enable.
Add On Hold Message media, duplicate to all target Sites and enable.
Add Overflow Message media, duplicate to all target Sites and enable.
Company Contacts
Enable and duplicate contacts across all target Sites
Group Contacts
Enable and duplicate contacts across all target Sites
Holiday Schedule
Enable and duplicate schedule across all target Sites
Music on Hold File
Add MoH media, duplicate to all target Sites and enable.
Music on Hold Configuration
Enable and duplicate settings across all target Sites
Phone Services
35Enable and duplicate across all target Sites
Time Schedule
Enable and duplicate schedule across all target Sites
Bulk Feature Management is supported on the following User Features:
Call Forwarding
Enable and duplicate settings across all target Users.
Phone Services
Enable and duplicate across all target Users
Pre-Alerting Announcement
Add custom media, duplicate to all target Users and enable.
Pre-Alerting Configuration
Enable and duplicate settings across all target Users
Voicemail Audio File
Add custom media, duplicate to all target Users and enable.
Voicemail Configuration
Enable and duplicate settings across all target Users
Voicemail Configuration
Enable and duplicate settings across all target Users
Insert a name for the job and select the Site radio button.
36The next step is to select a reference Site that you want to copy features from. Type in the name followed by the search magnifying glass, or to search all simply select the green magnifying glass button. Select the radio button next to the reference Site followed by the Next button. Select single or multiple target Sites that you want to copy features to. Type in the name followed by the search magnifying glass, or to search all simply select the green magnifying glass button. Select the radio button/s next to the reference Site/s followed by the Next button. The page will then present you with all of the available features that can be used as part of Site Bulk Feature Management. Please note it will only show features that have been configured/enabled on the reference Site. 37
Configure the features as needed, described further down in this document, then when you
are ready simply click the Next button at the bottom of the page. The information icon next
to each feature name provides more information on what can be configured.
You will then be presented with a summary page. Click on Submit to start the job.
You will then be returned to the main page where you will see the job with a status of Not
Started.
Once complete successfully the status will change to Completed.
Selecting the Job Name hyperlink will provide you with a modal showing you the status of
each of the setting changes.
Throughout the process the status’s you may see are as follows:
Not Started
In Progress
Completed
Error
When a job errors it does not mean the job has necessarily failed, it could be that these
mappings already exist. Select the Job Name hyperlink to review the modal.
In this example you can see that certain elements already existed or the names were the
same so the job did not attempt to overwrite these.
38You can clear a job at any time by selecting the radio button next to the job, followed by delete. Please note this simply removes the reference to the job from here and does not back the settings out. Mapping Custom Audio to Group Features To upload custom audio files to the following supported features, select the radio button against each item. Select the Choose File button which will open up a new window allowing you to select a local audio file but don’t forget the file standard must match the supported type, as detailed in the Site Features guide. Once uploaded, the Current Selection parameter will show the file. If this is not correct you 39
can select the [clear] button to remove this.

If you have other features to configure then carry on, if not select the Next button at the
bottom of the page to complete the job. Please note Auto Attendants and Call Centers
require the feature to be enabled and configured on both the reference Site and the Target
site as here we are simply copying audio files to them. If they are not enabled at the Site
you will see an error message.

Mapping Feature Settings

To copy other supported feature settings from one Site to another, select the radio button/s.
This will copy all settings from the reference Site to the target Site/s for any of the following
supported features:

If you have other features to configure then carry on, if not select the Next button at the
bottom of the page to complete the job.

40
Bulk Feature Management – User Features

Insert a name for the job and select the Employee radio button.

 The next step is to select a reference User that you want to copy features from. Type in the
 name followed by the search magnifying glass, or to search all simply select the green
 magnifying glass button. Please note ‘search all’ is limited to 10 users only, if there are
 more it will not return any results.

 Select the radio button next to the reference User followed by the Next button.

 This page will show all Users across all Sites, but can be filtered by Site using the
 dropdown or typing into the filter box. Select single or multiple target Users that you want
 to copy features to, followed by the +Add button

41
The target Users will then appear in the bottom box. If you have copied over any
incorrectly, simply use the Remove button. If you are happy to proceed then select the
Next button.

Select the radio button/s next to the reference User/s followed by the Next button.

The page will then present you with all of the available features that can be used as part of
User Bulk Feature Management. Please note it will only show features that have been
configured/enabled on the reference User.

42
Configure the features as needed, described further down in this document, then when you
 are ready simply click the Next button at the bottom of the page. The information icon next
 to each feature name provides more information on what can be configured.

You will then be presented with a summary page. Click on Submit to start the job.

You will then be returned to the main page where you will see the job with a status of Not
Started.

 Once complete successfully the status will change to Completed.

 Selecting the Job Name hyperlink will provide you with a modal showing you the status of
 each of the setting changes.

43
Mapping Custom Audio to Users

To upload custom audio files to the following supported features, select the radio button
against each item.

Select the Choose File button which will open up a new window allowing you to select a
local audio file but don’t forget the file standard must match the supported type, as detailed
in the User Features guide.

Once uploaded, the Current Selection parameter will show the file. If this is not correct you
can select the [clear] button to remove this.

If you have other features to configure then carry on, if not select the Next button at the
bottom of the page to complete the job.

Mapping Feature Settings

To copy other supported feature settings from one User to another, select the radio
button/s. This will copy all settings from the reference User to the target User/s for any of
the supported features.

If you have other features to configure then carry on, if not select the Next button at the
bottom of the page to complete the job.

44
Managing Sites
This allows the Company Administrator or Group Administrator to manage the Site
Features, Site Profile and Devices, and view the Site Dashboard.

Sites Sidebar
When you select the Sites tab you will be presented with a left-hand side bar, which
provides administrative functions for that Site, as per the screenshot

45
Site Selection
Select this tab to search, select and manage Sites:
You can search by Site name or simply hit the Search button to return a list of all Sites.
Features
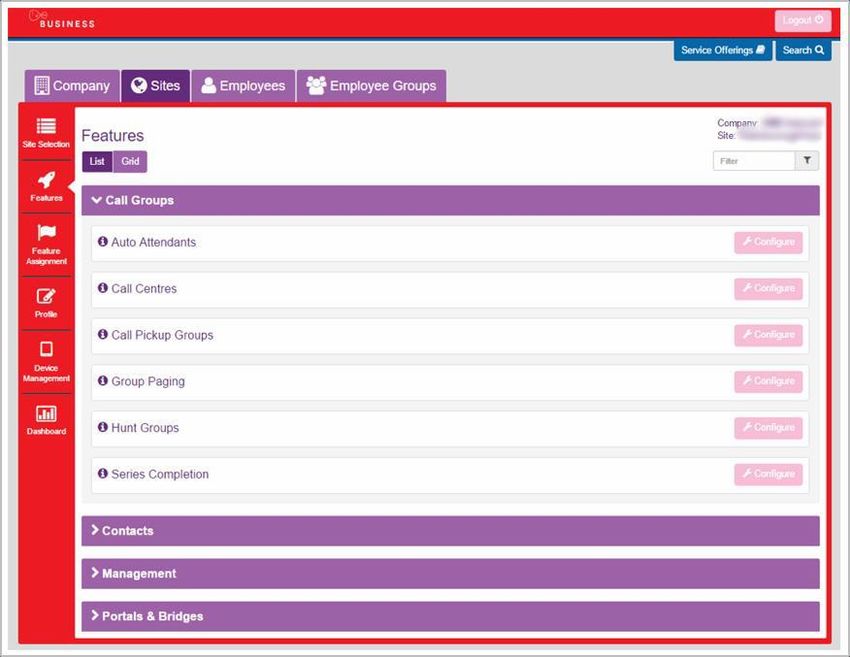
Select this tab to configure Site features:
As a Company or Group Administrator, you can configure the features for a Site. Company
Administrators can configure features for any Site within an entire Company. Group
Administrators can only configure features for the individual Sites for which they have been
granted administrative privileges. Site features are listed under the following categories and
can be displayed as a List or a Grid:
Call Groups – (e.g. Auto Attendants, Call Centres, and Hunt Groups)
Contacts – (e.g. Company Contacts, Group Contacts, Phone Services)
46 Management – (e.g. Call Capacity Management, Calling Plans, Group Calling Line
ID)
Portals & Bridges – (e.g. Call Director Portal, My Room Audio Conferencing Bridge
and Voice Portal)
Click the Configure button next to the Site Feature that you wish to configure.
Feature Assignment
Select this tab to remove features from a Site:
As a Company Administrator or Group Administrator, you can use the Site Feature
Assignment page to view the Site features that have been assigned to your Sites. You can
also change these assignments, making features available or unavailable to individual Sites
as required.
The changes you make to the feature assignments for a given Site apply to all Employees
who use the service at that Site. For example, if you enable a specific feature, Employees
at the Site can use it. If you disable a specific feature, it is not available for use by any
Employees at the Site. Similarly, only features that are currently enabled can be configured
using the Employee Feature Settings page. When you disable a feature, all corresponding
configuration capabilities are also disabled. You can change a Site’s feature assignments at
any time.
47If you are a Company Administrator, you can view and edit feature assignments for any of
your Company’s Sites. If you are a Group Administrator, you can only view and edit feature
assignments if you have been granted administrative privileges for a Group that is being
used to represent one of your Company’s Sites.
To assign or remove features, or to permit or deny a Group Administrator the right to make
changes, select or clear the check boxes in the Allow Admin Privileges list:
Profile
Select this tab to see a profile of the Site:
The Site Profile is informational and consists of the following:
Site details (e.g. Number of Users, address and contact details)
DN Ranges (telephone number(s) associated with the Site)
Call Capacity Groups
4849
Device Management
Select this tab to manage devices and profiles:

The Device Management feature allows you to create, modify, and delete the devices (IP
phones and/or Analogue Terminal Adaptors ATAs) that are used within a given Site. As an
Administrator, you can also see a list all of the devices that are currently in use within a
Site, or search for specific devices by device name, device type or available ports.

The Devices Employee feature associates a set of devices with an Employee (called
“alternative locations” or “shared call appearances”). The Device Management Site
Feature serves as a device inventory and provides functionality to manage and customise
devices.

Devices are listed as Device Types – type of devices associated to the Site – and Devices
– list of all devices under the Site.

Device Types
The Device Types tab allows you to view, manage and apply customisations to all devices
of a particular type (manufacturer and model) that are provisioned under the Site.

50
Only the customisations and their options that are available to the Device Type are
displayed. Customisations that are not applicable are greyed out.

In order to customise all devices under the Site of certain types you simply choose from the
customisation options and click Save. The device configuration files will be automatically
rebuilt for all devices. When the devices are resynchronised (e.g. on reboot) with the
configuration provisioning servers, the new customisations will be applied to the device(s).

For example:

The following table explains the available options, note, some options are only available if
they have been purchased as an add-on as part of your Agreement:

 Customisation     Option          Purpose

 ACD                               To apply Call Centre Agent ACD State soft keys to the device that
                                   allow Call Centre Agents to Sign In/Out of Call Centres that they
 When purchased                    are assigned to and set their ACD state e.g. Available, Wrap-Up
 as an add-on                      and Unavailable.

 ACD            On (tick check This applies a configuration that will enable additional soft keys on
                box)           the device for the Call Centre Agent to set their Call Centre ACD
 When purchased                state.
 as an add-on

 ACD            Off (default)      This applies a configuration that does not include the additional
 When purchased                    ACD soft keys for Users who are not Call Centre Agents or who
 as an add-on                      do not wish to use this functionality.

 BLF                              To apply Busy Lamp Field feature integration with devices. When
                                  this option is enabled, the SIP transport is changed from UDP to
 When purchased                   TCP to ensure that the complete and larger BLF signalling is
 as an add-on                     communicated successfully. You are advised to contact your
                                  Network Administrator before making any changes to this
                                  customisation.

51
BLF On (tick check This applies Busy Lamp Field feature integration with the device
box) and changes the signalling transport.
When purchased
as an add-on
BLF Off (default) Leave this option off or set to off when Busy Lamp Field
integration is not required.
When purchased
as an add-on
Codec To apply a particular voice codec that may offer better quality or
less bandwidth consumption. Leave blank or click reset to use the
default (typically applies G711 preference). You are advised to
contact your Network Administrator before making any changes to
this customisation.
Codec G711 This applies a G711a/u codec preference.
Codec G729 This applies only the G729 codec to ensure that a lower bandwidth
is consumed at the cost of voice quality.
Codec HD This applies the G722 HD Voice codec. It consumes the same
bandwidth as G711 and can offer a more realistic voice quality.
DC This applies a configuration to the device that allows it to operate
and communicate with the platform over a private Direct
Connection deployment, e.g. a MPLS deployment that privately
connects with the platform rather than via an Internet breakout
point. You are advised to contact your Network Administrator
before making any changes to this customisation.
DC Off This applies a standard deployment option when the device
communicates with the platform via normal access methods over
the Internet and not a Direct Connect deployment. Setting this to
Off for a Device Type that is DC-enabled by default overrides the
default and applies a configuration that is designed for
communication over the Internet rather than the private access
method.
DC On This applies a configuration to the device that is designed for
deployments where the device will operate over a private Direct
Connection deployment.
MCN To disable Missed Call Notifications on the device.
MCN Off (tick check This disables Missed Call Notifications on the device.
box)
52MCN On (default) Leave the check box unticked for Missed Call Notifications to be
enabled – the default behaviour.
Device Management also provides the option to create a configuration mask for
customisations and apply this mask to multiple Device Types. This speeds up the application
of the same customisations to multiple Device Types. Administrators select the mask options
from the expandable Mask menu and then click the mask icon for each Device Type to apply
the configuration.
Bulk Reboot
In order for the devices to take on their new configuration, you will need to reboot all of the
device types using the reboot button:
Selecting this button will instruct the phones to reboot, but please note, any device that is
unregistered will not be rebooted. When a device type reboot is initiated, the reboot icon
that is normally displayed on the screen is replaced by a Reboot Status link until the reboot
job is cleared, as per screenshot below.
When you click on the Reboot Status link, you are presented with a modal screen showing
the date and time that the reboot was launched along with a list of device instances (at the
time of reboot) of the specified type for the site, as per screenshot below. Manually
refreshing the page will provide updates.
53The following options may be seen:
Success - Device has been rebooted
successfully
Error - There was an error while trying to
reboot the device:
Device not registered
Reboot attempt timeout
Internal Server Error
Pending - Reboot command has been
sent to the device
Not Stared - Device has not been rebooted yet
Once the job has completed a refresh of the page will bring up the reboot button, providing
all devices were successful. If they were not, you should select the Clear Job button to
make the reboot button appear again for future use.
Bulk Reset
If the administrator has made lots of changes in error or simply wants to start again, then
they can select the Reset option which will restore. Once selected you will need to arrange
to reboot the devices in order for the phones to restore themselves, using the procedure
outlined above. Resetting a Device Type would default the following settings:
ACD - Default is Off
BLF – Busy Lamp Field - Default is Off
Codecs - Default is G722, G711A, G729
DC - Default is Off
MCN - Default is On
Device Types - Advanced Customisation
If the device is using a VDM device type, capable of having advanced customisation, then
the Device name will have the term VDM at the end of the name, will appear as a hyperlink
and the basic configuration options will not appear on this front page, as shown below:
54Simply click on the hyperlink and it will open up the following screen:
General Settings
Company/Group Administrators can prevent Employees from using the Configure keys
against VDM enabled devices. This will prevent these administration types from
undertaking the following activity:
Editing Line Keys
Editing Soft Keys
Editing Ringer Options
Restriction is done per Device Type per Site, individual Devices cannot be restricted. The
following restriction option is then available:
VDM available to Employees - Restrict End Users from accessing the VDM
functionality by checking the available button.
Click on Save and you will be presented with the following message.
55You can then customise these options for all devices under the Site:
Transfer Type
BLF – Busy Lamp Field (for supported devices only)
ACD – Automatic Call Distribution
MCN - Missed Call Notification
Headset Memory Mode
Audio Codecs
Video Codecs (for supported devices only)
Again simply choose from the customisation options, click Save and arrange to reboot the
devices. The following table explains the available options:
Customisation Option Purpose
Transfer Type This will allow the administrator to determine whether Consultative or
Blind Transfer is used by default for all transfer types.
Transfer Type Consultative If this enabled, then when the user selects the transfer button soft key
(Default) during a call, once they have entered the number it will dial the party they
are transferring to. The user can then consult with the party before
handing over the call and putting the phone down.
Transfer Type Blind If this enabled, then when the user selects the transfer button soft key
during a call it will transfer the call straight through with no consultation.
BLF To apply Busy Lamp Field feature integration with devices. When this
option is enabled the SIP transport is changed from UDP to TCP to
ensure that the complete and larger BLF signalling is communicated
successfully. You are advised to contact your Network Administrator
before making any changes to this customisation.
BLF On (tick This applies Busy Lamp Field feature integration with the device and
check box) changes the signalling transport.
BLF Off (default) Leave this option off or set to off when Busy Lamp Field integration is not
required.
ACD To apply Call Centre Agent ACD State soft keys to the device that allow
Call Centre Agents to Sign In/Out of Call Centres that they are assigned
to and set their ACD state e.g. Available, Wrap-Up, and Unavailable.
ACD On (tick This applies a configuration that will enable additional soft keys on the
check box) device for the Call Centre Agent to set their Call Centre ACD state.
ACD Off (default) This applies a configuration that does not include the additional ACD soft
keys for Users that are not a Call Centre Agent or who do not wish to use
this functionality.
MCN To disable Missed Call Notifications on the device use this option.
MCN Off (tick This disables Missed Call Notifications on the device.
check box)
MCN On (default) Leave the check box unticked for Missed Call Notifications to be enabled
– the default behaviour.
Headset Enabling this will configure this setting on the phone, saving the user
Memory from doing this locally. Headset memory mode instructs the phone to
56remember whether the user used the headset or the speakerphone for
their last call. When the user then makes the next call it remembers to
send the call to the headset if that was last used.
Headset On This enables Headset Memory Mode.
Memory
Headset Off (default) This disables Headset Memory Mode.
Memory
Audio Codec To apply a particular voice codec to reduce bandwidth consumption.
Leave blank or click reset to use the default (applies H264 preference).
You are advised to contact your Network Administrator before making
any changes to this customisation.
Codec G711 This applies a G711 codec preference.
Codec G729 This applies only the G729 codec to ensure that a lower bandwidth is
consumed at the cost of voice quality.
Codec G722 This applies the G722 HD Voice codec which is set by default. It
consumes the same bandwidth as G711 and can offer a more realistic
voice quality.
Video Codec To apply a particular video codec to reduce bandwidth consumption.
Leave blank or click reset to use the default (applies G722 preference).
You are advised to contact your Network Administrator before making
any changes to this customisation.
Codec H264 This applies a H264 codec preference.
Codec H263 This applies a H263 codec preference.
Devices
The Devices tab allows you to search, create, modify and delete devices and view,
manage and apply customisations to a subset of devices or individual devices that are
provisioned under the Site.
Only the customisations and their options that are available to the Device Type are
displayed. Customisations that are not applicable are greyed out.
In order to customise individual devices you simply locate the device and then choose from
the available customisation options, as per the table above, and click Save. If you can’t find
it then you can use the Search button to locate the device:
The device configuration file(s) will be automatically rebuilt. When the devices are
resynchronised (e.g. on reboot) with the configuration provisioning servers the
customisations will be applied to the device(s).
57You can also read