ADVANCED DIARY HELP - COPYRIGHT CSOFTLAB 2000-2021 ALL RIGHTS RESERVED.
←
→
Page content transcription
If your browser does not render page correctly, please read the page content below

Advanced Diary Help

Copyright © CSoftLab 2000-2021 All Rights Reserved.
2      Advanced Diary Help

Table of Contents

 Part I General Information                                                                                                                                                            4
      1 About ...................................................................................................................................
              Advanced Diary                                                                                                                      4
      2 Features
              ...................................................................................................................................
                   Overview                                                                                                                       5
      3 Installation
               ...................................................................................................................................
                        and system requirements                                                                                                    6
      4 How to...................................................................................................................................
                upgrade old versons of Advanced Diary                                                                                             6
      5 Interface
               ...................................................................................................................................
                    types and colors                                                                                                               7
      6 Multilanguage
               ...................................................................................................................................
                             interface                                                                                                             9
      7 Information
             ...................................................................................................................................
                        about updates                                                                                                            10

 Part II Working with Advanced Diary                                                                                                                                                12
      1 Overview
            ................................................................................................................................... 12
      2 Portable
             ...................................................................................................................................
                   mode                                                                                                                          14
      3 Working
            ...................................................................................................................................
                  with folders                                                                                                                  14
      4 Working
            ...................................................................................................................................
                  with records                                                                                                                  15
      5 Favorites
            ................................................................................................................................... 17
      6 Multimedia
             ...................................................................................................................................
                        Diary                                                                                                                    19
      7 Attached
             ...................................................................................................................................
                    Files                                                                                                                        22
      8 Manage
            ...................................................................................................................................
                  attachments                                                                                                                   23
      9 Working
            ...................................................................................................................................
                  with Categories                                                                                                               23
     10 Working
            ...................................................................................................................................
                  with text                                                                                                                     25
     11 Spell-checking
             ...................................................................................................................................
                             and autocorrection                                                                                                  35
     12 Working
            ...................................................................................................................................
                  with diary templates                                                                                                          37
     13 How to
            ...................................................................................................................................
                send an entry by email                                                                                                          38
     14 How to
            ...................................................................................................................................
                work with stickers                                                                                                              39
     15 Advanced
            ...................................................................................................................................
                     Diary - Print                                                                                                              41
     16 Creating
             ...................................................................................................................................
                   and editing print templates                                                                                                   41
     17 Previewing
             ...................................................................................................................................
                        and printing report                                                                                                      45
     18 Program's
             ...................................................................................................................................
                      options                                                                                                                    48
                 Keyboard Shortcuts
                               .......................................................................................................................................................... 48
                 General options
                               .......................................................................................................................................................... 50
                 Additional options
                               .......................................................................................................................................................... 51
                 Backup options.......................................................................................................................................................... 52
                 Text Editor options
                               .......................................................................................................................................................... 54
                 Fonts options.......................................................................................................................................................... 55
     19 Working
            ...................................................................................................................................
                  with databases                                                                                                                56
                 Database m anager
                              .......................................................................................................................................................... 56
                 Search in database
                              .......................................................................................................................................................... 57

                                                                                                                                                                  © 2021 CSoftLab
Contents                       3

                       Im port      .......................................................................................................................................................... 59
                       Export       .......................................................................................................................................................... 61
                       Backup       .......................................................................................................................................................... 62
                       Restore      .......................................................................................................................................................... 63
                       How to protect
                                    ..........................................................................................................................................................
                                        your inform ation by passw ord                                                                                                                         64
                       Working w ith..........................................................................................................................................................
                                     Dropbox                                                                                                                                                   65
           20 Working
                  ...................................................................................................................................
                        in a network                                                                                                                  67
                       Netw ork features
                                     ..........................................................................................................................................................
                                              overview                                                                                                                                          67
                       Server installation
                                     .......................................................................................................................................................... 68
                       Connection to..........................................................................................................................................................
                                       a server                                                                                                                                                 69
                       Managing users.......................................................................................................................................................... 71
                       Assigning entries
                                     .......................................................................................................................................................... 72
                       Server database
                                     ..........................................................................................................................................................
                                            m aintenance                                                                                                                                        75

   Part III Copyright and License                                                                                                                                                          76
            1 Copyright
                  ...................................................................................................................................
                          and License                                                                                                                 76

  Part IV Registration                                                                                                                                                                     77
            1 How to
                  ...................................................................................................................................
                      order Advanced Diary                                                                                                            77
            2 Limitations
                   ...................................................................................................................................
                             of evaluation version                                                                                                     78

   Part V Technical Support                                                                                                                                                                79
            1 Technical
                  ...................................................................................................................................
                          Support                                                                                                                     79

                  Index                                                                                                                                                                    80

© 2021 CSoftLab

                                                                                                                                                                                                     3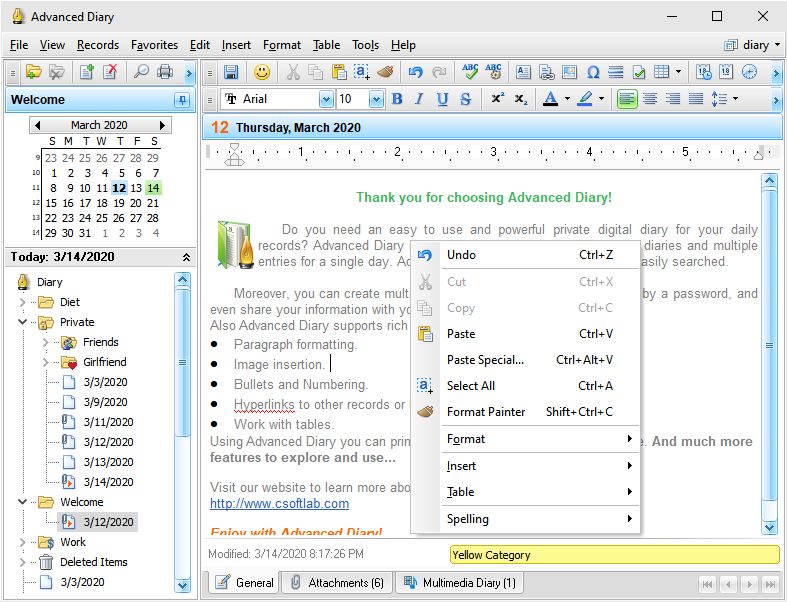
4      Advanced Diary Help

1         General Information

1.1       About Advanced Diary
          Do you need an easy to use yet powerful private digital diary for your daily records? Advanced Diary is
          the perfect choice.

          First, it supports multiple diaries and multiple entries for a single day. This is a unique feature available
          only in Advanced Diary. No other diary software is capable of keeping multiple diaries in a single
          database file.

          Not only can you enter diary text but you can create audio and video diaries as well!

          Moreover the program supports multiple databases. You can easily create a new database and switch
          back and forth between databases. Also you can protect your information with a password and even
          share your information with your friends or colleagues over a network! The program supports
          various access rights for each user and allows assign entries to specified users.

          Second, Advanced Diary is clearly structured and easily searched. Linking one entry to another is
          possible as well.

          Third, there are two available navigation types: Calendar (show by date) and Document Tree (show by
          file). Access diary entries by simply jumping to a certain date or by clicking the diary entries in the
          Document Tree.

          Who needs Advanced Diary? Not just romantic teenagers who want to write down all their secret
          thoughts. The program is perfect for tracking dietary habits or for keeping a record of weight loss
          progress. Advanced Diary can be a powerful personal development tool when used to log interesting
          ideas, observations and thoughts. Because the program comes with a clean uncluttered interface, using
          Advanced Diary is a pleasure.

          Advanced Diary supports rich text formatting, backgrounds, diary templates, images, tables, hyperlinks
          to the Internet or local files, in addition to any records in the database. You can export your data to RTF
          or HTML files. The built-in Print option allows EDITING of reports before printing. Advanced Diary also
          supports file attachments and much more.

          Advanced Diary is a fully portable program. You can install it on any USB jump or thumb drive and
          carry it so that you can write wherever you happen to be, such as on your lunch break at work. This is
          an especially nice feature since you can easily hide a small drive from prying eyes!
          Also Advanced Diary has a full Dropbox support! You can save a copy of your database into Dropbox
          and then load it on another computer with just one mouse click!

          Enjoy with Advanced Diary!

          Advanced Diary Development Team:
              Email: info@CSoftLab.com
              Web: http://www.CSoftLab.com

                                                                                                          © 2021 CSoftLab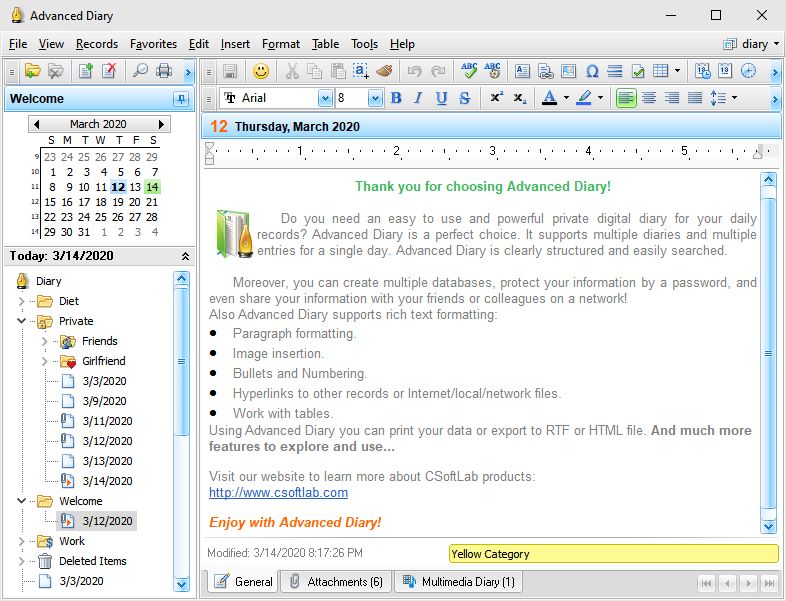
General Information        5

1.2       Features Overview
          Advanced Diary's Major Advantages:

          General

            Intuitive user-friendly interface.
            Fully portable program: install on any removable storage device for use on any pc.
            Supports various interface types and color schemes.
            Fully customizable view.
            Multi-language support.
            Full unicode support.
            Flexible tree-like database structure.
            Ability to restore deleted entries.
            Create new databases and simultaneously work with multiple databases.
            On-the-fly database swapping.
            Databases can be password protected and encrypted with the strong AES encryption algorithms.
            Share all data in real-time over a network.
            Various access rights for each database user.
            You can create public and private records, or assign entries to specified users only.
            Full Dropbox support. You can save a copy of your database into Dropbox and then load it on another
            computer with just one mouse click.
            File attachments - attach any file to entries and keep them directly in the database file.
            Attachments manager - you can see all your attachments in one window.
            Video recording.
            Voice recording.
            Ability to add text descriptions to attached files and multimedia diaries.
            Built-in fully functional media player for your audio and video diaries.
            Ability to create and insert the diary templates.
            Supports multiple diaries and multiple entries for a single day.
            Supports Calendar and Document Tree navigation types.
            Print with configurable templates.
            Built - in print templates editor.
            Ability to edit print reports before printing.
            Page header and footer are supported.
            Ability to export the print reports into RTF or HTML file.
            Powerful database search engine with regular expressions support.
            Import and export features (rtf, txt, html, dndb)
            Ability to set up various backgrounds for the documents.
            RTF support.
            Paragraph formatting.
            Image insertion.
            Bullets and Numbering.
            Hyperlinks to other database records or Internet/local/network files.
            Ability to work with tables.
            Spell checking.
            Ability to set up own hotkeys for any menu items.
            Minimize to system tray (optionally).
            Updates Checker.
            Proxy servers support.
            Simple installation and uninstallation.

© 2021 CSoftLab
6      Advanced Diary Help

          And many other features to explore and use...

1.3       Installation and system requirements
          System requirements:

          Advanced Diary requires Windows XP, Vista, Windows 7, 8.x, or Windows 10 environment.
          It will not work correctly under earlier Windows versions.

          Additional requirements:
          70 MB of free space on your hard disk

          Installation Guide
            If you have installed an older version of this software, before starting the installation, be sure that the
            Advanced Diary is not running.
            Run the installation of the new version and follow the instructions.
            If you have installed an older version of this software, do not uninstall it before installing the newer
            version. Install a newer version over the older one instead. This will help you to keep all the program
            data in the new version.

          Firebird server
          Advanced Diary installation package contains Firebird server. This product is free and necessary only if
          you plan to use Advanced Diary in a multi-user mode. Please see the Server installation help topic for
          more details.

          Uninstallation Guide
            Be sure that the Advanced Diary is not running.
            Run the "uninstall" from the Advanced Diary folder on your Start menu or from Add/Remove Programs
            in Windows Control Panel.

1.4       How to upgrade old versons of Advanced Diary
          Old database import:

          When replacing the old program version with the new one, the Advanced Diary finds the already existing
          old databases and offers users to convert them.

          click the "OK" button. You will see the next window with conversion process:

                                                                                                          © 2021 CSoftLab
General Information         7

          Note: The new versions of Advanced Diary do not have a backward compatibility with the old versions
          (4.x and older). Because of this Advanced Diary will create a copy of the old database after conversion.
          File will be created in the same location where converted database and will have the "*.DDB" file
          extension.

1.5       Interface types and colors
          Advanced Diary supports various interface types and colors. To change interface type, please use the
          "View" program main menu item.
          Here you can choose one of three styles: Standard Style, Ribbon Style or Mixed Style.

          Standard Style

          This style represents standard main menu and toolbars:

© 2021 CSoftLab
8      Advanced Diary Help

    Ribbon Style

    This style replaces main menu and standard toolbars with Ribbon panels, like in MS Office since 2007:

    Mixed Style

    This style combines Standard and Ribbon styles. Instead of main menu displayed minimized Ribbon.
    Also standard toolbars are present:

                                                                                             © 2021 CSoftLab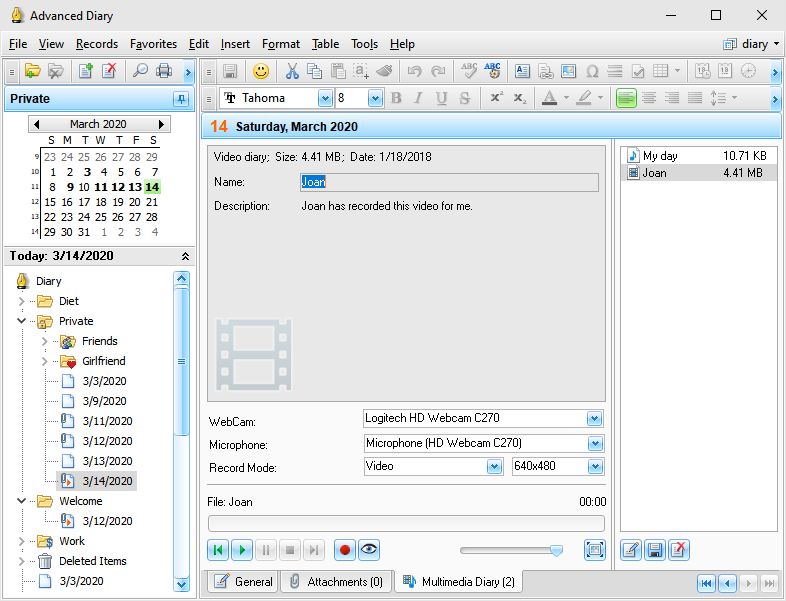
General Information         9

          To change the color scheme, please use the "View - Color Scheme" program's main menu item.
          In the opened window you can choose one of 45 color schemes or select "Native Colors". In the "Native
          Colors" mode Advanced Diary will use default system settings for the colors and controls painting. This
          mode is not available for the "Ribbon" and "Mixed" interface types.

1.6       Multilanguage interface
          Advanced Diary supports the multilanguage interface.
          To switch between languages please select the "View - Language" main menu item.
          Advanced Diary has a full unicode support. It will show correctly any international characters regardless
          of the system language.

© 2021 CSoftLab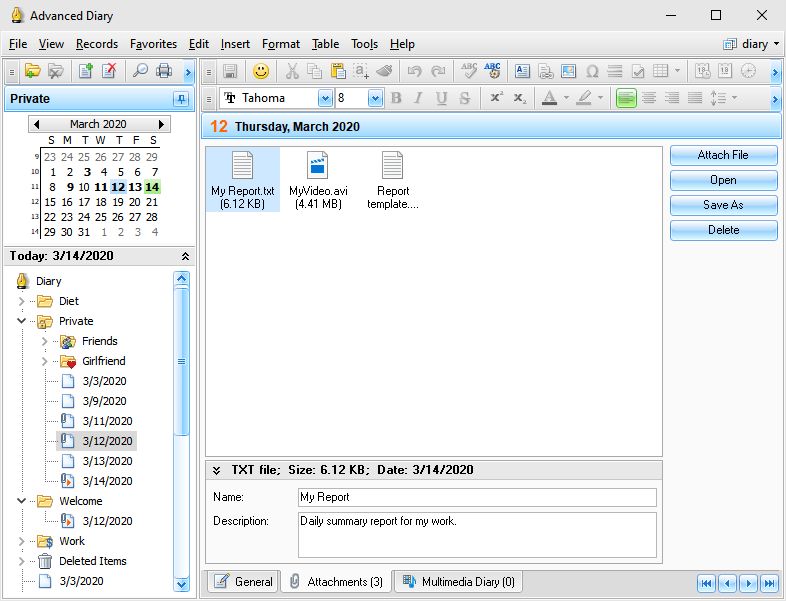
10      Advanced Diary Help

       Localization:

       The localization facility of our products allows you to have the products in your native language.
       Our goal is to have the user interface of our software translated to the most popular world languages.
       And we feel that a native speaker can make the translation to his/her native language the best way. So,
       if you can help us with the translation to your language, please send us an email. If your language is
       available (nobody is currently working on translation to the language), we'll send you our Localization
       tool.

       You are welcome to write to us:
         localization@CSoftLab.com

       Please send us your completed translation. We'll check it out, and, if it's good, we'll grant you a free
       license for Advanced Diary.

1.7    Information about updates
       If you like Advanced Diary software and are interested in updates, we can send you notifications about
       new versions.
       Select "Help - Information about updates" main menu item to subscribe to or unsubscribe from the
       our special newsletter.

                                                                                                 © 2021 CSoftLab
General Information 11
We guarantee that your email address will not be shared with third parties or used inappropriately.
Also you can run the built-in Updates Checker by clicking the "Help - Check for updates" main menu
item.
Advanced Diary can check for updates automatically, if this option is turned on in the program's Options.
© 2021 CSoftLab12 Advanced Diary Help
2 Working with Advanced Diary
2.1 Overview
Advanced Diary supports two navigation types: Calendar (show by date) and Document Tree (show by
file).
You can access diary entries by simply jumping to a certain date or by clicking the diary entries in the
Document Tree.
To make editing and viewing entries easier, the dates on the program calendar that have entries, are
marked in a bold font. To switch quickly to a current date, just right-click the calendar with the mouse
button and choose Go to today.
The entries in the Documents Tree displays a so-called "file tree" so you can can open a desired file
immediately. To change the documents sort order just click the "Records - Sort By" main menu item.
Since both navigation types are useful in their own unique ways, you can use any of them, depending on
the situation.
The Calendar and Documents tree are placed on the navigation panel in the left part of the program's
main window. You can show, hide left panel, or change its position using "View - Navigation Panel"
main menu item:
© 2021 CSoftLabWorking with Advanced Diary 13
The right part of the program's main window is intended for showing your diary entry. Here you can view,
edit or write the new entries.
Advanced Diary can be minimized to system tray (near the system clock) if an appropriate option is
selected in the program General Options.
You can open the main program's window by clicking the icon in system tray with the left mouse button,
or if you click the right mouse button, you will see a popup menu with the most frequently used functions
of the program:
Advanced Diary - opens the main window of the application, just as the left mouse button click does.
Hide/Show all Stickers - opens or minimizes all opened sticker windows.
Close all Stickers - closes all opened sticker windows.
Options - the program settings.
Exit - exit from the program (is similar to the command "File - Exit" of the main menu).
© 2021 CSoftLab14 Advanced Diary Help
2.2 Portable mode
Advanced Diary is a fully portable program. You can install it on a memory stick or any other
removable storage device and then use it on any computer without purchase additional licenses.
To turn on the portable mode, please follow these steps:
Install Advanced Diary on a removable storage device.
Run Advanced Diary.
Click the "Tools - Options" main menu item.
In the "Options" window select "Additional Options"
Turn on the "Save Settings in INI file" option.
Click "OK" button to save your options.
In the main window click the "File - Database manager" main menu item and make sure that
Advanced Diary works with the database on your removable device. If Advanced Diary works with the
database on your hard drive, simply copy this database onto removable device, then add it and
activate in the "Database manager" window.
That is all! From now you can use Advanced Diary on any computer.
2.3 Working with folders
To add a new folder press the "New Folder" button on the program's toolbar. You can also use the Ctrl
+ Alt + N shortcut. A new tree node will be added, now just enter desired folder name:
To edit (rename) an already existing folder, click this diary on the tree or the "Records - Rename
Folder" main menu item.
Moreover you can change a folder picture for better visualization. Just click the "Records - Change
Icon" main menu item and choose one of predefined pictures or load own picture from file. The picture
© 2021 CSoftLabWorking with Advanced Diary 15
size is 16x16 pixels.
To delete a folder, click the "Delete Folder" button. You can alternately use the Ctrl + Alt + D shortcut.
The "Confirmation" window will appear:
After the confirmation the selected folder and all entries inside this folder will moved into the "Deleted
Items" folder. This feature will allow to restore deleted entries, in case if you deleted them by mistake.
To completely delete your entries, please delete them inside the "Deleted Items" folder, or click the
"Records - Empty 'Deleted Items' Folder". After the confirmation these entries will be permanently
deleted from the database:
Warning: You won't be able to undo these changes.
2.4 Working with records
There are two methods to create a new entry: you can select any date on the program calendar and
enter your text. A new entry will be created for this date. Also you can click the "New" button on the
program toolbar or use the Ctrl + N shortcut. A dialog box will appear:
Here you can select an entry date and enter entry title (optionally). If record has title, it will appear on the
Documents tree instead of date. You can change the entry title by editing it in the Documents tree or by
clicking the "Records - Rename" main menu item. If you would like to change the entry date, simply
drag it onto an appropriate date on the program's calendar, and the entry date will be changed.
© 2021 CSoftLab16 Advanced Diary Help
To edit already existing record, simply select this record and then edit text.
To apply the record changes, click the "Save" button on the program toolbar and all information will be
saved into the database.
A built in text editor in Advanced Diary supports rich text formatting (RTF), pictures, tables and
hyperlink insertion. Also we've added the backgrounds and diary templates support. See the Working
with text and "Working with diary templates" help topics for more details.
You can add a voice diary or attach any file to the current entry. This is not hyperlink to file. The
attached file will be stored directly in the database.
Also you can assign any categories to your entry and then filter your entries by categories.
You can send your entries by email. See the "How to send an entry by email" help topic for more
details. Any entry can be opened as an electronic sticker on the monitor screen.
If necessary, you can cut, copy and paste selected entries by using an appropriate button in the
"Records" main menu item. Advanced Diary supports multiple records selection inside a single folder.
To delete an entry, click the "Delete" button. If an appropriate option is turned on, the "Confirmation"
window will appear:
After the confirmation all selected entries will moved into the "Deleted Items" folder. This feature will
allow to restore deleted entries, in case if you deleted them by mistake.
To completely delete your entries, please delete them inside the "Deleted Items" folder, or click the
"Records - Empty 'Deleted Items' Folder". After the confirmation these entries will be permanently
deleted from the database:
Warning: You won't be able to undo these changes.
© 2021 CSoftLabWorking with Advanced Diary 17
2.5 Favorites
Advanced Diary has the "Favorites" feature. You can add any entry into the Favorites list and then open
this entry with just one mouse click.
Adding Favorites
To add any entry to Favorites, select this entry and click the "Favorites - Add to Favorites" main menu
item.
"Add to Favorites" window will be opened:
Here you can enter a favorite text (optionally) and select a folder where a new favorite link will be added.
If necessary, you can create a new folder by pressing an appropriate button.
Please note, that you can create a link not only to any entry in Advanced Diary database! You can
create a favorite entry, which links to any file, folder, Internet or Email address. Just select an
appropriate link type:
© 2021 CSoftLab18 Advanced Diary Help
When the new favorite is added, it becomes available in the "Favorites" main menu item:
Just click it, and associated entry will be opened!
Organizing Favorites
To sort, rename, delete your favorites, or move them to folders, click the "Favorites - Organize
Favorites" main menu item.
"Organize Favorites" window will be opened:
© 2021 CSoftLabWorking with Advanced Diary 19
To create a new folder, click the "New Folder" button.
To rename any folder or favorite entry, click the "Edit" button.
To delete any folder or favorite entry, click the "Delete".
You can change the favorites order. Just select any entry or folder and click the "Move Up" or "Move
Down" buttons.
To move entries into a different folder, simply drag and drop this entry by mouse into an appropriate
folder.
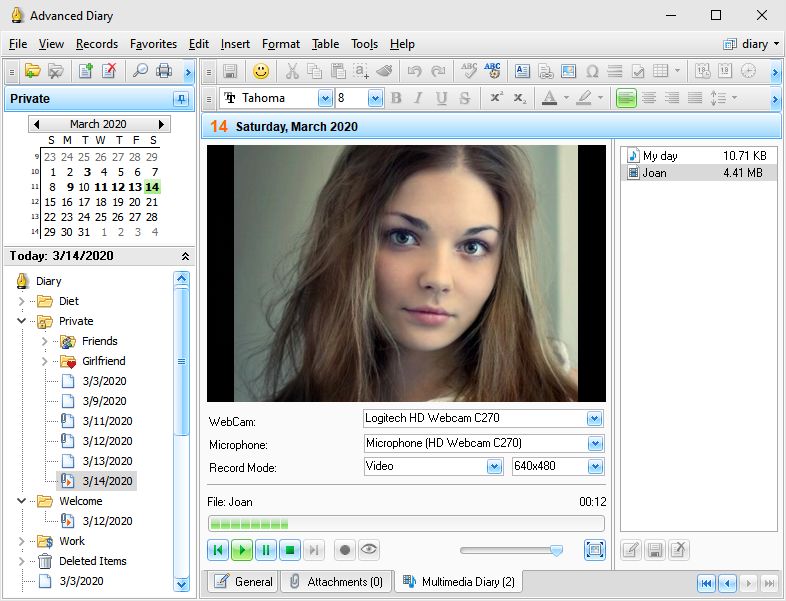
2.6 Multimedia Diary
To work with the audio and video diaries, open the Multimedia Diary tab:
© 2021 CSoftLab20 Advanced Diary Help
In this window you can record and play your multimedia diaries.
Options:
WebCam - if more than one webcam attached to your computer, you can select which webcam will be
used to record video.
Microphone - if more than one microphone attached to your computer, you can select which
microphone will be used to record voice (In Video record mode only. If you select Audio mode, Advanced
Diary will use default microphone).
Record Mode - here you can select what to record (Video or Audio diary).
Resolution - here you can change a resolution for video recording.
Use the Play, Pause, Stop, Next, Previous and Record buttons to start and stop recording, and to
play existing multimedia diaries.
Note: Advanced Diary keep all recorded audio and video diaries directly in the database.
Preview - use this button to get video from your webcam. This can be convenient, when you recording
video diary. If your computer does not have any webcams attached, this button is disabled.
Volume - use it to change the sound volume when playing your audio or video diaries.
Full Screen - opens built-in multimedia player in the full screen mode.
To rename existing voice diary click the Rename button.
To save any audio or diary into a file, click the Save As button.
© 2021 CSoftLabWorking with Advanced Diary 21
To delete selected multimedia diary click the Delete button.
When you play audio or video diary, you can scroll it using the progress bar above. Just click desired
position and your file will be played from this position.
You can find all your attachments including audio and video diaries in the Attachments manager window.
As well as for attached files, you can not only rename your multimedia diary, but also add description,
if necessary:
Important:
When you recording video, Advanced Diary uses XviD MPEG-4 Video Codec to compress video file. This
codec is necessary for the program. If it is not installed on your computer, Advanced Diary will show an
appropriate message. You can download XviD MPEG-4 Codec here:
http://www.xvid.org/
This codec is absolutely free. You don't need to pay for it.
Please restart Advanced Diary after you download and install XviD MPEG-4 Codec.
© 2021 CSoftLab22 Advanced Diary Help
2.7 Attached Files
To work with the attached files, open the Attachments tab:
At the bottom of this window you can see a summary information about attached file, can change file
name and add file description, if necessary.
Click the Attach File button to attach a new file. As alternate way you can drag any file to "Attached
Files" area.
Note: all files will be stored directly in the database and will be accessible even if you delete them from
your computer.
To open an attached file click the Open button.
To save any attachment into a file click the Save As button.
To delete an attached file click the Delete button.
You can find all your attachments including audio and video diaries in the Attachments manager window.
© 2021 CSoftLabWorking with Advanced Diary 23
2.8 Manage attachments
To manage all your attachments including audio and video diaries, please click the "File - Attachments
manager" main menu item. Attachments manager window will be opened:
In this window you can see all your attachments in one place. At the right part of this window you can
choose attachments type to display:
File attachments, audio diaries, or video diaries.
Also you can show or hide attachments, which belongs to deleted entries.
To open an attachment, click the Open button.
To save any attachment into a file, click the Save As button.
To delete any attachment, click the Delete button.
By clicking a green arrow in the attachments list, you can open Advanced Diary entry, which contains
this attachment.
To find attachment by name or by description, just type a text in the "Text to find" box and click "Find"
button. Advanced Diary will search for this text from cursor position.
2.9 Working with Categories
All Advanced Diary entries supports categories. We've added this feature for better visualization of your
information. You can assign any categories to the entry and then filter your entries by category. The
program allows you to edit existing or create new categories.
Assigning Categories
When you assign a category to an entry, the "Categories" window will be opened:
© 2021 CSoftLab24 Advanced Diary Help
To assign a category just mark a box at the left of the category name and click the "OK" button. Marked
categories will be assigned to the entry.
In this window you can customize your categories.
Click the "Add" or "Edit" button to add or edit a new category. This dialog box will be opened:
Here you can enter a category name and select category color.
To delete a category, click the "Delete" button.
You can change the categories order. Just select any category and click the "Move Up" or "Move
Down" buttons.
If the "Apply categories order to all entries" option is on, new order will be applied to all entries,
otherwise each entry in the database will have own categories order.
The program allows to set up categories to multiple entries. Just select several entries, then click the
"Records - Categories" main menu item and choose categories. These categories will be applied to all
selected records.
© 2021 CSoftLabWorking with Advanced Diary 25
Filtering by Categories
You can filter your entries by category or categories. Click the "Records - Filter by Category" program
main menu item. A dialog box will be opened:
Here you can mark categories for which you want to apply filter. Then click the "OK" button. Now
Advanced Diary will display only entries, which has at least one of selected categories.
To remove filter simply click the "Records - Filter by Category" program main menu item again.
2.10 Working with text
The text area in Advanced Diary supports rich text formatting (RTF), images, tables and hyperlink
insertion.
There is a main menu, a special toolbar, and a pop-up window that provide these options:
© 2021 CSoftLab26 Advanced Diary Help
Here you can change fonts, paragraph formatting, add bullets and background etc. Text editor allows to
insert text from file, images (even animated GIF files), special symbols, horizontal lines, tables etc.
Emotions
To insert the emotions pictures, click the Emotions button and an emotions panel will be displayed:
© 2021 CSoftLabWorking with Advanced Diary 27
To insert any emotion picture, simply click it on the panel.
You can add any own emotion pictures. Just copy your pictures into the "...\Advanced Diary
\Emotions" folder. Advanced Diary supports animated images.
To hide the emotions panel, simply click the Emotions button again.
Paste special
You can paste contents of the clipboard into a description area in various ways using the "Paste
Special" context menu item or Ctrl+Alt+V shortcut:
© 2021 CSoftLab28 Advanced Diary Help
Text Formatting
You can use standard functions (Bold, Italic, Underline) to change font style, highlight text, change
text color etc. Also Advanced Diary supports "Format Painter" feature. You can simply select
formatted text, press "Format Painter" button and select text, which you would like to format.
Paragraph Formatting
To open the paragraph formatting options, click the "Paragraph" button:
© 2021 CSoftLabWorking with Advanced Diary 29
Here you can change paragraph alignment, colors, borders, indentations etc.
Text Wrapping
Advanced Diary supports various text wrapping types. To set up a text wrapping around the pictures,
please select a picture, or put cursor after picture. Then click the "Text Wrapping" button.
The "Text Wrapping" window will be opened:
© 2021 CSoftLab30 Advanced Diary Help
Just select any text wrapping type and click the "OK" button.
Hyperlinks
To create a hyperlink inside a document, click the "Hyperlink" button. The dialog window that creates
hyperlinks will appear. You can add a link to any URL, email address, any external file or folder, or any
entry in the Advanced Diary database.
© 2021 CSoftLabWorking with Advanced Diary 31
If you select the "Database Entry" link type, the new window will be opened:
In this window you can select any folder or database entry. Then click the "OK" button to create
hyperlink to the selected entry.
Special Symbols
© 2021 CSoftLab32 Advanced Diary Help
To insert a special symbol, click the "Special Symbol" button. A dialog box will appear:
Select Font and necessary Symbol and click the "OK" button.
Please note, this window will remember last choosen settings for your convenience.
Horizontal Line
To insert a horizontal line, click the "Horizontal Line" button. A dialog box for line insertion will appear:
Select the Horizontal Line color and width, then click "OK".
Table
To insert a table, click the "Table" button. A dialog box for table insertion will appear:
© 2021 CSoftLabWorking with Advanced Diary 33
Select the number of rows and columns in the table and click "OK".
To change the cell colors in the table, select "Table - Cell Color" menu item. To change the table
settings, use the pop-up menu with additional functions.
To change the table properties, click the "Table - Properties" menu item:
In this window you can change Table width, colors, spacing etc.
There are several types of table width:
Automatic - table width will fit current document with, and you will be able to resize table by mouse.
% (percents) - table width in percents from total document width (when you resize document, table will
be resized automatically).
Pixels - fixed table width in pixels. Can be changed only in Table Properties window.
Last choosen width type will be saved and automatically applied to new tables, when you will add them
in the future.
Background
To add a background to a document, click the "Background" button. A dialog box will appear:
© 2021 CSoftLab34 Advanced Diary Help
Background Color - here you can choose a color for background.
To add a picture, click the "Open" button and select desired picture file. Advanced Diary comes with
some background pictures. You can find them in the "...\Advanced Diary\Backgrounds\" folder.
To save current background picture to a file, click the "Save" button.
To remove picture from background, click the "Clear" button.
Picture Position - if the picture is selected, you can set up its position: Tiles, Stretched, Center, Fixed
Tiles, Top Left, Top Right, Bottom Left, Bottom Right.
Padding - here you can choose the text editors padding.
Search in texts
To find a string or word in the text, click the "Find" button. A dialog box will appear:
© 2021 CSoftLabWorking with Advanced Diary 35
Using this dialog box you can find any words in the text and replace them with the new one if necessary.
2.11 Spell-checking and autocorrection
Advanced Diary has a spell-checking feature. You can check spelling not only in the main text editor.
This function will work and for any text box in the program if "Tools - Automatic spell-checking" option
is turned on.
To run spell-checking manually click the "Tools - Spell Checking" main menu item or press F7 button
on your keyboard.
Spelling Options
To access spelling options click the "Tools - Spelling Options" main menu item. You will see a dialog
box:
Here you can change various spelling options, edit custom dictionary and manage added dictionaries.
How to add a dictionary
To add a dictionary click the "Tools - Add Dictionary" main menu item. You will see a dialog box:
© 2021 CSoftLab36 Advanced Diary Help
Advanced Diary supports Hunspell dictionaries. You can download them at our website.
When you download the dictionary package, please unpack it into "...\Advanced Diary\Dictionaries\"
folder, add a path to .aff and .dic files into the "Add Dictionary" window and select language. When you
click OK, the dictionary will be added and turned on.
If you not found a dictionary for your language at our website, please note that Hunspell is the spell
checker of LibreOffice, OpenOffice.org, Mozilla Firefox 3 & Thunderbird, Google Chrome, and it is also
used by proprietary software packages, like Mac OS X, InDesign, memoQ, Opera and SDL Trados. Try
to find the necessary files in Internet.
AutoCorrection Options
To access autocorrection options, click the "Tools - AutoCorrect Options" main menu item. You will
see a dialog box:
© 2021 CSoftLabWorking with Advanced Diary 37
Here you can turn autocorrection on and off (see the Active check box), add custom rules to replace
text etc.
2.12 Working with diary templates
Advanced Diary supports documents templates. You can type any text, add pictures, tables etc and
then save this document as a template. Just click the "File - Templates - Save as Template" program
main menu item. A dialog box will appear:
Here you can enter a Template Name. Click the "OK" button and your template will be saved.
Then you can insert your templates into the entries. Click the "File - Templates - Add from Template"
program main menu item and select necessary template.
© 2021 CSoftLab38 Advanced Diary Help
To delete any template, please use the "File - Templates - Delete Template" program main menu
item and select necessary template.
Note: Advanced Diary can insert templates automatically for each new entry. Just configure the
program options.
2.13 How to send an entry by email
You can send any entry by email. Just select an entry, which you want to send and click the "Records -
Send by Email" program main menu item. A dialog box will be opened:
Here you should fill all necessary options:
SMTP Server - SMTP server, which sends out Email messages.
Port - default port for outgoing mail.
User ID - User name (to authorize access).
User password - password (to authorize access).
From address - the Email sender's address.
To address - Email recipients address. Advanced Diary supports multiple (comma separated) Email
addresses.
Server requires authentication - mark this option, if authentication is required.
Server requires authentication - turn on this option, if secure connection is required.
Remember password - mark this option if you don't want to enter password next time, when you will
send a message. Advanced Diary will remember it with another email options.
© 2021 CSoftLabWorking with Advanced Diary 39
Then click the Send button and your diary entry will be sent as an attached to email message RTF
document.
Note: to send the email messages, you need to have active Internet connection.
2.14 How to work with stickers
For your convenience Advanced Diary provides an opportunity to place and preview your records as
electronic sticker notes on the monitor.
To display the record as a sticker note on your monitor, click the "Records - Show as Sticker" program
main menu item.
The sticker window looks as following:
You can change the stickers window size, position, type (always on top of all windows or no), color and
transparency level.
To change the windows type use, the button. By clicking the "Close" button you can close the
sticker.
If you click the button, the pop-up menu with the additional functions will appear:
© 2021 CSoftLab40 Advanced Diary Help
Color - a stickers color change. You can chose between 15 preset colors given or select any custom
color.
Transparency - sets the window transparency level.
Always on top - when this option is on, the sticker will be displayed on the top of all other windows.
Go To - opens the main program window and places cursor on the record.
Edit - opens the entry for editing.
Print - using this function you can print the sticker's content.
Close - closes the sticker window.
Besides, you can move to the record currently viewed as a sticker by clicking the mouse at the title
inside the sticker.
You can hide, show or close all opened stickers, if necessary. You can find these functions in the
program's main menu:
Click the "Records - Hide/Show all stickers" main menu item to hide or show opened stickers, or
"Records - Close all Stickers" main menu item to close all opened stickers.
Also these functions are available in Advanced Diary menu in system tray:
Note:
The stickers content is available only for reading.
© 2021 CSoftLabWorking with Advanced Diary 41
2.15 Advanced Diary - Print
To print your entries, click the "Print" button or use the Ctrl + P shortcut.
A print dialog box will appear:
Select the information to be printed. Besides that, you can select a print template here. If you want to
create or edit a print template, click an appropriate button below the templates list.
Please, see the Creating and editing print templates topic for more information.
After setting all desired options, click the "OK" button. "Print Preview" window will be opened.
2.16 Creating and editing print templates
In order to create or edit a print template, select a desired template in the "Print" window and press the
Edit button or the Add button below the templates list if you want to create a new template:
© 2021 CSoftLab42 Advanced Diary Help
After you do that, the "Template Editor" window will open:
© 2021 CSoftLabWorking with Advanced Diary 43
The upper part of the window contains buttons for working with text (selecting font, alignment, insertion
and so on). To learn more about using these buttons, see the Working with text topic. In addition, some
new options have been added. They are described below.
Template Name: Name of the template that will be displayed in the template list in the print window
(required).
Report Header: This field is used to create report header, which will be located at the top of the first
page. You cannot insert field values here, you can insert only field names.
The Report Header field may contain any information you would like to place in the beginning of the
report. For example, report name, pictures or field names (in case you want to print a table record with
column names on top and values below).
Report Detail: This field is used to select all records that contain information to be printed. Accordingly,
during printing, information from this field will be repeated for each selected record. For example, if you
print one record, the information from Report Detail will be included in the report only once; if there are 10
records, Report Details will be repeated 10 times.
This is where we recommend you place field values. Besides this, you can place here any information,
like texts, images and so on. Just keep in mind that when the report is created, the field is repeated.
Report Footer: This field is used to create the bottom part of your report. It will be located at the
bottom of the last page. As with Report Header, you cannot insert field values here, you can insert only
field names.
The Report Footer field can be used to place any information you would like to see at the bottom of the
printed report text, images and so on.
How to add special information:
Button "Report Title" ("Insert Report Title" main menu item) is intended for quick insertion of the
Report title. This feature is specially created for international users, because if the text is entered
manually, another user who has different language settings won't be able to read it (the text won't be
translated).
When the Report Title button is used to insert the report title, it is highlighted with pink. This is done to
make the inserted title stand out from the rest of the text. This highlighting is not visible during printing.
You can change the title parameters font size, color, etc. The only limit is that you can not edit the text
of the title. If you try to do this, you will get error message when trying to save or preview the report.
Button "Field Name" ("Insert Field Name" main menu item) is used to insert database field name into
report. When you press the button, you will see the dialog window, which contains all available field
names:
© 2021 CSoftLab44 Advanced Diary Help
Select field name you would like to insert and press "OK".
Just like with the Report Title, you can enter the name manually, but it will not be translated when the
default language of the program is changed. The inserted field name is highlighted with green to be
visible in the surrounding text. This highlighting wont be visible after printing.
You can change the insertion parameters font size, color, etc. The only limit is that you can not edit the
text of the inserted element. If you try to do this, you will get error message when trying to save or
preview the report.
Button "Field Value" ("Insert Field Value" main menu item) is used to insert database field value into
report.
When you press the button, you will see the dialog window that contains all available fields:
Select the name of the field, which value you would like to insert and press "OK".
© 2021 CSoftLabWorking with Advanced Diary 45
You can not enter the value manually, because it wont be recognized during processing and the value
from the corresponding field wont be inserted from the record.
The inserted field value is highlighted with blue to make it visible in the surrounding text.
You can change the insertion parameters font size, color, etc. The only limit is that you can not edit the
text of the inserted element. If you try to do this, you will get error message when trying to save or
preview the report.
Some advice for creating print templates:
In order for your report to look good and be easy to read and comprehend, we recommend you to place
field names and values in the table cells. This way the text in the report will be aligned. If you want the
table not to be visible in the final report, you can alter table parameters, setting the width of table and
cell borders to 0 or by selecting white color for them (see "Working with text").
When preparing a report, Advanced Diary automatically merges tables present in Report Header, Report
Detail and Report Footer into one table (if the tables are present). This is done to make editing the
report easier and to avoid double borders (if the tables are stacked on top of each other, the merging
borders will be thicker, because two lines will merge into one).
Important: Advanced Diary will merge tables ONLY if the number of columns and their width is
IDENTICAL.
We recommend you create one table first (for example, in Report Header), and then copy it in other
report parts. This way all tables will be absolutely identical. The color of tables, cell and borders are of
no importance.
After creating a template, you can see what the report created with this template will look like. Simply
press the "Print Preview" button ("File - Print Preview" main menu item). The preview window will be
opened and you will see a report prepared for printing (see Previewing and printing report topic).
The settings from the print window will be used for printing the report. If you selected one record only
one record will be processed; if you selected a group of record, the entire group will be included into the
report.
To save your print template, press the "Save" button ("File - Save" main menu item) and enter template
name.
2.17 Previewing and printing report
Advanced Diary print preview window looks like this:
© 2021 CSoftLab46 Advanced Diary Help
You can not only preview the report - you can edit the report that has already been created as well!
To get detailed information about editing text, see the "Working with text" topic.
If you click the "Save" button ("File - Save" main menu item), you can save the report as HTML or RTF
file.
To print the document, click the "Print" button ("File Print" main menu item).
To see how the printed report will look like, click the "Print Preview" button ("File Print Preview" main
menu item).
© 2021 CSoftLabWorking with Advanced Diary 47
To set the print page parameters, click the "Page Setup" button ("File Page Setup" main menu item).
Page setup dialog window will appear:
© 2021 CSoftLab48 Advanced Diary Help
This window is used to set up margins for printing as well as to create header and footer. Color and
alignment of headers and footers can be changed.
To set paper orientation, press the "Paper" button.
2.18 Program's options
2.18.1 Keyboard Shortcuts
You can configure keyboard shortcuts for any menu item in the program. Click the "Tools - Shortcuts"
main menu item and you will see a dialog box with shortcuts options:
© 2021 CSoftLabWorking with Advanced Diary 49
To add or edit a shortcut, select it in the list, go to "Shortcut for selected command" area, and press
new key combination. If this shortcut is already in use, you will see a notification below the key
combination area.
For your convenience, we've added a function to find menu items by caption. Just enter menu item name
in the "Text to find" area and click the "Find" button.
All menu items are divided to 2 global categories: General (all program's commands) and Text Editor
(all text editor commands).
To reset shortcuts to default predefined values, click "Default" button.
© 2021 CSoftLab50 Advanced Diary Help
2.18.2 General options
The General Options window looks like this:
Run Advanced Diary at Windows startup - allows or forbids the automatic program launching upon
Windows startup.
Show splash screen at startup - turns on/off the function of showing the splash screen at Advanced
Diary startup.
Add icon to system tray - if this option is active, the Advanced Diary icon will be added to system tray.
Minimize to system tray - when this option is on, Advanced Diary will minimize to system tray when
you minimize the main window.
Minimize to system tray on close - when this option is turned on, Advanced Diary will minimize to
system tray when you close the main window. Otherwise Advanced Diary will be closed if you close the
main window.
Hotkeys to call up the program - here you can enter the keys which call up Advanced Diary from the
system tray.
Confirm before saving an entry - if this option is active, a dialog box with the confirmation request will
appear before saving changed entry.
© 2021 CSoftLabWorking with Advanced Diary 51
Confirm before deleting an entry - if this option is active, a dialog box with the confirmation request
will be shown before moving selected record into the "Deleted Items" folder:
or before permanently delete it from the database:
Automatically check for updates - when this option is on, Advanced Diary will connect to http://
www.csoftlab.com website and notify you, if the new version is available. You can also check for updates
manually by clicking the "Help - Check for updates" main menu item.
2.18.3 Additional options
The Additional Options window looks as following:
© 2021 CSoftLab52 Advanced Diary Help
The additional options mode allows to set up where Advanced Diary will keep the program settings.
You can choose one of these options:
Save settings in Windows registry - all program settings will be stored in Windows registry.
Save settings in INI file - when this options is on, Advanced Diary works in portable mode. You can
copy or install it on any removable storage device and then use on any computer.
Also in this window you can change the Stickers initial color. There are two options available: you can
select Random color - in this case C-Organizer will use one of 15 predefined colors, or you can select
one static color.
Use proxy - turn this option on and set up Address and Port, if you would like to use a proxy-server.
This option will be used for Updates Checker. If necessary you can set up authorization credentials:
User Name and Password.
2.18.4 Backup options
The Backup Options window looks as following:
© 2021 CSoftLabYou can also read