2019 QUICK START MANUAL - TAXSLAYER
←
→
Page content transcription
If your browser does not render page correctly, please read the page content below
2019
Quick Start Manual
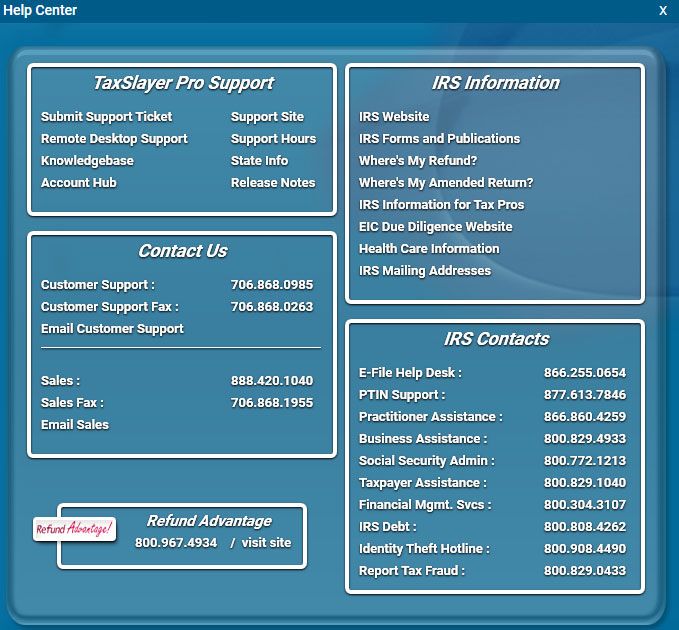
Table of Contents

Tax Brackets for 2019......................................................................................................................... 1

Filing Season Changes for 2019 Tax Returns………………………………………………………………………………….2

2019 Filing Season Security Requirements ........................................................................................ 4

Technical and Customer Support Options ......................................................................................... 6

System Requirements ........................................................................................................................ 8

Installing TaxSlayer Pro ...................................................................................................................... 9

Initial Configuration ........................................................................................................................... 10

Network Setup ................................................................................................................................... 13

Configuration of Workstation Computers ......................................................................................... 14

TaxSlayer Pro Main Menu .................................................................................................................. 16

Toolbar Icons ...................................................................................................................................... 18

Creating a Tax Return......................................................................................................................... 21

Electronic Filing .................................................................................................................................. 23

E‐Filing a Tax Return .......................................................................................................................... 24

Receiving Acknowledgements ........................................................................................................... 26

Printing a Tax Return.......................................................................................................................... 27

Program Updates ............................................................................................................................... 28

Tax Office Checklists .......................................................................................................................... 30
2018/2019 Federal Tax Rate Schedules

                                         Single
        2018                  2018                      2019                 2019
  Marginal Tax Rate      Taxable Income           Marginal Tax Rate     Taxable Income
        10%                $0—$9,525                    10%                $0‐$9,700
        12%             $9,526—$38,700                  12%            $9,701—$39,475
        22%             $38,701—$82,500                 22%            $39,476—$84,200
        24%            $82,501—$157,500                 24%           $84,201—$160,725
        32%            $157,501—$200,000                32%           $160,726—$204,100
        35%            $200,001—$500,000                35%           $204,101—$510,300
        37%             $500,001 or more                37%            $510,301 or more
                                  Head of Household
        2018                  2018                      2019                 2019
  Marginal Tax Rate      Taxable Income           Marginal Tax Rate     Taxable Income
        10%               $0—$13,600                    10%               $0‐$13,850
        12%             $13,601—$51,800                 12%            $13,851—$52,850
        22%             $51,801—$82,500                 22%            $52,851—$84,200
        24%            $82,501—$157,500                 24%           $84,201—$160,700
        32%            $157,500—$200,000                32%           $160,701—$204,100
        35%            $200,001—$500,000                35%           $204,101—$510,300
        37%             $500,001 or more                37%            $510,301 or more
                      Married Filing Jointly / Qualifying Widow(er)
        2018                  2018                      2019                 2019
  Marginal Tax Rate      Taxable Income           Marginal Tax Rate     Taxable Income
        10%               $0—$19,050                    10%               $0‐$19,400
        12%             $19,051—$77,400                 12%            $19,401—$78,950
        22%            $77,401—$165,000                 22%           $78,951—$168,400
        24%            $165,001—$315,000                24%           $168,401—$321,450
        32%            $315,001—$400,000                32%           $321,451—$408,200
        35%            $400,001—$600,000                35%           $408,201—$612,350
        37%             $600,001 or more                37%            $612,351 or more
                               Married Filing Separately
        2018                  2018                      2019                 2019
  Marginal Tax Rate      Taxable Income           Marginal Tax Rate     Taxable Income
        10%                 $0‐$9,525                   10%                $0‐$9,700
        12%             $9,526—$38,700                  12%            $9,7011—$39,475
        22%             $38,701—$82,500                 22%            $39,476—$84,200
        24%            $82,501—$157,500                 24%           $84,201—$160,725
        32%            $157,501—$200,000                32%           $160,726—$204,100
        35%            $200,001—$300,000                35%           $204,101—$306,175
        37%             $300,001 or more                37%            $306,176 or more

                                           1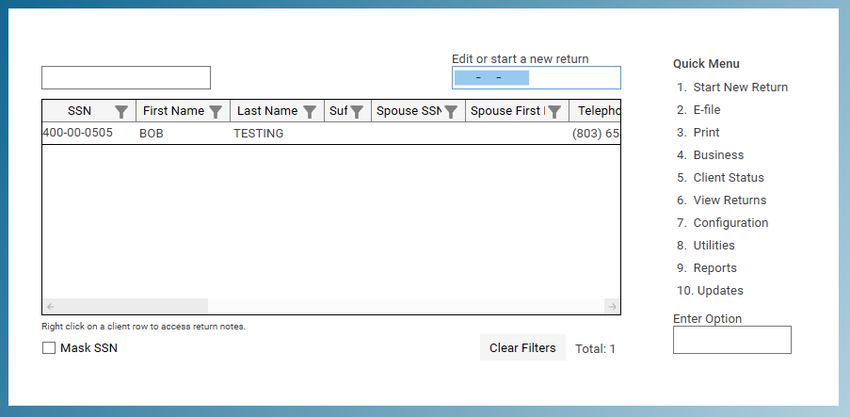
Filing Season Changes for 2019 Tax Returns

Form 1040‐SR U.S. Tax Return for Seniors – New for 2019 returns, taxpayers aged 65 and over will have
the option to file on new Form 1040‐SR. The new form has a larger font size making it easier to read.

Redesigned Form 1040 Schedules – For 2019 returns, the six (6) Form 1040 supplemental schedules
have been redesigned and condensed into three (3) schedules.

Standard Deduction – The standard deduction has increased slightly for all filing statuses. For 2019, the
standard deduction amount will be $12,200 for Single and Married Filing Separate filing statuses,
$18,350 for Head of Household and $24,400 for Married Filing Joint and Qualifying Widow(er). The
additional standard deduction amount for taxpayers who are age 65 or older and/or blind is $1,650 for
Single and Head of Household and $1,300 for Married Filing Joint, Married Filing Separate and Qualifying
Widow(er). The standard deduction for a dependent filing their own return is $1,100 or $350 plus the
dependent’s earned income, not to exceed the standard deduction amount for their filing status.

Increased Schedule A Medical Expense Threshold – The threshold for medical expenses reverts back to
10% of AGI for 2019 tax returns.

Health Care: Individual Responsibility Payment – The penalty for not having health insurance no longer
applies for 2019 federal tax returns. The District of Columbia, Massachusetts and New Jersey have state
health insurance mandates and penalties for 2019.

New Qualified Business Income Deduction Forms 8995 and 8995‐A – Taxpayers with Qualified Business
Income, Qualified Real Estate Investment Trust dividends or qualified income from a Publicly Traded
Partnership will use Form 8995 or 8995‐A to figure the amount of their QBI deduction.

Increased Income Thresholds for the Qualified Business Income Deduction – For 2019 returns, the
income thresholds for the QBI deduction increase to $321,400 for MFJ taxpayers, $160,724 for MFS
taxpayers and $160,700 for all other filing statuses.

Alimony Deduction Eliminated – For divorce decrees signed after 12/31/2018 that require alimony
payments, the payer will not cannot take a deduction for payments made. In addition, the recipient is
not required to claim payments received as income on their return.

Increased 401(k) Contribution Limits – For 2019, 401(k) contribution limits increased to $19,000 with a
$6,000 catch‐up amount for taxpayers over age 50.

Increased IRA Contribution Limits – For 2019, IRA contributions limits increased to $6,000 with a $1,000
catch‐up amount for taxpayers over age 50.

Increased AMT Exemptions – AMT exemptions have increased for 2019 making fewer taxpayers subject
to the tax. For 2019, the AMT exemption amount will be $71,700 for Single taxpayers, $111,700 for
Married Filing Joint taxpayers, $55,850 for Married Filing Separate taxpayers and $25,000 for Estates &

                                                   2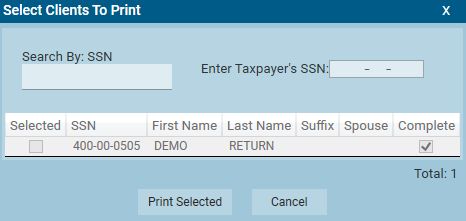
Trusts.

Increased HSA Contribution Limits – For 2019, HSA contribution limits have increased to $3,500 for
taxpayers with self‐coverage and $7,000 for taxpayers with family coverage.

                                                  3
IRS, State Tax Agencies and Tax Industry Partners Expand Identity Safeguards for 2019 Filing
Season
For the fourth year, the IRS, state tax agencies and leaders of the tax industry have partnered to enact a
series of defenses against identity and refund fraud. The public‐private Security Summit partnership has
put an additional safeguard in place for the 2019 filing season to further combat identity theft and tax
refund fraud.
TaxSlayer Pro is committed to ensuring the data and privacy of its valued customers are protected and
has put into place additional security features as outlined by the Security Summit Initiative for the 2019
program and TaxSlayer Pro Account Websites.
IRS EFIN Tracking Number – In order to comply with the IRS and industry partners’ efforts to prevent
fraud and tax related identity theft, TaxSlayer Pro must verify the EFIN of each professional customer.
The verification process must be completed for each EFIN in order to electronically file returns in 2020.
You will need to obtain your IRS EFIN Tracking Number from your IRS e‐Services account and enter it
into your TaxSlayer Pro Account. The number will be either a 16 or 20‐digit number and must be entered
in the Company Information section of your My Account/Account Hub before electronically filing tax
returns this tax season.
Video instructions for obtaining your EFIN tracking number from your IRS e‐Services account can be
viewed here. Instructions can also be found in the TaxSlayer Pro Knowledgebase by searching the
keywords tracking number.
Multi Factor Authentication – For the third year, multi factor authentication (MFA) is required for
all TaxSlayer cloud‐based applications and account websites. MFA is a security system used to
control program access. Accessing online TaxSlayer accounts will require two forms of
authentication and must be completed for all devices and Internet browsers. One factor of
authentication is your account password; the second is a six‐digit code sent to your cell phone
or e‐mail address when you attempt to log in to your My Account/Account Hub. If entered
correctly, your identity is considered verified and you will be granted access to the software or
account.
The authentication process must be repeated periodically and must be completed per device
and per internet browser.
EFIN Validation Code ‐ The IRS has mandated that an EFIN Validation Code be entered in the software.
The EFIN Validation Code is a 12‐digit code unique to your EFIN. The EFIN Validation Code will be
transmitted with each tax return that you e‐File. The IRS will use the code to verify that returns
transmitted using the EFIN are originating with the owner of the EFIN. Your EFIN Validation code can be
found by logging in to your TaxSlayer Pro My Account/Account Hub and selecting Account History >
Payment History > View. Below your 2019 Software Purchase Order Number, your EFIN Validation Code
will be displayed. You can manually enter the Validation Code or copy and paste it into the space
provided in the Firm Information Menu.
4ADMIN Account – The 2019 TaxSlayer Pro program includes a set of predefined security roles. Roles will
be used to set permissions for each preparer. The program includes a pre‐defined default ADMIN
Account Role which is used to manage permissions for preparers as well as manage preparer usernames
and passwords. The ADMIN Account Role cannot be edited. The ADMIN Account username is ADMIN.
During the initial configuration of the program, the you will be prompted to create a password and a
security question and answer for the ADMIN account.
Usernames – Each preparer using the software must log into the program using a unique username and
password. During the initial configuration of the program, you will be prompted to assign (or pull
forward from the prior year’s software) a unique username for each preparer entered in the Preparer’s
Menu.
Passwords – Each preparer associated with your firm must use their assigned username and a strong
password to access the tax program. When a preparer logs into the software for the first time with their
assigned username, they will be prompted to create a password and a security question and answer.
Passwords are required to expire periodically and must be reset every 180 days.
5Technical and Customer Support Options
When it comes to needing answers, TaxSlayer Pro has you covered. We are committed to providing you
the best technical and customer support in the industry. Our support team is ready and willing to help
answer any questions you may have about the operation of the program. In addition to our award‐
winning support team, we have created several avenues of information that will help you easily find the
answers to your questions.
Help Center – The Help Center can be accessed by selecting Help > Help Center from any menu within
TaxSlayer Pro. This is a great resource for locating important phone numbers, pertinent IRS websites,
and TaxSlayer Pro Support resources:
6Support Ticket – If you need Technical Support to assist you with setting up your network, trouble‐
shooting a printer, data conversion to a new computer, or help with anything technical related to
TaxSlayer Pro, simply create a Support Ticket for one of our Tier II Technical Support Agents to call you
back.
TaxSlayer Pro Knowledge Base ‐ The Knowledge Base contains hundreds of articles pertaining to the
operation and navigation of TaxSlayer Pro. If you have questions on how to perform certain tasks within
the program, you will most likely find your answers here. In addition, the Knowledge Base will give you
specific information about a menu you are currently viewing in the program. For example, if you are
preparing a Schedule C and you have a question, you can select the Help icon at the top of the screen to
view articles specific to the Schedule C.
Instructional Videos – Sometimes it’s better to visualize a task; that’s why we created our instructional
support videos. The support videos can be found under ‘Customer Resources > Educational Portal’ on
the TaxSlayer Pro website. These videos cover the fundamentals of TaxSlayer Pro. If you are new to
TaxSlayer Pro or if you have new preparers in your office, the support videos are a great place to start
learning more about operating the program. https://www.taxslayerpro.com/education/index
Email Support ‐ If you have a question that is not covered in our available resources, send our customer
support staff an email. Use the email link located in the Help Center section of the program. Enter the
required information on the email form and describe your question in detail. Your email will be
responded to as soon as possible. Our support email address is prosupport@taxslayerpro.com.
The TaxBook Web Library – TaxSlayer Pro has partnered with the best fast‐answer tax reference
solution – The TaxBook. All current customers of TaxSlayer Pro are offered The TaxBook at a significant
discount off the retail price. With the complexity of federal and state tax laws and the ever‐changing tax
code, having a reliable resource to help you find the answer to the tough tax questions is critical for your
business. You can purchase The TaxBook Web Library by logging in to your My Account/Account Hub
and selecting the Partner’s Program tile. Once you purchase the program, your TaxSlayer Pro software
will automatically add the TaxBook Library to the toolbar at the top of the screen.
Pro Support Blog – The Pro Support team has launched a blog that can be accessed from the TaxSlayer
Pro Website. Check the blog often for the latest news and pertinent information from the IRS, State
Agencies and TaxSlayer Pro. Subscribe to the blog to have all published posts delivered directly to your
email inbox.
7System Requirements
Recommended System Requirements:
Computer – Processor with a minimum PassMark score of 7500 for the transmitting computer or a
minimum score of 5000 for a workstation (https://www.cpubenchmark.net/)
Operating System – Windows 8, 8.1, or 10 (Note: Windows 7 and Windows 10S are not supported)
Memory – 8 GB RAM
Disk Space – 1GB per tax year will be sufficient (Additional disk space may be needed if you have a large
client database and utilize the Paper Cut paperless office)
USB or Flash Drive for backing up data (USB 3.0 or higher strongly recommended)
Printer – HP Compatible Laser Printer (Inkjet printers are not recommended for check printing)
Screen Resolution – 1024x768
Internet Connection – High Speed Internet Connection – Internet Explorer 11, or the latest version of
Chrome or Firefox
Latest Version of Adobe Acrobat Reader
Latest version of Microsoft .NET Framework
Minimum System Requirements:
Computer – Processor with a minimum PassMark score of 3000 for the transmitting computer or a
minimum score of 2500 for a workstation (https://www.cpubenchmark.net/)
Operating System – Windows 7 with the latest updates (Note: Windows 10 S is not supported)
Memory – 4 GB RAM
Disk Space – 750MB per tax year
Printer – HP Compatible Laser Printer (Inkjet printers are not recommended for check printing)
Screen Resolution – 1024x768
Internet Connection ‐ High Speed Internet Connection ‐ Internet Explorer 11, or the latest version of
Chrome or Firefox
Latest Version of Adobe Acrobat Reader
Latest version of Microsoft .NET Framework
Requirements for Scanners:
Scanners used with the PaperCut program should be TWAIN and/or WIA compliant.
*Caution – TaxSlayer Pro should not be installed on any computers running Windows 95, 98, ME, NT,
2000, or XP, Vista, 7 or Windows 10S. Microsoft has ended all support for these operating systems and
therefore the programming languages used to develop TaxSlayer Pro are no longer compatible with
these versions of Windows. In addition, TaxSlayer Pro is not compatible with Mac computers. Windows
10S is designed to only run Microsoft Store applications; therefore, it cannot run TaxSlayer Pro desktop.
8Installing TaxSlayer Pro
Step 1: Close all software applications. If you have anti‐virus software running, you should temporarily
disable it before installing TaxSlayer Pro. To disable your anti‐virus software, right‐click on the anti‐virus
software icon – this will bring up a dialog box to temporarily “Disable” or “Exit” the anti‐virus software.
Your anti‐virus software will reactivate when you restart your computer.
Step 2: Log in to your TaxSlayer Pro My Account/Account Hub by going to www.taxslayerpro.com and
selecting ‘Login’ from the main page. Enter your username and password. If prompted to authenticate,
follow the onscreen process to access your Account. Select 2019 and click the DOWNLOAD button on
the Software Options tile to download the program.
Step 3: Depending upon your browser, the download file will either be listed in the top right corner
under the ‘Down Arrow’ icon (FireFox), bottom left corner (Chrome), at the bottom highlighted in yellow
(Internet Explorer), or in a white box at the bottom of the screen (Edge). Once the download is
complete, choose either ‘Open’ or ‘Install’ to begin the installation process.
Step 4: License Agreement – Please read the TaxSlayer Pro software license agreement. If you agree to
the terms set forth in the license agreement, choose “I accept the terms of the license agreement” and
click ‘Next’. The license agreement can be printed by selecting the ‘Print’ button. If you do not agree to
the terms set forth in the license agreement, select Cancel and do not install the software. Contact
TaxSlayer Pro Sales for further information.
Step 5: Select the Installation Drive – Select the drive that you would like to install the program on.
TaxSlayer Pro should be installed on your local hard drive, usually the ‘C’ drive in most cases. Select
‘Next’ after making your selection. The next menu will give you the option to continue with the
installation of TaxSlayer Pro by selecting ‘Install’.
Step 6: The program will begin the installation process which may take several minutes depending on
the speed of your computer. Once the installation is complete, select ‘Finish’.
Step 7: After installation, a 2019 TaxSlayer Pro icon will be placed on your desktop. Double‐click the icon
to begin the initial configuration of TaxSlayer Pro. For step by step instructions on initial configuration of
the program, click here.
9Initial Configuration
Step 1: Start the Program – Double‐click the TaxSlayer Pro Icon. You will be greeted with a TaxSlayer Pro
message advising you of the information that will be entered during the initial program configuration.
(For additional information, click the "TaxSlayer Pro Quick Start Manual" link.) Press Enter or select OK.
A summary of program security information displays next. Read each section carefully. When finished,
press Enter or select OK.
Step 2: Network Setup What does it mean for TaxSlayer Pro to be used in a network?
If more than one computer in a location will be used to prepare tax returns, and you wish to allow a
preparer to work on any return they have permission to access from any computer, you will be using
a Network.
If only one computer in a location will be preparing tax returns, or you will have more than one
computer prepare returns but each computer and preparer will stand alone, creating and editing
their own returns, you will NOT be using a Network.
If there is not a previous year's installation of TaxSlayer Pro on this computer, you will be asked if you
will be using a network. Select YES or NO as appropriate.
If TaxSlayer Pro is already installed on this computer from the previous tax season, you will be asked if
you would like to use the same network configuration as last year.
If you are not using a network and didn't use one last year, select YES.
If you are using a network and want to use the same settings as last year, select YES.
If your office setup has changed from last year, either a change to using or not using a network, or if
the transmitting computer — which is also typically the computer designated as the file server — has
changed, select NO and refer to the Network Setup section below for more information.
Before moving along, you will be presented with the network configuration to confirm the settings
chosen. One caveat: If "File Server?" = NO, the "File Server Address" information should not be the same
as the "Local Computer Name" and "Local IP Address" information.
If you are using a network, note that if you are installing the program on a computer not designated as
the File Server (aka "a Workstation"), many of the following questions will be skipped as the required
information will be pulled from the File Server.
Step 3 – Firm Information – At this screen, simply fill in all of the required information.
Tip – When entering the name and address of your firm, do not enter characters such as apostrophes,
commas, periods, etc. If you enter any of these characters by mistake, the program will prompt you to
remove them before continuing.
The IRS requires that your unique EFIN Validation Code be entered in the software. Your EFIN Validation
code can be found by logging in to your TaxSlayer Pro Account Hub:
Log in to Account Hub.
10 Click Account History in the left side menu.
Under Payment History, click View
Note the 12‐character code beginning with "7Q" on the line for this year's software purchase:
Store Purchase ‐ Order #1xxxxx | Receipt
EFIN validation code 7Qxxxxxxxxxx. You will need to enter this into your 2019 Software.
You can copy the code off the screen and paste it into the space provided, or you can manually key it in.
Once you have finished entering the firm information, select Exit.
Step 4: Create the Administrator Account Password
The Administrator account username is ADMIN. The ADMIN account is used to manage firm, ERO,
and preparer information as well as preparer security roles. The ADMIN account does not prepare
tax returns, and the username cannot be changed, nor can any of its security role or other settings
be changed.
You will be prompted to create a password for the ADMIN account. The password must be between
8 and 30 characters in length, and it must contain:
at least one uppercase letter,
at least one lowercase letter,
at least one number, and
at least one special character, such as $, @, !, #, etc.
(NOTE: These are the same password requirements for preparers.) You will also be prompted to
create a security question and answer for the ADMIN account. The security question is used in the
process of changing the ADMIN password to verify that the user attempting to change the
password has permission to do so.
Step 5 – Step 5: Enter/Edit Preparers
If TaxSlayer Pro 2018 is installed on your computer, you will be prompted with a question asking to Pull
Preparers from Prior Year. If you would like to pull the preparers forward, select YES. Once the preparers
have been pulled forward, you can edit the information pertaining to each preparer if needed, delete
obsolete preparers, and add new preparers.
NOTE: Each preparer's username, password and assigned security role are pulled forward from the
previous year. Any of these settings can be modified from the Preparer Setup Menu.
Adding New Preparers
If you do not pull forward preparers from the prior year, you will be given the option to enter preparers.
To enter a preparer:
Select New
Enter a Preparer Code. A unique preparer code must be assigned to each preparer entered. You can
use any number from 1 to 999999.
Enter the preparer’s SSN, PTIN, first name, middle initial, and last name.
11 Enter a username that the preparer will use to log into the program. Each preparer has a unique
username. The preparer will create their own password and security question when they log into the
program for the first time.
Select OK to proceed to the Preparer Edit Menu. The Preparer Edit Menu gives you the option to add or
change several other items:
Preparer Practitioner PIN (the 5‐digit PIN that populates to federal and state e‐file signature forms);
Preparer Hourly Rate (if you are using hourly billing);
Preparer Prep Fee Commission % (if preparers earn a commission based on a return's prep fees);
Preparer E‐File Fee Commission % (if preparers earn a commission based on a return's e‐file fee);
The preparer’s power of attorney information (if the preparer is an Acceptance Agent);
Indicate if the preparer is supervised, in which case their supervisor's information will appear on tax
returns rather than the preparer's information;
The preparer firm information, if it is different from your firm information;
The preparer's security role and specific security settings, as well as clearing their password and
security question to be recreated upon their first (or next) login.
Newly added preparers are assigned the default security role “Super User.” A Super User has access to
all tax returns and all areas of the program except firm, ERO, and preparer Information, and security
roles settings. To change the preparer's default security role, select
Preparer Security
Role
Step 6 – Bank Setup
The following banks are affiliated with TaxSlayer Pro:
EPS Financial
Refund Advantage
Refundo
Republic Bank
River City Bank
Santa Barbara TPG.
If you will be offering bank products, we encourage you to complete and submit a bank application in
Account Hub as early as possible. For more information about these banks, click here.
If you are already approved with one or more banks, the bank(s) should appear in the Banks window. If
you do not see your approved bank, please contact TaxSlayer Pro Sales.
Once the bank has been selected, you will be shown a menu with bank product options such as
advances, pre‐ack advances, and the use of debit cards. If the bank has approved you for any of the
options shown, select the option and when queried select YES so the option will be available to present
to your client when finalizing their return. NOTE: A disbursement or advance option will not be available
in a return if it hasn't been selected here.
12Step 7 – Fee Setup Menu – The amounts specified in the Fees Menu are used to calculate the tax return
preparation fee that appears on the Client Invoice. If you used TaxSlayer Pro last year, or you entered
fees in the TaxSlayer Pro demo program, you can pull the fees forward by selecting the Pull Prior Year
Fees button. To change a fee or to enter a new fee, select the line for the form and enter the fee.
If you charge by the hour, check the Charge by the Hour check box in the lower left‐hand corner of the
screen. Custom Fees and Custom Discounts can also be created from the Fees menu. Select
the Exit button when you have finished configuring your fees.
Step 8 – Client Letters – You will be prompted to pull from the prior year each customizable client letter.
If you made changes to any of the client letters, select YES to pull them forward, preserving the changes.
Otherwise, select NO to use the default client letters.
Step 9 – Path Menu – The settings defined within the Path Menu tell the program where prior year data
is located and the path to a secondary backup drive.
Prior Year ‐ The prior year path will only need to be changed in unusual situations, and if it is incorrectly
specified you will not be able to pull prior year client data forward into the current year's return. If your
prior year data is stored on a drive other than the drive the current TaxSlayer Pro program is installed
on, the Prior Path location will need to be changed. To change the location, select Prior Path and
enter the absolute DOS path, i.e., the drive letter followed by a colon plus the directory location on the
drive with each directory separated by a backslash, e.g., E:\TAXSLAYER\2019NET\. If you need
assistance, please call TaxSlayer Pro Technical Support.
Secondary Backup Path ‐ A secondary backup can be specified here if desired. This backup is generally
to a removable drive, such as a thumb drive or external hard drive. (Secondary backup to a cloud
location is not supported.) To set up a secondary backup path for your tax returns, do the following:
Plug the drive into the computer
Select Secondary Backup Path and select the drive letter for the drive.
Two caveats about the secondary backup drive if you have one specified here:
The drive must be plugged into the computer when working on returns. If it is unplugged, you will
receive an error message when exiting a return that the return could not be saved to it.
Only return data is backed up. PDFs of the return as well as supporting documents, such as driver's
license images, aren't saved.
Step 10 – MACRO Setup – A macro, by definition, is a shortcut to a task you do repeatedly. In TaxSlayer
Pro, macros reduce the number of keystrokes by allowing you to select an entity from a list or to
complete name and address fields simply by entering the EIN. TaxSlayer Pro maintains six macros:
W‐2 employers and 1099 payers
K‐1 entities
Child Care Providers
Interest and dividend payers
Charitable organizations
13 Banks
To pull forward prior year macros, or enter new ones, select YES when queried. You will be asked about
pulling forward each of the six macros and will be given the opportunity to add to or edit each list if
desired. Select Exit at the bottom of each list to proceed to the next macro list. All of these lists can be
revisited after the program has been installed.
Step 11 – TaxSlayer Pro Premium – If you purchased TaxSlayer Pro Premium, enter the activation code.
The activation code can be found by logging in to your TaxSlayer Pro Account Hub:
Once you have logged in, click Pro Premium in the left side menu.
Copy and paste the 9‐digit activation code into the program, or type it in.
The program will guide you through the process of configuring premium features. If prompted to use
prior year settings for PaperCut e‐mail, select YES. Otherwise enter your email address when prompted.
The email method will default to TaxSlayer Pro and should not be changed unless required for your
particular office network. For a description of other email options, visit the TaxSlayer Pro
Knowledgebase and search for keywords “Premium Options.”
Several other premium options can be configured from the Premium Configuration Menu. Visit the
TaxSlayer Pro Knowledgebase and search for keywords “Premium Options” for detailed information on
all the Premium features. If you would like to upgrade to TaxSlayer Pro Premium and take advantage of
the Taxes to Go Mobile App, online client status, text messaging, and PaperCut, contact TaxSlayer Pro
Sales at 1.888.420.1040.
NOTE: If you upgrade to TaxSlayer Pro Premium subsequent to installing the program, activate it within
TaxSlayer Pro by selecting from the Main Menu:
Configuration
Configure Premium Options and enter the activation code.
To activate Paper Cut, change “Use Paper Cut Paperless Office Option” to YES. To activate the Text
Messaging feature, change “Send Text Message to Clients” to YES.
Step 12: Exit Configuration
Before exiting the final window headed "Software Installed!", check the date, time, and time zone on
your computer to ensure they are correct. If the date and time are not correct, the program will not be
able to communicate with our server. Adjust the date by clicking the time and date display in the
Windows taskbar, typically at the bottom right‐hand corner of the screen.
14Network Setup
Setting up the TaxSlayer Pro network takes only a few minutes if your office network is already working
properly.
IMPORTANT – If your office network is not set up or is not functioning properly, our TaxSlayer Pro
technicians will not be able to assist you in setting up the TaxSlayer Pro network. Contact your local
network technician for assistance.
Here are a few items to consider when setting up the TaxSlayer Pro network:
The TaxSlayer Pro Network operates in a peer‐to‐peer environment. This means that the TaxSlayer
Pro program must be installed on each computer in your office. The program cannot be installed on a
central file server and distributed across the network.
Make sure that File and Printer Sharing is enabled within your anti‐virus program. Some newer anti‐
virus programs will block file sharing on networks.
If you are not familiar with the information listed above or are encountering problems, we suggest
contacting a local network or computer technician to assist with the network setup.
In TaxSlayer Pro, only one computer is designated as the File Server and only one computer should be
designated as the Transmitting Computer. The simplest and easiest to manage setup is for the same
computer to handle both functions.
During initial configuration of the program, you will be asked if this computer is the File Server.
Select YES or NO as appropriate. You will then be asked if this is the Transmitting Computer.
Select YES or NO as appropriate.
To return to the network settings menu after initial configuration, from the Main Menu of the TaxSlayer
Pro select
Configuration
System/Network Configuration Menu
Logging In
ADMIN Account – The Administrator account username is ADMIN. The ADMIN account is used to
manage firm, ERO, and preparer information as well as preparer security roles. The ADMIN account does
not prepare tax returns, and the username cannot be changed, nor can any of its security role or other
settings be changed.
During the initial configuration of the program, you are prompted to create a password and a security
question and answer for the ADMIN account. Store this information securely as it may be necessary to
log in as ADMIN at a subsequent point in time.
Usernames – Each preparer using the software logs into the program using a unique username and a
password. During the initial configuration of the program, you will be prompted to assign (or pull
forward from the prior year’s software) a username for each preparer entered in the Preparer’s Menu.
Passwords – Each preparer associated with your firm must use their assigned username and a strong
password to access the tax program. A preparer's password and security question and answer aren't
15assigned in the Preparer Security menu. Rather, when a preparer logs into the software for the first time
with their assigned username, they will be prompted at that time to create a password and a security
question and answer.
Passwords will expire and need to be reset every 180 days.
NOTE: If you are not prompted to log in when you start the program, the program is experiencing a
problem and we recommend that you contact support immediately.
Security Roles
The TaxSlayer Pro program includes a set of predefined security roles. Roles are used to set permissions
for each preparer. Newly added preparers are defaulted to the security role "Super User." A Super User
has access to all tax returns and all areas of the program except firm, ERO, and preparer information,
and the security roles settings. To change a preparer's security role, from the Main Menu of TaxSlayer
Pro select:
Configuration
Firm/ERO/Preparer Setup
Preparer(s) Menu
Select Preparer
Preparer Security
Role
Choose the desired Role
16TaxSlayer Pro Main Menu
Navigating through the TaxSlayer Pro Main Menu is relatively easy. The center of the screen displays
your list of clients. The Quick Menu options to the right of the client list take you directly to the most
common tasks performed within TaxSlayer Pro. The ten Quick Menu options are described below:
1: Start New Return – Start a new tax return or select an existing return to edit.
2: E‐File – Transmit tax returns, receive acknowledgements, and print bank checks.
3: Print – Print copies of Individual Returns and Individual Extensions. Print organizers for the current
year or a prior year. Print blank forms.
4: Business – Start a new business return or edit an existing business return. E‐File Business Returns and
Extensions, Receive Business Acknowledgements, Print Business Returns and Organizers.
5: Client Status – Check the current e‐File and refund status for your clients. Information in the Client
Status module includes when the return was accepted or rejected, bank approval status, check status,
fees paid, and basic return information.
6: View Returns – View client returns. Select a client and pick a form to view from the list of completed
forms and schedules.
7: Configuration – Customize TaxSlayer Pro to include print setup and preferred settings, network
settings, firm and preparer information, program security, fee setup, bank setup, etc.
To view a list of all configuration settings, visit the TaxSlayer Pro Knowledgebase and search for
keywords “Configuration Menu”.
178: Utilities – Items in the Utilities Menu include the backup and recall returns utility, Quick MFJ
Calculator, delete a tax return, and ScreenConnect. To view a list of all items contained in the Utilities
Menu, visit the TaxSlayer Pro Knowledgebase and search for keywords “Utilities Menu”.
9: Reports – Keep track of the performance of your office by running various types of reports such as
Master Report, Client Reports, and Returns / Extensions Not Accepted Reports. To view descriptions for
all reports contained in the Reports Menu, visit the TaxSlayer Pro Knowledgebase and search for
keyword “Reports”.
10: Updates – Download and install updates to the program. If you have configured automatic updates
in the Update Manager, your selected updates will download and install automatically when you open
the program for the first time each day. Updates and state programs can also be downloaded manually
through the Updates Menu.
18Toolbar Icons
The icons located at the top of each screen are called the toolbar icons. Below is a brief description of
each icon and the benefits they provide.
Knowledge Base – The knowledge base icon is a direct link to the TaxSlayer Pro database
of program related articles. The knowledge base is searchable using key words and phrases. The
knowledge base can also be accessed from anywhere in the program by pressing the F1 key on your
keyboard.
The Tax Book – We have partnered with the best tax resource site available, The Tax Book.
You can purchase a discounted online version of The Tax Book by logging in to your My
Account/Account Hub. After purchasing, you will have access to The Tax Book within the TaxSlayer Pro
software. The Tax Book can also be accessed by pressing the F3 key on your keyboard from within the
program.
Calculator – At any time you can select the calculator icon to display a calculator which
includes a tape like feature to keep track of your entries. The calculator can also be accessed by pressing
the F6 key on your keyboard from within the program.
Appointments – The Appointment Calendar allows you to enter new appointments,
create notes, and print reports to view a breakdown of the day’s events.
Client Status – Check on the e‐File and refund status of a client’s return no matter
where you are in the program.
19Messages – Throughout tax season, TaxSlayer Pro will release messages to keep you
informed. When a red exclamation point appears over the icon, you have a new message from TaxSlayer
Pro to read. Click the icon to read your messages.
Publications – We have compiled the most widely used IRS Publications, Instructions and
Fill‐In Forms and made them readily available to you through the Publications icon.
Quick Calc – The Quick Calc is a refund calculator designed to give your customer an
estimate of his or her expected refund.
Extensions – Create a new individual extension or edit an existing extension.
Client Retention – Client Retention can be used to generate two types of reports: A
Prior Year Client List and a Call/Thank You List. If you used TaxSlayer Pro in 2018, you can generate a
report of all clients that have not returned for 2019. The prior year client data is accessed by preparer
number and can be password protected to prevent unauthorized access. A Call / Thank You list can be
generated to show a list of clients who have had their returns completed for the current year.
Rejected Returns – Any returns that come back from the IRS or state as rejected will be listed
in the Rejects Utility. Double‐click on a client in the list to open the return. The list can be sorted based
on federal or state rejects and reject codes.
Notes – Selecting the notes icon from inside a client’s tax return will allow you to enter notes
specific for the client. The notes can be marked to be displayed when entering the tax return and/or
when exiting the tax return. Return notes will also pull forward in future year returns.
20View Form – The View Form feature allows you to review the form from the current menu.
This feature is available for federal forms and schedules as well as state forms and schedules.
Form Finder – The Form Finder icon will appear in any state return to help you locate a
particular form in the state return you are preparing. The Form Finder will allow you to search for a form
by name or by form number.
State Tax Info – Within each state program is a State Tax Info icon. The icon links to
information that is relevant to the state you are working in. Information includes contact information, a
Where’s My Refund link, state forms and instructions and mailing addresses.
TaxSlayer Pro Premium Icons:
The PaperCut icon is only visible for TaxSlayer Pro Premium users. Paper Cut stores PDF
copies of all tax returns, management reports, and e‐File reports that have been printed to PDF. The
Email tax returns option is also available through the PaperCut Icon.
Taxes to Go Queued App Returns – Clients who have uploaded their tax return
information from the Taxes to Go Mobile App will appear in the queued app returns menu until the
return is started.
Taxes to Go Mobile App Chat – The Taxes to Go Chat feature allows the tax preparer
and mobile app clients to send messages back and forth.
21Creating a Tax Return
Creating a tax return in TaxSlayer Pro is simple. Follow the steps below to begin a basic tax return.
Step 1 – Select Tax Returns from the Main Menu of TaxSlayer Pro. After reviewing the IRC 7216
regulations, select Yes to print the consent form. (Note: If you do not offer bank products, a consent
form will not print).
Step 2 – Enter the SSN of the Primary taxpayer and press the Enter key. A question will appear asking if
you want to create a new return; select Yes.
Step 3 – Select the appropriate filing status. Note – If this is a 1040NR return, you must make that
selection from this menu.
Step 4 – Personal Information Entry Menu – Enter the taxpayer’s personal information. You will be
prompted to enter the taxpayer’s SSN for a second time to check for accuracy.
Step 5 – After entering personal information, the program takes you to a review menu to look over the
personal information that you entered. From this menu you can mark that the taxpayer is blind,
deceased, or a student. The taxpayer’s email address, dependent on another return designation and
military information is also entered in this menu.
Step 6 – Dependent Information – If the return you are preparing includes dependents, select ‘Yes’ to
begin entering the dependent information. Select New and enter the personal information of the first
dependent. Select OK once finished. If the taxpayer paid qualifying dependent care expenses, enter the
amount when prompted. Review the dependent information on the screen and make any necessary
changes. To enter additional dependents, select New and enter the information for the next dependent.
Note – If you entered an amount paid for qualifying dependent care expenses, you will be prompted to
enter the childcare provider information. If you choose not to enter the provider information now, the
program will remind you later that this information has not been entered.
Step 7 – Health Care Coverage – The program will prompt you to answer questions about the taxpayer’s
health care coverage for the year.
Step 8 – Next you will be prompted to enter W‐2s. To enter a W‐2 select New. Enter the information
from the taxpayer’s W‐2 into the W‐2 menu. Once complete, press the Enter key to exit. Select ‘New’ to
enter a second W‐2 or select Exit to continue. When you exit the W‐2 menu, you will be directed to the
Income Menu. If the taxpayer has additional forms of income, select the applicable menu and enter the
required information.
Step 9 – When all items of income have been entered, exit the menu. If the taxpayer is eligible for EIC,
the program will prompt you to answer due diligence questions from the EIC checklist. If the questions
are answered correctly, and the taxpayer qualifies, the program will calculate EIC.
Step 10 – After completing the EIC checklist, you will be directed to the 1040 Main Menu. At the 1040
Main Menu, you have multiple ways to navigate through the tax return. You can select one of the
22menus from the left‐hand side of the screen to jump to a particular category, you can use the Form
Finder to locate a certain form, or you can click directly on to the 1040 menu.
Step 11 – When all entries have been made on the tax return, you can mark the return for electronic
filing. For details on electronic filing, read the electronic filing section of the Quick Reference Guide
following Step 13. To exit the return without marking the return for electronic filing, press enter or
select the Exit button.
Step 12 – The Receipt Menu displays an overview of the calculated fees. You have the option to view
and edit the invoice, enter a payment, and show the client a breakdown of their estimated first check if
the client applied for a bank product. Select Exit. You will be asked Are You Ready to Mark the Return
Completed and Ready for Transmission? Answer No if the return is not complete. Answer Yes to mark
the return complete and exit back to the TaxSlayer Pro Main Menu.
23Electronic Filing
Before a return can be electronically filed, you must first mark it for electronic filing. From the main
1040 screen of the return, select Mark Return Electronic. Select the type of return to e‐file by choosing a
refund disbursement method. The client can choose to receive their refund by Direct Deposit, Electronic
Mailed Check, or Bank Product. If there is an amount due, you can enter an electronic payment (direct
debit).
After selecting the type of return, you will be directed to the Practitioner PIN Menu. The Practitioner PIN
Menu will generate Form 8879. Note ‐ The ERO must keep Form 8879 on file for 3 years; do not mail the
Form to the IRS. The taxpayer’s PIN, spouse’s PIN and the ERO’s PIN will automatically be generated. You
must verify the Signature Date. Once all information has been entered, exit the Practitioner PIN Menu.
You will be given the option to print Form 8879. You MUST have the taxpayer (and if applicable) have
the spouse sign Form 8879 prior to electronically filing the tax return.
Review the information on the E‐File Menu. If all entries are correct, exit to the client’s 1040 menu and
then exit to the Receipt Menu. Verify the information on the Receipt Menu and then exit the return. You
will be asked Are You Ready to Mark the Return as Complete and Ready for Transmission? Select Yes and
the return will be sent to the E‐File Transmission Table.
24E‐Filing a Tax Return
To e‐File your returns through TaxSlayer Pro, follow the steps below:
Step 1 – From the Main Menu of TaxSlayer Pro Select E‐File.
Step 2 – Select Transmit Electronic Return(s). This will display the Transmission Table. Returns that have
been marked for electronic filing and marked “Ready to Transmit” are automatically pulled onto the
Transmission Table.
The buttons at the bottom of the transmission table are defined below:
Add Client – This function allows you to add returns to the transmission table. As an example,
when you have corrected an IRS reject on a return you must manually add the return to the
transmission table to resubmit the return. Select ‘Add Client’ and then enter the taxpayer’s SSN.
If you receive a message stating, “The Client Was Not Found”, the return has not been marked
for electronic filing or the return has not been marked complete.
Clear Filters – If any filters have been applied to the list of clients in the transmission table, use
this function to remove them.
Print – This function allows you to print the list of clients shown in the Transmission Table.
When you click Print, you will be given a list of the available columns to print. Select the columns
you wish to be displayed on your report and click OK.
Export – This function allows you to export the list of clients shown in the Transmission Table to
a comma‐separated values (CSV) file. This file may then be opened in other programs such as
Excel. When you click Export, you will be given a list of the available columns to export. Select
the columns to be included in the file and click OK.
Remove Client – This function allows you to remove returns from the transmission table.
Deleting the return from the Transmission Table will prevent the return from being e‐Filed at
this time.
Cancel – To abort the transmission process, select the cancel button.
Transmit – When you are satisfied with the transmission table, select ‘Transmit’ to proceed with
e‐filing the return(s).
25Step 3 – After selecting Transmit the following screen will ask, “Do You Want a Printed List of Clients to
Send?” We recommend that you always print the list so you will know what will be transmitted and
when the transmission occurred. You will be asked if the printed information is correct. If it is correct,
select Yes. If you select No, you will be returned to the E‐File Main Menu.
Step 4 – The Transmit/Receive from TaxSlayer Pro window will be displayed. Click the Connect button. In
the box, you will see a description of each action during the transmission process. When prompted, click
on the Exit button.
Step 5 –From the E‐File Main Menu, select Print Reports. Each report ready to print will be marked with
an arrow next to the menu number. At a minimum, you will have a Transmission Confirmation Report.
This report will list the last name and SSN of the taxpayers who were transmitted. Keep this with your
List of Clients to Send report.
*IMPORTANT – The List of Clients to Send only shows that you created a Transmission Table. It does
not mean you actually made a transmission. If you DO NOT receive a Transmission Confirmation
Report, the returns DID NOT get sent to TaxSlayer Pro.
The returns will be processed and acknowledged by the IRS within 24 hours. The IRS does reserve the
right to wait 48 hours before giving an acknowledgement for any return.
26Receiving Acknowledgements
The IRS and states release acknowledgements continuously throughout the day. You will automatically
receive any available acknowledgements each time you transmit tax returns. To manually check for
acknowledgements, follow the steps below:
Step 1 – From the Transmitting computer, select E‐File. From the E‐File Main Menu, choose Receive
Acknowledgements Only.
Step 2 – The TaxSlayer Pro Communications screen will be displayed. Click the Connect button. In the
box, you will see a description of each action during the retrieval process. When prompted, click on the
Exit button.
Step 3 –From the E‐File Main Menu, select Print Reports. Each report available to print will be marked
with an arrow next to the menu number. The IRS and State Acknowledgement report will display an
acceptance or rejection code. In most cases, an explanation of the reject code will also be displayed.
27Printing a Tax return
There are two ways to print a return in TaxSlayer Pro. Returns can be printed from the Print Menu and
the View Results Menu.
Print Menu – From the Main Menu of TaxSlayer Pro select Print Returns and select Print Individual
Returns. A list of your clients will appear in a pick‐list. Enter the SSN of the tax return you would like to
print or select the client from the list. A box will appear with a list of print options. Choose the print
option you prefer and select OK. Once you have made your print selections, press the Print Selected
button. The return will be sent to your printer.
View Results – From inside the tax return, select View Results. Select Print Return. A box will appear
with a list of print options. Choose the print option you prefer and select OK. The return will be sent to
your printer. You can also print a single form from the View Results menu by highlighting the form and
selecting OK. The form will display on the screen. To print the form, select File and then Print.
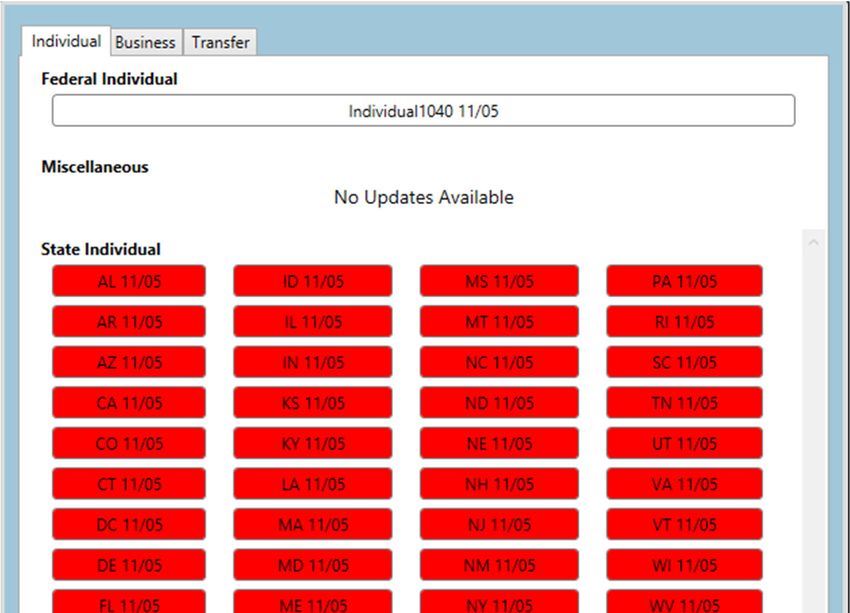
28Program Updates
TaxSlayer Pro has a built‐in utility to download and install program updates as they are released
throughout the year. When the program is opened for the first time each day, the update utility will
check for any available updates and automatically download and install the updates for you. If you need
to manually download and install an update during the day, follow the steps below.
To manually download and install updates:
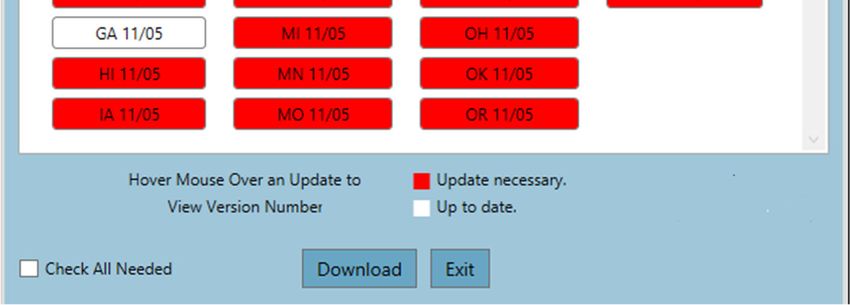
Step 1 – Select Updates from the Main Menu of TaxSlayer Pro.
Step 2 – Select Download / Install Updates.
There are three colors displayed on the page:
Red – A new update is ready to download
Gray – Update has been selected for download
White – The latest update is installed on your computer
29Step 3 – Select each update you want to download and click the Download button. A status window will
appear displaying the progress of the download. This may take a few minutes depending on the speed of
your Internet connection. When all the updates have downloaded, the program will proceed to install
each update. Once the installation is complete and each update turns white, the update process is
complete.
If you wish to install ALL available updates, click the check box ‘Check All Needed’ and then click the
Download button.
Installing Updates Across a Network
Once you download an update on the transmitting computer, the workstations will be able to use the
downloaded file. The available updates from the Transmitting Computer will be automatically installed
on the workstations the first time the program is opened on the workstation each day.
To manually update a workstation, select Updates. Updates will begin to sync between the workstation
and transmitting computer.
30Tax Office Checklists
IRS
Apply for new EFIN(s)* (if applicable, i.e. Adding additional locations, new to the tax preparation
business)
Obtain or Renew PTIN – This is an IRS annual requirement
Obtain IRS Tracking Number from IRS e‐Services
*If you are changing your EFIN, please fax the new EFIN letter from the IRS to 706.868.1955. Also,
please follow up with a quick email to sales@taxslayerpro.com, informing us of the change. Make
sure to include the former EFIN, the new EFIN, and a reason for the change.
State
Familiarize yourself with:
State e‐Filing mandates
Your state’s requirements for bank products
Requirements for filing extensions
Requirements for filing business returns
State Tax Law Changes for 2019
TaxSlayer Pro Software
Purchase TaxSlayer Pro Software for 2019
Update My Account/Account Hub at http://www.taxslayerpro.com
Contact Sales to complete conversion agreement (1st year customers only)
Contact TaxSlayer Pro technical support to convert prior year data (1st year customers only)
Install TaxSlayer Pro 2019 on all computers (available for download in mid to late November)
Purchase the TaxBook Web Library for use with the 2019 TaxSlayer Pro software. Call TaxSlayer
Pro Sales to get a discounted rate.
My Account/Account Hub
Complete Bank Application
Order Check/Card Stock from your bank
Familiarize yourself with all bank products and related bank fees
Complete Bank Compliance Requirement (varies by bank)
31You can also read