User Guide Shutter Stream 360 Software V. 10.0 - Iconasys
←
→
Page content transcription
If your browser does not render page correctly, please read the page content below
User Guide
   Shutter Stream 360 Software V. 10.0
Features Overview Video: https://youtu.be/_UeLsZyF2yg

*IMPORTANT – You must follow these steps before starting:

1. Downloading the Software:

Your purchase of Shutter Stream 360 Software includes 2 applications:

Shutter Stream 360 Software: Image Capture, Editing, Processing and Output
Tools)
360 Product View Creator Software: Composes individual images into 360 views

Please be sure to download and install both application (please refer back to your
post purchase email which includes instructions and download links).

2. Registering the Software:

After installing the software and at the time of first launch, users will be prompted
with the option to register the Shutter Stream software. Please follow registration
instructions here.
2
3. Setting up your Compatible Camera:
Please select your specific camera model from this page and walk through camera
settings set up instructions. This will ensure camera is ready to be used with
Shutter Stream when you launch the software.
After camera settings are correct:
Canon & Nikon Cameras – Power camera on, connect via USB to computer
then launch the Shutter Stream Software.
Sony Cameras – Wireless control, please follow instructions here
Smart Phone Cameras – Wireless control, please follow instructions here
Training Documents:
Registering the Software: https://www.iconasys.com/Downloads/registering-
shutter-stream-360-software.pdf
Shutter Stream 360 Quick Start Guide: https://iconasys.com/Downloads/Shutter-
Stream-360-Quick-Start-Guide.pdf
Shutter Stream Software Features Overview Video: https://youtu.be/_UeLsZyF2yg
360 View Creator User Guide: https://www.iconasys.com/Downloads/360-Product-
View-Creator-User-Guide.pdf
360 View Creator Overview Video: https://youtu.be/dZej4oq0ZBI
Help Desk & Support:
Help Desk: The Iconasys Knowledge Base will provide answers to many FAQ’s
Technical Support: Please see this page for all support contact options
Iconasys Inc. © 2013-2021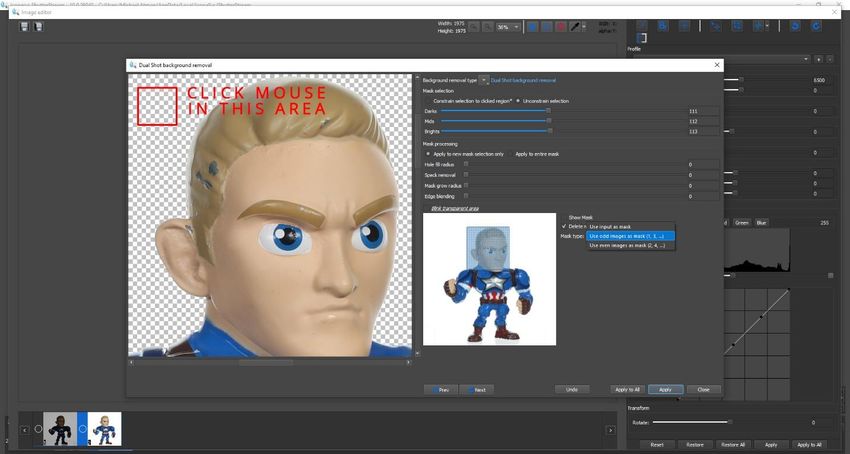
3

Table of Contents
Image Capture Tools
 Live View ......................................................................................................................... 6
 Image Overlay ................................................................................................................ 7
 Rotate .............................................................................................................................. 9
 Crop............................................................................................................................... 10
 Snap .............................................................................................................................. 12
 Camera Setting Window
 Camera Mode................................................................................................................ 13
 Saving Camera Settings............................................................................................... 13
 Shutter Speed .............................................................................................................. 14
 Aperture........................................................................................................................ 14
 White Balance .............................................................................................................. 14
 Exposure ....................................................................................................................... 14
 Sensitization ................................................................................................................. 15
 Flash .............................................................................................................................. 15
 Auto Focus .................................................................................................................... 15
 Manual Focus ............................................................................................................... 15
 Fixed Focus ................................................................................................................... 15

Image Viewing Gallery
 Gallery ............................................................................................................................ 16
 Scroll Left/Right ............................................................................................................. 17
 Delete ............................................................................................................................. 18
 Multi Row Viewing ........................................................................................................ 18
 EXIF MetaData ............................................................................................................... 18
 Display Alpha Channel ................................................................................................. 18

                                                    Iconasys Inc. © 2013-2021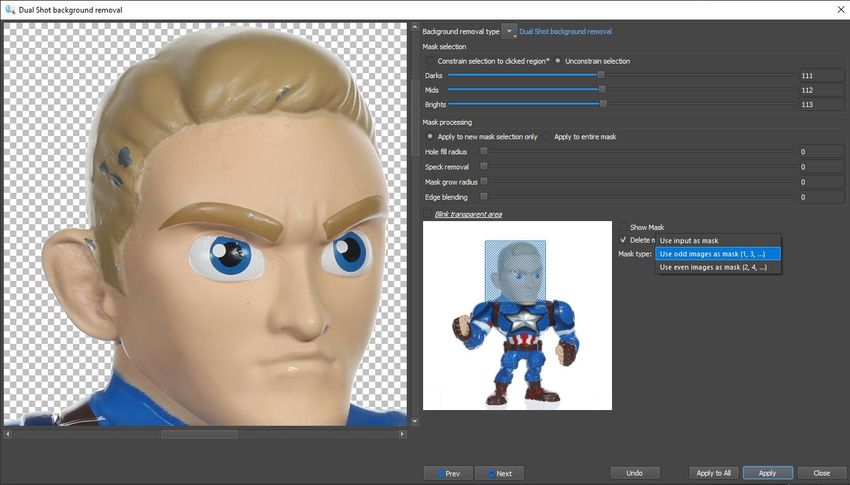
4

 Viewing Tools
 1:1 Viewing / Fit to Screen ........................................................................................... 19
 Zoom in/Zoom Out ....................................................................................................... 19
 Annotation Tools
 Annotations ................................................................................................................... 19
 Pen ................................................................................................................................ 20
 Line ................................................................................................................................. 20
 Arrow ............................................................................................................................. 20
 Circle .............................................................................................................................. 20
 Square ........................................................................................................................... 20

Image Processing Tools
 Dynamic Saving ............................................................................................................ 20
 Batch Saving ................................................................................................................. 24
 Editing ........................................................................................................................... 27
 Image Transfer ............................................................................................................. 55
 Email ............................................................................................................................. 55

360 Shooting, Options and Help
 360.................................................................................................................................. 58
 Options .......................................................................................................................... 58
 Help ................................................................................................................................ 67

                                                     Iconasys Inc. © 2013-2021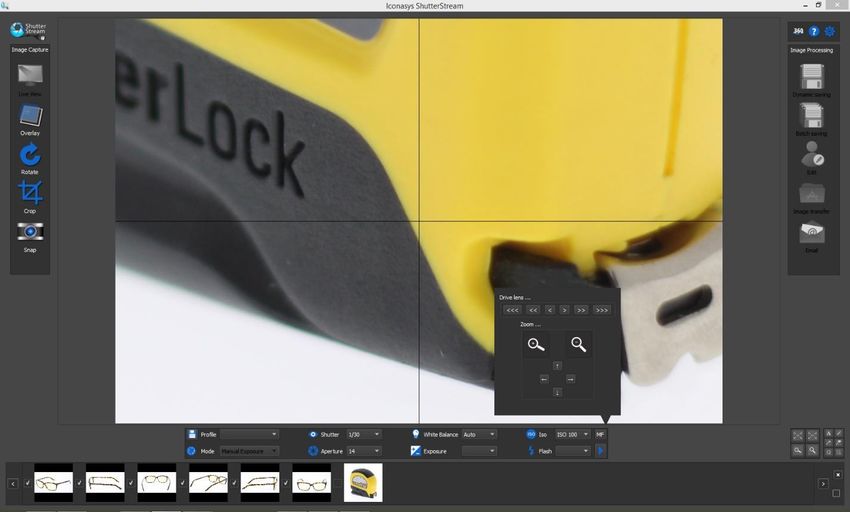
5

            Overview - Shutter Stream UI (video link)
      1. Image Capture Tools
      2. Image Viewing Gallery
      3. Image Processing Tools
      4. Live View / Image Viewing Window
      5. Camera Setting Taskbar
      6. 360*, Help and Options
         *360 shooting mode only available in Shutter Stream 360

                                                                                   6
1                                                                          4
                                                                                   3

                   5
2

    Please ensure camera is connected via USB and powered on before launching
                                               Shutter Stream.

                                               Iconasys Inc. © 2013-2021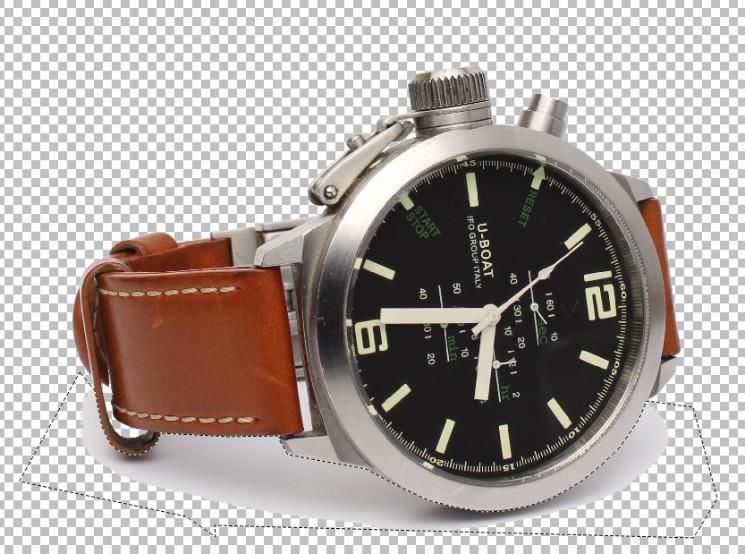
6

Image Capture Tools

          Live View (video) – ‘Live View’ will stream the cameras live view to the
monitor screen in real time so users can view the subject they wish to shoot before
actually capturing the image.

Enabling Live View: Left click on the icon to enable the cameras ‘Live View’. This will
then be projected in real time onto the ‘Live View Window’. While in Live View, all
‘Image Capture Tools’ and the ‘Camera Settings Window’ will be enabled.

Disabling Live View: ‘Live View’ will be automatically disabled after users clicks
‘Snap’. Alternatively, users can exit out of Live View mode by Left Clicking a
Thumbnail Image in the Thumbnail Viewing Gallery. This will switch the application
from ‘Live View’ mode to ‘Image Viewing’ mode.

Built into the ‘Live View’ is *Exposure Simulation (*this feature is only supported
by cameras that have Live View Exposure simulation). This means the current
exposure of the image (if it were to be captured) is projected in real time in the ‘Live
View Window’. While in the ‘Live View Mode’, users are able to use a variety of image
capture tools which include: ‘Image Overlay’, ‘Rotate’, ‘Crop’ and ‘Snap’. In addition
to these tools, users can also adjust camera settings in the ‘Camera Settings
Window’ to compensate exposure for the lighting environment.

Live View Options (video) – Click on the options area (gear icon in top right corner
of software).

                                   Iconasys Inc. © 2013-2021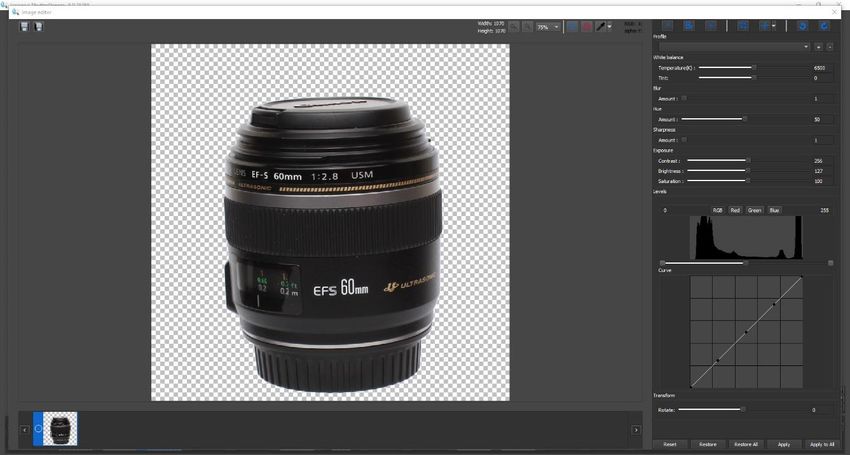
7

Display lines ON – This feature allows users to set
cross hair grid markers in the Live View Window.
Users can select up to 36x36 lines.
Marker Color – Users can change the display color
of the odd and even Display lines independently.
Display lines can with positioning and framing.
Camera live view size – Some cameras display the
Live View window in a lower resolution (for ex. the
Nikon D5200 camera displays Live View at 640 x 426
pixels) which can display quite small when working
on a higher resolution monitor. Users can increase
display size by selecting 2X or 3X.
Disable Mirror Slap – Users can define camera to
wait XXX milliseconds between disabling live view
mode and snapping picture to eliminate mirror slap
(read more on mirror slap here). This feature is ideal
when shooting macro photography or when
shooting with longer exposures.

Modeling Mode:
Modeling mode is designed for users shooting with
strobes who will require a different setting for Live
View and Image Capture. Users will create and save
a camera settings profile to be used for Live View
purposes only. When this is enabled and the profile
is selected, the live view will always reflect the
exposure from the saved profile settings.

Keep live view on after capture – The standard operation of Shutter Stream is
to upload the image after capture and display for viewing. Users also have the
ability to leave the Live View Window enabled after capturing an image. This will
automatically revert back to Live View mode after an image has been captured
and uploaded to the ‘Thumbnail Viewing Gallery’. Enable this by selecting the
check box.
Auto select after capture – This option will enable an images to be automatically
selected in the Thumbnail Gallery after capture.

                                 Iconasys Inc. © 2013-2021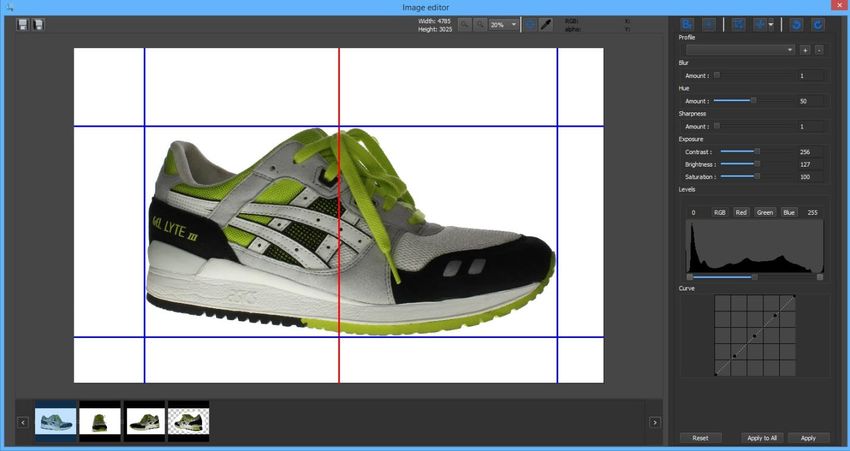
8

            Image Overlay (video) - The ‘Image Overlay’ feature will allow users
to overlay a transparent image over the ‘Live View Window’. This enables users to
achieve consistent product placement and shooting angles.

             First users will want to enable Image Overlay by left clicking on the
button. Next, by right clicking on the ‘Image Overlay’ button users have 4 options:
‘Import’, ‘Create’, ‘Load’ & ‘Save’.

Importing an Image Overlay: Right click on the ‘Image Overlay’ button while in
‘Live View Mode’ and select ‘Import’. This will open file explorer and allow users to
locate the image they wish to use for overlay (image must be in JPG or PNG format).
After the image has been located in the file explorer, select the image then click
‘Open’. This image will be placed over top of the Live View window. Should a user
wish to save this, Right Click on the Overlay button and select ‘Save’, give it a name,

                                       Iconasys Inc. © 2013-2021
9

click ‘OK’. Users can adjust opacity of this image in the Options area ->Image
Overlay Settings.

Creating an Image Overlay: Right click on the ‘Image Overlay’ button while in ‘Live
View Mode’ and select ‘Create’ to create an overlay of the existing live view. This
overlay will remain on the ‘Live View Window’ until the ‘Image Overlay’ button is
disabled (left click to enable/disable).

Saving an Image Overlay: After creating an ‘Image Overlay’, users may wish to
save and store this for later use. Simply Right Click on the Overlay button and select
‘Save’, give it a name, click ‘OK’ and it will be retained in the software and can be
reused at a later time. Users can save infinite ‘Image Overlays’.

Loading a Previously Saved Image Overlay: Right click on the ‘Image Overlay’
button and select ‘Load’. This will pop up a window that includes all previously
saved image overlays. Simply select the overlay you wish to use by highlighting it,
then click ‘OK’.

Deleting an Image Overlay: Left Click the checkbox to the left of the overlay then
click the delete ‘x’ button in the top right of the Overlay Window. This will remove
the previously save Overlay.

Adjusting Image Overlay Opacity: In the ‘Options’ area,
select ‘Image Overlay Settings’. By adjusting the number
(values between 15 and 85) users can adjust the overlay
opacity where 15 being the most transparent (lightest) and
85 being the least transparent (darkest).

The ‘Image Overlay’ feature is ideal for website and catalog product photography in

                                    Iconasys Inc. © 2013-2021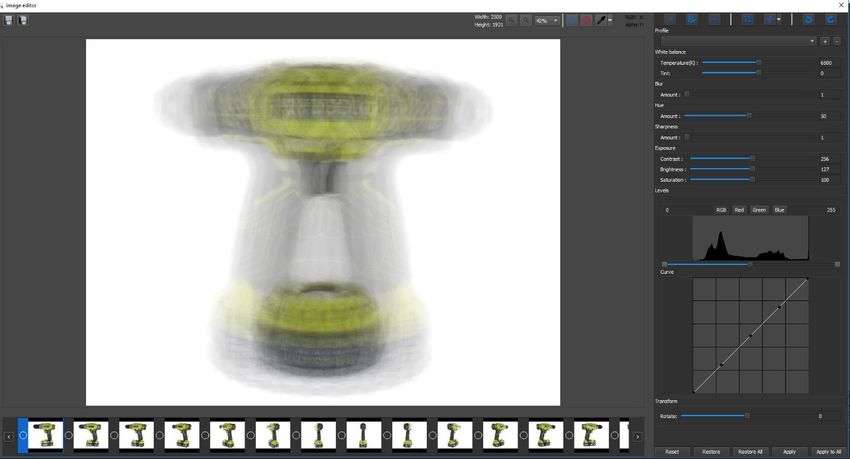
10

which consistent shooting angles and product placement are required. It is also a
great tool for positioning objects in the center of the turntable.

           Rotate (video) - Users can rotate live view and capture 90, 180 or 270-
degrees. This feature is ideal for when the camera is rotated to shoot in portrait
mode for tall skinny products or objects such as a bottle or mannequin:

Rotating the Live View: While in ‘Live View Mode, left click on the ‘Rotate’ button
and the ‘Live View’ will Rotate 90-degrees to a vertical orientation.

         By right clicking on the ‘Rotate’ button, users have the ability to set the
‘Rotate’ to 90, 180 or 270-degrees.

           Crop (video) – The ‘Crop’ tool gives users the ability to Pre-Crop their
subject prior to capture. Typically crop is an action that is standard to post-

                                   Iconasys Inc. © 2013-2021
11
production however, in Shutter Stream, crop can instantly be applied to images as
they are captured (Crop cannot be applied to RAW image format). In addition, users
can define the Crop shape in a specific ratio (Square or Custom Ratio) if required.
For example, if images are required at 800 x 500 pixels, users would want to select
Pre-Crop in an 8 x 5 ratio.
Setting Crop: While in Live View mode, users can enable the ‘Crop’ by left clicking
on the ‘Crop’ button then simply click and drag the mouse cursor over the subject in
the ‘Live View Window’.
Adjusting Crop: Drag and adjust from the bottom right corner. To get rid of a
‘Crop’, simply single click on the ‘Live View’ window outside of the crop. To move
‘Crop’ in current size and shape, left click and hold while inside crop and move
accordingly to desired position. See Options area -> Crop Options to define Crop
Ratio.
Iconasys Inc. © 2013-202112
Saving Crop: Users can save a ‘Crop’ profiles to
ensure for consistencies. To do so, please define
‘Crop’ in the Live View Window’ and when set to
desired location and size, right click on the ‘Crop’
button then select ‘Save’. User will then define a
name for the saved ‘Crop’ profile.
Loading a Previously Saved Crop: Right click on the ‘Crop’ button then click ‘Load’.
This will allow users to select a previously saved ‘Crop’.
Removing a Previously Saved Crop: Right click on the ‘Crop’ button then click
‘Remove’. Select the ‘Crop’ Profile you wish to remove then click ‘OK’.
Crop Options: See Options area (blue gear wheel in top right of UI) -> Crop Options
Define Crop Ratio: Users can choose
to define ‘Crop’ in a ‘Rectangle’,
‘Square’ or ‘Custom ratio’. If defining
crop in a Custom Ratio, please define
the ratio (width by height) using the
lowest common denominator (ex. if
required at 800 x 500 use 8 x 5).
Custom Size: Users can define crop location by ‘X’ and ‘Y’-axis in the Live View
window. The ‘Width’ and ‘Height’ options define the crop size in pixels on the live
view.
Enable live view cross guide lines: This option, when enabled, will place cross hair
grid lines in the Crop area.
Snap (video) - The ‘Snap’ feature will send a command to the camera
through USB to capture the image. Camera MUST be set to JPG or RAW+JPG
shooting mode as JPG images, when captured, are converted to TIFF image format
then displayed in the ‘Thumbnail Viewing Gallery.’
Iconasys Inc. © 2013-202113
Capturing an Image: Left Click the ‘Snap’ button. The captured image is instantly
captured and uploaded the Shutter Stream program within seconds for viewing,
editing, processing, exporting, emailing and/or FTP’ing.
Right Click Snap Options:
Image Capture with Focus Stacking: Right click the ‘Snap’ button and select
option ‘Image Capture with Focus Stacking’ (see Focus Stacking for more info
options area). See this video communicating workflow and Options area in the user
guide for parameter descriptions.
Image Capture with Multi Cameras: If using multiple cameras, users can toggle
from one to another in the ‘Options’ area by selecting ‘Reconnect to Camera’ then
selecting the available camera from the drop down menu.
Image Capture with Dual-Shot: This will enable Dual-Shot mode for using the
Grey Mask Background Removal mode in the editing tools (see Grey Mask
Background Removal for more info).
Options (blue gear wheel top right of UI) -> Snap Options
Snap Export
Options: Enabling
Instant Export will
allow users to
automatically
export images after
capture.
Dual Shot Options: Users are able to define Shot 1 and Shot 2 camera settings
profiles when using the Dual Shot shooting method.
Apply Edit Profile: Users can automatically apply an editing profile to an image
after capture.
Camera Setting Window (video) – Please ensure you have followed
all instructions from the compatible camera set up guide for your specific
camera using this link.
Iconasys Inc. © 2013-202114
Users have the ability to adjust camera settings through mouse clicks in the
‘Camera Settings Taskbar’ while in Live View. Simply left click the drop down to
select a new value or setting.
Saving Camera Settings – After users have defined camera exposure
settings (Shutter Speed, Aperture, White Balance & Sensitization) these can be
‘Saved’ these directly in the software. If lighting will remain consistent, it should be a
consideration to pre-define different Profiles based on object colors. For ex. Light
Objects, Dark Object, Yellow Objects etc.. In addition, this allows the software to
retain the knowledge of correct camera settings so after initial set up, users of any
skill level can create high quality images.
To save a ‘Camera Settings Profile’, users will
left click the Disk icon in the top left of the
Camera Settings Taskbar and this will bring up
the Save Camera Settings UI. Users will then
adjust camera settings if required, and click
the ‘Save’ button. Next, the user will be
prompted to add a Profile Name. After
entering a name and clicking ‘OK’, the Camera
Profile is saved. Users can access this Profile
in the ‘Profile’ Drop Down menu.
To delete a previously saved Camera Settings Profile, simply click the Profile from
the drop down in the Save Camera Settings UI and click the ‘Delete’ button. This will
remove the Profile from the Shutter Stream program.
If using the Dual Shot Shooting Mode, users will set and save two separate camera
setting profiles (at different exposures) .
Iconasys Inc. © 2013-202115
Camera Mode – This simply tells the user what Camera Mode the camera is
set to. This reflects the physical setting that is set on the camera. It is not adjustable
through the software but rather manually on the cameras Shooting Mode Dial.
Please be sure Camera is physically set to ‘Manual’ Exposure mode.
Shutter Speed – ‘Shutter Speed’ is the length of time a camera’s shutter is
open (defined in seconds) when capturing an image. The slower the Shutter Speed,
the brighter the resulting image.
Aperture – ‘Aperture’ is the opening through which light travels to the
cameras sensor. The smaller the Aperture value, the bigger the opening and the
brighter the resulting image. This setting is responsible for the depth of focus of a
resulting image. The higher the aperture value, the greater the focal depth however
can result in poorer image quality. Pending the type of products being shot and
lens being used, we typically suggest an aperture value between 10 and 18.
White Balance – ‘White Balance’ adjusts the intensity of colors in a
resulting image. Ideally, users wish to match the light balance pre-set with their
type of lighting. Users who are unsure of their lighting type should use ‘Auto White
Balance’ as this will typically do a great job and automatically compensate for the
lighting type being used. Users can also manually set a custom white balance
(please refer to the cameras User Guide for instructions) for their own lighting –
then select the Manual or Preset option in the drop down after set.
Exposure – ‘Exposure’ is only an option with Nikon DSLR cameras and
simply allows Nikon users to adjust ‘Live View' brightness and darkness (this
however does not affect the resulting image exposure when image is captured).
Sensitization – ‘Sensitization’ is another tool that is used to adjust
exposure. This feature is designed for shooting in low light environments when not
using a tripod. It is suggested to use a Sensitization value of 100 – this will help yield
the best quality results.
Iconasys Inc. © 2013-202116
Flash – ‘Flash’ is the camera’s Flash – this has to be enabled manually on the
camera. It is not suggested to use the cameras pop up Flash as it is a harsh light
that can hinder image quality. In addition, Live View exposure simulation will not
work while Flash is enabled (Canon cameras).
Focus Adjustments (video):
Auto Focus – While in ‘Auto Focus’ mode, the camera will use the built in
Auto Focus feature to capture images. By left clicking on the ‘AF’ button in the top
right of the Camera Settings Taskbar it will allow users to toggle to the Manual
focus mode.
Manual Focus – ‘Manual Focus’ will allow users to adjust the camera’s focal
point through mouse clicks. While in ‘MF’ mode, users can hover the mouse over
the ‘MF’ button and the focal point adjustment window will pop out. The buttons
are defined by near/far and focal length adjustment - large increment,
medium increment, fine increment. The focal point that is set is
automatically fixed and applied to the image being captured. The magnifier tool ‘+’
and ‘-‘allow users to view 1:1 or full screen on the image being captured. The left,
right, up and down arrows under the magnifier icons will allow users to adjust the
1:1 viewing area. The location of the 1:1 view will be defined by a blinking circle on
the live view window.
After setting a focal point manually, this will be retained from shot to shot until
adjusted (if need be).
Iconasys Inc. © 2013-202117
Viewing Gallery & Tools (video) - The ‘Thumbnail Viewing Gallery’
displays all images that have been previously captured into the Shutter Stream
program.
Keyboard Shortcuts for Viewing Tools: Please see here for all Keyboard
Shortcuts.
Viewing an Image: Left click on the thumbnail to view the image in large size in the
‘Image Viewing Window’. The image number in the row will be defined in the top
right corner of the ‘Thumbnail Viewing Gallery’ followed by the total number of
images. For ex. 19/34 means image 19 is selected and there is 34 total images in the
gallery. The total number of images selected is also displayed in the bottom left
corner of the Thumbnail Gallery Window.
Iconasys Inc. © 2013-202118
Selecting an Image(s): Left click the small circle to the left of the image. Once
selected it will be noted by a ● in the circle.
Batch Select a Set of Images: Select the first image, hold ‘shift’ then select the last
image in the set – this will select all images in between.
Select All images: Click the check box in the bottom right corner of the Thumbnail
Gallery Window.
Duplicate an Image: Select the image you wish to duplicate then use keyboard:
Windows: CTRL + n
Mac: Command + n
After selecting an image(s), users can use the Image Processing tools to process
and output images.
*Users can also define to have their images auto selected after capture in the
Options area –> Live View Options -> enable ‘Auto select after capture’
Scroll Left/Right – The scroll buttons on the left and right of the
‘Thumbnail Viewing Gallery’ allows users to scroll through all images. Simply left
click to scroll (or left click and hold to scroll continuously). Users can also use
Keyboard shortcuts left and right arrows to scroll through ‘Thumbnail Gallery’.
Delete – The ‘Delete’ button in the top right corner of the ‘Thumbnail
Viewing Gallery’ will delete any selected images (denoted by checkbox). Select
images you wish to delete then left click the ‘Delete’ button to remove images
permanently from the program.
The ‘Delete’ button can also be used to delete an existing row. If you have added
multiple rows in the ‘Thumbnail Gallery’ and wish to remove a row, first remove all
images from that row, then click the ‘Delete’ button on the empty row to remove
the row.
Iconasys Inc. © 2013-202119
Multi-Row Thumbnail Gallery – Users have the ability to add
additional rows to the ‘Thumbnail Gallery’. This can be used to help with file
management. First, in the Options area, under ‘Thumbnail Options’ users will need
to ensure ‘Disable Multi Row’ is unchecked. To add an additional Row, right-click on
the Thumbnail gallery and select ‘Add new row’. Users will be required to provide a
name for this row.
If using this feature, users can scroll up and down to view these different thumbnail
gallery rows. Multiple rows are denoted by the bottom number displayed (in the
case of this example 2/2 means viewing row 2 of 2 total rows). Use the up and
down arrows to navigate between different rows. Alternatively, right-click on the
thumbnail gallery and select the Row (by name) that you wish to view.
EXIF MetaData (video) – Users can choose to display EXIF MetaData on the
image while in the ‘Image Viewing Window’. This can be set in the ‘Options’ area
under ‘Show Image EXIF’. Note, EXIF MetaData is stripped after image processing
(for ex. pre-crop an image or edit an image).
Displaying Alpha Channel (transparent background) – Should users
edit and remove background from their images, these can be displayed with the
Alpha Channel. To do so, select ‘Options’ then in the dropdown choose ‘Alpha
Blending Options’ then check ‘Use Chessboard Pattern’:
Iconasys Inc. © 2013-202120
Displaying Alpha Channel – Background Color – The background color
option sets the default background color to be used when outputting images. The
Background Color will be applied to any JPG format images that have had their
backgrounds removed in the image editing area.
Viewing Tools – These tools are designed specifically for viewing images in
the ‘Image Viewing Window’.
1:1 Viewing / Fit to Screen – These will allow users to view their
images at 1:1 or fit to screen in the ‘Image Viewing Window’. Simply left click to view
1:1 or fit to screen.
Zoom In/Zoom Out – Allows users to ‘Zoom In’ and ‘Zoom Out’ on
the selected image in the ‘Image Viewing Window’. Simply left click on either button
to Zoom In/Out.
Annotation Tools (video)
Adjusting Annotation Properties
By right clicking on any of the ‘Annotation Tools’ and selecting ‘Properties’, users are
able to adjust the individual annotation tool’s size, color or font.
Annotate – Users have the ability to instantly add text to an image by left
clicking on the ‘Annotate’ button, clicking where they wish to enter the text on the
image in the ‘Image Viewing Window’ then typing.
Iconasys Inc. © 2013-202121
Pen – Users have the ability to freehand draw on an image by left clicking on
the ‘Pen’ tool then clicking and dragging on the image in the ‘Image Viewing
Window’.
Line – Users have the ability to draw a straight line on an image by left
clicking on the ‘Line’ tool then clicking and dragging on the image in the Image
Viewing Window’.
Arrow – Users have the ability to draw an arrow on an image by left clicking
on the ‘Arrow’ tool then clicking and dragging on the image in the ‘Image Viewing
Window’.
Circle – Users have the ability to draw a circle on an image by left clicking on
the ‘Circle’ tool then clicking and dragging on the image in the ‘Image Viewing
Window’.
Square – Users have the ability to draw a square on an image by left clicking
on the ‘Square’ tool then clicking and dragging on the image in the ‘Image Viewing
Window’.
Image Processing Tools
Dynamic Saving (video) - Users have the ability to save a single or
multiple images from the thumbnail viewing gallery multiple times in different
formats (JPG, PNG, RAW & TIFF), different size (pixels wide OR tall), Resolutions (72,
150 or 300 DPI), while having the option to apply a Watermark, an Editing Profile
and also save to an FTP site. An example of a real world scenario is a business that
has different use cases for each image they create. For instance, a user has shot 3
images of a single product – a top, a front and a side view. They wish to save this set
of images for their print catalog (300 DPI .TIFF image at 1000 pixels wide and also
for their website at 3 different sizes (thumbnail, product page and large view) - 150,
Iconasys Inc. © 2013-202122
500 and 1000 pixels wide at 72 DPI. Using the ‘Dynamic Save’ tool, they can create a
custom save profile that includes these 4 different save types and in one click the 3
images will each be saved 4 different times exactly as required for their
applications.
Dynamic Save UI Overview
Image Naming:
Master Name: This is a mandatory field and will be at the start of the image name.
Suffix Name: This is an optional field and can be used as a unique identifier for the
individual save type. This name will go after the Master name.
Sequential Naming: This is designed for users who are saving a set of images in
the ‘Dynamic Save’ tool. Users have the option to name images sequentially by
clicking the check box then selecting their numerical preference 1, 01 or 001 .
The name of the resulting images (assuming we are saving a set of 3 images) is as
follows:
sample-image-web-500w-01.jpg
Iconasys Inc. © 2013-202123
sample-image-web-500w-02.jpg
sample-image-web-500w-03.jpg
Start with: Users can override sequential naming starting with 1 by entering a
different number in this placeholder .
This would then result in naming as follows for the previous example:
sample-image-web-500w-04.jpg
sample-image-web-500w-05.jpg
sample-image-web-500w-06.jpg
Keep Original File Name: Users can choose to retain original filenames provided
by the camera.
Variable Naming: Users can enter these variables to auto name images being
saved:
[day] – will enter the current date
[month] – will enter the current month
[year] – will enter the current year
For example, if today is the 22nd, and I enter into the Master Filename field: day-
iconasys, the filename will be 22-iconasys.jpg
If users wish to provide a custom name for each individual image in the set, they
can do so by unchecking the ‘x’ box next to sequential naming. This will enable the
custom name fields below. In this example, we are saving a set of 3 images of the
same product – a front, top and side view. We can specify so that instead of naming
these numerically (01, 02, 03) they are now named as front, top, side.
The name of the resulting images is as follows:
sample-image-web-500w-front.jpg
sample-image-web-500w-top.jpg
sample-image-web-500w-side.jpg
Iconasys Inc. © 2013-202124
Individual ‘Save Types’:
Users have the ability to save an image or
set of images multiple different times.
To add an additional ‘Save Type’ users
simply click the ‘+’ icon to the right of the
‘Suffix Name’ field. To delete an additional
‘Save Type’ users click the ‘x’ icon.
Output path defines where the image(s)
will save.
Format defines image format (JPG, RAW,
TIFF, PNG). Both TIFF and PNG images will
retain transparent background properties
(if background had been removed).
Original will output the original, unedited
image(s).
Resolution specifies pixels per inch (72, 150 or 300) – if not checked, this will
default to the cameras pre-set resolution.
Resize allows users to resize image(s) by defining pixel width or height.
Create master will create a master folder using the ‘Master’ name.
Users can also chose to auto apply a previously saved Editing Profile and/or
transfer images to their FTP site and/or add a previously saved Watermark by
clicking the ‘x’ box and selecting a profile option in the drop down.
Creating & Saving a Dynamic Save Profile:
Users can create and save multiple ‘Dynamic Save Profiles’. To create a profile
simply add as many ‘Individual Save Types’ as required – while defining suffix name
(optional field), output path, format, resolution (optional), image size (optional),
editing profile (optional), transfer to an FTP site (optional) and/or apply a watermark
(optional). After the profile has been created, user will click the ‘Save Profile’ button,
enter in a name, then click ‘OK’. This will retain all information so it can be accessed
the next time the user wishes to save with the same profile.
Saving Images using the Dynamic Save Tool: After users have defined the ‘Master
Name’ and the ‘Individual Save Types’, simply click the ‘OK’ button in the bottom
right of the ‘Dynamic Save UI’.
Iconasys Inc. © 2013-202125
Delete files from disk after export: With this option enabled, images can be auto-
deleted from the software after output.
Batch Saving (video) - Multiple product images can be saved with
one click to a specific directory (local or network). Included in the ‘Batch Save’
feature is batch image resizing, resolution adjustment (web or print) renaming and
watermarking. The Batch Saving Tool always outputs image as JPG format. Should
user require a different image format (PNG, TIFF or RAW), please revert to ‘Dynamic
Saving’ tool.
Name: The field which the user will enter
the desired image name.
Location: This will be the Save To
Directory. Users can change this by clicking
the ‘Browse’ button to the right and
locating/selecting the desired output
folder.
Sequential Naming: Multiple images will
be named sequentially in a numerical
format. Users can define their numerical
preference - 1, 01 or 001.
Resize: To enable resizing, click the ‘x’ box
to the left of Resize text then specify a
pixel width or height.
Image Type: Choose from either JPG, PNG
or RAW format. Users can also choose to
output Original – this will be the original
unedited image(s) in JPG format.
Resolution: To enable resolution, click the
‘x’ box to the left of Resolution text then
specify a DPI.
Iconasys Inc. © 2013-202126
Users can also chose to auto apply a previously saved Editing Profile and/or
transfer images to their FTP site and/or add a previously saved Watermark by
clicking the ‘x’ box and selecting a profile option in the drop down.
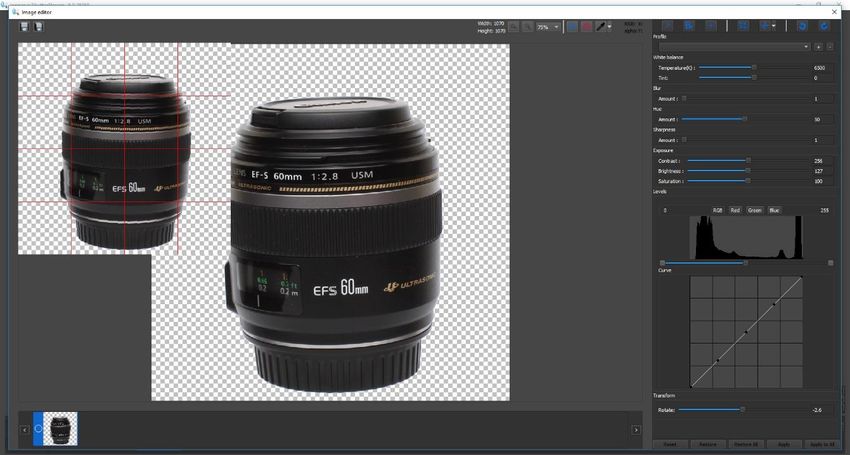
Edit (video) – ‘Edit’ will allow users to make edits to a single or
multiple images to enhance image quality, remove backgrounds, color correct and
other features to achieve desired quality. There is a wide range of tools available
that can help users achieve better quality results.
Editing UI Overview
Save Tools Viewing Tools
Image Viewing Window
Editing Tools
Thumbnail Gallery Apply/Restore
Shutter Stream Software includes a vast image editing suite that includes an array
of tools. Editing features and functionality can be divided into 3 parts: Basic Image
Editing, Background Removal Tools and Image Orientation Tools.
See Keyboard Shortcuts available in the Editing window here.
Examples.
Ctrl + Mouse Wheel Zoom in/out allows users to zoom in on image in preview
Iconasys Inc. © 2013-202127
windows
L: Selects ‘Lasso’ tool
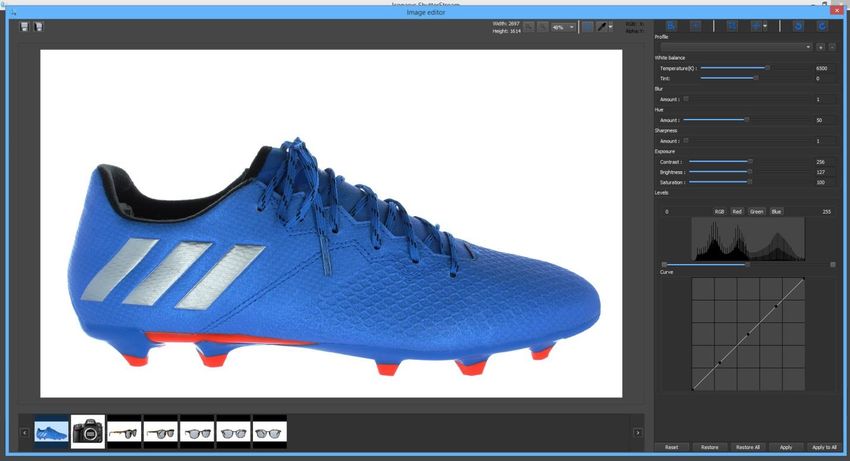
Basic Image Editing Tools:
To ‘Edit’ images, users will simply make adjustments using the available tools. As
changes are made, the ‘Editing Preview Window’ will pop out and show edits in real-
time. After these changes are reflected on the master, high resolution image, the
‘Editing Preview Window’ will go away. Editing changes are not formally applied to
the image until the user clicks:
Apply: make the changes to a single image
Apply to All: make changes to all images in Editing Window Thumbnail Gallery
Reset: can be used to revert images back to original if the edits have not been
applied
Restore: Revert a single image to its original state (after edits have been applied)
Restore All: Revert all images back to their original state (after edits have been
applied)
*Important: Users are unable to restore images if edits have been applied and have
exited the editing area).
Editing Features Overview: Users will click and drag slide bar to make editing
adjustments
White Balance: Temperature (K):
Adjustment to the color temperature of
the image. Affects the overall tone of the
photo by making it appear warmer
(more red tongs) or cooler (more blue
tones). Users can also adjust white
balance using the Eyedropper tool drop
down, then manually selecting the white
point.
Tint: Used to fix color contrast
Blur: Adjustment to add blur to the
entire image.
Iconasys Inc. © 2013-202128
Hue: Adjusts the main color
properties/vividness of an image.
Sharpness: Adjust how clear the image
looks.
Contrast: Adjust the separation
between the darkest and brightest areas
of an image (typically shadows and
highlights).
Brightness: Adjust an images brightness
intensity.
Saturation: Adjust the separation
between colors.
Levels: The graphic with the mountain
looking shapes is called the Histogram -
this describes the color values in the
selected image. The left side is the very
dark (black) colors in the image, on the
right the very bright (white) colors in the
image. The higher the mountain – the ‘reference points’ highlighted by blue circles
more a specific color is in the image. To
adjust levels value, users will see three Before
‘reference points’ immediately below the
histogram that are adjustable by clicking
and dragging (or by double clicking on Selected
the reference point and entering a white point
value). For instance, if we have an image
with a grey background and wish to
change that to white, we will drag the After All pixels
right reference point to the left – this will white
turn all colors to the right of the
repositioned reference point white.
Users can also ‘Select a white point’ or
‘Select a black point’. These tools will
help set all pixels beyond the selected
pixel value (using eye dropper) to pure
white or pure black. For example, if user
selects a white point with a RGB Value of
Iconasys Inc. © 2013-202129
230,230,230, this will adjust all pixels
with a value of 230,230,230 or greater to
pure white (255,255,255). To ‘Select a
white point’, select the eyedropper tool,
then left click on the darkest white pixel
to make other pixels. To ‘Select a black
point’, right click on the lightest dark
pixel.
Curves: This is a more advanced version
of the Levels tool. The reference points
are along a diagonal line. The Curves
tool allows users to adjust ‘reference
points’ throughout an image’s tonal
range by clicking and dragging. The top
of the y-axis is white and the bottom is
black. The right of the x-axis is white and
the left is black.
Background Removal Tools:
Shutter Stream Software includes tools dedicated to removing backgrounds from
images in the Shutter Stream Software. These allow users to remove product image
background to a solid color (ex. white – this can be set in the Options area under
‘Alpha Blending Color’) OR to a transparent background (if output in PNG or TIFF
format).These tools include:
Magic Wand Tool – which allows users to select a background color and
automatically remove that color (within a defined tolerance) from the image (page
45.
Lasso Tool – which allows users to manually clip a product from the
background or add parts of the image back in (page 48).
Iconasys Inc. © 2013-202130
These background removal tools can be used in conjunction with each other if
required. For ex. use ‘Magic Wand Tool’ to remove the background then use the
‘Lasso Tool’ to cut out the shadow under the product.
Automated Background Removal Tools – Denoted by the BR button,
there is 3 automated background removal options:
1. BR Using Background Image (page 30)
2. Chroma Key Background Removal (page 37)
3. Dual Shot Background Removal (page 39)
BR (Background Removal) - 3 options:
BR Using Background Image (video): After
shooting all product images, users are required
to shoot a background only ‘Reference Image’ in
which no variables (lighting, camera settings,
focal point & zoom) have been adjusted.
This ‘Reference Image’ will be set as the Background Image. Step by step
instructions as follows:
1. Enable ‘Live View’ mode then place an object in the field of view of the
camera.
2. Adjust camera settings to optimize for lighting environment (if required).
3. Enable Crop and define Pre-Crop markers (if required) - that is the area that
users wish to capture, around the subject.
4. Put camera into ‘Manual Focus’ mode to adjust (if required) and set a fixed
focal point.
Iconasys Inc. © 2013-202131
Figure A. ‘Live View’ mode enabled, Pre Cropped Subject
5. Capture image by clicking ‘Snap’ button in software – immediately after image
is captured, this will be uploaded into the Shutter Stream application for
viewing.
Iconasys Inc. © 2013-202132
Figure B. Captured image after clicking ‘Snap’
6. Repeat steps 1 – 4 while not changing any variables (camera position, crop
markers, camera settings, focal point and lighting must not change at all).
Figure C. Captured 4 product images with same crop, camera settings, focal point, camera position and lighting.
Iconasys Inc. © 2013-202133
7. After product images are captured, user will be required to shoot a ‘Reference
Image’ – that is an image of just the background. All shooting variables must
be maintained when capturing the reference (background only) image.
Figure D. Capturing Background Only image (Reference Image)
Iconasys Inc. © 2013-202134
Figure E. Captured background only image – selected and ready to import into Editing area
8. Select and import the Background only ‘Reference Image’ into the BR area in
the editing mode of Shutter Stream using ‘Add current image to background
gallery button’.
Figure F. Importing Reference Image (Background only) into BR tool
Iconasys Inc. © 2013-202135
9. After the Background Reference Image has been set, import the product
images into the editing area.
Figure G. Imported product images into Editing Area
10. Select the ‘BR’ tool and adjust:
Mask Selection:
Constrain selection to clicked region: This option, when enabled (checked) will
constrain the background removal to only pixels that are touching each other. If it is
enabled, users will have to select a pixel location (prompted after selecting ‘Apply’
or ‘Apply to All’. Note, there is no real time preview for the constrain option.
Unconstrain selection: This will not constrain the selection and colors that are
similar in the product vs. the background may be removed.
Edge Sensitivity: Defines the level of edge smoothing before applying the
threshold. We suggest this between 0 and 7 (typically much closer to 0).
Threshold: This is used to adjust the amount the tool will remove colors that differ
from the Reference Image. If the color of the product is similar to the background,
you will want to use a lower number. If the product contrasts the background color
Iconasys Inc. © 2013-202136
well, you can use a higher number. For example if you are trying to remove
shadows, you will want to use a higher number – however by increasing Threshold,
it might eat into the product. Users will see flickering grey background – this
denotes which part of the image is being removed. We typically suggest a value
between 5 and 40.
Mask Processing:
Apply to new mask selection only: This will only apply the mask processing
options to the current mask selection
Apply to entire mask: This will apply the mask processing options to the entire
image
Hole Fill Radius: Fills in holes generated by larger threshold values in the BR tool.
A note of warning though: if the tool is applied to objects that already have many
holes, those holes may fill as well.
Speck Removal: This is the opposite of Hole Fill. Remove specks of foreground
from the background.
Mask Grow Radius: This allows users to grow the mask selection area. It is defined
in pixels.
Edge Blending: The sharpness of the transition between the foreground and the
background. We suggest a value between 0 and 5 – typically closer to 0.
As changes are made, they will be reflected in real-time in the Background Removal
Preview Window (areas of the image that will be removed will blink in grey if ‘Blink
Transparent area’ option is checked). Users can adjust the 1:1 preview window
using the viewfinder (shaded blue box) on the small preview to the right.
Iconasys Inc. © 2013-202137
Figure H. Adjusting variables in Background Removal tool
11. Users then have the ability to Apply the Background Removal changes to a
single (Apply button) or entire set of images (Apply to All button).
**For the reference image to work flawlessly, it is important to ensure products are
being shot under correct lighting conditions. To understand suggested lighting
requirements, please see here**
Chroma Key Removal (video): Similar to BR Using Solid Color, this option uses
Chroma key colors (Red, Green or Blue):
1. Shoot on a Red, Green or Blue Background
2. Enable ‘Live View’ mode then place an object in the field of view of the
camera.
3. Adjust camera settings to optimize for lighting environment (if required).
4. Enable Crop and define Pre-Crop markers (if required) - that is the area that
users wish to capture, around the subject.
5. Capture image by clicking Snap button in software – immediately after image
is captured, this will be uploaded into the Shutter Stream application for
viewing.
6. Repeat steps 2 – 5 for shooting additional product images.
Iconasys Inc. © 2013-202138
7. Import the product image(s) into the
editing area, select the BR tool, then
in the Background Removal window,
under ‘Background Removal Type’
select ‘Solid Color’, then select the
best shade of Red, Green or Blue to
match product image(s) background.
8. Next, users will adjust:
Smoothing: The higher the number,
the smoother the edge definition.
*Soft Transparency: Will define the
how much of the background is
completely removed. The higher the
number, the more background that is
completely removed.
9. Adjust Mask Grow Radius (allows
users to grow the mask selection area
- defined in pixels) if required.
10. Users then have the ability to Apply
the Background Removal changes to
a single (Apply button) or entire set of
images (Apply to All button).
11. If required, users can take advantage
of the other editing tools (Lasso Tool,
Levels, Curves, Brightness, Saturation,
Contrast, Sharpness & Hue) to make
additional edits and/or color
corrections.
Soft transparency defined: Soft transparency controls the level of transparency
based on the strength of the background color. By adjusting the transparency
based on the strength of the background color the algorithm is able to more
naturally introduce transparency around the edge of the object. Increasing the soft
transparency threshold ignores subtle color changes more. This has the effect of
making the background completely transparent. A lower value of soft transparency
results in more semi-transparent backgrounds (versus fully transparent
backgrounds) that look more natural. This effect can be easily noticed around
strands of hair, smoke, fine details or transparent objects with a lot of color
Iconasys Inc. © 2013-202139
gradients. When the soft transparency is set to a low number, the fine details are
maintained extremely well but the background is not fully transparent -- unless the
pixels are exactly the color set for transparency. This creates a more natural look
when replacing the background with another image or another color. When the
soft threshold is set to a high number, the color transparency becomes more
aggressive and more pixels become fully transparent at the cost of removing finer
details and making the object look less natural and more threshold with fully
transparent background pixels.
When using Chroma Key Background Removal it is best to set the background as
far away from the object as possible so that the fine details of the background (i.e.
material texture) are not in focus and they are out of the depth of field. This will
allow users to use a lower soft transparency threshold, which will make the results
look more natural.
Dual Shot Background Removal: The Dual Shot Background Removal Tool uses 2
images, shot at different exposure, and will attempt to remove backgrounds by
analyzing both images.
Step 1: Enable Live View, adjust camera settings to correct exposure and save
camera settings profile (ex. name it Correct-Exposure). Camera Settings Profiles can
be saved using the blue disc icon in the top right of the camera settings window.
Iconasys Inc. © 2013-202140
Step 2: While in Live View, adjust camera settings to an underexposed setting and
save camera settings profile (ex. name it Underexposed). To adjust camera settings
exposure, we suggest adjusting Shutter Speed.
Iconasys Inc. © 2013-202141
Step 3: Enter Options area, select ‘Snap Options’ then select ‘Dual Shot Options’ and
select:
Shot 1 camera profile: Correct-Exposure
Shot 2 camera profile: Underexposed
Step 4: Enable Dual Shot Shooting Mode: Right click the ‘Snap’ icon under Image
Capture Tools menu and select “Image Capture with Dual-Shot’
Step 5 (optional): Pre Crop Subject:
Iconasys Inc. © 2013-202142
Step 6: Snap Image:
Step 7: Continue snapping images of product (if multiple angles required)
Iconasys Inc. © 2013-202143
Step 8: Select Images and enter into the ‘Editing’ area
Step 9: Select Background Removal tool and select option ‘Dual Shot Background
Removal’:
Step 10: Select Mask Type: ‘Use Odd Images as Mask’
Iconasys Inc. © 2013-202144
Step 11: Adjust the mask layer using settings:
Mask Selection:
Constrain selection to clicked region: This option, when enabled (checked) will
constrain the background removal to only pixels that are touching each other. If it is
enabled, users will have to select a pixel location. This can be done by clicking the
mouse on the preview image on the background. If users forget to define selection
area, they will be prompted after selecting ‘Apply’ or ‘Apply to All’). Note, there is no
real time preview for the constrain option.
Users will be able to adjust the mask using histogram tonal adjustments.
Darks: This refers to all black or dark pixels in the image
Mids: This refers to all mid tones in the image
Brights: This refers to all white or highlights in the image
Users will make adjustments to the 3 slide bars to find an optimal mask that will
properly cut the image from its background. We suggest keeping these 3 bars close
together (for example, Darks: 111, Mids: 112, Brights: 113). If you are editing an
product image with some opacity (ex. a water bottle), it is suggested to spread out
the sliders.
Iconasys Inc. © 2013-202145
Mask Processing:
Apply to new mask selection only: This will only apply the mask processing
options to the current mask selection
Apply to entire mask: This will apply the mask processing options to the entire
image
Hole Fill Radius: Fills in holes generated by larger threshold values in the BR tool.
A note of warning though: if the tool is applied to objects that already have many
holes, those holes may fill as well.
Speck Removal: This is the opposite of Hole Fill. Remove specks of foreground
from the background.
Mask Grow Radius: This allows users to grow the mask selection area. It is defined
in pixels.
Edge Blending: The sharpness of the transition between the foreground and the
background. We suggest a value between 0 and 5 – typically closer to 0.
As changes are made, they will be reflected in real-time in the Background Removal
Preview Window (areas of the image that will be removed will blink in grey if ‘Blink
Transparent area’ option is checked). Users can adjust the 1:1 preview window
using the viewfinder (shaded blue box) on the small preview to the right.
Step 12: Apply to a single or set of images (option to delete the mask after applying
the edits)
Magic Wand Tool (video)
Iconasys Inc. © 2013-202146
Steps:
1. Import images into ‘Editing’ area
2. Select ‘Magic wand’ tool
3. Hover mouse over image preview
on right side of UI and select
background color (icon will show
color picker)
4. Adjust variables (Threshold, Edge
Sensitivity, Edge Blending, Hole
Fill Radius, Mask Grow Radius,
Speck Removal) and inspect
image using 1:1 viewer in preview
window (shaded blue square
shows viewing area).
5. Optional: Constrain BR to
connected growth region.
6. Select ‘Apply’ or ‘Apply to All’ to
process images.
Magic Wand Options Explained:
Mask Selection:
Constrain selection to clicked region: This option, when enabled (checked) will
constrain the background removal to only pixels that are touching each other. If it is
enabled, users will have to select a pixel location (prompted after selecting ‘Apply’
or ‘Apply to All’. Note, there is no real time preview for the constrain option. For
example, if object has a hole in the center of it, the center hole would not be
selected if this option was checked.
Unconstrain selection: Will select pixels within the threshold anywhere on the
image frame. For example, if object has a hole in the center of it, the center hole
would be selected if this option was checked.
Iconasys Inc. © 2013-2021You can also read