Running Payroll with an Intuit Payroll Service
←
→
Page content transcription
If your browser does not render page correctly, please read the page content below
APPENDIX

                                                                                                                   D
Running Payroll with an
Intuit Payroll Service

I
  f you’re reading this appendix, you’ve probably decided to use Intuit’s Basic or
  Enhanced Payroll service. (Pages 416–417 of QuickBooks 2015: The Missing Manual
  describes those services’ features.) This appendix starts by describing how to sign
up for an Intuit payroll service and then activate it in QuickBooks. After that, you’ll
learn how to set up what you need to run payroll in your company file: accounts to
track payroll liabilities and expenses; payroll items to fill out paychecks; and employee
records for the people you need to pay.
Once your payroll setup is complete, you’ll learn how to set up payroll schedules,
which take the tedium out of paying employees on a regular timetable. You’ll also
learn how to run an unscheduled payroll to, for example, dish out bonuses at the
end of the year. This appendix wraps up with info about paying payroll liabilities,
such as employer payroll taxes, employee withholdings, health insurance premiums,
and retirement plan contributions.

 NOTE       Intuit regularly updates its payroll services and tax tables to keep up with ever-changing payroll
rules and regulations. Sometimes, they introduce new payroll features or enhancements on a different schedule
than QuickBooks releases. This online appendix will reflect new and enhanced payroll features when they become
available.

      Signing Up for an Intuit Payroll Service
If you decide to use Basic or Enhanced Payroll, you can sign up from within Quick-
Books. (Page 415 describes the various payroll services that Intuit offers.) Here’s
how you sign up for Basic or Enhanced Payroll in QuickBooks:

                                                                                                                      D-1
SIGNING UP
FOR AN INTUIT
  PAYROLL        1. Make sure that your company file contains your company’s legal name and
   SERVICE          Employer Identification number (EIN) by choosing Company→My Company
                    and making sure the Legal Name & Address and EIN fields are correctly
                    filled in.
                   The payroll service needs your EIN (see page 412) and the legal name of your
                   company, which is on your Articles of Incorporation or other legal documents
                   you received when you formed your company. With that info in your company
                   file, QuickBooks pulls it from your file during the signup process and fills in the
                   appropriate boxes for you. If you haven’t filled in those fields yet, see page 27
                   to learn how.
                 2. Choose Employees→Payroll→“Turn on Payroll in QuickBooks.”
                   QuickBooks opens the browser window shown in Figure D-1, and selects the first
                   option: “I want to pay & file my payroll taxes myself in a few clicks, with forms
                   completed by QuickBooks Payroll.” That option represents the most popular
                   Intuit payroll service—Enhanced Payroll.
                   If you want to sign up for Basic Payroll instead, select the second option: “I want
                   my accountant to pay & file my payroll taxes for me.” (Despite this option’s label,
                   if you sign up for Basic Payroll, you can pay and file your payroll taxes without
                   your accountant’s help if you want to.) Unlike Enhanced Payroll, Basic Payroll
                   doesn’t provide federal or state payroll tax forms in QuickBooks. That means
                   you need to run reports (page D-44) after you run payroll to get the info you
                   need to fill out those tax forms by hand.

                                                                         FIGURE D-1
                                                                         To sign up for Enhanced Payroll,
                                                                         select the first option, as shown
                                                                         here. Select the second option to
                                                                         choose Basic Payroll instead.

                 3. After you select the option you want, click the See My Plan button.
                   Depending on which option you chose, you’ll see either the Turn on Enhanced
                   Payroll screen or the Turn on Basic Payroll screen. If you want to learn more about
                   the service before you sign up, click each of the tabs in the middle of the screen.

 D-2            QUICKBOOKS 2015: THE MISSING MANUAL
SIGNING UP
                                                                                                                      FOR AN INTUIT
 4. Select either the “Pay annually” or “Pay monthly” option.                                                           PAYROLL
                                                                                                                         SERVICE
      You’ll pay less for your service overall by paying for an entire year up front.
 5. When you’re ready to sign up, click Try Now.
      You get a 30-day free trial. If you aren’t satisfied with the service, simply cancel
      it before the 30 days are up and Intuit won’t charge your credit card.
 6. On the “Review your order” page that appears, fill in your payment infor-
    mation (if necessary), and then click the Place Order button at the screen’s
    bottom right. (If Intuit doesn’t have your company or user registration
    information, fill in the payment fields, and then click the Checkout button.)
      If Intuit already has your credit card on file, it automatically fills in the “Review
      your order” page with that info. If you prefer, you can enter info for a different
      credit card to use instead.
      Be aware that Intuit automatically renews your subscription. So when you click
      Place Order, you authorize Intuit to charge the subscription price to your credit
      card after your free trial ends until you cancel the subscription. After you sub-
      mit your application, QuickBooks checks the company information and credit
      card number you provided. If it runs into any problems, a message tells you to
      contact Intuit (and conveniently lists the phone number to call).
  7. On the “Confirm your business information” page that appears, make sure
     that your EIN, owner name, and legal business name and address are cor-
     rect (if they’re not, edit them), and then click Continue. (If Intuit doesn’t
     have your user registration information, the button is labeled Place Order
     instead.)
      When you click Continue, the “That’s It! Payroll is on” screen appears and tells
      you that QuickBooks is going to download the latest tax tables and help you
      set up payroll.
 8. To complete payroll setup, click the Get Started button.
      QuickBooks automatically turns on the QuickBooks payroll preference, down-
      loads the latest tax table updates and other relevant info, activates your payroll
      service key, and launches Payroll Setup so you can begin setting up payroll, as
      described in the next section. QuickBooks also adds payroll-related entries to
      the Employees menu and to the Home Page’s Employees panel.

  TIP If you sign up for an Intuit payroll service outside of QuickBooks or your service doesn’t turn on auto-
matically in QuickBooks, you can manually activate it. First, choose Edit→Preferences→Payroll & Employees.
On the Company Preferences tab, select the “Full payroll” option (if it isn’t already selected), and then click OK.
Then, choose Employees→Payroll Service Options→Enter Payroll Service Key. In the dialog box that appears,
type the code you received from Intuit when you signed up.

           Appendix D: Running Payroll with an Intuit Payroll Service                                                         D-3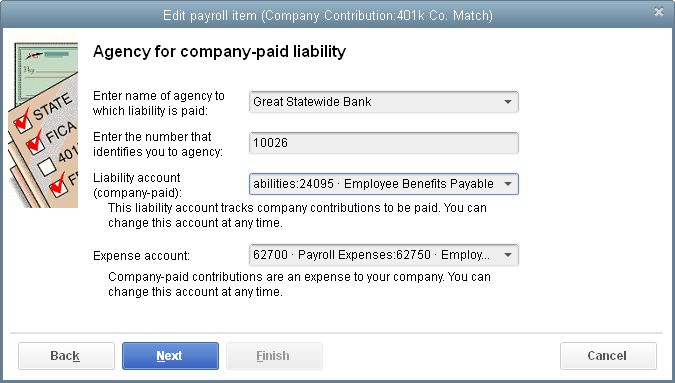
AN INTRO TO
QUICKBOOKS
PAYROLL
SETUP An Intro to QuickBooks Payroll Setup
QuickBooks includes the Payroll Setup interview to help you with most of your
payroll setup steps. However, that feature doesn’t handle every aspect of payroll
setup. For example, you might create additional payroll-related accounts before
you launch the interview. You can also fine-tune payroll items in the Payroll Item
List at any time. This section gives you an overview of your payroll setup tasks. It
also describes some of the payroll-related accounts you might want to create and
introduces you to the QuickBooks Payroll Setup interview.
NOTE When you use the Payroll Setup interview, behind the scenes, QuickBooks creates Payroll items, which
are similar to the service and product items you add to invoices, except that they represent the things you need to
produce payroll checks for, like compensation, benefits, taxes, and so on. All the data you see on paychecks and
payroll reports comes from Payroll items. The Enter Payroll Information window (Employees→Pay Employees)
and other payroll features use only Payroll items. Conversely, in the Write Checks window’s Items tab, the Item
drop-down list includes every type of item except Payroll items.
An Overview of the QuickBooks Payroll Setup Process
To make payroll run as smoothly as possible, you need to set up payroll properly in
QuickBooks. Here’s an overview of the steps you need to perform:
1. Gather employee information, such as names, addresses, Social Security
numbers, and W-4 information, as described on page 413.
2. If you haven’t already done so, turn on payroll in your company file (page
657).
3. Set up payroll accounts to track payroll liabilities and expenses (page D-5).
4. Use the QuickBooks Payroll Setup interview to set up payroll items (de-
scribed beginning on page D-6), and fill in employee payroll records (page
D-26).
5. Use the Payroll Center to define employee default values (page D-22).
6. If necessary, create additional payroll items or edit payroll items in the
Payroll Item List, as described on page D-22.
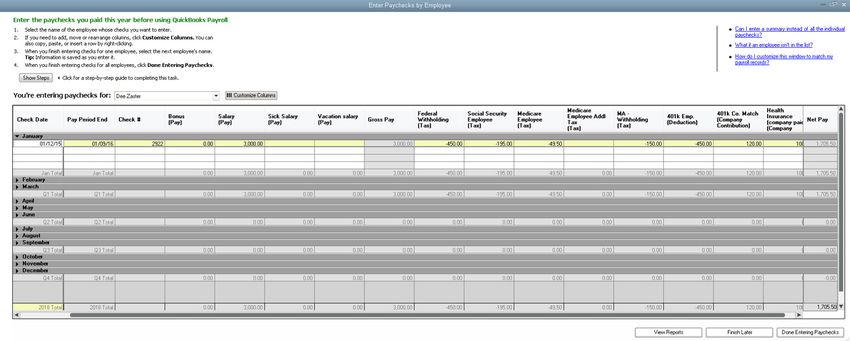
7. If you’ve paid employees in the current calendar year, enter year-to-date
payroll information (page D-30).
8. Compare your QuickBooks payroll setup and payroll reports with reports
from your accountant or prior payroll service to make sure that you have
all the accounts, items, and other information you need.
The following pages cover these steps in detail. And the box on page D-8 offers
advice about the right time to set up payroll.
D-4 QUICKBOOKS 2015: THE MISSING MANUAL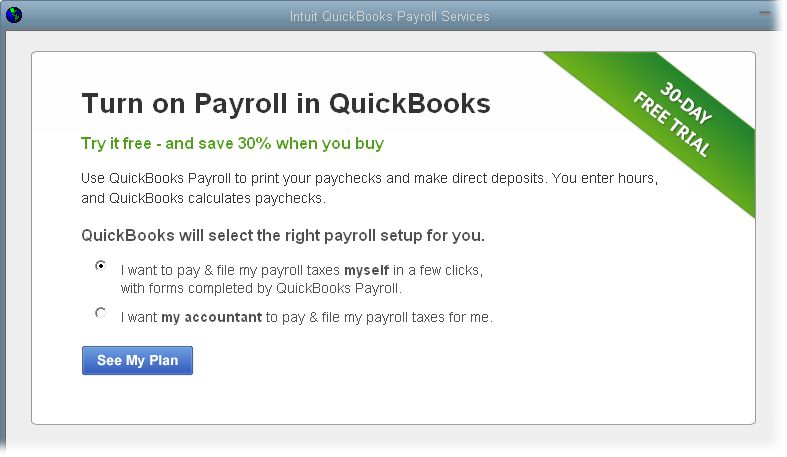
SETTING UP
                                                                                                                         PAYROLL
       Setting Up Payroll Accounts                                                                                      ACCOUNTS
When you first turn on payroll in QuickBooks, the program automatically creates
two accounts to track payroll: Payroll Expense for company expenses like wages and
payroll taxes, and Payroll Liabilities for the payroll taxes, withholdings, and other
payroll-related payments you need to make. If you use only those two accounts
when you run payroll, QuickBooks posts expenses to the Payroll Expense account
and posts money you owe to the Payroll Liabilities account. Although your records
will technically be correct, your accounts won’t show how much you paid for each
type of expense or liability; to see that info, you’ll have to run a payroll report.
If you want to include more payroll detail on your financial statements, simply create
additional accounts to track that detail. First, you need to decide which accounts you
want to see on your financial statements. For example, you may want accounts such
as Payroll Taxes, Wages and Salaries, Company-paid Benefits, and Officers Salaries
on your Profit & Loss report (page 445). On the Balance Sheet (page 451), you may
want to add subaccounts to the Payroll Liabilities account for federal tax withhold-
ing, state tax withholding, Social Security, Medicare, Federal Unemployment, State
Unemployment, Employee Deductions, and Benefits. (Expenses appear on Profit &
Loss reports, while liabilities show up on Balance Sheet reports.) Table D-1 shows one
way to break down payroll accounts. See page 56 to learn how to create accounts.

 TIP    Breaking down payroll into finer detail also makes it easier to find the culprit if you spot a payroll error.
That way, instead of looking through all your payroll accounts, you can focus on the one account whose total is
off.

TABLE D-1 Examples of additional accounts you can create to track payroll info in more detail

 PAYROLL ITEMS                          ACCOUNT                                WHEN IT’S USED

 Hourly, Salary, Commissions,           Salaries and Wages expense             Running payroll
 Bonuses, Tips                          account

 Officers Salary                        Officers Salaries expense              Running payroll
                                        account

 Federal Withholding Tax                Federal Withholding liability          Running payroll
                                        account

 Social Security Employee               FICA Payable liability                 Running payroll
 (employee paid)                        account

 Social Security Employer               FICA Payable liability                 Running payroll
 (company paid)                         account

 Social Security Employer               Payroll Taxes expense                  Remitting payroll taxes
 (company paid)                         account

 Medicare Employee                      FICA Payable liability                 Running payroll
 (employee paid)                        account

           Appendix D: Running Payroll with an Intuit Payroll Service                                                         D-5
SETTING UP
PAYROLL
ACCOUNTS PAYROLL ITEMS ACCOUNT WHEN IT’S USED
Medicare Employer FICA Payable liability Running payroll
(company paid) account
Medicare Employer Payroll Taxes expense Remitting payroll taxes
(company paid) account
Federal Unemployment, FUTA Payable and SUTA Running payroll
State Unemployment Payable liability accounts
Federal Unemployment, FUTA Expense and SUTA Remitting payroll taxes
State Unemployment Expense expense accounts
State Withholding Tax State Withholding liability Running payroll
account
Union Dues, Simple IRA, Employee Deductions Running payroll
401(K), HSA, Child Support, liability account
Wages Garnishments
Employer 401(K) match, Employee Benefits Payable Running payroll
Simple IRA match, HSA liability account
Contribution
Employer 401(K) match, Employee Benefits expense Remitting employee benefit
Simple IRA match, HSA account payments
Contribution
Working with the Payroll Setup Interview
The QuickBooks Payroll Setup interview guides you through the setup process and
shows how far along you are, as illustrated in Figure D-2. This section explains how
to navigate through the interview’s various steps.
Here’s a quick peek at how the QuickBooks Payroll Setup interview works:
1. To launch the Payroll Setup interview, choose Employees→Payroll Setup.
The first time you open the QuickBooks Payroll Setup window, the “Welcome
to QuickBooks Payroll Setup” screen displays two options.
2. If you’ve never run payroll before (with or without QuickBooks’ help),
select “The company has never issued paychecks” option. If you’ve issued
paychecks and paid payroll taxes in the past, select the “The company is
changing to QuickBooks Payroll” option instead. Then click Continue.
The “How do you want to set up pay types and paycheck items?” screen appears.
D-6 QUICKBOOKS 2015: THE MISSING MANUALSETTING UP
PAYROLL
ACCOUNTS
FIGURE D-2
A green arrow on the win-
dow’s left side indicates
which task you’re working
on (here, that’s Compensa-
tion). As you complete
the various payroll setup
steps, the interview adds
a green checkmark to the
completed tasks.
3. Choose your preferred option, and then click Continue.
The “Typical new employer setup” option is perfect if you haven’t yet set up
accounts with the appropriate tax agencies, but you can’t wait because you
need to pay your employees. When you select this option, the Payroll Setup
interview chooses default values for all your tax items and then jumps straight
to Employee Setup, so you can create paychecks. Once you have your payroll
tax information, you have to go back to the Payroll Setup interview (choose
Employees→Payroll Setup and then, on the left side of the interview window,
click Taxes) and modify settings and items to match how you pay employees.
If your new tax settings differ from the default values the program chose,
QuickBooks creates the necessary liability adjustments.
To make your own decisions about payroll items and settings, select the “Custom
setup” option instead.
You don’t have to go through the whole payroll setup process in one shot. You can
click a category on the dialog box’s left to jump to that setup step. Click a subcat-
egory to start filling in information. If you want to take a break, simply click the
Finish Later button, and the interview remembers everything you’ve done so far.
(If you selected the “Custom setup” option in step 3, you have to complete every
bit of payroll setup before you can run a payroll.)
Appendix D: Running Payroll with an Intuit Payroll Service D-7SETTING UP
COMPENSATION
ITEMS
UP TO SPEED
Choosing the Right Payroll Start Date
If you’ve paid employees using any method other than an Intuit If it’s nearing the end of the year, the easiest route is to wait
Payroll service, there’s a right and wrong time to start using until January 1 to switch to Intuit payroll. However, if you decide
QuickBooks for payroll. You have to file 941 reports (Employer’s to start mid-year, you can save yourself a lot of data entry by
Quarterly Federal Tax Returns) quarterly, as their name implies. starting to use QuickBooks for payroll at the beginning of a
Therefore, QuickBooks won’t let you summarize payroll data quarter. You’ll still have to enter summary values for each past
for the current quarter; instead, you have to enter individual quarter in the current year (page D-29), but you won’t have to
pay period totals from the beginning of the current quarter up enter any individual payrolls.
to the date you start using QuickBooks payroll.
Setting Up Compensation Items
The first items you define in the Payroll Setup interview tell QuickBooks how you
compensate your employees—whether you pay them a salary, hourly wages, or
additional income such as bonuses or commissions. This section describes how to
set up a few commonly-used compensation items.
NOTE If you’re intimidated by the QuickBooks Payroll Setup checklist and the number of choices you have
to make, you might consider hiring a QuickBooks ProAdvisor (to find one, head to http://proadvisor.intuit.com/
find-a-proadvisor/search.jsp) or an accountant who’s knowledgeable about QuickBooks payroll. Fortunately, once
payroll is set up, running payroll is easy (see page D-31).
Here’s how to create compensation payroll items:
1. If the Payroll Setup interview isn’t open, choose Employees→Payroll Setup.
The Payroll Setup interview launches.
2. In the left navigation bar, click Company Setup, and then click Compensa-
tion.
The “Review your Compensation list” screen (shown in Figure D-2) displays
the most common compensation items. You can add, edit, or delete items to
reflect your payroll needs.
3. To add a new compensation item, click the Add New button below the list.
The Add New window includes checkboxes for several types of compensation
items.
D-8 QUICKBOOKS 2015: THE MISSING MANUALSETTING UP
4. In the Add New dialog box, turn on the checkboxes for the compensation COMPENSATION
items you want to add. For example, you might turn on “Hourly wage and ITEMS
overtime” and Commission as shown in Figure D-3. Then click Next.
You can turn on the checkboxes for all the compensation items you want to cre-
ate. When you click Next, if QuickBooks needs more info, the interview displays
screens with fields and other settings.
FIGURE D-3
When you turn on check-
boxes for compensation
items (as shown here)
and then click Next, the
interview asks questions
about the items you’re
adding. (Not surprisingly,
if the interview doesn’t
need additional info for
an item, you won’t see a
screen for that item.)
5. In the Add New dialog box, fill in the boxes and select options related to
hourly compensation (Figure D-4).
For example, fill in the “Show on paycheck as” box with the label you want to
appear for hourly compensation on paychecks, such as “Hourly.” Select the Yes
or No options to tell QuickBooks whether hourly employees receive time-and-a-
half or double-time pay. If you select the Yes option for either hourly overtime
rate, you can also change the label that appears on paychecks for those items.
Appendix D: Running Payroll with an Intuit Payroll Service D-9SETTING UP
COMPENSATION
ITEMS
FIGURE D-4
In the Payroll Setup
interview, you don’t specify
salary or hourly pay rates.
Instead, you set up an
hourly or annual pay rate
for each employee as
described on page D-27.
QuickBooks then uses those
rates to calculate the values
for each paycheck.
6. Click Next to display the settings for the next item—in this example, that’s
the Commission item. Select the appropriate option (here, that’s “Percent-
age of sales (or other amount)”), and then click Finish.
The new items appear in the interview’s Compensation list, and behind the
scenes, QuickBooks adds them to the Payroll Item List (choose Lists→Payroll
Item List to see it). For example, when you add “Hourly wage and overtime,” the
program creates an Hourly item. If you selected the Yes options for overtime,
it also creates “Double-time hourly” and “Overtime (x1.5 hourly).” QuickBooks
also links those items to accounts in your chart of accounts so you can track
your payroll liabilities and expenses.
If you want to review or edit the items you just created, here’s what you do:
1. On the interview’s “Review your Compensation list” screen, select the item,
and then click the Edit button below the list.
The Edit dialog box appears with fields for the item you selected, as shown in
Figure D-5.
D-10 QUICKBOOKS 2015: THE MISSING MANUALSETTING UP
EMPLOYEE
BENEFITS
FIGURE D-5
For some payroll items, the
Edit dialog box contains
additional fields that aren’t
available when you first
create the item. So if you
don’t see a field you want
to set when you create a
payroll item, simply edit
the item to change that
setting. You can edit payroll
items in the interview or
in the Payroll Item List
window (page D-22).
2. Make the changes you want, such as the account linked to the item, and
then click Finish.
For example, when you edit the Hourly item, you’ll see the “Account type” field
set to Expense, which is what you want. But if the “Account name” is set to
something generic like Payroll Expenses, click the down arrow and choose the
subaccount you want, such as “Payroll Expenses: Salaries and wages.” If you
edit the Commission item, you can also specify the commission rate or amount.
3. When you’re done setting up compensation items, click Continue at the
dialog box’s bottom right.
The interview jumps to the Employee Benefits category, which is described in
the next section.
Setting Up Employee Benefits
As you probably already know, employee benefits come in many shapes and sizes.
The Payroll Setup interview helps you set up these items. This section shows you
how to set up some typical employee benefits.
Appendix D: Running Payroll with an Intuit Payroll Service D-11SETTING UP
EMPLOYEE You can get to the interview’s Employee Benefits category in two ways: click Em-
BENEFITS ployee Benefits on the interview’s left or, if you’re finished working on Compensation
items, click Continue on the “Review your Compensation list” screen. Either way,
the Employee Benefits category on the interview’s left expands to show the types
of benefits you can define: Insurance Benefits, Retirement Benefits, Paid Time Off,
and Miscellaneous.
Defining Insurance Benefits
The Payroll Setup interview lets you define benefits for health, dental, vision, and
life insurance. You can also set up other types of insurance, such as health savings
accounts or flexible spending plans. Here’s an example that shows how to set up
health insurance benefits:
1. On the interview’s left, click Insurance Benefits. (If you don’t see it, click
Company Setup→Employee Benefits to display it.)
Alternatively, if the “Set up employee benefits” screen is visible, click Continue.
2. Click the Add New button, and then, in the Add New dialog box, turn on
the checkboxes for the insurance items you want to add, such as “Health
insurance.”
If you don’t know what an insurance benefit represents, click the Explain link
to the label’s right.
3. Click Next to begin setting up the items you selected.
If you turned on more than one checkbox, the interview will step you through
screens for the benefits you selected.
4. In this example, on the “Tell us about health insurance” screen (Figure D-6),
select the “Both the employee and company pay portions” option, select
the “Payment is deducted after taxes” option, and then click Next.
When you choose these options, QuickBooks creates payroll items for the
company’s and employees’ payments with the employees’ portions deducted
after taxes.
NOTE If your company pays for health insurance, you need a payroll item only if you include those benefits
on employees’ W-2s. If you aren’t sure whether you need payroll items for company-paid benefits, ask your ac-
countant or tax professional.
5. On the “Set up the payment schedule for health insurance” screen, fill in the
vendor’s name (the company that you send health insurance premiums to),
your company’s account number, and, if necessary, specify your payment
schedule, as shown in Figure D-7. Then click Finish.
When you click Finish, you see the “Review your Insurance Benefits” list, which
now includes your health insurance items. For this example, you’ll see a “Health
D-12 QUICKBOOKS 2015: THE MISSING MANUALSETTING UP
Insurance (company paid)” item for the company’s portion and a “Health Insur- EMPLOYEE
ance (taxable)” item for what employees pay after tax. BENEFITS
FIGURE D-6
When you share the
expense with employees or
they pay the entire amount,
options appear so you can
specify whether the pay-
ment is deducted before or
after taxes are calculated.
For example, Section 125
health plan payments are
deducted before taxes, so
they reduce employees’
tax bills.
FIGURE D-7
Initially, the interview
selects the “I don’t need a
regular payment schedule
for this item” option, which
means you have to make
your payments manually. If
you select one of the other
options, QuickBooks sets
up a payment schedule so
you know when the next
payment is due. Page D-40
explains how to make pay-
ments with this payment
schedule.
6. To edit the “Health Insurance (taxable)” item, select it, and then click the
Edit button.
The Add New dialog box doesn’t give you a chance to specify all the settings
for this item, so you have to edit it to make those changes.
7. Click Next until you see the Edit After-Tax Employee-Paid Health screen.
In the “Account name” box, choose the liability account you want to use
(such as Payroll Liabilities:Emp. Health Ins Payable), and then click Next.
Appendix D: Running Payroll with an Intuit Payroll Service D-13SETTING UP
EMPLOYEE The “Tell us which taxes apply to this item” screen appears and selects the “Use
BENEFITS standard tax settings” option. In most cases, QuickBooks chooses the correct
tax tracking type for the item you’re creating, so you can click Next to jump to
the next screen.
8. On the “Tell us how to calculate the amount” screen (Figure D-8), fill in the
boxes to specify how to calculate the employee’s premium.
Suppose the employee pays a flat amount per paycheck. In that case, keep the
“Calculate amount” box set to “Do not calculate. Enter flat amount” and, in the
“Default rate or amount” field, enter the amount the employee pays, such as
50. If necessary, fill in the boxes to define any limits to what the employee pays.
FIGURE D-8
You’ll see different fields
depending on the choice
you make in the “Calculate
amount” drop-down
list. For example, if you
calculate the premium as
a percentage of pay, the
“Based on” field appears
and you can choose “% of
net” or “% of gross” to use
the employee’s net (after
deductions and taxes) or
gross pay.
9. Click Finish.
The “Review your Insurance Benefits list” screen reappears.
10. If you want to edit another item, select it, click the Edit button, and then
answer the interview’s questions. When you’re done, click Finish.
When the health insurance items are set up the way you want, click Continue to
jump to the Retirement Benefits category, which is described in the next section.
Setting Up Retirement Benefits
Retirement benefits include various tax-advantaged plans like 401(k)s and 403(b)s,
which are named after the tax code sections that cover them. When you offer retire-
ment benefits, you can set up Payroll items for your employees’ contributions along
with any matching contributions your company makes. This section uses employer
and employee contributions to a 401(k) plan as an example of defining retirement
benefits in QuickBooks.
D-14 QUICKBOOKS 2015: THE MISSING MANUALSETTING UP
Here’s how you set up employee and company matching contributions to a 401(k) EMPLOYEE
plan: BENEFITS
1. On the Payroll Setup interview window’s left, click Retirement Benefits.
(If you don’t see that category, click Company Setup→Employee Benefits
to display it.)
Alternatively, if the “Review your Insurance Benefits list” screen is visible, you
can click Continue to jump to the retirement benefits category and automati-
cally open the Add New dialog box. (If the Add New dialog box doesn’t open,
click the Add New button below the list.)
2. In the Add New dialog box (Figure D-9), turn on the checkbox for the plan(s)
you offer—such as “401(k) (most common)”—and then click Next.
The “Set up the payment schedule for 401(k)” screen appears.
FIGURE D-9
In addition to different
retirement plans, you can
also turn on checkboxes
to tell QuickBooks that
your plan offers Roth
contributions.
3. On the “Set up the payment schedule for 401(k)” screen, in the Payee (Ven-
dor) box, choose the company that manages your retirement plan.
You can’t add a new vendor from the drop-down list. If you haven’t created
the vendor yet, continue with the next step to save the new payroll item. Then,
create the new vendor (page 84); after that, you can edit the 401(k) payroll
item (page D-16) to add the vendor.
Appendix D: Running Payroll with an Intuit Payroll Service D-15SETTING UP
EMPLOYEE 4. Fill in your company’s account number, and, if necessary, specify your pay-
BENEFITS ment schedule. Then click Finish.
When you click Finish, the “Review your Retirement Benefits” list includes two
new items (in this example, 401k Co. Match and 401k Emp). You need to edit
these items to add the rest of the info, as described in the next section.
EDITING RETIREMENT BENEFIT ITEMS
You can edit payroll items in the QuickBooks Payroll Setup interview or from within
the Payroll Item List. Here’s how to do the latter:
1. If the interview window is still open, at its bottom left, click the Finish Later
button to close it. In the Finish Later message box, click OK
2. Choose Lists→Payroll Item List.
The Payroll Item List window opens.
3. Right-click the 401k Co. Match item, and then choose Edit Payroll Item on
the shortcut menu. In the “Edit payroll item (Company Contribution: 401k
Co. Match)” dialog box, click Next.
If you want to change the label that appears on paychecks, before you click
Next, edit the value in the “Show on paychecks as” box.
4. If you didn’t add the vendor and account number when you created the
payroll item, then in the “Enter name of agency to which liability is paid”
drop-down list, choose the company that manages your plan and in the
“Enter the number that identifies you to agency” box, enter your plan ac-
count number.
5. In the “Liability account (company paid)” drop-down list, choose the li-
ability account for your company matching contributions. In this example,
that’s Payroll Liabilities: Employee Benefits Payable (Figure D-10).
This account holds your company matching funds until you deposit them in your
401(k) plan account to be distributed to your employees’ accounts.
6. In the “Expense account” drop-down list, choose the expense account you
want to use for company matching contributions, such as Payroll Expenses:
Employee Benefits, and then click Next.
This expense account tracks your company’s matching expenses after you pay
off your 401(k) plan liabilities.
7. On the “Tax tracking type” screen, keep 401(k) Co. Match selected, and
then click Next. On the Taxes screen, click Next.
QuickBooks usually chooses the correct tax tracking type and associated taxes
for the payroll items you create. If it doesn’t select the correct tax tracking type,
choose the one you want from the drop-down list. Then, on the Taxes screen,
you can select the affected tax items by turning on their checkmark cells.
D-16 QUICKBOOKS 2015: THE MISSING MANUALSETTING UP
EMPLOYEE
BENEFITS
FIGURE D-10
If you can’t see the entire
account name in the field,
click within the field, and
then press the End key
to show the end of the
account name.
8. On the “Calculate based on quantity” screen, keep the Neither option se-
lected and click Next.
The Neither option is the most common choice; it tells QuickBooks you want
to specify a percentage of pay or a flat amount per paycheck. You can choose
other options to calculate company matching based on the hours worked or a
value you enter on employees’ paychecks.
9. On the “Default rate and limit” screen, fill in the first unlabeled field with
the flat rate or the percentage you want to use, such as 4%.
You can also fill in the second unlabeled field with your upper limit for company
matching. In most cases, you keep the Limit Type field set to “Annual – Restart
each year”.
10. Click Finish.
Here’s how you edit the Payroll item for employee 401(k) contributions.
1. In the Payroll Item List, right-click 401k Emp., and then choose Edit Payroll
Item from the shortcut menu. In the “Edit payroll item (Deduction: 401k
Emp.)” dialog box, click Next.
2. If necessary, on the “Agency for employee-paid liability” screen, choose
the vendor who manages your plan. In the “Liability account (employee-
paid)” drop-down list, choose the liability account for employee 401(k)
contributions (in this example, that’s Payroll Liabilities: Employee Deduc-
tions). Then click Next.
Appendix D: Running Payroll with an Intuit Payroll Service D-17SETTING UP
EMPLOYEE The liability account holds the employee contributions that you deduct from their
BENEFITS paychecks until you deposit those funds in the 401(k) plan. You don’t specify an
expense account for employee contributions because your company incurs no
expense. You simply deduct the contributions from the employees’ paychecks
and then deposit those contributions into the 401(k) plan.
3. On the “Tax tracking type” screen, keep 401(k) selected, and then click
Next. On the Taxes screen, click Next.
On the Taxes screen, QuickBooks automatically turns on the Federal Withhold-
ing item’s checkmark cell. That’s because employee 401(l) contributions reduce
employees’ taxable income, so you don’t have to withhold as much federal tax.
4. On the “Calculate based on quantity” screen, keep the Neither option se-
lected and click Next.
Selecting this option lets you specify the percentage or amount you want
QuickBooks to deduct.
5. On the “Default rate and limit” screen, fill in the first unlabeled field with
the flat rate or percentage you want to use, such as 15%.
QuickBooks uses the value you enter here if you don’t specify a value in an
employee’s record.
6. In the second unlabeled field, fill in the upper limit for employee contribu-
tions (for example, $18,000 for the year 2015). Keep the Limit Type field
set to “Annual – Restart each year,” and click Finish
Setting Up Paid Time Off and Miscellaneous Items
Benefits like sick time and vacation pay fall into the Paid Time Off category. The Mis-
cellaneous category covers anything else that’s added or deducted from paychecks,
like cash advances, mileage reimbursements, or union dues. This section describes
how you set up these payroll items in the Payroll Setup interview.
Here’s how to add and edit paid time off items:
1. If the interview window isn’t open, choose Employees→Payroll Setup. On
the interview’s left, click Paid Time Off.
If you don’t see that category, choose company Setup→Employee Benefits→Paid
Time Off. Alternatively, if you just finished setting up retirement benefits, on
the “Review your Retirement Benefits list” screen, click Continue to jump to
the Paid Time Off category.
2. To add paid time off items, in the “Review your Paid Time Off list” screen,
click the Add New button.
The Add New dialog box opens with two checkboxes: “Paid sick time off” and
“Paid vacation time off.”
D-18 QUICKBOOKS 2015: THE MISSING MANUALSETTING UP
3. Turn on both checkboxes, and then click Finish. EMPLOYEE
BENEFITS
The “Review your Paid Time Off list” screen now includes items for sick time
and vacation for both hourly and salaried employees.
4. If you want to edit your paid time off items (for example, to change the ex-
pense account to which they’re linked), select the item, and then click the
Edit button below the list. Make the changes you want, and then click Finish.
You can also edit these items in the Payroll Item List window as described for
retirement benefit items on page D-22.
5. On the “Review your Paid Time Off list” screen, click Continue to move to
the Miscellaneous category.
You can also click the Miscellaneous category on the interview’s left.
6. To add items for other additions or deductions, click the Add New button
below the list. In the Add New dialog box, turn on the checkboxes for the
items you want to create. Then click Next and fill in any fields you want to
change.
If the interview doesn’t need any information about the items, the label on the
button at the dialog box’s bottom right changes to “Finish.”
7. When you see the Finish button at the dialog box’s bottom right, click it to
save the items.
The items you created now appear on the “Review your Additions and Deduc-
tions list” screen.
If you want to edit your paid time off and miscellaneous items in other ways, at the
interview window’s bottom left, click Finish Later. Then, choose Lists→Payroll Item
List to open the Payroll Item List window. Right-click the payroll item you want to
edit, and then choose Edit Payroll Item on the shortcut menu. When you’re done
editing the item, in the Edit dialog box, click Finish. (Page D-24 explains how to
specify accrual rates for paid time off.)
Setting Up Payroll Taxes
Although the Payroll Setup interview wants to take you from the Employee Benefits
category to the Employee Setup category, you’re better off creating the rest of your
Payroll items before setting up employees. That way, you can use your Payroll items to
set up employee default settings (page D-22). Then, when you create your employee
records, QuickBooks automatically assigns those default Payroll items and values.
Taxes are the last category of Payroll items you need to set up: your tax ID numbers,
the tax agencies you pay, and federal, state, and local payroll taxes. Here’s how to
set up payroll taxes in the Payroll Setup interview:
Appendix D: Running Payroll with an Intuit Payroll Service D-19SETTING UP
EMPLOYEE 1. On the left side of the interview window, click Taxes→Federal taxes.
BENEFITS
QuickBooks automatically creates the federal tax items you need since most of
them apply to all employees.
2. On the left side of the interview window, click “State taxes.”
The “Review your state taxes” screen appears.
3. To add taxes for a state if they aren’t already in the list, click Add New
below the list.
The “Add a new tax” dialog box shown in Figure D-11 opens.
4. In the State drop-down list, choose a state, and then click Finish.
QuickBooks adds the typical taxes for that state—like income tax, unemploy-
ment tax, and so on—and fills in tax rates that are standard for all companies.
FIGURE D-11
When you select a state in
the “Add a new tax” dialog
box (foreground) and
click Finish, QuickBooks
creates all the typical taxes
for that state, complete
with standard rates. If
you have to pay local or
other payroll taxes that
QuickBooks doesn’t know
about, select the “Create a
specific local/custom tax”
option instead.
5. In the “Set up payroll taxes” dialog box, fill in the Company Rate box with
the unemployment rate your company pays.
Because the unemployment tax rate depends on your payroll, QuickBooks can’t
fill this rate in for you. If you receive a SUI rate change notice, you can change
the rate for the first quarter of the following year. However, you must wait until
after July 1 of the current year to make that change.
6. To change how a tax item’s label appears on paychecks or to change the
accounts it uses, select the tax, and then click Edit. When you’re done edit-
ing the item, click Finish.
In the Edit dialog box, you can change the item’s label, make it inactive, choose
different expense and liability accounts, or change its tax rate.
D-20 QUICKBOOKS 2015: THE MISSING MANUALSETTING UP
You can also set up a schedule for your payroll tax payments. On the left side of the EMPLOYEE
Payroll Setup interview window, click “Schedule payments.” Then, in the Schedule BENEFITS
Payments dialog box, tell QuickBooks whom to pay and when. If you use Enhanced
Payroll, you can also select the Check or E-pay option to specify the payment
method you want to use. (If you opt for E-pay, clicking Next displays a screen with
instructions for setting up e-payment accounts and enrolling with the appropri-
ate tax agency.) In the “Payment (deposit) frequency” drop-down list, the typical
frequency for that tax has the words “usual frequency” appended to its name. If
you have questions about which frequency you should use, call the IRS, your state,
or your accountant. (You can also learn more about payroll taxes at Intuit’s Payroll
Tax Compliance website, http://payroll.intuit.com/support/compliance.) After you
assign frequencies to payments, QuickBooks keeps track of what you owe to each
tax agency and reminds you when it’s time to pay your taxes.
Fine-Tuning Payroll Items
To see the Payroll items in your company file, choose Lists→Payroll Item List. This
section steps you through adding and editing Payroll items.
ADDING A NEW PAYROLL ITEM
Here’s how to add a new Payroll item:
1. Choose Lists→Payroll Item List. In the Payroll Item List window, click Payroll
Item→New.
The “Add new payroll item” dialog box opens. QuickBooks automatically selects
the EZ Setup option, which is usually what you want, so click Next.
2. On the “Payroll item type” screen, select the type of Payroll item you need,
and then click Next.
Payroll items fall into seven categories: Compensation, Insurance Benefits,
Retirement Benefits, Paid Time Off, Other Additions, Other Deductions, and
Custom Setup.
When you click Next, the Add New dialog box (which looks like the one in the
Payroll Setup interview) opens.
3. Fill in the settings.
Click Next to step through screens, filling in what QuickBooks needs to know
about the item, such as the vendor and account number for a 401(k) plan, the
Tax Tracking type (which specifies whether the item shows up on your payroll tax
returns and employee W-2s), and the taxes that the item affects. For example,
if you select an expense item, QuickBooks asks for the expense account you
want to use. For a Company Contribution Payroll item, QuickBooks needs to
know which liability and expense accounts to use.
4. When you get to the last screen, click Finish.
The Add New dialog box closes, and the new Payroll item appears in the Payroll
Item List window.
Appendix D: Running Payroll with an Intuit Payroll Service D-21SETTING UP To make sure that your new item appears correctly on your financial statements,
EMPLOYEES run a Profit & Loss report and a Balance Sheet report (page 580).
EDITING A PAYROLL ITEM
You might need to edit Payroll items, for example, to change the limits for 401(k)
contributions, to change a tax rate, or to fill in values QuickBooks didn’t when you first
created the items. Here’s how you edit a Payroll item in the Payroll Item List window:
1. Choose Lists→Payroll Item List. In the Payroll Item List window, right-click
the item you want to edit, and then choose Edit Payroll Item on the shortcut
menu.
The “Edit payroll item [item name]” dialog box opens, where [item name] is
the item you right-clicked.
2. Make the changes you want, click Next, and when the Finish button becomes
active, click it to save your changes.
The changes you made appear in the Payroll Item List window.
Rinse and repeat until all your payroll items are set up the way you want.
Setting Up Employees
After you set up Payroll items, your next task is setting up employees in QuickBooks.
If you haven’t gathered the info you need about your employees, in the QuickBooks
Payroll Setup window, click Finish Later, and then perform these steps:
• Gather employee information and records. You need personal info, such as
Social Security numbers and hire dates, along with signed W-4 and I-9 federal
forms. For employees already on the payroll, you need their pay rates, the total
pay they’ve received, and deductions taken, along with sick time and vacation
balances. If you’ve paid employees during the year, gather up your historical
payroll info and all tax deposits you made.
• Set up employee payroll defaults. If you have more than a few employees,
you can save time by setting up standard values for the Payroll items that ap-
ply to every employee, like common deductions and typical 401(l) contribution
percentages. That way, QuickBooks automatically fills in these items for you
when you create a new employee record, so all you have to do is make any
necessary modifications for that individual. The next section explains employee
defaults in detail.
Setting Employee Defaults
Typically, you use a common set of Payroll items for all your employees, such as
salary and wages, tax deductions, health insurance, and 401(k) contributions. And
many employee records probably use the same values for those items. For example,
if all your employees live in California, they all pay federal and California state taxes.
D-22 QUICKBOOKS 2015: THE MISSING MANUALAnd perhaps most of your employees contribute the same percentage to your SETTING UP
company’s 401(k) plan. EMPLOYEES
Instead of assigning the same Payroll items and values to each employee manually,
you can save these standard items and settings so that QuickBooks fills in most of
the payroll fields for you. You can also specify the pay period you use and the class
to apply (if you track performance by class).
Here’s how to define standard Payroll items and values:
1. Choose Employees→Employee Center (or, on the Home Page, click the
Employees button at the top of the Employees panel).
The Employee Center window opens.
2. In the Employee Center window’s toolbar, choose Manage Employee
Information→Change New Employee Default Settings.
The Employee Defaults dialog box (Figure D-13, background) opens. You can
also open this dialog box from the Preferences dialog box. To do that, choose
Edit→Preferences→Payroll & Employees, click the Company Preferences tab,
and then click the Employee Defaults button at the dialog box’s bottom right.
See page 658 to learn about other employee preferences you can set.
NOTE The Employee Defaults dialog box includes the same set of fields and checkboxes that you’ll find in
the Payroll Setup interview and in the New Employee window’s Payroll Info tab (in the Employee Center’s toolbar,
click New Employee, and then click Payroll Info). When you edit an employee’s record, you can change any default
payroll settings that don’t apply to that person.
3. If you don’t have a payroll schedule set up, in the Payroll Schedule field,
choose from the drop-down list.
By creating a payroll schedule, you can group employees who are paid on the
same frequency (such as weekly, bi-weekly, and so on) and run payroll for all of
them. In addition, QuickBooks creates a reminder (page 483) when a scheduled
payroll is due, so, for example, you don’t have to remember whether your bi-
weekly pay period ends this Friday or next. If a scheduled payroll is due or over-
due, in the Payroll Center’s Pay Employees table, the scheduled payroll’s Status
cell contains an alert icon. An alert icon also appears on the Pay Employees tab.
4. In the New Payroll Schedule dialog box, enter your payroll schedule infor-
mation as shown in Figure D-12, and then click OK.
In the first box, type a name for the schedule, such as Biweekly if you pay your
employees every other week. In the second box’s drop-down list, choose the
frequency (in this example, it’s already set to “Biweekly (Every other week)”).
The boxes on the screen change depending on the frequency you select.
For a biweekly schedule, in the “What is the pay period end date?” box, choose
the last day of the first payroll period you’ll run with this schedule. In the “What
Appendix D: Running Payroll with an Intuit Payroll Service D-23SETTING UP date should appear on paychecks for this pay period?” box, choose the date
EMPLOYEES when employees are actually paid (typically a few days after the end of the pay
period so you have time to process payroll).
FIGURE D-12
A payroll schedule makes
it easy to run payroll for
all the employees you pay
on the same schedule. You
set the frequency, the pay
period end date, and the
paycheck date. After you
assign the payroll schedule
to your employees (page
D-23), you can run that
payroll schedule and
QuickBooks creates
paychecks for every em-
ployee on that schedule,
automatically updates the
next pay period’s end date
and the check date for the
next scheduled payroll run,
and creates a reminder
to run it.
5. In the Employee Defaults dialog box, set up standard items for every type
of Payroll item you use, as shown in Figure D-13.
Be sure to specify a state for withholding, because QuickBooks doesn’t fill
this in automatically. To do so, in the Employee Defaults dialog box, click the
Taxes button, and then, in the Taxes Defaults dialog box that opens (shown in
Figure D-13, foreground), click the State tab and choose a default state in the
State Subject to Withholding drop-down list. If an employee’s record doesn’t
include a state for withholding, you’ll underpay your state withholding and
unemployment tax.
6. To set the default values for paid time off, click the Sick/Vacation button.
The “Sick and Vacation Defaults” dialog box opens.
7. In the Sick section’s “Accrual period” drop-down list, choose how sick time
accrues.
If employees receive their entire allowance of sick time at the beginning of the
year, choose “Beginning of year.” If they earn a portion of sick time on each
paycheck, choose “Every paycheck.” For hourly employees, you can dole out
some sick time for every hour they work by choosing “Every hour on paycheck.”
D-24 QUICKBOOKS 2015: THE MISSING MANUALSETTING UP
EMPLOYEES
FIGURE D-13
Although your standard
items for taxes don’t
appear in the “Additions,
Deductions, and Com-
pany Contributions” list
(background), when you
click Taxes, you can see
the payroll tax items that
will be assigned to each
new employee you create
(foreground). Similarly, by
clicking the Sick/Vacation
button, you can set how
sick and vacation time
accrue, the maximum ac-
crued hours each year, and
whether hours roll over
from one year to the next.
8. In the next box, fill in the number of hours of sick time accrued in each
period you specified in the “Accrual period” box, as shown in Figure D-14.
For example, if you chose “Every paycheck” in the “Accrual period” drop-down
list, you might type 3 in the “Hours accrued per paycheck” box to allot 3 hours
of sick time to each paycheck. At that rate, if employees are paid biweekly, they
would earn 78 hours of sick time over an entire year.
9. In the “Maximum number of hours” box, fill in the maximum number of hours
of sick time an employee can accrue.
When you set a maximum value for sick time, the employee won’t accrue any
more sick time once they’ve reached that number of hours.
NOTE The “Reset hours each new year?” checkbox is turned off initially, which tells QuickBooks that em-
ployees can continue to accrue hours from year to year. If you turn that checkbox on, QuickBooks resets accrued
hours to zero at the beginning of each year. (In other words, employees lose any unused hours at the end of the
year.)
10. Fill in the Vacation section’s fields in the same way you filled in settings for
sick time. When you’re done, click OK.
The “Sick and Vacation Defaults” dialog box closes.
Appendix D: Running Payroll with an Intuit Payroll Service D-25SETTING UP 11. In the Employee Defaults dialog box, click OK.
EMPLOYEES
Your standard Payroll items and values are ready to go.
FIGURE D-14
You can set up sick time and vacation pay to accrue at the
beginning of the year, on every paycheck, or for every
hour on a paycheck. When you choose the accrual period,
you then set the number of hours of paid time off em-
ployees accrue each period. If you limit how many hours
an employee can accrue, fill in the “Maximum number of
hours” box.
When you create a new employee, QuickBooks automatically fills in the fields you
specified in Employee Defaults. For example, if you add a Salary item without an
hourly or annual rate, QuickBooks adds the Salary item to each new employee’s
record but leaves the value field blank. On the other hand, if most people contribute
15% to their 401(k) plan, in the Employee Defaults dialog box’s “Additions, Deduc-
tions, and Company Contributions” table, choose 401(k) in an Item Name cell, and
then type –15% in the Amount cell. That way, when you create a new employee, the
401(k) percentage deduction is automatically set to 15%, but you can change it to
match the percentage the person chooses to contribute.
Creating Employee Records
You can create employee records either in the Payroll Setup interview window or
by creating new employee records in the Employee Center (in the Employee Center
toolbar, click New Employee to open the New Employee window). The info you have
to provide is the same either way. If you set up default employee values (page D-22),
the Employee Center is the way to go because it uses your default values to fill in
many fields in new employee records.
TIP You can add or edit employees using the same techniques you use to add and edit customers (page 70).
As in other QuickBooks Centers, when you select an employee in the Employees tab, you can see transactions and
info related to that employee on the Transactions, To Do’s, Notes, and Sent Email tabs.
D-26 QUICKBOOKS 2015: THE MISSING MANUALSETTING UP
EMPLOYEES
GEM IN THE ROUGH
Building Paychecks from Time Worked
If you pay your employees by the hour and use one of Quick- 3. When the Edit Employee dialog box opens, click the
Books’ payroll services to generate employee payroll checks, Payroll Info tab.
time tracking can automate your payroll process a bit. 4. Below the Earnings table, turn on the “Use time data to
When you link your employees to their QuickBooks timesheets, create paychecks” checkbox, and then click OK to save
the program takes care of calculating how much they’ve the record.
earned. Here’s how to link employees and timesheets to take Employees can still track time without this checkbox turned
advantage of this feature: on, which is ideal if you don’t need a connection between the
1. On the Home Page, click the Employees button to open hours worked and the employee’s paycheck. For example, leave
the Employee Center (or choose Employees→Employee the checkbox off if you bill customers for employee time but
Center). pay those employees a straight salary.
2. On the Employees tab, double-click an employee whom
you pay by the hour (or click the employee’s name and
then press Ctrl+E).
With employee records in hand and payroll settings in place, choose Employees→
Employee Center. At the window’s top left, choose New Employee. As Figure D-15
shows, the New Employee window has several tabs for employee information.
FIGURE D-15
The New Employee win-
dow has tabs for various
categories of employee
information. The Personal
and Address & Contact
tabs cover basic 411 like
name, gender, date of
birth, address, and contact
info. The Payroll Info tab
has fields for compensa-
tion, benefits, and other
payroll-related items.
You provide details about
employment status on the
Employment Info tab.
Appendix D: Running Payroll with an Intuit Payroll Service D-27You can also read