Yandex.Tank Documentation - Release 1.1.1 Yandex - Read the Docs
←
→
Page content transcription
If your browser does not render page correctly, please read the page content below
Yandex.Tank Documentation
                Release 1.1.1

                     Yandex

                    Jan 24, 2018
Contents

1   Getting started                                                                                                                                                                    3
    1.1 Getting Help . . . . . . . . . . . . . . .     .   .   .   .   .   .   .   .   .   .   .   .   .   .   .   .   .   .   .   .   .   .   .   .   .   .   .   .   .   .   .   .   3
    1.2 What are the Yandex.Tank components? .         .   .   .   .   .   .   .   .   .   .   .   .   .   .   .   .   .   .   .   .   .   .   .   .   .   .   .   .   .   .   .   .   3
    1.3 Running Yandex.Tank . . . . . . . . . .        .   .   .   .   .   .   .   .   .   .   .   .   .   .   .   .   .   .   .   .   .   .   .   .   .   .   .   .   .   .   .   .   3
    1.4 See also . . . . . . . . . . . . . . . . . .   .   .   .   .   .   .   .   .   .   .   .   .   .   .   .   .   .   .   .   .   .   .   .   .   .   .   .   .   .   .   .   .   4

2   Installation                                                                                                                                                                       5
    2.1 Docker container . . . . . . . . . . . . . . . . . . . . . . . . . . . . . . . . . . . . . . . . . . . . .                                                                     5
    2.2 Installation, from PyPi . . . . . . . . . . . . . . . . . . . . . . . . . . . . . . . . . . . . . . . . . .                                                                    5
    2.3 Installation, .deb packages . . . . . . . . . . . . . . . . . . . . . . . . . . . . . . . . . . . . . . . .                                                                    6

3   Routing and firewall                                                                                                                                                               7
    3.1 Firewall . . . . . . . . . . . . . . . . . . . . . . . . . . . . . . . . . . . . . . . . . . . . . . . . . .                                                                   7
    3.2 Routing . . . . . . . . . . . . . . . . . . . . . . . . . . . . . . . . . . . . . . . . . . . . . . . . . .                                                                    7
    3.3 Tuning . . . . . . . . . . . . . . . . . . . . . . . . . . . . . . . . . . . . . . . . . . . . . . . . . .                                                                     8

4   Tutorials                                                                                                                                                                           9
    4.1 Preparing requests . . . . . . . . . . . .     .   .   .   .   .   .   .   .   .   .   .   .   .   .   .   .   .   .   .   .   .   .   .   .   .   .   .   .   .   .   .   .   10
          4.1.1   Access mode . . . . . . . . . .      .   .   .   .   .   .   .   .   .   .   .   .   .   .   .   .   .   .   .   .   .   .   .   .   .   .   .   .   .   .   .   .   11
          4.1.2   URI-style, URIs in load.ini . . .    .   .   .   .   .   .   .   .   .   .   .   .   .   .   .   .   .   .   .   .   .   .   .   .   .   .   .   .   .   .   .   .   11
          4.1.3   URI-style, URIs in file . . . . .    .   .   .   .   .   .   .   .   .   .   .   .   .   .   .   .   .   .   .   .   .   .   .   .   .   .   .   .   .   .   .   .   12
          4.1.4   URI+POST-style . . . . . . . .       .   .   .   .   .   .   .   .   .   .   .   .   .   .   .   .   .   .   .   .   .   .   .   .   .   .   .   .   .   .   .   .   12
          4.1.5   Request-style . . . . . . . . . .    .   .   .   .   .   .   .   .   .   .   .   .   .   .   .   .   .   .   .   .   .   .   .   .   .   .   .   .   .   .   .   .   12
    4.2 Run Test! . . . . . . . . . . . . . . . . .    .   .   .   .   .   .   .   .   .   .   .   .   .   .   .   .   .   .   .   .   .   .   .   .   .   .   .   .   .   .   .   .   14
    4.3 Results . . . . . . . . . . . . . . . . . .    .   .   .   .   .   .   .   .   .   .   .   .   .   .   .   .   .   .   .   .   .   .   .   .   .   .   .   .   .   .   .   .   14
    4.4 Tags . . . . . . . . . . . . . . . . . . . .   .   .   .   .   .   .   .   .   .   .   .   .   .   .   .   .   .   .   .   .   .   .   .   .   .   .   .   .   .   .   .   .   14
    4.5 SSL . . . . . . . . . . . . . . . . . . . .    .   .   .   .   .   .   .   .   .   .   .   .   .   .   .   .   .   .   .   .   .   .   .   .   .   .   .   .   .   .   .   .   15
    4.6 Autostop . . . . . . . . . . . . . . . . .     .   .   .   .   .   .   .   .   .   .   .   .   .   .   .   .   .   .   .   .   .   .   .   .   .   .   .   .   .   .   .   .   15
          4.6.1   HTTP and Net codes conditions        .   .   .   .   .   .   .   .   .   .   .   .   .   .   .   .   .   .   .   .   .   .   .   .   .   .   .   .   .   .   .   .   15
          4.6.2   Average time conditions . . . .      .   .   .   .   .   .   .   .   .   .   .   .   .   .   .   .   .   .   .   .   .   .   .   .   .   .   .   .   .   .   .   .   16
    4.7 Logging . . . . . . . . . . . . . . . . . .    .   .   .   .   .   .   .   .   .   .   .   .   .   .   .   .   .   .   .   .   .   .   .   .   .   .   .   .   .   .   .   .   16
    4.8 Results in phout . . . . . . . . . . . . .     .   .   .   .   .   .   .   .   .   .   .   .   .   .   .   .   .   .   .   .   .   .   .   .   .   .   .   .   .   .   .   .   17
    4.9 Graph and statistics . . . . . . . . . . . .   .   .   .   .   .   .   .   .   .   .   .   .   .   .   .   .   .   .   .   .   .   .   .   .   .   .   .   .   .   .   .   .   17
    4.10 Precise timings . . . . . . . . . . . . . .   .   .   .   .   .   .   .   .   .   .   .   .   .   .   .   .   .   .   .   .   .   .   .   .   .   .   .   .   .   .   .   .   17
    4.11 Thread limit . . . . . . . . . . . . . . .    .   .   .   .   .   .   .   .   .   .   .   .   .   .   .   .   .   .   .   .   .   .   .   .   .   .   .   .   .   .   .   .   18
    4.12 Dynamic thread limit . . . . . . . . . . .    .   .   .   .   .   .   .   .   .   .   .   .   .   .   .   .   .   .   .   .   .   .   .   .   .   .   .   .   .   .   .   .   18
    4.13 Custom stateless protocol . . . . . . . .     .   .   .   .   .   .   .   .   .   .   .   .   .   .   .   .   .   .   .   .   .   .   .   .   .   .   .   .   .   .   .   .   18

                                                                                                                                                                                        i
4.14 Gatling . . . . . . . . . . . . . . . . . . . . . . . . . . . . . . . . . . . . . . . . . . . . . . . . . . 19
5 Advanced usage 21
5.1 Command line options . . . . . . . . . . . . . . . . . . . . . . . . . . . . . . . . . . . . . . . . . . 21
5.2 Advanced configuration . . . . . . . . . . . . . . . . . . . . . . . . . . . . . . . . . . . . . . . . . 22
5.2.1 Default configuration files . . . . . . . . . . . . . . . . . . . . . . . . . . . . . . . . . . . 22
5.2.2 The DEFAULT section . . . . . . . . . . . . . . . . . . . . . . . . . . . . . . . . . . . . . 22
5.2.3 Multiline options . . . . . . . . . . . . . . . . . . . . . . . . . . . . . . . . . . . . . . . . 23
5.2.4 Referencing one option to another . . . . . . . . . . . . . . . . . . . . . . . . . . . . . . . 23
5.2.5 Time units . . . . . . . . . . . . . . . . . . . . . . . . . . . . . . . . . . . . . . . . . . . . 23
5.2.6 Shell-options . . . . . . . . . . . . . . . . . . . . . . . . . . . . . . . . . . . . . . . . . . 24
5.3 Artifacts . . . . . . . . . . . . . . . . . . . . . . . . . . . . . . . . . . . . . . . . . . . . . . . . . 24
5.4 Sources . . . . . . . . . . . . . . . . . . . . . . . . . . . . . . . . . . . . . . . . . . . . . . . . . . 24
5.5 load.ini example . . . . . . . . . . . . . . . . . . . . . . . . . . . . . . . . . . . . . . . . . . . . . 24
6 Modules 25
6.1 TankCore . . . . . . . . . . . . . . . . . . . . . . . . . . . . . . . . . . . . . . . . . . . . . . . . . 25
6.1.1 Architecture . . . . . . . . . . . . . . . . . . . . . . . . . . . . . . . . . . . . . . . . . . . 26
6.1.2 Test lifecycle . . . . . . . . . . . . . . . . . . . . . . . . . . . . . . . . . . . . . . . . . . 27
6.1.3 Options . . . . . . . . . . . . . . . . . . . . . . . . . . . . . . . . . . . . . . . . . . . . . 27
6.1.4 consoleworker . . . . . . . . . . . . . . . . . . . . . . . . . . . . . . . . . . . . . . . . . . 28
6.1.5 apiworker . . . . . . . . . . . . . . . . . . . . . . . . . . . . . . . . . . . . . . . . . . . . 28
6.1.6 exit codes . . . . . . . . . . . . . . . . . . . . . . . . . . . . . . . . . . . . . . . . . . . . 29
6.2 Load Generators . . . . . . . . . . . . . . . . . . . . . . . . . . . . . . . . . . . . . . . . . . . . . 29
6.2.1 Phantom . . . . . . . . . . . . . . . . . . . . . . . . . . . . . . . . . . . . . . . . . . . . . 29
6.2.2 JMeter . . . . . . . . . . . . . . . . . . . . . . . . . . . . . . . . . . . . . . . . . . . . . . 34
6.2.3 BFG . . . . . . . . . . . . . . . . . . . . . . . . . . . . . . . . . . . . . . . . . . . . . . . 35
6.2.4 Pandora . . . . . . . . . . . . . . . . . . . . . . . . . . . . . . . . . . . . . . . . . . . . . 39
6.3 Artifact uploaders . . . . . . . . . . . . . . . . . . . . . . . . . . . . . . . . . . . . . . . . . . . . 40
6.3.1 Yandex.Overload . . . . . . . . . . . . . . . . . . . . . . . . . . . . . . . . . . . . . . . . 41
6.4 Handy tools . . . . . . . . . . . . . . . . . . . . . . . . . . . . . . . . . . . . . . . . . . . . . . . . 41
6.4.1 Auto-stop . . . . . . . . . . . . . . . . . . . . . . . . . . . . . . . . . . . . . . . . . . . . 41
6.4.2 Telegraf . . . . . . . . . . . . . . . . . . . . . . . . . . . . . . . . . . . . . . . . . . . . . 43
6.4.3 Console on-line screen . . . . . . . . . . . . . . . . . . . . . . . . . . . . . . . . . . . . . 47
6.4.4 Aggregator . . . . . . . . . . . . . . . . . . . . . . . . . . . . . . . . . . . . . . . . . . . 47
6.4.5 ShellExec . . . . . . . . . . . . . . . . . . . . . . . . . . . . . . . . . . . . . . . . . . . . 47
6.4.6 Resource Check . . . . . . . . . . . . . . . . . . . . . . . . . . . . . . . . . . . . . . . . . 48
6.4.7 RC Assert . . . . . . . . . . . . . . . . . . . . . . . . . . . . . . . . . . . . . . . . . . . . 48
6.4.8 Tips&Tricks . . . . . . . . . . . . . . . . . . . . . . . . . . . . . . . . . . . . . . . . . . . 49
6.4.9 BatteryHistorian . . . . . . . . . . . . . . . . . . . . . . . . . . . . . . . . . . . . . . . . 49
6.4.10 SvgReport . . . . . . . . . . . . . . . . . . . . . . . . . . . . . . . . . . . . . . . . . . . . 49
6.5 Deprecated . . . . . . . . . . . . . . . . . . . . . . . . . . . . . . . . . . . . . . . . . . . . . . . . 49
6.5.1 Monitoring . . . . . . . . . . . . . . . . . . . . . . . . . . . . . . . . . . . . . . . . . . . 49
7 Ammo generators 55
8 Indices and tables 59
iiYandex.Tank Documentation, Release 1.1.1
Author Alexey Lavrenuke
Version 1.1.1
Date Jan 24, 2018
Homepage Yandex.Tank Homepage on Github
Download Launchpad PPA Pypi
Documentation PDF Documentation
License GNU LGPLv3
Issue tracker GitHub Issues
Contents:
Contents 1Yandex.Tank Documentation, Release 1.1.1 2 Contents
CHAPTER            1

                                                                                                 Getting started

Welcome to Yandex.Tank documentation. Yandex.Tank is an extensible load testing utility for unix systems. It is
written in Python and uses different load generator modules in different languages.

1.1 Getting Help

Gitter.im

1.2 What are the Yandex.Tank components?

    • Core - basic steps of test prepare, configuration, execution. Artifacts storing. Controls plugins/modules.
    • Load generators - modules that uses and controls load generators (load generators NOT included).
    • Artifact uploaders - modules that uploads artifacts to external storages and services.
    • Handy tools - monitoring tools, console online screen, autostops and so on.

Note: Using phantom as a load generator for mild load tests (less then 1000rps) an average laptop with 64bit Ubuntu
(10.04/. . . /13.10) would be sufficient. The tank could be easily used in virtual machine if queries aren’t too heavy and
load isn’t too big. Otherwise it is recommended to request a physical server or a more capable virtual machine from
your admin.

1.3 Running Yandex.Tank

1.Install tank to your system Installation
2.Tune your system Routing and firewall

                                                                                                                        3
Yandex.Tank Documentation, Release 1.1.1 3.And run the tutorial Tutorials 4.If you are skilled enough, feel free to use Advanced usage. 5.For developers Modules. 1.4 See also Evgeniy Mamchits’ phantom - Phantom scalable IO Engine Alexey Lavrenuke’s pandora - A load generator in Go language Gregory Komissarov’s firebat - test tool based on Phantom BlazeMeter’s Sense - service for storing and analysing performance test results 4 Chapter 1. Getting started
CHAPTER       2

                                                                                                       Installation

Note: Phantom load generator works fine with gcc
Yandex.Tank Documentation, Release 1.1.1 sudo -H pip install --upgrade setuptools Install latest Yandex.Tank from master branch: sudo -H pip install https://api.github.com/repos/yandex/yandex-tank/tarball/master You’ll probably need Phantom load generator, so install it from our ppa: sudo add-apt-repository ppa:yandex-load/main && sudo apt-get update sudo apt-get install phantom phantom-ssl 2.3 Installation, .deb packages Note: Deprecated. Deb packages aren’t renewed in PPA. You should add proper repositories on Debian-based environment. For instance, add following repos to sources.list : deb http://ppa.launchpad.net/yandex-load/main/ubuntu trusty main deb-src http://ppa.launchpad.net/yandex-load/main/ubuntu trusty main or this way sudo apt-get install python-software-properties sudo apt-get install software-properties-common sudo add-apt-repository ppa:yandex-load/main Then update package list and install yandex-tank package: sudo apt-get update && sudo apt-get install yandex-tank 6 Chapter 2. Installation
CHAPTER            3

                                                                                       Routing and firewall

3.1 Firewall

Before test execution, please, check service availability. If service is running on server with IP x.x.x.x and listening
for TCP port zz, try to connect to it with telnet like this: telnet x.x.x.x zz If everything OK, you’ll see:

$ telnet 203.0.113.1 80
Trying 203.0.113.1...
Connected to 203.0.113.1. Escape character is '^]'.

Otherwise if port is unreachable:

$ telnet 203.0.113.1 80 Trying 203.0.113.1...
telnet: Unable to connect to remote host: Connection timed out

Note: it’s just an example, programs like nc/nmap/wget/curl could be used as well, but not ping!)

3.2 Routing

OK, service is reachable, next thing you should know is how far Yandex.Tank is located from the service you’d like
to test. Heavy load can make switch to be unresponsible or to reboot, or at least it may lead to network losses, so the
test results would be distorted. Be careful. Path estimation could be done by execution of tracepath command or
it analogs (tracert/traceroute) on Yandex.Tank machine:

$ tracepath 203.0.113.1
1: tank.example.com (203.0.113.1)             0.084ms pmtu 1450
1: target.load.example.com (203.0.113.1)            20.919ms reached
1: target.example.com (203.0.113.1)             0.128ms reached
Resume: pmtu 1450 hops 1 back 64``
Hops count = 1 means that tank and target are in closest location.

                                                                                                                      7
Yandex.Tank Documentation, Release 1.1.1 $ tracepath 24.24.24.24 1: 1.example.com (203.0.113.1) 0.084ms pmtu 1450 1: 2.example.com (203.0.113.1) 0.276ms 1: 3.example.com (203.0.113.1) 0.411ms 2: 4.example.com (203.0.113.1) 0.514ms 3: 5.example.com (203.0.113.1) 10.690ms 4: 6.example.com (203.0.113.1) 0.831ms asymm 3 5: 7.example.com (203.0.113.1) 0.512ms 6: 8.example.com (203.0.113.1) 0.525ms asymm 5 7: no reply In second example you’d better find another closer located tank. 3.3 Tuning To achieve the top most performance you should tune the source server system limits: ulimit -n 30000 net.ipv4.tcp_max_tw_buckets = 65536 net.ipv4.tcp_tw_recycle = 1 net.ipv4.tcp_tw_reuse = 0 net.ipv4.tcp_max_syn_backlog = 131072 net.ipv4.tcp_syn_retries = 3 net.ipv4.tcp_synack_retries = 3 net.ipv4.tcp_retries1 = 3 net.ipv4.tcp_retries2 = 8 net.ipv4.tcp_rmem = 16384 174760 349520 net.ipv4.tcp_wmem = 16384 131072 262144 net.ipv4.tcp_mem = 262144 524288 1048576 net.ipv4.tcp_max_orphans = 65536 net.ipv4.tcp_fin_timeout = 10 net.ipv4.tcp_low_latency = 1 net.ipv4.tcp_syncookies = 0 net.netfilter.nf_conntrack_max = 1048576 8 Chapter 3. Routing and firewall
CHAPTER           4

                                                                                                       Tutorials

So, you’ve installed Yandex.Tank to a proper machine, it is close to target, access is permitted and server is tuned.
How to make a test?

Note: This guide is for phantom load generator.

Create a file on a server with Yandex.Tank: load.ini
[phantom]
address=203.0.113.1 ;Target's address
port=80 ;target's port
rps_schedule=line(1, 100, 10m) ;load scheme

phantom have 3 primitives for describing load scheme:

1. step (a,b,step,dur) makes stepped load, where a,b are start/end load values, step - increment value, dur -
step duration.
Example: step(25, 5, 5, 60) - stepped load from 25 to 5 rps, with 5 rps steps, step duration 60s. step(5,
    25, 5, 60) - stepped load from 5 to 25 rps, with 5 rps steps, step duration 60s

2. line (a,b,dur) makes linear load, where a,b are start/end load, dur - the time for linear load increase from
a to b.
Example: line(100, 1, 10m) - linear load from 100 to 1 rps, duration - 10 minutes line(1, 100, 10m)
    - linear load from 1 to 100 rps, duration - 10 minutes

3. const (load,dur) makes constant load. load - rps amount, dur - load duration.

Note: const(0, 10) - 0 rps for 10 seconds, in fact 10s pause in a test.

                                                                                                                   9
Yandex.Tank Documentation, Release 1.1.1
Example: const(100,10m) - constant load for 100 rps for 10 mins.
Note: You can set fractional load like this: line(1.1, 2.5, 10) – from 1.1rps to 2.5 for 10 seconds.
Note: const(0, 10) 0 rps for 10 seconds, in fact 10s pause in a test.
Note: step and line could be used with increasing and decreasing intensity:
You can specify complex load schemes using those primitives.
Example: rps_schedule=line(1,10,10m) const(10,10m)
linear load from 1 to 10, duration 10 mins and then 10 mins of 10 RPS constant load.
Time duration could be defined in seconds, minutes (m) and hours (h). For example: 27h103m645
For a test with constant load at 10rps for 10 minutes, load.ini should have next lines:
[phantom]
address=203.0.113.1 ;Target's address
port=80 ;target's port.
rps_schedule=const(10, 10m) ;load scheme
4.1 Preparing requests
There are several ways to set up requests:
• Access mode
• URI-style
• URI+POST
• request-style.
Note: Request-style is default ammo type.
Note: Regardless of the chosen format, resulted file with requests could be gzipped - tank supports archived ammo
files.
To specify external ammo file use ammofile option.
Note: You can specify URL to ammofile, http(s). Small ammofiles (~Yandex.Tank Documentation, Release 1.1.1 Note: If ammo type is uri-style or request-style, tank will try to guess it. Use ammo_type option to explicitly specify ammo format. Don’t forget to change ammo_type option if you switch format of your ammo, otherwise you might get errors. Example: [phantom] address=203.0.113.1 ; Target's address ammofile=https://yourhost.tld/path/to/ammofile.txt 4.1.1 Access mode INI-file configuration: ammo_type=access You can use access.log file from your webserver as a source of requests. Just add to load.ini options ammo_type=access and ammofile=/tmp/access.log where /tmp/access.log is a path to access.log file. [phantom] address=203.0.113.1 ;Target's address port=80 ;target's port rps_schedule=const(10, 10m) ;load scheme header_http = 1.1 headers = [Host: www.target.example.com] [Connection: close] ammofile=/tmp/access.log ammo_type=access Parameter headers defines headers values (if it nessessary). 4.1.2 URI-style, URIs in load.ini INI-file configuration: Don’t specify ammo_type explicitly for this type of ammo. Update configuration file with HTTP headers and URIs: [phantom] address=203.0.113.1 ;Target's address port=80 ;target's port rps_schedule=const(10, 10m) ;load scheme ; Headers and URIs for GET requests header_http = 1.1 headers = [Host: www.target.example.com] [Connection: close] uris = / /buy /sdfg?sdf=rwerf /sdfbv/swdfvs/ssfsf Parameter uris contains uri, which should be used for requests generation. Note: Pay attention to sample above, because whitespaces in multiline uris and headers options are important. 4.1. Preparing requests 11
Yandex.Tank Documentation, Release 1.1.1

4.1.3 URI-style, URIs in file

INI-file configuration: ammo_type=uri
Create a file with declared requests: ammo.txt

[Connection: close]
[Host: target.example.com]
[Cookie: None]
/?drg tag1
/
/buy tag2
[Cookie: test]
/buy/?rt=0&station_to=7&station_from=9

File consist of list of URIs and headers to be added to every request defined below. Every URI must begin from a
new line, with leading /. Each line that begins from [ is considered as a header. Headers could be (re)defined in the
middle of URIs, as in sample above.
Example: Request /buy/?rt=0&station_to=7&station_from=9 will be sent with Cookie:                                    test,
    not Cookie: None.
Request may be marked by tag, you can specify it with whitespace following URI.

4.1.4 URI+POST-style

INI-file configuration: ammo_type=uripost
Create a file with declared requests: ammo.txt

[Host: example.org]
[Connection: close]
[User-Agent: Tank]
5 /route/?rll=50.262025%2C53.276083~50.056015%2C53.495561&origin=1&simplify=1
class
10 /route/?rll=50.262025%2C53.276083~50.056015%2C53.495561&origin=1&simplify=1
hello!clas
7 /route/?rll=37.565147%2C55.695758~37.412796%2C55.691454&origin=1&simplify=1
uripost

File begins with optional lines [. . . ], that contain headers which will be added to every request. After that section there
is a list of URIs and POST bodies. Each URI line begins with a number which is the size of the following POST body.

4.1.5 Request-style

INI-file configuration: ammo_type=phantom
Full requests listed in a separate file. For more complex requests, like POST, you’ll have to create a special file. File
format is:

[size_of_request] [tag]\n
[request_headers]
[body_of_request]\r\n
[size_of_request2] [tag2]\n
[request2_headers]
[body_of_request2]\r\n

12                                                                                                 Chapter 4. Tutorials
Yandex.Tank Documentation, Release 1.1.1 where size_of_request – request size in bytes. ‘rn’ symbols after body are ignored and not sent anywhere, but it is required to include them in a file after each request. Pay attention to the sample above because ‘r’ symbols are strictly required. Note: Parameter ammo_type is unnecessary, request-style is default ammo type. sample GET requests (null body) 73 good GET / HTTP/1.0 Host: xxx.tanks.example.com User-Agent: xxx (shell 1) 77 bad GET /abra HTTP/1.0 Host: xxx.tanks.example.com User-Agent: xxx (shell 1) 78 unknown GET /ab ra HTTP/1.0 Host: xxx.tanks.example.com User-Agent: xxx (shell 1) sample POST requests (binary data) 904 POST /upload/2 HTTP/1.0 Content-Length: 801 Host: xxxxxxxxx.dev.example.com User-Agent: xxx (shell 1) ^.^........W.j^1^.^.^.2 ..^^.i.^B.P..-!(.l/Y..V^. ...L?...S'NR.^^vm...3Gg@s...d'.\^ ˓→.5N.$NF^,.Z^.aTE^. ._.[..k#L^`\RE.J.
Yandex.Tank Documentation, Release 1.1.1

533
POST /updateShopStatus? HTTP/1.0
User-Agent: xxx/1.2.3
Host: xxxxxxxxx.dev.example.com
Keep-Alive: 300
Content-Type: multipart/form-data; boundary=AGHTUNG
Content-Length:334
Connection: Close

--AGHTUNG
Content-Disposition: form-data; name="host"

load-test-shop-updatestatus.ru
--AGHTUNG
Content-Disposition: form-data; name="user_id"

1
--AGHTUNG
Content-Disposition: form-data; name="wsw-fields"

disable
 ˓→

--AGHTUNG--

sample ammo generators you may find on the Ammo generators page.

4.2 Run Test!

     1. Request specs in load.ini – just run as yandex-tank
     2. Request specs in ammo.txt – run as yandex-tank ammo.txt
Yandex.Tank detects requests format and generates ultimate requests versions.
yandex-tank here is an executable file name of Yandex.Tank.
If Yandex.Tank has been installed properly and configuration file is correct, the load will be given in next few seconds.

4.3 Results

During test execution you’ll see HTTP and net errors, answer times distribution, progressbar and other interesting
data. At the same time file phout.txt is being written, which could be analyzed later.
If you need more human-readable report, you can try Report plugin, You can found it here
If you need to upload results to external storage, such as Graphite or InfluxDB, you can use one of existing artifacts
uploading modules Modules

4.4 Tags

Requests could be grouped and marked by some tag.
Example:

14                                                                                              Chapter 4. Tutorials
Yandex.Tank Documentation, Release 1.1.1
73 good
GET / HTTP/1.0
Host: xxx.tanks.example.com
User-Agent: xxx (shell 1)
77 bad
GET /abra HTTP/1.0
Host: xxx.tanks.example.com
User-Agent: xxx (shell 1)
75 unknown
GET /ab HTTP/1.0
Host: xxx.tanks.example.com
User-Agent: xxx (shell 1)
good, bad and unknown here are the tags.
Note: RESTRICTION: utf-8 symbols only
4.5 SSL
To activate SSL add ssl = 1 to load.ini. Don’t forget to change port number to appropriate value. Now, our
basic config looks like that:
[phantom]
address=203.0.113.1 ;Target's address
port=80; target's port
rps_schedule=const (10,10m) ;Load scheme
ssl=1
4.6 Autostop
Autostop is an ability to automatically halt test execution if some conditions are reached.
4.6.1 HTTP and Net codes conditions
There is an option to define specific codes (404,503,100) as well as code groups (3xx, 5xx, xx). Also you can define
relative threshold (percent from the whole amount of answer per second) or absolute (amount of answers with specified
code per second).
Examples:
autostop = http(4xx,25%,10) – stop test, if amount of 4xx http codes in every second of last
10s period exceeds 25% of answers (relative threshold).
autostop = net(101,25,10) – stop test, if amount of 101 net-codes in every second of last 10s
period is more than 25 (absolute threshold).
autostop = net(xx,25,10) – stop test, if amount of non-zero net-codes in every second of last
10s period is more than 25 (absolute threshold).
4.5. SSL 15Yandex.Tank Documentation, Release 1.1.1 4.6.2 Average time conditions Example: autostop = time(1500,15) – stops test, if average answer time exceeds 1500ms. So, if we want to stop test when all answers in 1 second period are 5xx plus some network and timing factors - add autostop line to load.ini: [phantom] address=203.0.113.1 ;Target's address port=80 ;target's port rps_schedule=const(10, 10m) ;load scheme [autostop] autostop=time(1s,10s) http(5xx,100%,1s) net(xx,1,30) 4.7 Logging Looking into target’s answers is quite useful in debugging. For doing that add writelog = 1 to load.ini. Note: Writing answers on high load leads to intensive disk i/o usage and can affect test accuracy.** Log format: Where metrics are: size_in size_out response_time(interval_real) interval_event net_code (request size, answer size, response time, time to wait for response from the server, answer network code) Example: user@tank:~$ head answ_*.txt 553 572 8056 8043 0 GET /create-issue HTTP/1.1 Host: target.yandex.net User-Agent: tank Accept: */* Connection: close HTTP/1.1 200 OK Content-Type: application/javascript;charset=UTF-8 For load.ini like this: [phantom] address=203.0.113.1 ;Target's address port=80 ;target's port rps_schedule=const(10, 10m) ;load scheme writelog=1 [autostop] 16 Chapter 4. Tutorials
Yandex.Tank Documentation, Release 1.1.1

autostop=time(1,10)
  http(5xx,100%,1s)
  net(xx,1,30)

4.8 Results in phout

phout.txt - is a per-request log. It could be used for service behaviour analysis (Excel/gnuplot/etc) It has following
fields: time, tag, interval_real, connect_time, send_time, latency, receive_time,
interval_event, size_out, size_in, net_code proto_code
Phout example:

1326453006.582                  1510       934         52         384      140         1249      37          478
 ˓→  0      404
1326453006.582         others           1301       674        58         499        70         1116      37
 ˓→478    0             404
1326453006.587         heavy           377        76         33         178       90          180       37
 ˓→478    0             404
1326453006.587                  294        47          27         146      74          147       37          478
 ˓→  0      404
1326453006.588                  345        75          29         166      75          169       37          478
 ˓→  0      404
1326453006.590                  276        72          28         119      57          121       53          476
 ˓→  0      404
1326453006.593                  255        62          27         131      35          134       37          478
 ˓→  0      404
1326453006.594                  304        50          30         147      77          149       37          478
 ˓→  0      404
1326453006.596                  317        53          33         158      73          161       37          478
 ˓→  0      404
1326453006.598                  257        58          32         106      61          110       37          478
 ˓→  0      404
1326453006.602                  315        59          27         160      69          161       37          478
 ˓→  0      404
1326453006.603                  256        59          33         107      57          110       53          476
 ˓→  0      404
1326453006.605                  241        53          26         130      32          131       37          478
 ˓→  0      404

Note: contents of phout depends on phantom version installed on your Yandex.Tank system.

4.9 Graph and statistics

Use Report plugin OR use your favorite stats packet, R, for example.

4.10 Precise timings

You can set precise timings in load.ini with verbose_histogram parameter like this:

4.8. Results in phout                                                                                              17
Yandex.Tank Documentation, Release 1.1.1

[phantom]
address=203.0.113.1 ;Target's address
port=80 ;target's port
rps_schedule=const(10, 10m) ;load scheme
[aggregator]
verbose_histogram = 1

Note: Please keep an eye, last value of time_periods is no longer used as response timeout Use phantom.timeout
option.

4.11 Thread limit

instances=N in load.ini limits number of simultanious connections (threads).
Example with 10 threads limit:

[phantom]
address=203.0.113.1 ;Target's address
port=80 ;target's port
rps_schedule=const(10, 10m) ;load scheme
instances=10

4.12 Dynamic thread limit

instances_schedule =  – test with active instances schedule will
be performed if load scheme is not defined. Bear in mind that active instances number cannot be decreased and final
number of them must be equal to instances parameter value.
Example:

[phantom]
address=203.0.113.1 ;Target's address
port=80 ; target's port
instances_schedule = line(1,10,10m)
loop=10000 ; ammo loops count

Note: Load scheme is excluded from this load.ini as we used instances_schedule parameter.

Note: When using instances_schedule you should specify how many loops of ammo you want to generate
because tank can’t find out from the schedule how many ammo do you need

4.13 Custom stateless protocol

In necessity of testing stateless HTTP-like protocol, Yandex.Tank’s HTTP parser could be switched off, providing
ability to generate load with any data, receiving any answer in return. To do that add tank_type = 2 to load.

18                                                                                         Chapter 4. Tutorials
Yandex.Tank Documentation, Release 1.1.1

ini.

Note: Indispensable condition: Connection close must be initiated by remote side

[phantom]
address=203.0.113.1 ;Target's address
port=80 ;target's port
rps_schedule=const(10, 10m) ;load scheme
instances=10
tank_type=2

4.14 Gatling

If server with Yandex.Tank have several IPs, they may be used to avoid outcome port shortage. Use gatling_ip
parameter for that. Load.ini:

[phantom]
address=203.0.113.1 ;Target's address
port=80 ;target's port
rps_schedule=const(10, 10m) ;load scheme
instances=10
gatling_ip = IP1 IP2

4.14. Gatling                                                                                            19
Yandex.Tank Documentation, Release 1.1.1

20                                         Chapter 4. Tutorials
CHAPTER    5

                                                                                          Advanced usage

5.1 Command line options

Yandex.Tank has an obviously named executable yandex-tank. Here are available command line options:
     -h, –help show command line options
     -c CONFIG, –config=CONFIG Read options from INI file. It is possible to set multiple INI files by
          specifying the option serveral times.
           Default: ./load.ini
     -i, –ignore-lock Ignore lock files.
     -f, –fail-lock Don’t wait for lock file, quit if it’s busy.
           Default behaviour is to wait for lock file to become free
     -l LOG, –log=LOG Main log file location.
           Default: ./tank.log
     -m, –manual-start Tank will prepare for test and wait for Enter key to start the test.
     -n, –no-rc Don’t read /etc/yandex-tank/*.ini and ~/.yandex-tank
     -o OPTION, –option=OPTION Set an option from command line. Options set in cmd line override
          those have been set in configuration files. Multiple times for multiple options.
           Format: .=value
           Example:  yandex-tank -o "console.short_only=1" --option="phantom.
           force_stepping=1"
     -s SCHEDULED_START, –scheduled-start=SCHEDULED_START Run test on specified time, date
          format YYYY-MM-DD hh:mm:ss or hh:mm:ss
     -q, –quiet Only print WARNINGs and ERRORs to console.
     -v, –verbose Print ALL, including DEBUG, messages to console. Chatty mode.

                                                                                                         21
Yandex.Tank Documentation, Release 1.1.1 Add an ammo file name as a nameless parameter, e.g.: yandex-tank ammo.txt or yandex-tank ammo.gz 5.2 Advanced configuration Configuration files organized as standard INI files. Those are files partitioned into named sections that contain ‘name=value’ records. Example: [phantom] address=example.com:80 rps_schedule=const(100,60s) [autostop] autostop=instances(80%,10) Note: A common rule: options with the same name override those set before them (in the same file or not). 5.2.1 Default configuration files If no --no-rc option passed, Yandex.Tank reads all *.ini from /etc/yandex-tank directory, then a personal config file ~/.yandex-tank. So you can easily put your favourite settings in ~/.yandex-tank Example: tank.artifacts_base_dir, phantom.cache_dir, console.info_panel_width 5.2.2 The DEFAULT section One can use a magic DEFAULT section, that contains global options. Those options are in charge for every section: [autostop] autostop=time(1,10) [console] short_only=1 [meta] job_name=ask is an equivalent for: [DEFAULT] autostop=time(1,10) short_only=1 job_name=ask Note: Don’t use global options wich have same name in different sections. 22 Chapter 5. Advanced usage
Yandex.Tank Documentation, Release 1.1.1

5.2.3 Multiline options

Use indent to show that a line is a continuation of a previous one:

[autostop]
autostop=time(1,10)
  http(404,1%,5s)
  net(xx,1,30)

Note: Ask Yandex.Tank developers to add multiline capability for options where you need it!*

5.2.4 Referencing one option to another

%(optname)s gives you ability to reference from option to another. It helps to reduce duplication.
Example:

[DEFAULT]
host=target12.load.net

[phantom]
address=%(host)s
port=8080

[monitoring]
default_target=%(host)s

[shellexec]
prepare=echo Target is %(host)s

5.2.5 Time units

Default : milliseconds.
Example:

``30000 == 30s``
``time(30000,120)`` is an equivalent to ``time(30s,2m)``

Time units encoding is as following:

                                             Abbreviation      Meaning
                                             ms                millisecons
                                             s                 seconds
                                             m                 minutes
                                             h                 hours

Note: You can also mix them: 1h30m15s or 2s15ms.

5.2. Advanced configuration                                                                                23
Yandex.Tank Documentation, Release 1.1.1
5.2.6 Shell-options
Option value with backquotes is evaluated in shell.
Example:
[meta]
job_name=`pwd`
5.3 Artifacts
As a result Yandex.Tank produces some files (logs, results, configs etc). Those files are placed with care to the artifact
directory. An option for that is artifacts_base_dir in the tank section. It is recommended to set it to a
convenient place, for example, ~/yandex-tank-artifacts; it would be easier to manage the artifacts there.
5.4 Sources
Yandex.Tank sources are here.
5.5 load.ini example
;Yandex.Tank config file
[phantom]
;Target's address and port
address=fe80::200:f8ff:fe21:67cf
port=8080
instances=1000
;Load scheme
rps_schedule=const(1,30) line(1,1000,2m) const(1000,5m)
; Headers and URIs for GET requests
header_http = 1.1
uris=/
/test
/test2
headers=[Host: www.ya.ru]
[Connection: close]
[autostop] autostop = http(5xx,10%,5s)
24 Chapter 5. Advanced usageCHAPTER 6
Modules
6.1 TankCore
Core class. Represents basic steps of test execution. Simplifies plugin configuration, configs reading, artifacts storing.
Represents parent class for modules/plugins.
INI file section: [tank]
25Yandex.Tank Documentation, Release 1.1.1 6.1.1 Architecture 26 Chapter 6. Modules
Yandex.Tank Documentation, Release 1.1.1
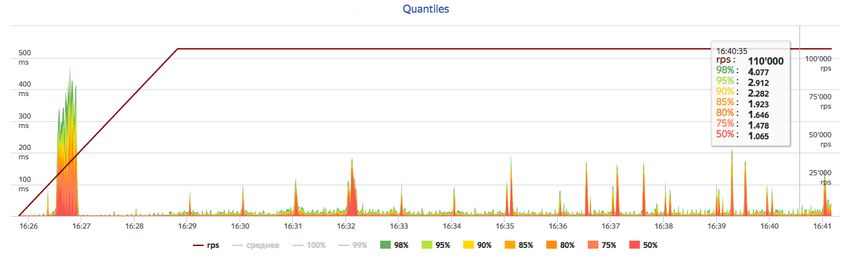
6.1.2 Test lifecycle
6.1.3 Options
Basic options:
lock_dir Directory for lockfile.
Default: /var/lock/.
6.1. TankCore 27Yandex.Tank Documentation, Release 1.1.1
plugin_ Path to plugin. Empty path interpreted as disable of plugin.
artifacts_base_dir Base directory for artifacts storing. Temporary artifacts files are stored here.
Default: current directory.
artifacts_dir Directory where to keep artifacts after test.
Default: directory in artifacts_base_dir named in Date/Time format.
flush_config_to Dump configuration options after each tank step (yandex.tank steps. sorry, russian only)
to that file
taskset_path Path to taskset command.
Default: taskset.
affinity Set a yandex-tank’s (python process and load generator process) CPU affinity.
Default: empty.
Example: 0-3 enabling first 4 cores, ‘0,1,2,16,17,18’ enabling 6 cores.
6.1.4 consoleworker
Consoleworker is a cmd-line interface for Yandex.Tank.
Worker class that runs and configures TankCore accepting cmdline parameters. Human-friendly unix-way interface
for yandex-tank. Command-line options described above.
6.1.5 apiworker
apiworker is a python interface for Yandex.Tank.
Worker class for python. Runs and configures TankCore accepting dict(). Python-frinedly interface for yandex-
tank.
Example:
from yandextank.api.apiworker import ApiWorker
import logging
import traceback
import sys
logger = logging.getLogger('')
logger.setLevel(logging.DEBUG)
#not mandatory options below:
options = dict()
options['config'] = '/path/to/config/load.ini'
options['manual_start'] = "1"
options['user_options'] = [
'phantom.ammofile=/path/to/ammofile',
'phantom.rps_schedule=const(1,2m)',
]
log_filename = '/path/to/log/tank.log'
#======================================
apiworker = ApiWorker()
apiworker.init_logging(log_filename)
28 Chapter 6. ModulesYandex.Tank Documentation, Release 1.1.1
try:
apiworker.configure(options)
apiworker.perform_test()
except Exception, ex:
logger.error('Error trying to perform a test: %s', ex)
6.1.6 exit codes
{
"0": "completed",
"1": "interrupted_generic_interrupt",
"2": "interrupted",
"3": "interrupted_active_task_not_found ",
"4": "interrupted_no_ammo_file",
"5": "interrupted_address_not_specified",
"6": "interrupted_cpu_or_disk_overload",
"7": "interrupted_unknown_config_parameter",
"8": "interrupted_stop_via_web",
"9": "interrupted",
"11": "interrupted_job_number_error",
"12": "interrupted_phantom_error",
"13": "interrupted_job_metainfo_error",
"14": "interrupted_target_monitoring_error",
"15": "interrupted_target_info_error",
"21": "autostop_time",
"22": "autostop_http",
"23": "autostop_net",
"24": "autostop_instances",
"25": "autostop_total_time",
"26": "autostop_total_http",
"27": "autostop_total_net",
"28": "autostop_negative_http",
"29": "autostop_negative_net",
"30": "autostop_http_trend",
"31": "autostop_metric_higher",
"32": "autostop_metric_lower"
}
6.2 Load Generators
6.2.1 Phantom
Load generator module that uses phantom utility.
INI file section: [phantom]
6.2. Load Generators 29Yandex.Tank Documentation, Release 1.1.1
How it works
Options
Basic options
ammofile Ammo file path (ammo file is a file containing requests that are to be sent to a server. Could
be gzipped).
rps_schedule Load schedule in terms of RPS.
instances Max number of instances (concurrent requests).
instances_schedule Load schedule in terms of number of instances.
loop Number of times requests from ammo file are repeated in loop.
ammo_limit Limit request number.
autocases Enable marking requests automatically.
30 Chapter 6. ModulesYandex.Tank Documentation, Release 1.1.1
Available options: 1 – enable, 0 – disable).
chosen_cases Use only selected cases.
There are 3 ways to constrain requests number: by schedule with rps_schedule, by requests number with
ammo_limit or by loop number with loop option. Tank stops if any constrain is reached. If stop reason is reached
ammo_limit or loop it will be mentioned in log file. In test without rps_schedule file with requests is used
one time by default.
Additional options
writelog Enable verbose request/response logging.
Default: 0.
Available options: 0 - disable, all - all messages, proto_warning - 4+5+network errors, proto_error -
5+network errors.
ssl Enable SSL.
Default: 0.
Available options: 1 - enable, 0 - disable.
timeout Response timeout.
Default: 11s.
Note: Default multiplier is seconds. If you specify 10, timeout will be 10 seconds. Currently we support here
multipliers: ‘d’ for days, ‘h’ for hours, ‘m’ for minutes, ‘s’ for seconds Examples: 0.1s is 100 milliseconds. 1m for
1 minute.
address Address of target.
Default: 127.0.0.1.
Format: [host]:port, [ipv4]:port, [ipv6]:port. Tank checks each test if port is avail-
able.
port (deprecated, use address) Port of target.
Default: 80.
gatling_ip Use multiple source addresses. List, divided by spaces.
tank_type Available options: http and none (raw TCP).
Default: http.
eta_file Path to ETA file.
connection_test Test TCP socket connection before starting the test.
Default: 1.
Available options: 1 - enable, 0 - disable.
URI-style options
uris URI list, multiline option.
6.2. Load Generators 31Yandex.Tank Documentation, Release 1.1.1
headers HTTP headers list in the following form: [Header: value], multiline option.
header_http HTTP version.
Default: 1.0
Available options: 1.0 and 1.1. 2.0 is NOT supported by this load generator.
stpd-file cache options
use_caching Enable cache.
Default: 1.
cache_dir Cache files directory.
Default: base artifacts directory.
force_stepping Force stpd file generation.
Default: 0.
Advanced options
phantom_path Phantom utility path.
Default: phantom.
phantom_modules_path Phantom modules path.
Default: /usr/lib/phantom.
config Use given (in this option) config file for phantom instead of generated.
phout_file Import this phout instead of launching phantom (import phantom results).
stpd_file Use this stpd-file instead of generated.
threads Phantom thread count.
Default: /2 + 1.
buffered_seconds Amount of seconds to which delay aggregator, to be sure that everything were read
from phout.
additional_libs List separated by whitespaces, will be added to phantom config file in section
module_setup
method_prefix Object’s type, that has a functionality to create test requests.
Default: method_stream.
source_log_prefix Prefix, added to class name that reads source data.
Default: empty.
method_options Additional options for method objects. It is used for Elliptics etc.
Default: empty.
affinity Set a phantom’s CPU affinity.
Example: 0-3 enabling first 4 cores, ‘0,1,2,16,17,18’ enabling 6 cores.
Default: empty.
32 Chapter 6. ModulesYandex.Tank Documentation, Release 1.1.1
TLS/SSL additional options
Note: ssl=1 is required
client_cipher_suites Cipher list, consists of one or more cipher strings separated by colons (see man
ciphers).
Example: client_cipher_suites = RSA:!COMPLEMENTOFALL
Default: empty.
client_certificate Path to client certificate which is used in client’s “Certificate message” in Client-
authenticated TLS handshake.
Default: empty.
client_key Path to client’s certificate’s private key, used for client’s “CertificateVerify message” genera-
tion in Client-authenticated TLS handshake.
Default: empty.
Phantom http-module tuning options
phantom_http_line First line length.
Default: 1K.
phantom_http_field_num Headers amount.
Default: 128.
phantom_http_field Header size.
Default: 8K.
phantom_http_entity Answer size.
Default: 8M.
Note: Please, keep in mind, especially if your service has large answers, that phantom doesn’t read more than defined
in phantom_http_entity.
Artifacts
phantom_*.conf Generated configuration files.
phout_*.log Raw results file.
phantom_stat_*.log Phantom statistics, aggregated by seconds.
answ_*.log Detailed request/response log.
phantom_*.log Internal phantom log.
6.2. Load Generators 33Yandex.Tank Documentation, Release 1.1.1
Multi-tests
To make several simultaneous tests with phantom, add proper amount of sections with names phantom-_N_. All
subtests are executed in parallel. Multi-test ends as soon as one subtest stops.
Example:
[phantom]
phantom_path=phantom
ammofile=data/dummy.ammo
instances=10
instances_schedule=line(1,10,1m)
loop=1
use_caching=1
[phantom-1]
uris=/
/test
/test2
headers=[Host: www.ya.ru]
[Connection: close]
rps_schedule=const(1,30) line(1,1000,2m) const(1000,5m)
address=fe80::200:f8ff:fe21:67cf
port=8080
ssl=1
timeout=15
instances=3
gatling_ip=127.0.0.1 127.0.0.2
phantom_http_line=123M
[phantom-2]
uris=/3
rps_schedule=const(1,30) line(1,50,2m) const(50,5m)
Options that apply only for main section: buffered_seconds, writelog, phantom_modules_path, phout_file, config,
eta_file, phantom_path
6.2.2 JMeter
JMeter module uses JMeter as a load generator. To enable it, disable phantom first (unless you really want to keep it
active alongside at your own risk), enable JMeter plugin and then specify the parameters for JMeter:
[tank]
; Disable phantom:
plugin_phantom=
; Enable JMeter instead:
plugin_jmeter=yandextank.plugins.JMeter
INI file section: [jmeter]
Options
jmx Testplan for execution.
args Additional commandline arguments for JMeter.
34 Chapter 6. ModulesYandex.Tank Documentation, Release 1.1.1
jmeter_path Path to JMeter, allows to use alternative JMeter installation.
Default: jmeter
buffered_seconds Amount of seconds to which delay aggregator, to be sure that everything were read
from jmeter’s results file.
jmeter_ver Which jmeter version tank should expect. Currently it affects the way connection time is
logged, but may be used for other version-specific settings.
Default: 3.0
ext_log Available options: none, errors, all. Add one more simple data writer which logs all
possible fields in jmeter xml format, this log is saved in test dir as jmeter_ext_XXXX.jtl.
Default: none
all other options in the section They will be passed as User Defined Variables to JMeter.
Timing calculation issues
Since version 2.13 jmeter could measure connection time, latency and full request time (aka in phan-
tom), but do it in it’s own uniq way: latency include connection time but not recieve time. For the sake of consistency
we recalculate as and calculate as >, but it does not guranteed to work perfectly in all cases (i.e. some samplers may not support latency and
connect_time and you may get something strange in case of timeouts).
For jmeter 2.12 and older connection time logging not avaliable, set jmeter_ver properly or you’ll get an error for
unknown field in Simlpe Data Writer listner added by tank.
Artifacts
Original testplan.
Modified test plan with results output section.
JMeter’s results.
JMeter’s log.
6.2.3 BFG
(What is BFG) BFG is a generic gun that is able to use different kinds of cannons to shoot. To enable it, disable
phantom first (unless you really want to keep it active alongside at your own risk), enable BFG plugin and then specify
the parameters for BFG and for the gun of your choice.
There are three predefined guns: Log Gun, Http Gun and SQL gun. First two are mostly for demo, if you want to
implement your own gun class, use them as an example.
But the main purpose of BFG is to support user-defined scenarios in python. Here is how you do it using ‘ultimate’
gun.
1. Define your scenario as a python class (in a single-file module, or a package):
import logging
log = logging.getLogger(__name__)
class LoadTest(object):
6.2. Load Generators 35Yandex.Tank Documentation, Release 1.1.1
def __init__(self, gun):
# you'll be able to call gun's methods using this field:
self.gun = gun
# for example, you can get something from the 'ultimate' section of a config
˓→ file:
my_var = self.gun.get_option("my_var", "hello")
def case1(self, missile):
# we use gun's measuring context to measure time.
# The results will be aggregated automatically:
with self.gun.measure("case1"):
log.info("Shoot case 1: %s", missile)
# there could be multiple steps in one scenario:
with self.gun.measure("case1_step2") as sample:
log.info("Shoot case 1, step 2: %s", missile)
# and we can set the fields of measured object manually:
sample["proto_code"] = 500
# the list of available fields is below
def case2(self, missile):
with self.gun.measure("case2"):
log.info("Shoot case 2: %s", missile)
def setup(self, param):
''' this will be executed in each worker before the test starts '''
log.info("Setting up LoadTest: %s", param)
def teardown(self):
''' this will be executed in each worker after the end of the test '''
log.info("Tearing down LoadTest")
2. Define your options in a config file:
[tank]
; Disable phantom:
plugin_phantom=
; Enable BFG instead:
plugin_bfg=yandextank.plugins.Bfg
[bfg]
; parallel processes count
instances = 10
; gun type
gun_type = ultimate
; ammo file
ammofile=req_json.log
; load schedule
rps_schedule=line(1,100,10m)
[ultimate_gun]
; path to your custom module
module_path = ./my_own_service
36 Chapter 6. ModulesYandex.Tank Documentation, Release 1.1.1 ; python module name module_name = mygun ; gun initialization parameter init_param = Hello 3. Create an ammo file: Ammo format: one line – one request, each line begins with case name separated by tab symbol (‘t’). Case name defines the method of your test class that will be executed. The line itself will be passed to your method as ‘missile’ parameter. If there was no case name for an ammo, the ‘default’ case name will be used case1my-case1-ammo case2my-case2-ammo my-default-case-ammo Note: TIP: if each line is a JSON-encoded document, you can easily parse it inside your scenario code 4. Shoot em all! How it works 6.2. Load Generators 37
Yandex.Tank Documentation, Release 1.1.1

BFG Worker Type

By default, BFG will create lots of processes (number is defined by instances option). Every process will execute
requests in a single thread. These processes will comsume a lot of memory. It’s also possible to switch this behavior
and use gevent to power up every worker process, allowing it to have multiple concurrent threads executing HTTP
requests.
With green worker, it’s recommended to set instances to number of CPU cores, and adjust the number of real
threads by green_threads_per_instance option.
INI file section: [bfg]
      worker_type Set it to green to let every process have multiple concurrent green threads.
      green_threads_per_instance Number of green threads every worker process will execute. Only affects
           green worker type.

BFG Options

INI file section: [bfg]
      gun_type What kind of gun should BFG use.
      ammo_type What ammo parser should BFG use.
            Default: caseline.
      pip Install python modules with pip install --user before the test.
      init_param An initialization parameter that will be passed to your setup method.
      other common stepper options

Ultimate Gun Options

gun_type = ultimate
INI file section: [ultimate_gun]
      module_path Path to your module
      module_name Python module name
      class_name Class that contains load scenarios, default: LoadTest
The fields of measuring context object and their default values:
      send_ts A timestamp when context was entered.
      tag A marker passed to the context.
      interval_real The time interval from enter to exit. If the user defines his own value, it will be preserved.
           Microseconds.
      connect_time Microseconds. Default: 0
      send_time Microseconds. Default: 0
      latency Microseconds. Default: 0
      receive_time Microseconds. Default: 0
      interval_event Microseconds. Default: 0

38                                                                                             Chapter 6. Modules
Yandex.Tank Documentation, Release 1.1.1
size_out Bytes out. Integer. Default: 0
size_in Bytes in. Integer. Default: 0
net_code Network code. Integer. Default: 0
proto_code Protocol code (http, for example). Integer. Default: 200
SQL Gun Options
gun_type = sql
INI file section: [sql_gun]
db DB uri in format: dialect+driver://user:password@host/dbname[?key=value..
], where dialect is a database name such as mysql, oracle, postgresql, etc., and driver the name of a
DBAPI, such as psycopg2, pyodbc, cx_oracle, etc. details
6.2.4 Pandora
Pandora is a load generator written in Go. For now it supports only SPDY/3 and HTTP(S). Plugins for other protocols
(HTTP/2, Websocket, XMPP) are on the way.
First of all you’ll need to obtain a binary of pandora and place it somewhere on your machine. By default, Yandex.Tank
will try to just run pandora (or you could specify a path to binary in pandora_cmd). Disable phantom first (unless
you really want to keep it active alongside at your own risk), enable Pandora plugin and then specify the parameters.
[tank]
; Disable phantom:
plugin_phantom=
; Enable Pandora instead:
plugin_pandora=yandextank.plugins.Pandora
; Pandora config section:
[pandora]
; Pandora executable path
pandora_cmd=/usr/bin/pandora
; Enable/disable expvar monitoring
expvar = 1 ; default
; Pandora config contents (json)
config_content = {
"pools": [
{
"name": "dummy pool",
"gun": {"type": "log"},
"ammo": {
"type": "dummy/log",
"AmmoLimit": 10000000
},
"result": {
"type": "log/phout",
"destination": "./phout.log"
},
"shared-limits": false,
"user-limiter": {
6.2. Load Generators 39Yandex.Tank Documentation, Release 1.1.1
"type": "unlimited"
},
"startup-limiter": {
"type": "periodic",
"batch": 1,
"max": 5,
"period": "0.5s"
}
}]}
; OR config file (yaml or json)
config_file = pandora_config.yml
Schedules
The first schedule type is periodic schedule. It is defined as periodic(, ,
). Pandora will issue one batch of size batch_size, once in period seconds, maximum of limit
ticks. Those ticks may be used in different places, for example as a limiter for user startups or as a limiter for each
user request rate.
Example:
startup_schedule = periodic(2, 0.1, 100)
user_schedule = periodic(10, 15, 100)
shared_schedule = 0
Start 2 users every 0.1 seconds, 100 batches, maximum of 2 * 100 = 200 users. Each user will issue requests in batches
of 10 requests, every 15 seconds, maximum of 100 requests. All users will read from one ammo source.
Second schedule type is linear. It is defined like this: linear(, , ).
Example:
user_schedule = linear(.1, 10, 10m)
shared_schedule = 1
The load will raise from .1 RPS (1 request in 10 seconds) until 10 RPS during 10 minutes. Since shared_schedule
is 1, this defines the overall load.
The last schedule type is unlimited. It has no parameters and users will shoot as soon as possible. It is convenient
to use this type of load to find out maximum performance of a service and its level of parallelism. You should limit
the loop number if you want the test to stop eventually.
Example:
loop = 1000000
startup_schedule = periodic(2, 10, 50)
user_schedule = unlimited()
shared_schedule = 0
Start 2 users every 10 seconds. Every user will shoot without any limits (next request is sended as soon as the previous
response have been received). This is analogous to phantom’s instances schedule mode.
6.3 Artifact uploaders
40 Chapter 6. ModulesYandex.Tank Documentation, Release 1.1.1
Note: Graphite uploader, InfluxDB uploader and BlazeMeter Sense are not currently supported in the last Yan-
dex.Tank version. If you want one of them, use 1.7 branch.
6.3.1 Yandex.Overload
Overload is a service for performance analytics made by Yandex. We will store your performance experiments results
and show them in graphic and tabular form. Your data will be available at https://overload.yandex.net.
INI file section: [overload]
Options
token_file Place your token obtained from Overload (click your profile photo) into a file and specify the
path here
job_name (Optional) Name of a job to be displayed in Yandex.Overload
job_dsc (Optional) Description of a job to be displayed in Yandex.Overload
Example:
[tank]
; plugin is disabled by default, enable it:
plugin_uploader=yandextank.plugins.DataUploader overload
[overload]
token_file=token.txt
job_name=test
job_dsc=test description
6.4 Handy tools
6.4.1 Auto-stop
The Auto-stop module gets the data from the aggregator and passes them to the criteria-objects that decide if we should
stop the test.
INI file section: [autostop]
6.4. Handy tools 41Yandex.Tank Documentation, Release 1.1.1
Options
autostop Criteria list divided by spaces, in following format: type(parameters)
Basic criteria types
time Stop the test if average response time is higher then allowed.
Example: time(1s500ms, 30s) time(50,15).
Exit code - 21
http Stop the test if the count of responses in time period (specified) with HTTP codes fitting the mask
is larger then the specified absolute or relative value.
Examples: http(404,10,15) http(5xx, 10%, 1m). Exit code - 22
net Like http, but for network codes. Use xx for all non-zero codes.
Exit code - 23
quantile Stop the test if the specified percentile is larger then specified level for as long as the time period
specified.
Available percentile values: 25, 50, 75, 80, 90, 95, 98, 99, 100.
Example: quantile (95,100ms,10s)
instances Available when phantom module is included. Stop the test if instance count is larger then
specified value.
Example: instances(80%, 30) instances(50,1m).
Exit code - 24
metric_lower and metric_higher Stop test if monitored metrics are lower/higher than specified for time
period.
Example: metric_lower(127.0.0.1,Memory_free,500,10).
Exit code - 31 and 32
Note: metric names (except customs) are written with underline. For hostnames masks are allowed
(i.e target-*.load.net)
steady_cumulative Stops the test if cumulative percentiles does not change for specified interval.
Example: steady_cumulative(1m).
Exit code - 33
limit Will stop test after specified period of time.
Example: limit(1m).
Basic criteria aren’t aggregated, they are tested for each second in specified period. For example autostop=time(50,15)
means “stop if average responce time for every second in 15s interval is higher than 50ms”
Advanced criteria types
total_time Like time, but accumulate for all time period (responses that fit may not be one-after-another,
but only lay into specified time period).
42 Chapter 6. ModulesYandex.Tank Documentation, Release 1.1.1
Example: total_time(300ms, 70%, 3s).
Exit code - 25
total_http Like http, but accumulated. See total_time.
Example: total_http(5xx,10%,10s) total_http(3xx,40%,10s).
Exit code - 26
total_net Like net, but accumulated. See total_time.
Example: total_net(79,10%,10s) total_net(11x,50%,15s)
Exit code - 27
negative_http Inversed total_http. Stop if there are not enough responses that fit the specified mask.
Use to be shure that server responds 200.
Example: negative_http(2xx,10%,10s).
Exit code - 28
negative_net Inversed total_net. Stop if there are not enough responses that fit the specified mask.
Example: negative_net(0,10%,10s).
Exit code - 29
http_trend Stop if trend for defined http codes is negative on defined period. Trend is a sum of an average
coefficient for linear functions calculated for each pair points in last n seconds and standart deviation
for it
Example: http_trend(2xx,10s).
Exit code - 30
6.4.2 Telegraf
Runs metrics collection through SSH connection. You can debug your SSH connection using
yandex-tank-check-ssh tool. It is supplied with Yandex.Tank.
Thanks to https://github.com/influxdata/telegraf for metric collection agent.
For using this plugin, replace old plugin plugin_monitoring=yandextank.plugins.Monitoring in .ini
file with this:
[tank]
plugin_monitoring=yandextank.plugins.Telegraf
In https://github.com/yandex/yandex-tank/blob/master/yandextank/core/config/00-base.ini it is already
done. Please, don’t use both plugin_monitoring=yandextank.plugins.Telegraf and
plugin_monitoring=yandextank.plugins.Monitoring simultaneously.
INI file section: [telegraf]
You can use old monitoring config format, if you specify it in [monitoring] section. Telegraf plugin transparently
supports it. You can use new monitoring config format, if you specify it in [telegraf] section.
Backward compatibility logic:
6.4. Handy tools 43You can also read