Blackboard Ultra
   Workbook
←
→
Page content transcription
If your browser does not render page correctly, please read the page content below
Blackboard Ultra Workbook
Blackboard Ultra Workbook v.1.3

Table of Contents
1.           Welcome to this Blackboard Ultra workbook .......................................................................... 6
2.           Your Blackboard module site template .................................................................................... 7
3.           Accessibility ............................................................................................................................... 8
4.           Organising Content in a Blackboard Ultra Site ......................................................................... 9
5.           About Learning Modules ......................................................................................................... 11
     5.1 - Watch a video about Learning Modules ................................................................................... 11

                  Task: Watch a video about learning modules .................................................................... 11
     5.2 - Learning Module Navigation ..................................................................................................... 12
     5.3 - Add Folders to Learning Modules ............................................................................................. 12
6. Adding Content to a Blackboard Ultra Site ..................................................................................... 13
     6.1 - Create a Document ................................................................................................................... 13
     6.2 - Video about creating a document ............................................................................................ 14

                  Task: Watch a video about creating a document............................................................... 14
     6.3 - Adding Items to a New Document page ................................................................................... 15

                  Task: Create a document and add some text. ................................................................... 16
     6.4 - Adding more content to a Document ....................................................................................... 17
7. Communication ................................................................................................................................ 20
     7.1 - Announcements ........................................................................................................................ 20
     7.2 - Course Announcements page ................................................................................................... 20
     7.3 - Watch a video about creating announcements........................................................................ 21

                  Task: Watch a video about creating an announcement .................................................... 21
     7.4 - Create an announcement ......................................................................................................... 22
     7.5 - Schedule an announcement ..................................................................................................... 23

                  Task: create an announcement and add some text. .......................................................... 23
     7.6 - Edit or delete an announcement .............................................................................................. 23

                  Task: Edit or delete the announcement ............................................................................. 23

                                                                              Learning Innovation and Digital Engagement                               2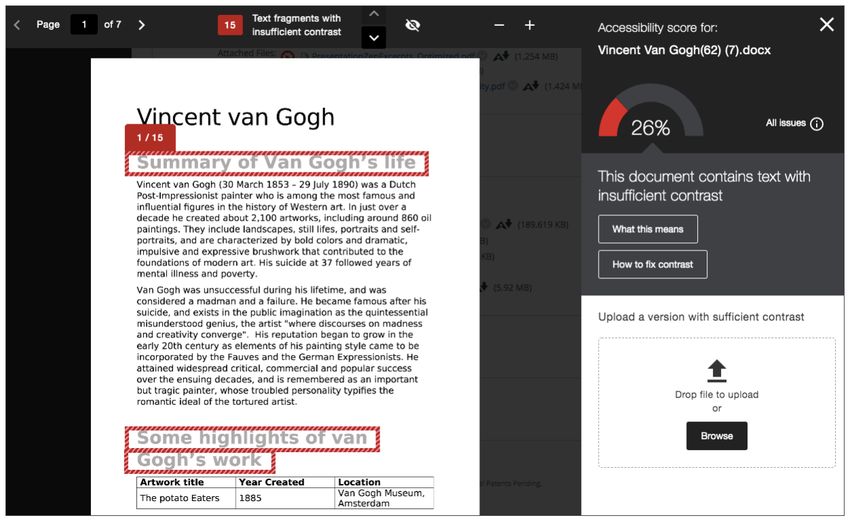
Blackboard Ultra Workbook v.1.3

     7.7 - Where announcements appear ................................................................................................ 23
     7.8 - Messages page .......................................................................................................................... 24
     7.9 - Send a message......................................................................................................................... 25

                  Task: Send a message ......................................................................................................... 26
8. Assignments ..................................................................................................................................... 27
     8.1 - Create a Blackboard assignment .............................................................................................. 27
     8.2 - Watch a video about creating Blackboard assignments ........................................................... 28

                  Task: Watch the video on how to create an assignment ................................................... 28
     8.3 - Creating a Blackboard Assignment ........................................................................................... 29
     8.4 - Add files and text blocks to Blackboard assignments ............................................................... 31
     8.5 - Edit, reorder, and delete Blackboard assignments ................................................................... 32
     8.6 - Blackboard Assignments and the activity stream ..................................................................... 33

                  Task: create a blackboard assignment ............................................................................... 33
     8.7 - Creating a Turnitin assignment ................................................................................................. 34

                  Task: create a Turnitin assignment .................................................................................... 37
9.           Interaction and Activity in a Blackboard Ultra Site ................................................................ 38
     9.1 - Discussions page ....................................................................................................................... 38
     9.2 - Discussions or conversations? .................................................................................................. 39
     9.3 - Create a discussion ................................................................................................................... 39

                  Task: Create a Discussion ................................................................................................... 40
     9.4 - Course groups ........................................................................................................................... 41
     9.5 - Accessing course groups ........................................................................................................... 41
     9.6 - Create course groups ................................................................................................................ 42
     9.7 - Custom groups .......................................................................................................................... 43
     9.10 - Randomly assign ..................................................................................................................... 44
     9.11 - Self-enrolment ........................................................................................................................ 45
     9.12 - Reuse groups........................................................................................................................... 47
     9.13 - Watch a video about creating course groups ......................................................................... 48

                                                                            Learning Innovation and Digital Engagement                            3
Blackboard Ultra Workbook v.1.3

               Task: Watch the video on how to create course groups.................................................... 48
  9.14 - Manage individual groups....................................................................................................... 49
  9.15 - Add and delete groups ............................................................................................................ 49
  9.16 - Manage student membership ................................................................................................ 50
  9.17 - Course Groups page ................................................................................................................ 51
  9.18 - Course groups and conversion ............................................................................................... 52
  9.19 - Blackboard Collaborate........................................................................................................... 53
  9.20 - Access Blackboard Collaborate ............................................................................................... 53
  9.21 - Join sessions ............................................................................................................................ 54
  9.22 - Course room ........................................................................................................................... 55
  9.23 - Turn off the course room ........................................................................................................ 56

               Task: Turn course room off then back on .......................................................................... 56
  9.24 - Add sessions to course content .............................................................................................. 56

               Task: create a new session in collaborate .......................................................................... 57
  9.25 - View session recordings .......................................................................................................... 57
10.       Appendices .............................................................................................................................. 58
  10.1 - Appendix 1 - Accessibility ....................................................................................................... 58
          10.1.1 - Write plainly................................................................................................................ 58
          10.1.2 - Heading structure ....................................................................................................... 58
          10.1.3 - Emphasizing content................................................................................................... 59
          10.1.4 - Images ......................................................................................................................... 59
          10.1.5 - Text in images ............................................................................................................. 59
          10.1.6 - Links ............................................................................................................................ 60
          10.1.7 - Lists and tables............................................................................................................ 60
                      10.1.7.1 - Lists ............................................................................................................. 60
                      10.1.7.2 - Tables .......................................................................................................... 61
          10.1.8 - Making PDF documents accessible ............................................................................. 61
          10.1.9 - Save documents as tagged PDFs................................................................................. 61
  10.2 - Appendix 2 - ALLY.................................................................................................................... 62
          10.2.1 - Improve the usability and accessibility of your content ............................................. 62
          10.2.2 - Alternative formats ..................................................................................................... 62
          10.2.3 - Accessibility score indicators ...................................................................................... 62
          10.2.4 - Instructor feedback..................................................................................................... 63
                                                                          Learning Innovation and Digital Engagement                               4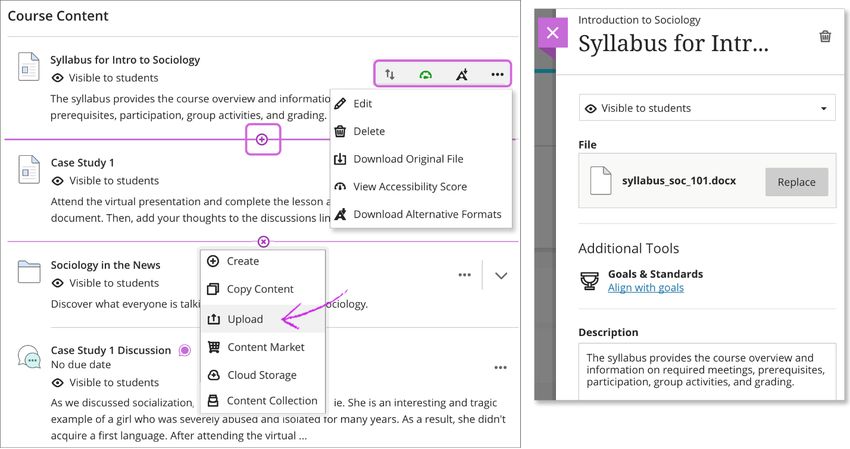
Blackboard Ultra Workbook v.1.3

            10.2.5 - Course accessibility report .......................................................................................... 64
            10.2.6 - Watch an overview video about Ally .......................................................................... 65
Additional Help ..................................................................................................................................... 66

                                                                           Learning Innovation and Digital Engagement                              5
Blackboard Ultra Workbook v.1.3

1. Welcome to this Blackboard Ultra workbook

About this workbook

This workbook will help you get to grips with Blackboard Ultra, the University’s new virtual
learning environment. The workbook has four sections that will go through the most
common tasks that you may currently carry out in the current version of Blackboard.

The workbook also suggests tasks for you to complete that we believe will help you to get
the most from Ultra and we recommend that you complete these at each stage before
moving on to the next part of the workbook.

Before you begin please watch this video which is made by Blackboard. It is promotional in
nature but does highlight the major benefits of Ultra both you and your students.

To help you navigate through this workbook we have added some ‘signposts’ as explained
below:

*Quick Tip* - Some information that will save you time.

*FYI* - For your information.

            Tasks:    - This will help you get the most out of what you have read.

                                                Learning Innovation and Digital Engagement   6
Blackboard Ultra Workbook v.1.3

    2. Your Blackboard module site template

    We have created a template (fig. 1) that you will find when you first access any new Blackboard
    module site.

1

2

3

4

5

6

7

8

    Fig. 1. Template of a blank module

    The template is to help you build up content on your site but also to help provide students with a
    consistent layout across their Blackboard sites.

    A breakdown of what is included in the template is as follow:

        1. Introduction to Ultra for Academics – a short welcome from us about the big advantages of
           Ultra and a suggested way to organise site content. You can delete this section from the site
           whenever you wish.
        2. Welcome and Module Handbook – An allocated area for a description of the module along
           with the module handbook
        3. Discussion Forum – An area to start a discussion with your students.
        4. Learning Resources – An area where module materials are kept, this has been created as
           learning module and is explained further within the workbook.
        5. Module Recordings – An area to store Panopto recordings
        6. Assessment – An allocated space with a folder for both assessment details and one for
           coursework submission through either Turnitin or Blackboard Assignment.
        7. Your Voice Matters – Feedback from students.
        8. Blackboard Help – Resources for your students with helpful guides on how to use
           blackboard.

                                                      Learning Innovation and Digital Engagement         7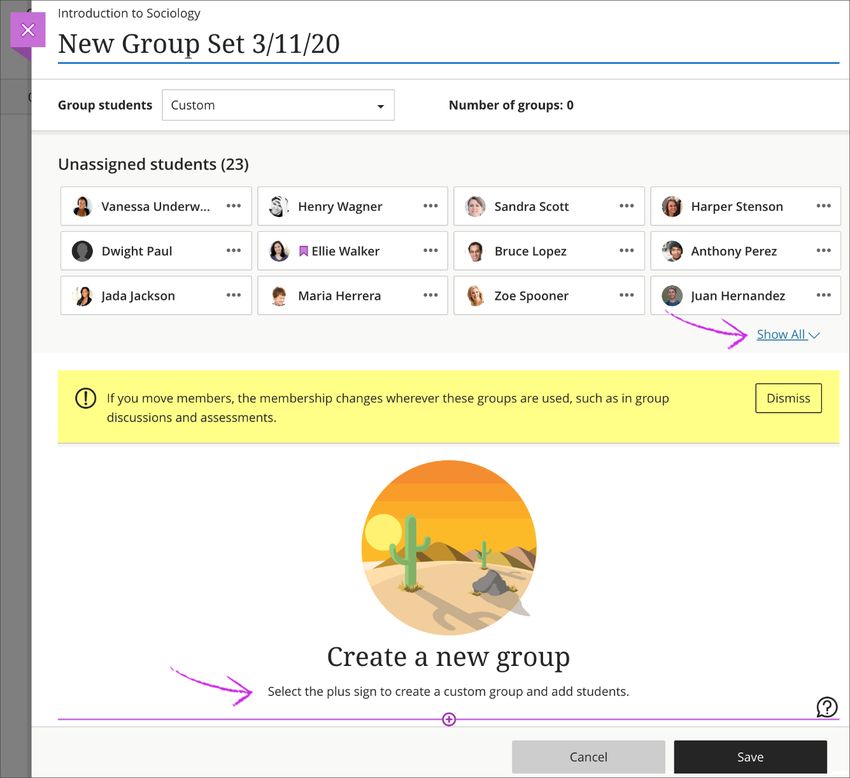
Blackboard Ultra Workbook v.1.3

3. Accessibility
The United Kingdom’s legislation regarding accessibility has changed. It is therefore
important that when thinking about adding content to Blackboard sites, you consider that
the content is as accessible as possible. Several tools have been provided in both Blackboard
and Microsoft Office to help you with this. The checklist and guide links below will help you
further.

Ally Accessibility checklist
Microsoft Accessibility Guide

For more detail and guidance on how to make your content more accessible please see
Appendix 1.

                                              Learning Innovation and Digital Engagement   8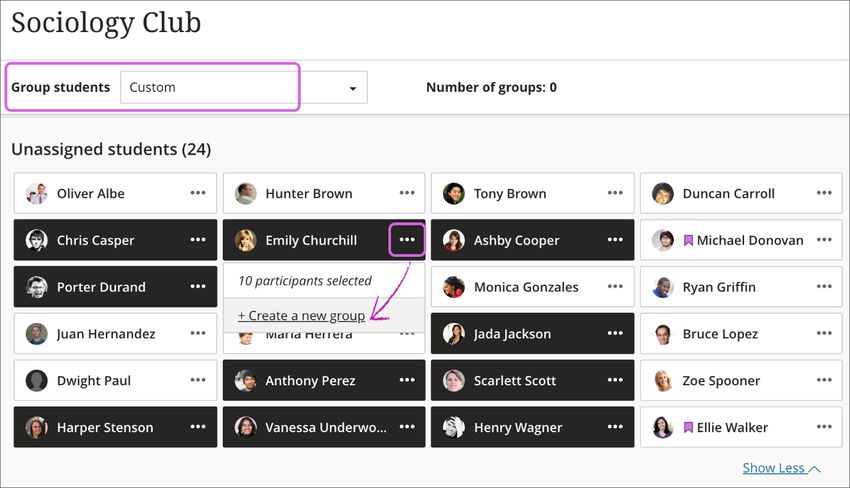
Blackboard Ultra Workbook v.1.3

4. Organising Content in a Blackboard Ultra Site
All Content in a Blackboard site (files, multimedia, discussion boards etc) are accessed in the
right-hand pane of a Blackboard Ultra site page, the ‘Course Content’ area. Within this area
content can be toggled between ‘visible’ and invisible to students.

There are two types of container within an Ultra site that you can use to organise/curate
content within the Course Content area. These are Folders and Learning Modules. A folder is
to some extent self-explanatory as to each nature and works pretty much like a folder on
one’s own computer.

Learning Modules in contrast let students navigate from one content item to the next
without distractions or extra clicks. A learning module can help immerse students in the
topic or concept you're teaching.

                                                          A

                            B

                                                                   C

Fig. 2. Student view of module

        A. Navigation bar: Open frequently used tools in one step. Select an icon to check
           the course calendar, respond to class discussions, access the course gradebook,
           and send a message.
        B. Details & Actions: Manage your course with these options:
           • Class Register: View your class list. You can see who is on your module.

                                               Learning Innovation and Digital Engagement   9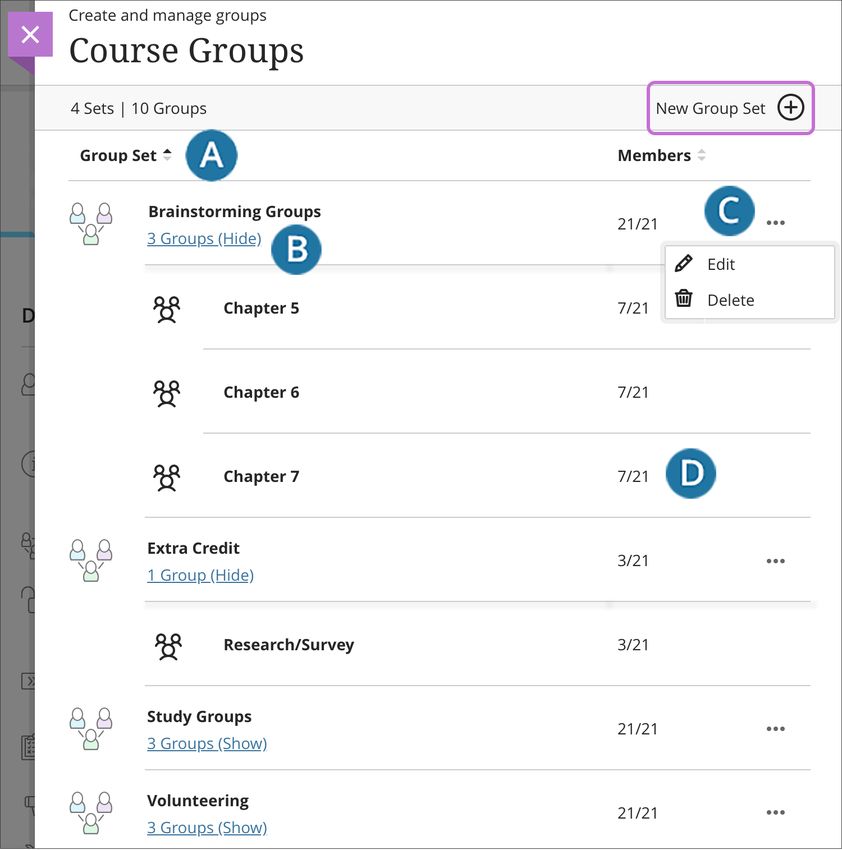
Blackboard Ultra Workbook v.1.3
• Course availability:
Open: Open a course when you're ready for students to
participate.
Private: Make a course private while you add or experiment with
content, and then open it to students when you're ready. Students
see private courses in their course lists, but they can't access
them.
o Blackboard Collaborate: Use the open Blackboard Collaborate session as
a convenient launch point for scheduled and impromptu meetings. The
icon appears in purple to show you and other course members when
people are active in the Collaborate room.
o Attendance: Mark attendance grades.
o Announcements: Create or schedule course announcements for all
course members to view.
C. Add content: Select the purple ‘+’ sign wherever you want to add content, the
purple ‘+’ sign will appear on any line within the course content area.
Learning Innovation and Digital Engagement 10Blackboard Ultra Workbook v.1.3
5. About Learning Modules
5.1 - Watch a video about Learning Modules
The following narrated video provides a visual and auditory representation of some of the
information included on the following pages. For a detailed description of what is portrayed
in the video, open the video on YouTube, navigate to More actions, and select Open
transcript.
Task: Watch a video about learning modules
Please click and watch the video link
Video: learning modules explains how to create a learning module and set its visibility in the
Ultra Course view.
Learning Innovation and Digital Engagement 11Blackboard Ultra Workbook v.1.3
5.2 - Learning Module Navigation
Below (fig. 3) is a sample of what can be added to a learning module.
3
1
2
4
Fig. 3. Sample of learning Module
1. Change module visibility. You can show or hide the module to students. You can also
select conditional availability. You can set the module availability for a certain date if
you wish.
2. Add and create module content. Drag content from the Course Content page into
the module or create content directly within it.
3. View and organize content. Select the arrow to expand the module and view all
content. Reorder content in the order you want students to access it.
4. Change content visibility. You can select visibility for individual items within the
learning module.
*Warning* If you delete a learning module with content, the content is also removed from
the Course Content page.
5.3 - Add Folders to Learning Modules
You can add folders to a learning module to further organise content. Folders in learning
modules can only contain content items, not other folders.
Learning Innovation and Digital Engagement 12Blackboard Ultra Workbook v.1.3
6. Adding Content to a Blackboard Ultra Site
There are a number of ways to add content into a learning module or folder or simply into
the main Course Content area of a Blackboard Ultra site. These include:
• Documents
• Links
• Discussions
• Assignments
• Tests
6.1 - Create a Document
Within Blackboard a ‘Document’ is a blank page to which you can add multiple items and file
types.
On the Course Content page, you can create a ‘Document’ in an Ultra site to present a
combination of content. For example, you can include introductory text for a topic or
session, an audio file, a video or an image. When students select the document title, the
materials you added are all presented together on one page. Students see the content just
as you see it, without the editing options.
Adding content in Blackboard ultra is a very easy process, firstly you need to look for a line
within the course content area, as shown in (fig. 4), then click on the purple ‘+’ sign.
Fig. 4 Adding content using the + symbol
This will in turn change into a purple ‘x’ with a drop-down menu which is shown in fig.5
within that menu, select ‘Create’ to open the Create Item panel and select Document.
The New Document page opens.
Learning Innovation and Digital Engagement 13Blackboard Ultra Workbook v.1.3
You can also expand or create a folder or learning module and add a document.
Fig. 5. Drop down list option for adding content
6.2 - Video about creating a document
Task: Watch a video about creating a document
Please click and watch the video about creating a document.
The following narrated video provides a visual and auditory representation of some of the
information included on this page. For a detailed description of what is portrayed in the
video, open the video on YouTube, navigate to More actions, and select Open transcript.
Video: Create a document explains how to create a document page in the Ultra module
view.
Learning Innovation and Digital Engagement 14Blackboard Ultra Workbook v.1.3
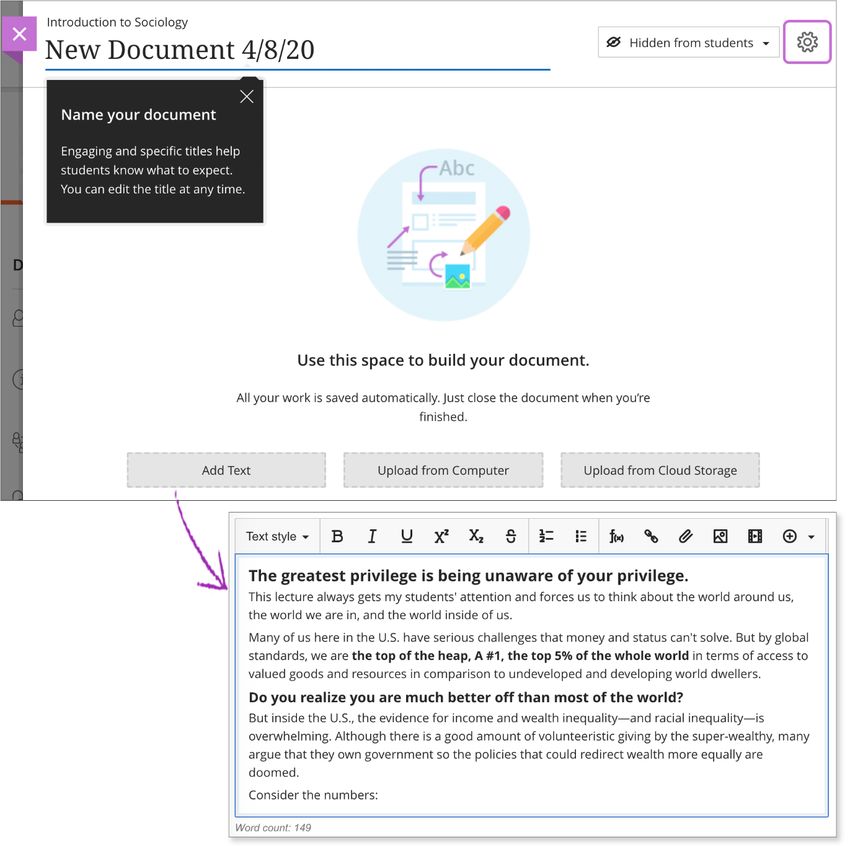
6.3 - Adding Items to a New Document page
On the New Document page, use the options at the bottom of the page to add content. You
can add as many text blocks and files as you want.
4
1
5
3
2
Fig.6 adding new items to a document
1. Type a title. (fig. 6) When adding a new document, the title appears as the link
students select to view the materials. If you don't add a title, New Document and
the date appear in the content list.
2. Add text blocks. (fig. 6) Select Add Text to open the editor. You can also paste
text from a Word doc.
*Quick Tip* You can also use the editor to embed images and attach files along with your
text. To use your keyboard to jump to the editor toolbar, press ALT + F10. On a Mac, press Fn
+ ALT + F10. Use the arrow keys to select an option, such as a numbered list.
3. Add files. Select Upload from Computer and browse for or drag files from your
computer, such as a Word doc or an audio file. You cannot add a folder of items.
More on how media files appear
Learning Innovation and Digital Engagement 15Blackboard Ultra Workbook v.1.3
Upload from Cloud Storage: You can upload files from cloud storage, such as OneDrive® and
Google Drive™. When you add a file from cloud storage, the system makes a copy of the file
in the Blackboard site. Any change you may make to a file within your Blackboard will not
apply to the file in cloud storage and vice versa. If your browser allows, media files display
inline.
Task: Create a document and add some text.
Using the information above and what you have seen in the video please create a ‘Document’ and
add some text.
4. Show or hide the document. (fig. 6) Students can't see a document until you
choose to show it. You can create all your content ahead of time and choose
what you want students to see based on your schedule. You can also
set availability conditions based on date and time. On the Course Content page,
students can see when a Document is set to be available.
5. Allow class conversations. (fig. 6) What if your students have questions? You can
allow conversations within a document, and anyone can contribute. Select
the Settings icon to open the Document Settings panel and select the
conversations check box. As the conversation develops, it appears only within
the document.
More on conversations
• Add an optional description. The description appears within the document title on
the Course Content page shown in fig 7. Content item descriptions are limited to 250
characters.
Fig. 7. Optional description in document settings
Learning Innovation and Digital Engagement 16Blackboard Ultra Workbook v.1.3
6.4 - Adding more content to a Document
After you have added your first piece of content to your document, select the purple ‘+’ sign
wherever you want to add more content, this can be done by clicking on any line within
your document. Once you click on the line the sign will change to ‘x’ with a drop-down
menu as shown (fig. 8). You can add as many text blocks and files as you want, wherever
you want.
Fig. 8. Adding more content to a document
Saving a Document
After you save a document, it will appear in the content list under ‘Course Content’. You can
change the document's content at any time and change the order of the items you added to
the document (fig. 9).
In their activity streams, students are notified a new document is available.
Fig. 9. Activity stream
Edit, reorder, and delete documents
You can make changes to existing documents and change where they appear on
your Course Content page. Press the Move icon in a document's row (fig. 10) and move it to
a new location. You can also move a document into an expanded folder.
Learning Innovation and Digital Engagement 17Blackboard Ultra Workbook v.1.3
To the right of a Document’s name, (fig. 10) click on the 3 small dots to open a menu to
select Edit, Conversations, and Delete.
Fig. 10. Edit, Reordering or deleting a document
Delete documents
You can delete a document from the site or hide it from students to preserve the
information. Students can't access hidden documents on the Course Content page.
Add files, images, audio, and video
On the Course Content page, you can browse for files in cloud storage or on your computer.
In some cases, students select the file name to download and open it. If permitted by the
settings in a browser, some media files open in a new window or tab. Students are notified
in their activity streams when you add content.
Supported file types include DOC, DOCX, HTM, HTML, MP3, MPG, PDF, PPT, PPTX, XLS, XLSX,
RTF, TXT, ZIP, and most image types.
Fig. 11. Uploading files, images, audio and video
Upload files. Select the purple ‘+’ sign (fig. 11) wherever you want to upload files. In the
menu, select Upload to browse for files on your computer. The files appear in the content
list.
Learning Innovation and Digital Engagement 18Blackboard Ultra Workbook v.1.3
Open a file's menu to edit the file name, align with goals, replace the file, or add a
description. You can also expand or create a folder or learning module and then upload files.
At Westminster you can use Blackboard Ally to be sure your content is more accessible.
Accessibility score indicators and alternative formats appear next to files. You can more
information regarding Ally in Appendix 2.
Add files from cloud storage. If you already have files stored in the cloud, such as in
OneDrive® and Google Drive™, you can add them to your module. You may choose multiple
files from cloud storage to add to your Course Content page in one action. The files you add
are copies. If you make a change to a file in cloud storage, you need to upload a new copy in
your module.
Reorder, edit, and delete content easily. Point to an item to reveal the Move icon and drag
the item to a new location in the content list. Open the menu and select Edit or Delete. For
example, in the panel, you can change a file's name, type a description that appears with
the file on the Module Content page, or replace the file.
*Quick Tip* With your keyboard, you can move an item to a new location, move an item into
an expanded folder, and move a folder into another expanded folder.
Zip files
On the Course Content page, you can upload a compressed package of files, also called a ZIP
file. Students select the ZIP file to download it to their computers and unzip it to access the
contents. In the menu, select Upload to browse for the file on your computer.
Learning Innovation and Digital Engagement 19Blackboard Ultra Workbook v.1.3
7. Communication
7.1 - Announcements
Announcements help you share important information with others in your module.
Announcements render differently in Blackboard ultra than in the old version of Blackboard
Unlike messages, announcements (fig 12) appear immediately when a student opens a
module.
Students are less likely to ignore the information you share in an announcement because it
demands attention. They need to dismiss the notification before they can view other
content in the site.
Fig. 12. New course announcement notification
7.2 - Course Announcements page
Find course announcements in the Details & Actions pane.
The Course Announcements page lists all announcements in your Blackboard Ultra site,
including each announcement’s status and number of viewers. You can create, copy, edit,
and delete announcements on this page.
1
2
3
4
Fig. 13. Course announcement
Learning Innovation and Digital Engagement 20Blackboard Ultra Workbook v.1.3
1. Search or sort the list. (fig. 13) You can sort announcements by the title, status,
or the number of viewers. You can use the search function to find
announcements by title or message content.
2. Create a new announcement. (fig. 13) You can create a blank announcement or
copy an existing announcement to use as a template.
3. View the status. (fig. 13) Announcements have three states: Posted, Scheduled,
and Drafted. An announcement’s status appears with its content. You can also
view the number of module announcements by status at the top of the page.
4. Manage announcements. (fig. 13) You can edit or delete announcements from
this page.
You can create an announcement for a future event, such as a reminder about a module
event or exam. You can schedule announcements to post automatically in your module on
the date and time you specify. You can also use the schedule feature to hide an
announcement when it's no longer relevant.
As you create an announcement, select Schedule announcement. Choose a date and time to
start and stop the display of the announcement to students.
*Quick Tip* Use the date picker for scheduling announcements. If you type a date, it reverts
to the default date when you save the announcement.
7.3 - Watch a video about creating announcements
Task: Watch a video about creating an announcement
Please click and watch the video on creating an announcement.
The following narrated video provides a visual and auditory representation of some of the
information included on this page. For a detailed description of what is portrayed in the
video, open the video on YouTube, navigate to More actions, and select Open transcript.
Video: Create announcements shows how to create an announcement in a Blackboard Ultra
site.
Learning Innovation and Digital Engagement 21Blackboard Ultra Workbook v.1.3
7.4 - Create an announcement
Select Create announcement found on the Details and Action pane to get started. The New
Announcement page appears.
Type a title and message text for the announcement as shown (fig. 14). You can include up
to 256 characters in the title. Select Save to save your announcement draft. Select Post in
the Status column of the Course Announcements page to post the announcement
immediately.
You can also schedule announcements to start and end at certain times.
Fig. 14. Creating an announcement
After you’ve created and posted announcements in your course, the count of posted and
total announcements updates on the Details and Action pane (fig. 15).
Fig. 15. Announcement posted and total count
Learning Innovation and Digital Engagement 22Blackboard Ultra Workbook v.1.3
7.5 - Schedule an announcement
You can create an announcement for a future event, such as a reminder about a module
event or exam. You can schedule announcements to post automatically in your module on
the date and time you specify. You can also use the schedule feature to hide an
announcement when it's no longer relevant.
As you create an announcement, select Schedule announcement. Choose a date and time to
start and stop the display of the announcement to students.
Task: create an announcement and add some text.
With the information above, create an announcement and post it.
7.6 - Edit or delete an announcement
You can edit any announcement in your module, including past, active, and scheduled
announcements. On the Course Announcements page, select the menu to manage an
announcement. The following information can be found in the Course Announcement
section found on page 22.
• Select Edit to change an announcement’s title or message (fig. 13). You can also
edit the announcement’s scheduled posting.
• Select Delete to permanently remove the announcement from your module.
• Select Copy to copy the announcement. You can create a template
announcement and copy it for announcements that use a similar format.
Task: Edit or delete the announcement
With the information above, edit or delete the announcement you have created.
7.7 - Where announcements appear
Active module announcements appear the first time each student enters the module after
the announcement is posted. Announcements appear before the student can access
the module Content page. After the student dismisses the announcement, it won’t appear
immediately when the student accesses the module in the future.
Active announcements also appear in the Today and Recent sections of the activity stream.
The announcement disappears from the activity stream when the student dismisses it
within the module.
If an announcement is still active, students can access the announcements they’ve
dismissed. On the Module Content page, students can select View archive to read past,
active announcements in the module
Learning Innovation and Digital Engagement 23Blackboard Ultra Workbook v.1.3
7.8 - Messages page
You may have noticed that with announcements no rich media can be added as in the old
version of Blackboard. If you need to send rich media, you will need to send a message
instead. If a message is sent this is then delivered to in a module, access the Messages page
on the navigation bar. All your module messages and responses appear. You can easily scan
the entire list and open a message to read all the responses.
Any unread messages appear first in the list. Each message displays the profile picture of the
author. Under the author’s name, you can view how many participants are included or if the
message is for the whole class.
Fig. 16. Messages page
A. Easily view what's new. A count of messages appears above the list. New responses
appear with a bold font.
B. Send a message. Select the New Message icon to send a message. Send to one
person, multiple people, or the entire class.
*Quick Tip* If you have many messages, select the number of messages you want to
see per page to narrow your focus.
C. Delete a message. Use the Delete icon to delete a message. If more responses come
in, you'll get them. You can't edit or delete individual responses in a message.
D. Navigate to another message. Messages open in a panel with all the responses. Use
the View Previous Messages and Next Message icons at the top to view the previous
or next message in the list.
Learning Innovation and Digital Engagement 24Blackboard Ultra Workbook v.1.3
When you create or respond to a message, select the Add Participants icon highlighted in
fig. 17 to add additional people unless the message was sent to the entire class. The original
recipients see a note in the next message that you added new people or the whole class.
The new recipients see the message from the point they were added.
Click here to add
participants
Fig. 17. Adding participants to messages
7.9 - Send a message
When you select the New Message icon on the Messages page, the New Message panel
opens.
Fig. 18. Sending a new message
Start typing to add recipients. As you type, matching recipient names appear in a menu for
easy selection (fig.18). You can continue to add as many names as you want or send to the
whole class.
Lead with the most important info. Messages don't have titles. Recipients need to rely on
the first part of your message as they choose what to read. Use the options in the editor to
format your text.
*Quick Tip* To use your keyboard to jump to the editor toolbar, press ALT + F10. On a Mac,
press Fn + ALT + F10. Use the arrow keys to select an option, such as a numbered list.
Learning Innovation and Digital Engagement 25Blackboard Ultra Workbook v.1.3
Send an email copy. You can send an email copy of a module message. Students might see,
read, and act on important announcements and module messages when they receive a copy
in their inboxes. Email copies are only delivered if recipients have valid email addresses in
their Blackboard Learn profiles. When you select this option, all recipients of the message
receive an email copy.
*FYI* Recipients can view your message in their email inboxes but won't be able to send an
email to reply.
Allow or disallow replies. You may choose not to allow replies for messages you create. If
you choose to send a message to the whole class, no one is allowed to reply by default.
When module messages are read-only for students, you're alerted when you create a
message. The Allow replies to this message check box applies to the roles within a site
allowed to reply to and create messages, such as other instructors and teaching assistants.
Task: Send a message
With the information above, send a message to your colleague
Learning Innovation and Digital Engagement 26Blackboard Ultra Workbook v.1.3
8. Assignments
8.1 - Create a Blackboard assignment
You can create assignments alongside other content. Students can access their work next to
the content they need, right when they need it. You can also create a group assignment and
release it to one or more groups in your course.
More on creating assignments for groups of students
Fig. 19. Creating a Blackboard Assignment in the course content area
In the menu (fig. 19), select Create to open the Create Item panel and select Assignment.
The New Assignment page opens.
You can also expand or create a folder and add an assignment.
When you create an assignment, a gradebook item is created automatically.
After you post assignment grades, students can view their scores on their grades pages or in
the activity stream. They can also access an assignment, their submissions, your feedback,
rubrics, and their grades from the assignment link on the Course Content page.
Learning Innovation and Digital Engagement 27Blackboard Ultra Workbook v.1.3
8.2 - Watch a video about creating Blackboard assignments
The following narrated video provides a visual and auditory representation of some of the
information included on this page. For a detailed description of what is portrayed in the
video, open the video on YouTube, navigate to More actions, and select Open transcript.
Video: Create an assignment shows how to create an assignment with simplified workflows.
Task: Watch the video on how to create an assignment
Please click and watch the video on create an assignment
Learning Innovation and Digital Engagement 28Blackboard Ultra Workbook v.1.3
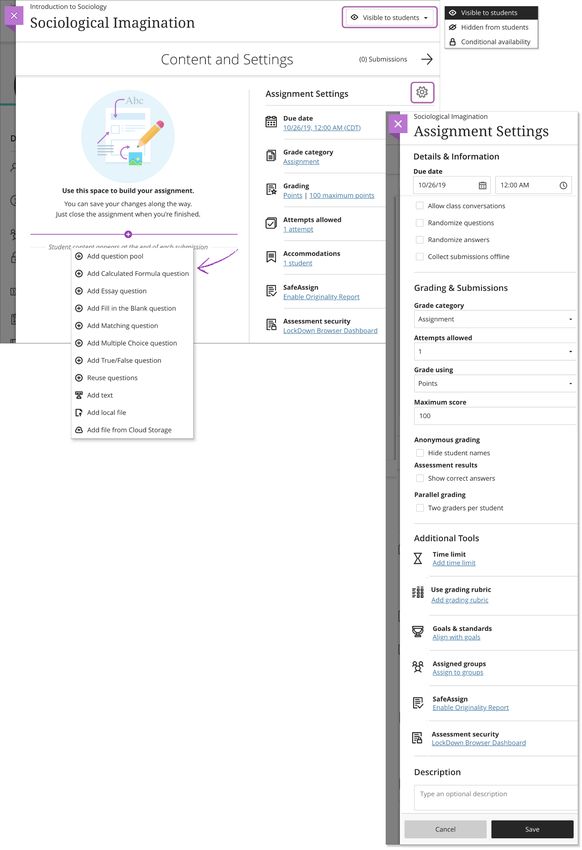
8.3 - Creating a Blackboard Assignment
Selecting ‘Assignment’ from the create item menu will allow you to create a Blackboard
assignment. Over the next few pages a detailed description will explain the image fig. 22.
3
1
4
5
7
8
6
9
10
11
2
12
13
14
15
16
Fig. 20. How to create a blackboard assignment.
Learning Innovation and Digital Engagement 29Blackboard Ultra Workbook v.1.3
To set up the assignment complete the following:
1. Add the assignment essentials. (fig. 20) Provide an intuitive assignment title so
students can easily find the assignment among your course content. On the Course
Content page, the title appears as the link students select to view the materials. If
you don't add a title, "New Assignment" and the date appear in the content list. If
you don't add content, the assignment won't appear on the Course Content page.
2. Add text, files, and questions. (fig. 20) Select the plus sign to open the menu and
make a selection. You can choose a question type, add a question pool, or reuse
questions and content from existing assessments. You can add files and text, such as
instructions for the assignment. You can also add files from cloud storage, such as
OneDrive® and Google Drive™.
3. Show or hide the assignment. (fig. 20) Students can't see an assignment until you
choose to show it. You can create all your content ahead of time and choose what
you want students to see based on your schedule. You can also set availability
conditions based on date, time, and performance on other items in the course
gradebook. On the Course Content page, students can see when you set the
assignment to show.
4. Apply assignment settings. (fig. 20) Select the Settings icon to open the panel where
you provide the assignment's details and information.
5. Provide a due date. (fig. 20) Due dates appear on the calendar and in the activity
stream. Late submissions appear with a Late label in the course gradebook.
Encourage students to review what’s due now and what’s ahead so they can ask
questions as soon as possible.
6. View accommodations. (fig. 20) You can set accommodations for students and make
them exempt from certain course requirements, such as assignment due dates and
time limits. To select accommodations, go to the Class Register and open a student's
menu. The number of accommodations you've made appears on the assignment
page in the Assignment Settings section. More on accommodations
7. Allow class conversations. (fig. 20) What if your students have questions about an
assignment? You can allow conversations within an assignment, and anyone can
contribute. As the conversation develops, it appears only with the relevant
assignment. More on conversations
8. Collect submissions offline. (fig. 20) You may want to grade student work that
doesn’t require students to upload a submission. For example, you can add grades to
your gradebook for oral presentations, science fair projects, acting performances,
and artwork delivered in person. More on collecting submissions offline
9. Change the grade category. (fig. 20) You can change the assignment's grade
category to be part of one of the custom gradebook categories you set up in your
course. You can create new categories to customize how coursework is grouped in
your course. Custom categories can be useful when you set up the overall grade.
10. Determine the number of attempts. (fig. 20) You can let your students submit more
than one attempt at an assignment. When you allow multiple attempts, you can also
choose how the final grade is calculated.
11. Select the grading schema. (fig. 20) From the Grade using menu, select an existing
grading schema such as Points. You can change the grading schema at any time and
the change will show to students and in your gradebook.
12. Enable anonymous grading. (fig. 20) When you create an assignment without
questions, you can enable anonymous grading, so student names are hidden while
you grade. You may only add text and files to anonymously graded assignments.
More on anonymous grading
Learning Innovation and Digital Engagement 30Blackboard Ultra Workbook v.1.3
13. Enable parallel grading. (fig. 20) You can enable parallel grading and assign graders
when you create an assignment. You can also enable parallel grading even after
students make submissions. The system randomly assigns graders you choose so
each student has two graders for the assignment. The grading workload is
distributed evenly among the graders. Graders can only open the submissions for the
students assigned to them. Instructors or reconcilers determine the final grades for
students. More on parallel grading
14. Make a group assignment. (fig. 20) You can create an assignment for one or more
groups of students. By default, you assign a grade to each group as a whole, but you
can change a group member's individual grade.
15. Enable SafeAssign. (fig. 20) You can use SafeAssign to check for potential plagiarism
in student submissions. You can enable the SafeAssign Originality Report any time,
even after students have started their submissions, but submissions are only
checked when SafeAssign is enabled.
16. Add an optional description. (fig. 20) The description appears with the assignment
title on the Course Content page.
8.4 - Add files and text blocks to Blackboard assignments
Setting the Blackboard assignment brief can be done by either putting in some text via the
text blocks or adding a file such as a word document. To begin select the purple ‘+’ sign to
open the menu wherever you want text, or a file (fig.20). You can add as many text blocks
and files as you want.
Add text blocks. Select Add text to open the editor. You can include instructions for a
section of the assignment or introductory text for an audio file or image. You can also paste
text from a Word doc.
*Quick Tip* You can also use the editor to embed images and attach files along with your
text.
If you create an assignment that includes only text blocks, you can manually change
the Maximum score in the Assignment Settings.
Add files. Select Add local file to browse for a file on your computer. Your institution
controls the maximum file size you can upload. You can't add a folder of files.
Add file from Cloud Storage: You can instantly connect to multiple web apps where you
store files, such as OneDrive. The files you add are copies. If you make a change to a file in
cloud storage, you need to upload a new copy in your course. If your browser allows, media
files you add from cloud storage display inline.
More on cloud storage
Learning Innovation and Digital Engagement 31Blackboard Ultra Workbook v.1.3
8.5 - Edit, reorder, and delete Blackboard assignments
You can make changes to existing assignments and change where they appear on
your Course Content page. Be aware that if you change an existing assignment that students
can access, some students may have started their submissions. You can't change the grading
schema if you've already started grading.
Press the Move icon highlighted in fig. 21 in an assignment's row and move it by dragging it
to a new location. You can also move an assignment into a folder, this again can be done by
dragging it into a folder.
In an assignment's row, open the menu to select the Edit and Delete functions.
Fig. 21. Moving a Blackboard assignment
Delete assignments
You can delete an assignment from your course and if no student submissions exist, the
gradebook item is also deleted. For assignments with submissions, you must confirm that
you want to permanently remove the assignment, all submissions, and grades from your
course.
Or, you can hide the assignment from students to preserve the submissions and the scores
in the gradebook. Students can't access hidden assignments on the Course Content page or
on their grades pages even if you have graded submissions.
Learning Innovation and Digital Engagement 32Blackboard Ultra Workbook v.1.3
8.6 - Blackboard Assignments and the activity stream
When you create an assignment and make it visible to students, they're notified in their
activity stream.
Fig. 22. Blackboard Assignment stream view for students
You'll see an alert in the stream when you have submissions to grade. Select the assignment
title to begin grading on the assignment submissions page.
Fig. 23. Blackboard Assignment new submission stream view for staff
More on the activity stream
Task: create a blackboard assignment
With the information above, create a blackboard assignment.
Learning Innovation and Digital Engagement 33Blackboard Ultra Workbook v.1.3
8.7 - Creating a Turnitin assignment
The other type of assignment offered at the university is Turnitin, as this is a 3rd party addon
it is accessed in a different manner to that of the Blackboard assignment option. To begin
please follow the instructions below:
1. Navigate to the Content Market in the Blackboard module page.
Fig. 24. Adding a Turnitin Assignment through Content Market
2. Select the Turnitin tool shown below.
Fig. 25. LTI (Learning Tools Interoperability) for Turnitin found in the content market
3. Fill out the Turnitin assignment settings along with the following:
• Max grade
Set a point value for the assignment to allow a grade to be set by rubrics (if
used) and be sent to the grade book. For example, if you set the max grade as
100, this is the highest grade your student can receive.
• Start date
The start date is the date and time students can begin submitting to the
assignment.
Learning Innovation and Digital Engagement 34Blackboard Ultra Workbook v.1.3
• Due date
The due date is the date and time students' papers are due for the
assignment.
• Feedback release date
The feedback release date is the date and time students can begin viewing
the comments and grades you have left on their papers. Feedback can only
be released after the due date.
Fig. 26. Turnitin submission setting.
4. Click on Optional settings. The information below will help you to understand the
settings available and correctly customize the assignment.
• Submission storage options
• Standard paper repository
Student papers will be checked against other institutions' student
submissions.
• Institution paper repository
Student papers will only be checked against other student papers
within your institution. With this setting enabled, if a student from
your institution submits a paper matching a paper of a student from
another institution, Turnitin will not identify this match.
• Do not store the submitted papers
A similarity report will still be generated for paper submissions, but
your students' papers will not be stored in the Turnitin standard paper
repository or the institution's paper repository for future comparison.
• Student's choice of paper repository
Students have the freedom to choose where they would like their
paper to be saved. It is advised that this setting is only used if you do
not intend to use Turnitin to assess originality.
• Allow submissions of any file type
Select the checkbox to allow all file types - even those that are not supported
for generating a Similarity Report. This includes files that include media.
• Allow late submissions
Select the checkbox to allow late submissions for the assignment; students
will be able to submit papers after the due date.
Learning Innovation and Digital Engagement 35Blackboard Ultra Workbook v.1.3
• Enable anonymous marking
Select the checkbox to obscure student names within the assignment inbox,
Similarity Report and online grading until the assignment's feedback release
date. Student names may be revealed for an assignment by clicking on
the anonymous marking enabled button to reveal the author's name for the
paper.
• Compare against
These search options allow you to select the repositories that students'
submissions will be checked against when processing Similarity Reports for
papers. The similarity score may decrease if a repository option is deselected.
• Report generation and resubmissions
• Generate reports immediately (resubmissions are not allowed)
Originality Reports for all submissions will be generated immediately.
Students cannot resubmit papers. If, for any reason, a resubmission is
required when this setting is selected, you must manually delete a
student's submission from the assignment inbox to allow the student
to submit again.
• Generate reports immediately (resubmissions are allowed until due
date). After 3 resubmissions reports generate after 24 hours.
This option is typically used when students are self-reviewing and
revising their submissions and able to view the Similarity Report.
Similarity Reports will be generated immediately for each student's
initial submission to this assignment.
• Students may resubmit as often as they wish until the assignment's
due date.
• Similarity Reports for a second or subsequent submission will
generate after 24 hours of submission.
• As all previous submissions are removed upon resubmission, only the
latest submission is available to both you and the student.
• Similarity Reports will regenerate within an hour of the due date and
time to allow student submissions to compare against one another
within the assignment.
• Generate reports on due date (resubmissions are allowed until due date)
Originality Reports will not be generated for any submission until the due
date and time of the assignment is reached. Students may resubmit as many
times as needed until the due date and time but will not receive reports
during this period. No resubmissions are allowed after the due date and time
of the assignment
Learning Innovation and Digital Engagement 36Blackboard Ultra Workbook v.1.3
• Allow students to view Similarity Reports
Select the checkbox to allow your students to view their Similarity Reports for
submissions to this assignment. This option gives you more flexibility and
control when creating assignments.
• Exclude bibliographic materials
Select the checkbox to exclude text appearing in the bibliography, works
cited, or references sections of student papers from being checked for
matches when generating Originality Reports. You can overwrite this setting
in individual Similarity Reports.
• Exclude quoted materials
Select the checkbox to exclude quotations from being checked for matches
when generating Similarity Reports. You can overwrite this setting in
individual Similarity Reports.
• Exclude small sources
Select the checkbox to exclude matches that are not of sufficient length
(determined by you) from being considered when generating Similarity
Reports. A box will appear, where you can exclude matches by word count
or by percentage.
5. After you have set your assignment, then select submit
Task: create a Turnitin assignment
With the information above, create a Turnitin assignment.
Learning Innovation and Digital Engagement 37Blackboard Ultra Workbook v.1.3
9. Interaction and Activity in a Blackboard Ultra Site
9.1 - Discussions page
Discussions are one way to engage students in activity in a Blackboard site. They broaden
communication and foster strong connections among the group and help with the
development of a learning community.
Fig. 27. Adding a discussion to course content
Create opportunities for interaction right where you need them. On your Course Content,
just select the purple ‘+’ sign or the Discussions icon from the Navigation Bar to add a
discussion.
Use the activity stream to your advantage. Review student contributions and respond
directly from the activity stream. Or, you can jump to the full course discussion from the
activity stream.
You own discussions. Not ready to share a new discussion? Hide it. Want to make it
simpler? Create folders to organize discussions. You can also rearrange the order or delete
an entire discussion or specific response. New discussions are hidden from students by
Learning Innovation and Digital Engagement 38Blackboard Ultra Workbook v.1.3
default. When you're ready to start, make your discussions visible to get your students
talking!
9.2 - Discussions or conversations?
While you can use class discussions to develop or share ideas, you can also use
conversations for quick exchanges on specific content. For example, when you create
assignments, you can enable conversations. Anyone can make a contribution to the
assignment conversation—ask for help, share sources, or answer questions others have.
Everyone can read the conversations while they view the assignment.
*FYI* Conversations appear only with the relevant content item and don't appear on the
discussions page.
9.3 - Create a discussion
On the Course Content page, select the purple ‘+’ sign wherever you want to add a
discussion. Select Create > Participation and Engagement > Discussion.
Fig. 28. Creating a Discussion
Type a meaningful title to help students find the right discussion in the content list. If you
don't add a title, "New Discussion" and the date appear on the main discussion page.
Learning Innovation and Digital Engagement 39You can also read