VMware AirWatch Product Provisioning for macOS Guide - VMware Docs
←
→
Page content transcription
If your browser does not render page correctly, please read the page content below
VMware AirWatch Product Provisioning for
macOS Guide
Using Product Provisioning for managing macOS devices.

Have documentation feedback? Submit a Documentation Feedback support ticket using the Support Wizard on
support.air-watch.com.
Copyright © 2018 VMware, Inc. All rights reserved. This product is protected by copyright and intellectual property laws in the United States and other countries as well as by
international treaties. VMware products are covered by one or more patents listed at http://www.vmware.com/go/patents.
VMware is a registered trademark or trademark of VMware, Inc. in the United States and other jurisdictions. All other marks and names mentioned herein may be trademarks of their
respective companies.

                                                                                                    VMware AirWatch Product Provisioning for macOS Guide | v.2018.05 | May 2018
                                                                                                                                    Copyright © 2018 VMware, Inc. All rights reserved.

                                                                                                                                                                                   1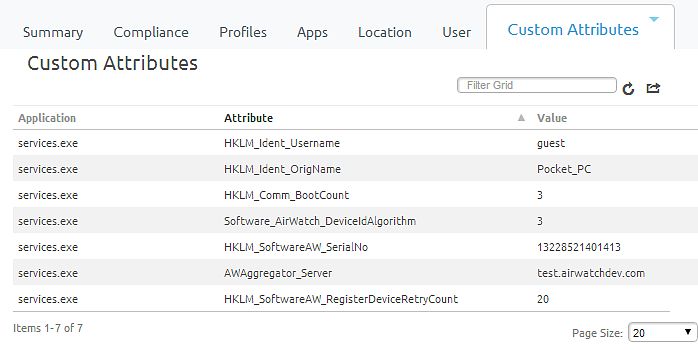
Table of Contents
 Chapter 1: Overview                                                                                                           4
             Introduction to Product Provisioning for macOS                                                                    5
             Supported Devices, OS, and Agents                                                                                 5

 Chapter 2: Relay Server Configuration                                                                                         6
             Relay Servers Overview                                                                                            7
             Configure a Relay Server                                                                                          8
             Batch Import Relay Servers                                                                                      10
             Pull Service Based Relay Server Configuration                                                                   11
             Create a Windows-Based Pull Service Relay Server                                                                12
             Create a Linux-Based Pull Service Relay Server                                                                  13
             Remote Viewing Files on Relay Server                                                                            14
             Relay Server Management                                                                                         15

 Chapter 3: Products                                                                                                        17
             Product Provisioning Overview                                                                                   18
             Files/Actions for Products                                                                                      18
             Create a Files/Actions Component                                                                                18
             Manage Files/Actions                                                                                            20
             Create a macOS MobileConfig Provisioning File                                                                   21
             Product Conditions                                                                                              21
             Conditions List View                                                                                            22
             Create a Condition                                                                                              22
             Delete a Condition                                                                                              25
             Custom Attributes Overview                                                                                      25
             Configure a Custom Attributes Profile (macOS)                                                                   26
             Create Custom Attributes                                                                                        27
             Custom Attributes Importing                                                                                     27
             Assign Organization Groups Using Custom Attributes                                                              28
             macOS Custom Attributes                                                                                         29
             Create a Product                                                                                                31
             Product Verification                                                                                            33

                                                     VMware AirWatch Product Provisioning for macOS Guide | v.2018.05 | May 2018
                                                                                Copyright © 2018 VMware, Inc. All rights reserved.

                                                                                                                               2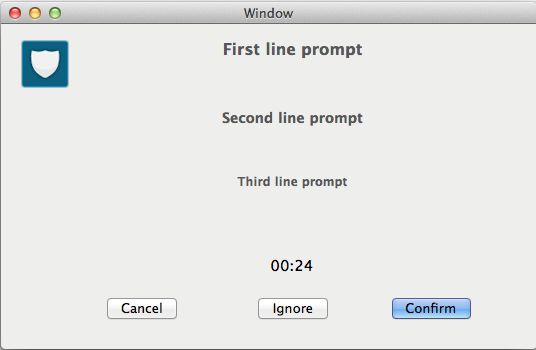
Chapter 4: Product Management                                                                                          34
          Products Dashboard                                                                                            35
          Products List View                                                                                            36
          Products in the Device Details View                                                                           37
          Product Job Statuses                                                                                          38

                                                VMware AirWatch Product Provisioning for macOS Guide | v.2018.05 | May 2018
                                                                           Copyright © 2018 VMware, Inc. All rights reserved.

                                                                                                                          3
Chapter 1:
Overview
Introduction to Product Provisioning for macOS 5
Supported Devices, OS, and Agents 5
VMware AirWatch Product Provisioning for macOS Guide | v.2018.05 | May 2018
Copyright © 2018 VMware, Inc. All rights reserved.
4Chapter 1: Overview
Introduction to Product Provisioning for macOS
Product provisioning enables you to create, through Workspace ONE UEM, products containing profiles, applications,
and files/actions (depending on the platform you use). These products follow a set of rules, schedules, and dependencies
as guidelines for ensuring your devices remain up-to-date with the content they need.
Product provisioning also encompasses the use of relay servers. These servers are FTP(S) servers designed to work as a
go-between for devices and the UEM console. Create these servers for each store or warehouse to store product content
for distribution to your devices.
As this guide focuses on the functionality provided by product provisioning, it does not contain all the features and
functionality that Workspace ONE UEM offers for managing macOS devices. For more information on general MDM
functionality for macOS devices, see the VMware AirWatch macOS Platform Guide available on docs.vmware.com.
Supported Devices, OS, and Agents
The product provisioning functionality supports different devices and operating systems. The functionality available
changes based on the supported rugged device.
Workspace ONE UEM supports product provisioning for devices with the following operating systems:
l macOS 10.7 Lion+ devices:
o MacBook Pro
o MacBook Air
o Mac Mini
o iMac
o Mac Pro
VMware AirWatch Product Provisioning for macOS Guide | v.2018.05 | May 2018
Copyright © 2018 VMware, Inc. All rights reserved.
5Chapter 2:
Relay Server Configuration
Relay Servers Overview 7
Configure a Relay Server 8
Batch Import Relay Servers 10
Pull Service Based Relay Server Configuration 11
Create a Windows-Based Pull Service Relay Server 12
Create a Linux-Based Pull Service Relay Server 13
Remote Viewing Files on Relay Server 14
Relay Server Management 15
VMware AirWatch Product Provisioning for macOS Guide | v.2018.05 | May 2018
Copyright © 2018 VMware, Inc. All rights reserved.
6Chapter 2: Relay Server Configuration
Relay Servers Overview
Relay servers act as a content distribution node that provides help in bandwidth and data use control. Relay servers act
as a proxy between the Workspace ONE UEM server and the rugged device for product provisioning.
Relay Server Basics
This proxy serves as an FTP/Explicit FTPS/SFTP server that distributes products to the device for download and
installation. You can distribute to all devices without consuming all the bandwidth to the main/central MDM server.
Relay servers represent a best practice for pushing products to downloaded applications and content – as opposed to
downloading directly from the Workspace ONE UEM server. Relay servers also add redundancy through the fallback
feature. If a device's relay server is down, the device falls back to the next relay server in the hierarchy system until it finds
a working server or connects to the Workspace ONE UEM server. If you are not using a relay server, the device
downloads applications and content directly from the Workspace ONE UEM server.
Note: Relay servers, both push and pull configurations, fall back to the next available relay server in its hierarchy and
continue to fall back until the device finds a suitable server or reaches Workspace ONE UEM. This arrangement
ensures devices with products provisioned to them have access to their content.
Source Server Vs Relay Server
A source server is the original location of the data, usually a database, or content repository. After the data is
downloaded from the source server to the UEM console, it is then transferred to the relay server. The data is then
downloaded from the relay server to devices.
Configure a Relay Server
Configure an FTP, Explicit FTPS, or SFTP file server to integrate with Workspace ONE UEM as a relay server. For more
information, see Configure a Relay Server on page 8.
Pull Relay Server Configuration
Relay servers either push or pull content based on the configuration. A pull relay server pulls content from Workspace
ONE UEM based on certain variables established in the server configuration. A push server pushes content from
Workspace ONE UEM to devices whenever it is published. For more information on installing a pull server, see Pull
Service Based Relay Server Configuration on page 11.
Pull Relay Server Security
Client-server applications such as Workspace ONE UEM use the transport layer security (TLS) cryptographic protocol to
communicate across a network. TLS is supported by the file transfer protocol (FTP), file transfer protocol over SSL (FTPS),
and SSH file transfer protocol (SFTP).
These file transfer protocols only secure those parts of the process where data is in transit between the client and the
server. Because of this limitation, VMware recommends the use of OS-level disk encryption. There are several operating
system-specific tools available (for example BitLocker for Windows, GnuPG for Linux).
VMware AirWatch Product Provisioning for macOS Guide | v.2018.05 | May 2018
Copyright © 2018 VMware, Inc. All rights reserved.
7Chapter 2: Relay Server Configuration
Bulk Importing
The Relay Server Import feature loads relay servers into the system in bulk. This feature simplifies the configuration of
multiple relay servers. For more information, see Batch Import Relay Servers on page 10.
Remote Viewing of Files on a Relay Server
After configuring a relay server and assigning products to use the relay server, you can view the files hosted on the
server. For more information, see Remote Viewing Files on Relay Server on page 14.
Relay Server Management
Maintaining Relay Servers keeps your products running smoothly so your devices remain up-to-date. Workspace ONE
UEM offers several tools to ensure that your relay servers work as intended. For more information, see Relay Server
Management on page 15.
Configure a Relay Server
Configure a relay server by configuring an FTP, Explicit FTPS, or SFTP file server and integrating it with Workspace ONE
UEM.
Important: If you use the pull service to create a pull-based relay server, you must give SYSTEM full access to the
home directory. This configuration means the pull service stores and removes files from the directory.
Pull Relay Server Security
Client-server applications such as Workspace ONE UEM use the transport layer security (TLS) cryptographic protocol to
communicate across a network. TLS is supported by the file transfer protocol (FTP), file transfer protocol over SSL (FTPS),
and SSH file transfer protocol (SFTP).
These file transfer protocols only secure those parts of the process where data is in transit between the client and the
server. Because of this limitation, VMware recommends the use of OS-level disk encryption. There are several operating
system-specific tools available (for example BitLocker for Windows, GnuPG for Linux).
Requirements
l An FTP, Explicit FTPS, or SFTP server.
l You must create an FTP user with a home directory. This user must have read/write/delete permissions for both the
directory and the files used in the relay server. This FTP user must have a user name and password for
authentication.
l Workspace ONE UEM supports SFTP servers, however, the supported staging clients, Stage Now (Android) and Rapid
Deployment, do not support SFTP servers for use with barcode staging.
VMware AirWatch Product Provisioning for macOS Guide | v.2018.05 | May 2018
Copyright © 2018 VMware, Inc. All rights reserved.
8Chapter 2: Relay Server Configuration
Procedure
1. Navigate to Devices > Staging & Provisioning > Relay Servers > List View and select Add, followed by Add Relay
Server.
2. Complete all applicable settings in the tabs that are displayed.
Setting Description
General
Name Enter a name for the relay server.
Description Enter a description for the relay server.
Relay Server Select either Push or Pull as the relay server method.
Type Push – This method is typically used in on-premises deployments. The UEM console pushes content
and applications contained in the product or staging to the relay server.
Pull – This method is typically used in SaaS deployments. A web-based application stored in the
relay server pulls content and applications contained in the product or staging from the UEM
console through an outbound connection.
For more information on installing a pull server, see Pull Service Based Relay Server Configuration on
page 11.
Restrict Enable to limit content delivery to a specific time window.
Content Provide a Start Time and End Time based on the relay server time.
Delivery
Window
Assignment
Managed By Select the organization group that manages the relay server.
Staging Assign the organization groups that use the relay server as a staging server.
Server A staging server only works for the staging process involving the supported staging clients, Stage
Now (Android) and Rapid Deployment.
Production Assign the organization groups that use the relay server as a production server.
Server A production server works with any device with the proper agent installed on it.
Device Connection
Protocol This is the information the device uses to authenticate with the FTP server when downloading
applications and content.
FTP, Explicit FTPS, or SFTP as the Protocol for the relay server.
If using Explicit FTPS, your Explicit FTPS server must have a valid SSL certificate. Configure the SSL
certificate on the Explicit FTPS server.
Hostname Enter the name of the server that hosts the device connection.
VMware AirWatch Product Provisioning for macOS Guide | v.2018.05 | May 2018
Copyright © 2018 VMware, Inc. All rights reserved.
9Chapter 2: Relay Server Configuration
Setting Description
Port Select the port established for your server.
Important: The ports you configure when you create your FTP, Explicit FTPS, or SFTP server must
be the same ports you enter when creating a relay server in the Workspace ONE UEM console.
Workspace ONE UEMdoes not support Implicit FTPS relay servers.
User Enter the server user name.
Password Enter the server password.
Path Enter the path for the server.
This path must match the home directory path of the ftp user. For example, if the ftp user's home
directory is C:\ftp\home\jdoe, the path entered into this text box must be C:\ftp\home\jdoe.
Passive Enable to force the client to establish both the data and command channels.
Mode
Verify This setting is only visible when Protocol is set to FTPS.
Server Enable to ensure the connection is trusted and there are no SSL errors.
If left unchecked, then the certificate used to encrypt the data can be untrusted and data can still be
sent.
3. For a push server, select the Console Connection tab and complete the settings. This is the information that the
UEM console uses to authenticate with the FTP(S) server when pushing apps and content. The settings are typically
identical to the Device Connection tab.
For a pull server, select the Pull Connection tab and complete the settings.
Settings Descriptions
Pull Local Enter the local directory path for the server.
Directory
Pull Discovery Enter the IP addresses or the MAC addresses of the server. Separate each address with commas.
Text IP addresses use periods as normal but MAC addresses do not use any punctuation in this form.
Pull Frequency Enter the frequency in minutes that the pull server should check with the UEM console for
changes in the product.
4. Press the Test Connection button to test your Console Connection to the server. Each step of the connection is
tested and the results are displayed to help with troubleshooting connection issues.
Press the Export button on the Test Connection page to export the data from the test as a CSV file.
5. Select Save.
Batch Import Relay Servers
The Relay Server Import feature loads relay servers into the system in bulk. Make sure to associate the relay server users
with an organization group.
VMware AirWatch Product Provisioning for macOS Guide | v.2018.05 | May 2018
Copyright © 2018 VMware, Inc. All rights reserved.
10Chapter 2: Relay Server Configuration
Save all files in .csv format before importing.
To bulk import relay servers, take the following steps.
1. Navigate to Devices > Staging & Provisioning > Relay Servers > List View and select Batch Import.
2. Enter a Batch Name.
3. Enter a Batch Description.
4. Select Choose File to upload the Batch File. Batch files must be in CSV format. Select the Information icon ( ) to
download a template.
5. Select Save to upload the batch import.
Pull Service Based Relay Server Configuration
Pull service based relay servers periodically contacts the Workspace ONE UEM console to check for new products,
profiles, files, and actions, and applications assigned to devices under the pull relay servers purview. Configure a pull
server to deliver content to devices without excessive bandwidth use.
If you make changes or additions, the server creates an outbound connection to the UEM console to download the new
content to the server before pushing it to its devices. Pull service is best used when traversing any NAT firewall or SaaS to
on-premises hybrid environments because SaaS customers typically do not want the service to tie-up bandwidth when
content is delivered from Workspace ONE UEM to the store server.
Pull Relay Server Security
Client-server applications such as Workspace ONE UEM use the transport layer security (TLS) cryptographic protocol to
communicate across a network. TLS is supported by the file transfer protocol (FTP), file transfer protocol over SSL (FTPS),
and SSH file transfer protocol (SFTP).
These file transfer protocols only secure those parts of the process where data is in transit between the client and the
server. Because of this limitation, VMware recommends the use of OS-level disk encryption. There are several operating
system-specific tools available (for example BitLocker for Windows, GnuPG for Linux).
To create a pull relay server, you must first have an FTP, Explicit FTPS, or SFTP server to function as the relay server. FTP
(S) servers must be compliant with RFC 959 and RFC 2228 set by the Internet Engineering Task Force. The instructions
below detail how to create a pull relay server from an Explicit FTP(S) server.
Important: The ports you configure when you create your FTP, Explicit FTPS, or SFTP server must be the same ports
you enter when creating a relay server in the Workspace ONE UEM console. Workspace ONE UEMdoes not support
Implicit FTPS relay servers.
This process covers the installation of one server at a time. For bulk installation, you must use a third-party application.
Workspace ONE UEM supports importing servers in bulk through the Bulk Import option. See Batch Import Relay Servers
on page 10 for more information.
VMware AirWatch Product Provisioning for macOS Guide | v.2018.05 | May 2018
Copyright © 2018 VMware, Inc. All rights reserved.
11Chapter 2: Relay Server Configuration
Create a Windows-Based Pull Service Relay Server
Configure a pull service relay server using a Windows FTP, Explicit FTPS, or SFTP server for use with product provisioning
and staging. The pull service must be installed before you integrate the server with the Workspace ONE UEM console.
Prerequisites
l An FTP, Explicit FTPS, or SFTP server. Workspace ONE UEM does not support Implicit FTPS Windows-based relay
servers.
l .NET must be installed on Windows-based servers.
l The relay server requires network access between the server (in-store, distribution center, and so on) and to the
Workspace ONE UEM SaaS environment.
l Each server requires disk storage of 2 MB for the pull server installer and hard disk space for all the content pulled to
the server.
Process
To create a windows-based pull relay server, take the following steps.
1. Configure an FTP, Explicit FTPS, or SFTP server. You must create an FTP user with read/write/delete permissions for
both the directory and the files used in the relay server. This FTP user must have a user name and password for
authentication. Note the home directory of the user for use in configuring the pull service.
2. Navigate to Groups & Settings > All Settings > System > Enterprise Integration > Pull Service Installers.
3. Download the Windows Pull Service Installer and the Configuration file onto the server using your preferred server
management system.
4. Open the XML config file and update the IP Address with your console server FQDN, for example,
cn274.awmdm.com.
C:\AirWatch\PullService\
https://[endpointURL]/contentpull/
5. Run the WindowsPullServiceInstaller.exe.
.NET is installed before the MSI is extracted.
6. Follow the instructions prompted by the installer.
7. Navigate to Devices >Staging & Provisioning > Relay Servers > Undiscovered Pull Relay Servers. If you have
configured the FTP, Explicit FTPS, or SFTP server correctly, it provides feedback to this effect. If you do not see your
server displayed, check your configuration settings.
VMware AirWatch Product Provisioning for macOS Guide | v.2018.05 | May 2018
Copyright © 2018 VMware, Inc. All rights reserved.
12Chapter 2: Relay Server Configuration
8. Configure the relay server as a pull relay server in the UEM console. See Configure a Relay Server on page 8 for more
details.
If you are using the silent install from the command prompt, use the following commands:
l WindowsPullServiceInstaller.exe /s /v"/qn/"
l To include log: WindowsPullServiceInstaller.exe /s /v"/qn" /l WindowsPullServiceInstaller.txt”
The installer looks for the PullserviceInstaller.config file in the installer execution directory. If the file is missing, the
installer prompts you to let you know the file is missing.
Create a Linux-Based Pull Service Relay Server
Configure a pull service relay server using a Linux FTP, Explicit FTPS, or SFTP server for use with product provisioning and
staging. The pull service must be installed before you integrate the server with the Workspace ONE UEM console.
Prerequisites
l An FTP, Explicit FTPS, or SFTP server.
l Linux-based servers must run either CentOS or SLES 11 SP3.
l Java 8+ must be installed on Linux-based servers.
l The relay server requires network access between the server (in-store, distribution center, and so on) and to the
Workspace ONE UEM SaaS environment.
l Each server requires disk storage of 2 MB for the pull server installer and hard disk space for all the content pulled to
the server.
Process
To create a Linux-based pull relay server, take the following steps.
1. Configure an FTP, Explicit FTPS, or SFTP server. You must create an FTP user with read/write/delete permissions for
both the directory and the files used in the relay server. This FTP user must have a user name and password for
authentication. Note the home directory of the user for use in configuring the pull service.
2. Navigate to Groups & Settings > All Settings > System > Enterprise Integration > Pull Service Installers.
3. Download the Linux Pull Service Installer and the Configuration file onto the server using your preferred server
management system.
4. Open the XML config file and update the IP Address with your console server FQDN, for example,
cn274.awmdm.com.
C:\AirWatch\PullService\
VMware AirWatch Product Provisioning for macOS Guide | v.2018.05 | May 2018
Copyright © 2018 VMware, Inc. All rights reserved.
13Chapter 2: Relay Server Configuration
https://[endpointURL]/contentpull/
5. In the command prompt, enter:
sudo ./LinuxPullServerInstaller.bin
a. Alternatively, enter the following command to silently install:
sudo ./LinuxPullServerInstaller.bin -I silent
6. Navigate to Devices > Staging & Provisioning > Relay Servers > Undiscovered Pull Relay Servers. If you have
configured the FTP, Explicit FTPS, or SFTP server correctly, it provides feedback to this effect. If you do not see your
server displayed, check your configuration settings.
7. Configure the relay server as a pull relay server in the UEM console. See Configure a Relay Server on page 8 for more
details.
The installer looks for the PullserviceInstaller.config file in the installer execution directory. If the file is missing, the
installer prompts you to let you know the file is missing.
Remote Viewing Files on Relay Server
View files sent to a relay server for distribution to devices through the Remote File Viewer.
To access the Remote File Viewer, take the following steps.
1. Navigate to Devices > Staging & Provisioning > Relay Servers > List View.
2. Select the server you are interested in viewing by clicking the radio button to the left of the Active indicator, above
the Edit pencil icon.
3. Select the More Actions button.
VMware AirWatch Product Provisioning for macOS Guide | v.2018.05 | May 2018
Copyright © 2018 VMware, Inc. All rights reserved.
14Chapter 2: Relay Server Configuration
4. Select Remote File List to open the Remote File List for your selected relay server.
Relay Server Management
Maintaining Relay Servers keeps your products running smoothly so your devices remain up-to-date.
Relay Server Status
After creating a relay server, refresh the relay server detail page to get the current status of the connection.
The Source Server and Relay Server statuses are as follows:
VMware AirWatch Product Provisioning for macOS Guide | v.2018.05 | May 2018
Copyright © 2018 VMware, Inc. All rights reserved.
15Chapter 2: Relay Server Configuration
Settings Descriptions
Indicator Source Server Relay Server
Last retrieval from server succeeded. Last file sync with server succeeded.
Retrieval from server in progress. File sync with server in progress
Last retrieval failed. Last file sync failed.
Once the check mark displays for both source server and relay server, the product components are available for
distribution to the end-user device.
Advanced Info
Along with the Relay Server Status, you can access the Advanced Info action for more detailed information pertaining to
the server. This action can be found in the More Actions options drop-down available after selecting a relay server.. The
Advanced Info action displays the Queued Count of files, the Last Error Code displayed, and the Last Error Description.
VMware AirWatch Product Provisioning for macOS Guide | v.2018.05 | May 2018
Copyright © 2018 VMware, Inc. All rights reserved.
16Chapter 3:
Products
Product Provisioning Overview 18
Files/Actions for Products 18
Create a Files/Actions Component 18
Manage Files/Actions 20
Create a macOS MobileConfig Provisioning File 21
Product Conditions 21
Conditions List View 22
Create a Condition 22
Delete a Condition 25
Custom Attributes Overview 25
Configure a Custom Attributes Profile (macOS) 26
Create Custom Attributes 27
Custom Attributes Importing 27
Assign Organization Groups Using Custom Attributes 28
macOS Custom Attributes 29
Create a Product 31
Product Verification 33
VMware AirWatch Product Provisioning for macOS Guide | v.2018.05 | May 2018
Copyright © 2018 VMware, Inc. All rights reserved.
17Chapter 3: Products
Product Provisioning Overview
The main feature of the Product Provisioning system is creating an ordered installation of profiles, applications, and
files/actions (depending on the platform used) into one product to be pushed to devices based on the conditions you
create.
Product Provisioning Basics
Once products are created and activated, they are pushed to the device based on the conditions set. Conditions are an
optional tool that determine when a product is downloaded as well as when it is installed. Content provisioning by
products can be pushed to devices through optional relay servers.
Products are pushed to devices that are chosen by smart group assignments. These groups control which devices get
which product based on how the group is created. You can also use Assignment Rules to further target your products to
devices.
Important: You must upload the content of the product before a product can be created.
Files/Actions
You can install, configure, and upgrade devices by assigning files/actions to a product. The files/actions component also
contains ways to manage the file system of a device. For more information, see Files/Actions for Products on page 18.
Product Conditions
A condition determines when the product or OS upgrade package should be downloaded and installed. Conditions are
checked when a product is pushed to a device. For more information, see Product Conditions on page 21.
Create a Product
After creating the content you want to push to devices, create a product that controls when the content is pushed as well
as the order of installation of the product. For more information, see Create a Product on page 31.
Files/Actions for Products
You can install, configure, and upgrade devices by assigning files/actions to a product. The files/actions component also
contains ways to manage the file system of a device.
A file/action is the combination of the files you want on a device and the actions you want performed on the device with
the file. You cannot assign files/actions directly to a device. Instead, you assign a file/action to a product. The product is
then assigned to the device using Smart Group assignment.
View the files/actions in the Files/Actions List View.
Create a Files/Actions Component
Create Files/Actions to install and configure files and upgrades onto your devices using product provisioning.
To add files and actions to a Files/Actions component, take the following steps.
VMware AirWatch Product Provisioning for macOS Guide | v.2018.05 | May 2018
Copyright © 2018 VMware, Inc. All rights reserved.
18Chapter 3: Products
1. Navigate to Devices > Staging & Provisioning > Components > Files/Actions and select Add Files/Actions.
2. Select the device Platform for which you want to make the files/actions.
3. Complete the General fields.
Settings Descriptions
Name Enter a name for the files/actions. The name cannot be longer than 255 characters.
Description Enter a short description for the files/actions.
Version This setting is automated by the Workspace ONE UEM console.
Platform Read-only setting displays the chosen platform.
Managed By Select the organization group that can edit the files/actions.
4. Select the Files tab.
5. Select Add Files. The Add Files window displays.
6. Select Choose Files to browse for a file or multiple files to upload.
7. Select Save to upload the files. Once the files upload, the file grouping screen opens. File groups allow you to assign
different download paths and settings to different groups of files you have uploaded to a single file/action.
8. Select an uploaded file(s) and select Add to move the files into a new file group.
9. Define the Download Path the device uses to store the file group in a specific device folder. If the download path
entered does not exist, the folder structure is created as part of installation.
10. Select Save. You may repeat the previous steps for as many files as you want.
11. Select the Manifest tab. Actions are not required as long as you have at least one file uploaded.
12. Add actions to the Install Manifest or the Uninstall Manifest if needed.
The uninstall manifest only runs when the Uninstall action is added to the product. Also, if nothing is added to the Uninstall Manifest,
uninstalling the file/action results in no effect.
Settings Descriptions
Execute Runs the selected script on the device. This command supports .sh and .scpt files.
Script You must enter the script file path and name. Select Execute as Root to run the script as the Root user.
If you do not enable this option, the script runs as the user currently logged in.
VMware AirWatch Product Provisioning for macOS Guide | v.2018.05 | May 2018
Copyright © 2018 VMware, Inc. All rights reserved.
19Chapter 3: Products
Settings Descriptions
Install Install files on the device. You must use the Run manifest action to install files or applications. This is
accomplished using command lines. Supports the following file types.
l macOS: DMG, PKG, or APP (zipped).
If the DMG file contains an APP file, Workspace ONE UEM moves the APP file to the /Applications
folder. If the DMG contains a PKG or MPKG file, extract the file from the DMG and push the PKG or
MPKG directly.
Workspace ONE UEM supports installing and managing .app files as internal applications which
provides additional control for removing apps upon unenrollment.
Run The manifest should be used to execute an application. This is accomplished using command lines. The
Run command must use the syntax of "\[full file path]". For example, \program files\program.exe.
You must select the context of the command. Select whether the command runs at the system level,
the user level, or the admin account level.
Note: With macOS devices, you can run any root command that you normally use within Terminal.
The AirWatch Agent automatically appends sudo before running any command.
Uninstall Uninstall a program or application on the device. You must enter the application name.
Note: The Uninstall Manifest is for deleting files when a product is removed. If you remove a
product from a device, any files installed remain on the device until uninstalled using an Uninstall
Manifest.
13. When finished adding actions to the Manifest, select Save.
Manage Files/Actions
Manage your created files/actions to keep products and devices up to date.
Edit Files/Actions
When you edit any existing files/actions, the version number automatically increases. After saving the edits, Workspace
ONE UEM runs a check against all active products to find any that contain the newly edited files/actions.
If any active products contain the files/actions, a warning prompt displays listing all active products affected by the
edited files/actions. You can then choose to Activate or Deactivate a product using the files/actions.
Delete Files/Actions
Workspace ONE UEM checks any attempt to delete files/actions against the list of active products.
In order to delete files/actions, it must be detached from all products.
1. Select the Files/Actions listed in the Warning prompt.
2. Select Edit.
VMware AirWatch Product Provisioning for macOS Guide | v.2018.05 | May 2018
Copyright © 2018 VMware, Inc. All rights reserved.
20Chapter 3: Products
3. Remove the files/actions from the product.
4. Select Save.
5. Repeat for all products containing the files/actions.
6. Once the files/actions detaches from all products, you may delete the files/actions.
If the files/actions is part of an active product, a warning prompt displays listing any product that uses the files/actions.
Create a macOS MobileConfig Provisioning File
XML provisioning allows you to download a custom-designed MobileConfig file to a device in a provisioning product.
After the file is downloaded, it executes a run command to extract the settings from the MobileConfig file and install them
on the device.
1. Navigate to Devices > Staging & Provisioning > Components > Files/Actions and select Add.
2. Select your platform.
3. Enter the required settings on the General tab, then select the Files tab and upload the desired XML file and enter
the destination path on the device.
4. Select the Files tab. Select Add Files and add the MobileConfig file. Complete all the required settings.
5. Select the Manifest tab. Select Add Action under Install Manifest.
6. Select Run as the Action to Perform.
7. Enter the command appropriate for the MobileConfig file.
8. Select Save.
9. Navigate to Devices > Staging & Provisioning > Products List View and select the Add Product button.
10. Select your platform.
11. Enter the General information.
12. Select the Manifest tab.
13. Select Install Files/Actions and choose the file/action just created.
14. Save and Activate the product.
The product downloads to all assigned devices and the XML file should successfully install.
Product Conditions
A condition determines when the product or OS upgrade package should be downloaded and installed. Conditions are
checked when a product is pushed to a device.
Your device fleet is not always readily available for maintenance. You could have devices in different time zones or
countries. Since you cannot always ensure that a device is not in use when you push a product, you can use conditions
to delay the download and installation.
VMware AirWatch Product Provisioning for macOS Guide | v.2018.05 | May 2018
Copyright © 2018 VMware, Inc. All rights reserved.
21Chapter 3: Products
These conditions defer the product download or installation until the device meets the criteria of the assigned condition.
You can set the products to only download based on battery life, power adapters, user confirmation, and other criteria.
The available conditions for your products vary based on the device platform.
Conditions List View
You can view conditions from the list view by navigating to Devices > Staging & Provisioning > Components >
Conditions. You can also edit and delete conditions from the list view.
Select the pencil icon ( ) to the left of the name of the condition to open the Edit Condition screen.
Select the radio button to the far left of the condition to display the Copy and Delete buttons, offering more actions.
Before you can delete a condition, you may have to detach it from one or more products.
Create a Condition
Conditions enable you to set products to download and install on your device only when preset conditions are met.
Create a condition to determine when a product downloads and installs onto your devices.
To create a condition, take the following steps.
1. Navigate to Devices > Staging & Provisioning > Components > Conditions and select Add Condition.
2. Select the Platform you want to create a condition for.
3. Complete the Create Condition Type settings.
Settings Description
Name Enter a name for the condition. The name cannot be longer than 255 characters.
Description Enter a description for the condition.
Condition The type of condition affects the parameters on the Condition Details tab.
l Adapter Time
l Confirm
Managed By Select the organization group that manages the condition.
4. Select Next.
5. Complete the Create Condition Details settings based on the condition type chosen.
VMware AirWatch Product Provisioning for macOS Guide | v.2018.05 | May 2018
Copyright © 2018 VMware, Inc. All rights reserved.
22Chapter 3: Products
l Adapter Time – This condition type tests for various combinations of constraints related to Network
Adapters including local date, time, and frequency on the device.
Settings Description
Specify Set to Specify this scenario to begin configuring the condition scenario.
scenario Up to 5 scenarios may be entered, each with their own constraint choices.
#1?
Each Scenario is an OR statement and each option inside a Scenario is an AND statement. For
example, a device will check to see if Scenario #1 OR Scenario #2 is true. If Scenario #1 is true, it will
check if all the constraints listed are true because they are AND statements.
Scenario Enter a description for the adapter time scenario.
description
Constrain Set to Constrain based on the Best Connected Network Adapter and configure the following.
Network o Specify any Included or Excluded Network Adapters.
Adapters?
o Choose to either Select Network Adapter Class from a drop-down list or Type in a
Network Adapter Name.
o Up to five network adapters may be selected in the Adapter selection method? setting.
o For each adapter you want to include/exclude, choose between Select a Network
Adapter Class drop-down list and entering a specific Adapter name.
If you want to skip this kind of constraint, then select Don't constrain based on the Best
Connected Network Adapter. Then you can proceed with defining another kind of constraint.
Constrain For each day of the week, choose whether it will be included or excluded.
days of
week?
Constrain For each month, choose whether it will be included or excluded.
months?
Constrain Enter a Start day of month? and an End day of month?.
days of
month?
Constrain Enter a Start year? and an Last year?.
years?
Constrain Enter the Start hour?, Start minute?, End hour?, and End minute?.
time of
day?
Set Ranges from Every 15 Minutes to Every 1 Week.
frequency
limit?
l Confirm – This condition type prompts the end user to determine whether or not the condition is met. This
VMware AirWatch Product Provisioning for macOS Guide | v.2018.05 | May 2018
Copyright © 2018 VMware, Inc. All rights reserved.
23Chapter 3: Products
prompt is customizable so you can control what displays on the prompt.
Settings Description
Message to be displayed
First line Enter a header of the prompt
prompt
Second line Enter the subheading of the prompt (macOS Only).
prompt
Third line Enter the body of the prompt into the Third Line Prompt (Mac OSX Only).
prompt
Allow users to Select Yes if you want to give users a chance to opt out of the action upon
cancel action which this condition is placed.
(s)? Select No to obligate users to accept the action.
Delay
Delay (seconds) Use this to delay for a specified time or until the end user makes a selection.
If you enter a non-zero value, the prompt will wait for that value worth of
seconds. Then if the end user does not make a selection in the time allowed,
the condition is automatically considered not met.
If a value of zero is entered, then the prompt displays indefinitely until the user
makes a selection.
Enable Select Yes to allow the delay time to be “counted” down on the device so the
countdown? end user knows how much time is remaining to make a selection.
Select No to hide the delay countdown.
VMware AirWatch Product Provisioning for macOS Guide | v.2018.05 | May 2018
Copyright © 2018 VMware, Inc. All rights reserved.
24Chapter 3: Products
Settings Description
Defer Action
Defer time This controls the minimum time after the condition is not met before the end
user will be prompted again to determine the state of this condition.
If a non-zero value is entered, the end user will not be prompted again for at
least that number of seconds.
If a value of zero is entered, then the end user could be prompted again as
soon as the next execution of the Check-In command.
Maximum This controls the maximum number of times the condition is not met.
number of Once the condition has not been met this number of times, it will either be met
defers or failed, depending on the setting of the next feature.
If a value of zero is entered, then the condition will be met or failed on the first
time.
Action after Select the action to trigger after the maximum number of defers is met.
maximum o Fail Condition
defers
o Display Cancel Button
o Pass Condition
6. Select Finish.
Delete a Condition
Remove unwanted conditions from your product. Workspace ONE UEM checks any attempt to delete a condition against
the list of active products.
To delete a condition, it must be detached from all products as detailed below.
1. Select the Product listed in the Warning prompt.
2. Select Edit.
3. Remove the condition from the product.
4. Select Save.
5. Repeat the steps above for all products containing the condition.
6. Once the condition detaches from all products, you may delete the condition.
If a condition is part of an active product, a warning prompt appears listing any product that uses the condition.
Custom Attributes Overview
Custom attributes enable administrators to extract specific values from a managed device and return it to the Workspace
ONE UEM console. You can also assign the attribute value to devices for use in product provisioning or device lookup
VMware AirWatch Product Provisioning for macOS Guide | v.2018.05 | May 2018
Copyright © 2018 VMware, Inc. All rights reserved.
25Chapter 3: Products
values.
These attributes allow you to take advantage of the rules generator when creating products using Product Provisioning.
Note: Custom attributes (and the rules generator) are only configurable and useable at Customer-level organization
groups.
Custom Attributes Database
Custom attributes are stored either as XML files on the device or in the custom attribute database on the Workspace
ONE UEM console server. When using the database, custom attributes are sent as samples to Workspace ONE UEM
periodically for asset tracking of key/value pairs. If a record in the device database is configured with 'Create Attribute' =
TRUE, then the AirWatch Agent automatically retrieves the Name and Value sent with the custom attributes sample. The
key/value pair displays in the Device Details page for the device in the Custom Attributes tab.
Create Custom Attributes
Create a custom attribute and values to push to devices. You create the attributes and values associated with them. For
more information, see Create Custom Attributes on page 27.
Importing Custom Attributes
The custom attribute batch import feature allows you to load custom attributes and corresponding values into the
system in bulk. In the templates provided, each column corresponds to one custom attribute and each row corresponds
to different parameters of custom attribute. For more information, see Custom Attributes Importing on page 27.
Platform-Specific Custom Attributes Provisioning
You can push custom attributes to a device using XML provisioning for use with advanced product provisioning
functionality. The method for pushing the XML varies based on the device platform.
Configure a Custom Attributes Profile (macOS)
Write a command or script and report it as a custom attribute using the AirWatch Agent for macOS v.2.3 and higher.
Choose when to execute the command or script on hourly intervals or during an event.
Custom Attributes can also be used in Assignment Rules for Products. For more information about Products, see the
VMware Workspace ONE UEM Product Provisioning for macOS Guide.
To create a Custom Attributes profile, take the following steps.
1. Navigate to Devices > Profiles & Resources > Profiles and select Add then Add Profile. Select Apple macOS, and
then select Device Profile, since this profile is only applicable to the entire device.
2. Scroll down the menu bar on the left and select Custom Attributes followed by Configure.
3. Enter the Attribute Name.
4. Enter the Script/Command to run. Expand the text box as needed.
5. Choose an Execution Interval to allow for scheduling to report either in hours or as an event occurs.
VMware AirWatch Product Provisioning for macOS Guide | v.2018.05 | May 2018
Copyright © 2018 VMware, Inc. All rights reserved.
26Chapter 3: Products
6. Use the + and - buttons at the bottom of the payload to create multiple scripts.
7. Select Save & Publish when you are finished to push the profile to devices.
Note: Custom Attribute values cannot return the following special characters: / \ " * : ; < > ? |. If a script returns
a value which contains these characters, the value is not reported on the console. Trim these characters from the
script's output.
Create Custom Attributes
Create a custom attribute and values to push to devices. These attributes and values control how product rules work and
function as lookup values for certain devices.
1. Navigate to Devices > Staging & Provisioning > Custom Attributes > List View.
2. Select Add and then select Add Attribute.
3. Under the Settings tab, enter an Attribute Name.
4. Enter the optional Description of what the attribute identifies.
5. Enter the name of the Application that gathers the attribute.
6. Select Collect Value for Rule Generator to make the values of the attribute available in the drop-down menu of the
rule generator.
7. Select Use in Rule Generator if you want to use the attribute in the rule generator.
8. Select Persist to prevent the removal of the custom attribute from the Workspace ONE UEM console unless an
Admin or an API call explicitly removes it. Otherwise, the attribute is removed as normal.
If you delete a custom attribute reported from a device to the UEM console, a persisted custom attribute remains in
the UEM console.
Custom attribute persistence is only available to Android and Windows Rugged devices.
9. Select Use as Lookup Value to use the custom attribute as a lookup value anywhere in the UEM console.
For example, you can use custom attributes as part of a device friendly name to simplify device naming.
10. Select the Values tab.
11. Select Add Value to add values to the custom attribute and then select Save.
Custom Attributes Importing
The custom attribute batch import feature allows you to load custom attributes and corresponding values into the
system in bulk. In the templates provided, each column corresponds to one custom attribute and each row corresponds
to different parameters of custom attribute.
With the templates, you can import custom attributes in different ways and with different information.
VMware AirWatch Product Provisioning for macOS Guide | v.2018.05 | May 2018
Copyright © 2018 VMware, Inc. All rights reserved.
27Chapter 3: Products
Caution: The syntax of the first column of each template must be replicated exactly. Failure to use proper syntax can
cause database issues and result in loss of data.
Template Types
l Custom Attributes Template – Allows you to define a custom attribute and its settings.
l Custom Attribute Values Template – Allows you to define the values of predefined custom attributes.
l Device Custom Attribute Values – Allows you to define the values of predefined custom attributes for individual
devices based on the cross reference (Xref) value. The Xref values determine the individual devices receiving the value
for each custom attribute.
o 1 – DeviceID (Workspace ONE UEM assigned DeviceID when the device enrolls)
o 2 – Serial Number
o 3 – UDID
o 4 – MAC Address
o 5 – IMEI Number
Save the file as a .csv before you import it.
Assign Organization Groups Using Custom Attributes
Configure rules that control how devices are assigned to organization groups following enrollment. You can only create
one custom attribute assignment rule for each organization group you run.
1. Ensure that you are currently in a customer type organization group.
2. Navigate to Groups & Settings > All Settings > Devices & Users > General > Advanced.
3. Set Device Assignment Rules to Enabled.
VMware AirWatch Product Provisioning for macOS Guide | v.2018.05 | May 2018
Copyright © 2018 VMware, Inc. All rights reserved.
28Chapter 3: Products
4. Set the Type to Organization Group by Custom Attribute.
5. Select Save.
6. Navigate to Devices > Staging & Provisioning > Custom Attributes > List View > Add > Add Attribute and create a
custom attribute if you have not already done so. See Create Custom Attributes on page 27 for more information.
7. Navigate to Devices > Staging & Provisioning > Custom Attributes > Custom Attributes Assignment Rules > Add
Rule.
8. Select the Organization Group to which the rule assigns devices.
9. Select Add Rule to configure the logic of the rule.
Setting Description
Attribute/Application This custom attribute determines device assignment.
Operator This operator compares the Attribute to the Value to determine if the device qualifies for
the product.
When using more than one Operator in a rule, you must include a Logical Operator
between each Operator.
Note: There is a limitation on the less than () operators. This
includes "less than or equal to" and "greater than or equal to" variants. These
operators are mathematical in nature, which means they are effective at comparing
numbers including integers. They cannot be used to compare non-numeric text
strings. And while it is common for software versions to be represented with numbers
intended to portray a graded versioning system (for example, 6.14.2), such
representations are not numbers because they have more than one decimal point.
These representations are actually text strings. Therefore, any assignment rule that
compares software version numbers with multiple decimal points using greater than
or less than operators (and their variants) may result in an error message.
Value All values from all applicable devices are listed here for the Attribute selected for the rule.
Add Logical Operator Select to display a drop-down menu of logical operators such as AND, OR, NOT, and
parentheses. Allows for more complex rules.
10. Select Save after configuring the logic of the rule.
When a device enrolls with an assigned attribute, the rule assigns the device to the configured organization group.
macOS Custom Attributes
Use XML provisioning to collect custom attributes based on device details. Custom attributes enable you to use
advanced product provisioning functionality.
Implementation
To begin collecting custom attributes, follow the steps detailed below:
VMware AirWatch Product Provisioning for macOS Guide | v.2018.05 | May 2018
Copyright © 2018 VMware, Inc. All rights reserved.
29Chapter 3: Products
1. Navigate to Devices > Profiles & Resources > Profiles and select Add. Select Apple macOS, and then select Device
Profile, since this profile is only applicable to the entire device.
2. Create a Custom Attributes profile. For more information, see Configure a Custom Attributes Profile (macOS) on page
26.
The script included in the profile runs on the device to gather the values for each attribute.
You may also view existing custom attributes for all devices at a particular organization group as well as manually create
custom attributes directly in the console. Navigate to Devices > Staging & Provisioning > Custom Attributes > List View
to see these custom attributes listed. Any custom attribute created in this manner automatically associates with a device
and its respective custom attribute value that is successfully transmitted to the console.
Key-Value Pair Examples
The following is an example of commands you may use for creating, removing, or modifying key-value pairs. Use these
for dynamically changing the values for a custom attribute on the device.
Add a key-value pair
/usr/libexec/PlistBuddy -c "Add :ASSET_ID string '1'" "/Library/Application
Support/AirWatch/Data/CustomAttributes /CustomAttributes.plist"
Delete a key-value pair
/usr/libexec/PlistBuddy -c "Delete :ASSET_TAG" "/Library/Application
Support/AirWatch/Data/CustomAttributes/ CustomAttributes.plist"
VMware AirWatch Product Provisioning for macOS Guide | v.2018.05 | May 2018
Copyright © 2018 VMware, Inc. All rights reserved.
30Chapter 3: Products
Modify a key-value pair
/usr/libexec/PlistBuddy -c "Set :ASSET_ID '2'" "/Library/Application
Support/AirWatch/Data/CustomAttributes/ CustomAttributes.plist"
Create a Product
After creating the content you want to push to devices, create a product that controls when the content is pushed.
Creation of the product also defines the order in which the product is installed.
In order to edit a product, the product must be deactivated in the list view first.
To create and configure a product.
1. Navigate to Devices > Staging & Provisioning > Product List View > Add Product.
2. Select the Platform you want to create a staging configuration for.
3. Complete the General fields.
Setting Description
Name Enter a name for the product. The name cannot be longer than 255 characters.
Description Enter a short description for the product.
Managed By Select the organization group that can edit the product.
Assigned Smart Groups Enter the smart groups the product provisions.
4. Select Add Rules to use Assignment Rules to control which devices receive the product.
Application rules can be applied to unmanaged applications installed on the device. This allows you to use system
apps as well as third party apps that are not managed by Workspace ONE UEM.
Setting Description
Add Rule Select to create a rule for product provisioning. Displays the Attribute/Application,
Operator, and Value drop-down menus.
Add Logical Operator Select to display a drop-down menu of logical operators such as AND, OR, NOT, and
parentheses. Allows for more complex rules.
Attribute/Application This is the custom attribute used to designate which devices receive the product. Custom
attributes are created separately.
For more information see Custom Attributes Overview on page 25.
VMware AirWatch Product Provisioning for macOS Guide | v.2018.05 | May 2018
Copyright © 2018 VMware, Inc. All rights reserved.
31Chapter 3: Products
Setting Description
Operator This operator compares the Attribute to the Value to determine if the device qualifies for
the product.
Note: There is a limitation on the less than () operators. This
includes "less than or equal to" and "greater than or equal to" variants. These
operators are mathematical in nature, which means they are effective at comparing
numbers including integers. They cannot be used to compare non-numeric text strings.
And while it is common for software versions to be represented with numbers
intended to portray a graded versioning system (for example, 6.14.2), such
representations are not numbers because they have more than one decimal point.
These representations are actually text strings. Therefore, any assignment rule that
compares software version numbers with multiple decimal points using greater than or
less than operators (and their variants) may result in an error message.
Value This is the value of the custom attribute. All values from all applicable devices are listed
here for the Attribute selected for the rule.
5. Select Save to add the Assignment Rule to the product.
6. Select the Manifest tab.
7. Select Add to add actions to the Manifest. At least one manifest action is required.
Setting Description
Action Types Select the Manifest action to add to the profile:
l Install Files/Actions – This option runs the Install Manifest.
l Uninstall Files/Actions – This option runs the Uninstall Manifest.
Files/Actions Displays when the Action Type is set to Install Files/Actions or Uninstall Files/Actions.
Enter the application name.
8. Add additional Manifest items if desired.
9. You can adjust the order of manifest steps using the up and down arrows in the Manifest list view. You may also edit
or delete a manifest step.
10. Select the Conditions tab if you want to use conditions with your product. These conditions are optional and are not
required to create and use a product.
11. Select Add to add either Download Conditions, Install Conditions, or both.
l A Download Condition determines when a product should be downloaded but not installed on a device.
l An Install Condition determines when a product should be installed on a device.
12. Select the Deployment tab if you want to control the time and date that products are activated and deactivated. This
tab is optional and is not required to create and use a product.
VMware AirWatch Product Provisioning for macOS Guide | v.2018.05 | May 2018
Copyright © 2018 VMware, Inc. All rights reserved.
32You can also read