APP USER MANUAL - LED Konzept
←
→
Page content transcription
If your browser does not render page correctly, please read the page content below

APP USER
                    MANUAL

Version 4.0.0   www.casambi.com   support@casambi.com
2

Table of contents

System overview                                                           4
First time Casambi App use                                                5
Luminaires tab                                                            6
       Basic Gestures                                                     6
       Grouping                                                           7
       Creating and editing a group                                       7
       Using a group                                                      7
       Editing luminaire control properties                               8
Gallery tab                                                               10
       Controlling luminaires                                             11
       Arranging gallery pictures                                         11
Scenes tab                                                                12
       Types of scene                                                     12
       Creating a basic scene                                             13
       Circadian scenes                                                   14
       Daylight scenes                                                    15
       Animation scenes                                                   16
       Example animations                                                 17
       Time-based scenes                                                  18
       Example of a Time-based scene                                      19
More tab                                                                  20
       Timers                                                             20
       Switches                                                           22
       Xpress switch                                                      24
       Unpairing Xpress                                                   25
       Sensors                                                            26
       Gateways                                                           28
       Network setup                                                      33
       Network settings                                                   33
       Sharing settings                                                   34
       Control options                                                    36
       Performance & Security                                             38
       Add devices                                                        39
       Configure all luminaires                                           40
       Network History                                                    41
       Upgrade to Evolution                                               42
       Device storage used                                                45
       Nearby Devices                                                     46
       Change Network                                                     47
       Create a network                                                   48
       Resetting a network password                                       49
       App settings                                                       49
       Help                                                               50
       Site                                                               50

Version 3-2021                                www.casambi.com   support@casambi.com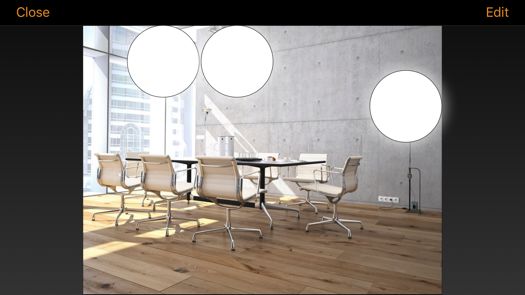
3

Appendix
Definitions of terminology                                               53
Smart switch                                                             55
Push buttons                                                             62
Daylight sensor calibration and set up                                   63
Control hierarchy                                                        68
Evolution and Classic Networks                                           71
Changing device firmware (Evolution  Classic)                          72
Changing a device profile                                                73
Error texts                                                              74
Time syncing                                                             74
Communication issues                                                     74
Apple Watch                                                              75

                  LIGHTING CONTROL FOR THE MODERN WORLD

Version 3-2021                               www.casambi.com   support@casambi.com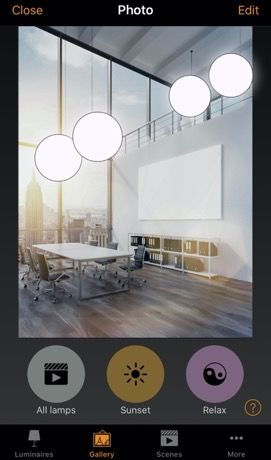
4

System overview

Casambi is an advanced lighting control solution based on Bluetooth Low Energy (BLE). Bluetooth Low Energy
is the only low power wireless technology in all modern smartphones, tablets and even smart watches, making
it the only mainstream and future proof low power radio technology in the world.

Casambi technology can be integrated into fixtures, LED-drivers, LED-modules, switches, sensors and different
kinds of control modules creating an optimal solution in terms of ease of installation and functionality with
minimal additional hardware and deployment costs. Casambi ready products, that are produced by Casambi
partners and are 100% compatible with Casambi’s native products.

Casambi technology provides a mesh network where all the intelligence of the system is replicated in every
node and, in such a way, creates a system with no single points of failure.

The Casambi app works as one of the user interfaces in a Casambi lighting control solution, as the
commissioning tool and as well as a remote gateway. The Casambi app works with iOS as well as Android
devices, like smartphones, tablets and smartwatches. The app is free to download from Google Play and Apple
App Store.

Version 3-2021                                www.casambi.com                           support@casambi.com

5

First time Casambi App use
When first taking devices into use they need to first be added to a network. All luminaires in the same network
can be easily controlled from the Luminaires tab. Other devices appear in the relevant section of the More tab.
One device can only be part of one network at a time. When a device is part of a network it is in a ‘paired’ state
and cannot be added to any other network unless it is first ‘unpaired’. i.e. removed from the network. All Casambi
devices are normally supplied in an unpaired state. If a brand new device is already paired, please contact your
supplier or the FAQ section of our website knowledge base (https://support.casambi.com/support/home).

1.      Download the app from Apple App Store or Google Play Store and allow notifications if prompted.
2.      Switch on your Casambi enabled devices and open the Casambi app.
3.      The app will search for all powered Casambi enabled devices within Bluetooth range of your mobile
        device. These will then be displayed in a list with the options to Take into use or Add individually to..
        • Take into use will automatically add all devices to a new network. Depending on the firmware of
            devices you may first be prompted to choose if the network should be a Classic or Evolution type.
            Only Casambi devices with the same firmware type (Classic or Evolution) can be added to the same
            network. See Create a network section of this user guide for more information).
        • Add individually to.. will enable each device to be identified and added to a network individually (see
            Add devices section of this guide for more information).
4.      When devices have been added to a network you can control and program them from the app.

By default, a new network is ‘Not Shared’, which means that its configuration is only stored on the device used
to create it, and only that specific device can control the luminaires. If you reset, delete or reinstall the Casambi
app, or damage or lose the mobile device, you will no longer be able to access the network. If you wish to
ensure possibilities for future access to the network, Casambi recommend that you share the network. This can
be done at any time after initially creating the network. Please see the Sharing Settings section of this user guide
for more information. Sharing should also be done if you want to have the possibility for multiple mobile devices
to control the same Casambi network. In order to be able to recover lost passwords, a valid administrator email
address and password must always be used..

The Casambi app has four tabs: Luminaires, Gallery, Scenes and More. All of these will be covered in this
user guide.

The app displays help text under most configurable options to provide clarification of the purpose of each
setting. There is also an additional Help option in the More tab. A general help button  can be found in the
bottom right of many screens. This can be disabled in the App settings.

Version 3-2021                                   www.casambi.com                               support@casambi.com
6

Luminaires tab
Luminaires that are paired to your network will be displayed in the Luminaires tab. Each will have an icon picture
and name. Luminaires that are online (i.e. powered) will also show a bar indicating the current brightness level
and light colour.

Luminaire or Group icons shown in the Luminaires tab can be rearranged by pushing Edit, selecting and holding
the icon, then dragging it to a different position. Release the icon in its new position. Push Done when finished.

Basic Gestures
The basic gestures used to control the luminaires are:
   • Tap the luminaire icon to turn the luminaire on or off.
   • Pan left or right on the luminaire icon adjust the luminaire light level. The app remembers the set level
       so, if you turn on the luminaire off and on again using the tap gesture, it will return to that level.
   • Pan up or down on the luminaire icon to adjust the colour temperature of a tuneable white luminaire.
   • Push and hold the luminaire icon to open the main adjustable parameters.
           o For colour changing luminaires you can set the desired colour. It is possible to save your
                favourite colours to the palette. Set the colour and then select and hold an empty palette space
                to save it. The colour palette cannot be reset but saved colours can be over-written with new
                colours.
           o If your luminaire supports more than one channel, you can adjust the channels separately.

Tip: Use the same gestures on the All luminaires icon to control all of your luminaires simultaneously or use the
Nearby luminaires icon to only control those devices within range of your mobile device.

          Tap                     Pan left / right               Pan up / down                Push and hold

Version 3-2021                                       www.casambi.com                        support@casambi.com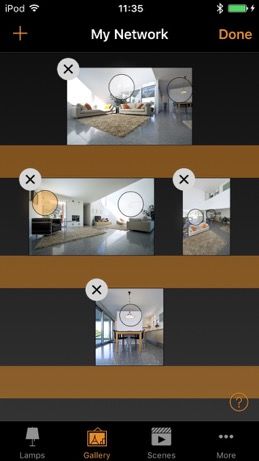
7

Grouping
Grouping is a method of organizing luminaire icons in the Luminaires tab. This can make it easier to find the
correct luminaires later (especially if you have a large network). Groups can be considered as physical
collections of luminaires in an area (e.g. all luminaires in a row or in one room). One luminaire can
only be part of one group. You can name groups and set common dimming levels, colour or colour
temperature for all luminaires in a group.

Groups are predominantly intended for manual control, whereas scenes are designed primarily for automation.
See the Scenes section for more information.

Creating and editing a group
There are two ways to create a group:
1. Select Group (top left of the screen). Select the luminaires for the group by tapping them. The + / – icons
    (top right) can be used to select or deselect all luminaires that are not already in another group. Create the
    group by tapping the folder icon . Name the group. Tap Add a new group. Tap Done to save the changes.
2. Select Edit at the top of the screen. Drag individual luminaire icons on top of each other to create a group.
    Double tap on the group to open it. Tap on the Group name to rename it. Tap Done to save the changes.

To add more luminaires into a group, select Edit and then drag and drop luminaire icons into the relevant group.

If you want to edit a group, select Edit and then the group to open it for editing. You can rename the group or
remove luminaires by dragging and dropping them outside the group area. When you have finished editing the
group, select Done and Close.

If you want to remove a group, select Edit or Group and then select the “X” in the corner of the group icon. This
will remove the group and the luminaires will appear again as individual devices in the Luminaires tab.

Using a group
You can control all luminaires in a group simultaneously using the same basic app gestures on the relevant
group icon. You can also still control individual luminaires separately, even if they are part of a group. Double
tap the group to open it. You can then use the basic gestures on individual luminaires.

Version 3-2021                                  www.casambi.com                             support@casambi.com
8

Editing luminaire control properties
To edit individual luminaire control properties, double tap the luminaire icon you want to edit or tap Edit at the
top of the screen and select the luminaire to edit. A separate window then shows the configurable properties.
Note that the available options list may vary depending on the used Casambi enable device.

STATE Here you can open the luminaire main adjustable parameters view.

MODES Modes can be used to store different dimming levels, colours or colour temperatures that can be
recalled using Switches or the Smart Switching option. To edit a mode, select and hold the Default or Mode ‘X’
(1-3) text and Edit/Cancel options will appear. Select Edit and adjust the luminaire settings as needed. The
mode is automatically saved after exiting the view (tap outside the window to close it). Default can be used to
set the desired luminaire start up state after a power cut. If you wish to clear a set mode, select and hold the
desired Mode ‘X’ and Edit/Clear/Cancel options will appear. Select Clear to deactivate the mode. Note that the
Default mode cannot be cleared.

SMART SWITCH Allows you to define functionality that occurs if the luminaires power is turned off/on. It is a
method of achieving simple lighting control. Note that the smart switch option is only available on certain
Casambi enabled devices. For detailed information about smart switching please see the Smart Switching
section in the Appendix.

PUSH BUTTONS and ROTARY SWITCH Allows you to select the function of a luminaire’s inbuilt switch (if fitted),
depending on the type of Casambi device which is being used. For detailed information push buttons please
see the Push Buttons sections in the Appendix.

Use toggle This option is only displayed if the luminaire has a push button. It allows the button to toggle the
command on and off each time the button is pressed. If disabled the push button will only activate the assigned
push button function.

PRESENCE SENSOR Allows you to select the function of a luminaire’s inbuilt sensor (if fitted).

Dedicated daylight sensor This option allows you to select a daylight sensor which can affect the luminaire. You
can also adjust the Daylight gain for this luminaire using the slider.

Version 3-2021                                  www.casambi.com                             support@casambi.com

9

STARTUP STATE FOR POWER ON Allows you to set the luminaire to use either the Default mode (default light
level) or Last state when switching on the luminaire. The Last state option will cause a luminaire to go to the
same dimming level and colour which were previously in use before the luminaire was switched off. Note that if
the Last state option is selected and the luminaire was OFF when power was switched off, then the luminaire
will stay off when power is reapplied. If you wish to prevent this you can set a minimum dimmed level for the
last state so that the luminaire will always illuminate at that minimum level even if its last state was actually OFF.

Minimum dim level and Maximum dim level You can also configure minimum and maximum dimming levels for
the luminaire. The luminaire will always operate within these restrictions, although dimming to 0% will always
turn off the luminaire.

MANUAL CONTROL The Behaviour and Timeout options allow you to over-ride the network’s default manual
control settings and create individual options for an individual luminaire. Select Behaviour to change how manual
control should work for the luminaire and select Timeout to over-ride the default timeout value. Note that the
Manual Control option will only appear if Use control hierarchy has been enabled in the Control options section
of the network settings.

INFORMATION Within this section you can change the luminaire’s name and create a new icon which replaces
the luminaire’s default image. The icon can be an existing picture from your device’s photo gallery, or you can
take a new photo. The Details section also displays further technical information about the luminaire.

Unpair device / Replace device Use the Unpair device option to remove a luminaire from a network. If a luminaire
has become damaged and is powered off, the Replace device option can then be used to replace a luminaire.
When using the Replace device option, an identical luminaire device must be used. This allows all of the previous
settings for the luminaire to be used by the new luminaire device.

Version 3-2021                                   www.casambi.com                                support@casambi.com
10

Gallery tab
The Gallery in the Casambi app is an intuitive way of controlling your luminaires. Place luminaire control icons
(circles from which you can control a luminaire) in a picture to enable simple visual control of the luminaires in
the image.

To add a picture, select the black and white image (for adding the first picture only) or select Edit and then +.
Then choose if you want to Take photo or Choose existing picture from your device’s gallery. After you have
taken a photo or selected a photograph it is added to the Casambi Gallery.

Next, add luminaire control icons to the picture by tapping the + sign to open the selection screen containing
your luminaires.

Select a luminaire that is in the picture and confirm your selection using Done. If the required luminaire is in a
group, first double tap the group and you can then select the required luminaire.

A luminaire control circle will then be shown in the centre of the picture. Drag the control circle to where you
wish it to be in the picture (this is usually over the actual luminaire to be controlled, or over whatever the luminaire
is highlighting). You can resize the circle by using a two-finger pinching action.

To add more luminaire controls to the picture tap on the + sign and select another luminaire.

You can rename the picture by selecting the picture and tapping the picture title at the top of the screen. The
text can then be edited.

When you have added all desired luminaire controls to the picture, select Done. Note: Any scenes or groups
associated with luminaires in the picture will be displayed under the picture.

To return to the Gallery and add more photographs, select Close.

Tip: Use a panorama picture to capture more luminaires in one photo. Alternatively, use a graphical floor plan
and add luminaire control icons based on luminaire location.

Version 3-2021                                    www.casambi.com                                support@casambi.com
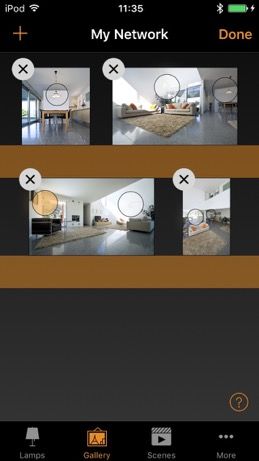
11

Controlling luminaires
After adding at least one picture you can open it in the Gallery and control the luminaires in it. Tap on a picture
to open it in full screen. Note: Scenes or groups associated with luminaires in the picture will be displayed under
the picture. The scene icon is shown even if just one luminaire in the picture is part of the scene.

Use the normal gestures to control the luminaires in the picture. If the gestures are used over individual luminaire
icons then only that luminaire will be controlled. If you use gestures by selecting an area of the picture that does
not have icons, then you will control all luminaires in the picture that have icons associated with them.

Arranging gallery pictures
You can change the order and size of pictures in the Gallery.

Select Edit at the top of the screen and then drag and drop pictures to arrange them.

If you want to resize pictures, move the thick bar up or down between the pictures. Note that this feature is only
available for Apple iOS.

Confirm the changes by selecting Done.

Version 3-2021                                   www.casambi.com                              support@casambi.com
12

Scenes tab
Scenes allow you to create and recall lighting situations. A scene can control any variation of luminaires in the
network. Luminaires can be used in multiple scenes. As many scenes as needed can be created.

Scenes never activate by themselves. They must always have something activate them
   • Manually: For example, by pushing a Casambi enabled button/switch, or by physically selecting the
       scene icon in the app.
   • Sensor: For example, configuring a sensor to activate a scene when movement is detected.
   • Timer: For example, setting a timer to switch lights on at a certain time of day

A scene is active when its icon is highlighted.

Types of scene
There are three types of “scene” that can be created in the Casambi app. Which to use will depend on what
you are trying to achieve.

Note: Basic scenes must first be created before animations or time-based scenes can be used correctly.

Scene This is a single lighting scenario (usually containing a number of luminaires adjusted to different dimmed
levels and/or colours) that you wish to be able to recall. Basic scenes can also be configured as Circadian
scenes (so that tuneable white luminaires will automatically adjust according to a defined profile graph for as
long as the scene is active), or a Daylight scene (which adjusts the luminaires in the scene according to the
amount of light measured by a lux sensor).

Animation scene Consists of at least one basic scene. When the Animation scene is active, the basic scenes
are automatically stepped through one after the other to create a sequence of lighting changes (for example a
Red, Green, Blue colour changing sequence, or one scene that is set to dim to different levels).

Time based scene Consists of at least two “conditions” with different scenes or scene dimmed levels for each.
Depending on when the Time based scene is activated, the relevant lighting scene condition for that time will
be actioned.

Please see the following sections for more details about all the scene types

Version 3-2021                                    www.casambi.com                           support@casambi.com
13 Creating a basic scene Select Edit and + then enter a name for the scene and select Add a scene. The scene edit view will open where you can select and adjust the luminaires to be included in the scene. Select luminaires individually, or use None, Invert or All to remove all luminaires from the scene, change any active luminaires to inactive & visa-versa, or add all network luminaires to the scene. Use + or - to add or remove all individually visible luminaires, but not luminaires within groups To add group luminaires to a scene, double tap the group and select the luminaires. Add or remove all group luminaires by tapping + or -. Adjust selected group luminaires using basic gestures anywhere in the group area. Luminaires can also be added to a scene from a gallery image. Select the Gallery tab, open the appropriate gallery image and select the required luminaire(s). You can adjust the luminaires separately using the basic gestures, or you can use the Luminaires in scene control icon to adjust all of the luminaires in the scene. To change the name, image and colour for the scene, select Settings at the bottom of the screen. You can then rename the scene, use the colour palette to define a colour for the scene icon, and choose an icon for the scene. A scene can be hidden from the user view by selecting Hidden. To return to the scenes tab, select Done. Add more scenes using the + at the top of the scenes tab. Copy scenes by pushing and holding an existing scene. A copy is created in edit mode with an additional number added to the original scene name. You can rename this scene from the scene Settings. Tip: Remember to include luminaires which must remain off in a scene and adjust them to 0 % dimmed level. Version 3-2021 www.casambi.com support@casambi.com
14

Circadian scenes
A circadian rhythm allows automatic colour temperature management for basic scenes by using a response
graph that displays the hours of the day and colour temperature. When a circadian scene is active it will set the
colour-temperature based on the response graph. It will adjust the colour temperature for as long as the scene
is active. Note: If desired, a circadian profile can also be used in the same scene as daylight control.

A circadian profile can be added to a scene that you are editing. To add a circadian rhythm to a scene, select
the Settings icon in the bottom right corner and then choose Circadian rhythm. Select Add a new profile and
give it a name and push OK or choose an existing profile. Graphs from other networks created on the same
mobile device can also be imported. To import a graph from another network, simply select the Import option
and you will then be presented with a list of circadian rhythms from the other networks on your device.

Select the desired profile name and tap on the response graph. You can then adjust the points on the response
graph to your requirements. The time of day bar can also be moved left or right to help you select when your
circadian rhythm should start and finish. When moving the bar, the time and colour temperature will be shown
in the top left.

You can add or remove points on the graph. Push and hold on an area on the graph to create a new marker
point. Select an existing point to highlight it and then the bin icon in the bottom left to delete the highlighted
marker point.

Use the Switch Form option to change the response graph form from a smooth graph to a stepped graph.

Select Done when your rhythm is complete.

Notes:
   • Only tuneable white luminaires can follow a circadian profile.
   • Multiple circadian rhythms can be created, but only one profile can be used per scene.
   • If you need to have a different circadian graph defined for another scene then you need to create a new
       graph. If you select and edit a graph that has been used in a previous scene the change will also affect
       the original scene.
   • Scenes containing a circadian graph will display a small graph in the scene icon image.

Version 3-2021                                  www.casambi.com                             support@casambi.com
15 Daylight scenes Daylight scenes utilise information provided by lux sensors to automatically adjust the scene lighting level based on the amount of light available. Daylight control can be configured when editing a basic scene by selecting Daylight control from the scene Settings. Available settings are described below: Basic (ON/OFF) Luminaires in an active scene will switch ON or OFF based on two configurable Lux threshold levels. Sensors may or may not be affected by light from nearby luminaires and the mode only operates when it is the highest active priority item in the control hierarchy. The scene’s output is always defined by the dimming level(s) of the luminaires selected within the scene. Open loop Luminaires in an active scene will have their output level (0-100%) adjusted by comparing the sensor's lux reading against a response graph. Sensors should not be affected by any light from the luminaires in the network. This mode can operate even if it is not the highest priority item in the control hierarchy. Examples: Luminaires controlled by a sensor installed in a separate location to the luminaires (e.g. outdoors) or controlled by a sensor that is facing towards a window away from the luminaires. Closed loop A target lux level is specified. The sensor actively adjusts the luminaires in the active scene to try to reach and maintain that lux level via a feedback loop (by observing the results of its own changes). Sensors are affected by light from the luminaires in the scene. This mode can only operate when it is the highest priority item in the control hierarchy. Example: Luminaires controlled by a daylight sensor that is in the same area as the luminaires. External This is similar to the open loop option but is based on a 0-100% dimming signal being sent from the sensor rather than a Lux level. This option is designed to be used to combine a Casambi unit with a sensor which is not Casambi-activated. Examples include a CBU-ASD connected to a non-Casambi sensor, or when dimming is performed by an external DALI controller or DALI 2 sensor. Casambi-ready sensors created by our partners already contain the Casambi firmware so do not need to use the External option. When the desired Mode of operation has been selected you will then need to select the Controlling sensors and set some other parameters. The parameters to be configured will vary depending on the selected Mode of operation. Explanations of each function are included under each option field in the app. For Open loop or External modes you can configure the response graph in a similar way to a Circadian profile response graph. Version 3-2021 www.casambi.com support@casambi.com
16

Animation scenes
Animations consist of multiple existing basic scenes that are activated in a defined sequence. Animation scenes
can be activated in the same way as standard scenes.

Select Edit and then the + in the top right corner. Name the scene and select Add an animation. Note: At least
one basic scene must already exist in order to create an animation.

Add the animation steps. Steps consist of scenes and wait times. You can add a maximum of about 80 steps
(the exact amount will vary depending on what timing settings are used for each animation step). The scenes
and wait times can be added in any order. The order can be rearranged by pushing the 3 lines on the right of
the relevant animation step and dragging it to a new location in the step list. When the animation scene is
activated the steps will follow the listed order (from top to bottom).

Each scene used in an animation can have a fade in time and a dimmed level set for it. The fade time is how
long it will take for the scene to reach its dimmed level set in the animation. The dimmed level is the dimming
percentage relative to the set dimmed level of the basic scene.

Examples:
   • The basic scene had all luminaires set to 100%. Its dimmed level in the animation scene is set to 50%.
      When the animation is active the basic scene only come on at 50%.
   • The basic scene had all luminaires set to 50%. Its dimmed level in the animation scene is set to 50%.
      When the animation is active the basic scene only come on at 25%.

An animation can be set to fade off (default), stay on the last step or repeat after the last animation step.

The scene name, icon colour and icon can be set, and the animation scene can also be hidden from the Scenes
tab user view if needed. It will reappear if Edit has been selected.

When you have finished editing the animation, select Done.

The animation scene icon will display the total time length of the animation. If the animation has been set to
repeat, an infinity symbol will also be displayed.

Note: Non-repeating animations cannot be used within Time-based scenes.

Tip: Timers can be used to turn an animation on and off based on time.

Version 3-2021                                  www.casambi.com                               support@casambi.com
17 Example animations Example 1: • Add Scene Red, fade time 10 sec • Add wait 3 min • Add Scene Blue, fade time 10 sec • Add wait 5 min • Add Scene All Off, fade time 10 sec When activated, the animation scene above will fade into scene Red in 10 seconds. Red will be active for 3 minutes. Then the scene will fade to the scene Blue in 10 seconds. Blue will be active for 5 minutes and then fade out in 10 seconds. Example 2: • Add Scene SHOWROOM1, 100% fade time 1 sec • Add wait 15 sec • Add Scene SHOWROOM1, 0% fade time 1 sec • Add Scene SHOWROOM2, 100% fade time 1 sec • Add wait 15 sec • Add Scene SHOWROOM2, 0% fade time 1 sec • Add Scene SHOWROOM3, 100% fade time 1 sec • Add wait 15 sec • Add Scene SHOWROOM3, 0% fade time 1 sec • Repeat ON When activated, the animation scene above will fade into scene SHOWROOM1 in 1 second and be active for 15 seconds before fading off (to 0%) within 1 second. Then the scene SHOWROOM2 will fade on in 1 second and remain active for 15 seconds before fading off (to 0%) within 1 second. Then the scene SHOWROOM3 will fade on in 1 second and remain active for 15 seconds before fading off (to 0%) within 1 second. The whole animation will then repeat itself. Version 3-2021 www.casambi.com support@casambi.com
18

Time-based scenes
A time-based scene can be used to achieve a different dimmed level of a scene or activate different lighting
scenarios depending on when the time based scene is activated. A time based scene has the added advantage
over a Timer in that it can be triggered at random times, therefore only activating scenes when needed. Time
based scenes are primarily designed to be used in conjunction with presence sensors.

A minimum of two conditions are required for a time based scene to function. A condition is a scenario to be
reproduced only if the time based scene is activated during the active period defined for that condition.

To create a time based scene select Edit and then the + in the top right corner. Name the scene and select Add
a time based scene. Note: At least one basic scene must already exist in order to create a time based scene.

Select On all days and set when the first conditions’ active period should start. You can configure from days of
the week, time or select based on sunrise or sunset (if you have enabled location). When set, push Done.

Set the Fade time for the scene you wish to activate. This will determine how long it takes for the scene to fade
in whenever the time-based scene is activated at a time suiting that condition.

Select Add a scene to choose the scene to activate. You can also tap on the scene and alter its dimmed level
if desired. Remember that the dimming level will be relative to the dimmed level of the original scene.

Carry out the same process for the second condition. If you wish to add more conditions select Add a condition.

The scene name, icon colour and icon can be set, and the time based scene can also be hidden from the
Scenes tab user view if needed. It will reappear if Edit has been selected.

When you have finished editing the Time based scene, select Done.

Notes:
   • Multiple scenes can be part of a single condition. All scenes contained in one condition must have
       mutually exclusive luminaires (i.e. Every scene that is part of a single time based scene condition must
       have different luminaires from every other scene used in the same condition. If they don’t then operation
       may not be as expected because luminaires may receive multiple conflicting commands simultaneously).
   • Non-repeating animations cannot be used with time based scenes.
   • If a time based scene is active during the time period when conditions change, the next condition will
       be automatically set.

Version 3-2021                                 www.casambi.com                             support@casambi.com
19 Example of a Time based scene A time based scene (“Kitchen lwr1 timed”) is created to set scene “Kitchen lower 1” dimming level at 40% between 08.00 and 21.00. This is the first condition of the time based scene. Between 21.00 and 08.00, the dimming level of the same “Kitchen lower 1” scene will be set to 15% (so as not to be too bright if the scene is activated during the night). This is the second condition of the time based scene. The scene is not active 24 hours / day. Instead, a presence sensor is set to trigger the time based scene “Kitchen lwr1 timed” only when presence is detected. Depending on when the time based scene is triggered, it then sets the dimming level of scene Kitchen lower 1 appropriately. Version 3-2021 www.casambi.com support@casambi.com
20

More tab

Timers
The timer function is used to create one or more timers that can be configured to turn scenes on and off based
on the time or date or sunrise/sunset times. For example, you can set meeting room luminaires to activate
during office hours or set corridor lights to dim to a lower level during the night.

To set a timer, go to the More tab and select Timers.

Create a new timer by selecting Edit in the top right corner and then + in the top left corner.

Select the Switches ON button and set when the scene should activate. You can set the timer to operate on
weekdays or a specific date. The time can be set for a specific time of day or can use local sunrise and sunset
times to turn the scene on. To use sunrise/sunset the network location needs to be enabled. See the Network
setup settings section for detailed instructions. Select Done to confirm the changes.

Select the Switches OFF option and select the time when the scene should turn off. The options available are
the same as those available for the Switches ON time. You can also select After and set the length of time the
scene should remain on for. Select Done to confirm the changes.

Select the scene or scenes that you want to control with this timer from the Add a scene option. Note that if
multiple scenes are to be activated from the same timer then they must contain mutually exclusive luminaires
(i.e. Every scene that is part of a single timer must have different luminaires from every other scene used for the
same timer. If they don’t then operation may not be as expected because luminaires will receive multiple
conflicting commands simultaneously).

Set the Fade time for the scene. This is the time it will take for the luminaires in the scene to reach their defined
light level when the timer is activated. Fading will start when the timer is activated. This means that if you set the
scene to come on at 14:05 and you set a fader for 30 seconds then the scene is at full brightness at 14:05:30.
The scene also fades to off with the same time, so if the scene goes off at 15:00 the light will be fully off at
15:00:30.

Version 3-2021                                   www.casambi.com                                support@casambi.com
21

If an application also uses presence detectors and requires that a timer would operate regardless of any
movement being detected (i.e. At a higher priority in the Casambi Control Hierarchy), Override presence should
be enabled for the timer. Note that a timer using Override presence must always have its own Switches ON and
Switches OFF times set because it will operate on a higher level within the Casambi Control Hierarchy. See the
Appendix for an explanation of the Control Hierarchy.

It is also possible to Enable/Disable a timer by using the Enabled button. Confirm your settings by selecting
Done. After saving a timer it is possible to copy that timer. Open the timer again, scroll to the bottom of the
settings and select Save as copy.

Refresh a timer Timers only send commands to the network at the specific set times. If you program a timer to
activate at a time that is earlier than the current time, it will not activate until the Switches ON time is next reached
(e.g. The next day). If you wish a timer to refresh to a state that would currently be active, select Edit and then
select the refresh button (spiral arrow) in the top left of the Timers screen, next to the +.

Notes:
   • Timers do not always require a Switch ON or Switch OFF time configured. For example, multiple timers
       could be configured to trigger the same scene to different dimming levels throughout a 24-hour period.
       Therefore, only start times would be necessary for each timer because one timer automatically overrides
       the previous timer. To disable an ON or OFF time, swipe left (iOS) or push and hold (Android) on the
       Switches ON or Switches OFF option. A Delete option will then appear. Select this to disable the ON or
       OFF option for that timer. The text Not set will then be shown under the Switches ON or Switches OFF
       option. Note: If using the Override presence option, the timer must have both Switches ON and Switches
       OFF times set.
   • Casambi units will keep track of time as long as at least one unit in the network remains powered. In a
       situation where all units have lost power the network time needs to be re-synchronised to the units again.
       In this situation please open the Casambi app and connect to the network to set the time again. For a
       Not shared network this must be done on the same mobile device that was used to originally configure
       the network. For a shared network you must log in using the network Administrator email and password.
   • Timers can occupy different priority levels in the Casambi Control Hierarchy depending on what timer
       features have been used (e.g. A Weekday timer has a lower priority than a Date timer). Please see the
       Control Hierarchy section in the Appendix for more details.

Version 3-2021                                     www.casambi.com                                support@casambi.com
22
Switches
Within the Switches section, Casambi-enabled switches can be configured. All Casambi-enabled switches, push
buttons or rotary controls that are paired to the network will be shown in the Switches page (even if these are
integral to a luminaire).
To use switches that only switch the mains power on and off with Casambi, see the Smart Switching section in
the Appendix.
To configure a switch, tap on the desired switch that you wish to configure.
You will be presented with various options depending on the type of Casambi enabled switch (e.g. The amount
of push buttons available to configure, or configuration options for a rotary control).
Select the push button or rotary control to configure. Initially, Not in use will be displayed. Select this to open a
list of available options. The available options shown will depend on the profile that the Casambi enabled switch
has been configured with. Some Casambi enabled switches have more available options than others. Possible
options may be:
• Controls a luminaire • Cycle scenes
• Controls an element • Active/Standby
• Controls a group • Presence
• Control scene • Presence/Absence
• Controls all luminaires • Absence
• Adjust the temperature of a luminaire • Resume automation (group)
• Adjust the temperature of a group • Resume automation
• Adjust the temperature of all luminaire
Select the desired option and review the list of further options then presented that may also need to be
configured (e.g. You may need to select the luminaire, group or scene to be controlled). Various other options
may be available depending on the profile configuration of devices available in your network.
Version 3-2021 www.casambi.com support@casambi.com23 Note: Elements are single dim channels. If the profile of a unit is for example 4ch/dim,dim,dim,dim, each of the channels can be controlled from four Xpress buttons separately. This could be useful in RGBW applications where Casambi app may not really be convenient to use. When all settings have been configured push Done and then Done again. The Use toggle option can be enabled of disabled. If enabled, one push of a switch will activate the set function (e.g. Select a scene). A second push will deactivate it. Disabling the Use toggle function means that pushing a switch will only activate the selected function. To rename a switch, scroll to the bottom of the screen and tap on Name. When finished, push Back to return to the main Switches view. Tip: If you are within Bluetooth range of the switch you wish to program, easily identify it by selecting Switches from the More tab. You will then see a magnifying glass in the top right of the screen. Push the magnifying glass and you will then be prompted to Push a button within 10 second. Push the switch you desire to program and the programming options for that switch will automatically open. You can then configure and rename that specific switch as desired. If you are not within Bluetooth range of any switches the magnifying glass icon will not appear. Version 3-2021 www.casambi.com support@casambi.com
24

Xpress switch
The Casambi Xpress is a wireless user interface that brings flexibility to interior design. The switch can be kept
wherever the user needs it and it gives direct access to all the important Casambi lighting control functionalities.

1. To pair an Xpress, press any two pre-set buttons on the Xpress (for example, buttons 1 and 3). and the
   Casambi app will automatically open a Found a new device window. You will be prompted to either Add to
   “….” the current network to which you are connected, or to Add individually to…. If you select Add individually
   too… you will be presented with a list of possible networks (if you have visited multiple networks using your
   mobile device), or the possibility to Create a network. Note that if you have disabled the Notify unpaired
   devices option in App settings, you will not see the pop up window, and will be able to see the Xpress from
   the list of Nearby devices in the More tab. Select the Xpress from there and choose the network to add it
   to.

2. After you have added the Xpress switch to the network navigate to the More tab and select Switches to
   configure the four numbered buttons.

3. Select the Xpress switch from the list of available switches and the configuration page will open. Initially,
   Not in use will be displayed for each button (1-4). You can then select each numbered button individually
   and assign it to control a luminaire, scene, group, element or all luminaires. It is also possible to assign
   resume automation options either for a group or the whole network.

4. When settings have been configured push Done and then Done again.

5. The Use toggle function, when activated, will allow each Xpress button to activate/deactivate the
   programmed action on each button press. When deactivated, it will only allow the assigned action to be
   activated.

6. Select Long press all OFF function to allow any Xpress configurable button (1-4) to be held down for
   approximately 5 seconds to turn off all luminaires in the network.

7. You can also rename the Xpress and change its icon to make identification easier. Select Back to save the
   settings and return to the Switches screen.

Version 3-2021                                   www.casambi.com                              support@casambi.com
25

After configuring the buttons, they will now control the assigned scene, luminaire, group, element or resume
automation (see Control Hierarchy).

The first press will turn on the scene, lamp or group and second press will turn it off (unless the Use toggle
option has been deactivated). The + and - buttons allow you to dim your selected device(s) up or down. The up
and down buttons can be used to change colour temperature (of a tuneable white luminaire) or the direct/indirect
lighting ratio, provided that your luminaire supports these features.

Unpairing a Xpress
To begin the unpairing process, first press any two pre-set buttons on the switch. There are three ways to unpair
a Xpress switch:

1. By selecting the Unpair device option within the switch settings. Tap on the Xpress switch to be unpaired
   and scroll to the bottom to find the Unpair device option.

2. By swiping the device row to the left (in iOS) or tap and hold on the device (in Android) in the switches
   main page. Then select Delete.

3. By selecting the switch from the Nearby devices list and choosing the Unpair device option.

Make sure that the Xpress switch has at least one of the amber LEDs on during unpairing. You will also need
to perform the unpairing steps quickly before the switch turns itself off (no LEDs on).

If the amber LEDs on an Xpress switch remain on or cycle for longer than 30 seconds when no button is being
pushed, then it is advised to remove and reinsert the battery to prevent unnecessary battery drain.

Version 3-2021                                 www.casambi.com                              support@casambi.com
26

Sensors
Paired sensors will appear on the Sensors page in the More tab. Presence sensors, Daylight sensors, and
combined Presence/Daylight sensors will be shown.

Presence sensors
In order to configure a presence sensor, the Use Control Hierarchy option must first be enabled (see Network
setup/Control options). For each sensor there are different configuration options which can be chosen:

•   Presence                                               •   Resume automation (group)
•   Presence/Absence                                       •   Resume automation
•   Absence

Presence can activate up to two mutually exclusive scenes when the sensor is triggered.

Presence/Absence Activates up to two mutually exclusive scenes when the sensor is triggered, and then
activates up to two mutually exclusive scenes when absence has been detected (i.e. When there is no movement
and the linger time has expired – see below). Note: presence and absence scene(s) must contain the same
luminaire(s). An absence scene cannot control different luminaires to those configured in the presence scene(s).

Absence Removes manual control from selected scene(s) when presence is no longer detected and the linger
time has expired (see below). e.g. The scene(s) are activated manually (e.g. by a switch) but automatically
deactivated.

Linger time Is the delay between presence no longer being detected and the controlled scene(s) expiring.

Fade time Is the time it takes the scene(s) to dim to off (0%) or to the Absence scene once presence is no
longer detected and the linger time has expired.

Removes manual control Allows any previous manual control of a scene to be removed once presence is no
longer detected and the linger time has also passed.

The two Resume automation options can be used to remove manual control from a specific group of luminaires
or from all luminaires in your network.

Version 3-2021                                 www.casambi.com                             support@casambi.com
27

A paired presence sensor will display a ‘walking person’ icon in the top right of the main sensor icon image
when presence is detected.

Note: 230VAC-switching PIR sensors can also be used with the CBU-ASD or CBU-TED to act as a Casambi-
enabled sensor. The profile of the CBU device may first need to be changed to enable this (See Changing a
device profile in the Appendix).

Up to 20 sensors (for Evolution networks), or 10 sensors (for Classic networks) can be configured to control
the same luminaire.

Daylight sensors
From the Sensors list in the More tab you can configure the sensitivity and tolerance of a daylight sensor. Tap
on the Daylight sensor option to open the settings.

Altering Sensitivity will determine the reaction time of the sensor when changes in detected illumination occur.

The Tolerance determines how large change in illumination is required before the sensor will react.

Usually for testing purposes the sensitivity and tolerance settings are low, but in normal use the settings are
typically set higher to ensure that rapid changes in measured illumination do not result in rapid changes of the
artificial lighting (e.g. if a cloud temporarily covers the sun you may not need the artificial lighting to react).

The daylight sensor can also be calibrated. This CALIBRATION may be needed because the lux value received
by the sensor is typically not the same as the actual lux received on the surface below it (A downward facing
ceiling mounted sensor receives reflected light whereas the surface under the sensor typically receives direct
light). To enter a calibration value tap on the Current value and then enter the actual lux value measured on the
surface of interest (e.g. A sensor positioned above a desk may be measuring 400 lux, but the actual lux value
measured by a lux sensor placed on the desk surface may be 500 lux. When configuring a Closed loop daylight
scene (to enable constant light levels to be maintained), you can then set your target lux value to the lux value
you wish to achieve on the desk surface.

Closed loop, and other daylight sensor configuration options and settings are done when creating a daylight
scene (see the Daylight scenes section).

Note: If multiple lux sensors control the same luminaire, the average of all lux readings will be the used value.

Version 3-2021                                  www.casambi.com                              support@casambi.com
28

Gateways

Internet gateway
Using a gateway, it is possible to control Casambi-enabled luminaires remotely. A network administrator can
also remotely configure the network.

To enable remote access, a Casambi network needs to have one iOS or Android device acting as a gateway
and the sharing settings for the network need to be Open, Password protected or Administrator only.

To set up the gateway device select Gateway in the Network Setup screen. If the Gateway option is grey and
cannot be selected, make sure the sharing setting is not set to Not shared.

Select the Gateway button to enable the gateway on the device. If you have added an email address for the
network you can also enable notifications to that email address if the gateway is disconnected for some reason.

Note: The Casambi gateway feature relies on third-party devices and connections. Because of this, a continuous
and flawless operation cannot be guaranteed.

After enabling the gateway please make sure that:

1. The Casambi app is always open on the gateway device. The app can be in the background when using
   iOS devices, but the app must be active and at the foreground when using Android devices.

2. The gateway device has a reliable Internet connection at all times.

3. The gateway device has a reliable Bluetooth connection to at least one Casambi device in the network.

4. Disable all automatic updates on gateway device.

5. The gateway device is always plugged in to a power source.

6. Disable all power-saving options from the device that might cause the Bluetooth or Internet connection to
   close.

Version 3-2021                                 www.casambi.com                            support@casambi.com
29

DALI gateway
This feature is only available if using Evolution firmware version 32.0 (2020-03-27) or later.

A CBU-DCS can be used to act as a gateway between a wired DALI network (controlled by DALI controller
hardware and software) and a wireless Casambi network. Before connecting the CBU-DCS, it must first be in
an un-paired state and the CBU-DCS DALI Gateway profile must be applied (see the Luminaires section for
unpairing and profile changing instructions). The CBU-DCS must be connected to the same powered DALI bus
as the DALI controller. Once physically connected, the CBU-DCS can be paired to the existing Casambi
network.

Any device which exists in the Casambi network will then appear as standard DALI gear to the wired DALI
controller software. Each Casambi device uses one DALI address but the CBU-DCS DALI gateway does not;
instead it appears transparent to the DALI controller software.

Casambi devices which control more than one channel appear as single-channel DALI gear to the DALI
controller software, therefore the separate channels cannot be dimmed individually by the DALI controller
software, only by the Casambi app.

Casambi devices which use TW, RGB or XY controls are presented to the DALI controller software as DALI or
DALI DT8 (Tc/RGB/XY) devices.

If your Casambi network exceeds the DALI limitation of 64 devices, you can simply add multiple CBU-DCS
DALI gateways in your existing Casambi network. The DALI controller software will then be able to address all
of your Casambi devices. All Casambi luminaires can be addressed by the DALI controller software,
regardless of what type of Casambi device they are. i.e. the Casambi device does not need to be a DALI-
controllable device.

As with other Casambi devices, the gateway device can be renamed and assigned its own icon.

Version 3-2021                                  www.casambi.com                              support@casambi.com
30

DALI gateway - Gateway Parameters
Control Scope defines which devices are passed though the DALI gateway to the DALI control software. The
default option is All luminaries. However, this can also be restricted to a single scene, in which you can define
the devices which you wish to be seen by the DALI controller software.

Control priority defines the level at which the gateway will prioritise commands sent by the DALI control
software:

•   Higher than manual Prevents the Casambi system (apps, sensors, switches, timers) from controlling
    Casambi devices. Casambi devices can only be controlled by the DALI controller software.
•   Manual Is the default setting. It allows control of Casambi devices by both the DALI controller software and
    the Casambi app.
•   Higher than automation Allows the DALI controller software to control lights which are under automation by
    presence/absence sensors or timers, but not those manually controlled by the Casambi app.
•   Lowest-priority automation Allows the DALI controller software to control lights which are not currently
    automated by presence/absence sensors or timers. Any luminaire control from the Casambi app (manual,
    timers or sensor automation) will take over the externally set dimming levels.

The resume automation button (@) must be used to allow the Casambi app to regain full control if the Higher
than automation or Lowest-priority automation options are used.

Export sensors Allows Casambi enabled sensors to be available as DALI-2 sensors in the DALI network.

Export switches Allows Casambi enabled switches to be available as DALI-2 push buttons in the DALI
network.

Version 3-2021                                  www.casambi.com                             support@casambi.com
31
Input dimming curve defines how the dimming levels that the DALI system sends to the Casambi DALI Gateway
are interpreted and sent further within the Casambi network.
The Casambi DALI gateway profile offers the unique possibility to control any type of luminaire from a DALI
system. As such, Casambi enabled luminaires may utilise linear, logarithmic or custom dimming curves, or there
may even be a mixture of all of these in a single Casambi network. A DALI system dimming curve usually uses
the DALI standard logarithmic curve (with 0-255 steps). However, some DALI control systems (or non-DALI BMS
adapters) may use a 0-100% linear curve. Differing dimming curves between the control system and luminaires
may result in a dimming response that is not optimal when controlling a Casambi network from DALI. The Input
dimming curve option therefore offers the possibility to change how the DALI system dimming curve is
transferred into the Casambi network.
Options for the Input dimming curve are:
• default: This is actually the same as Linear.
• Linear: Transfers the dimming curve received from the DALI system into the Casambi network “as is”.
• Logarithmic (DALI): Will apply a logarithmic curve to the curve received from the DALI system.
o Note that this setting may not respond ideally if Update actual dim level has been enabled.
The most suitable option to select will depend entirely on the combinations of dimming curves used in a specific
set up. Unfortunately, uniform results may not be possible to achieve if the Casambi network contains luminaires
having a mixture of different dimming curves.
Update actual dim level Depending on the Control priority defined in the DALI Gateway settings, dimmed levels
and the actual state of tuneable white and colour controls (if DALI DT8 devices are concerned) sent by the DALI
system may be overridden by Manual or Automation control actions in a Casambi network. Since use cases
vary, there may or may not be the requirement for changes made in the Casambi network to be visible to the
DALI system.
Configuration options are:
• Yes (default)
o The DALI system will be able to obtain the dimmed level/colour changes from the DALI Gateway
regardless of whether the change is made by the DALI system or directly in the Casambi network.
• No
o Only the dimmed level/colour changes sent by the DALI system itself are shown in the DALI
system. Any changes made in the Casambi network are not visible to the DALI system.
• Only at Manual priority
o “Yes (default)” will be applicable if the DALI Gateway Control priority has been set to Manual
priority. “No” will be applicable if the Control priority setting is set to any other setting.
In all cases the DALI system must still send a command (query) requesting the latest dimmed level/colour status
information (i.e. Changes in the Casambi network are not automatically transferred directly from Casambi to
DALI).
Version 3-2021 www.casambi.com support@casambi.com32
DALI Gateway input device limitations
The DALI standard specifies a maximum of 64 DALI luminaire addresses and 64 DALI-2 input device
addresses. Input devices include push-buttons, sliders, occupancy sensors, and light sensors.
A CBU-DCS DALI Gateway enables 64 input devices to be addressed according to the DALI standard, but
only 80 DALI-2 “instances” can be processed by the DALI Gateway. This means that the amount of input
devices possible in your Casambi network may be limited depending on the number of instances the devices
use.
The quantity of input device instances varies.
• A single motion sensor uses 1 instance.
• A lux/presence sensor uses 2 instances.
• A single push button uses 1 instance (e.g. A 4-button switch panel uses 4 instances).
• An Xpress switch has 4 instances, one for each configurable button (+, -, up and down commands are
not transferrable via the DALI gateway)
• Casambi ready products from our ecosystem partners may use more instances depending on their
design (e.g. The number of individual push buttons they contain).
o An EnOcean switch panel uses 4 instances.
o Drivers can also be designed with push button input/s and would then use at least 1 instance.
When planning DALI Gateway use in a Casambi network containing input devices, a calculation of the number
of input device instances is necessary to ensure communication through the DALI Gateway works as desired.
If you exceed the 80-instance limit, input devices will still be addressable (up to 64 devices) but some
instances will not be recognized.
Input device limit calculation examples:
a) 64x single push buttons = 64 DALI instances = OK
b) 45x lux/presence sensor = 90 DALI instances = NOT OK
c) 20x presence only sensors + 5x Four button switches = 40 DALI instances (20+(5x4)) = OK
Version 3-2021 www.casambi.com support@casambi.comYou can also read