MCUXpresso Secure Provisioning Tool v3.1 - NXP
←
→
Page content transcription
If your browser does not render page correctly, please read the page content below
NXP Semiconductors              Document identifier: MCUXSPTUG
User Guide                                  Rev. 4, 28 July 2021

MCUXpresso Secure Provisioning Tool v3.1
NXP Semiconductors

Contents
Chapter 1 Introduction........................................................................................... 5

Chapter 2 Features................................................................................................ 6
       2.1 Supported devices and features................................................................................................6

Chapter 3 Minimum System Requirements......................................................... 10

Chapter 4 Terms and Definitions......................................................................... 11

Chapter 5 Installation........................................................................................... 14
       5.1 Windows.................................................................................................................................. 14
       5.2 MacOS.....................................................................................................................................19
                5.2.1 Enabling USB Connection on MacOS.......................................................................................26
       5.3 Linux........................................................................................................................................ 27

Chapter 6 User Interface......................................................................................28
       6.1 Menu and Settings...................................................................................................................28
                6.1.1 Menu Bar...................................................................................................................................28
                6.1.2 Preferences...............................................................................................................................29
                6.1.3 Workspaces.............................................................................................................................. 29
                          6.1.3.1 Sharing and Copying Workspaces...............................................................................................31
                6.1.4 Toolbar...................................................................................................................................... 31
                6.1.5 Connection................................................................................................................................ 32
                6.1.6 Boot Device Configuration........................................................................................................ 33
       6.2 Build Image..............................................................................................................................35
                6.2.1 Source Image Formats..............................................................................................................36
                6.2.2 TrustZone Pre-configuration File...............................................................................................36
       6.3 Write Image............................................................................................................................. 37
                6.3.1 OTP/PFR Configuration............................................................................................................ 39
                          6.3.1.1 Tree of All Items...........................................................................................................................40
                          6.3.1.2 Item Editor....................................................................................................................................41
                          6.3.1.3 Buttons.........................................................................................................................................41
                          6.3.1.4 Tree-Filtering Toolbar.................................................................................................................. 42
                          6.3.1.5 Read from Connected Device......................................................................................................42
                          6.3.1.6 Required Value............................................................................................................................ 42
                          6.3.1.7 Locks............................................................................................................................................42
                          6.3.1.8 Calculated Fields......................................................................................................................... 43
                          6.3.1.9 Validation and Problem Resolution..............................................................................................43
                          6.3.1.10 Advanced Mode......................................................................................................................... 44
                          6.3.1.11 Write/Burn.................................................................................................................................. 44
                          6.3.1.12 PFR and OTP Differences......................................................................................................... 45
       6.4 Manufacturing Tool..................................................................................................................45
                6.4.1 USB Path.................................................................................................................................. 46
       6.5 Keys Management...................................................................................................................48
                6.5.1 Generate Keys.......................................................................................................................... 48
                6.5.2 Add Keys...................................................................................................................................50

                                          MCUXpresso Secure Provisioning Tool v3.1, Rev. 4, 28 July 2021
User Guide                                                                                                                                                                 2 / 100
NXP Semiconductors
                                                                                                                                                                       Contents

                6.5.3 Import/Export Keys....................................................................................................................52
       6.6 Log...........................................................................................................................................52

Chapter 7 Workflow............................................................................................. 54
       7.1 Common Steps........................................................................................................................54
                7.1.1 Downloading MCUXpresso SDK...............................................................................................54
                7.1.2 Opening Example Project......................................................................................................... 55
                7.1.3 Building Example Project.......................................................................................................... 55
                7.1.4 Setting up Secure Provisioning Tool......................................................................................... 55
                7.1.5 Preparing Secure Keys............................................................................................................. 56
       7.2 RT10xx/RT11xx Device Workflow........................................................................................... 56
                7.2.1 Preparing Source Image........................................................................................................... 56
                         7.2.1.1 Image Running from External NOR Flash................................................................................... 56
                         7.2.1.2 Image Running in Internal RAM...................................................................................................57
                         7.2.1.3 Image Running from External SDRAM........................................................................................ 58
                7.2.2 Connecting the Board............................................................................................................... 59
                7.2.3 Booting Images......................................................................................................................... 60
                         7.2.3.1 Booting Unsigned Image..............................................................................................................61
                         7.2.3.2 Booting Authenticated Image.......................................................................................................61
                         7.2.3.3 Booting Encrypted Image (RT10xx).............................................................................................62
                         7.2.3.4 Booting XIP Encrypted Image (BEE OTPMK) (RT10xx)..............................................................63
                         7.2.3.5 Booting XIP Encrypted Image (BEE user keys) Unsigned (RT10xx)...........................................64
                         7.2.3.6 Booting XIP Encrypted Image (BEE User Keys) Authenticated (RT10xx)...................................65
                         7.2.3.7 Booting OTFAD Encrypted Image (User Keys) Unsigned (RT11xx)........................................... 66
                         7.2.3.8 Booting OTFAD Encrypted Image (User Keys) Authenticated (RT11xx).....................................67
                7.2.4 Creating/Customizing DCD files................................................................................................68
                7.2.5 Flowcharts (RT10xx)................................................................................................................. 69
                         7.2.5.1 Unsigned......................................................................................................................................69
                         7.2.5.2 Authenticated (HAB).................................................................................................................... 70
                         7.2.5.3 Encrypted (HAB).......................................................................................................................... 70
                         7.2.5.4 XIP Encrypted (BEE OTMPK)......................................................................................................71
                         7.2.5.5 XIP Encrypted (BEE User Keys) Unsigned..................................................................................71
                         7.2.5.6 XIP Encrypted (BEE User Keys) Authenticated...........................................................................72
                7.2.6 Flowcharts (RT11xx)................................................................................................................. 72
                         7.2.6.1 Unsigned......................................................................................................................................73
                         7.2.6.2 Authenticated............................................................................................................................... 73
                         7.2.6.3 OTFAD Encrypted (User Key) Unsigned..................................................................................... 74
                         7.2.6.4 OTFAD Encrypted (User Key) Authenticated.............................................................................. 74
       7.3 LPC55Sxx Device Workflow....................................................................................................74
                7.3.1 Preparing Source Image........................................................................................................... 74
                         7.3.1.1 Image Running from Internal Flash..............................................................................................75
                7.3.2 Connecting the Board............................................................................................................... 76
                7.3.3 Booting Images......................................................................................................................... 77
                         7.3.3.1 Security Levels.............................................................................................................................77
                         7.3.3.2 Booting Unsigned/Unsigned with CRC Image............................................................................. 77
                         7.3.3.3 Booting Signed or PRINCE Encrypted Image..............................................................................78
                         7.3.3.4 Key Store..................................................................................................................................... 79
                7.3.4 Flowcharts.................................................................................................................................80
                         7.3.4.1 Unsigned......................................................................................................................................80
                         7.3.4.2 Unsigned with CRC......................................................................................................................81
                         7.3.4.3 Signed..........................................................................................................................................81
                         7.3.4.4 PRINCE Encrypted and Signed................................................................................................... 82
                         7.3.4.5 PRINCE Encrypted with CRC...................................................................................................... 82
       7.4 RTxxx Device Workflow...........................................................................................................82

                                         MCUXpresso Secure Provisioning Tool v3.1, Rev. 4, 28 July 2021
User Guide                                                                                                                                                               3 / 100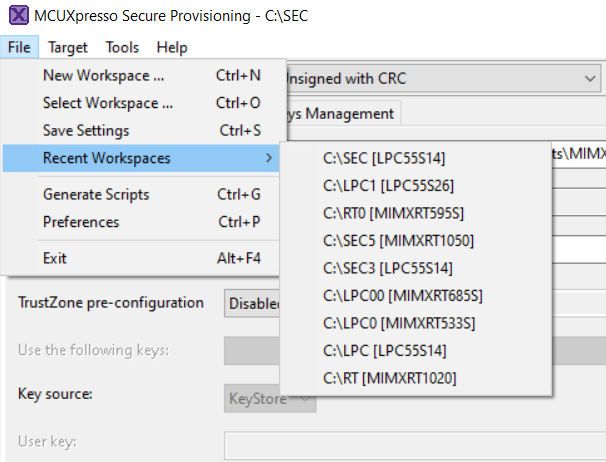
NXP Semiconductors
                                                                                                                                                                       Contents

                7.4.1 Preparing Source Image........................................................................................................... 82
                         7.4.1.1 Image Running in External FLASH ............................................................................................. 83
                         7.4.1.2 Image Running in Internal RAM ..................................................................................................83
                7.4.2 Connecting the Board............................................................................................................... 84
                7.4.3 Booting Images......................................................................................................................... 85
                         7.4.3.1 Booting an Unsigned/Unsigned with CRC Image........................................................................ 85
                         7.4.3.2 Booting Signed Image Using Shadow Registers ........................................................................ 86
                         7.4.3.3 Booting OTFAD Encrypted Image Using Shadow Registers....................................................... 86
                         7.4.3.4 Booting Signed/Encrypted Image – Burn Fuses.......................................................................... 87
                         7.4.3.5 Full Security ................................................................................................................................ 88
                7.4.4 Flowcharts.................................................................................................................................88
                         7.4.4.1 Unsigned......................................................................................................................................89
                         7.4.4.2 Unsigned with CRC......................................................................................................................89
                         7.4.4.3 Signed..........................................................................................................................................90
                         7.4.4.4 OTFAD.........................................................................................................................................90

Chapter 8 Command Line Operations................................................................. 91
       8.1 Build.........................................................................................................................................91
                8.1.1 Build Arguments........................................................................................................................91
       8.2 Write........................................................................................................................................ 93
                8.2.1 Write Arguments....................................................................................................................... 93
       8.3 Generate Keys.........................................................................................................................95
                8.3.1 Generate Keys Arguments........................................................................................................95
       8.4 Manufacture.............................................................................................................................96
                8.4.1 Manufacture Arguments............................................................................................................96
       8.5 Clear Security (LPC55Sxx)......................................................................................................96
                8.5.1 Clear Security Arguments......................................................................................................... 96
       8.6 Command Line Examples....................................................................................................... 97
       8.7 Command Line Tools.............................................................................................................. 97

Chapter 9 Revision History.................................................................................. 99

                                         MCUXpresso Secure Provisioning Tool v3.1, Rev. 4, 28 July 2021
User Guide                                                                                                                                                               4 / 100
NXP Semiconductors

Chapter 1
Introduction
MCUXpresso Secure Provisioning Tool (SEC) is a GUI tool made to simplify the generation and provisioning of bootable
executables on NXP MCU platforms. It is built upon the proven security enablement toolset provided by NXP and takes advantage
of the breadth of programming interfaces provided by the BootROM. New users should find it easier to prepare, flash and fuse
images, while experienced users will rediscover features from the existing toolset (sdphost, blhost, elftosb, cst, image_enc) under
a friendlier GUI. Experienced users can further customize secure provisioning flows by modifying scripts generated by the tool.

 Figure 1. MCUXpresso Secure Provisioning Tool

                                   MCUXpresso Secure Provisioning Tool v3.1, Rev. 4, 28 July 2021
User Guide                                                                                                                  5 / 100
NXP Semiconductors

Chapter 2
Features
Features of MCUXpresso Secure Provisioning Tool v3.1 include:
  • Support target connectivity via UART and USB-HID serial download modes
  • Support multiple user application image formats
  • Automated conversion of bare images to bootable images
  • Downloading a bootable image in the target boot device
  • Customization of the boot device either using GUI, or predefined Flash Configuration Blocks
  • Generation of certificate trees for image signing and encryption, or use of user supplied certificates
  • Generation of signed and optionally encrypted executables
  • Support for development (unsigned) boot type
  • Support for authenticated (signed) and encrypted boot type
  • Key provisioning and fusing as dictated by boot type
  • Advanced OTP/PFR configuration
  • Command line interface for customized boot flows
  • Additional command-line utilities for low-level interaction with the device
  • Integrated Development Environments supported: MCUXpresso IDE, Keil MDK 5, IAR Embedded Workbench
  • Windows 64-bit, Linux 64-bit, and MacOS hosts

2.1 Supported devices and features
Table 1. Supported boot types

Family            Processor              Unsigned          CRC          Signed/Authenticated        Encrypted   Encrypted
                                                                                                    XIP         non-XIP

LPC55Sxx          LPC55S69               ✓                 ✓            ✓                           PRINCE

                  LPC55S66               ✓                 ✓            ✓                           PRINCE

                  LPC55S28               ✓                 ✓            ✓                           PRINCE

                  LPC55S26               ✓                 ✓            ✓                           PRINCE

                  LPC55S16               ✓                 ✓            ✓                           PRINCE

                  LPC55S14               ✓                 ✓            ✓                           PRINCE

                  LPC55S06               ✓                 ✓            ✓                           PRINCE

                  LPC55S04               ✓                 ✓            ✓                           PRINCE

MIMXRTxxx         MIMXRT533S             ✓                 ✓            ✓                           OTFAD

                  MIMXRT555S             ✓                 ✓            ✓                           OTFAD

                  MIMXRT595S             ✓                 ✓            ✓                           OTFAD

                  MIMXRT633S             ✓                 ✓            ✓                           OTFAD

                                               Table continues on the next page...

                                   MCUXpresso Secure Provisioning Tool v3.1, Rev. 4, 28 July 2021
User Guide                                                                                                              6 / 100
NXP Semiconductors
                                                                                                                         Features

Table 1. Supported boot types (continued)

Family          Processor                Unsigned        CRC           Signed/Authenticated        Encrypted      Encrypted
                                                                                                   XIP            non-XIP

                MIMXRT685S               ✓               ✓             ✓                           OTFAD

MIMXRT10xx      MIMXRT1064               ✓                             ✓                           BEE            HAB

                MIMXRT1060               ✓                             ✓                           BEE            HAB

                MIMXRT1050               ✓                             ✓                           BEE            HAB

                MIMXRT1024               ✓                             ✓                           BEE

                MIMXRT1020               ✓                             ✓                           BEE            HAB

                MIMXRT1015               ✓                             ✓                           BEE

                MIMXRT1010               ✓                             ✓

MIMXRT11xx      MIMXRT1176               ✓                             ✓                           OTFAD

                MIMXRT1175               ✓                             ✓                           OTFAD

                MIMXRT1173               ✓                             ✓                           OTFAD

                MIMXRT1172               ✓                             ✓                           OTFAD

                MIMXRT1171               ✓                             ✓                           OTFAD

                MIMXRT1166               ✓                             ✓                           OTFAD

                MIMXRT1165               ✓                             ✓                           OTFAD

Table 2. Supported boot devices

Family        Processor              Boot Device

                                     Internal FLASH              Flash NOR              Flash NAND             SD Card

LPC55Sxx      LPC55S69               ✓

              LPC55S66               ✓

              LPC55S28               ✓

              LPC55S26               ✓

              LPC55S16               ✓

              LPC55S14               ✓

              LPC55S06               ✓

              LPC55S04               ✓

RTxxx         MIMXRT533S                                         ✓

              MIMXRT555S                                         ✓

              MIMXRT595S                                         ✓

              MIMXRT633S                                         ✓

              MIMXRT685S                                         ✓

                                              Table continues on the next page...

                                  MCUXpresso Secure Provisioning Tool v3.1, Rev. 4, 28 July 2021
User Guide                                                                                                                7 / 100
NXP Semiconductors
                                                                                                                   Features

Table 2. Supported boot devices (continued)

Family        Processor             Boot Device

                                    Internal FLASH              Flash NOR             Flash NAND        SD Card

RT10xx        MIMXRT1064                                        ✓                                       ✓

              MIMXRT1060                                        ✓                                       ✓

              MIMXRT1050                                        ✓                                       ✓

              MIMXRT1024                                        ✓

              MIMXRT1020                                        ✓                                       ✓

              MIMXRT1015                                        ✓

              MIMXRT1010                                        ✓

RT11xx        MIMXRT1176                                        ✓                     ✓                 ✓

              MIMXRT1175                                        ✓                     ✓                 ✓

              MIMXRT1173                                        ✓                     ✓                 ✓

              MIMXRT1172                                        ✓                     ✓                 ✓

              MIMXRT1171                                        ✓                     ✓                 ✓

              MIMXRT1166                                        ✓                     ✓                 ✓

              MIMXRT1165                                        ✓                     ✓                 ✓

Table 3. Supported other features

Family        Processor        Other Features

                               TrustZone                       DCD                     OTP Config/PFR Config   Shadow
                                                                                                               Registers

LPC55Sxx      LPC55S69         ✓                                                       PFR Config

              LPC55S66         ✓                                                       PFR Config

              LPC55S28         ✓                                                       PFR Config

              LPC55S26         ✓                                                       PFR Config

              LPC55S16         ✓                                                       PFR Config

              LPC55S14         ✓                                                       PFR Config

              LPC55S06         ✓                                                       PFR Config

              LPC55S04         ✓                                                       PFR Config

RTxxx         MIMXRT533S       ✓                                                       OTP Config              ✓

              MIMXRT555S       ✓                                                       OTP Config              ✓

              MIMXRT595S       ✓                                                       OTP Config              ✓

              MIMXRT633S       ✓                                                       OTP Config              ✓

              MIMXRT685S       ✓                                                       OTP Config              ✓

                                              Table continues on the next page...

                                MCUXpresso Secure Provisioning Tool v3.1, Rev. 4, 28 July 2021
User Guide                                                                                                           8 / 100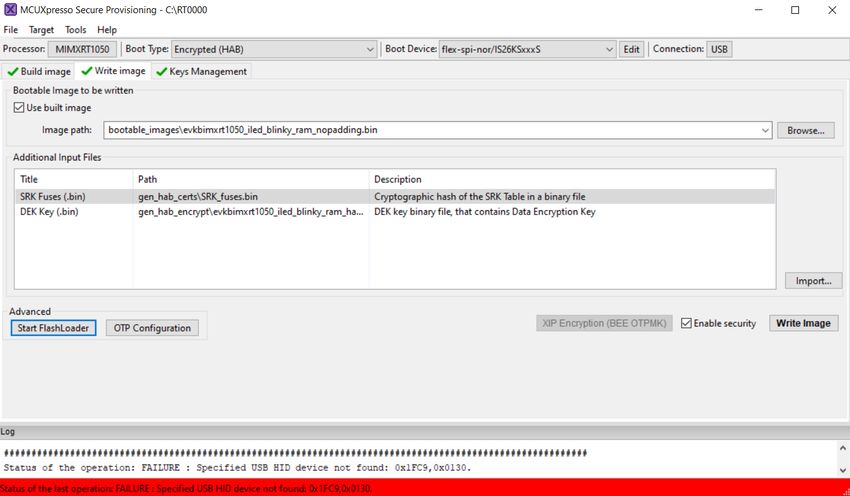
NXP Semiconductors
                                                                                                                    Features

Table 3. Supported other features (continued)

Family        Processor         Other Features

                                TrustZone                      DCD                      OTP Config/PFR Config   Shadow
                                                                                                                Registers

RT10xx        MIMXRT1064                                       ✓                        OTP Config

              MIMXRT1060                                       ✓                        OTP Config

              MIMXRT1050                                       ✓                        OTP Config

              MIMXRT1024                                       ✓                        OTP Config

              MIMXRT1020                                       ✓                        OTP Config

              MIMXRT1015                                                                OTP Config

              MIMXRT1010                                                                OTP Config

RT11xx        MIMXRT1176                                       ✓                        OTP Config

              MIMXRT1175                                       ✓                        OTP Config

              MIMXRT1173                                       ✓                        OTP Config

              MIMXRT1172                                       ✓                        OTP Config

              MIMXRT1171                                       ✓                        OTP Config

              MIMXRT1166                                       ✓                        OTP Config

              MIMXRT1165                                       ✓                        OTP Config

                                 MCUXpresso Secure Provisioning Tool v3.1, Rev. 4, 28 July 2021
User Guide                                                                                                            9 / 100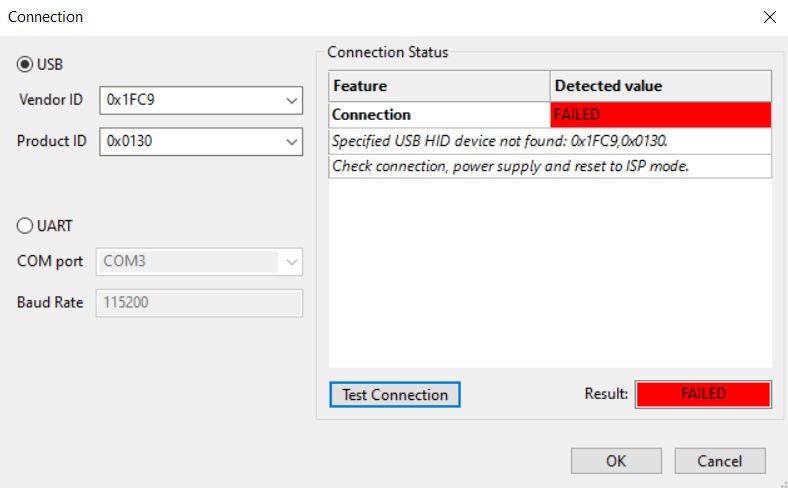
NXP Semiconductors

Chapter 3
Minimum System Requirements
Following are the minimum system requirements for running SEC:
  • Microsoft(R) Windows(R) 10 (64-bit)
  • Mac OS X operating system (10.14.6, 10.15 or later)
  • Ubuntu 20.04 LTS 64 bit, with GNOME and OpenSSL 1.1.1 11 [Sep 2018]
  • 4GB RAM
  • Display with resolution 1024 x 768

                                 MCUXpresso Secure Provisioning Tool v3.1, Rev. 4, 28 July 2021
User Guide                                                                                        10 / 100
NXP Semiconductors
Chapter 4
Terms and Definitions
Table 4. Terms and Definitions
Term Definition
AES Advanced Encryption Standard
AES-128 Rijndael cipher with block and key sizes of 128 bits
BEE Bus Encryption Engine
Block cipher Encryption algorithm that works on blocks of N={64, 128, ...} bits
CA Certificate Authority, the holder of a private key used to certify public keys
CAAM Cryptographic Acceleration and Assurance Module, an accelerator for encryption,
stream cipher, and hashing algorithms, with a random number generator and
runtime integrity checker
CBC Cipher Block Chaining, a cipher mode that uses the feedback between the
ciphertext blocks
CBC-MAC A message authentication code computed with a block cipher
Cipher block The minimum amount of data on which a block cipher operates
Ciphertext Encrypted data
CMS Cryptographic Message Syntax, a general format for data that may have
cryptography applied to it, such as digital signatures and digital envelopes. HAB
uses the CMS as a container holding PKCS#1 signatures.
CSF Command Sequence File, a binary data structure interpreted by the HAB to guide
authentication operations
CST Code Signing Tool, an application running on a build host to generate a CSF and
associated digital signatures
DCD Device Configuration Data, a binary table used by the ROM code to configure the
device at early boot stage
DCP Data coprocessor, an accelerator for AES encryption and SHA hashing algorithms
DEK Data encryption key, a one-time session key used to encrypt the bulk of the boot
image
ECB Electronic Code Book, a cipher mode with no feedback between the ciphertext
blocks
EKIB Encrypted Key Info Block
EPRDB Encrypted Protection Region Descriptor Block
HAB High Assurance Boot, a software library executed in internal ROM on the Freescale
processor at boot time which, among other things, authenticates software in external
memory by verifying digital signatures in accordance with a CSF. This document is
strictly limited to processors running HABv4.
Table continues on the next page...
MCUXpresso Secure Provisioning Tool v3.1, Rev. 4, 28 July 2021
User Guide 11 / 100NXP Semiconductors
Terms and Definitions
Table 4. Terms and Definitions (continued)
Term Definition
Hash Digest computation algorithm
IVT Image Vector Table
KEK Key Encryption Key, used to encrypt a session key or DEK
KeyBlob KeyBlob is a data structure that wraps the key and the counter and the range of
image decryption using AESCTR algorithm
KIB Key Info Block with KEY and IV for AES128-CBC, recall key and IV used in PRDB
wrap and unwrap is defined as key info block
MAC Message Authentication Code. Provides integrity and authentication checks
Message digest Unique value computed from the data using a hash algorithm. Provides only an
integrity check (unless encrypted).
OS Operating System
OTFAD On-The-Fly AES Decryption
OTP One-Time Programmable. OTP hardware includes masked ROM, and electrically
programmable fuses (eFuses).
PKCS#1 Standard specifying the use of the RSA algorithm. For more information, see https://
en.wikipedia.org/wiki/PKCS_1 and https://web.archive.org/web/20051029040347/
http://rsasecurity.com/rsalabs/node.asp?id=2125.
PKI Public Key Infrastructure, a hierarchy of public key certificates in which each
certificate (except the root certificate) can be verified using the public key above
it.
Plaintext Unencrypted data
PRDB Protection Region Descriptor Block, recalls the counter and the range of image
decryption using AES-CTR algorithm
Rijndael Block cipher chosen by the US Government to replace DES. Pronounced rain-dahl.
RSA Public key cryptography algorithm developed by Rivest, Shamir, and Adleman.
Accelerator (including hash acceleration) found on some processors.
SDP Serial Download Protocol, also called UART/USB Serial Download Mode. IT allows
code provisioning through UART or USB during production and development
phases.
Session key Encryption key generated at the time of encryption. Only ever used once.
SHA-1 Hash algorithm that produces a 160-bit message digest
SRK Super Root Key, an RSA key pair which forms the start of the boot-time
authentication chain. The hash of the SRK public key is embedded in the processor
using OTP hardware. The SRK private key is held by the CA. Unless explicitly
noted, SRK in this document refers to the public key only.
UID Unique Identifier, a unique value (such as a serial number) assigned to each
processor during fabrication
Table continues on the next page...
MCUXpresso Secure Provisioning Tool v3.1, Rev. 4, 28 July 2021
User Guide 12 / 100NXP Semiconductors
Terms and Definitions
Table 4. Terms and Definitions (continued)
Term Definition
XIP Execute-In-Place, refers to a software image that is executed directly from its non-
volatile storage location rather than first being copied to volatile memory.
MCUXpresso Secure Provisioning Tool v3.1, Rev. 4, 28 July 2021
User Guide 13 / 100NXP Semiconductors
Chapter 5
Installation
This chapter describes the procedure required to install SEC on Windows, MacOS, and Linux operating systems.
5.1 Windows
To install SEC as a desktop application on a local host, perform the following steps:
1. Visit the NXP website to download the SEC installer for Windows.
2. Double-click the MCUXpresso_Secure_Provisioning_.exe installer to begin installation.
MCUXpresso_Secure_Provisioning_.exe installer.
3. On the first page of the wizard, click Next.
Figure 2. MCUXpresso Secure Provisioning Tool Setup
4. On the End-User License Agreement page of the wizard, select I accept the terms of the License Agreement and click Next.
MCUXpresso Secure Provisioning Tool v3.1, Rev. 4, 28 July 2021
User Guide 14 / 100NXP Semiconductors
Installation
Figure 3. Accepting the end-user license agreement
5. On the Select Installation Folder page of the wizard, select Browse and navigate to a destination folder you want to install
the SEC to and click Next.
MCUXpresso Secure Provisioning Tool v3.1, Rev. 4, 28 July 2021
User Guide 15 / 100NXP Semiconductors
Installation
Figure 4. Selecting installation folder
6. On the Configure Shortcuts page of the wizard, select shortcuts you want to be created for SEC and click Next.
MCUXpresso Secure Provisioning Tool v3.1, Rev. 4, 28 July 2021
User Guide 16 / 100NXP Semiconductors
Installation
Figure 5. Configuring shortcuts
7. On the Ready to Install page of the wizard, select Install.
Figure 6. Ready to install
MCUXpresso Secure Provisioning Tool v3.1, Rev. 4, 28 July 2021
User Guide 17 / 100NXP Semiconductors
Installation
The setup begins the installation.
NOTE
If you want to review or change any of your installation settings, click Back. Click Cancel to exit the wizard.
The installer prompts you when the installation completes.
Figure 7. Installing MCUXpresso Secure Provisioning Tool
8. Click Finish to close and exit the setup wizard.
MCUXpresso Secure Provisioning Tool v3.1, Rev. 4, 28 July 2021
User Guide 18 / 100NXP Semiconductors
Installation
Figure 8. Completing installation
9. To start using SEC, run the tool from the desktop shortcut on desktop or from the Start menu. You can also navigate
to the \bin\ folder and launch the securep.exe or launch the shortcut in the .
5.2 MacOS
To install SEC as a desktop application on a local host, perform the following steps:
1. Visit the MCUXpresso website to download the SEC installer for MacOS.
2. Double-click the MCUXpresso_Secure_Provisioning_.pkg to start the Install MCUXpresso Secure Provisioning
Tool wizard.
NOTE
When you try to open the MacOS installer, you may receive and error. To avoid it, manually select the option Mac
App Store and identified developers in the Security & Privacy menu.
3. On the Introduction page, click Continue.
MCUXpresso Secure Provisioning Tool v3.1, Rev. 4, 28 July 2021
User Guide 19 / 100NXP Semiconductors
Installation
Figure 9. Introduction
4. On the Software License Agreement page, click Continue.
MCUXpresso Secure Provisioning Tool v3.1, Rev. 4, 28 July 2021
User Guide 20 / 100NXP Semiconductors
Installation
Figure 10. Software license agreement
5. Confirm that you have read and agreed to the terms of the Software License Agreement by clicking Agree.
MCUXpresso Secure Provisioning Tool v3.1, Rev. 4, 28 July 2021
User Guide 21 / 100NXP Semiconductors
Installation
Figure 11. Accepting software license agreement
6. On the Destination Select page, click the green arrow to select the installation folder, and once done, click Continue.
MCUXpresso Secure Provisioning Tool v3.1, Rev. 4, 28 July 2021
User Guide 22 / 100NXP Semiconductors
Installation
Figure 12. Select destination
7. On the Installation Type page, click Install.
MCUXpresso Secure Provisioning Tool v3.1, Rev. 4, 28 July 2021
User Guide 23 / 100NXP Semiconductors
Installation
Figure 13. Installation type
8. Type in your login credentials to continue with the installation and click Install Software.
MCUXpresso Secure Provisioning Tool v3.1, Rev. 4, 28 July 2021
User Guide 24 / 100NXP Semiconductors
Installation
Figure 14. Install software
9. Click Continue.
Unless errors are reported, the Summary page confirms that the installation was completed successfully.
10. On the Summary page, click Close.
MCUXpresso Secure Provisioning Tool v3.1, Rev. 4, 28 July 2021
User Guide 25 / 100NXP Semiconductors
Installation
Figure 15. Summary
5.2.1 Enabling USB Connection on MacOS
During the first connection to the target by USB, MacOS X Catalina will block the access to USB HID devices as a security measure
and the operation will fail with error.
Perform the following steps to enable USB connection:
1. In the OS security alert message box, select Open System Preferences.
Figure 16. Open System Preferences
2. Unlock Privacy preferences to enable changes.
3. Select MCUXpresso Secure Provisioning , confirm, and quit the application.
MCUXpresso Secure Provisioning Tool v3.1, Rev. 4, 28 July 2021
User Guide 26 / 100NXP Semiconductors
Installation
Figure 17. Confirm change
4. Lock Privacy preferences.
5. If the application was not closed, close it manually.
6. Start the application and proceed with the operation.
5.3 Linux
You can install SEC on Ubuntu using Ubuntu Software Center. The installation uses the DEB package.
1. Visit the MCUXpresso website to download the SEC installer for Linux.
2. Open the terminal and change the directory where the installer is downloaded, make the installer executable and run
with sudo.
$ cd ~/Downloads
$ chmod +x mcuxpresso-secure-provisioning-_.deb.bin
$ sudo ./mcuxpresso-secure-provisioning-_.deb.bin
If the command executed with sudo is successful, the setup will install the SEC in the dedicated folder /opt/nxp/.
NOTE
Installation prerequisites are necessary due to known Ubuntu bug: https://bugs.launchpad.net/ubuntu/+source/
gnome-software/+bug/1573408.
MCUXpresso Secure Provisioning Tool v3.1, Rev. 4, 28 July 2021
User Guide 27 / 100NXP Semiconductors
Chapter 6
User Interface
SEC offers a simple and user-friendly user interface. It consists of the Menu bar, Toolbar, and three main views accessible through
tabs: Build Image, Write Image, and Keys Management. The bottom part of the interface is occupied by the Log window.
Figure 18. SEC user interface
6.1 Menu and Settings
6.1.1 Menu Bar
The Menu bar contains several drop-down menus offering various application, configuration, and file-related functions.
File General workspace and configuration-related operations
New Workspace … Create a new workspace. You will be prompted to specify its location and choose from the
supported processors. In the case the location already contains a workspace, the workspace
will be opened and not created. For more information, see Workspaces.
Select Workspace ... Switch to another workspace. You will be prompted to specify which workspace to open. For
more information, see Workspaces.
Save Settings Save the current workspace settings.
Recent Workspaces Display a list of recently used workspaces. For more information, see Workspaces. Number
of displayed workspaces can be customized in Preferences.
Generate Scripts Generate the build and write scripts for all operating systems according to the configuration.
The scripts are generated into the workspace.
Preferences Open the Preferences dialog. For more information, see Preferences.
Exit Exit SEC.
Target Target device-related operations
MCUXpresso Secure Provisioning Tool v3.1, Rev. 4, 28 July 2021
User Guide 28 / 100NXP Semiconductors
User Interface
Connection ... Open the Connection configuration dialog. For more information, see Connection.
Tools List of additional tools
Manufacturing Tool Open the Manufacturing Tool. For more information, see Manufacturing Tool.
Help User help and additional general information
Contents Open the User Manual.
About Display information about the current version.
6.1.2 Preferences
The Preferences dialog contains various settings applicable the whole SEC.
Currently, the following options are available:
Timeout for communication Represents a delay (in seconds) after which the ROM bootloader or flashloader will be ready after
re-established after reset reset of the processor. The read value may be affected by configuration of your host. The selected
(flashloader to be value may affect the generated write script.
initialized) [sec]:
Maximal number of recent Customize maximal number of recent workspaces displayed in File>Recent Workspaces.
workspaces displayed in Supported range 1 - 25. Default value: 9.
File menu
Read current values Choose how the reading of device values on opening the OTP Configuration is handled.
after OTP Configuration Following options are available:
is opened
never Don't read the values automatically
ask Confirm the reading manually
always Automatically read device values
Use restricted data Enables the use restricted data for selected processor. The checkbox is enabled only if restricted
from directory: data are installed for the selected processor.
Install Restricted Data ... Install restricted device data for use in OTP Configuration. The data are installed from a ZIP
archive. SEC first verifies whether selected data are compatible with the current tool and if yes, the
data are copied into SEC installation folder. Restart SEC to start using the data.
NOTE
Restricted data are only available for download from the NXP webpage after
signing a Non Disclosure Agreement. Restricted data are currently available for
RT10xx and RT11xx devices only.
6.1.3 Workspaces
All files generated by the tool are stored in a dedicated folder structure called a workspace.
A workspace is a practical concept for operating with multiple boards, devices, or executables signed with different sets of keys.
Workspace is always created for a specific device family. Once created, it can only be used to modify the configuration of devices
belonging to that family.
To create a new workspace, select File>New Workspace ... from the Menu bar.
MCUXpresso Secure Provisioning Tool v3.1, Rev. 4, 28 July 2021
User Guide 29 / 100NXP Semiconductors
User Interface
Figure 19. Creating a new workspace
To switch to a different workspace, select File>Select Workspace ... from the Menu bar and choose from the Open
Workspace dialog.
To switch to a recently used workspace, select File>Recent Workspaces from the Menu bar and choose from the list.
Figure 20. Selecting a recent workspace
The workspace contains multiple sub-folders, some specific to device families:
root folder Contains the following:
MCUXpresso Secure Provisioning Tool v3.1, Rev. 4, 28 July 2021
User Guide 30 / 100NXP Semiconductors
User Interface
• Last configuration of the tool in file spt_settings.json.
• Build and write scripts.
• Build and write JSON files containing all parameters used to generate the build and write
scripts.
• Log for all executed commands, recorded in file log.txt.
source_images Primarily intended as a folder to store input images provided by users. Also used by the tool to
store input images, if input format conversion is needed.
bd_files Generated command files used by elftosb during bootable image generation step (elftosb input).
backups Backup of old keys/crts after importing or generating new ones
bootable_images Intermediate and final bootable images (elftosb output). The nopadding binary starts at the
address IVT, while the regular binary includes everything from the beginning of the boot device.
configs (RT10xx, RT11xx) Configuration files - OTFAD config file (JSON), BEE user keys config file (JSON)
crts, keys Generated certificates and their corresponding keys.
gen_bee_encrypt BEE user key files created during the build image step for XIP encrypted boot types. The keys
(RT10xx) are used to burn SW_GP2/GP4 fuses during the image write step.
gen_hab_encrypt DEK key files generated by CST tool. The DEK key file is used during write image to generate
(RT10xx, RTxxx) key blob for Encrypted HAB boot type.
dcd_files (RT10xx, DCD files included in the build image step.
RT11xx)
gen_hab_certs (RT10xx, Output Super Root Key table and hash (srktool output). The table is programmed along with the
RT11xx) bootable image. The hash is programmed in platform fuses.
trustzone_files TrustZone-M configuration files (JSON or BIN) used by elftosb during bootable image generation
(LPC55Sxx, RTxxx) step (elftosb input).
gen_sb (LPC55Sxx, CMPA and CFPA pages (BIN) used to configure secure boot pages, and SB KEK keys (BIN and
RTxxx) TXT) for the key store.
gen_scripts Temporary scripts for tool operation.
6.1.3.1 Sharing and Copying Workspaces
It's recommended to store all used files in the workspace. The "spt_settings.json" file contains all paths relative to the workspace
root folder, so if you open settings on another computer, you can still re-generate all scripts.
In case the script needs to be executed on another computer without re-generation, it uses environment variables to specify SEC
installation directory and workspace. These environment variables can be specified externally, or if not specified, the default value
will be used.
Remember that these variables are used in build and write scripts, but can't be used in configuration files (BD, JSON, and so on).
The configuration files must be updated manually.
6.1.4 Toolbar
The Toolbar offers a quick selection of basic settings.
Figure 21. Toolbar
MCUXpresso Secure Provisioning Tool v3.1, Rev. 4, 28 July 2021
User Guide 31 / 100NXP Semiconductors
User Interface
Processor Click the button to switch the processor. You can switch to a processor from the same device family only. To select
a processor from a different family, create a new workspace.
Boot Type Choose the type of secure boot. The list depends on device capabilities of currently selected processor.
Boot Device Choose the target memory where the device will boot from. Use the Edit button to open the Boot Device
Configuration dialog. For more infomation, see Boot Device Configuration.
Connection Choose the connection to the target. This release supports UART and USB-HID connectivity. Click the button to
customize connection details. For more information, see Connection.
6.1.5 Connection
The Connection dialog allows you to select the connection type and test it.
The dialog is accessible from Target > Connection from the Menu bar or from the Toolbar.
Figure 22. Connection dialog with errors and proposed next steps
It contains the following options:
USB Specify USB connectivity to the specified Vendor ID/Product ID pair.
UART Specify UART connectivity through the specified port and baud rate.
Use the Test Connection function to quickly verify that the device can be properly accessed with given configuration. To ensure
a successful detection of the processor with Test Connection make sure of the following:
• The board is correctly powered up
• The board is properly configured to ISP (In-System Programming) mode
• The board is connected through the USB OTG port or UART
Connection dialog detects following parameters:
MCUXpresso Secure Provisioning Tool v3.1, Rev. 4, 28 July 2021
User Guide 32 / 100NXP Semiconductors
User Interface
Connection Status of the selection communication device (USB or serial port).
Mode Communication mode bootloader or flashloader aplication.
Processor Match if connected processor matches the selected one, No match otherwise.
Security Security level which was detected in the connected processor.
For RT10xx/RT11xx it reports if HAB is enabled.
For RTxxx it reports if SECURE_BOOT is enabled (in fuses) or DCFG_CC_SOCU enabled.
For LPC55Sxx it reports if PFR is sealed.
Following connection results are possible:
Not tested yet Use the Test Connection button to run tests.
OK Connection successfully established.
FAILED Connection tests failed. For details, see Connection Status. If the connection detection fails, SEC tries to detect
additional processors connected to the computer. This may help to find a wrong SEC configuration, such as
wrongly selected processor or wrongly selected VID/PID. In case you need more information about the failure,
you can use SEC in verbose mode and see the console view with details of the operation.
6.1.6 Boot Device Configuration
The Boot Device Configuration dialog contains initialization parameters. Content of the dialog depends on the selected
boot device.
Figure 23. Boot Device Configuration for NOR flash
MCUXpresso Secure Provisioning Tool v3.1, Rev. 4, 28 July 2021
User Guide 33 / 100NXP Semiconductors
User Interface
Figure 24. Boot Device Configuration for SD card
Figure 25. Boot Device Configuration for SEMC NAND (RT11xx)
NOTE
Configuration of SEMC/NAND boot device can result in fuses burn. In such case the burn fuses confirmation dialog
is shown during the write image operation.
The tool includes preconfigured templates for NXP evaluation boards. They can be selected from the Toolbar for quick access.
MCUXpresso Secure Provisioning Tool v3.1, Rev. 4, 28 July 2021
User Guide 34 / 100NXP Semiconductors
User Interface
6.2 Build Image
In the Build image view, you can transform a development image into a bootable format compatible with the device of choice.
Certain options are device-family specific.
Figure 26. Build image (RT10xx)
Source executable Choose the input executable file. The format can be ELF (compatible with MCUXpresso IDE and
image (all devices) IAR), S-Record or plain binary or HEX file. For Keil μVision, it's recommended to use HEX format,
because MDK ELF format without debug symbols can't be used. For RT10xx only, you can also use
a bootable image with header.
Start address (all Base address of the image. Applicable only to binary image. For ELF and S-Record and HEX file,
devices) this is detected automatically.
XIP: yes/no Whether the selected source image is built as "eXecuted In Place", and will be executed from boot
device, where it is stored. If not, the image must be copied to RAM before the execution. The
information is derived from the starting address of the image and compared with memory address
of selected processor, so the result might not be correct if selected image does not match selected
processor.
Use custom bootable Name of the generated bootable image file and its location. If not specified, the tool will name the
image path (all image based on the input. File extension is specific for processor and boot type, it's either BIN for
devices) bootable images or SB for SB capsules.
DCD (Binary) Selection, what Device Configuration Data shall be included in the bootable image. Option From
(RT10xx, RT11xx) Source Image can be used only if source image contains DCD. The DCD enables early configuration
of the platform including SDRAM. MCUXpresso Config Tools can generate a DCD in a compatible
format. If the target processor does not support DCD files, the checkbox is disabled. For more
information, see Creating/Customizing DCD files.
TrustZone pre- Allows you to enable TrustZone features. Following selection is possible:
configuration
• Disabled - Default. Disables TrustZone.
(LPC55Sxx, RTxxx)
• Enabled (preset) - Enables TrustZone with preset data.
• Enabled (custom data) - Enables TrustZone with custom TrustZone-M data loaded from
specified location. Overwrites preset data. JSON and BIN files supported. JSON data can be
MCUXpresso Secure Provisioning Tool v3.1, Rev. 4, 28 July 2021
User Guide 35 / 100NXP Semiconductors
User Interface
generated in and exported from the TEE tool of MCUXpresso Config Tools. BIN file is created
by elftosb utility. For more information, see TrustZone Pre-configuration File.
Use the following keys Sign and optionally encrypt the image with the specified root of trust key chain (SRK1..4) (RT10xx/
(all devices) RT11xx) or ROT1..4: IMG (LPC55Sxx, RTxxx). This option is only applicable to authenticated and
encrypted boot modes and offers selection of keys generated in the Keys Management view.
XIP Encryption (BEE Open the configuration dialog of XIP Encryption user keys. Option enabled only for XIP Encrypted
User Keys) (RT10xx) (BEE User Keys) Authenticated and XIP Encrypted (BEE User Keys) Unsigned boot types.
OTFAD Encryption Open the configuration dialog of OTFAD Encryption. Option enabled only for OTFAD Encrypted boot
(RT11xx, RTxxx) types.
Key source Key source for signing the image. LPC55Sxx devices limited to KeyStore.
(LPC55Sxx, RTxxx)
User key (LPC55Sxx, For OTP key source master key used to derive other keys. For KeyStore user key used to sign the
RTxxx) image. Only available for Signed boot types.
SBKEK (LPC55Sxx, Key used as key encryption key to handle SB2 file. Only enabled when Key source is KeyStore.
RTxxx) Only available for secured boot types. For LPC55Sxx devices, the key store is initialized only once
in device life cycle and after that any change in SBKEK will cause failure to load SB file into the
processor. For more information, see Key Store.
PRINCE Regions Open configuration window for encrypted PRINCE regions.
(LPC55Sxx)
6.2.1 Source Image Formats
SEC supports several formats for source image: ELF, HEX, BIN or SREC/S19. The image format is then unified into format
required by the build script, and this conversion is done inside SEC (prior build script is called). It's recommended to avoid
conversion and use format needed for the build.
By default, the source image may not contain any boot header. For RT10xx, bootable image can be used too; such image is parsed
and if contains DCD or FCB sections, these parts can be reused to build new bootable image. Once bootable image is selected
and parser accepts the image, the tool offers to reuse specific parts and if confirmed, the configuration is updated.
Figure 27. Configuration Helper
6.2.2 TrustZone Pre-configuration File
TrustZone and related features of the MCU can be pre-configured by data from application image header at boot time instead of
setting the registers from the application code. TEE (Trusted Execution Environment) tool from MCUXpresso Config Tools allows
you to export the TZ-M preset data for use in SEC. Follow these steps to modify the existing example application, export the TZ-M
file and add it into the application image.
MCUXpresso Secure Provisioning Tool v3.1, Rev. 4, 28 July 2021
User Guide 36 / 100NXP Semiconductors
User Interface
NOTE
TrustZone feature is available only for LPC55Sxx and RTxxx devices.
To create, export, and import a TrustZone file, do the following:
1. Open an SDK example:
a. From MCUXpresso IDE:
i. In the Quickstart panel, select Import SDK example(s)....
ii. Select the example to import.
iii. InProject Explorer, open the context menu of the imported secure project.
b. From MCUXpresso Config Tools:
i. On start, select Create a new configuration and project based on an SDK example or hello world project.
ii. Clone one of the TrustZone enabled (secure) projects.
2. Open the TEE tool:
a. In MCUXpresso IDE:
i. In the Menu bar, select MCUXpresso Config Tools > Open TEE.
b. In MCUXpresso Config Tools
i. Select TEE tool from the Config Tools Overview.
3. In Security Access Configuration>Miscellaneous, use the Output type drop-down list to select ROM preset.
4. Configure security policies of memory regions as you see fit (for details, see MCUXpresso Config Tools User Guide).
5. In Menu bar, select File>Export>TEE Tool>Export Source Files.
6. In the Export window, specify the JSON file download folder and select Finish.
7. Remove the BOARD_InitTrustZone() call from the SystemInitHook(void) function and tzm_config.h include located in the
main application file (for example, hello_world_s.c)
Alternatively, basic TZ-M-preset JSON data included within the SEC layout can also be used as a starting point template for futher
modifications of TrustZone pre-configuration. Device-specific template files are provided in the data\targets\LPC55S##\ sub-
folder.
NOTE
The TrustZone template contains all registers/options with default preset values. Because SAU and AHB are
disabled in the template, it's expected that the template will be customized before use.
Once the JSON file has been downloaded, you can import it in SEC:
1. In the Menu bar of SEC, select File>Select Workspace ... and choose a LPC-specific workspace. Alternatively, create a new
one by selecting File>New Workspace ....
2. In the Build image tab, switch the Boot type to Signed or Unsigned with CRC.
3. Use the TrustZone pre-configuration drop-down list to select Enabled (custom data).
4. Click Browse to navigate to the location of the stored JSON file and select Open to import it.
6.3 Write Image
Use the Write image view to write an image into boot device and burn platform fuses in order to achieve a secure boot. Certain
options are device family-specific.
MCUXpresso Secure Provisioning Tool v3.1, Rev. 4, 28 July 2021
User Guide 37 / 100NXP Semiconductors
User Interface
Figure 28. Write image (LPC55Sxx)
Use built image (all devices) If checked, the output of the Build Image operation will be used for write.
Bootable image Path to the image that will be written into the target device. File extension is specific for processor
(all devices) and boot type, it's either BIN for bootable images or SB for SB capsules. For RT processors, the
binary image must be in "nopadding" form without FCB header.
Additional Files (all devices) Display input files for Write Image operation. Contents depend on processor, boot type, and other
build options. By default, contents are output files of the Build Image operation. You can manually
replace each file with a custom file using the Import button.
XIP Encryption (BEE Open configuration window of BEE OTP Master Key.
OTPMK) (BEE OTPMK
boot type, RT10xx)
Enable security (all devices) Check to enable that the security configuration fuse will be burned during programming of the
boot image. Once this is done the board will only accept authenticated images when booting from
internal memory. Double-check that all settings are correct before checking this box. Mutually
exclusive with Use Shadow Registers (RTxxx only).
Use Shadow Use shadow registers of the target device instead of fuses. This checkbox is not interactive, it's
Registers (RTxxx) selected automatically for RTxxx processors if Enable security is de-selected.
Start FlashLoader Allows you to initialize and start flashloader on the connected processor. If security is enabled
(RT10xx, RT11xx) in the chip, the signed flashloader is created automatically. Useful if you want to use blhost
from command-line.
OTP Configuration Open the One Time Programmable Configuration dialog. For more information, see the OTP
(RT10xx, RT11xx, RTxxx) Configuration section.
MCUXpresso Secure Provisioning Tool v3.1, Rev. 4, 28 July 2021
User Guide 38 / 100You can also read