Creating Accessible iTunes U Content
←
→
Page content transcription
If your browser does not render page correctly, please read the page content below

Creating Accessible iTunes U Content                                                                         1

Creating Accessible iTunes U Content

By The Carl and Ruth Shapiro Family
National Center for Accessible Media,
WGBH Educational Foundation

© 2009 The Carl and Ruth Shapiro Family National Center for Accessible Media, WGBH Educational Foundation.
All rights reserved.

Creating Accessible iTunes U Content                                     2

     Contents
3    Introduction
3    Part 1: Understanding Accessibility and iTunes Multimedia
 3   1.1: Overview of Terms and Concepts
 5   1.2: Benefits of captions and audio descriptions
 6   1.3: Accessible PDF documentation
 6   1.4: Tools for creating accessible iTunes materials
8    Part 2: Creating Captions for iTunes Multimedia
 9   2.1: Captioning method
10   2.2: Appearance and position of captions on the screen
15   2.3: Considerations for writing captions
15   2.4: Creating SCC closed captions
16   2.5: Using QuickTime to add SCC captions to video clips
18   2.6: Using Compressor to add SCC captions to video clips
19   2.7: Adding QTText captions to video clips
21   2.8: Displaying QTText captions over a transparent background
22   2.9: Displaying QTText captions over a translucent background
24   2.10: Adding SCC captions to audio clips
27   2.11: Adding QTText captions to audio clips
30   Part 3: Adding Foreign-Language Subtitles to iTunes Multimedia
30   3.1: Adding QTText subtitles to iTunes multimedia
30   3.2: Adding closed subtitles to iTunes multimedia
35   Part 4: Creating Audio Descriptions for iTunes Multimedia
35   4.1: Integration of descriptions into multimedia
35   4.2: Considerations for writing descriptions
36   4.3: Description method
37   4.4: Sample method of recording descriptions
38   4.5: Adding open descriptions to video: full-mix audio
40   4.6: Adding closed descriptions to video: full-mix audio
40   4.7: Adding closed descriptions to video: description-only track
41   4.8: Adding closed descriptions that are accessible using system menus
45   4.9: Embedding extended descriptions in video
47   Part 5: Creating Accessible iTunes U Documentation
48   5.1: Tools for creating accessible source documents
49   5.2: Creating source documents that will convert to accessible PDF
56   5.3: Creating accessible PDFs when no source document is available
62   Appendix 1: Adding Wired Sprites to Control Captions and Descriptions
65   Appendix 2: Turning SCC Closed Captions On and Off
66   Appendix 3: Caption Support in Apple Products
67   Appendix 4: Closed Captioning and Audio Description Resources
68   Appendix 5: General Resources
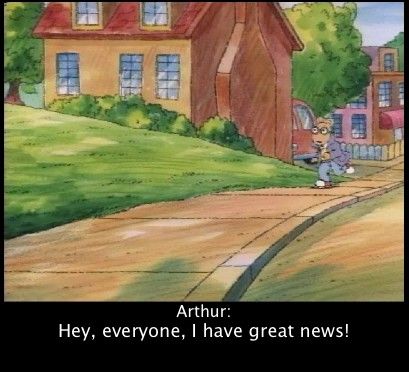
Creating Accessible iTunes U Content                                                      3

Creating Accessible iTunes U Content
Introduction
With iTunes U, students, educators, and the public have anytime, anywhere access
to a continually growing and comprehensive collection of free educational media that
includes movies, audio files, and PDFs. By taking the steps to make these media
files fully accessible, iTunes U content providers will ensure that all students and
others can fully benefit from these valuable educational resources.
This guide will teach you how to make your iTunes U materials accessible for those
people who are deaf, hard of hearing, blind or visually impaired. After a brief review
of accessibility and access technology, you will learn how to add captions, foreign-
language subtitles and audio descriptions to multimedia playable in iTunes and
QuickTime Player, as well as mobile devices such as iPhone and iPod. You’ll also
learn how to create accessible PDF documents to support the multimedia on your
iTunes U site.

Part 1: Understanding Accessibility and iTunes Multimedia
1.1: Overview of Terms and Concepts
Before learning how to create accessible iTunes materials, it will be helpful to define
terms and concepts relevant to accessible multimedia in iTunes.
Captions
Captions were originally invented nearly 40 years ago to help deaf and hard-of-
hearing people understand television, but they are in fact useful to everyone.
Captions are always written in the same language as the audio. They not only render
the main audio track (known as program audio) as text on the screen, they also
indicate important non-speech information, such as sound effects, music and
laughter. In some countries they are called subtitles, which is not the same as
foreign-language subtitles (see below).
Captions are either closed or open. Closed captions are transmitted as data along
with the video but are not visible until the user elects to turn them on, usually by
invoking an on-screen control or menu selection. Open captions are always visible;
they have been merged with the video track and cannot be turned off. The rules and
regulations related to closed captions can be found on the Federal Communications
Commission’s website.
SCC captions
The SCC (Scenarist Closed Caption) file format is a human-readable representation
of the actual line-21 closed-caption data carried in the NTSC broadcast signal. Data
in the SCC format are closed captions that can be embedded into iTunes-compatible
video or audio files, and can be decoded by QuickTime Player (7.1.6 or greater),
iTunes (7.4 or greater), iPhone, iPod touch and iPod nano. These devices offer a
menu choice or an on-screen switch to toggle the caption text on and off. SCC
captions cannot be styled by the author; that is, their display characteristics (font
face and size, background color, background opacity, etc.) are determined by a
combination of the caption data and the playback device.
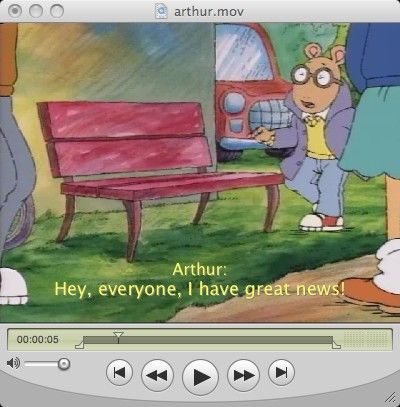
Creating Accessible iTunes U Content                                                  4

Below is an image of SCC captions being played in iTunes. You can also watch a
brief video clip with SCC captions.

QTText captions
QTText is a text format from Apple used primarily for creating and displaying captions
and foreign-language subtitles. They can be open or closed (see Part 1.5 for
important information), and nearly all display characteristics of QTText captions can
be specified by the author: font face, size, weight, color, etc. The caption region (the
box in which the captions are displayed) can have a solid background, a translucent
background or a transparent background, and can be placed directly over the video
region or adjacent to the edges of the video region. In most cases, QTText captions
integrated into iTunes multimedia will be open. Below is an image showing one
example of QTText captions. You can also view a brief video clip with QTText
captions.

Creating Accessible iTunes U Content                                                       5

Foreign-language subtitles
Foreign-language subtitles are a translation of dialog or narration into words on the
screen. Unlike captions, subtitles are not strictly intended for use by deaf or hard-of-
hearing viewers and so do not contain non-speech elements. In iTunes multimedia,
subtitles can be created using QTText. QuickTime Player, iTunes and iPhone also
have a built-in menu to toggle between multiple subtitle tracks when the text has
been encoded in a special manner; see Part 3.2 for details.
Audio descriptions
Audio descriptions (also known as video descriptions or simply descriptions) make
visual media accessible to people who are blind or visually impaired by providing
descriptive narration of key visual elements. These elements include actions,
costumes, gestures, scene changes or any other important visual information that
someone who cannot see the screen might ordinarily miss. Descriptions are usually
timed and recorded to fit into natural pauses in the program-audio track. Watch a
brief video clip with audio descriptions.
As with captions, descriptions can be open or closed. Open descriptions are
merged with the program-audio track and cannot be turned off by the viewer. In most
cases, descriptions integrated into iTunes multimedia will be open. Closed
descriptions can be recorded as a separate track containing descriptions only,
timed to play at specific spots in the timeline and played in parallel with the program-
audio track. Authors may also include two program-audio tracks within a single
movie—one with descriptions and one without. See Part 1.5 for important information
about accessing closed descriptions in iTunes U multimedia.
Screen reader
A screen reader locates information seen on the computer screen and vocalizes it
using speech synthesis software. A screen reader application is purchased
separately and added to a computer to enable it to be used by people who are
blind and visually impaired. Mac OS X comes with a built-in screen reader,
VoiceOver; Windows screen readers are third-party devices that must be purchased
and installed by the user. Screen readers are available for desktop and laptop
computers as well as certain mobile devices, including iPhone 3GS. Similarly, both
iPod nano and iPod shuffle make use of speech synthesis technology (via spoken
menus and VoiceOver, respectively) to navigate menus and playlists without sight.

1.2: Benefits of captions and audio descriptions
Both captions and audio descriptions are useful to a wide array of users in addition
to their originally intended audiences. Groups who benefit include, but are not limited
to, the following:
• Anyone in a noisy environment, or an environment where loud volume is not
  appropriate. Gyms, bars and restaurants regularly employ captions as a way for
  patrons to watch television while in those establishments.
• People learning to read or learning English as a second language. Research has
  shown that captions help reinforce vocabulary and language.
• Students grappling with difficult materials or concepts. Audio descriptions can be
  used to give supplemental information about what is on screen—the structure of
  lengthy mathematical equations or the intricacies of a painting, for example.
Creating Accessible iTunes U Content                                                      6

• The aging population. As a large portion of the population grows older, both
  captions and audio descriptions could become important for people who develop
  sensory disabilities that accompany the aging process.
• Researchers. Captions can provide a powerful search capability, allowing users to
  search the caption text to locate a specific video or an exact point in a video.

1.3: Accessible PDF documentation
iTunes U allows you to upload not just audio and video materials; it also supports
PDF documentation. PDF is a popular format from Adobe that preserves the fonts,
images, graphics and layout of nearly any source document. This ensures that users
will see the finished document exactly as the author intended.
PDFs can be created so that people with disabilities can access them. In order for
PDFs to be accessible, they need to be created using properly structured tags,
appropriate alternative information where necessary (e.g., image tags must contain
alt text), and the tags must reflect the proper reading order. If a document is created
with this in mind, it can be successfully accessed using a screen reader or other
assistive technology.
Screen-reader users are especially affected by the way in which the PDF is created,
so it is crucial that PDFs be authored to be accessible by everyone. A PDF that
hasn’t been made accessible can be difficult or even impossible for a blind or visually
impaired user to navigate. A variety of tools and techniques exist to create accessible
PDFs, but authors must be careful to observe the approaches outlined in Part 5 to
ensure that the document is usable by everyone.

1.4: Tools for creating accessible iTunes materials
If you’re new to iTunes U, start by visiting the iTunes U site for general information
and links to discussion forums and support materials. “Creating Your iTunes U Site”
from Apple Education will give you basic information about how to build your first
iTunes U site. If you aren’t sure what video and audio formats are compatible with
iTunes U, or have never created video or audio clips before, read “Creating Content
for iPod + iTunes” from Apple Education before proceeding any further.
Below is a basic list of applications and support materials you’ll need to make your
iTunes U materials accessible.
Multimedia:
• Captioning software (see Part 2, Table 1)
• QuickTime Player Pro 7.X
• A text editor (such as TextEdit or NotePad)
• Audio-recording software, such as QuickTime, GarageBand, Audacity, Logic or
  Sound Forge
Creating Accessible iTunes U Content                                                     7

PDF:
• Adobe Acrobat 9 Pro
• A screen reader such as Jaws, Window-Eyes or VoiceOver
Other software may be necessary for certain procedures (for example, adding closed
subtitles for playback on iPhone or adding wired sprites for toggling captions or
descriptions on and off from within QuickTime and iTunes). These applications are
discussed in the documentation.
Note: Using wired sprites. Wired sprites are QuickTime tracks that add interactivity to
a presentation. For accessibility purposes, wired sprites can be used for turning
audio descriptions or QTText captions on and off. The process of integrating them
into a multimedia presentation is described in Appendix 1. If you’ve never seen them
before, watch a sample video containing wired sprites.
The use of wired sprites is included in this document for the sake of completeness,
but they may not be appropriate for all situations. It is important to note that wired
sprites can be operated only in QuickTime Player or iTunes. They cannot currently
be used on iPhone or iPod. If you choose to put movies containing wired sprites in
iTunes U, therefore, you should make it clear to the user that the sprites can only be
operated on specific players.

Creating Accessible iTunes U Content                                                   8

Part 2: Creating Captions for iTunes Multimedia
Writing captions is not necessarily a difficult task, but it does require some
forethought and planning. This section will provide you with information on choosing
and implementing a caption format, budgeting time and when to consider having an
outside vendor create the caption files for you.
Captions should be added to a presentation once the video and audio elements have
been completed. Waiting to author captions until the end of the production process
will ensure that they accurately reflect the program audio. If you must re-edit the
video or audio after the captions have been created, you may have to re-edit the
captions as well.
iTunes U multimedia supports two caption formats: SCC and QTText. Both are
explained in detail below; see Part 1.1 for a general discussion about the differences
between the two. Broadly speaking, the SCC format is best for implementing closed
captions, and QTText is best for open captions and foreign-language subtitles.
QTText can also be used to display closed captions, but you must create a wired
sprite to turn the captions on and off. See Part 1.5 for more information about wired
sprites.
In many ways, closed captions offer the best experience for all viewers because they
are hidden unless explicitly revealed by the user. Open captions are suitable in
situations where the author needs control over specific characteristics of the text
(color or font face, for example), or when the most effective option is to simply
always have the captions visible. Provided the text accurately reflects the audio and
is clearly displayed, however, both closed and open captions work equally well to
make multimedia accessible to deaf and hard-of-hearing viewers.
When developing a workflow for a project, remember to include enough time to write
captions and integrate them into the final presentation. How much time is required
will, of course, vary with each project. For example, a 10-minute documentary-style
clip will probably take less time to caption than a clip of the same length but with
multiple speakers and frequent shot changes. How much experience the author has
in writing captions will also affect the timeline: someone new to the process may take
several hours more to create the data than someone familiar with the process. To
save production time, select and learn to use captioning software before you
actually need to caption your multimedia.
Before creating your own captions, learn about iTunes-compatible file formats by
reading “Creating Content for iPod + iTunes” from Apple Education. Captions can be
created using a number of different software packages. The table below shows
several currently available applications.

Creating Accessible iTunes U Content                                                     9

Table 1: Caption-creation software

Name                OS            Cost         Media formats       Output

Annotation Edit     Mac OS X      $300;        MOV, MP4, M4V,      SCC, QTText, others
                                  free demo    others

CapScribe           Mac OS X      Free         MOV, MP4, AVI       QTText, others

Hi-Caption          Windows       Varies       AVI, MOV, others    QTText, RealText,
                                                                   SAMI, others

MAGpie              Mac OS X,     Free         MOV, AVI, WMV,      QTText, RealText,
                    Windows                    RM                  SAMI, DFXP, plain
                                                                   text

MacCaption,         Mac OS X,     Varies       Tape, MOV, MP4,     Broadcast formats
CaptionMaker        Windows                    others              plus QTText, SCC,
                                                                   others

MovCaptioner        Mac OS X      $25          MOV, MP4, M4V,      SRT, QTText, others
                                               others

Subtitle Workshop   Windows       Free         AVI, WMV, others    SRT, QTText, others

2.1: Captioning method
Providing synchronized captions is significantly different from merely providing a text
transcript of the audio portion of the presentation. (However, a text transcript is
always recommended in addition to captions. Transcripts provide an easy way to
scan a video’s script or to search for particular terms. In iTunes, they can be
uploaded as accessible PDF documents or included as metadata that travels with
the clip itself. See below for details.)There are a number of applications you can use
to create captions; several are shown in Table 1, above. Specific caption-creation
processes will vary depending on the software used; however, the general workflow
can be described as follows.
Enter caption text into the editor
Caption text can be entered by transcribing directly into the editor or, in many cases,
by importing an electronic script. The latter is generally more efficient than the
former, but this may vary depending on the application.
Edit and break text into captions
Once you have entered text into the caption editor, you can edit as necessary,
correct spelling errors and divide or combine blocks of text to create smaller or larger
captions. Normally, each caption will contain one, two or three rows of text.
Time the captions
Once the text has been edited and formatted, you’ll assign a timecode to each
caption that indicates when it will appear or disappear from the screen. How you do
so will depend on the software you’re using, but it’s generally as simple as pressing
a button on the keyboard or clicking one on-screen. In most cases you’ll find that one
caption will follow another without pause, but you will also have the option to erase
the caption display when there is a break in the narration or dialog.
Creating Accessible iTunes U Content                                                   10

Review your work
Misspelled or poorly edited and timed captions will only make it harder for the viewer
to keep up with what’s happening on-screen, so accuracy in captioning is
paramount. In most caption-editing software, you’ll be able to make changes to both
text and timing as you spot errors. If possible, have someone else review your work
when you are done.
Export a caption file and add the captions to the video
When you’re satisfied with your work, your captioning software will allow you to
export the captions in various formats. In iTunes, you can use either QTText or SCC.
See the next section for details on adding the captions to the video itself.
Create a transcript
Once you’re finished captioning your video, create a transcript and upload that to
iTunes U along with the video. Transcripts are useful for everyone: before taking the
time to download a video, a user can scan the transcript to see if the video is worth
retrieving. They’re also searchable, can be printed or e-mailed and can be used as a
reference tool.
Transcripts can be supplied as accessible PDFs; be sure to read Part 5 before you
upload the file. They can also be added as metadata using the Lyrics pane; read
“Creating Content for iPod + iTunes” to learn how to paste text into the Lyrics pane
for this purpose.
2.2: Appearance and position of captions on the screen
What captions look like in iTunes multimedia will depend on the format you choose.
SCC closed captions look very similar to NTSC broadcast closed captions, and
characteristics such as font face, size or background are determined by the device
decoding the caption data. They are always positioned over the video region, and
the author can choose to place them on the screen in various locations (e.g., left,
right, center, top, bottom) to indicate who is speaking or to avoid covering important
on-screen graphics or action. Finally, they can display a maximum of 32 characters
per caption row. QuickTime Player, iTunes, iPhone and iPod nano can decode SCC
captions; all offer a convenient built-in interface to turn the captions on and off (see
Appendix 2). Here’s a picture of SCC captions playing in iTunes:
Creating Accessible iTunes U Content                                                  11

If you want complete control over font characteristics, QTText captions can be
created in nearly any font (keep in mind that some fonts are more readable as
captions than others), color, weight or size. In most cases, however, authors use a
light-colored font over an opaque (black) background, as demonstrated in the
images below.
Creating Accessible iTunes U Content                                               12

The position of the caption region (the box in which the captions are placed) can also
vary. Most authors will place the caption region adjacent to the bottom edge of the
video region, as shown in the images above. However, QTText captions can also be
positioned in an opaque region directly over the video, as shown below.

They can also be placed over the video in a translucent region, which allows viewers
to see a bit of the movie behind the caption background...
Creating Accessible iTunes U Content                                                13

...or in a transparent region over the video, which makes the captions appear to float
over the video, as shown below.

Finally, the placement of QTText captions within the caption region is variable. In
many cases, authors will place the captions in the center of the region, as seen here.
Creating Accessible iTunes U Content                                               14

You can also move the captions to one side to indicate who is speaking:

Or you can leave them in the center and simply identify who is speaking:

In most cases, QTText captions integrated into iTunes multimedia are open—that is,
they are merged with the video track and cannot be turned off. If you want QTText
captions to be closed, you’ll need to create a wired sprite to add a custom caption-
toggle interface to the movie (see Appendix 1 as well as Part 1.5). Wired sprites can
be operated only when the movie is played using QuickTime or iTunes. A movie with
wired sprites cannot be used on iPod.
Creating Accessible iTunes U Content                                                  15

2.3: Considerations for writing captions
Captions are not difficult to create, but caption writing can be time-consuming,
especially for those new to the process. For example, someone with experience
might be able to write, edit, review and output captions for a 10-minute clip in
approximately 45 minutes, whereas the same clip captioned by a new user might
take 2 hours or more to create. The speed at which a clip can be captioned will vary
depending on a number of factors, such as the author’s typing speed and command
of English. An electronic script or transcript of the program audio, which is usually
prepared as part of the general production process, is a valuable time-saver because
it can be imported into most captioning applications, thereby eliminating the need to
transcribe the audio from scratch.
Someone with excellent writing, spelling and listening skills can write captions.
Captioners should have adequate access to reference and support materials
(dictionaries, textbooks, the Web, etc.) in order to ensure that the captions are as
accurate as possible. Ideally, the captions should be given a final review by someone
other than the original writer.
When the workload is greater than in-house staff can support, it would be wise to
consider sending the multimedia to a vendor who can create captions in a timely
manner. Rates for this service will vary widely depending on the length of the
material, formats required, turnaround time, etc. A short list of major vendors can be
found in Appendix 4.

2.4: Creating SCC closed captions
As discussed earlier, a main advantage of SCC captions is that they make use of
built-in caption controls in QuickTime Player, iTunes, iPhone and iPod nano, giving
users easy access to the captions at all times. Currently, SCC caption files can be
exported directly from zeitAnker’s AnnotationEdit, CPC’s CaptionMaker and
MacCaption. You can also use free software such as MAGpie to write the initial
QTText caption files, then use Subtitle Workshop to convert the files to SRT. The
SRT files can be then converted to SCC using free command-line tools.
MovCaptioner or Subtitle Workshop will also create SRT caption files, which can
then be converted to SCC. Check Table 1, above, for details on these and other
caption-authoring applications.
Once you have an SCC caption file, you’ll add it to the movie using either QuickTime
or Compressor (a component of Final Cut Studio), as described in Parts 2.5 and 2.6,
respectively.
Creating Accessible iTunes U Content                                              16

    2.5: Using QuickTime to add SCC captions to video clips
    Follow the instructions below to use QuickTime to create SCC-captioned movies
    playable on desktop or mobile players.
1   Open the uncaptioned movie using QuickTime.
2   Choose File > Export, then choose Movie to iPod. Close the movie window when the
    export is finished.
3   Open the exported movie in QuickTime. Set this window aside.
4   Open the SCC file in a new QuickTime Player window. You should see the captions
    displayed over a white region, as shown in the picture below. If you don’t see
    captions, make sure the captions are turned on by choosing View > Show Closed
    Captioning.
Creating Accessible iTunes U Content 17
The default size of the SCC track is 640 x 480. If this isn’t the size of your source
video, you’ll need to scale the track. Choose Window > Show Movie Properties. In
the tracks list, click Closed Caption Track, then click the Visual Settings button. In the
Scaled Size fields, enter the height and width to match that of your source video.
Depending on the size of the source, you may need to uncheck the Preserve Aspect
Ratio box. Below is an example.
Close the Movie Properties window when you are done.
5 Select (Edit > Select All) and copy (Edit > Copy) the entire SCC caption track.
6 Switch to the uncaptioned M4V movie. Make sure the playhead is positioned at the
beginning of the movie, then choose Edit > Add to Movie.
7 Play the movie. If you don’t see captions, make sure the captions are turned on by
choosing View > Show Closed Captioning. Below is an image showing SCC captions
playing in QuickTime Player.Creating Accessible iTunes U Content 18
8 Move the playhead to the beginning of the movie, choose File > Save, and save the
file as a self-contained movie. (It will be saved with the MOV file extension, but it will
still be playable on iPhone or iPod.)
Your SCC closed-captioned movie is now ready to be uploaded to iTunes U.
2.6: Using Compressor to add SCC captions to video clips
Compressor is a component of Final Cut Studio. If you’re already using Final Cut
Studio to prepare your movies for iTunes, you will find it very convenient to add SCC
caption files with Compressor. Note that Compressor does not create SCC
captions. Instead, it takes existing SCC files and encodes them into movies. See
Part 2.4 to learn about creating SCC files, then follow the instructions below to add
them to your movies.
1 Open the uncaptioned video file(s) in Compressor.
2 In the Batch window, apply the appropriate output settings (e.g., H.264 for iPod video
and iPhone).
3 Click the job to which you want to add captions.
4 In the Inspector window, click the Additional Information tab, as shown below.
5 Click the Choose button and browse to the SCC file.Creating Accessible iTunes U Content 19
6 Click the Submit button in the Batch window to start the compression.
When the compression is finished, your SCC closed-captioned movie will be ready to
upload to iTunes U.
2.7: Adding QTText captions to video clips
The instructions below will show you how to merge QTText captions with the source
video, creating an open-captioned movie. If you want your QTText-captioned
presentation to play on all devices, open captions are currently the best option. If you
want closed QTText captions, you’ll need to add wired sprites to toggle the captions
on and off, but bear in mind that these controls can only be used in QuickTime and
iTunes (see Part 1.5). See Appendix 1 to learn about using wired sprites.
1 Open the QTText file in QuickTime Player. The file opens as a caption track, as
shown below.
2 Select (Edit > Select All) and copy (Edit > Copy) the entire track.
3 Open the original (uncaptioned) video in a new QuickTime window.
4 Place the playhead at the beginning of the movie, then choose Edit > Add to Movie.
The caption track appears at the top of the video region, as shown below.
5 Open Window > Show Movie Properties. Double-click Text Track, enter a more
descriptive name (e.g., captions) and press Return.Creating Accessible iTunes U Content 20
6 Click the Visual Settings button.
7 Reposition the caption region: in the Offset area, enter the new position. The first
entry is the X (horizontal) position; the second entry is the Y (vertical) position. For
example, if the source video is 400w x 300h, and you want the top of the caption
region to be positioned at the bottom edge of the video region, enter an offset of
0 x 300, as shown below.Creating Accessible iTunes U Content 21
8 Close the Movie Properties window.
9 Move the playhead to the beginning of the movie, choose File > Save As, and save
the file as a self-contained movie.
10 Choose File > Export and export as Movie to QuickTime Movie. This will create an
open-captioned movie—the text track will be combined with the video track so the
captions cannot be turned off.
11 Open the exported movie in a new QuickTime window, choose File > Export, then
choose Movie to iPod.
Your QTText open-captioned movie is ready to be uploaded to iTunes U.
2.8: Displaying QTText captions over a transparent background
Instead of placing the caption region below the video region, as described above, it
is possible to display captions directly over the video region using a transparent
background. This can be useful for saving space on the screen, for example, since
placing the caption region outside the video region can enlarge the size of the
presentation as a whole.
To embed transparent-background captions, first create a QTText caption file
(described in Part 2.3). You must then add QuickTime descriptors to the header (the
bracketed information at the top of the caption file), as detailed below.
1 Open the QTText file in a text editor, such as TextEdit or Notepad.
2 In the header, add {keyedText:on}. This will create the transparent caption region.
3 To improve the legibility of the text, add a drop shadow to the captions by adding
{dropShadow:on} to the header. To adjust the characteristics of the drop shadow, use
{dropShadowOffset:X,Y}, where X specifies the number of pixels to offset the shadow
to the right, and Y specifies the number of pixels to offset the shadow down. Values of
1,1 are often sufficient.
4 Adjust the height of the caption region by changing {height=X} in the header, where X
represents the height of the region in pixels. Depending on the font size you’re using,
a height specification of 40–80 is generally sufficient. If your header doesn’t have a
{height} descriptor, add it now.
5 Specify the color of the text by adding {textColor:R,G,B} to the header, where R=red,
G=green and B=blue. Each value can range from 0–65535.
6 Smooth the edges of the text by adding {anti-alias:on}.Creating Accessible iTunes U Content 22
7 Embed the track as described in Part 2.7. When offsetting the caption track, position
the caption region near the bottom edge of the video region, as shown below.
Read about QuickTime descriptors to learn more about what you can do with QTText
tracks.
2.9: Displaying QTText captions over a translucent background
To embed translucent-background captions in your movie, first create a QTText
caption file (described in Part 2.3), then follow the steps below.
1 Open a text editor, such as TextEdit, and create a caption-background track by
entering the following text:
{QTtext}{timescale:100}{width:400}{height:57}
[00:00:00.00]
[00:00:36.20]
The last timecode shown above ([00:00:36.20]) should be altered to represent the
entire length of your movie. Also change the {width} descriptor to match the width of
your movie, and the {height} descriptor to accommodate the maximum number of
rows in a caption. Depending on the font size, a height specification of 40–80 is
usually sufficient. Do not enter caption text, or any other text, in this file.
2 Save the file with the extension .txt (e.g., mask.txt). Quit the text editor and then open
this .txt file in QuickTime. This track will become the background for the captions.Creating Accessible iTunes U Content 23
3 Embed this background track into the original movie, as described in steps 2-7 of Part
2.7. Note that the background track will appear solid black, positioned at the top of
the video region, as shown in the image below.
4 Choose Window > Show Movie Properties. Double-click Text Track, type a more
descriptive name (e.g., mask) and press Return.
5 Click the Visual Settings button.
6 From the Transparency pop-up menu, choose Blend. Move the Transparency Level
slider left or right to adjust the transparency of the background. Below is an image
showing the slider at approximately 30% transparency.Creating Accessible iTunes U Content 24
7 Reposition the mask region: in the Offset area, enter the new position. The first entry
is the X (horizontal) position; the second entry is the Y (vertical) position. Position the
mask region so the bottom edge just touches the bottom edge of the video region.
8 Close the Movie Properties window, set the movie aside but do not close the player
window.
9 Open the QTText caption file in a text editor and add QuickTime descriptors as
discussed in steps 1-6 in Part 2.8. (You may find that it isn’t necessary to include
{dropShadow} when embedding translucent captions.) Close the text editor when
you’re finished.
10 Open the QTText caption file in a new QuickTime window. Select (Edit > Select All)
and copy (Edit > Copy) the entire track.
11 Click the movie that contains the mask track. Embed the caption track as described in
Part 2.7. When offsetting the caption track, make sure all the captions fit inside the
mask, as shown in the image below. If you find that the captions don’t fit properly,
adjust the {height} in the caption file’s header.
2.10: Adding SCC captions to audio clips
When adding SCC captions to an audio-only clip you must include a video track for
the captions to be visible. This video track can be a static image (a university logo,
for example) layered in the movie so it appears behind the captions. Here’s how it’s
done.
1 Create SCC captions as described in Part 2.4.
2 Open the original (uncaptioned) audio file in a QuickTime window. Choose File >
Export and export it as Movie to iPod, and close the window.
3 Open the exported audio file in QuickTime and set this window aside.Creating Accessible iTunes U Content 25
4 Open the SCC file in a new QuickTime Player window. You should see the captions
displayed over a white region, as shown in the picture below. If you don’t see
captions, make sure the captions are turned on by choosing View > Show Closed
Captioning.
The default size of the SCC region is 640 x 480. You can scale this to a smaller size,
such as 320 x 240, but anything smaller may decrease the readability of the caption
text. To scale the region, choose Window > Show Movie Properties. In the tracks list,
click Closed Caption Track, then click the Visual Settings button. In the Scaled Size
fields, enter the new height and width. Close the Movie Properties window when
you’re finished.
5 Select (Edit > Select All) and copy (Edit > Copy) the entire track.
6 Switch to the uncaptioned audio file. Make sure the playhead is positioned at the
beginning of the movie, then choose Edit > Add to Movie.
7 Play the movie. If you don’t see captions, make sure the captions are turned on by
choosing View > Show Closed Captioning. Set this window aside.
8 Open the image you want to use as a background in a new QuickTime window.
Choose File > Export, then choose Movie to iPod.
9 Open the exported image in QuickTime. Select (Edit > Select All) and copy (Edit >
Copy) the entire track.
10 Switch to the captioned audio track. Make sure the playhead is at the beginning of
the movie, then choose Edit > Add to Selection & Scale.
11 Drag the playhead to a point in the movie where captions should appear and choose
View > Show Closed Captioning (you won’t see captions at this point, however).
12 Choose Window > Show Movie Properties.
13 Click Closed Caption Track, then the Visual Settings button.Creating Accessible iTunes U Content 26
14 Next to the Layer edit field, click the arrows until you see captions appear in the
player window (you should only have to move one or two layers). You’ll see
something similar to the images below.
15 Close the Movie Properties window.
16 Play the movie. You should see SCC captions playing over the background image
you chose.
17 Move the playhead to the beginning of the movie, choose File > Save As, and save
the file as a self-contained movie. Note that it will be saved with the MOV file
extension, but it will still be playable on iPhone or iPod.
Your SCC-captioned audio clip is now ready to be uploaded to iTunes U. Watch a
sample SCC-captioned audio clip.Creating Accessible iTunes U Content 27
2.11: Adding QTText captions to audio clips
The instructions below will show you how to merge QTText captions with the source
audio file, creating an open-captioned audio clip. If you want your QTText-captioned
presentation to play on all devices, open captions are currently the best option. If you
want closed QTText captions, you’ll need to add wired sprites to toggle the captions
on and off, but bear in mind that these controls can only be used in QuickTime and
iTunes (see Part 1.5). See Appendix 1 to learn about using wired sprites.
An important point to note is that you must include a video track in order for the
captions to be visible. If no video track is present, the captions will not survive the
export process described below. This video track can be a static image (a university
logo, for example) that is visible behind the caption layer, or it can be an image
scaled to a small size and layered in the movie so it is essentially invisible. The
example below illustrates the latter.
1 Write the captions and export a QTText file (see Part 2.3).
2 Open the original (uncaptioned) audio clip in a QuickTime window and set this
window aside.
3 Open the QTText file in a separate QuickTime window.
4 Select (Edit > Select All) and copy (Edit > Copy) the entire track.
5 Switch to the uncaptioned audio file. Make sure the playhead is positioned at the
beginning of the movie, then choose Edit > Add to Movie.
6 Play the audio file; you should see captions over a black region, as shown below. Set
this window aside.
7 Open an image in a new QuickTime window. The content doesn’t matter because it
will become invisible later.
8 Chose Window > Show Movie Properties. Click Video Track in the track list and then
click the Visual Settings button.Creating Accessible iTunes U Content 28
9 Just below the Scaled Size fields, uncheck Preserve Aspect Ratio. In the Scaled Size
fields, replace the width to match the width of the captioned audio clip, and enter the
height as 1. Below is an example.
You’ll wind up with a visible region that is only one pixel in height, similar to the one
below.
10 Close the Show Movie Properties window.
11 Select (Edit > Select All) and copy (Edit > Copy) the entire track.
12 Switch to the player containing the captioned audio clip. Make sure the playhead is
positioned at the beginning of the clip, then choose Edit > Add to Selection & Scale.
You should see the image appear at the top of the caption region.
13 Choose Window > Show Movie Properties and click Video Track in the track list, then
click the Visual Settings button.Creating Accessible iTunes U Content 29
14 Next to the Layer field, click arrow buttons until you see the image disappear from the
player window. (It’s not actually disappearing; it’s simply moving behind the caption
layer.) You should only have to move one or two layers.
15 Move the playhead to the beginning of the movie, choose File > Save As and save
the file as a self-contained movie.
16 Choose File > Export and export as Movie to QuickTime Movie. This will combine the
tracks and create an open-captioned audio clip.
17 Open the exported movie in QuickTime, choose File > Export, then choose Movie to
iPod.
Your QTText open-captioned audio clip is ready to be uploaded to iTunes U. Watch a
sample QTText-captioned audio clip.Creating Accessible iTunes U Content 30 Part 3: Adding Foreign-Language Subtitles to iTunes Multimedia Foreign-language subtitles will make your iTunes multimedia more versatile and allow you to expand the reach of your materials. In many cases, you’ll find that QTText tracks are adequate for subtitles. Resist the temptation to create subtitles using SCC tracks. If you use SCC tracks for subtitles, you’ll confuse your audience: deaf viewers will expect to see captions when they activate the caption toggle, not foreign-language subtitles. You’ll also lose the ability to include both closed captions and subtitles in your movie. 3.1: Adding QTText subtitles to iTunes multimedia The steps for integrating QTText subtitles into your video are identical to those for captions. See Part 2, Table 1, to learn which captioning applications create QTText files. Once you’ve written and exported the text files, follow the directions in Parts 2.7, 2.8 or 2.9 for adding the subtitles to your video, depending on the style you want to use. In the Show Movie Properties window, be sure to name the text tracks logically (e.g., French, German, Italian, etc.) so you can easily identify them. Your movie can accommodate multiple text tracks, but this will require the use of wired sprites to toggle each track on and off. As discussed in Part 1.5, these sprites can only be used in QuickTime Player and iTunes, not iPhone or iPod. See Appendix 1 for for instructions on adding wired sprites. 3.2: Adding closed subtitles to iTunes multimedia Movies in the M4V format can carry closed subtitle tracks tagged with special metadata that allows them to be recognized and decoded by QuickTime Player, iTunes, iPhone and iPod touch. These devices give users access to the closed subtitles through menus or on-screen controls. This subtitle format has some limitations to keep in mind should you choose to implement it: the text can’t be styled, and the placement of the subtitles within the player varies depending on the playback device (iPhone and iPod touch place them at the bottom of the screen; iTunes and QuickTime place them at the top). To see what they look like, watch a sample clip with closed foreign-language subtitles. You’ll need to use several different tools to integrate the closed-subtitle data into your movie. A Windows computer is required for some processes, and you should be comfortable using the command-prompt window. Before beginning, download and install the following software: • MP4Box (Windows only). For simplicity, install it in the same directory as the source media and subtitle files. • Dumpster (Windows). Mac users can download QuickTime Movie Atom Dumpster. • Captioning software that creates SubRip (SRT) files (see Part 2, Table 1). You can also use MAGpie to write the initial QTText subtitle files and Subtitle Workshop to convert these files to SRT.
Creating Accessible iTunes U Content                                                    31

     Once the software is installed, begin by creating the subtitle file.
1    Write the subtitles. The process is similar to the captioning method described in Part
     2.3. Do not apply any styles (color, size, font type, italics, etc.).
2    Export the file as SRT. If you’re using MAGpie, first export the file as QTText, then
     open this file in Subtitle Workshop and save it as an SRT file.
3    On a Windows computer, copy the SRT file into the directory containing MP4Box.exe.
4    Repeat this process for each track of subtitles.
     Next, convert the source video to M4V.
1    Open the movie in QuickTime.
2    Choose File > Export and export as Movie to iPod.
3    Copy the exported movie to the same directory as MP4Box.exe.
     Now convert the SRT files to the TTXT format.
1    Open a command-prompt window and change to the directory that contains
     MP4Box.exe.
2    Convert the SRT files to TTXT files by typing (no quotes) “mp4box -ttxt filename.srt”,
     where “filename.srt” is the SRT subtitle file you want to convert.
3    Repeat for each SRT file.
     Next, integrate each TTXT file into the source M4V.
1    At the command prompt, type (no quotes) “mp4box -add
     filename.ttxt:lang=threeDigitLanguageCode targetMovieName.m4v”, where
     “filename.ttxt” is the name of the TTXT file you created in the previous step;
     “threeDigitLanguageCode” is the three-digit ISO code representing the track’s
     language; and targetMovieName.m4v is the name of the video to which you are
     adding the subtitles.
2    Repeat for each TTXT file.
     When you have integrated all the TTXT files into the movie, drag the M4V onto the
     Dumpster icon. Double-click ‘moov’. The subtitle tracks you added to the movie can
     be found at the end of the ‘trak’ list. For example, if you added four subtitle tracks
     they will be the last four ‘trak’ entries. With this in mind...
1    Double-click the first ‘trak’ that corresponds to your first subtitle track.
2    Double-click ‘tkhd’.
3    Change Flags to $000001.
4    Click the Apply button at the bottom of the window (you must click Apply after you
     make each change described here or your changes will not be saved).
5    Change Alternate Group to $0002.
6    Double-click ‘tkhd’ to close.
7    Double-click ‘mdia’.
8    Double-click ‘hdlr’.
9    Change Component subtype to $7362746c (this will change the type to ‘sbtl’).
10   Double-click ‘hdlr’ to close.
Creating Accessible iTunes U Content 32
11 Repeat the above steps for each ‘trak’ that corresponds to a subtitle track, but leave
all other ‘tkhd’/Flags set to $000000. Be sure to click the Apply button at the bottom
of the window after you make each change. When you have finished altering all
tracks, close Dumpster. Next, check your movie in iTunes.
1 Open the movie in iTunes.
2 Hover the pointer over the player so that the control bar appears.
3 Click the bubble icon once and you should see an alphabetical list of your subtitle
tracks, as shown in the following image.
4 Choose a language from the menu and the subtitles will appear at the top of the
video region, as seen below.
5 If any subtitle tracks are missing from the menu, close iTunes, reopen the M4V in
Dumpster and verify that you have set all the flags, groups and component subtypes
exactly as specified above.Creating Accessible iTunes U Content 33
6 Transfer the movie to iPhone or iPod touch. Open the movie on the iPod touch and
tap the screen once to reveal the video controls. Tap the bubble icon; you should see
a list of languages appear, as shown below.
7 Choose a language and tap Done.
8 Play the movie. The subtitles will appear at the bottom of the video region, as shown
below.Creating Accessible iTunes U Content 34 If you’re playing the movie with QuickTime Player, the subtitles can be accessed through the View > Subtitles menu, as shown below.
Creating Accessible iTunes U Content                                                 35

Part 4: Creating Audio Descriptions for iTunes Multimedia
When audio descriptions are absent from multimedia, blind or visually impaired users
must depend on friends, family members, teachers or others to obtain relevant visual
information from video clips. The techniques discussed in this section will show you
how to add audio descriptions to your iTunes multimedia. Before creating your own
descriptions, learn about iTunes-compatible audio file formats by reading “Creating
Content for iPod + iTunes” from Apple Education.

4.1: Integration of descriptions into multimedia
Audio descriptions should be carefully written to fit into the natural pauses in the
program dialog. In cases where a longer description is necessary but there is not a
sufficient pause in the program audio to accommodate it, you can integrate extended
audio descriptions into the movie. In this situation, the program dialog and video
appear to automatically pause while a long audio description plays. When the
description has finished playing, the video and dialog resume playback. Extended
and “regular” descriptions may be mixed in a single multimedia presentation. You
can watch a brief example of a video clip with regular descriptions as well as a video
clip with extended descriptions.
When descriptions are integrated into television programs or movies, sound
engineers are careful to lower, or “duck,” the program audio when the description is
playing so the description can be heard clearly, and then raise the program audio
level when the description has finished. In iTunes multimedia, ducking will only be
possible if you use a sound-editing application to add the descriptions directly to the
program audio track. This adds time to your production timeline but, depending on
your goals, may be necessary if you want to produce a professional-level
presentation. Even if you don’t duck the sound levels, you can still create an effective
described presentation. Just note that you may have to boost the description’s sound
level when you create and process the file to be sure it can be heard over the
program audio.
A final point to consider is that you need not always supply a video track with the
described audio. The descriptions can be integrated into the movie and then the
entire audio portion of the presentation can be saved with open descriptions and
extracted to a separate audio file. This audio file can then be uploaded to iTunes.
Users can download just the audio (saving both time and bandwidth) and listen to it
on any player, including an audio-only device such as iPod shuffle.

4.2: Considerations for writing descriptions
Ideally, describers should have excellent writing skills and a firm command of the
vocabulary associated with the subject, as well as adequate access to reference and
support materials, such as dictionaries, relevant textbooks, the Web, etc., in order to
ensure that the descriptions are as clear and accurate as possible. As a final quality-
control mechanism, the descriptions should always be reviewed by someone other
than the original writer.
Creating Accessible iTunes U Content                                                  36

Accurately and succinctly describing visual elements poses numerous challenges.
The Carl and Ruth Shapiro Family National Center for Accessible Media (NCAM) has
created a set of guidelines for describing images in science textbooks and related
materials; you’ll find helpful information there regardless of your subject matter.
Always ensure that the descriptions convey as much information as necessary
without being overly long. Describe all important details thoroughly, such as scenery
and actions, scientific and mathematical expressions, or graphs and charts, and use
a vocabulary that is appropriate to the subject matter or intended audience.
Descriptions should be added to a presentation once the video and audio elements
have been completed. Waiting to author descriptions until the end of the production
process will ensure that they accurately reflect the program visuals. If you must re-
edit the video or audio after the descriptions have been created, you may have to re-
record the descriptions as well.
If you want your described presentation to play on all devices, open descriptions are
currently the best option. Note that iTunes, iPhone and iPod touch (OS 3.x) do, in
fact, have the capability to toggle alternate audio tracks on and off via menus or the
on-screen controller. QuickTime, iPod nano and Apple TV do not yet support this
feature, although they may do so in the future. If you choose to integrate closed
audio descriptions, you should also create a version with open descriptions so
viewers with other playback devices can download that video and hear the described
audio. See Part 4.8 for complete details.
Another approach to closed descriptions is to add wired sprites to toggle the
described audio on and off, but bear in mind that these controls can only be used
in QuickTime and iTunes (see Part 1.5). See Appendix 1 to learn about adding
wired sprites to your presentation.

4.3: Description method
There are a number of ways to write and record descriptions. The most
straightforward method is to use a text processor to write a description script, then
use QuickTime to both record the audio files and add the descriptions to the original
video. NCAM’s free multimedia-accessibility application, MAGpie, also allows
authors to write description scripts, record them and output them for integration with
iTunes multimedia. See MAGpie’s documentation for complete details on usage and
techniques for creating audio-description files. You can also use any sound-editing
application, such as Audacity, GarageBand, Logic or Sound Forge to record the files.
For the best results, record the descriptions in a quiet environment using a high-
quality microphone. To minimize errors or ambiguity, speak clearly and read from a
written script.
Here is a summary of the basic steps required for recording and integrating audio
descriptions into iTunes multimedia.
Watch the video and note opportunities for descriptive narration
Watch the entire presentation to determine where there are pauses in the dialog or
narration for insertion of descriptions. This will also help you become familiar with the
general pacing of the program material as well as the language level, vocabulary and
knowledge the producer has assumed on the part of the viewer. While watching,
keep notes indicating where descriptions will be inserted.
Creating Accessible iTunes U Content                                                    37

12   Write the descriptions
     Time the pause where your first description will be inserted, then use a text editor or
     an application such as MAGpie to write the description to fit within that interval. Read
     the description while timing it to make sure it fits within the pause; edit as necessary
     and re-time. Repeat for subsequent descriptions.
     Record the descriptions
     Using QuickTime, MAGpie or any sound-recording software, record and edit the
     descriptions. Time them and re-record as necessary.
     Integrate the descriptions into the video
     If you’re planning to integrate regular descriptions, use QuickTime to add them to the
     movie. If you’re adding extended descriptions, you’ll also need to do some video
     manipulation with QuickTime. These techniques are detailed below.
     Review your work; save and upload the clip
     Watch the completed movie to make sure the descriptions play at the proper points
     in the timeline, are clearly written and appropriately descriptive. If you’re using
     extended descriptions, make sure that the video stops and restarts accurately. Re-
     record and re-integrate descriptions as necessary.

     4.4: Sample method of recording descriptions
     The easiest way to record audio-description files is to use QuickTime. First, write the
     descriptions. When you’re ready to record them, follow the steps below.
 1   Open QuickTime and choose File > New Audio Recording.
 2   Plug a microphone into your computer, click the red Record button in QuickTime
     Player and make a test recording. Play it back and listen carefully to ensure your
     voice was recorded at an appropriate level relative to the program audio of the movie.
     Make adjustments as necessary until you’re happy with the quality of the audio.
 3   Place a printed or electronic copy of the description script where you can easily see
     it, click the red Record button in QuickTime Player and speak into the microphone.
     When you’re finished, click the button again to stop recording.
 4   Listen to the recording; re-record if necessary. When you’re satisfied with the
     recording, save the file.
 5   Record the remaining descriptions.
     Any extraneous noise at the beginning and end of the audio clip—mouse or
     keyboard clicks, paper rustling, breathing, etc.—can be easily deleted. You can do
     this as you create each audio file, or you can wait until you’ve recorded them all and
     then edit them all at once.
 1   Open the audio file in QuickTime.
 2   Position the playhead at the beginning of the movie and press I to mark the in-point of
     the segment you’re going to cut.
 3   Move the playhead to the point in the timeline immediately before you hear the
     description audio begin.
You can also read